高级 Traefik 配置教程 - TLS、仪表板、ping、指标、身份验证等
简介
本教程是 Traefik 系列的第二部分。第一部分可以在这里找到.
在前面的教程中,解释了基本的 Traefik 概念,我们展示了一个在独立 Docker 中运行的简单 Traefik 配置。在本教程中,我们将介绍一些高级概念,例如 TLS、身份验证和链中间件、Traefik 仪表板、Prometheus 的 Traefik 指标和健康检查。
本教程的代码库可以在这里找到。 Traefik 教程中出现的所有 docker-compose 文件都可以在这里找到.
先决条件
-
码头工人
-
码头工人撰写
所有 docker compose 文件均已使用 Docker 20.10.12 和 docker-compose 1.24.0 进行了测试。
创建所需的 Docker 网络
docker network create traefik_public
docker network create socket_proxy
进入全屏模式 退出全屏模式
TL;DR
[ ](https://res.cloudinary.com/practicaldev/image/fetch/s--FSZxRHMx--/c_limit%2Cf_auto%2Cfl_progressive%2Cq_auto%2Cw_880/https://github.com /karvounis/traefik-tutorial-docker-compose-files/blob/master/standalone/advanced/images/tldr-doge.jpg%3Fraw%3Dtrue)
高级概念
TLS
本节的完整docker-compose文件可在此处找到.
Traefik 可以配置为接受传入的HTTPS 连接以终止 SSL 连接(这意味着它将向服务发送解密数据)。它可以配置为使用ACME 提供程序(如 Let's Encrypt)来自动生成证书。但是,我们不打算对此进行介绍,因为网上已经有大量关于该主题的信息丰富的材料。在本教程中,我们将创建自己的 CA 和 Traefik 证书并配置 Traefik 以使用它们。
证书
我们需要创建自己的 TLS 证书,以便在传输过程中进行加密并正确保护与 Traefik 之间的通信。我已经生成了一些证书,可以在这里找到。
但是,您可以通过运行以下命令来创建自己的证书:
mkdir -p certs/{ca,traefik}
# Create CA certificates
openssl genrsa -out certs/ca/rootCA.key 4096
openssl req -x509 -new \
    -nodes \
    -sha256 \
    -days 3650 \
    -key certs/ca/rootCA.key \
    -subj "/C=GR/L=Athens/O=Karvounis Tutorials, Inc./CN=Karvounis Root CA/OU=CA department" \
    -out certs/ca/rootCA.pem
# Create Traefik wildcard certificates
openssl genrsa -out certs/traefik/traefik.key 4096
openssl req -new \
    -key certs/traefik/traefik.key \
    -subj "/C=GR/L=Athens/O=Karvounis Tutorials, Inc./CN=*.karvounis.tutorial/OU=Dev.to" \
    -out certs/traefik/traefik.csr
openssl x509 -req \
    -sha256 \
    -days 365 \
    -CA certs/ca/rootCA.pem \
    -CAkey certs/ca/rootCA.key \
    -CAcreateserial \
    -in certs/traefik/traefik.csr \
    -out certs/traefik/traefik.crt
进入全屏模式 退出全屏模式
上述命令将在以下目录结构下创建必要的证书:
$ tree certs/
certs/
├── ca
│   ├── rootCA.key
│   ├── rootCA.pem
│   └── rootCA.srl
└── traefik
    ├── traefik.crt
    ├── traefik.csr
    └── traefik.key
进入全屏模式 退出全屏模式
生成的 traefik 证书是*.karvounis.tutorial的通配符证书,将涵盖教程的所有用例。从现在开始,我们将在每个docker-compose文件中使用这些证书。
服务配置
traefik:
    image: traefik:v2.6
    command:
    # Entrypoints configuration
    - --entrypoints.web.address=:80
    ## Create a new entrypoint called `websecure` that is going to be used for TLS
    - --entrypoints.websecure.address=:443
    ## Forces redirection of incoming requests from `web` to `websecure` entrypoint
    ## https://doc.traefik.io/traefik/routing/entrypoints/#redirection
    - --entrypoints.web.http.redirections.entryPoint.to=websecure
    # Docker provider configuration
    - --providers.docker=true
    - --providers.docker.exposedbydefault=false
    - --providers.docker.endpoint=tcp://socket_proxy:2375
    - --providers.docker.network=traefik_public
    # File provider configuration
    - --providers.file.directory=/traefik/config/my_dynamic_conf
    # Logging configuration
    - --log.level=info
    - --log.format=json
    ports:
    - 80:80
    - 443:443
    volumes:
    - ./certs/traefik:/traefik/config/certs:ro
    - ./config.yml:/traefik/config/my_dynamic_conf/conf.yml:ro
    networks:
    - traefik_public
    - socket_proxy
    restart: unless-stopped
    depends_on:
    - socket_proxy

whoami:
    image: traefik/whoami:v1.7.1
    labels:
      - traefik.enable=true
      - traefik.http.routers.whoami_route.entrypoints=websecure
      - traefik.http.routers.whoami_route.rule=Host(`whoami.karvounis.tutorial`)
      - traefik.http.routers.whoami_route.service=whoami_service
      - traefik.http.routers.whoami_route.tls=true
      - traefik.http.services.whoami_service.loadbalancer.server.port=80
    networks:
      - traefik_public
进入全屏模式 退出全屏模式
入口点配置
--entrypoints.websecure.addressu003d:443
定义一个名为websecure的入口点,它将侦听 Traefik 容器的端口 443。此入口点将用于所有 TLS 连接。
--entrypoints.web.http.redirections.entryPoint.tou003dwebsecure
它可以将所有传入请求从web入口点永久重定向到websecure入口点。这意味着即使有人尝试发送 HTTP 请求,该请求也会被重定向到 HTTPS。
文件提供者配置
TLS 认证配置是 Traefik 动态配置的一部分。不幸的是,我们不能使用Docker 提供程序来使用标签动态配置 tls 证书。我们必须使用文件提供程序代替。
--providers.file.directoryu003d/traefik/config/my_dynamic_conf
指向 Traefik 可以从中加载动态配置的目录。在我们的例子中,我们将挂载一个包含证书路径的config.yml文件。
卷
volumes:
    - ./certs/traefik:/traefik/config/certs:ro
    - ./config.yml:/traefik/config/my_dynamic_conf/conf.yml:ro
进入全屏模式 退出全屏模式
将本地./certs/traefik文件夹及其内容(Traefik 证书)挂载到容器内的/traefik/config/certs。包含动态配置的本地./config.yml文件将挂载在/traefik/config/my_dynamic_conf/目录中,这是 Traefik 从中查找其动态配置的目录。
Traefik 的公钥和私钥在容器中的路径分别是/traefik/config/certs/traefik.crt和/traefik/config/certs/traefik.key。
配置
以下配置文件可以在此处找到,用于定义证书和密钥在容器中的路径。
tls:
  certificates:
    - certFile: /traefik/config/certs/traefik.crt
      keyFile: /traefik/config/certs/traefik.key
进入全屏模式 退出全屏模式
whoami 服务标签
我们将为whoami_route启用 TLS。这可以通过将traefik.http.routers.whoami_route.entrypoints的值更改为websecure(HTTPS 入口点)并将traefik.http.routers.whoami_route.tls标签设置为 true 来实现。
labels:
    - traefik.enable=true
    - traefik.http.routers.whoami_route.entrypoints=websecure
    - traefik.http.routers.whoami_route.rule=Host(`whoami.karvounis.tutorial`)
    - traefik.http.routers.whoami_route.service=whoami_service
    - traefik.http.routers.whoami_route.tls=true
    - traefik.http.services.whoami_service.loadbalancer.server.port=80
进入全屏模式 退出全屏模式
部署
通过执行以下命令部署容器:
docker-compose -f docker-compose.tls.yml up -d
进入全屏模式 退出全屏模式
请求
首先,我们将向http://whoami.karvounis.tutorial发送请求。
$ curl -H "Host: whoami.karvounis.tutorial" \
    http://localhost
# OR curl http://whoami.karvounis.tutorial
Moved Permanently
进入全屏模式 退出全屏模式
由于我们使用以下命令配置的重定向,响应是永久移动:--entrypoints.web.http.redirections.entryPoint.to=websecure。对 HTTPweb入口点的每个请求都将自动重定向到 HTTPSwebsecure入口点!
让我们尝试直接点击 HTTPS 入口点:
$ curl --cacert ./certs/ca/rootCA.pem \
    https://whoami.karvounis.tutorial
Hostname: 5f1a8f92cd2b
IP: 127.0.0.1
IP: 172.19.0.2
RemoteAddr: 172.19.0.3:53910
GET / HTTP/1.1
Host: whoami.karvounis.tutorial
User-Agent: curl/7.68.0
Accept: */*
Accept-Encoding: gzip
X-Forwarded-For: 172.20.0.1
X-Forwarded-Host: whoami.karvounis.tutorial
X-Forwarded-Port: 443
X-Forwarded-Proto: https
X-Forwarded-Server: 40e915108da5
X-Real-Ip: 172.20.0.1
进入全屏模式 退出全屏模式
成功!向 HTTPS 入口点发送请求并指定 CA 的公钥,返回预期的响应。
平
本节的完整docker-compose文件可以在这里找到.
Traefik 提供了一个ping端点,启用后可用于检查 Traefik 实例的健康状况。
配置更改
--pingu003d真
启用/ping健康检查 URL。但是,我们不会使用路由器公开它。相反,我们将通过利用 docker-compose 的healthcheck选项来使用 URL 来检查 Docker 容器的健康状况。
健康检查配置
每 10 秒,Docker 将执行命令traefik healthcheck --ping来建立每个 Traefik 实例的健康状况(docs)。如果该命令连续 3 次不成功,Docker 会将容器标记为不健康并重新启动它。
healthcheck:
    # Run traefik healthcheck command
    # https://doc.traefik.io/traefik/operations/cli/#healthcheck
    test: ["CMD", "traefik", "healthcheck", "--ping"]
    interval: 10s
    timeout: 5s
    retries: 3
    start_period: 5s
进入全屏模式 退出全屏模式
部署
通过执行以下命令部署容器:
docker-compose -f docker-compose.ping.yml up -d
进入全屏模式 退出全屏模式
通过执行以下命令检查 traefik 服务的状态:
docker-compose -f docker-compose.ping.yml ps traefik
进入全屏模式 退出全屏模式
几秒钟后,traefik 服务的状态将从starting变为healthy。
仪表板
本节的完整docker-compose文件可在此处找到.
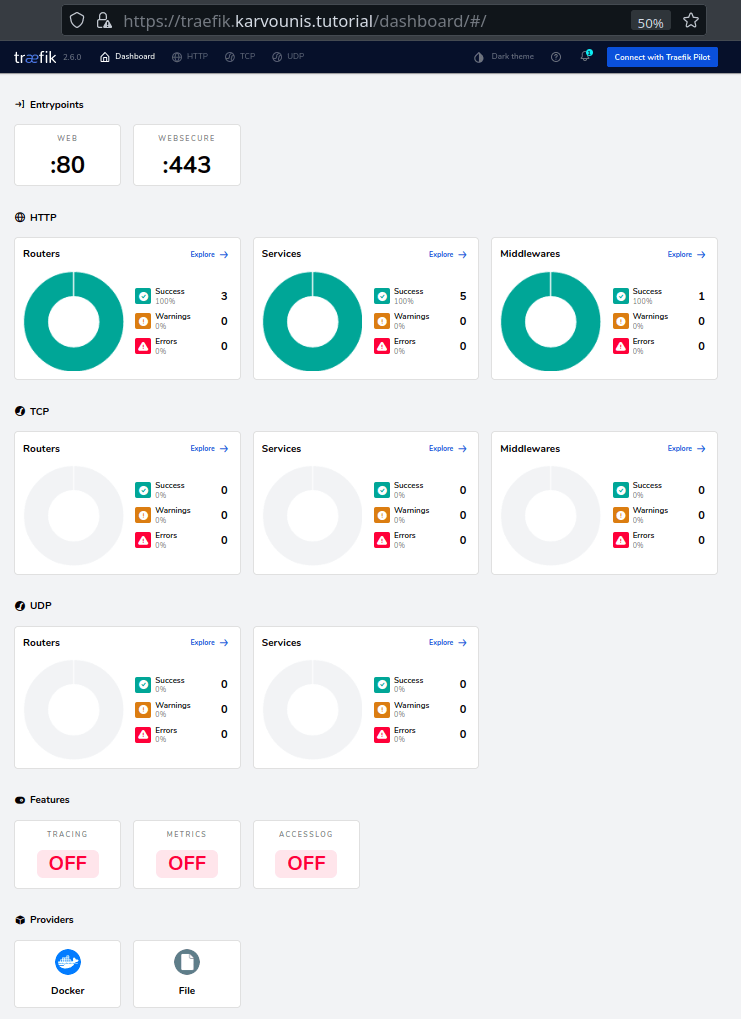
Traefik 提供了一个仪表板,您可以在其中查看所有活动的路由器、服务和中间件。在本节中,我们将了解如何启用仪表板以及如何配置路由器以访问它。
Traefik服务配置
这是我们第一次将 Docker 标签添加到traefik服务。他们将定义一个新的路由器,称为dashboard,它只能通过 TLS 访问。
为了启用dashboard和api,您必须将--api.dashboard=true添加到traefik服务的command配置选项中。
服务标签
下面的 Docker 标签定义了一个名为dashboard的新路由器。该路由器使用 Host Based rule 以及两个 PathPrefix 规则来匹配所有必要的请求。此路由器只能通过websecure入口点访问。
labels:
    - traefik.enable=true
    - traefik.http.routers.dashboard.rule=Host(`traefik.karvounis.tutorial`) && (PathPrefix(`/api`) || PathPrefix(`/dashboard`))
    - traefik.http.routers.dashboard.tls=true
    - traefik.http.routers.dashboard.entrypoints=websecure
    - traefik.http.routers.dashboard.service=api@internal
进入全屏模式 退出全屏模式
部署
通过执行以下命令部署容器:
docker-compose -f docker-compose.dashboard.yml up -d
进入全屏模式 退出全屏模式
用户界面
您可以通过访问https://traefik.karvounis.tutorial/dashboard/和https://traefik.karvounis.tutorial/api/rawdata的api访问仪表板。
提示:不要忘记/dashboard/中的尾部斜杠/!
[ ](https://res.cloudinary.com/practicaldev/image/fetch/s--OV6aRdd_--/c_limit%2Cf_auto%2Cfl_progressive%2Cq_auto%2Cw_880/https://github.com /karvounis/traefik-tutorial-docker-compose-files/blob/master/standalone/advanced/images/traefik_dashboard.jpg%3Fraw%3Dtrue)
认证
此部分的完整docker-compose文件可在此处找到.
在上一节中公开仪表板之后,很明显我们需要保护它并将访问权限仅限于经过身份验证的用户。
Traefik 提供以下 HTTP 身份验证中间件:
-
基本认证
-
摘要认证
-
转发验证
在本节中,我们将使用BasicAuth中间件保护dashboard路由器,使用DigestAuth保护whoami路由器。
配置更改
traefik服务:
labels:
    - traefik.enable=true
    - traefik.http.routers.dashboard.rule=Host(`traefik.karvounis.tutorial`) && (PathPrefix(`/api`) || PathPrefix(`/dashboard`))
    - traefik.http.routers.dashboard.tls=true
    - traefik.http.routers.dashboard.entrypoints=websecure
    - traefik.http.routers.dashboard.service=api@internal
    # Middlewares
    - traefik.http.routers.dashboard.middlewares=dashboard_auth
    ## Creates 2 authentication middlewares
    ### `dashboard_auth` is a BasicAuth middleware and is going to be used by the `dashboard` router.
    ### dashboard:tutorial
    - traefik.http.middlewares.dashboard_auth.basicauth.users=dashboard:$$2y$$05$$T/WVjQVqBc24NLUNI/xuVu0V2B.RPY50k2.CCH5JHGInb3EUeaDcO
    ### `auth` is a DigestAuth middleware and is going to be used by the `whoami_route` router.
    ### whoami:tutorial
    - traefik.http.middlewares.digest_auth.digestauth.users=whoami:traefik:f4ba293a96d5dcf51eb2f03b5931dd96
进入全屏模式 退出全屏模式
whoami服务:
    labels:
      - traefik.enable=true
      - traefik.http.routers.whoami_route.entrypoints=websecure
      - traefik.http.routers.whoami_route.rule=Host(`whoami.karvounis.tutorial`)
      - traefik.http.routers.whoami_route.service=whoami_service
      - traefik.http.routers.whoami_route.tls=true
      # `whoami_route` uses the `digest_auth` middleware defined in the `traefik` service
      - traefik.http.routers.whoami_route.middlewares=digest_auth
      - traefik.http.services.whoami_service.loadbalancer.server.port=80
进入全屏模式 退出全屏模式
traefik.http.middlewares.dashboard_auth.basicauth.users
此标签创建一个名为dashboard_auth的新BasicAuth中间件。它包含具有凭据dashboard:tutorial的用户,并且可以包含一组授权用户。如果您有大量用户,您还可以将他们的凭据添加到文件中,将该文件挂载到容器并指定usersFile选项以指向该文件。
您可以通过以下方式生成密码:
# Using the httpd:2.4-alpine image which is 58.2MB
$ docker run --rm httpd:2.4-alpine htpasswd -nbB dashboard tutorial | sed -e s/\\$/\\$\\$/g
# OR with `xmartlabs/htpasswd` docker image which is 9MB
$ docker run --rm -ti xmartlabs/htpasswd dashboard tutorial | sed -e s/\\$/\\$\\$/g
# OR without docker
$ htpasswd -nbB dashboard tutorial | sed -e s/\\$/\\$\\$/g

dashboard:$$2y$$05$$T/WVjQVqBc24NLUNI/xuVu0V2B.RPY50k2.CCH5JHGInb3EUeaDcO
进入全屏模式 退出全屏模式
提示:在docker-compose.yml中使用时,散列中的所有美元符号都需要加倍才能转义!
traefik.http.middlewares.digest_auth.digestauth.users
此标签创建一个名为digest_auth的新DigestAuth中间件。它包含具有凭据whoami:tutorial的用户,并且可以包含一组授权用户。此处也提供usersFile选项。
您可以使用以下命令生成摘要凭据:
$ print whoami:traefik:$(printf whoami:traefik:tutorial | md5sum | awk '{print $1}')
# OR with htdigest `htdigest [-c] passwordfile realm username` and type the password
$ htdigest -c /tmp/pwd_file traefik whoami && cat /tmp/pwd_file

whoami:traefik:f4ba293a96d5dcf51eb2f03b5931dd96
进入全屏模式 退出全屏模式
traefik.http.routers.dashboard.middlewaresu003ddashboard_auth
指示dashboard路由器使用dashboard_auth作为身份验证中间件。
traefik.http.routers.whoami_route.middlewaresu003ddigest_auth
指示whoami_route路由器使用digest_auth作为认证中间件。
提示:您可以使用其他服务中定义的中间件!
部署
通过执行以下命令部署容器:
docker-compose -f docker-compose.auth.yml up -d
进入全屏模式 退出全屏模式
请求
如果您尝试像以前一样访问https://traefik.karvounis.tutorial/api/rawdataURL,您将获得401响应状态代码。
$ curl --cacert ./certs/ca/rootCA.pem \
    https://traefik.karvounis.tutorial/api/rawdata
401 Unauthorized
进入全屏模式 退出全屏模式
为了使用curl访问 Traefikapi,您必须指定基本的身份验证用户凭据。
$ curl --cacert ./certs/ca/rootCA.pem \
    -u dashboard:tutorial \
    https://traefik.karvounis.tutorial/api/version
{"Version":"2.6.0","Codename":"rocamadour","startDate":"2022-02-23T17:42:57.897252485Z","pilotEnabled":true}
进入全屏模式 退出全屏模式
如果要访问whoami服务,需要指定whoami授权用户的digest凭证。否则,Traefik 将像上面那样以401响应。
$ curl --cacert ./certs/ca/rootCA.pem \
    --digest -u whoami:tutorial \
    https://whoami.karvounis.tutorial
Hostname: 637aadaf37b3
IP: 127.0.0.1
IP: 172.19.0.2
RemoteAddr: 172.19.0.3:40984
GET / HTTP/1.1
Host: whoami.karvounis.tutorial
User-Agent: curl/7.68.0
Accept: */*
Accept-Encoding: gzip
Authorization: Digest username="whoami", realm="traefik", nonce="2ZZJLL5tPk8bEDU8", uri="/", cnonce="YzUxNzMyZWIyODNjN2VlNDIyMDkyMmY3Nzc3YjVkNDE=", nc=00000001, qop=auth, response="518ade9a297beb2f5174e2368e8cf561", opaque="pfm5w5vBpLYhEv7A", algorithm="MD5"
X-Forwarded-For: 172.20.0.1
X-Forwarded-Host: whoami.karvounis.tutorial
X-Forwarded-Port: 443
X-Forwarded-Proto: https
X-Forwarded-Server: 5966f55786bb
X-Real-Ip: 172.20.0.1
进入全屏模式 退出全屏模式
链中间件
本节的完整docker-compose文件可以在这里找到.
在本节中,我们将新建一个链中间件并指示whoami_route使用它。该中间件由两个中间件组成:
- 一个新的 HTTPRateLimit中间件称为
simple_ratelimit。这个中间件将限制在特定时间段内对whoami_service服务的最大允许请求量。
2.digest_auth我们已经在认证部分看到。
chain中间件首先通过simple_ratelimit传递请求,然后通过digest_auth中间件。如果请求成功地通过了两者,那么它将达到whoami_service。Traefik 的文档没有指定您可以链接的中间件数量的硬性限制。
配置更改
我们将通过向traefik服务添加以下标签来创建新的simple_ratelimit和secured_chain中间件:
labels:
    - traefik.http.middlewares.secured_chain.chain.middlewares=simple_ratelimit,digest_auth
    ## The `simple_ratelimit` middleware allows
    ## an average of 5 requests per 5 seconds
    ## and a burst of 2 requests.
    - traefik.http.middlewares.simple_ratelimit.ratelimit.average=5
    - traefik.http.middlewares.simple_ratelimit.ratelimit.period=5s
    - traefik.http.middlewares.simple_ratelimit.ratelimit.burst=2
进入全屏模式 退出全屏模式
根据上述数字,允许的最大请求速率为r=average/period=5/5s=1 request/second。如果我们超过该速率,请求将被自动拒绝,并带有 429 HTTP 状态代码。
我们还需要指示whoami_route使用secured_chain中间件:
labels:
    # Use the `secured_chain` chain middleware
    - traefik.http.routers.whoami_route.middlewares=secured_chain
进入全屏模式 退出全屏模式
部署
通过执行以下命令部署容器:
docker-compose -f docker-compose.chain.yml up -d
进入全屏模式 退出全屏模式
请求
向https://whoami.karvounis.tutorial发送一个简单的curl请求将像以前一样工作。还没有什么异常。
curl --cacert ./certs/ca/rootCA.pem \
    --digest -u whoami:tutorial \
    https://whoami.karvounis.tutorial
进入全屏模式 退出全屏模式
以下命令将每 1.5 秒向https://whoami.karvounis.tutorial发送一个 curl 请求。所有 5 个请求都将成功,因为速率低于允许的最大请求速率。
SLEEP_TIMER=1.5s
for i in {1..5};
do
    echo "\nRequest number: $i"
    curl --cacert ./certs/ca/rootCA.pem \
        --digest -u whoami:tutorial \
        https://whoami.karvounis.tutorial
    sleep "${SLEEP_TIMER}"
done
进入全屏模式 退出全屏模式
另一方面,以下命令将每 0.5 秒向https://whoami.karvounis.tutorial发送一个 curl 请求。这个 2 个请求/秒的请求速率比最大允许速率快!第一个请求将成功,但所有后续请求都将被拒绝并返回429 Too Many RequestsHTTP 状态代码。
SLEEP_TIMER=0.5s
for i in {1..5};
do
    echo "\nRequest number: $i"
    curl --cacert ./certs/ca/rootCA.pem \
        --digest -u whoami:tutorial \
        https://whoami.karvounis.tutorial
    sleep "${SLEEP_TIMER}"
done
进入全屏模式 退出全屏模式
指标
本节的完整docker-compose文件可以在这里找到.
目前,Traefik 支持 4 个指标后端:
-
数据狗
-
涌入数据库
-
普罗米修斯
-
统计数据
在本节中,我们将公开 Traefik 的 Prometheus 指标。
配置更改
首先,我们将启用 prometheus 后端并禁用默认的内部路由器,以允许创建到prometheus@internal服务的自定义路由器。
command:
    # Prometheus metrics
    ## Enable prometheus metrics
    - --metrics.prometheus=true
    ## Create a manual router instead of the default one.
    - --metrics.prometheus.manualrouting=true
    - --metrics.prometheus.addrouterslabels=true
    ...
进入全屏模式 退出全屏模式
自定义metrics路由器通过https://traefik.karvounis.tutorial/metrics公开指标,并使用dashboard_authBasicAuth 中间件进行身份验证。
labels:
    # `metrics` router configuration
    - traefik.http.routers.metrics.rule=Host(`traefik.karvounis.tutorial`) && PathPrefix(`/metrics`)
    - traefik.http.routers.metrics.tls=true
    - traefik.http.routers.metrics.entrypoints=websecure
    - traefik.http.routers.metrics.service=prometheus@internal
    - traefik.http.routers.metrics.middlewares=dashboard_auth
    ...
进入全屏模式 退出全屏模式
部署
通过执行以下命令部署容器:
docker-compose -f docker-compose.metrics.yml up -d
进入全屏模式 退出全屏模式
请求
向https://traefik.karvounis.tutorial/metrics发送以下请求。响应包含特定 Traefik 实例的所有 Prometheus 指标。
curl --cacert ./certs/ca/rootCA.pem \
    -u dashboard:tutorial \
    https://traefik.karvounis.tutorial/metrics
进入全屏模式 退出全屏模式
最后说明
我希望你喜欢这个关于 Traefik 的高级教程。更多有趣的教程即将推出!请在下面的评论部分告诉我您的想法!干杯
您可以在LinkedIn和Github上找到我。
更多推荐
 已为社区贡献22914条内容


所有评论(0)