How To Set Up a Continuous Delivery Pipeline with Flux on DigitalOcean Kubernetes
The author selected the Free and Open Source Fund to receive a donation as part of the Write for DOnations program.
Introduction
By itself, Kubernetes does not offer continuous integration and deployment features. While these concepts are often not widespread in smaller projects, bigger teams who host and update their deployments extensively find it much easier to set up such processes to alleviate manual time-consuming tasks and instead focus on developing the software that’s being deployed. One approach to maintaining continuous delivery for Kubernetes is GitOps.
GitOps views the Git repositories hosting the application and Kubernetes manifests as the central source of truth regarding deployments. It allows for separated deployment environments by using repository branches, gives you the ability to quickly reproduce any config state, current or past, on any cluster, and makes rollbacks trivial thanks to Git versioning. The manifests are secure, synchronized, and easily accessible at all times. Modifications to the manifest or application can be audited, allowed, or denied depending on external factors (usually, the continuous integration system). Automating the process from pushing the code to having it deploy on a cluster can greatly increase productivity and enhance the developer experience while making the deployment always consistent with the central code base.
Flux is an open-source tool facilitating the GitOps continuous delivery approach for Kubernetes. Flux allows for automated application and configuration deployments to your clusters by monitoring the configured Git repositories and automatically applying the changes as soon as they become available. It can apply Kustomize manifests (which provide an easy way to optionally patch parts of the usual Kubernetes manifests on the fly), as well as watch over Helm chart releases. You can also configure it to be notified via Slack, Discord, Microsoft Teams, or any other service that supports webhooks. Webhooks provide a way of notifying an app or a service of an event that’s happened somewhere else and provide its description.
In this tutorial, you’ll install Flux and use it to set up continuous delivery for the podinfo app to your DigitalOcean Kubernetes cluster. podinfo is an app that provides details about the environment it’s running in. You’ll host the repositories holding Flux configuration and podinfo on your GitHub account. You’ll set up Flux to watch over the app repository, automatically apply the changes, and notify you on Slack using webhooks. In the end, all changes that you make to the monitored repository will quickly be propagated to your cluster.
Prerequisites
To complete this tutorial, you will need:
-
A DigitalOcean Kubernetes cluster with your connection configuration configured as the
kubectldefault. Instructions on how to configurekubectlare shown under the Connect to your Cluster step when you create your cluster. To learn how to create a Kubernetes cluster on DigitalOcean, see Kubernetes Quickstart. -
A Slack workspace you’re a member of. To learn how to create a workspace, visit the [official docs] (https://slack.com/help/articles/206845317-Create-a-Slack-workspace).
-
A GitHub account with a Personal Access Token (PAT) created with all privileges. To learn how to create one, visit the official docs.
-
Git initialized and set up on your local machine. To get started with Git, as well as see installation instructions, visit the How To Contribute to Open Source: Getting Started with Git tutorial.
-
The podinfo app repository forked to your GitHub account. For instructions on how to fork a repository to your account, visit the official getting started docs.
Step 1 — Installing and Bootstrapping Flux
In this step, you’ll set up Flux on your local machine, install it to your cluster, and set up a dedicated Git repository for storing and versioning its configuration.
On Linux, you can use the official Bash script to install Flux. If you’re on MacOS, you can either use the official script, following the same steps as for Linux, or use Homebrew to install Flux with the following command:
- brew install fluxcd/tap/flux
To install Flux using the officially provided script, download it by running the following command:
- curl https://fluxcd.io/install.sh -so flux-install.sh
You can inspect the flux-install.sh script to verify that it’s safe by running this command:
- less ./flux-install.sh
To be able to run it, you must mark it as executable:
- chmod +x flux-install.sh
Then, execute the script to install Flux:
- ./flux-install.sh
You’ll see the following output, detailing what version is being installed:
Output[INFO]  Downloading metadata https://api.github.com/repos/fluxcd/flux2/releases/latest
[INFO]  Using 0.13.4 as release
[INFO]  Downloading hash https://github.com/fluxcd/flux2/releases/download/v0.13.4/flux_0.13.4_checksums.txt
[INFO]  Downloading binary https://github.com/fluxcd/flux2/releases/download/v0.13.4/flux_0.13.4_linux_amd64.tar.gz
[INFO]  Verifying binary download
[INFO]  Installing flux to /usr/local/bin/flux
To enable command autocompletion, run the following command to configure the shell:
- echo ". <(flux completion bash)" >> ~/.bashrc
For the changes to take effect, reload ~/.bashrc by running:
- . ~/.bashrc
You now have Flux available on your local machine. Before installing it to your cluster, you’ll first need to run the prerequisite checks that verify compatibility:
- flux check --pre
Flux will connect to your cluster, which you’ve set up a connection to in the prerequisites. You’ll see an output similar to this:
Output► checking prerequisites
✔ kubectl 1.21.1 >=1.18.0-0
✔ Kubernetes 1.20.2 >=1.16.0-0
✔ prerequisites checks passed
Note: If you see an error or a warning, double check the cluster you’re connected to. It’s possible that you may need to perform an upgrade to be able to use Flux. If kubectl is reported missing, repeat the steps from the prerequisites for your platform and check that it’s in your PATH.
During the bootstrapping process, Flux creates a Git repository at a specified provider and initializes it with a default configuration. To do so requires your GitHub username and personal access token, which you’ve retrieved in the prerequisites. The repository will be available under your account on GitHub.
You’ll store your GitHub username and personal access token as environment variables to avoid typing them multiple times. Run the following commands, replacing the highlighted parts with your GitHub credentials:
- export GITHUB_USER=your_username
- export GITHUB_TOKEN=your_personal_access_token
You can now bootstrap Flux and install it to your cluster by running:
- flux bootstrap github \
- --owner=$GITHUB_USER \
- --repository=flux-config \
- --branch=main \
- --path=./clusters/my-cluster \
- --personal
In this command, you specify that the repository should be called flux-config at provider github, owned by the user you’ve just defined. The new repository will be personal (not under an organization) and will be made private by default.
The output you’ll see will be similar to this:
Output► connecting to github.com
► cloning branch "main" from Git repository "https://github.com/GITHUB_USER/flux-config.git"
✔ cloned repository
► generating component manifests
✔ generated component manifests
✔ committed sync manifests to "main" ("b750ffae686c2f110364694d2ddae26c7f18c6a2")
► pushing component manifests to "https://github.com/GITHUB_USER/flux-config.git"
► installing components in "flux-system" namespace
✔ installed components
✔ reconciled components
► determining if source secret "flux-system/flux-system" exists
► generating source secret
✔ public key: ssh-rsa AAAAB3NzaC1yc2EAAAADAQABAAABAQDKw943TnUiKLVk4WMLC5YCeC+tIPVvJprQxTfLqcwkHtedMJPanJFifmbQ/M3CAq1IgqyQTydRJSJu6E/4YDOwx1vawStR9XU16rkn+rZbmvRxZ97E0HNb5m54OwmziAWf0EPdsfiIIJYSRkCMihpKJUNoakl+sng6LQsW+WIRlOK39aJRWud+rygQEuEKmD7YHKQ0VSb/L5v50jiPgEZImiREHNfjBU+RkEni3aZuOO3jNy5WdlPkpdqfHe8fdFsjJnvNB0zmfe3eTIB2fbdDzxo2usLbFeAMhGCRYsGnniHsytBHNLmxDM/4I18xlNN9e6WEYpgHEJVb8azKmwSX
✔ configured deploy key "flux-system-main-flux-system-./clusters/my-cluster" for "https://github.com/GITHUB_USER/flux-config"
► applying source secret "flux-system/flux-system"
✔ reconciled source secret
► generating sync manifests
✔ generated sync manifests
✔ committed sync manifests to "main" ("1dc033e24f3288a70ff80c57816e16c52bc62303")
► pushing sync manifests to "https://github.com/GITHUB_USER/flux-config.git"
► applying sync manifests
✔ reconciled sync configuration
◎ waiting for Kustomization "flux-system/flux-system" to be reconciled
✔ Kustomization reconciled successfully
► confirming components are healthy
✔ source-controller: deployment ready
✔ kustomize-controller: deployment ready
✔ helm-controller: deployment ready
✔ notification-controller: deployment ready
✔ all components are healthy
Flux noted that it made a new Git repository, committed a basic starting configuration to it, and provisioned necessary controllers in your cluster.
In this step, you’ve installed Flux on your local machine, created a new Git repository to hold its configuration, and deployed its server-side components to your cluster. The changes defined by the commits in the repository will now get propagated to your cluster automatically. In the next step, you’ll create configuration manifests ordering Flux to automate deployments of the podinfo app you’ve forked whenever a change occurs.
Step 2 — Configuring the Automated Deployment
In this section, you will configure Flux to watch over the podinfo repository that you’ve forked and apply the changes to your cluster as soon as they become available.
In addition to creating the repository and initial configuration, Flux offers commands to help you generate config manifests with your parameters faster than writing them from scratch. The manifests, regardless of what they define, must be available in its Git repository to be taken into consideration. To add them to the repository, you’ll first need to clone it to your machine to be able to push changes. Do so by running the following command:
- git clone https://github.com/$GITHUB_USER/flux-config ~/flux-config
You may be asked for your username and password. Input your account username and provide your personal access token for the password.
Then, navigate to it:
- cd ~/flux-config
To instruct Flux to monitor the forked podinfo repository, you’ll first need to let it know where it’s located. This is achieved by creating a GitRepository manifest, which details the repository URL, branch, and monitoring interval.
To create the manifest, run the following command:
- flux create source git podinfo \
- --url=https://github.com/$GITHUB_USER/podinfo \
- --branch=master \
- --interval=30s \
- --export > ./clusters/my-cluster/podinfo-source.yaml
Here, you specify that the source will be a Git repository with the given URL and branch. You pass in --export to output the generated manifest and pipe it into podinfo-source.yaml, located under ./clusters/my-cluster/ in the main config repository, where manifests for the current cluster are stored.
You can show the contents of the generated file by running:
- cat ./clusters/my-cluster/podinfo-source.yaml
The output will look similar to this:
---
apiVersion: source.toolkit.fluxcd.io/v1beta1
kind: GitRepository
metadata:
  name: podinfo
  namespace: flux-system
spec:
  interval: 30s
  ref:
    branch: master
  url: https://github.com/GITHUB_USER/podinfo
You can check that the parameters you just passed into Flux are correctly laid out in the generated manifest.
You’ve now defined a source Git repository that Flux can access, but you still need to tell it what to deploy. Flux supports Kustomize resources, which podinfo exposes under the kustomize directory. By supporting Kustomizations, Flux does not limit itself, because Kustomize manifests can be as simple as just including all usual manifests unchanged.
Create a Kustomization manifest, which tells Flux where to look for deployable manifests, by running the following command:
- flux create kustomization podinfo \
- --source=podinfo \
- --path="./kustomize" \
- --prune=true \
- --validation=client \
- --interval=5m \
- --export > ./clusters/my-cluster/podinfo-kustomization.yaml
For the --source, you specify the podinfo Git repository you’ve just created. You also set the --path to ./kustomize, which refers to the filesystem structure of the source repository. Then, you save the YAML output into a file called podinfo-kustomization.yaml in the directory for the current cluster.
The Git repository and Kustomization you’ve created are now available, but the cluster-side of Flux can’t yet see them because they’re not in the remote repository on GitHub. To push them, you must first commit them by running:
- git add . && git commit -m "podinfo added"
With the changes now committed, push them to the remote repository:
- git push
Same as last time, git may ask you for your credentials. Input your username and your personal access token to continue.
The new manifests are now live, and cluster-side Flux will soon pick them up. You can watch it sync the cluster’s state with the one presented in the manifests by running:
- watch flux get kustomizations
After the refresh interval specified for the Git repository elapses (which you’ve set to 30s in the manifest above), Flux will retrieve its latest commit and update the cluster. Once it does, you’ll see output similar to this:
OutputNAME            READY   MESSAGE
flux-system     True    Applied revision: main/fc07af652d3168be329539b30a4c3943a7d12dd8
podinfo         True    Applied revision: master/855f7724be13f6146f61a893851522837ad5b634
You can see that a podinfo Kustomization was applied, along with its branch and commit hash. You can list deployments and services as well to check that podinfo is deployed:
- kubectl get deployments,services
You’ll see that they are present, configured according to their respective manifests:
OutputNAME                      READY   UP-TO-DATE   AVAILABLE   AGE
deployment.apps/podinfo   2/2     2            2           56s

NAME                 TYPE        CLUSTER-IP      EXTERNAL-IP   PORT(S)             AGE
service/kubernetes   ClusterIP   10.245.0.1      <none>        443/TCP             34m
service/podinfo      ClusterIP   10.245.78.189   <none>        9898/TCP,9999/TCP   56s
Any changes that you manually make to these and other resources that Flux controls will quickly be overwritten with the ones referenced from Git repositories. To make changes, you’d need to modify the central sources, not the actual deployments in a cluster. This applies to deleting resources as well — any resources you manually delete from the cluster will soon be reinstated. To delete them, you’d need to remove their manifests from the monitored repositories and wait for the changes to be propagated.
Flux’s behavior is intentionally rigid because it operates on what it finds in the remote repositories at the end of each refresh interval. Suspending Kustomization monitoring and, in turn, state reconciliation is useful when you need to manually override the resources in the cluster without being interrupted by Flux.
You can pause monitoring of a Kustomization indefinitely by running:
- flux suspend kustomization kustomization_name
The default behavior can be brought back by running flux resume on a paused Kustomization:
- flux resume kustomization kustomization_name
You now have an automated process in place that will deploy podinfo to your cluster every time a change occurs. You’ll now set up Slack notifications, so you’ll know when a new version of podinfo is being deployed.
Step 3 — Setting up Slack Notifications
Now that you’ve set up automatic podinfo deployments to your cluster, you’ll connect Flux to a Slack channel, where you’ll be notified of every deployment and its outcome.
To integrate with Slack, you’ll need to have an incoming webhook on Slack for your workspace. Incoming webhooks are a way of posting messages to the configured Slack channel.
If you haven’t ever created a webhook, you’ll first need to create an app for your workspace. To do so, first log in to Slack and navigate to the app creation page. Press on the green Create New App button and select From scratch. Name it flux-app, select the desired workspace, and click Create New App.
You’ll be redirected to the settings page for the new app. Click on Incoming Webhooks on the left navigation bar.
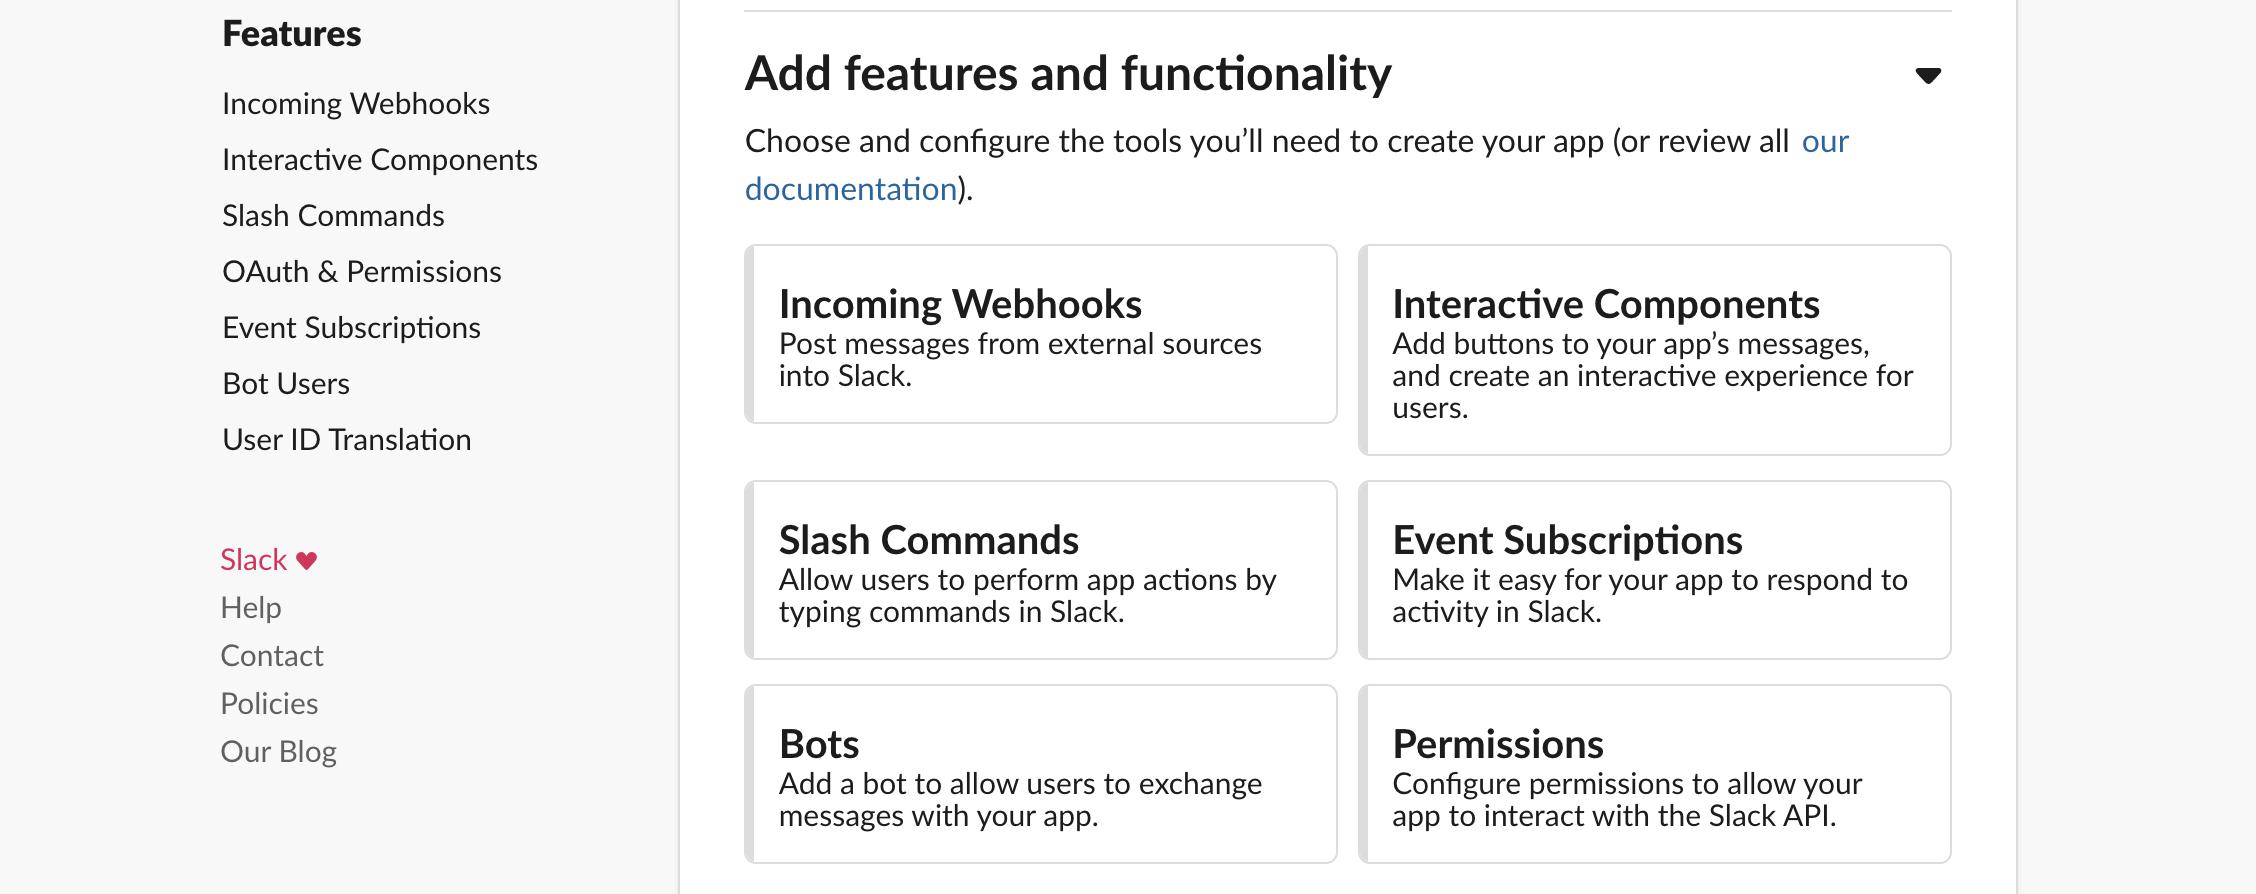
Enable webhooks for flux-app by flipping the switch button next to the title Activate Incoming Webhooks.
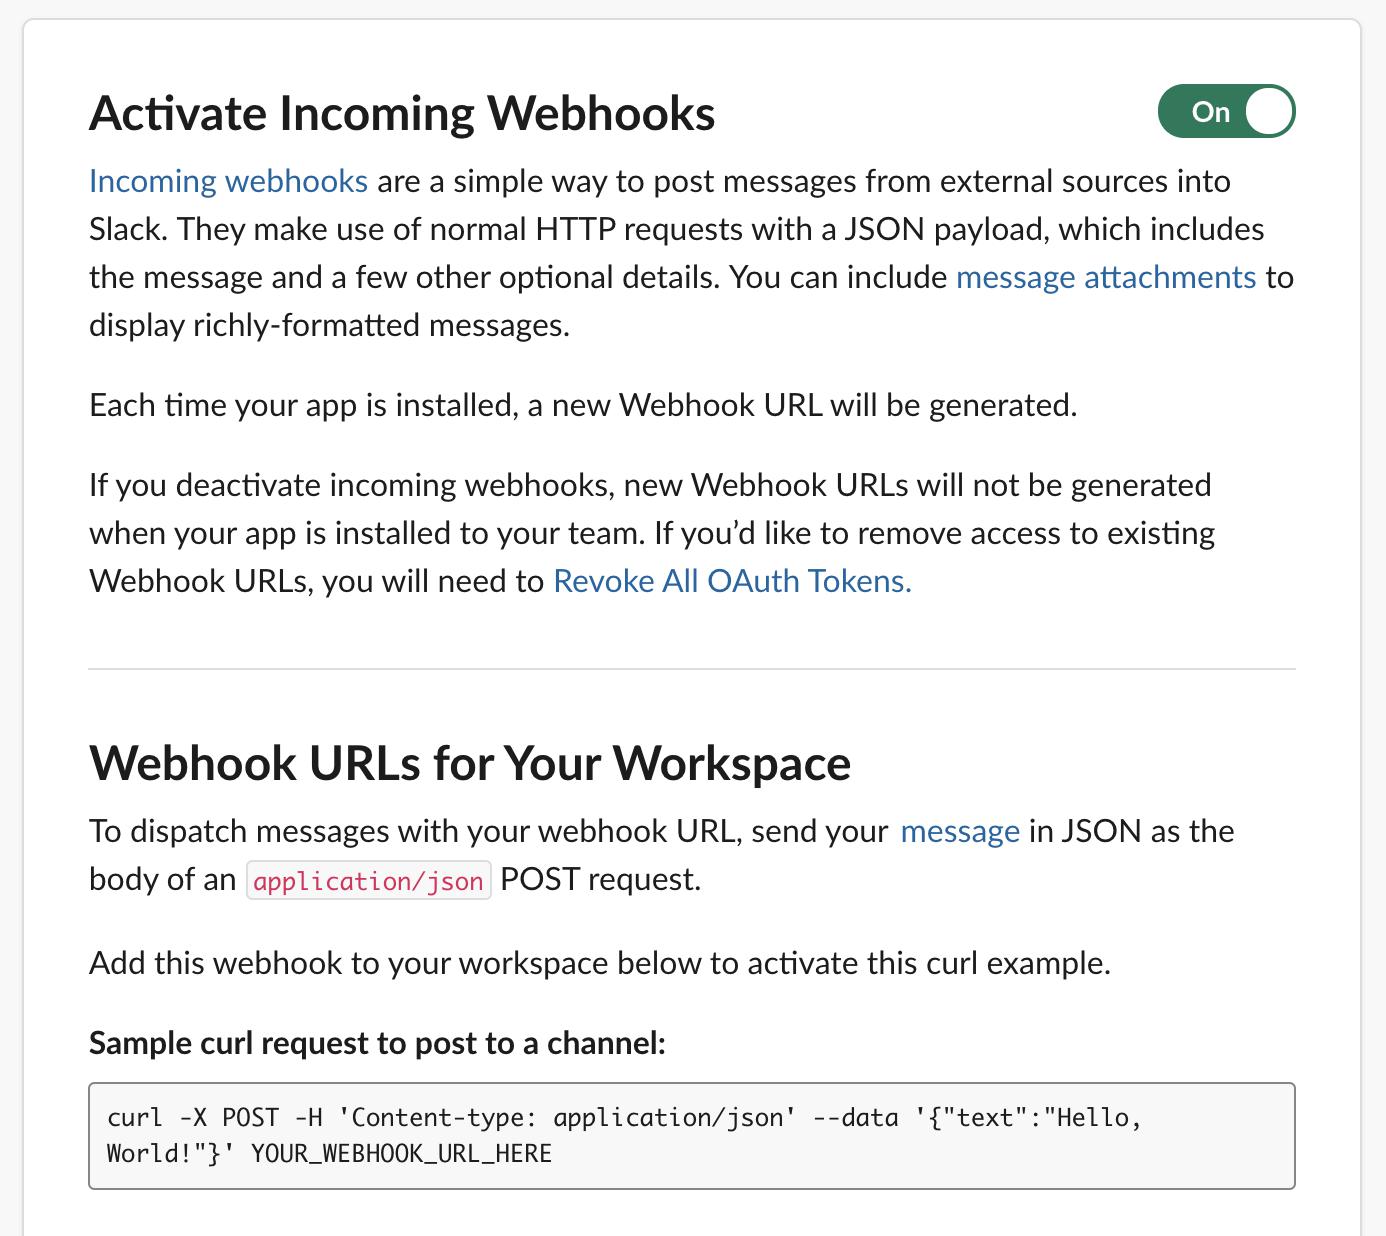
A new section further down the page will be uncovered. Scroll down and click the Add New Webhook to Workspace button. On the next page, select the channel you want the reports to be sent to and click Allow.
You’ll be redirected back to the settings page for webhooks, and you’ll see a new webhook listed in the table. Click on Copy to copy it to clipboard and make note of it for later use.
You’ll store the generated Slack webhook for your app in a Kubernetes Secret in your cluster, so that Flux can access it without explicitly specifying it in its configuration manifests. Storing the webhook as a Secret also lets you easily replace it in the future.
Create a Secret called slack-url containing the webhook by running the following command, replacing your_slack_webhook with the URL you’ve just copied:
- kubectl -n flux-system create secret generic slack-url --from-literal=address=your_slack_webhook
The output will be:
Outputsecret/slack-url created
You’ll now create a Provider, which allows Flux to talk to the specified service using webhooks. They read the webhook URL from Secrets, which is why you’ve just created one. Run the following Flux command to create a Slack Provider:
- flux create alert-provider slack \
- --type slack \
- --channel general \
- --secret-ref slack-url \
- --export > ./clusters/my-cluster/slack-alert-provider.yaml
Aside from Slack, Flux supports communicating with Microsoft Teams, Discord, and other platforms via webhooks. It also supports sending generic JSON to accommodate more software that parses this format.
A Provider only allows Flux to send messages and does not specify when messages should be sent. For Flux to react to events, you’ll need to create an Alert using the slack Provider by running:
- flux create alert slack-alert \
- --event-severity info \
- --event-source Kustomization/* \
- --event-source GitRepository/* \
- --provider-ref slack \
- --export > ./clusters/my-cluster/slack-alert.yaml
This command creates an alert manifest called slack-alert that will react to all Kustomization and Git repository changes and report them to the slack provider. The event severity is set to info, which will allow the alert to be triggered on all events, such as Kubernetes manifests being created or applied, something delaying deployment, or an error occurring. To report only errors, you can specify error instead. The resulting generated YAML is exported to a file called slack-alert.yaml.
Commit the changes by running:
- git add . && git commit -m "Added Slack alerts"
Push the changes to the remote repository by running the following command, inputting your GitHub username and personal access token if needed:
- git push
After the configured refresh interval for the Git repository elapses, Flux will retrieve and apply the changes. You can watch the Alert become available by running:
- watch kubectl -n flux-system get alert
You’ll soon see that it’s Initialized:
OutputNAME          READY   STATUS        AGE
slack-alert   True    Initialized   7s
With alerting now set up, any actions that Flux takes will be logged in the Slack channel of the workspace that the webhook is connected to.
You’ll test this connection by introducing a change to your fork of podinfo. First, clone it your local machine by running:
- git clone https://github.com/$GITHUB_USER/podinfo.git ~/podinfo
Navigate to the cloned repository:
- cd ~/podinfo
You’ll modify the name of its Service, which is defined in ~/podinfo/kustomize/service.yaml. Open it for editing:
- nano ~/podinfo/kustomize/service.yaml
Modify the Service name, like so:
apiVersion: v1
kind: Service
metadata:
  name: podinfo-1
spec:
  type: ClusterIP
  selector:
    app: podinfo
  ports:
    - name: http
      port: 9898
      protocol: TCP
      targetPort: http
    - port: 9999
      targetPort: grpc
      protocol: TCP
      name: grpc
Save and close the file, then commit the changes by running:
- git add . && git commit -m "Service name modified"
Then, push the changes:
- git push
After a few minutes, you’ll see the changes pop up in Slack as they are deployed:
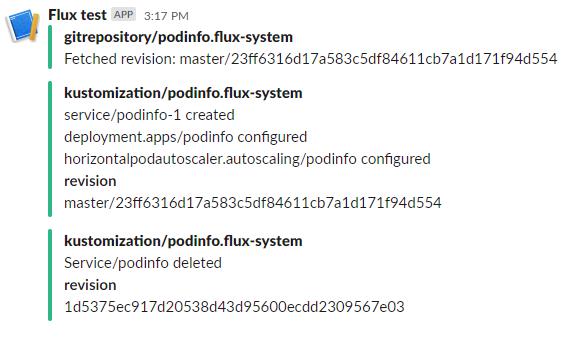
Flux fetched the new commit, created a new Service called podinfo-1, configured it, and deleted the old one. This order of actions ensures that the old Service (or any other manifest) stays untouched if provisioning of the new one fails.
In case the new revision of the watched manifests contains a syntax error, Flux will report an error:
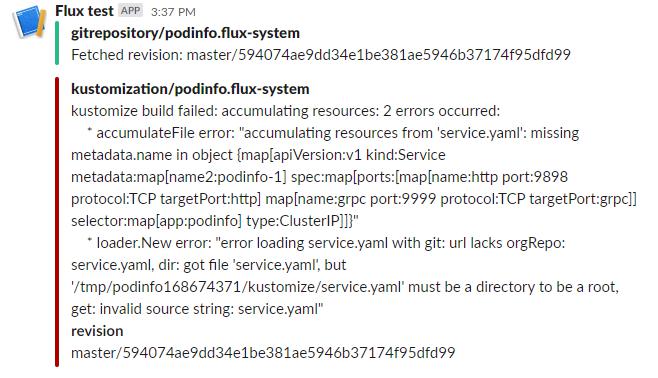
You’ve connected Flux to your Slack workspace, and will immediately be notified of all actions and deployments that happen. You’ll now set up Flux to watch over Helm releases.
Step 4 — (Optional) Automating Helm Release Deployments
In addition to watching over Kustomizations and Git repositories, Flux can also monitor Helm charts. Flux can monitor charts residing in Git or Helm repositories, as well as in S3 cloud storage. You’ll now set it up to watch over the podinfo chart, which is located in a Helm repository.
The process of instructing Flux to monitor a Helm chart is similar to what you did in step 2. You’ll first need to define a source that it can poll for changes (of one of the three types noted earlier). Then, you’ll specify which chart to actually deploy among the ones it finds by creating a HelmRelease.
Navigate back to the flux-config repository:
- cd ~/flux-config
Run the following command to create a source for the Helm repository that contains podinfo:
- flux create source helm podinfo \
- --url=https://stefanprodan.github.io/podinfo \
- --interval=10m \
- --export > ./clusters/my-cluster/podinfo-helm-repo.yaml
Here, you specify the URL of the repository and how often it should be checked. Then, you save the output into a file called podinfo-helm-repo.yaml.
With the source repository now defined, you can create a HelmRelease, defining which chart to monitor:
- flux create hr podinfo \
- --interval=10m \
- --source=HelmRepository/podinfo \
- --chart=podinfo \
- --target-namespace=podinfo-helm \
- --export > ./clusters/my-cluster/podinfo-helm-chart.yaml
As in the previous command, you save the resulting YAML output to a file, here called podinfo-helm-chart.yaml. You also pass in the name of the chart (podinfo), set the --source to the repository you’ve just defined and specify that the namespace the chart will be installed to is podinfo-helm.
Since the podinfo-helm namespace does not exist, create it by running:
- kubectl create namespace podinfo-helm
Then, commit and push the changes:
- git add . && git commit -m "Added podinfo Helm chart" && git push
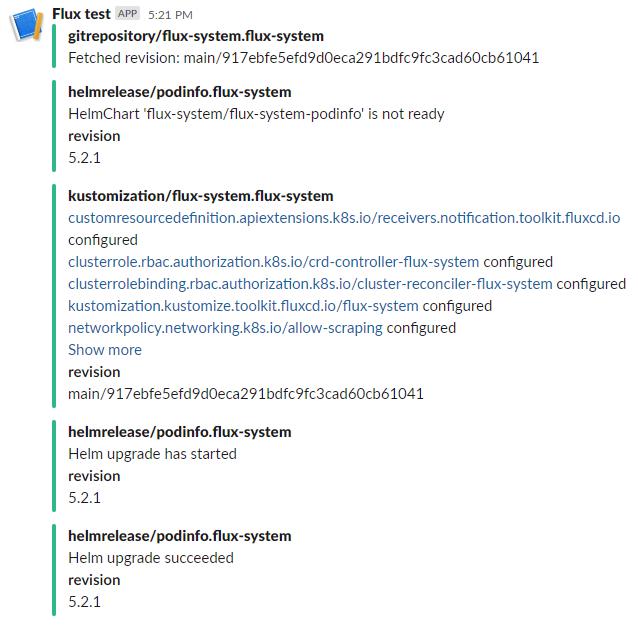
After a few minutes, you’ll see that Flux logged a successful Helm chart upgrade in Slack:
You can check the pods contained in the podinfo-helm namespace by running:
- kubectl get pods -n podinfo-helm
The output will be similar to this:
OutputNAME                                     READY   STATUS    RESTARTS   AGE
podinfo-chart-podinfo-7c9b7667cb-gshkb   1/1     Running   0          33s
This means that you have successfully configured Flux to monitor and deploy the podinfo Helm chart. As soon as a new version is released, or a modification is pushed, Flux will retrieve and deploy the newest variant of the Helm chart for you.
Conclusion
You’ve now automated Kubernetes manifest deployments using Flux, which allows you to push commits to watched repositories and have them automatically applied to your cluster. You’ve also set up alerting to Slack, so you’ll always know what deployments are happening in real time, and you can look up previous ones and see any errors that might have occurred.
In addition to GitHub, Flux also supports retrieving and bootstrapping Git repositories hosted at GitLab. You can visit the official docs to learn more.
更多推荐
 已为社区贡献22912条内容



所有评论(0)