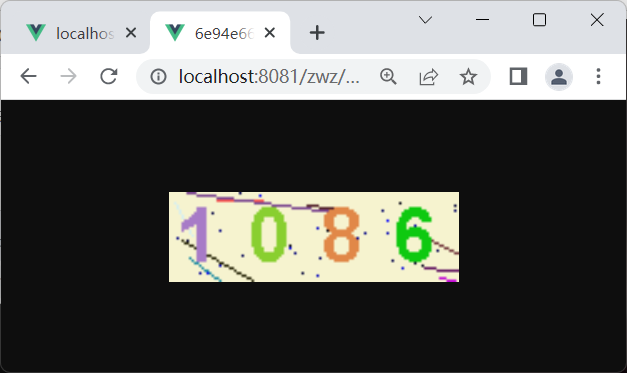
SpringBoot+原生awt,实现花花绿绿的图形验证码
本文基于 SpringBoot 和原生的 Java awt 包,讲解简易版图形验证码的实现,适合SpringBoot入门者学习使用。
图形验证码是用于验证用户身份的一种方式,通常在网站注册、登录或进行某些敏感操作时会使用。它通过展示一个包含随机字符或数字的图形,要求用户输入相应的字符或数字来证明其为真人而非机器人。图形验证码能有效地防止机器人攻击和恶意注册行为,提高网站的安全性。
本文将基于 SpringBoot 和原生的 Java awt 包,完成图形验证码的实现,源码在 项目仓库 中,需要者可自助参考。
一、导入依赖
在实现图形验证码之前,首先要导入依赖,比如 SpringBoot 依赖:
<dependency>
    <groupId>org.springframework.boot</groupId>
    <artifactId>spring-boot-starter-web</artifactId>
</dependency>
awt 包属于 Java 原生包,无需导入三方 maven 依赖,只需引入 JDK 即可。
二、编写工具类
接下来,就开始开发验证码的工具类,包括验证码配置、生成随机数、生成随机颜色、编写创建图片方法、编写构建函数,下面将逐一介绍。
2.1 验证码配置
首先是验证码的配置,创建 CreateVerifyCode 类,创建相应字段,包括字符个数、图片高度、图片宽度、干扰个数等参数,定义如下。
@ApiModelProperty(value = "验证码字符个数")
private int charactersNumber = 4;

@ApiModelProperty(value = "图片高度")
private int imagePeripheralHeight = 40;

@ApiModelProperty(value = "图片宽度")
private int imagePeripheralWidth = 160;

@ApiModelProperty(value = "干扰线数")
private int lineCount = 20;
2.2 生成随机数
新建一个方法 randomStr,用于实现生成随机数的功能,代码如下。
@ApiOperation(value = "随机生成验证码")
public String randomStr(int size) {
    String str1 = "0123456789";
    String str2 = "";
    for (int i = 0; i < size; i++) {
        double randomIndex = Math.random();
        double randomNumber = randomIndex * (str1.length() - 1);
        str2 += str1.charAt((int) randomNumber);
    }
    return str2;
}
2.3 生成随机颜色
新建一个方法 getRandColor,用于实现生成随机颜色的功能,代码如下。
@ApiOperation(value = "随机生成验证码颜色")
private Color getRandColor(int color1, int color2) {
    color1 = color1 > 255 ? 255 : color1;
    color2 = color2 > 255 ? 255 : color2;
    return new Color(color1 + random.nextInt(color2 - color1), color1 + random.nextInt(color2 - color1), color1 + random.nextInt(color2 - color1));
}
2.4 编写创建图片方法
有了验证码配置之后,新建一个方法 creatImage,用于实现图形验证码图片创建的逻辑,代码如下。
@ApiOperation(value = "图片生成工具类")
private void creatImage(String code) {
    if(ZwzNullUtils.isNull(code)){
        throw new ZwzException("图形验证码过期了,再生成个新的哦!");
    }
    this.code = code;
    buffImg = new BufferedImage(imagePeripheralWidth, imagePeripheralHeight, BufferedImage.TYPE_INT_RGB);
    Graphics g = buffImg.getGraphics();
    g.setColor(getRandColor(200, 250));
    g.fillRect(0, 0, imagePeripheralWidth, imagePeripheralHeight);
    Font font = new Font("Fixedsys", Font.BOLD, imagePeripheralHeight - 5);
    g.setFont(font);
    float yawpRate = 0.01f;
    int area = (int) (yawpRate * imagePeripheralWidth * imagePeripheralHeight);
    for (int i = 0; i < area; i++) {
        buffImg.setRGB(random.nextInt(imagePeripheralWidth), random.nextInt(imagePeripheralHeight), random.nextInt(255));
    }
    for (int i = 0; i < lineCount; i++) {
        int xs = random.nextInt(imagePeripheralWidth);
        int ys = random.nextInt(imagePeripheralHeight);
        int xe = xs + random.nextInt(imagePeripheralWidth);
        int ye = ys + random.nextInt(imagePeripheralHeight);
        g.setColor(getRandColor(2, 254));
        g.drawLine(xs, ys, xe, ye);
    }
    for (int i = 0; i < code.length(); i++) {
        String strRand = code.substring(i, i + 1);
        g.setColor(getRandColor(2, 254));
        g.drawString(strRand, i * (imagePeripheralWidth / charactersNumber) + 3, imagePeripheralHeight - 8);
    }
}
2.5 编写构建函数
为了用尽可能精简的代码实现图形验证码,构造函数是比不可少的,开发者可以在构建对象时直接传入参数,实现图形验证码的设计,代码如下。
public CreateVerifyCode(int imageWidth, int imageHeight, int codeCount, int lineCount, String code) {
    this.imagePeripheralWidth = imageWidth;
    this.imagePeripheralHeight = imageHeight;
    this.charactersNumber = codeCount;
    this.lineCount = lineCount;
    creatImage(code);
}
三、编写接口
工具类编写完成后,就开始设计 API 接口了,可以分为验证码初始化和图片返回。
3.1 验证码初始化
首先定义一个 init 接口,用户请求该接口时,系统利用 Java 的 UUID,生成一个随机字符串,并随机生成一个四位数字,放入缓存,返回该随机字符串,代码如下。
@RequestMapping(value = "/init", method = RequestMethod.GET)
@ApiOperation(value = "初始化验证码")
public Result<Object> init() {
    String codeId = UUID.randomUUID().toString().replace("-","");
    redisTemplate.opsForValue().set(codeId, new CreateVerifyCode().randomStr(4),2L, TimeUnit.MINUTES);
    return ResultUtil.data(codeId);
}
接口测试结果如下,接口返回了一个随机字符串:bdb3cc192cf147eda20afa5e5d22bd8c。

3.2 图片返回
前端收到随机字符串 bdb3cc192cf147eda20afa5e5d22bd8c 后,再次请求,拿走验证码图片,核心代码如下。
@RequestMapping(value = "/draw/{captchaId}", method = RequestMethod.GET)
@ApiOperation(value = "根据验证码ID获取图片")
public void draw(@PathVariable("captchaId") String captchaId, HttpServletResponse response) throws IOException {
    String codeStr = redisTemplate.opsForValue().get(captchaId);
    CreateVerifyCode createVerifyCode = new CreateVerifyCode(116,36,4,10, codeStr);
    response.setContentType("image/png");
    createVerifyCode.write(response.getOutputStream());
}
首先根据随机字符串,在 redis 中拿到验证码的值,在调用验证码工具类生成图片,返回前端。


3.3 验证码过滤
系统集成了 Spring Security,需要引入并重写 WebSecurityConfig 类,重写 securityFilterChain 方法。
<dependency>
    <groupId>org.springframework.boot</groupId>
    <artifactId>spring-boot-starter-security</artifactId>
</dependency>
@Bean
public SecurityFilterChain securityFilterChain(HttpSecurity http) throws Exception {

    http.authorizeHttpRequests().requestMatchers("/zwz/dictData/getByType/**","/zwz/file/view/**","/zwz/user/regist","/zwz/common/**","/*/*.js","/*/*.css","/*/*.png","/*/*.ico", "/swagger-ui.html").permitAll()
            .and().formLogin().loginPage("/zwz/common/needLogin").loginProcessingUrl("/zwz/login").permitAll()
            .successHandler(authenticationSuccessHandler).failureHandler(authenticationFailHandler).and()
            .headers().frameOptions().disable().and()
            .logout()
            .permitAll()
            .and()
            .authorizeHttpRequests()
            .anyRequest()
            .authenticated()
            .and()
            .cors().and()
            .csrf().disable()
            .sessionManagement().sessionCreationPolicy(SessionCreationPolicy.STATELESS)
            .and()
            .exceptionHandling().accessDeniedHandler(zwzAccessDeniedHandler)
            .and()
            .authenticationProvider(authenticationProvider())
            .addFilterBefore(authenticationJwtTokenFilter(), UsernamePasswordAuthenticationFilter.class)
            .addFilterBefore(imageValidateFilter, UsernamePasswordAuthenticationFilter.class);
    return http.build();
}
对于通过验证码的请求,给与放行,核心代码如下:
@Override
@ApiOperation(value = "验证码过滤")
protected void doFilterInternal(HttpServletRequest request, HttpServletResponse response, FilterChain filterChain) throws ServletException, IOException {
    Boolean filterFlag = false;
    for(String requestURI : captchaProperties.getVerification()){
        if(pathMatcher.match(requestURI, request.getRequestURI())){
            filterFlag = true;
            break;
        }
    }
    if(!filterFlag) {
        filterChain.doFilter(request, response);
        return;
    }
    String verificationCodeId = request.getParameter("captchaId");
    String userInputCode = request.getParameter("code");
    if(ZwzNullUtils.isNull(userInputCode) || ZwzNullUtils.isNull(verificationCodeId)){
        ResponseUtil.out(response, ResponseUtil.resultMap(RESPONSE_FAIL_FLAG,RESPONSE_CODE_FAIL_CODE,"验证码为空"));
        return;
    }
    String codeAnsInRedis = redisTemplate.opsForValue().get(verificationCodeId);
    if(ZwzNullUtils.isNull(codeAnsInRedis)){
        ResponseUtil.out(response, ResponseUtil.resultMap(RESPONSE_FAIL_FLAG,RESPONSE_CODE_FAIL_CODE,"已过期的验证码,需要重新填写"));
        return;
    }
    if(!Objects.equals(codeAnsInRedis.toLowerCase(),userInputCode.toLowerCase())) {
        ResponseUtil.out(response, ResponseUtil.resultMap(RESPONSE_FAIL_FLAG,RESPONSE_CODE_FAIL_CODE,"验证码不正确"));
        return;
    }
    redisTemplate.delete(verificationCodeId);
    filterChain.doFilter(request, response);
}
最终,基于 SpringBoot+原生 awt,实现花花绿绿的图形验证码。
更多推荐
 已为社区贡献1条内容


所有评论(0)