
【Docker+K8s 实战·第八篇·收官】CI/CD 完整流水线:GitHub Actions + Docker + K8s,一次 push 到生产
·
【Docker+K8s 实战·第八篇·收官】CI/CD 完整流水线:GitHub Actions + Docker + K8s,一次 push 到生产
更新时间:2026-05-20 | 阅读时长:约 26 分钟
系列:Docker + K8s 实战(共 8 篇)· 收官篇
环境:GitHub Actions,Docker Hub / GHCR,Kubernetes 1.30+
标签:CI/CDGitHub ActionsDockerKubernetesGitOps自动化部署HelmArgoCD
系列完整进度
| 篇次 | 主题 | 状态 |
|---|---|---|
| 第一篇 | Docker 基础:镜像、容器、Dockerfile | ✅ |
| 第二篇 | Dockerfile 进阶:多阶段构建 | ✅ |
| 第三篇 | Docker Compose:多容器编排 | ✅ |
| 第四篇 | K8s 核心概念:Pod、Service、Deployment | ✅ |
| 第五篇 | K8s 配置与存储:ConfigMap、Secret、PV | ✅ |
| 第六篇 | K8s 网络与服务发现:Ingress、TLS | ✅ |
| 第七篇 | K8s 生产实践:HPA、滚动更新 | ✅ |
| 第八篇(本篇·收官) | CI/CD 完整流水线 | — |
目录
- 一、CI/CD 流水线总体设计
- 二、GitHub Actions 基础
- 三、阶段一:代码质量检查
- 四、阶段二:构建与推送镜像
- 五、阶段三:部署到 Kubernetes
- 六、多环境部署:staging + production
- 七、GitOps:ArgoCD 自动同步
- 八、Helm:参数化 K8s 配置
- 九、系列收官:完整知识图谱
一、CI/CD 流水线总体设计
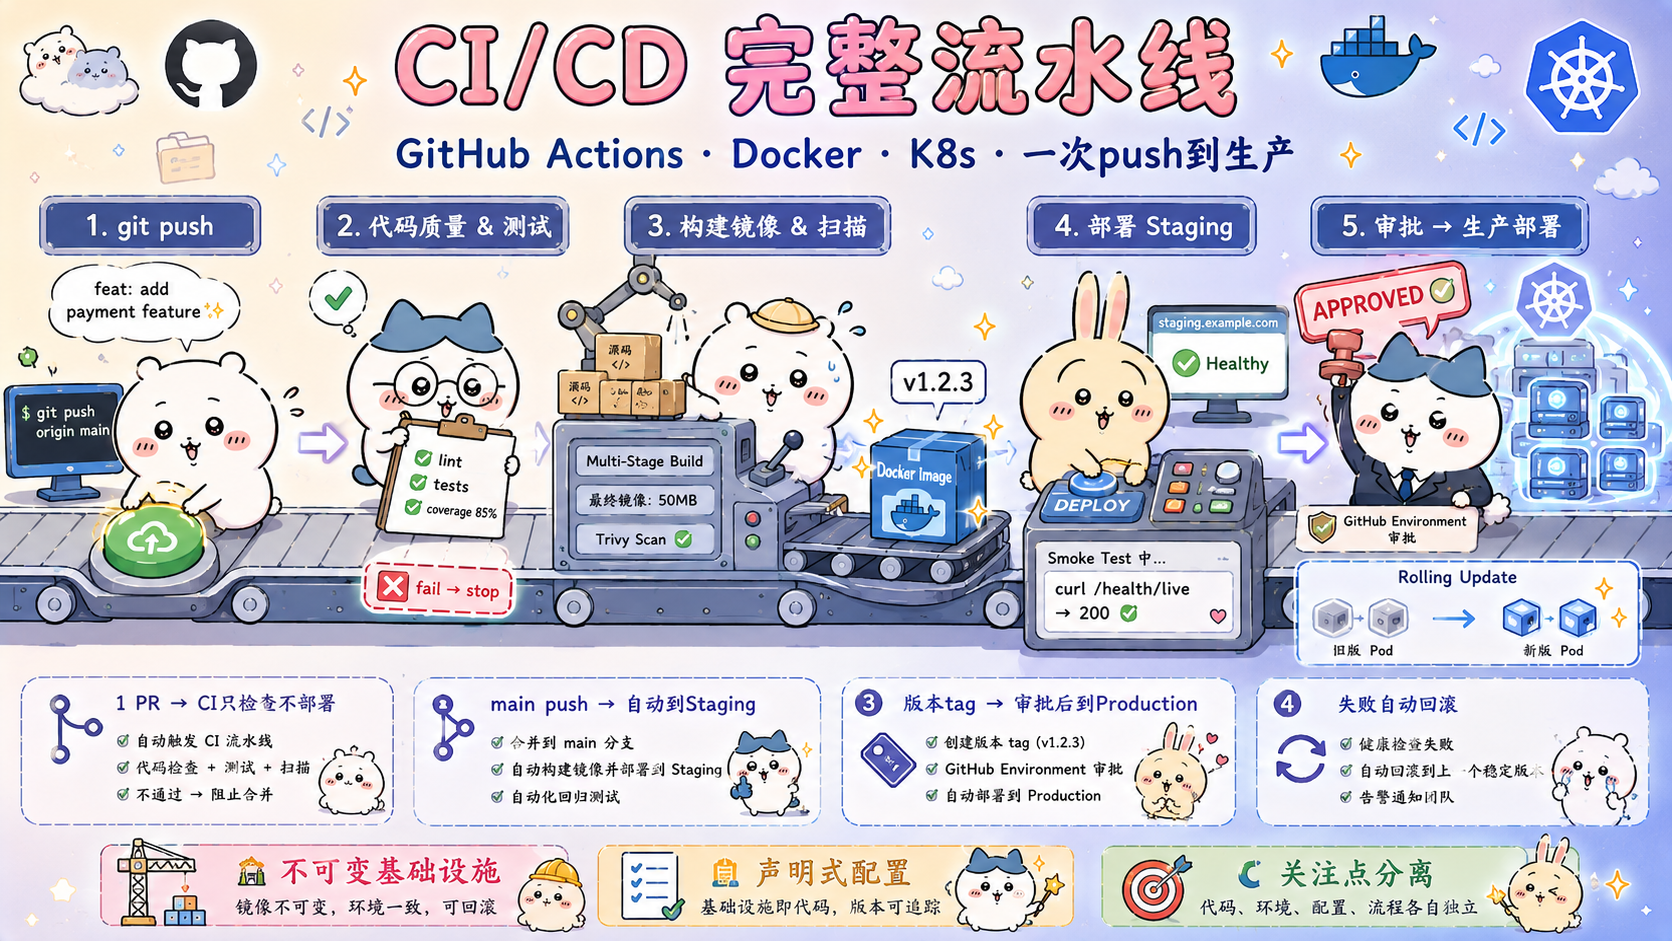
完整的 CI/CD 流水线:

代码变更(git push)
    ↓
┌───────────────────────────────────────────────────┐
│  CI:持续集成(保证代码质量)                        │
│                                                   │
│  ① 代码检查                                        │
│     lint(语法/风格)                               │
│     type-check(TypeScript/mypy)                  │
│     security scan(漏洞扫描)                       │
│                                                   │
│  ② 自动化测试                                       │
│     单元测试                                        │
│     集成测试(用 Docker Compose 启动依赖)            │
│     覆盖率检查(< 80% 失败)                         │
│                                                   │
│  ③ 构建镜像                                         │
│     多阶段构建(小镜像)                             │
│     镜像安全扫描(Trivy)                            │
│     推送到 Registry(打版本 tag)                    │
└───────────────────────────────────────────────────┘
    ↓
┌───────────────────────────────────────────────────┐
│  CD:持续部署(自动上线)                            │
│                                                   │
│  ④ 部署到 Staging                                   │
│     kubectl apply / helm upgrade                  │
│     自动化 smoke test(验证部署成功)                │
│                                                   │
│  ⑤ 部署到 Production(需要审批)                     │
│     GitHub Environment 手动审批                    │
│     滚动更新,零停机                                │
│     健康检查确认(rollout status)                   │
│     失败自动回滚                                    │
└───────────────────────────────────────────────────┘

触发条件:
  push to main       → 部署到 staging
  release tag v*.*.*  → 部署到 production(需人工审批)
  PR                  → 只跑 CI(不部署)
二、GitHub Actions 基础
2.1 关键概念
# .github/workflows/ci-cd.yml

name: CI/CD Pipeline          # 流水线名称

# ── 触发条件 ─────────────────────────────────────────────
on:
  push:
    branches:
      - main                  # push 到 main 分支
      - develop
    tags:
      - 'v*.*.*'              # 推送版本 tag(如 v1.2.3)
  pull_request:
    branches:
      - main                  # 向 main 发 PR
  workflow_dispatch:          # 支持手动触发
    inputs:
      environment:
        description: '部署环境'
        required: true
        default: 'staging'
        type: choice
        options: [staging, production]

# ── 全局环境变量 ──────────────────────────────────────────
env:
  REGISTRY: ghcr.io                           # GitHub Container Registry
  IMAGE_NAME: ${{ github.repository }}        # 如 myorg/myapp
  # 或 Docker Hub
  # REGISTRY: docker.io
  # IMAGE_NAME: myusername/myapp

# ── Job 定义 ─────────────────────────────────────────────
jobs:
  test:                        # Job 名称
    name: 🧪 测试              # 显示名称
    runs-on: ubuntu-latest     # 运行环境

    # 服务容器(集成测试的依赖)
    services:
      postgres:
        image: postgres:16-alpine
        env:
          POSTGRES_PASSWORD: test
          POSTGRES_DB: testdb
        options: >-
          --health-cmd pg_isready
          --health-interval 10s
          --health-retries 5

    steps:
      - name: 检出代码
        uses: actions/checkout@v4

      - name: 运行测试
        run: pytest tests/
        env:
          DATABASE_URL: postgresql://postgres:test@localhost/testdb
2.2 常用 Actions
# ── 代码检出 ──────────────────────────────────────────────
- uses: actions/checkout@v4
  with:
    fetch-depth: 0    # 获取完整历史(git log 用)

# ── 缓存依赖 ──────────────────────────────────────────────
- uses: actions/cache@v4
  with:
    path: ~/.npm
    key: ${{ runner.os }}-npm-${{ hashFiles('**/package-lock.json') }}
    restore-keys: |
      ${{ runner.os }}-npm-

# ── 设置 Node.js ──────────────────────────────────────────
- uses: actions/setup-node@v4
  with:
    node-version: '20'
    cache: 'npm'

# ── 设置 Python ───────────────────────────────────────────
- uses: actions/setup-python@v5
  with:
    python-version: '3.12'
    cache: 'pip'

# ── Docker Buildx(多平台构建)────────────────────────────
- uses: docker/setup-buildx-action@v3

# ── 登录 Docker Registry ──────────────────────────────────
- uses: docker/login-action@v3
  with:
    registry: ghcr.io
    username: ${{ github.actor }}
    password: ${{ secrets.GITHUB_TOKEN }}

# ── 构建并推送镜像 ────────────────────────────────────────
- uses: docker/build-push-action@v5
  with:
    context: .
    push: true
    tags: ghcr.io/myorg/myapp:latest
    cache-from: type=gha
    cache-to: type=gha,mode=max

# ── Trivy 安全扫描 ────────────────────────────────────────
- uses: aquasecurity/trivy-action@master
  with:
    image-ref: ghcr.io/myorg/myapp:latest
    severity: 'CRITICAL,HIGH'
    exit-code: '1'

# ── kubectl 部署 ──────────────────────────────────────────
- uses: azure/k8s-deploy@v5
  with:
    manifests: k8s/
    images: ghcr.io/myorg/myapp:${{ github.sha }}
三、阶段一:代码质量检查
# .github/workflows/ci.yml(PR 和 push 都触发)
name: CI

on:
  push:
    branches: [main, develop]
  pull_request:
    branches: [main]

jobs:
  # ── 代码检查 ────────────────────────────────────────────
  lint-and-type-check:
    name: 🔍 代码检查
    runs-on: ubuntu-latest
    steps:
      - uses: actions/checkout@v4

      - uses: actions/setup-python@v5
        with:
          python-version: '3.12'
          cache: 'pip'

      - name: 安装检查工具
        run: pip install ruff mypy

      - name: Ruff 代码风格检查
        run: ruff check .

      - name: Ruff 格式检查
        run: ruff format --check .

      - name: mypy 类型检查
        run: mypy app/ --ignore-missing-imports

  # ── 安全扫描 ─────────────────────────────────────────────
  security-scan:
    name: 🔒 安全扫描
    runs-on: ubuntu-latest
    steps:
      - uses: actions/checkout@v4

      - name: 依赖漏洞扫描
        uses: pypa/gh-action-pip-audit@v1.0.8
        with:
          inputs: requirements.txt

      - name: Dockerfile 安全检查
        uses: hadolint/hadolint-action@v3.1.0
        with:
          dockerfile: Dockerfile

  # ── 单元测试 ─────────────────────────────────────────────
  unit-tests:
    name: 🧪 单元测试
    runs-on: ubuntu-latest
    steps:
      - uses: actions/checkout@v4

      - uses: actions/setup-python@v5
        with:
          python-version: '3.12'
          cache: 'pip'

      - name: 安装依赖
        run: pip install -r requirements.txt -r requirements-dev.txt

      - name: 运行单元测试(含覆盖率)
        run: |
          pytest tests/unit \
            --cov=app \
            --cov-report=xml \
            --cov-fail-under=80 \
            -v

      - name: 上传覆盖率报告
        uses: codecov/codecov-action@v4
        with:
          files: ./coverage.xml
          token: ${{ secrets.CODECOV_TOKEN }}

  # ── 集成测试 ─────────────────────────────────────────────
  integration-tests:
    name: 🔗 集成测试
    runs-on: ubuntu-latest
    services:
      postgres:
        image: postgres:16-alpine
        env:
          POSTGRES_PASSWORD: testpass
          POSTGRES_DB: testdb
        options: >-
          --health-cmd pg_isready
          --health-interval 10s
          --health-timeout 5s
          --health-retries 5
      redis:
        image: redis:7-alpine
        options: >-
          --health-cmd "redis-cli ping"
          --health-interval 10s
          --health-retries 5

    steps:
      - uses: actions/checkout@v4

      - uses: actions/setup-python@v5
        with:
          python-version: '3.12'
          cache: 'pip'

      - name: 安装依赖
        run: pip install -r requirements.txt -r requirements-dev.txt

      - name: 执行数据库迁移
        run: python manage.py migrate
        env:
          DATABASE_URL: postgresql://postgres:testpass@localhost/testdb
          REDIS_URL: redis://localhost:6379/0

      - name: 运行集成测试
        run: pytest tests/integration -v
        env:
          DATABASE_URL: postgresql://postgres:testpass@localhost/testdb
          REDIS_URL: redis://localhost:6379/0
          SECRET_KEY: test-secret-key
四、阶段二:构建与推送镜像
# .github/workflows/build.yml
name: Build & Push Image

on:
  push:
    branches: [main]
    tags: ['v*.*.*']

env:
  REGISTRY: ghcr.io
  IMAGE_NAME: ${{ github.repository }}

jobs:
  build-and-push:
    name: 🐳 构建镜像
    runs-on: ubuntu-latest
    # 输出镜像 tag,供后续 job 使用
    outputs:
      image-tag: ${{ steps.meta.outputs.tags }}
      image-digest: ${{ steps.build.outputs.digest }}
      version: ${{ steps.version.outputs.version }}

    permissions:
      contents: read
      packages: write         # 推送到 GHCR 需要

    steps:
      - name: 检出代码
        uses: actions/checkout@v4
        with:
          fetch-depth: 0      # 获取完整历史,用于生成版本号

      # 生成语义化版本号
      - name: 生成版本号
        id: version
        run: |
          if [[ "${{ github.ref }}" == refs/tags/* ]]; then
            VERSION="${GITHUB_REF#refs/tags/}"
          else
            VERSION="$(git describe --tags --always --dirty)-$(echo $GITHUB_SHA | cut -c1-7)"
          fi
          echo "version=${VERSION}" >> $GITHUB_OUTPUT
          echo "版本号:${VERSION}"

      # 生成镜像 metadata(tags 和 labels)
      - name: 生成镜像 Metadata
        id: meta
        uses: docker/metadata-action@v5
        with:
          images: ${{ env.REGISTRY }}/${{ env.IMAGE_NAME }}
          tags: |
            # push 到 main:打 sha 短哈希 tag
            type=sha,prefix=,suffix=,format=short
            # push tag v*:打版本 tag(如 v1.2.3)
            type=semver,pattern={{version}}
            type=semver,pattern={{major}}.{{minor}}
            # main 分支:打 latest tag
            type=raw,value=latest,enable=${{ github.ref == 'refs/heads/main' }}
          labels: |
            org.opencontainers.image.title=MyApp
            org.opencontainers.image.description=My production application
            org.opencontainers.image.vendor=MyOrg

      # 设置 Docker Buildx(支持多平台和缓存)
      - name: 设置 Docker Buildx
        uses: docker/setup-buildx-action@v3

      # 登录到 GHCR
      - name: 登录 GitHub Container Registry
        uses: docker/login-action@v3
        with:
          registry: ${{ env.REGISTRY }}
          username: ${{ github.actor }}
          password: ${{ secrets.GITHUB_TOKEN }}

      # 构建并推送(使用 GitHub Actions 缓存加速)
      - name: 构建并推送镜像
        id: build
        uses: docker/build-push-action@v5
        with:
          context: .
          file: ./Dockerfile
          platforms: linux/amd64,linux/arm64    # 多平台构建
          push: true
          tags: ${{ steps.meta.outputs.tags }}
          labels: ${{ steps.meta.outputs.labels }}
          # GitHub Actions 缓存(免费,速度快)
          cache-from: type=gha
          cache-to: type=gha,mode=max
          build-args: |
            BUILD_DATE=${{ fromJSON(steps.meta.outputs.json).labels['org.opencontainers.image.created'] }}
            GIT_COMMIT=${{ github.sha }}
            VERSION=${{ steps.version.outputs.version }}

      # 安全扫描(构建后扫描)
      - name: Trivy 镜像漏洞扫描
        uses: aquasecurity/trivy-action@master
        with:
          image-ref: ${{ env.REGISTRY }}/${{ env.IMAGE_NAME }}:${{ github.sha }}
          format: sarif
          output: trivy-results.sarif
          severity: CRITICAL,HIGH
          exit-code: '1'          # 发现高危漏洞则 CI 失败

      # 上传扫描报告到 GitHub Security
      - name: 上传安全扫描报告
        uses: github/codeql-action/upload-sarif@v3
        if: always()              # 即使 trivy 失败也上传报告
        with:
          sarif_file: trivy-results.sarif

      # 输出镜像摘要(用于追踪)
      - name: 输出镜像信息
        run: |
          echo "镜像:${{ env.REGISTRY }}/${{ env.IMAGE_NAME }}"
          echo "Tag:${{ steps.meta.outputs.tags }}"
          echo "Digest:${{ steps.build.outputs.digest }}"
          echo "版本:${{ steps.version.outputs.version }}"
五、阶段三:部署到 Kubernetes
5.1 配置 kubeconfig
# 在 GitHub Secrets 中添加 K8s 集群配置

# 方式1:完整 kubeconfig(适合自建集群)
# 获取 kubeconfig
kubectl config view --minify --flatten > kubeconfig.yaml
# 在 GitHub 仓库 Settings → Secrets 中添加:
# KUBE_CONFIG = (kubeconfig.yaml 的 base64 编码内容)
# base64 kubeconfig.yaml | pbcopy

# 方式2:ServiceAccount Token(更安全,推荐)
# 创建专用 ServiceAccount
kubectl create serviceaccount github-actions -n myapp
kubectl create clusterrolebinding github-actions \
  --clusterrole=cluster-admin \
  --serviceaccount=myapp:github-actions

# 获取 Token(K8s 1.24+)
kubectl create token github-actions -n myapp --duration=8760h
# 在 GitHub Secrets 中添加:
# KUBE_TOKEN = 上面输出的 token
# KUBE_SERVER = https://your-cluster-api-server
# KUBE_CA_CERT = (base64 编码的 CA 证书)
5.2 部署 Job
# .github/workflows/deploy.yml
name: Deploy to K8s

on:
  workflow_call:                  # 被其他 workflow 调用
    inputs:
      environment:
        required: true
        type: string
      image-tag:
        required: true
        type: string
    secrets:
      KUBE_CONFIG:
        required: true

jobs:
  deploy:
    name: 🚀 部署到 ${{ inputs.environment }}
    runs-on: ubuntu-latest
    environment:
      name: ${{ inputs.environment }}
      url: https://${{ inputs.environment == 'production' && 'example.com' || 'staging.example.com' }}

    steps:
      - name: 检出代码
        uses: actions/checkout@v4

      # 配置 kubectl
      - name: 配置 kubectl
        uses: azure/setup-kubectl@v3
        with:
          version: 'v1.30.0'

      - name: 设置 kubeconfig
        run: |
          mkdir -p ~/.kube
          echo "${{ secrets.KUBE_CONFIG }}" | base64 -d > ~/.kube/config
          chmod 600 ~/.kube/config

      # 验证集群连接
      - name: 验证集群连接
        run: |
          kubectl cluster-info
          kubectl get nodes

      # 更新镜像版本(触发滚动更新)
      - name: 更新镜像版本
        run: |
          NAMESPACE=${{ inputs.environment }}

          kubectl set image deployment/api \
            api=ghcr.io/${{ github.repository }}:${{ inputs.image-tag }} \
            -n ${NAMESPACE}

          kubectl set image deployment/worker \
            worker=ghcr.io/${{ github.repository }}:${{ inputs.image-tag }} \
            -n ${NAMESPACE}

          # 添加更新注解(记录在 rollout history)
          kubectl annotate deployment/api \
            kubernetes.io/change-cause="${{ inputs.image-tag }} deployed by GitHub Actions" \
            -n ${NAMESPACE} \
            --overwrite

      # 等待滚动更新完成
      - name: 等待部署完成
        run: |
          NAMESPACE=${{ inputs.environment }}

          kubectl rollout status deployment/api \
            -n ${NAMESPACE} \
            --timeout=300s

          kubectl rollout status deployment/worker \
            -n ${NAMESPACE} \
            --timeout=300s

      # Smoke Test(验证服务健康)
      - name: Smoke Test
        run: |
          NAMESPACE=${{ inputs.environment }}

          if [ "${NAMESPACE}" == "production" ]; then
            BASE_URL="https://example.com"
          else
            BASE_URL="https://staging.example.com"
          fi

          # 等待 DNS 和 Ingress 生效
          sleep 10

          # 验证健康检查接口
          HTTP_STATUS=$(curl -s -o /dev/null -w "%{http_code}" \
            "${BASE_URL}/health/live" \
            --retry 5 \
            --retry-delay 5 \
            --retry-connrefused)

          if [ "${HTTP_STATUS}" != "200" ]; then
            echo "❌ Smoke Test 失败!HTTP 状态码:${HTTP_STATUS}"
            echo "触发回滚..."
            kubectl rollout undo deployment/api -n ${NAMESPACE}
            kubectl rollout undo deployment/worker -n ${NAMESPACE}
            exit 1
          fi

          echo "✅ Smoke Test 通过!HTTP 状态码:${HTTP_STATUS}"

      # 输出部署信息
      - name: 部署成功通知
        if: success()
        run: |
          echo "✅ 部署成功!"
          echo "环境:${{ inputs.environment }}"
          echo "镜像:ghcr.io/${{ github.repository }}:${{ inputs.image-tag }}"
          echo "Pod 状态:"
          kubectl get pods -n ${{ inputs.environment }} -l app=api

      # 部署失败处理
      - name: 部署失败回滚
        if: failure()
        run: |
          echo "❌ 部署失败,执行回滚..."
          kubectl rollout undo deployment/api -n ${{ inputs.environment }}
          kubectl rollout status deployment/api -n ${{ inputs.environment }} --timeout=120s
          echo "回滚完成"
六、多环境部署:staging + production
# .github/workflows/ci-cd-complete.yml
# 完整的多环境 CI/CD 流水线
name: Complete CI/CD Pipeline

on:
  push:
    branches: [main]
    tags: ['v*.*.*']
  pull_request:
    branches: [main]

env:
  REGISTRY: ghcr.io
  IMAGE_NAME: ${{ github.repository }}

jobs:
  # ══════ 阶段1:代码质量 ══════
  quality:
    name: 🔍 代码质量检查
    runs-on: ubuntu-latest
    steps:
      - uses: actions/checkout@v4
      - uses: actions/setup-python@v5
        with:
          python-version: '3.12'
          cache: 'pip'
      - run: pip install ruff mypy
      - run: ruff check . && ruff format --check .
      - run: mypy app/

  # ══════ 阶段2:测试 ══════
  test:
    name: 🧪 自动化测试
    needs: quality             # 质量检查通过才测试
    runs-on: ubuntu-latest
    services:
      postgres:
        image: postgres:16-alpine
        env:
          POSTGRES_PASSWORD: test
          POSTGRES_DB: testdb
        options: >-
          --health-cmd pg_isready
          --health-interval 10s
          --health-retries 5
      redis:
        image: redis:7-alpine
        options: >-
          --health-cmd "redis-cli ping"
          --health-interval 10s
          --health-retries 3
    steps:
      - uses: actions/checkout@v4
      - uses: actions/setup-python@v5
        with:
          python-version: '3.12'
          cache: 'pip'
      - run: pip install -r requirements.txt -r requirements-dev.txt
      - run: |
          python manage.py migrate
          pytest --cov=app --cov-fail-under=80 -v
        env:
          DATABASE_URL: postgresql://postgres:test@localhost/testdb
          REDIS_URL: redis://localhost:6379/0
          SECRET_KEY: ci-test-key

  # ══════ 阶段3:构建镜像 ══════
  build:
    name: 🐳 构建镜像
    needs: test               # 测试通过才构建
    runs-on: ubuntu-latest
    # PR 时不 push,只 build 测试
    if: github.event_name != 'pull_request'
    outputs:
      image-tag: ${{ steps.meta.outputs.version }}
      image-full: ${{ env.REGISTRY }}/${{ env.IMAGE_NAME }}:${{ steps.meta.outputs.version }}

    permissions:
      contents: read
      packages: write
      security-events: write  # 上传安全报告

    steps:
      - uses: actions/checkout@v4
      - uses: docker/setup-buildx-action@v3
      - uses: docker/metadata-action@v5
        id: meta
        with:
          images: ${{ env.REGISTRY }}/${{ env.IMAGE_NAME }}
          tags: |
            type=sha,prefix=,format=short
            type=semver,pattern={{version}}
            type=raw,value=latest,enable=${{ github.ref == 'refs/heads/main' }}
      - uses: docker/login-action@v3
        with:
          registry: ${{ env.REGISTRY }}
          username: ${{ github.actor }}
          password: ${{ secrets.GITHUB_TOKEN }}
      - uses: docker/build-push-action@v5
        id: build
        with:
          context: .
          platforms: linux/amd64,linux/arm64
          push: true
          tags: ${{ steps.meta.outputs.tags }}
          labels: ${{ steps.meta.outputs.labels }}
          cache-from: type=gha
          cache-to: type=gha,mode=max
      - uses: aquasecurity/trivy-action@master
        with:
          image-ref: ${{ env.REGISTRY }}/${{ env.IMAGE_NAME }}:${{ steps.meta.outputs.version }}
          severity: CRITICAL,HIGH
          exit-code: '1'
          format: sarif
          output: trivy.sarif
      - uses: github/codeql-action/upload-sarif@v3
        if: always()
        with:
          sarif_file: trivy.sarif

  # ══════ 阶段4:部署到 Staging ══════
  deploy-staging:
    name: 🚀 部署到 Staging
    needs: build
    runs-on: ubuntu-latest
    # 只有 main 分支才部署到 staging
    if: github.ref == 'refs/heads/main'
    environment:
      name: staging
      url: https://staging.example.com

    steps:
      - uses: actions/checkout@v4
      - uses: azure/setup-kubectl@v3
      - name: 设置 kubeconfig
        run: |
          mkdir -p ~/.kube
          echo "${{ secrets.STAGING_KUBE_CONFIG }}" | base64 -d > ~/.kube/config
      - name: 部署到 Staging
        run: |
          kubectl set image deployment/api \
            api=${{ needs.build.outputs.image-full }} \
            -n staging
          kubectl rollout status deployment/api -n staging --timeout=300s
      - name: Smoke Test
        run: |
          sleep 15
          curl -f https://staging.example.com/health/live || \
            (kubectl rollout undo deployment/api -n staging && exit 1)
          echo "✅ Staging 部署成功"

  # ══════ 阶段5:部署到 Production(需要审批)══════
  deploy-production:
    name: 🚀 部署到 Production
    needs: [build, deploy-staging]
    runs-on: ubuntu-latest
    # 只有 tag push 才部署到生产
    if: startsWith(github.ref, 'refs/tags/v')
    environment:
      name: production          # GitHub Environment,可以配置审批人
      url: https://example.com  # 部署成功后显示的链接

    steps:
      - uses: actions/checkout@v4
      - uses: azure/setup-kubectl@v3
      - name: 设置 kubeconfig
        run: |
          mkdir -p ~/.kube
          echo "${{ secrets.PROD_KUBE_CONFIG }}" | base64 -d > ~/.kube/config
      - name: 部署到 Production
        run: |
          # 更新所有相关 Deployment
          for deploy in api worker scheduler frontend; do
            kubectl set image deployment/${deploy} \
              ${deploy}=${{ needs.build.outputs.image-full }} \
              -n production 2>/dev/null || true
          done

          # 等待所有 Deployment 完成
          kubectl rollout status deployment/api -n production --timeout=300s
          kubectl rollout status deployment/worker -n production --timeout=300s

      - name: 生产 Smoke Test
        run: |
          sleep 20
          # 多次验证确保稳定
          for i in 1 2 3; do
            sleep 5
            curl -f https://example.com/health/live || \
              (kubectl rollout undo deployment/api -n production && exit 1)
          done
          echo "✅ Production 部署成功!"

      # Slack/钉钉/企业微信 通知
      - name: 发送部署通知
        if: always()
        uses: 8398a7/action-slack@v3
        with:
          status: ${{ job.status }}
          text: |
            部署到 Production:${{ job.status }}
            版本:${{ needs.build.outputs.image-tag }}
            提交:${{ github.sha }}
        env:
          SLACK_WEBHOOK_URL: ${{ secrets.SLACK_WEBHOOK }}
6.1 配置 GitHub Environment 审批
GitHub 仓库 → Settings → Environments → New environment

Environment: production
Protection rules:
  ✅ Required reviewers: [team-leads](需要指定人审批)
  ✅ Wait timer: 0 minutes
  ✅ Deployment branches: Selected branches → v*.*.*(只允许 tag)

这样每次部署到 production 时,
会自动暂停等待指定审批人点击 "Approve and deploy"。
七、GitOps:ArgoCD 自动同步
GitOps 理念:
  集群状态 = Git 仓库中的 YAML 文件
  ArgoCD 持续监听 Git 仓库变化
  自动同步 Git 中的期望状态到集群

与传统 CI/CD 的区别:
  传统:CI/CD 系统 → kubectl apply → 集群
  GitOps:更新 Git → ArgoCD 检测变化 → 自动同步集群

优势:
  集群状态有版本历史(git log)
  回滚 = git revert
  多集群管理统一
  审计追踪完整
# 安装 ArgoCD
kubectl create namespace argocd
kubectl apply -n argocd -f \
  https://raw.githubusercontent.com/argoproj/argo-cd/stable/manifests/install.yaml

# 获取初始密码
kubectl get secret argocd-initial-admin-secret \
  -n argocd \
  -o jsonpath="{.data.password}" | base64 -d

# 访问 UI
kubectl port-forward svc/argocd-server -n argocd 8080:443
# https://localhost:8080
# argocd-app.yaml:定义 ArgoCD Application
apiVersion: argoproj.io/v1alpha1
kind: Application
metadata:
  name: myapp-production
  namespace: argocd
spec:
  project: default

  # 源:Git 仓库中的 K8s 配置
  source:
    repoURL: https://github.com/myorg/myapp-config
    targetRevision: main                # 监听 main 分支
    path: k8s/production                # 目录
    # 如果使用 Helm
    # chart: myapp
    # helm:
    #   values: |
    #     image.tag: latest

  # 目标:部署到哪个集群和 namespace
  destination:
    server: https://kubernetes.default.svc
    namespace: production

  # 同步策略
  syncPolicy:
    automated:
      prune: true           # 自动删除 Git 中不存在的资源
      selfHeal: true        # 手动修改集群状态后自动恢复到 Git 中的状态
      allowEmpty: false     # 不允许同步空目录
    syncOptions:
      - CreateNamespace=true    # 自动创建 namespace
      - PrunePropagationPolicy=foreground
    retry:
      limit: 5
      backoff:
        duration: 5s
        factor: 2
        maxDuration: 3m
# CI 更新镜像 tag(GitOps 方式)
# CI 不直接 kubectl,而是更新 Git 仓库中的镜像 tag
# ArgoCD 检测到 Git 变化,自动同步到集群

# .github/workflows/update-image-tag.yml
name: Update Image Tag

jobs:
  update-tag:
    name: 更新 Git 中的镜像 Tag
    steps:
      - name: 检出配置仓库
        uses: actions/checkout@v4
        with:
          repository: myorg/myapp-config   # 独立的配置仓库(推荐)
          token: ${{ secrets.CONFIG_REPO_TOKEN }}

      - name: 更新镜像 Tag
        run: |
          # 使用 kustomize 更新镜像 tag
          cd k8s/production
          kustomize edit set image \
            ghcr.io/myorg/myapp=ghcr.io/myorg/myapp:${{ github.sha }}

          # 或者直接 sed
          sed -i "s|image: ghcr.io/myorg/myapp:.*|image: ghcr.io/myorg/myapp:${{ github.sha }}|g" \
            deployment.yaml

      - name: 提交变更
        run: |
          git config user.name "GitHub Actions"
          git config user.email "actions@github.com"
          git add .
          git commit -m "chore: update image tag to ${{ github.sha }}"
          git push
          # ArgoCD 检测到 Git 变化,自动同步到集群!
八、Helm:参数化 K8s 配置
Helm 解决的问题:
  不同环境(staging/prod)的 K8s 配置大部分相同,只有少数差异
  (副本数、资源限制、域名、镜像 tag 等)

  不用 Helm:维护多份几乎相同的 YAML(难以维护)
  用 Helm:一套模板 + 不同的 values.yaml(DRY 原则)
# 安装 Helm
brew install helm   # macOS

# 创建 Chart
helm create myapp
# myapp/
#   Chart.yaml         Chart 元信息
#   values.yaml        默认值
#   templates/         K8s 资源模板
#     deployment.yaml
#     service.yaml
#     ingress.yaml
#     _helpers.tpl     辅助模板函数
# myapp/values.yaml(默认值)
replicaCount: 2

image:
  repository: ghcr.io/myorg/myapp
  tag: latest
  pullPolicy: IfNotPresent

service:
  type: ClusterIP
  port: 80

ingress:
  enabled: true
  className: nginx
  host: example.com
  tls:
    enabled: true
    secretName: example-com-tls

resources:
  requests:
    cpu: 100m
    memory: 128Mi
  limits:
    cpu: 500m
    memory: 512Mi

autoscaling:
  enabled: false
  minReplicas: 2
  maxReplicas: 10
  targetCPUUtilizationPercentage: 70

env:
  LOG_LEVEL: info
  PORT: "8000"

secrets:
  dbPassword: ""
  secretKey: ""
# myapp/values-staging.yaml(staging 覆盖)
replicaCount: 1

image:
  tag: sha-abc123    # CI 传入具体 tag

ingress:
  host: staging.example.com
  tls:
    secretName: staging-example-com-tls

resources:
  limits:
    cpu: 200m
    memory: 256Mi

env:
  LOG_LEVEL: debug
# myapp/values-production.yaml(production 覆盖)
replicaCount: 5

image:
  tag: v1.2.0        # 生产用版本 tag

ingress:
  host: example.com

resources:
  requests:
    cpu: 200m
    memory: 256Mi
  limits:
    cpu: 1000m
    memory: 1Gi

autoscaling:
  enabled: true
  minReplicas: 5
  maxReplicas: 20
# Helm 常用命令

# 安装
helm install myapp ./myapp \
  -f myapp/values-staging.yaml \
  --set image.tag=sha-abc123 \
  --namespace staging \
  --create-namespace

# 升级(已存在则更新,不存在则安装)
helm upgrade --install myapp ./myapp \
  -f myapp/values-production.yaml \
  --set image.tag=v1.2.0 \
  --namespace production \
  --atomic \             # 失败则自动回滚
  --timeout 300s \
  --wait                 # 等待所有资源就绪

# 查看
helm list -A             # 所有 namespace 的 releases
helm status myapp -n production
helm history myapp -n production

# 回滚
helm rollback myapp 2 -n production   # 回到第 2 个版本

# 渲染模板(不部署,只查看生成的 YAML)
helm template myapp ./myapp \
  -f values-staging.yaml \
  --set image.tag=sha-abc123

# 删除
helm uninstall myapp -n staging
# 在 GitHub Actions 中使用 Helm
- name: Helm 部署
  uses: azure/setup-helm@v3
  with:
    version: '3.14.0'

- name: Helm upgrade
  run: |
    helm upgrade --install myapp ./helm/myapp \
      -f helm/myapp/values-${{ inputs.environment }}.yaml \
      --set image.tag=${{ inputs.image-tag }} \
      --namespace ${{ inputs.environment }} \
      --create-namespace \
      --atomic \
      --timeout 300s \
      --wait
九、系列收官:完整知识图谱
Docker + K8s 实战系列完整知识图谱:

┌─────────────────────────────────────────────────────────────┐
│  第一篇:Docker 基础                                          │
│  镜像/容器/Dockerfile/数据卷/网络                             │
│  docker run/exec/logs/inspect                               │
└─────────────────────────────────────────────────────────────┘

┌─────────────────────────────────────────────────────────────┐
│  第二篇:Dockerfile 进阶                                      │
│  多阶段构建(1GB→50MB)                                       │
│  BuildKit 缓存挂载/跨平台构建/镜像安全扫描                     │
└─────────────────────────────────────────────────────────────┘

┌─────────────────────────────────────────────────────────────┐
│  第三篇:Docker Compose                                       │
│  多容器编排/服务依赖/网络隔离                                   │
│  多环境 override/Makefile 封装                               │
└─────────────────────────────────────────────────────────────┘

┌─────────────────────────────────────────────────────────────┐
│  第四篇:K8s 核心概念                                         │
│  Pod/Deployment/Service/Namespace                           │
│  集群架构/kubectl 常用命令                                    │
└─────────────────────────────────────────────────────────────┘

┌─────────────────────────────────────────────────────────────┐
│  第五篇:K8s 配置与存储                                       │
│  ConfigMap/Secret(Sealed Secrets)                         │
│  PV/PVC/StorageClass/StatefulSet                            │
└─────────────────────────────────────────────────────────────┘

┌─────────────────────────────────────────────────────────────┐
│  第六篇:K8s 网络与服务发现                                   │
│  CoreDNS/Ingress/ingress-nginx                              │
│  cert-manager(Let's Encrypt)/NetworkPolicy                │
└─────────────────────────────────────────────────────────────┘

┌─────────────────────────────────────────────────────────────┐
│  第七篇:K8s 生产实践                                         │
│  三探针/资源限制/HPA(KEDA)                                  │
│  滚动更新/蓝绿/PDB/ResourceQuota                             │
└─────────────────────────────────────────────────────────────┘

┌─────────────────────────────────────────────────────────────┐
│  第八篇:CI/CD 完整流水线(本篇·收官)                         │
│  GitHub Actions(质量/测试/构建/部署)                         │
│  多环境(staging/production)/GitOps(ArgoCD)               │
│  Helm 参数化配置                                             │
└─────────────────────────────────────────────────────────────┘

贯穿全系列的三个核心理念:

① 不可变基础设施(Immutable Infrastructure)
   代码变更 → 构建新镜像 → 部署新镜像 → 不改已运行的容器
   回滚 = 部署旧镜像(而非在运行中修改配置)

② 声明式配置(Declarative Configuration)
   告诉 K8s "我要什么状态"(YAML)
   K8s 负责达到并维持这个状态
   不是"执行步骤",而是"描述目标"

③ 关注点分离(Separation of Concerns)
   代码(Git)↔ 配置(ConfigMap)↔ 密钥(Secret)
   构建(CI)↔ 部署(CD)↔ 运行(K8s)
   开发环境(Compose)↔ 生产环境(K8s)
💬 八篇系列全部看完了!你们现在的 CI/CD 是什么方案?有没有在生产用 K8s? 欢迎评论区分享!
🙏 「Docker + K8s 实战」系列(八篇)完结撒花!从 Docker 基础到 K8s 生产再到 CI/CD,全链路讲完了。如果整个系列帮到你,最后一次三连(点赞👍 + 收藏⭐ + 关注)!感谢一路相伴!
本文为原创技术分享。环境:Docker 26.x,Kubernetes 1.30+,GitHub Actions。最后更新:2026-05-20
Docker + K8s 实战系列(八篇)完结 🎉
更多推荐

 0
0 0
0- 0


 已为社区贡献9条内容

所有评论(0)