
【SpringCloud从入门到架构师】第1章 SpringBoot高阶夯实(微服务前置必备)
1. SpringBoot核心自动配置原理、SPI机制深度解析
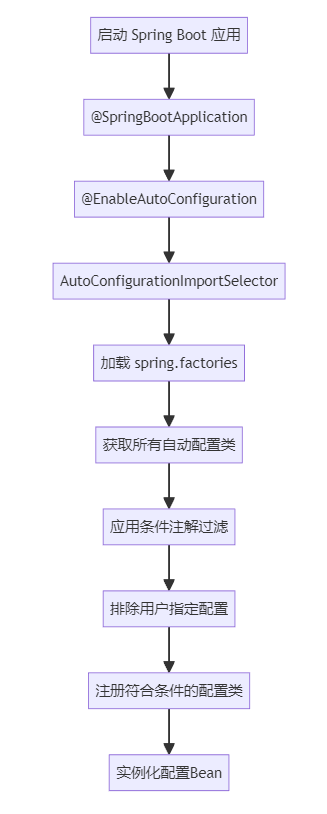
一、Spring Boot 自动配置原理
1.1 核心注解:@SpringBootApplication
@SpringBootConfiguration
@EnableAutoConfiguration
@ComponentScan(excludeFilters = {
    @Filter(type = FilterType.CUSTOM, classes = TypeExcludeFilter.class),
    @Filter(type = FilterType.CUSTOM, classes = AutoConfigurationExcludeFilter.class)
})
public @interface SpringBootApplication {
    // 核心是 @EnableAutoConfiguration
}
1.2 @EnableAutoConfiguration 机制
@AutoConfigurationPackage
@Import(AutoConfigurationImportSelector.class)
public @interface EnableAutoConfiguration {
    // 导入 AutoConfigurationImportSelector
}
AutoConfigurationImportSelector 工作流程:
public class AutoConfigurationImportSelector implements ... {

    // 1. 加载自动配置类
    protected List<String> getCandidateConfigurations(
            AnnotationMetadata metadata, AnnotationAttributes attributes) {
        // 关键:从 META-INF/spring.factories 加载配置
        List<String> configurations = SpringFactoriesLoader.loadFactoryNames(
                getSpringFactoriesLoaderFactoryClass(), getBeanClassLoader());
        return configurations;
    }

    // 2. 自动配置类筛选
    protected List<String> getAutoConfigurationEntry(...) {
        // 2.1 获取所有候选配置
        List<String> configurations = getCandidateConfigurations(...);

        // 2.2 去重
        configurations = removeDuplicates(configurations);

        // 2.3 排除指定配置(@EnableAutoConfiguration.exclude)
        Set<String> exclusions = getExclusions(...);
        configurations.removeAll(exclusions);

        // 2.4 应用过滤条件(@Conditional)
        configurations = getConfigurationClassFilter().filter(configurations);

        // 2.5 触发自动配置导入事件
        fireAutoConfigurationImportEvents(...);

        return new AutoConfigurationEntry(configurations, exclusions);
    }
}
1.3 条件注解(@Conditional)机制
// 核心条件注解类
@ConditionalOnClass        // 类路径存在指定类
@ConditionalOnMissingClass // 类路径不存在指定类
@ConditionalOnBean         // 容器中存在指定Bean
@ConditionalOnMissingBean  // 容器中不存在指定Bean
@ConditionalOnProperty     // 配置属性满足条件
@ConditionalOnResource     // 资源文件存在
@ConditionalOnWebApplication // 是Web应用
@ConditionalOnNotWebApplication // 不是Web应用
@ConditionalOnExpression   // SpEL表达式为true
示例:DataSource 自动配置
@Configuration(proxyBeanMethods = false)
@ConditionalOnClass({ DataSource.class, EmbeddedDatabaseType.class })
@ConditionalOnMissingBean(type = "io.r2dbc.spi.ConnectionFactory")
@EnableConfigurationProperties(DataSourceProperties.class)
@Import({ DataSourcePoolMetadataProvidersConfiguration.class,
          DataSourceInitializationConfiguration.class })
public class DataSourceAutoConfiguration {

    @Configuration(proxyBeanMethods = false)
    @Conditional(EmbeddedDatabaseCondition.class)
    @ConditionalOnMissingBean({ DataSource.class, XADataSource.class })
    @Import(EmbeddedDataSourceConfiguration.class)
    protected static class EmbeddedDatabaseConfiguration {
    }

    @Configuration(proxyBeanMethods = false)
    @Conditional(PooledDataSourceCondition.class)
    @ConditionalOnMissingBean({ DataSource.class, XADataSource.class })
    @Import({ DataSourceConfiguration.Hikari.class,
              DataSourceConfiguration.Tomcat.class,
              DataSourceConfiguration.Dbcp2.class,
              DataSourceConfiguration.Generic.class })
    protected static class PooledDataSourceConfiguration {
    }
}
1.4 自动配置加载流程
二、Spring SPI 机制深度解析
2.1 Java SPI 机制回顾
Java SPI 标准实现:
// 1. 定义接口
public interface DatabaseDriver {
    String connect(String url);
}

// 2. 实现类
public class MySQLDriver implements DatabaseDriver {
    public String connect(String url) {
        return "MySQL连接:" + url;
    }
}

// 3. META-INF/services/com.example.DatabaseDriver 文件内容:
// com.example.MySQLDriver
// com.example.OracleDriver

// 4. 使用 ServiceLoader 加载
ServiceLoader<DatabaseDriver> drivers =
    ServiceLoader.load(DatabaseDriver.class);
for (DatabaseDriver driver : drivers) {
    System.out.println(driver.connect("localhost:3306"));
}
2.2 Spring 增强的 SPI:SpringFactoriesLoader
public abstract class SpringFactoriesLoader {

    // 核心位置
    public static final String FACTORIES_RESOURCE_LOCATION =
        "META-INF/spring.factories";

    // 加载工厂实现
    public static List<String> loadFactoryNames(
            Class<?> factoryType, @Nullable ClassLoader classLoader) {

        String factoryTypeName = factoryType.getName();
        return loadSpringFactories(classLoader)
                .getOrDefault(factoryTypeName, Collections.emptyList());
    }

    // 解析 spring.factories 文件
    private static Map<String, List<String>> loadSpringFactories(
            @Nullable ClassLoader classLoader) {

        // 1. 从所有jar包的 META-INF/spring.factories 读取
        Enumeration<URL> urls = classLoader.getResources(FACTORIES_RESOURCE_LOCATION);

        // 2. 解析内容
        while (urls.hasMoreElements()) {
            URL url = urls.nextElement();
            Properties properties = PropertiesLoaderUtils.loadProperties(
                new UrlResource(url));

            for (Map.Entry<?, ?> entry : properties.entrySet()) {
                String factoryTypeName = ((String) entry.getKey()).trim();
                String[] factoryImplementationNames =
                    StringUtils.commaDelimitedListToStringArray((String) entry.getValue());

                // 3. 合并所有实现
                result.computeIfAbsent(factoryTypeName,
                    key -> new ArrayList<>())
                    .addAll(Arrays.asList(factoryImplementationNames));
            }
        }

        return result;
    }
}
2.3 Spring Boot 中的 SPI 应用
spring.factories 示例:
# Auto Configure
org.springframework.boot.autoconfigure.EnableAutoConfiguration=\
org.springframework.boot.autoconfigure.admin.SpringApplicationAdminJmxAutoConfiguration,\
org.springframework.boot.autoconfigure.aop.AopAutoConfiguration,\
org.springframework.boot.autoconfigure.amqp.RabbitAutoConfiguration,\
org.springframework.boot.autoconfigure.batch.BatchAutoConfiguration

# Application Context Initializer
org.springframework.context.ApplicationContextInitializer=\
org.springframework.boot.context.ConfigurationWarningsApplicationContextInitializer,\
org.springframework.boot.context.ContextIdApplicationContextInitializer

# Application Listener
org.springframework.context.ApplicationListener=\
org.springframework.boot.ClearCachesApplicationListener,\
org.springframework.boot.builder.ParentContextCloserApplicationListener
2.4 自定义 Starter 实现
- 创建自动配置类:
@Configuration
@ConditionalOnClass(UserService.class)
@EnableConfigurationProperties(UserProperties.class)
public class UserAutoConfiguration {

    @Bean
    @ConditionalOnMissingBean
    public UserService userService(UserProperties properties) {
        return new UserService(properties);
    }

    @Bean
    @ConditionalOnProperty(prefix = "user", name = "enable-log", havingValue = "true")
    public UserLogAspect userLogAspect() {
        return new UserLogAspect();
    }
}- 配置属性类:
@ConfigurationProperties(prefix = "user")
public class UserProperties {
    private String name = "default";
    private int age = 18;
    private boolean enableLog = false;

    // getters and setters
}- 注册到 spring.factories:
# META-INF/spring.factories
org.springframework.boot.autoconfigure.EnableAutoConfiguration=\
com.example.user.UserAutoConfiguration
三、自动配置的扩展点
3.1 使用 @Conditional 扩展
// 自定义条件注解
@Target({ ElementType.TYPE, ElementType.METHOD })
@Retention(RetentionPolicy.RUNTIME)
@Documented
@Conditional(OnProductionCondition.class)
public @interface ConditionalOnProduction {
}

// 条件判断逻辑
public class OnProductionCondition implements Condition {
    @Override
    public boolean matches(ConditionContext context,
                          AnnotatedTypeMetadata metadata) {
        Environment env = context.getEnvironment();
        String profile = env.getProperty("spring.profiles.active");
        return "prod".equals(profile);
    }
}
3.2 使用 AutoConfigurationImportFilter
public class CustomAutoConfigurationImportFilter
        implements AutoConfigurationImportFilter {

    private final ConfigurableEnvironment environment;

    @Override
    public boolean[] match(String[] autoConfigurationClasses,
                          AutoConfigurationMetadata metadata) {

        boolean[] matches = new boolean[autoConfigurationClasses.length];

        for (int i = 0; i < autoConfigurationClasses.length; i++) {
            String className = autoConfigurationClasses[i];

            // 自定义过滤逻辑
            if (shouldSkip(className)) {
                matches[i] = false;
            } else {
                matches[i] = true;
            }
        }

        return matches;
    }

    private boolean shouldSkip(String className) {
        // 根据环境变量、配置等决定是否加载
        return false;
    }
}
3.3 使用 AutoConfigurationImportListener
public class CustomAutoConfigurationImportListener
        implements AutoConfigurationImportListener {

    @Override
    public void onAutoConfigurationImportEvent(
            AutoConfigurationImportEvent event) {

        // 获取导入的自动配置类
        List<String> candidateConfigurations =
            event.getCandidateConfigurations();

        // 获取排除的配置类
        Set<String> exclusions = event.getExclusions();

        // 记录日志、统计信息等
        log.info("导入自动配置类: {}", candidateConfigurations);
    }
}
四、源码级调试技巧
4.1 调试自动配置过程
// 1. 设置调试断点
// AutoConfigurationImportSelector.getAutoConfigurationEntry()
// ConfigurationClassParser.doProcessConfigurationClass()

// 2. 查看加载的自动配置类
// 启动时添加:--debug 参数
// 或设置:logging.level.org.springframework.boot.autoconfigure=DEBUG

// 3. 查看条件注解评估结果
// ConditionEvaluationReportLoggingListener
4.2 理解自动配置报告
# 调试输出示例:
Positive matches:    # 匹配成功的配置
-----------------
   AopAutoConfiguration matched:
      - @ConditionalOnClass found required classes
        'org.springframework.context.annotation.EnableAspectJAutoProxy',
        'org.aspectj.lang.annotation.Aspect' (OnClassCondition)
      - @ConditionalOnProperty (spring.aop.auto=true) matched (OnPropertyCondition)

Negative matches:    # 匹配失败的配置
-----------------
   ActiveMQAutoConfiguration:
      Did not match:
         - @ConditionalOnClass did not find required class
           'javax.jms.ConnectionFactory' (OnClassCondition)

Exclusions:          # 显式排除的配置
-----------
   None

Unconditional classes: # 无条件配置
--------------------
   org.springframework.boot.autoconfigure.context.ConfigurationPropertiesAutoConfiguration
五、最佳实践与注意事项
5.1 自动配置最佳实践
// 1. 使用配置属性类
@ConfigurationProperties(prefix = "my.service")
public class MyServiceProperties {
    private int timeout = 5000;
    private String url;

    // 提供合理的默认值
}

// 2. 明确的条件注解
@Configuration
@ConditionalOnClass(SomeFeature.class)
@ConditionalOnProperty(prefix = "my", name = "enabled", havingValue = "true")
@AutoConfigureAfter(DataSourceAutoConfiguration.class)  // 指定顺序
public class MyAutoConfiguration {
}

// 3. 提供 Bean 的候选者
@Bean
@ConditionalOnMissingBean
@ConditionalOnSingleCandidate(DataSource.class)
public MyService myService(DataSource dataSource) {
    return new MyService(dataSource);
}
5.2 常见问题排查
// 1. 自动配置不生效
// 检查:spring.factories 文件位置和格式
// 检查:@Conditional 条件是否满足
// 检查:是否有 exclude 排除

// 2. Bean 冲突问题
// 使用 @ConditionalOnMissingBean
// 使用 @Primary 注解
// 使用 @Qualifier 指定

// 3. 配置加载顺序问题
// 使用 @AutoConfigureBefore/@AutoConfigureAfter
// 使用 @AutoConfigureOrder
六、总结
Spring Boot 自动配置的核心机制:
- @EnableAutoConfiguration 通过
AutoConfigurationImportSelector启用 - spring.factories 作为 SPI 扩展点,定义自动配置类
- @Conditional 系列注解实现条件化配置
- SpringFactoriesLoader 提供增强的 SPI 实现
这种设计实现了:
- 开箱即用 :默认配置满足大部分场景
- 按需加载 :条件注解控制配置生效
- 易于扩展 :SPI 机制支持第三方集成
- 灵活覆盖 :用户配置优先于自动配置
理解这些原理有助于:
- 深度定制 Spring Boot 应用
- 开发高质量的 Starter
- 解决复杂的配置问题
- 优化应用启动性能
2. yml/profiles多环境配置、配置优先级、自定义配置绑定
Spring Boot 的多环境配置、优先级和自定义绑定是核心功能。以下是详细说明和示例:
多环境配置 (Profiles)
1.1 配置文件命名约定
application.yml          # 主配置
application-dev.yml      # 开发环境
application-test.yml     # 测试环境
application-prod.yml     # 生产环境
1.2 激活方式
方式1:配置文件指定
# application.yml
spring:
  profiles:
    active: dev
方式2:命令行激活
java -jar app.jar --spring.profiles.active=prod方式3:系统环境变量
export SPRING_PROFILES_ACTIVE=prod方式4:JVM参数
java -Dspring.profiles.active=test -jar app.jar1.3 配置文件示例
主配置 (application.yml)
# 公共配置
app:
  name: MyApplication
  version: 1.0.0

spring:
  profiles:
    active: @activatedProperties@  # Maven/Gradle占位符

logging:
  level:
    root: INFO
开发环境 (application-dev.yml)
# 开发环境配置
server:
  port: 8080
  servlet:
    context-path: /dev-api

spring:
  datasource:
    url: jdbc:mysql://localhost:3306/dev_db
    username: dev_user
    password: dev_pass
    driver-class-name: com.mysql.cj.jdbc.Driver
  redis:
    host: localhost
    port: 6379

app:
  env: development
  debug: true
生产环境 (application-prod.yml)
# 生产环境配置
server:
  port: 80
  servlet:
    context-path: /api

spring:
  datasource:
    url: jdbc:mysql://prod-db:3306/prod_db
    username: ${DB_USERNAME}
    password: ${DB_PASSWORD}
    driver-class-name: com.mysql.cj.jdbc.Driver
    hikari:
      maximum-pool-size: 20
  redis:
    cluster:
      nodes: redis1:6379,redis2:6379,redis3:6379
    password: ${REDIS_PASSWORD}

app:
  env: production
  debug: false
配置优先级(从高到低)
2.1 优先级顺序
1. 命令行参数 (--key=value)
2. SPRING_APPLICATION_JSON 环境变量
3. ServletConfig 初始化参数
4. ServletContext 初始化参数
5. JNDI 属性
6. Java 系统属性 (System.getProperties())
7. 操作系统环境变量
8. RandomValuePropertySource
9. 打包在 jar 外的 Profile-specific 配置文件
10. 打包在 jar 内的 Profile-specific 配置文件
11. 打包在 jar 外的 application.yml/application.properties
12. 打包在 jar 内的 application.yml/application.properties
13. @PropertySource 注解
14. 默认属性 (SpringApplication.setDefaultProperties)
2.2 覆盖示例
# 优先级演示
# application.yml
server:
  port: 8080

# 通过命令行覆盖
# java -jar app.jar --server.port=9090

# 通过环境变量覆盖
# export SERVER_PORT=9090
自定义配置绑定
3.1 @ConfigurationProperties 方式
配置类
import org.springframework.boot.context.properties.ConfigurationProperties;
import org.springframework.stereotype.Component;
import lombok.Data;

@Component
@ConfigurationProperties(prefix = "app.config")
@Data
public class AppConfig {

    private String name;
    private String version;
    private Database database;
    private Security security;
    private List<String> whiteList;

    @Data
    public static class Database {
        private String url;
        private String username;
        private String password;
        private Integer maxConnections;
    }

    @Data
    public static class Security {
        private String secretKey;
        private Long tokenExpire;
        private Boolean enableTwoFactor;
    }
}
配置文件
app:
  config:
    name: "MyApp"
    version: "2.0.0"
    database:
      url: "jdbc:mysql://localhost:3306/mydb"
      username: "admin"
      password: "secret"
      max-connections: 50
    security:
      secret-key: "my-secret-key-123"
      token-expire: 3600
      enable-two-factor: true
    white-list:
      - "192.168.1.1"
      - "192.168.1.2"
      - "192.168.1.3"
3.2 @Value 方式
import org.springframework.beans.factory.annotation.Value;
import org.springframework.stereotype.Component;

@Component
public class CustomConfig {

    @Value("${app.name:defaultApp}")  // 默认值
    private String appName;

    @Value("${server.port}")
    private Integer serverPort;

    @Value("${app.features.enabled}")
    private Boolean featuresEnabled;

    @Value("#{'${app.ips}'.split(',')}")
    private List<String> ipList;

    @Value("#{${app.map}}")
    private Map<String, String> configMap;
}
3.3 复杂类型绑定
@Component
@ConfigurationProperties(prefix = "app")
@Data
@Validated  // 支持JSR-303验证
public class ApplicationProperties {

    @NotNull
    @Size(min = 1, max = 50)
    private String name;

    @Email
    private String adminEmail;

    @Min(1)
    @Max(65535)
    private Integer maxUsers;

    @Pattern(regexp = "^[a-zA-Z0-9._%+-]+@[a-zA-Z0-9.-]+\\.[a-zA-Z]{2,}$")
    private String contactEmail;

    @Valid  // 嵌套对象验证
    private DatabaseConfig database;

    @Data
    public static class DatabaseConfig {
        @NotEmpty
        private String url;

        @Min(1)
        @Max(100)
        private Integer poolSize;
    }
}
3.4 属性转换器
@Component
@ConfigurationPropertiesBinding
public class StringToDurationConverter implements Converter<String, Duration> {

    @Override
    public Duration convert(String source) {
        return Duration.parse(source);
    }
}

// 使用
@Component
@ConfigurationProperties(prefix = "app.time")
@Data
public class TimeConfig {
    private Duration timeout;  // 自动转换 "PT30S" -> Duration
}
最佳实践示例
4.1 完整的多环境配置示例
目录结构
src/main/resources/
├── application.yml
├── application-dev.yml
├── application-test.yml
├── application-prod.yml
└── config/
    ├── datasource.yml
    └── redis.yml
主配置 (application.yml)
# 公共配置
spring:
  application:
    name: demo-app
  profiles:
    active: @spring.profiles.active@
  config:
    import:
      - classpath:config/datasource.yml
      - classpath:config/redis.yml

# 日志配置
logging:
  config: classpath:logback-${spring.profiles.active}.xml
  file:
    name: logs/${spring.application.name}.log
  pattern:
    console: "%d{yyyy-MM-dd HH:mm:ss} [%thread] %-5level %logger{36} - %msg%n"
    file: "%d{yyyy-MM-dd HH:mm:ss} [%thread] %-5level %logger{36} - %msg%n"

# 自定义配置
app:
  info:
    name: ${spring.application.name}
    version: @project.version@
    description: "Spring Boot Application"
环境特定配置 (application-prod.yml)
# 生产环境
server:
  port: 8080
  compression:
    enabled: true
    mime-types: text/html,text/xml,text/plain,text/css,application/javascript,application/json
    min-response-size: 1024

management:
  endpoints:
    web:
      exposure:
        include: health,info,metrics
      base-path: /manage
  endpoint:
    health:
      show-details: never

app:
  security:
    cors:
      allowed-origins: https://prod.example.com
      allowed-methods: GET,POST,PUT,DELETE
    jwt:
      secret: ${JWT_SECRET:default-secret-key}
      expiration: 86400
4.2 配置验证类
@Component
@ConfigurationProperties(prefix = "app")
@Data
@Validated
public class AppProperties {

    @NotNull
    private String name;

    @NotNull
    @Pattern(regexp = "^\\d+\\.\\d+\\.\\d+$")
    private String version;

    @Valid
    private ApiConfig api;

    @Valid
    private CacheConfig cache;

    @Data
    public static class ApiConfig {
        @NotBlank
        private String baseUrl;

        @Min(1000)
        @Max(60000)
        private Integer timeout;

        @NotNull
        private Boolean retryEnabled;
    }

    @Data
    public static class CacheConfig {
        @NotBlank
        private String type;

        @Min(1)
        private Integer ttl;

        @NotNull
        private Boolean clusterMode;
    }
}
4.3 使用配置类
@Service
public class UserService {

    private final AppProperties appProperties;

    public UserService(AppProperties appProperties) {
        this.appProperties = appProperties;
    }

    public void printConfig() {
        System.out.println("App Name: " + appProperties.getName());
        System.out.println("API Timeout: " + appProperties.getApi().getTimeout());
        System.out.println("Cache TTL: " + appProperties.getCache().getTtl());
    }
}
实用技巧
5.1 配置占位符
app:
  base-url: https://${app.domain:localhost}:${server.port}
  domain: example.com
  endpoints:
    user: ${app.base-url}/api/users
    product: ${app.base-url}/api/products
5.2 列表和Map配置
app:
  servers:
    - name: server1
      host: 192.168.1.1
      port: 8080
    - name: server2
      host: 192.168.1.2
      port: 8080

  settings:
    cache.enabled: true
    cache.ttl: 3600
    logging.level: DEBUG
    retry.max-attempts: 3
5.3 条件配置
@Configuration
@ConditionalOnProperty(name = "app.feature.x.enabled", havingValue = "true")
public class FeatureXConfig {

    @Bean
    @ConditionalOnMissingBean
    public FeatureXService featureXService() {
        return new FeatureXService();
    }
}
这些示例涵盖了Spring Boot配置的主要方面。根据实际需求选择合适的配置方式,并遵循优先级规则进行配置管理。
3. 全局异常处理、统一返回结果、拦截器、过滤器实战
一、项目结构
src/main/java/com/example/demo/
├── config/
│   ├── WebConfig.java          # Web配置(拦截器、过滤器配置)
│   └── CorsConfig.java         # 跨域配置
├── common/
│   ├── annotation/
│   │   └── NoResponseWrap.java # 不包装响应注解
│   ├── constant/
│   │   └── ResponseCode.java   # 响应状态码
│   ├── entity/
│   │   ├── BaseResponse.java   # 统一响应实体
│   │   └── PageResult.java     # 分页响应实体
│   ├── exception/
│   │   ├── BusinessException.java  # 业务异常
│   │   └── GlobalExceptionHandler.java # 全局异常处理器
│   └── interceptor/
│       ├── AuthInterceptor.java    # 认证拦截器
│       ├── LogInterceptor.java     # 日志拦截器
│       └── RateLimitInterceptor.java # 限流拦截器
├── filter/
│   ├── RequestLogFilter.java       # 请求日志过滤器
│   ├── XssFilter.java              # XSS过滤过滤器
│   └── FilterConfig.java           # 过滤器配置
└── controller/
    └── DemoController.java         # 示例控制器
二、核心代码实现
统一返回结果实体
ResponseCode.java - 响应状态码枚举
package com.example.demo.common.constant;

import lombok.Getter;

@Getter
public enum ResponseCode {
    SUCCESS(200, "操作成功"),
    BAD_REQUEST(400, "参数错误"),
    UNAUTHORIZED(401, "未授权"),
    FORBIDDEN(403, "禁止访问"),
    NOT_FOUND(404, "资源不存在"),
    METHOD_NOT_ALLOWED(405, "请求方法不允许"),
    INTERNAL_SERVER_ERROR(500, "服务器内部错误"),
    SERVICE_UNAVAILABLE(503, "服务不可用"),

    // 业务错误码
    USER_NOT_EXIST(1001, "用户不存在"),
    USER_PASSWORD_ERROR(1002, "密码错误"),
    TOKEN_INVALID(1003, "Token无效"),
    TOKEN_EXPIRED(1004, "Token已过期");

    private final int code;
    private final String message;

    ResponseCode(int code, String message) {
        this.code = code;
        this.message = message;
    }
}
BaseResponse.java - 统一响应实体
package com.example.demo.common.entity;

import com.example.demo.common.constant.ResponseCode;
import lombok.Data;
import lombok.NoArgsConstructor;

@Data
@NoArgsConstructor
public class BaseResponse<T> {
    private int code;
    private String message;
    private T data;
    private long timestamp;

    public BaseResponse(int code, String message, T data) {
        this.code = code;
        this.message = message;
        this.data = data;
        this.timestamp = System.currentTimeMillis();
    }

    // 成功响应
    public static <T> BaseResponse<T> success() {
        return success(null);
    }

    public static <T> BaseResponse<T> success(T data) {
        return new BaseResponse<>(
            ResponseCode.SUCCESS.getCode(),
            ResponseCode.SUCCESS.getMessage(),
            data
        );
    }

    public static <T> BaseResponse<T> success(String message, T data) {
        return new BaseResponse<>(
            ResponseCode.SUCCESS.getCode(),
            message,
            data
        );
    }

    // 失败响应
    public static <T> BaseResponse<T> error() {
        return error(ResponseCode.INTERNAL_SERVER_ERROR);
    }

    public static <T> BaseResponse<T> error(ResponseCode responseCode) {
        return error(responseCode.getCode(), responseCode.getMessage());
    }

    public static <T> BaseResponse<T> error(int code, String message) {
        return new BaseResponse<>(code, message, null);
    }

    public static <T> BaseResponse<T> error(String message) {
        return error(ResponseCode.INTERNAL_SERVER_ERROR.getCode(), message);
    }
}
PageResult.java - 分页响应实体
package com.example.demo.common.entity;

import lombok.Data;
import java.util.List;

@Data
public class PageResult<T> {
    private long total;
    private List<T> list;
    private int pageNum;
    private int pageSize;
    private int pages;

    public PageResult(List<T> list, long total, int pageNum, int pageSize) {
        this.list = list;
        this.total = total;
        this.pageNum = pageNum;
        this.pageSize = pageSize;
        this.pages = (int) Math.ceil((double) total / pageSize);
    }
}
自定义异常
BusinessException.java - 业务异常
package com.example.demo.common.exception;

import com.example.demo.common.constant.ResponseCode;
import lombok.Getter;

@Getter
public class BusinessException extends RuntimeException {
    private final int code;

    public BusinessException(String message) {
        super(message);
        this.code = ResponseCode.INTERNAL_SERVER_ERROR.getCode();
    }

    public BusinessException(ResponseCode responseCode) {
        super(responseCode.getMessage());
        this.code = responseCode.getCode();
    }

    public BusinessException(int code, String message) {
        super(message);
        this.code = code;
    }

    public BusinessException(ResponseCode responseCode, String message) {
        super(message);
        this.code = responseCode.getCode();
    }
}
全局异常处理
GlobalExceptionHandler.java - 全局异常处理器
package com.example.demo.common.exception;

import com.example.demo.common.constant.ResponseCode;
import com.example.demo.common.entity.BaseResponse;
import lombok.extern.slf4j.Slf4j;
import org.springframework.http.HttpStatus;
import org.springframework.validation.BindException;
import org.springframework.validation.FieldError;
import org.springframework.web.bind.MethodArgumentNotValidException;
import org.springframework.web.bind.annotation.ExceptionHandler;
import org.springframework.web.bind.annotation.ResponseStatus;
import org.springframework.web.bind.annotation.RestControllerAdvice;
import org.springframework.web.servlet.NoHandlerFoundException;

import javax.servlet.http.HttpServletRequest;
import javax.validation.ConstraintViolation;
import javax.validation.ConstraintViolationException;
import java.util.stream.Collectors;

@Slf4j
@RestControllerAdvice
public class GlobalExceptionHandler {

    /**
     * 处理业务异常
     */
    @ExceptionHandler(BusinessException.class)
    public BaseResponse<Object> handleBusinessException(BusinessException e) {
        log.warn("业务异常: {}", e.getMessage());
        return BaseResponse.error(e.getCode(), e.getMessage());
    }

    /**
     * 处理参数校验异常(@Validated @RequestBody)
     */
    @ExceptionHandler(MethodArgumentNotValidException.class)
    public BaseResponse<Object> handleMethodArgumentNotValidException(
            MethodArgumentNotValidException e) {
        String message = e.getBindingResult().getFieldErrors().stream()
                .map(FieldError::getDefaultMessage)
                .collect(Collectors.joining(", "));
        log.warn("参数校验异常: {}", message);
        return BaseResponse.error(ResponseCode.BAD_REQUEST.getCode(), message);
    }

    /**
     * 处理参数校验异常(@Validated 方法参数)
     */
    @ExceptionHandler(ConstraintViolationException.class)
    public BaseResponse<Object> handleConstraintViolationException(
            ConstraintViolationException e) {
        String message = e.getConstraintViolations().stream()
                .map(ConstraintViolation::getMessage)
                .collect(Collectors.joining(", "));
        log.warn("参数校验异常: {}", message);
        return BaseResponse.error(ResponseCode.BAD_REQUEST.getCode(), message);
    }

    /**
     * 处理参数绑定异常
     */
    @ExceptionHandler(BindException.class)
    public BaseResponse<Object> handleBindException(BindException e) {
        String message = e.getFieldErrors().stream()
                .map(FieldError::getDefaultMessage)
                .collect(Collectors.joining(", "));
        log.warn("参数绑定异常: {}", message);
        return BaseResponse.error(ResponseCode.BAD_REQUEST.getCode(), message);
    }

    /**
     * 处理404异常
     */
    @ExceptionHandler(NoHandlerFoundException.class)
    @ResponseStatus(HttpStatus.NOT_FOUND)
    public BaseResponse<Object> handleNoHandlerFoundException(
            NoHandlerFoundException e, HttpServletRequest request) {
        log.warn("请求路径不存在: {} {}", request.getMethod(), request.getRequestURI());
        return BaseResponse.error(ResponseCode.NOT_FOUND);
    }

    /**
     * 处理其他所有异常
     */
    @ExceptionHandler(Exception.class)
    @ResponseStatus(HttpStatus.INTERNAL_SERVER_ERROR)
    public BaseResponse<Object> handleException(Exception e, HttpServletRequest request) {
        log.error("系统异常: {} {}", request.getMethod(), request.getRequestURI(), e);
        // 生产环境隐藏详细错误信息
        String message = "系统繁忙,请稍后再试";
        // 开发环境显示详细错误
        if (isDevEnvironment()) {
            message = e.getMessage();
        }
        return BaseResponse.error(ResponseCode.INTERNAL_SERVER_ERROR.getCode(), message);
    }

    private boolean isDevEnvironment() {
        // 这里可以根据实际需求判断环境
        return true; // 示例
    }
}
响应包装切面
ResponseAdvice.java - 响应包装切面
package com.example.demo.common.advice;

import com.example.demo.common.annotation.NoResponseWrap;
import com.example.demo.common.entity.BaseResponse;
import com.fasterxml.jackson.core.JsonProcessingException;
import com.fasterxml.jackson.databind.ObjectMapper;
import lombok.RequiredArgsConstructor;
import lombok.extern.slf4j.Slf4j;
import org.springframework.core.MethodParameter;
import org.springframework.http.MediaType;
import org.springframework.http.converter.HttpMessageConverter;
import org.springframework.http.server.ServerHttpRequest;
import org.springframework.http.server.ServerHttpResponse;
import org.springframework.web.bind.annotation.RestControllerAdvice;
import org.springframework.web.servlet.mvc.method.annotation.ResponseBodyAdvice;

/**
 * 统一响应包装切面
 */
@Slf4j
@RestControllerAdvice
@RequiredArgsConstructor
public class ResponseAdvice implements ResponseBodyAdvice<Object> {

    private final ObjectMapper objectMapper;

    @Override
    public boolean supports(MethodParameter returnType,
                           Class<? extends HttpMessageConverter<?>> converterType) {
        // 检查类或方法上是否有@NoResponseWrap注解
        boolean hasClassAnnotation = returnType.getContainingClass()
                .isAnnotationPresent(NoResponseWrap.class);
        boolean hasMethodAnnotation = returnType.hasMethodAnnotation(NoResponseWrap.class);

        // 如果已经返回BaseResponse,不再包装
        if (returnType.getParameterType().equals(BaseResponse.class)) {
            return false;
        }

        // 如果有@NoResponseWrap注解,不包装
        return !(hasClassAnnotation || hasMethodAnnotation);
    }

    @Override
    public Object beforeBodyWrite(Object body,
                                 MethodParameter returnType,
                                 MediaType selectedContentType,
                                 Class<? extends HttpMessageConverter<?>> selectedConverterType,
                                 ServerHttpRequest request,
                                 ServerHttpResponse response) {

        // 处理String类型返回值
        if (body instanceof String) {
            try {
                response.getHeaders().setContentType(MediaType.APPLICATION_JSON);
                return objectMapper.writeValueAsString(BaseResponse.success(body));
            } catch (JsonProcessingException e) {
                log.error("响应包装异常", e);
                return BaseResponse.error("响应序列化失败");
            }
        }

        // 处理void返回类型
        if (body == null && returnType.getParameterType().equals(void.class)) {
            return BaseResponse.success();
        }

        return BaseResponse.success(body);
    }
}
NoResponseWrap.java - 不包装响应注解
package com.example.demo.common.annotation;

import java.lang.annotation.*;

/**
 * 标记不需要统一包装响应的接口
 */
@Target({ElementType.TYPE, ElementType.METHOD})
@Retention(RetentionPolicy.RUNTIME)
@Documented
public @interface NoResponseWrap {
}
拦截器实现
AuthInterceptor.java - 认证拦截器
package com.example.demo.common.interceptor;

import com.example.demo.common.constant.ResponseCode;
import com.example.demo.common.exception.BusinessException;
import lombok.extern.slf4j.Slf4j;
import org.springframework.stereotype.Component;
import org.springframework.web.servlet.HandlerInterceptor;

import javax.servlet.http.HttpServletRequest;
import javax.servlet.http.HttpServletResponse;

@Slf4j
@Component
public class AuthInterceptor implements HandlerInterceptor {

    @Override
    public boolean preHandle(HttpServletRequest request,
                           HttpServletResponse response,
                           Object handler) throws Exception {

        String token = request.getHeader("Authorization");
        String requestURI = request.getRequestURI();

        log.info("认证拦截器: {} {}", request.getMethod(), requestURI);

        // 放行登录接口
        if (requestURI.contains("/api/auth/login")) {
            return true;
        }

        // 验证token
        if (token == null || token.isEmpty()) {
            throw new BusinessException(ResponseCode.UNAUTHORIZED);
        }

        // 这里可以添加token验证逻辑
        if (!isValidToken(token)) {
            throw new BusinessException(ResponseCode.TOKEN_INVALID);
        }

        // 设置用户信息到request
        request.setAttribute("userId", extractUserIdFromToken(token));

        return true;
    }

    private boolean isValidToken(String token) {
        // 实际项目中这里应该验证token的有效性
        return token.startsWith("Bearer ");
    }

    private Long extractUserIdFromToken(String token) {
        // 实际项目中这里应该从token中解析用户信息
        return 1L;
    }
}
LogInterceptor.java - 日志拦截器
package com.example.demo.common.interceptor;

import lombok.extern.slf4j.Slf4j;
import org.springframework.stereotype.Component;
import org.springframework.web.servlet.HandlerInterceptor;
import org.springframework.web.servlet.ModelAndView;

import javax.servlet.http.HttpServletRequest;
import javax.servlet.http.HttpServletResponse;

@Slf4j
@Component
public class LogInterceptor implements HandlerInterceptor {

    private static final ThreadLocal<Long> startTimeThreadLocal = new ThreadLocal<>();

    @Override
    public boolean preHandle(HttpServletRequest request,
                           HttpServletResponse response,
                           Object handler) {
        startTimeThreadLocal.set(System.currentTimeMillis());
        log.info("请求开始: {} {}, 参数: {}",
                request.getMethod(),
                request.getRequestURI(),
                request.getQueryString());
        return true;
    }

    @Override
    public void postHandle(HttpServletRequest request,
                          HttpServletResponse response,
                          Object handler,
                          ModelAndView modelAndView) {
        // 可以在这里处理响应数据
    }

    @Override
    public void afterCompletion(HttpServletRequest request,
                               HttpServletResponse response,
                               Object handler,
                               Exception ex) {
        Long startTime = startTimeThreadLocal.get();
        if (startTime != null) {
            long duration = System.currentTimeMillis() - startTime;
            log.info("请求结束: {} {}, 耗时: {}ms, 状态码: {}",
                    request.getMethod(),
                    request.getRequestURI(),
                    duration,
                    response.getStatus());
            startTimeThreadLocal.remove();
        }

        if (ex != null) {
            log.error("请求异常: {}", ex.getMessage(), ex);
        }
    }
}
RateLimitInterceptor.java - 限流拦截器
package com.example.demo.common.interceptor;

import com.example.demo.common.constant.ResponseCode;
import com.example.demo.common.exception.BusinessException;
import com.google.common.util.concurrent.RateLimiter;
import lombok.extern.slf4j.Slf4j;
import org.springframework.stereotype.Component;
import org.springframework.web.servlet.HandlerInterceptor;

import javax.servlet.http.HttpServletRequest;
import javax.servlet.http.HttpServletResponse;
import java.util.concurrent.ConcurrentHashMap;

@Slf4j
@Component
public class RateLimitInterceptor implements HandlerInterceptor {

    // 使用Guava的RateLimiter进行限流
    private final ConcurrentHashMap<String, RateLimiter> limiters =
        new ConcurrentHashMap<>();

    // 默认限流:每秒10个请求
    private static final double DEFAULT_RATE = 10.0;

    @Override
    public boolean preHandle(HttpServletRequest request,
                           HttpServletResponse response,
                           Object handler) {
        String ip = getClientIp(request);
        String key = "rate_limit:" + ip;

        RateLimiter limiter = limiters.computeIfAbsent(
            key, k -> RateLimiter.create(DEFAULT_RATE)
        );

        if (!limiter.tryAcquire()) {
            log.warn("IP {} 请求过于频繁", ip);
            throw new BusinessException(ResponseCode.SERVICE_UNAVAILABLE, "请求过于频繁,请稍后再试");
        }

        return true;
    }

    private String getClientIp(HttpServletRequest request) {
        String ip = request.getHeader("X-Forwarded-For");
        if (ip == null || ip.length() == 0 || "unknown".equalsIgnoreCase(ip)) {
            ip = request.getHeader("Proxy-Client-IP");
        }
        if (ip == null || ip.length() == 0 || "unknown".equalsIgnoreCase(ip)) {
            ip = request.getHeader("WL-Proxy-Client-IP");
        }
        if (ip == null || ip.length() == 0 || "unknown".equalsIgnoreCase(ip)) {
            ip = request.getRemoteAddr();
        }
        return ip;
    }
}
4. SpringBoot性能优化、启动提速、冗余依赖剔除
SpringBoot 应用性能优化和启动提速是一个系统工程,涉及多个层面。以下从 启动优化 、运行时优化 、依赖治理 和 部署优化 四个维度提供具体方案。
一、启动阶段优化
1. 延迟初始化(Lazy Initialization)
# application.yml
spring:
  main:
lazy-initialization: true # 所有Bean延迟初始化- 优点 :减少启动时创建的Bean数量,加快启动速度
- 缺点 :首次请求响应时间变长,可能掩盖启动时的配置问题
- 折中方案 :仅对特定Bean使用
@Lazy
2. 组件扫描优化
@SpringBootApplication(
    scanBasePackages = "com.your.package",  // 精确指定扫描范围
    exclude = {
        DataSourceAutoConfiguration.class,  // 排除不需要的自动配置
        CacheAutoConfiguration.class
    }
)
3. 类路径优化
# 使用JAR索引文件
java -Djarmode=layertools -jar app.jar extract
java -Dspring.boot.classpath.index=./layers/application/classpath.idx -jar app.jar
4. 编译时优化(Spring Native / GraalVM)
<!-- pom.xml -->
<dependency>
    <groupId>org.springframework.experimental</groupId>
    <artifactId>spring-native</artifactId>
    <version>0.12.1</version>
</dependency>
# 编译为原生镜像
mvn spring-boot:build-image5. Spring Context 索引(@Indexed)
// 在常用注解上添加@Indexed
@Indexed
@Component
public @interface MyComponent {
}
生成 META-INF/spring.components 文件加速扫描。
二、运行时性能优化
1. JVM参数调优
# 生产环境推荐配置
java -server \
     -Xms2g -Xmx2g \           # 堆大小固定,避免动态调整
     -XX:MetaspaceSize=256m \
     -XX:MaxMetaspaceSize=256m \
     -XX:+UseG1GC \            # G1垃圾回收器
     -XX:MaxGCPauseMillis=200 \
     -XX:+UseStringDeduplication \
     -XX:+HeapDumpOnOutOfMemoryError \
     -jar app.jar
2. 连接池优化(HikariCP)
spring:
  datasource:
    hikari:
      maximum-pool-size: 20           # 根据CPU核心数调整
      minimum-idle: 5
      connection-timeout: 3000
      idle-timeout: 600000
      max-lifetime: 1800000
      connection-test-query: SELECT 1
3. 缓存优化
// 使用Caffeine作为本地缓存
@Configuration
public class CacheConfig {
    @Bean
    public CacheManager cacheManager() {
        CaffeineCacheManager manager = new CaffeineCacheManager();
        manager.setCaffeine(Caffeine.newBuilder()
            .expireAfterWrite(10, TimeUnit.MINUTES)
            .maximumSize(1000));
        return manager;
    }
}
4. 异步处理
@EnableAsync
@Configuration
public class AsyncConfig implements AsyncConfigurer {
    @Override
    public Executor getAsyncExecutor() {
        ThreadPoolTaskExecutor executor = new ThreadPoolTaskExecutor();
        executor.setCorePoolSize(5);
        executor.setMaxPoolSize(10);
        executor.setQueueCapacity(100);
        executor.setThreadNamePrefix("Async-");
        executor.initialize();
        return executor;
    }
}
三、依赖治理与瘦身
1. 依赖分析工具
# 查看依赖树
mvn dependency:tree -Dverbose > tree.txt

# 使用Maven Enforcer插件禁止传递依赖
<plugin>
    <groupId>org.apache.maven.plugins</groupId>
    <artifactId>maven-enforcer-plugin</artifactId>
    <version>3.0.0</version>
    <executions>
        <execution>
            <id>enforce-banned-dependencies</id>
            <goals><goal>enforce</goal></goals>
            <configuration>
                <rules>
                    <bannedDependencies>
                        <excludes>
                            <exclude>commons-logging:commons-logging</exclude>
                            <exclude>log4j:log4j</exclude>
                        </excludes>
                    </bannedDependencies>
                </rules>
            </configuration>
        </execution>
    </executions>
</plugin>
2. SpringBoot依赖分析
# 使用SpringBoot提供的分析工具
java -jar app.jar --debug
# 或使用Actuator端点
curl http://localhost:8080/actuator/conditions
3. 排除不必要的依赖
<dependency>
    <groupId>org.springframework.boot</groupId>
    <artifactId>spring-boot-starter-web</artifactId>
    <exclusions>
        <exclusion>
            <groupId>org.springframework.boot</groupId>
            <artifactId>spring-boot-starter-tomcat</artifactId>
        </exclusion>
        <exclusion>
            <groupId>org.springframework.boot</groupId>
            <artifactId>spring-boot-starter-logging</artifactId>
        </exclusion>
    </exclusions>
</dependency>
4. 使用JAR瘦身插件
<plugin>
    <groupId>org.springframework.boot</groupId>
    <artifactId>spring-boot-maven-plugin</artifactId>
    <configuration>
        <layers>
            <enabled>true</enabled>
        </layers>
        <excludes>
            <exclude>
                <groupId>org.projectlombok</groupId>
                <artifactId>lombok</artifactId>
            </exclude>
        </excludes>
    </configuration>
</plugin>
5. 模块化打包(Layer Tools)
# 分层打包Docker镜像
FROM adoptopenjdk:11-jre-hotspot as builder
WORKDIR application
ARG JAR_FILE=target/*.jar
COPY ${JAR_FILE} app.jar
RUN java -Djarmode=layertools -jar app.jar extract

FROM adoptopenjdk:11-jre-hotspot
COPY --from=builder application/dependencies/ ./
COPY --from=builder application/spring-boot-loader/ ./
COPY --from=builder application/snapshot-dependencies/ ./
COPY --from=builder application/application/ ./
ENTRYPOINT ["java", "org.springframework.boot.loader.JarLauncher"]
四、监控与诊断
1. 启动耗时分析
@SpringBootApplication
public class Application implements ApplicationRunner {
    public static void main(String[] args) {
        SpringApplication app = new SpringApplication(Application.class);
        app.setApplicationStartup(new BufferingApplicationStartup(2048));
        app.run(args);
    }

    @Override
    public void run(ApplicationArguments args) {
        // 查看启动指标
        // curl http://localhost:8080/actuator/startup
    }
}
2. 使用Arthas诊断
# 在线诊断工具
curl -O https://arthas.aliyun.com/arthas-boot.jar
java -jar arthas-boot.jar
# 常用命令
dashboard          # 仪表板
trace *Controller* # 追踪方法调用
jad com.example.Class # 反编译
3. JMX监控
spring:
  jmx:
    enabled: true
management:
  endpoints:
    jmx:
      exposure:
        include: "*"
五、最佳实践清单
✅ 必须做的:
- 启用SpringBoot Actuator 监控关键指标
- 使用最新稳定版SpringBoot (每个版本都有性能改进)
- 合理设置JVM参数 ,特别是堆大小和GC算法
- 生产环境关闭DevTools
- 使用
@Profile区分环境配置
⚠️ 建议做的:
- 定期运行依赖检查 :
mvn versions:display-dependency-updates - 使用Docker层缓存 优化镜像构建
- 启用HTTP/2 (需要SSL)
- 配置合理的连接池参数
- 使用编译时注解处理器 (如MapStruct、Lombok)
🔧 高级优化:
- 考虑使用Quarkus/Micronaut 替代SpringBoot(对启动时间要求极高时)
- 实施特性开关 减少不必要的功能加载
- 数据库连接预热 (启动后执行简单查询)
- 使用RSocket替代HTTP (内部服务通信)
- 实施渐进式交付 (蓝绿部署)
六、快速检查清单
# 1. 检查JAR大小
ls -lh target/*.jar

# 2. 检查启动时间
time java -jar app.jar

# 3. 检查依赖数量
mvn dependency:list | wc -l

# 4. 检查自动配置
java -jar app.jar --debug | grep -A5 -B5 "Positive matches"

# 5. 生成原生镜像分析报告
native-image --enable-monitoring=heapdump app
通过以上多维度优化,通常可以将SpringBoot应用启动时间减少30%-70%,内存占用降低20%-50%。建议根据实际监控数据,采取有针对性的优化措施。
5. 快速搭建可复用的SpringBoot项目脚手架
一、项目结构设计
标准Maven多模块结构
springboot-scaffold/
├── scaffold-parent              # 父POM
├── scaffold-common              # 通用模块
├── scaffold-core                # 核心业务模块
├── scaffold-api                 # API接口模块
├── scaffold-dao                 # 数据访问层
└── scaffold-web                 # Web层
二、基础依赖配置
父POM配置
<?xml version="1.0" encoding="UTF-8"?>
<project>
    <parent>
        <groupId>org.springframework.boot</groupId>
        <artifactId>spring-boot-starter-parent</artifactId>
        <version>3.1.5</version>
    </parent>

    <properties>
        <java.version>17</java.version>
        <maven.compiler.source>17</maven.compiler.source>
        <maven.compiler.target>17</maven.compiler.target>
        <project.build.sourceEncoding>UTF-8</project.build.sourceEncoding>

        <!-- 常用依赖版本 -->
        <mybatis-plus.version>3.5.3.1</mybatis-plus.version>
        <knife4j.version>4.3.0</knife4j.version>
        <mapstruct.version>1.5.5.Final</mapstruct.version>
        <hutool.version>5.8.21</hutool.version>
        <lombok.version>1.18.30</lombok.version>
    </properties>

    <dependencyManagement>
        <dependencies>
            <!-- Web -->
            <dependency>
                <groupId>org.springframework.boot</groupId>
                <artifactId>spring-boot-starter-web</artifactId>
            </dependency>

            <!-- Validation -->
            <dependency>
                <groupId>org.springframework.boot</groupId>
                <artifactId>spring-boot-starter-validation</artifactId>
            </dependency>

            <!-- MyBatis Plus -->
            <dependency>
                <groupId>com.baomidou</groupId>
                <artifactId>mybatis-plus-boot-starter</artifactId>
                <version>${mybatis-plus.version}</version>
            </dependency>

            <!-- Knife4j API文档 -->
            <dependency>
                <groupId>com.github.xiaoymin</groupId>
                <artifactId>knife4j-openapi3-jakarta-spring-boot-starter</artifactId>
                <version>${knife4j.version}</version>
            </dependency>
        </dependencies>
    </dependencyManagement>
</project>
三、核心配置类
全局异常处理
@RestControllerAdvice
@Slf4j
public class GlobalExceptionHandler {

    @ExceptionHandler(BusinessException.class)
    public Result<?> handleBusinessException(BusinessException e) {
        log.error("业务异常: {}", e.getMessage(), e);
        return Result.error(e.getCode(), e.getMessage());
    }

    @ExceptionHandler(MethodArgumentNotValidException.class)
    public Result<?> handleValidException(MethodArgumentNotValidException e) {
        String message = e.getBindingResult().getAllErrors()
                .stream()
                .map(DefaultMessageSourceResolvable::getDefaultMessage)
                .collect(Collectors.joining("; "));
        return Result.error(ErrorCode.PARAM_ERROR.getCode(), message);
    }

    @ExceptionHandler(Exception.class)
    public Result<?> handleException(Exception e) {
        log.error("系统异常: ", e);
        return Result.error(ErrorCode.SYSTEM_ERROR);
    }
}
统一响应封装
@Data
@Builder
@NoArgsConstructor
@AllArgsConstructor
public class Result<T> implements Serializable {
    private Integer code;
    private String message;
    private T data;
    private Long timestamp;

    public static <T> Result<T> success() {
        return success(null);
    }

    public static <T> Result<T> success(T data) {
        return Result.<T>builder()
                .code(ErrorCode.SUCCESS.getCode())
                .message(ErrorCode.SUCCESS.getMessage())
                .data(data)
                .timestamp(System.currentTimeMillis())
                .build();
    }

    public static <T> Result<T> error(ErrorCode errorCode) {
        return Result.<T>builder()
                .code(errorCode.getCode())
                .message(errorCode.getMessage())
                .timestamp(System.currentTimeMillis())
                .build();
    }

    public static <T> Result<T> error(Integer code, String message) {
        return Result.<T>builder()
                .code(code)
                .message(message)
                .timestamp(System.currentTimeMillis())
                .build();
    }
}
错误码枚举
@Getter
@AllArgsConstructor
public enum ErrorCode {
    SUCCESS(200, "成功"),
    PARAM_ERROR(400, "参数错误"),
    UNAUTHORIZED(401, "未授权"),
    FORBIDDEN(403, "禁止访问"),
    NOT_FOUND(404, "资源不存在"),
    SYSTEM_ERROR(500, "系统内部错误"),
    BUSINESS_ERROR(1000, "业务异常");

    private final Integer code;
    private final String message;
}
四、数据层配置
MyBatis Plus配置
@Configuration
@MapperScan("com.yourpackage.mapper")
public class MybatisPlusConfig {

    @Bean
    public MybatisPlusInterceptor mybatisPlusInterceptor() {
        MybatisPlusInterceptor interceptor = new MybatisPlusInterceptor();
        // 分页插件
        interceptor.addInnerInterceptor(new PaginationInnerInterceptor(DbType.MYSQL));
        // 乐观锁插件
        interceptor.addInnerInterceptor(new OptimisticLockerInnerInterceptor());
        return interceptor;
    }

    @Bean
    public ConfigurationCustomizer configurationCustomizer() {
        return configuration -> configuration.setUseGeneratedKeys(false);
    }
}
基础实体类
@Data
public class BaseEntity {
    @TableId(type = IdType.AUTO)
    private Long id;

    @TableField(fill = FieldFill.INSERT)
    private LocalDateTime createTime;

    @TableField(fill = FieldFill.INSERT_UPDATE)
    private LocalDateTime updateTime;

    @TableLogic
    private Integer deleted;
}
通用Mapper
public interface BaseMapper<T extends BaseEntity> extends com.baomidou.mybatisplus.core.mapper.BaseMapper<T> {

    default Page<T> selectPage(PageParam pageParam) {
        return selectPage(new Page<>(pageParam.getPageNum(), pageParam.getPageSize()), null);
    }

    default Page<T> selectPage(PageParam pageParam, @Param(Constants.WRAPPER) Wrapper<T> queryWrapper) {
        return selectPage(new Page<>(pageParam.getPageNum(), pageParam.getPageSize()), queryWrapper);
    }
}
五、工具类封装
分页参数
@Data
public class PageParam {
    @Min(value = 1, message = "页码不能小于1")
    private Integer pageNum = 1;

    @Min(value = 1, message = "每页条数不能小于1")
    @Max(value = 100, message = "每页条数不能大于100")
    private Integer pageSize = 10;

    private String orderBy;
    private Boolean asc = true;
}
分页结果
@Data
@Builder
public class PageResult<T> {
    private List<T> records;
    private Long total;
    private Integer pageNum;
    private Integer pageSize;
    private Integer pages;

    public static <T> PageResult<T> of(Page<T> page) {
        return PageResult.<T>builder()
                .records(page.getRecords())
                .total(page.getTotal())
                .pageNum((int) page.getCurrent())
                .pageSize((int) page.getSize())
                .pages((int) page.getPages())
                .build();
    }
}
六、API文档配置
Swagger/Knife4j配置
@Configuration
@EnableOpenApi
public class SwaggerConfig {

    @Bean
    public OpenAPI springShopOpenAPI() {
        return new OpenAPI()
                .info(new Info()
                        .title("API文档")
                        .description("SpringBoot脚手架API文档")
                        .version("v1.0")
                        .contact(new Contact()
                                .name("开发者")
                                .email("dev@example.com")))
                .externalDocs(new ExternalDocumentation()
                        .description("项目文档")
                        .url("https://github.com/your-project"));
    }
}
七、应用配置
application.yml
spring:
  application:
    name: scaffold-demo
  datasource:
    url: jdbc:mysql://localhost:3306/scaffold?useUnicode=true&characterEncoding=utf8&useSSL=false&serverTimezone=Asia/Shanghai
    username: root
    password: 123456
    driver-class-name: com.mysql.cj.jdbc.Driver
    hikari:
      maximum-pool-size: 20
      minimum-idle: 5
      connection-timeout: 30000

  # Redis配置
  redis:
    host: localhost
    port: 6379
    database: 0
    timeout: 3000ms
    lettuce:
      pool:
        max-active: 20
        max-idle: 10
        min-idle: 5

  # 文件上传
  servlet:
    multipart:
      max-file-size: 10MB
      max-request-size: 100MB

# MyBatis Plus配置
mybatis-plus:
  mapper-locations: classpath*:/mapper/**/*.xml
  type-aliases-package: com.yourpackage.entity
  configuration:
    map-underscore-to-camel-case: true
    log-impl: org.apache.ibatis.logging.stdout.StdOutImpl
  global-config:
    db-config:
      logic-delete-field: deleted
      logic-delete-value: 1
      logic-not-delete-value: 0

# 日志配置
logging:
  level:
    com.yourpackage: debug
    org.springframework.web: info
  pattern:
    console: "%d{yyyy-MM-dd HH:mm:ss} [%thread] %-5level %logger{36} - %msg%n"

# 自定义配置
app:
  jwt:
    secret: your-jwt-secret-key
    expire: 7200
  upload:
    path: /data/upload/
    max-size: 10MB
八、快速启动脚本
一键生成脚本
#!/bin/bash
# scaffold-generator.sh

echo "开始生成SpringBoot脚手架项目..."

# 创建项目目录
mkdir -p springboot-scaffold/{common,core,api,dao,web}

# 复制配置文件
cp -r template/* springboot-scaffold/

# 初始化Git仓库
cd springboot-scaffold
git init
git add .
git commit -m "Initial commit: SpringBoot脚手架项目"

echo "项目生成完成!"
echo "请修改以下文件:"
echo "1. application.yml 中的数据库配置"
echo "2. pom.xml 中的项目信息"
echo "3. 包名 com.yourpackage"
九、最佳实践建议
开发规范
- 使用Lombok减少样板代码
- 使用MapStruct进行对象映射
- 使用Validation进行参数校验
- 统一日志格式和级别
- 使用枚举定义状态码和常量
安全建议
- 添加Spring Security依赖
- 配置JWT token验证
- 接口防刷和限流
- SQL注入防护
- XSS防护
性能优化
- 添加Redis缓存
- 数据库连接池配置
- 接口响应时间监控
- 慢SQL日志记录
- 分页查询优化
监控配置
<!-- 添加监控依赖 -->
<dependency>
    <groupId>org.springframework.boot</groupId>
    <artifactId>spring-boot-starter-actuator</artifactId>
</dependency>
<dependency>
    <groupId>io.micrometer</groupId>
    <artifactId>micrometer-registry-prometheus</artifactId>
</dependency>
十、快速使用
- 克隆模板仓库
git clone https://github.com/your-template-repo.git- 修改配置
- 更新pom.xml中的项目信息
- 配置application.yml中的数据库连接
- 修改包名为实际项目包名
- 运行项目
mvn clean install
mvn spring-boot:run
这个脚手架包含了企业级开发所需的基础组件,您可以根据实际需求进行裁剪和扩展。建议根据具体业务场景添加相应的模块和功能。
更多推荐
 16
16 0
0- 0


 已为社区贡献55条内容

所有评论(0)