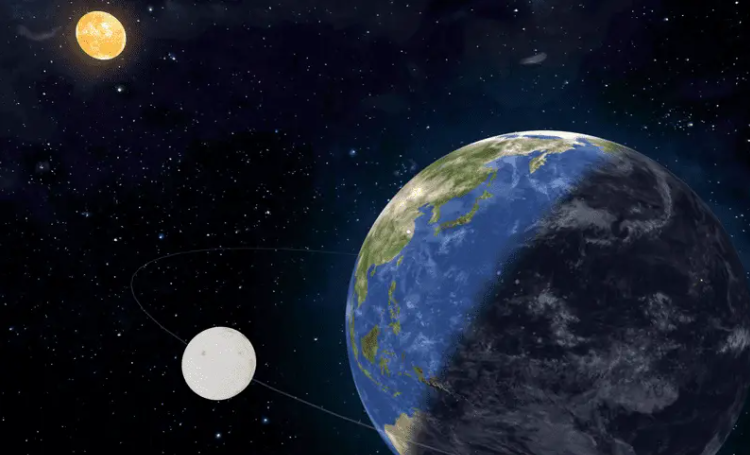
作为一名前端开发,笔者的第一反应不是“这个壁纸真好看”,而是“这个效果我能实现吗?”。这种奇特的好奇心驱使我开始了用代码复现这一视觉奇观的探索之旅。
有趣的是,最打动我的不是最终地球模型的逼真程度,而是那个微妙的光影过渡——那条被称为“晨昏线”的光暗分界线,它既清晰又模糊,既分割又连接着地球的白天与黑夜。如何在代码中捕捉这种自然界的诗意过渡?这个问题成为了整个项目最迷人的挑战。
现在我们一起踏上这段从视觉灵感转化为技术实现的旅程,我们将用Three.js绘制星辰与大海,用着色器计算光影效果,用数学公式模拟昼夜的交替;当你看到那颗由你亲手编码的地球在浏览器中开始第一次转动时,你会发现,前端不仅仅是职业,更是一种生活方式。
环境准备
要实现这样的效果,我们先准备需要的一些素材贴图:
|
1
2
3
4
5
6
7
8
9
10
11
12
13
14
15
16
17
18
19
20
21
22
23
24
25
26
27
28
29
30
31
32
33
34
35
36
37
38
39
40
41
42
43
44
45
46
47
48
49
50
51
52
53
54
55
56
57
58
59
60 |
// 背景星空球体半径
const BACKGROUND_STARS_RADIUS = 200;
// 地球球体的半径
const EARTH_RADIUS = 5;
// 太阳半径
const SUN_RADIUS = 1;
// 月球半径
const MOON_RADIUS = 0.5
// 月球轨道半径
const MOON_TRACK_RADIUS = EARTH_RADIUS * 2
class Earth {
constructor() {
this.assetsLoader = new AssetsLoader();
this.assetsLoader.load([
{
type: AssetsType.Texture,
name: "sun", // 太阳贴图
path: "/images/earth/8k_sun.jpg",
},
{
type: AssetsType.Texture,
name: "moon", // 月球贴图
path: "/images/earth/8k_moon.jpg",
},
{
type: AssetsType.Texture,
name: "stars", // 星空背景贴图
path: "/images/earth/8k_stars_milky_way.jpg",
},
{
type: AssetsType.Texture,
name: "dayTexture", // 白天贴图
path: "/images/earth/8k_earth_daymap.jpg",
},
{
type: AssetsType.Texture,
name: "nightTexture", // 夜晚贴图
path: "/images/earth/8k_earth_nightmap.jpg",
},
{
type: AssetsType.Texture,
name: "normalMap", // 法线贴图
path: "/images/earth/8k_earth_normal_map.jpg",
},
{
type: AssetsType.Texture,
name: "clouds", // 云层贴图
path: "/images/earth/earth_clouds_2048.png",
},
]);
this.assetsLoader.on("onLoad", () => {
this.initMesh();
});
}
}
|
本文所有素材均下载于Solar Textures(https://www.solarsystemscope.com/textures/)
素材准备好后,我们就可以来初始化场景下的物体;我们先创造我们美丽的蓝色星球,让它位于中心原点的位置:
|
1
2
3
4
5
6
7
8
9
10
11
12
13
14
15
16
17
18
19
20
21
22 |
class Earth {
initEarth() {
if (dayTexture && nightTexture) {
const earthMaterial = new ShaderMaterial({
uniforms: {
dayTexture: { value: dayTexture },
nightTexture: { value: nightTexture },
sunPosition: { value: this.sunPosition },
},
vertexShader: earthVertexShader,
fragmentShader: earthFragmentShader,
});
const earthGeometry = new SphereGeometry(EARTH_RADIUS, 128, 128);
const earthMesh = new Mesh(earthGeometry, earthMaterial);
earthMesh.position.set(0, 0, 0);
this.basic.addScene(earthMesh);
}
}
}
|
然后给空旷的宇宙安装一颗恒星,放在右边偏上的位置:
|
1
2
3
4
5
6
7
8
9
10
11
12
13
14
15
16 |
class Earth {
sunPosition: Vector3 = new Vector3(20, 10, 0);
initSun() {
const sunTexture = this.assetsLoader.getAssets("sun") as Texture | null;
if (sunTexture) {
const sunGeometry = new SphereGeometry(SUN_RADIUS, 32, 32);
const sunMaterial = new MeshBasicMaterial({
map: sunTexture,
});
const sun = new Mesh(sunGeometry, sunMaterial);
sun.position.copy(this.sunPosition);
this.scene.add(sun);
}
}
}
|
有意思的是,这里的太阳虽然看起来像个发光的球,但实际上它只是个“装饰品”;我们真正用到的其实是它的位置信息sunPosition,用于在后面模拟昼夜交替时,将太阳的位置信息传入到着色器代码中。
在真实宇宙中,是地球绕着太阳转。但在我们的虚拟场景中,为了保持地球始终在画面中央(坐标原点),笔者耍了个小聪明——让太阳“绕着”地球转,同时给太阳一个自转。
|
1
2
3
4
5
6
7
8
9
10
11
12
13
14
15
16
17
18
19
20
21 |
class Earth {
rotateVector3ByRadian(vec3: Vector3, axis: Vector3, radian: number) {
// 创建旋转矩阵
const matrix = new Matrix4()
// 设置绕轴旋转的矩阵
matrix.makeRotationAxis(axis.normalize(), radian)
// 应用旋转矩阵到向量
vec3.applyMatrix4(matrix)
}
render(clock: Clock) {
rotateVector3ByRadian(
this.sunPosition,
new Vector3(0, 1, 0),
0.0004,
)
if (this.sunMesh) {
this.sunMesh.position.copy(sunPos)
this.sunMesh.rotation.y += 0.002
}
}
}
|
接着,给我们的宇宙增加一份浩瀚感,这里的星空背景通过球体加上贴图来进行渲染:
|
1
2
3
4
5
6
7
8
9
10
11
12
13
14
15
16
17
18
19 |
class Earth {
initStarBackground() {
const starsTexture = this.assetsLoader.getAssets("stars") as Texture | null;
if (starsTexture) {
const sphereGeometry = new SphereGeometry(
BACKGROUND_STARS_RADIUS,
64,
64
);
sphereGeometry.scale(-1, 1, 1);
const sphereMaterial = new MeshBasicMaterial({
map: starsTexture,
side: DoubleSide,
});
const sphere = new Mesh(sphereGeometry, sphereMaterial);
this.scene.add(sphere);
}
}
}
|
地球怎么能独自在宇宙中流浪呢?怎么能少得了它忠实的小跟班——月球呢?但只是放个月球太普通了,我决定给它加个专属的“跑道”track:
|
1
2
3
4
5
6
7
8
9
10
11
12
13
14
15
16
17
18
19
20
21
22
23
24
25
26 |
class Earth {
moonPosition: Vector3 = new Vector3(0, MOON_TRACK_RADIUS, 0)
initMoon() {
const group = new Group()
const trackGeo = new TorusGeometry(MOON_TRACK_RADIUS, 0.01, 64, 64)
const trackMt = new MeshBasicMaterial({
color: guiOption.moon.trackColor,
transparent: true,
opacity: 0.5,
})
const track = new Mesh(trackGeo, trackMt)
group.add(track)
const moonGeo = new SphereGeometry(MOON_RADIUS, 64, 64)
const moonMt = new MeshBasicMaterial({
map: moonTexture,
})
const moon = new Mesh(moonGeo, moonMt)
moon.position.copy(this.moonPosition)
group.add(moon)
group.rotateX(MathUtils.degToRad(100))
this.scene.add(group)
}
}
|
那个半透明的轨道环其实是个视觉引导——它告诉用户“嘿,月球是沿着这条路径运动的”。虽然真实月球没有可见轨道,但这个设计增加了场景的科技感和可读性。
当我看到月球带着它的光环开始绕着地球旋转时,那感觉就像完成了一个精密的宇宙钟表——每个部件都有它的位置,每个运动都有它的规律。这个小跟班让我们的地球不再孤单,整个太阳系开始有了“系统”的感觉。
实现昼夜分明
前面我们搭建好了整个太阳系舞台,但此刻的地球还只是一个静止的球体,没有光影变化,没有昼夜交替。现在,是时候为这颗蓝色星球注入灵魂了。还记得我们初始化地球时预留的vertexShader和fragmentShader吗?那两个看似简单的GLSL代码文件,才是实现昼夜交替魔法的核心所在。
如果说地球模型是个巨大的工厂,那么顶点着色器就是为每个工人(像素点)准备工牌的生产线。下面着色器代码其实在做两件重要的事情:
|
1
2
3
4
5
6
7
8
9
10 |
// 纹理坐标
varying vec2 vUv;
// 变换后的法线向量
varying vec3 vNormal;
void main(){
vUv=uv;
vNormal=normalize(normalMatrix*normal);
gl_Position= projectionMatrix * modelViewMatrix * vec4(position, 1.0);
}
|
vUv用来记录每个顶点的纹理坐标,vNormal计算并传递法线向量,每个顶点的法线就像一根小指针,直直地指向该点的“正上方”,normalize()函数让法线向量保持长度为1(归一化)。varying表示把顶点着色器的计算结果传递给下面的片元着色器。
所以别看上面这段代码短,它可是整个昼夜效果的地基。它为地球表面每个点都准备好了:“我是谁(uv坐标)”、“我面朝哪里(法线)”,就等着片元着色器来判断:“你现在应该是白天还是黑夜”;下面是我们最重要的片元着色器代码了:
|
1
2
3
4
5
6
7
8
9
10
11
12
13
14
15
16
17
18
19
20
21
22 |
#ifdef GL_ES
precision mediump float;
#endif
uniform sampler2D dayTexture;
uniform sampler2D nightTexture;
uniform vec3 sunPosition;
varying vec2 vUv;
varying vec3 vNormal;
void main(){
vec3 lightDir=normalize(sunPosition);
float dotProduct=dot(normalize(vNormal),lightDir);
if(dotProduct>0.){
gl_FragColor=texture2D(dayTexture,vUv);
}else{
gl_FragColor=texture2D(nightTexture,vUv);
}
}
|
这段代码虽然只有短短的十几行,却决定了地球表面每一处是光明还是黑暗。GLSL语法比较难懂,我们下面就来详细介绍一下。
首先我们将前面顶点着色器中处理好的单位法线向量vNormal接收,然后将传入的太阳的位置接收,通过normalize函数进行归一化操作,得到了太阳的方向;最轴将上面计算的法线向量和太阳的方向进行点积运算。
将太阳位置归一化后的方向向量,表示从原点指向太阳位置的单位向量,而不是从太阳位置出发指向原点,这一点需要注意。
这里详细说一下点积运算的几何意义,在三维空间中,两个向量的点积公式是:
|
1 |
dot(A, B) = |A| × |B| × cos(θ)
|
其中θ是A和B之间的夹角;而我们上面已经对两个向量都进行了归一化操作,因此公式简化为:
因此这里的角度θ其实代表了法线与太阳光线方向的夹角,我们通过一张图来理解,球体表面的蓝色箭头,表示法线;而原点黄色的箭头,表示太阳的方向:
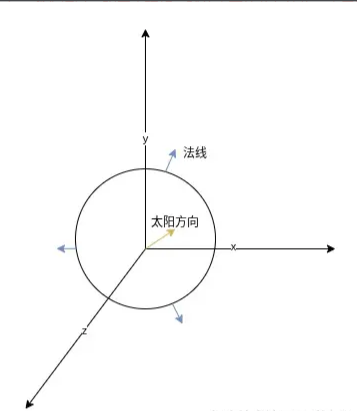
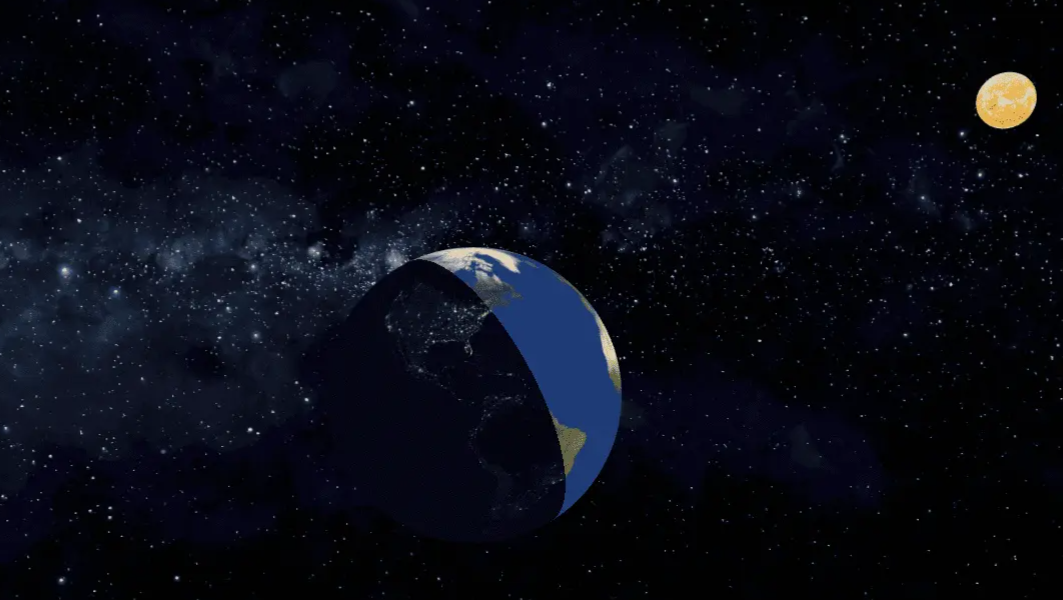
因此在上面片元着色器代码中,计算得到的dotProduct变量,其实也是cos(θ)的值;我们通过对它的值进行判断,如果dotProduct大于0,则表示法线与太阳方向夹角小于90度,则表示当前点在白天,则使用白天贴图进行渲染;否则使用夜晚贴图进行渲染;运行后,我们就能看到地球的白天黑夜有明显的界线分隔了。
最后在太阳转动的同时,不要忘记更新地球材质的uniforms中的sunPosition属性:
|
1
2
3
4
5
6
7 |
class Earth {
render(clock: Clock) {
if (this.earthMaterial) {
this.earthMaterial.uniforms.sunPosition.value.copy(this.sunPosition)
}
}
}
|
星空顶
如果你最近去过高端楼盘展厅或者坐过某些豪华车型,大概率见过那个让人惊艳的设计——星空顶。无数光点在头顶缓缓闪烁,像是把整个银河系微缩在了方寸之间。这种将宇宙浪漫融入空间的设计,早已成为“高端感”的代名词。
我们项目怎么能少了这样迷人的星空呢?不行,我们的项目也要向高端、豪华看齐。虽然之前我们用一张星空贴图作为背景,但是总感觉不够真实,缺少了星空那种忽明忽暗的光亮效果;我们在太阳到星空背景球体之间,通过Points来添加众多的星星,我们首先初始化星星的一些参数:
|
1
2
3
4
5
6
7
8
9
10
11
12
13
14
15
16
17
18
19
20
21 |
// 星星数量
const STARS_AMOUNT = 1000;
// 星星最小距离
const STARS_MIN_DISTANCE = 100;
// 星星最大距离
const STARS_MAX_DISTANCE = 200;
class Earth {
initStars() {
const starGeometry = new BufferGeometry();
// 每个点的xyz坐标
const positions = new Float32Array(STARS_AMOUNT * 3);
// 每个点rgb颜色
const colors = new Float32Array(STARS_AMOUNT * 3);
// 每个点的初始大小
const sizes = new Float32Array(STARS_AMOUNT);
// 每个点的闪烁相位
const phases = new Float32Array(STARS_AMOUNT);
// 每个点的闪烁频率
const frequencies = new Float32Array(STARS_AMOUNT);
}
}
|
由于我们想要生成从太阳到星空背景球体之间圆环内的随机点,因此我们可以通过极坐标的方式来计算,通过极坐标转换到三维空间内的坐标:
|
1
2
3
4
5
6
7
8
9
10
11
12
13
14
15
16
17 |
class Earth {
initStars() {
for (let i = 0; i < STARS_AMOUNT; i++) {
const i3 = i * 3
// 在球体空间内随机生成位置
const distance = getRandomInt(STARS_MIN_DISTANCE, STARS_MAX_DISTANCE)
const theta = Math.random() * Math.PI * 2 // 方位角
const phi = Math.acos(2 * Math.random() - 1) // 极角
// 球坐标转直角坐标
positions[i3] = distance * Math.sin(phi) * Math.cos(theta)
positions[i3 + 1] = distance * Math.sin(phi) * Math.sin(theta)
positions[i3 + 2] = distance * Math.cos(phi)
}
}
}
|
坐标位置搞定了,我们继续给每个点生成随即的颜色、大小、闪烁相位、闪烁频率属性:
|
1
2
3
4
5
6
7
8
9
10
11
12
13
14
15
16
17
18
19
20
21
22
23
24
25 |
// 随机颜色(偏向白色和蓝色)
const colorChoice = Math.random()
if (colorChoice < 0.7) {
// 白色/淡黄色星星
colors[i3] = 1.0 // R
colors[i3 + 1] = 0.9 + Math.random() * 0.1 // G
colors[i3 + 2] = 0.8 + Math.random() * 0.2 // B
} else if (colorChoice < 0.9) {
// 蓝色星星
colors[i3] = 0.4 + Math.random() * 0.3 // R
colors[i3 + 1] = 0.6 + Math.random() * 0.3 // G
colors[i3 + 2] = 1.0 // B
} else {
// 红色/橙色星星
colors[i3] = 1.0 // R
colors[i3 + 1] = 0.5 + Math.random() * 0.3 // G
colors[i3 + 2] = 0.3 + Math.random() * 0.2 // B
}
// 大小
sizes[i] = Math.random() * 2 + 0.5
// 闪烁频率
frequencies[i] = Math.random() * 0.5 + 0.5
// 闪烁相位
phases[i] = Math.random() * Math.PI * 2
|
最后,我们通过BufferGeometry将这些数据传入Points对象中:
|
1
2
3
4
5 |
starGeometry.setAttribute("position", new BufferAttribute(positions, 3))
starGeometry.setAttribute("color", new BufferAttribute(colors, 3))
starGeometry.setAttribute("size", new BufferAttribute(sizes, 1))
starGeometry.setAttribute("phase", new BufferAttribute(phases, 1))
starGeometry.setAttribute("frequency", new BufferAttribute(frequencies, 1))
|
然后创建Points对象,同时在uniforms中添加一个time属性,用于控制星星闪烁:
|
1
2
3
4
5
6
7
8
9
10 |
const starMaterial = new ShaderMaterial({
uniforms: {
time: { value: 0.0 },
},
vertexShader: starsVertexShader,
fragmentShader: starsFragmentShader,
transparent: true,
blending: AdditiveBlending,
})
const stars = new Points(starGeometry, starMaterial)
|
在我们的顶点着色器代码中,接收上面的顶点数据:
|
1
2
3
4
5
6
7
8
9
10
11
12
13
14
15
16
17
18
19
20
21
22
23
24
25 |
attribute float size;
attribute vec3 color;
attribute float phase;
attribute float frequency;
varying vec3 vColor;
uniform float time;
void main() {
vColor = color;
// 闪烁效果计算
float blink = sin(time * frequency + phase) * 0.5 + 0.8;
// 添加一些随机噪声使闪烁更自然
float noise = sin(dot(position, vec3(12.9898, 78.233, 45.5432)) * 43758.5453) * 0.1;
// 最终大小
float finalSize = size * (blink + noise);
vec4 mvPosition = modelViewMatrix * vec4(position, 1.0);
gl_PointSize = finalSize * (300.0 / -mvPosition.z);
gl_Position = projectionMatrix * mvPosition;
}
|
vColor用来将前面生成的点的颜色传递给片元着色器,让星星有独立的颜色;blink是实现星星闪烁的关键公式,time × frequency表示随时间变化的相位,phase控制每个粒子的初始相位偏移,使得闪烁不会同步进行;sin函数产生平滑的正弦波振荡,取值范围是[-1, 1],最终blink的范围是[0.3, 1.3],再乘以size初始化大小,得到了星星在不同时刻的最终大小。
最后片元着色器代码如下:
|
1
2
3
4
5
6
7
8
9
10
11
12
13
14
15
16
17
18 |
#ifdef GL_ES
precision mediump float;
#endif
varying vec3 vColor;
void main() {
// 圆形点
float distanceToCenter = length(gl_PointCoord - vec2(0.5));
if (distanceToCenter > 0.5) {
discard;
}
// 添加一些发光效果
float alpha = 1.0 - smoothstep(0.0, 0.5, distanceToCenter);
gl_FragColor = vec4(vColor, alpha * 0.9);
}
|
美丽的晨昏线
如果仔细观察真实的地球照片,你会发现一个迷人的细节:白天和黑夜之间,并没有一条生硬的分界线。取而代之的,是一片温柔过渡的“灰色地带”——这就是我们常说的晨昏线,也是日出日落时分最富诗意的区域。
回头看我们之前实现的昼夜分割的效果,虽然功能完整,但是少了些自然界的柔美;现实世界的光影变化,从来不是非黑即白的开关,而是渐变的艺术;下面我们就来创造出一个平滑过渡的晨昏区域,让白昼缓缓融入黑夜。
上面我们详细介绍了白天黑夜如何通过太阳光和法线进行判断,而其核心原理就是下面的计算公式:
|
1 |
float dotProduct=dot(normalize(vNormal),lightDir);
|
dotProduct的取值范围是[-1, 1],当在0~1之间时,代表表面正对太阳,是白天;-1~0之间,表示背对太阳,是黑夜;我们想要让太阳在中间地带有一个过渡的范围,我们先给ShaderMaterial传入一个参数transitionWidth:
|
1
2
3
4
5
6
7
8
9
10 |
const earthMaterial = new ShaderMaterial({
uniforms: {
dayTexture: { value: dayTexture },
nightTexture: { value: nightTexture },
// 新增过渡范围参数
transitionWidth: { value: 0.2 },
},
vertexShader: earthVertexShader,
fragmentShader: earthFragmentShader,
})
|
然后,在片元着色器中添加过渡参数:
|
1
2
3
4
5
6 |
uniform float transitionWidth;
void main(){
float transitionCenter = 0.0; // 晨昏线
float transitionStart = transitionCenter - transitionWidth * 0.5;
float transitionEnd = transitionCenter + transitionWidth * 0.5;
}
|
当传入transitionWidth是0.2时,计算得到下面的范围:
- transitionStart = -0.1
- transitionEnd = 0.1
这就意味着在dotProduct点积值[-0.1, 0.1]范围内是过渡区域;然后使用smoothstep创建一个平滑插值:
|
1
2
3
4 |
void main(){
// 使用smoothstep创建平滑过渡
float mixFactor = smoothstep(transitionStart, transitionEnd, dotProduct);
}
|
smoothstep函数的行为如下:
- 当 dotProduct <= transitionStart 时:mixFactor = 0.0
- 当 dotProduct >= transitionEnd 时:mixFactor = 1.0
- 当 transitionStart < dotProduct < transitionEnd 时:mixFactor 平滑过渡
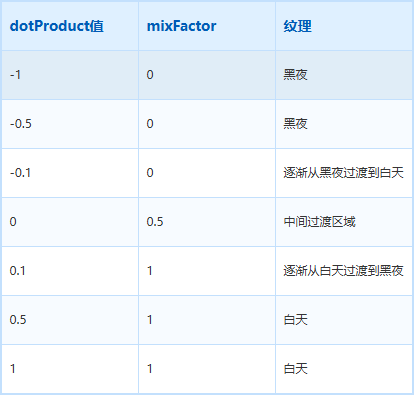
因此,smoothstep函数实际上将dotProduct区间值[-1, 1]映射到mixFactor的[0, 1]范围内,并创建一个平滑过渡;其中[-1 , -0.1],映射为0,表示黑夜,[0.1 , 1],映射为1,表示白天,中间的(-0.1 , 0.1)映射到(0, 1)表示过渡的区域;我们通过一个表格来详细表示:
最后使用mix函数将白天和黑夜的纹理进行混合:


 5
5 0
0


 已为社区贡献2条内容

所有评论(0)