
从模型到实物:将AI模型部署到ESP32与液晶屏的全栈实战指南
本打算继续介绍如何在AI创想实验室(AiEduLab.tech)上搭建和训练多数出头模型,但考虑到模型训练完用到硬件上这部分是综合性较强的,对于新手来讲还有较大困难,而上一篇说明的不够详细,所以单独写一篇教程,希望能起到抛砖引玉的作用。
一、流程
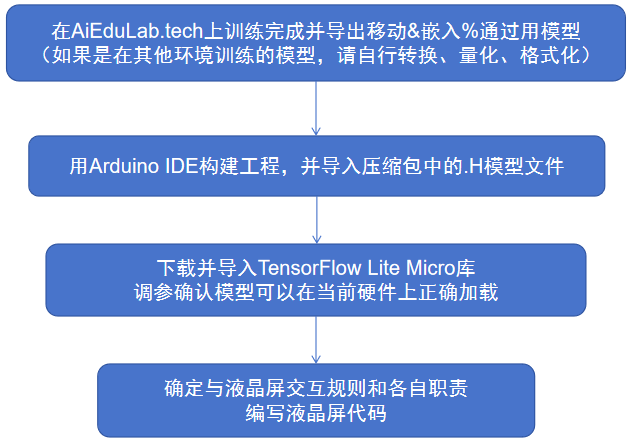
二、硬件和环境准备
1、硬件(某宝搜索名称即可)
①ESP32-S3(注意规格选 N16R8 ,否则无法容纳模型)
②陶晶驰串口屏(能手写,大小适宜即可)
③esp8266烧录器(用于给液晶屏烧录代码)
2、软件
①Arduino IDE (我用的2.3.8)
②USART HMI IDE(液晶屏IDE)
3、Arduion IDE配置
①安装ESP32开发板
②安装推理库:TFLiteMicro_ArduinoESP32S3.h
4、模型获取
如果想立即尝试整个流程,可以在Ai创想实验室中的“图像分类——手写数字识别”项目的右侧列表中的“已训练模型”中下载“极小”模型,导入到训练器而后”导出移动&嵌入&通用模型“,在得到的压缩包中有.H模型,该模型已经量化并处理好了格式可直接在下述流程使用。
如果你使用其他平台或自己代码训练的模型,那么应安装对应的工具链转化、量化、规范化,而后再下述流程中尝试修复一些问题。
三、硬件连接
1、烧录器:其RX\TX和液晶屏的RX\TX分别连接而后烧录
2、ESP32:其RX\TX(自定义软串)和液晶屏的TX\RX分别连接进行通讯
PS:如果你和我的ESP32-S3一样,那么还需要一根USB-TYPEC数据线,插到两个TYPE-C口上面那个上烧录,摆放如以下灵魂图示时,右上那个口:
口二
四、代码部分
我们将计算的内容全部放到ESP32上,而液晶屏仅负责发送按钮点击和触摸坐标、接受显示文本和绘制指令。也就是说,实际上液晶屏上绘制的数字是点,模型接受是我们插值之后绘制的图像(数组),这中间有一个简单的插值算法。
通讯时的指令格式是我们自定义的,按照液晶屏本身的一些定义(结束为FF FF FF)我们自定义各种自己需要的指令,然后通过loop来读取并存入缓冲区,当从缓冲区解析出一个合法指令(符合格式要求)的我们就可以执行。无需担忧软串和连线的问题,只要我们设置合适的波特率对于这种简单且短的线路(直接使用液晶屏的线即可)通讯质量完全能够得以保障。
1、.H库的导入
将下载的.H库复制到.ino所在目录(在以下代码中其名为mnist_model_data.h),然后导入相关库:
#include <Arduino.h>
#include <vector>
#include <math.h>
#include "TFLiteMicro_ArduinoESP32S3.h"
#include "mnist_model_data.h"
2、通讯部分
我们使用软串口与液晶屏通讯,接受液晶屏的指令也向液晶屏发出指令。根据液晶屏的开发文档,在液晶屏上定义一些控件并在合适的事件中添加代码:
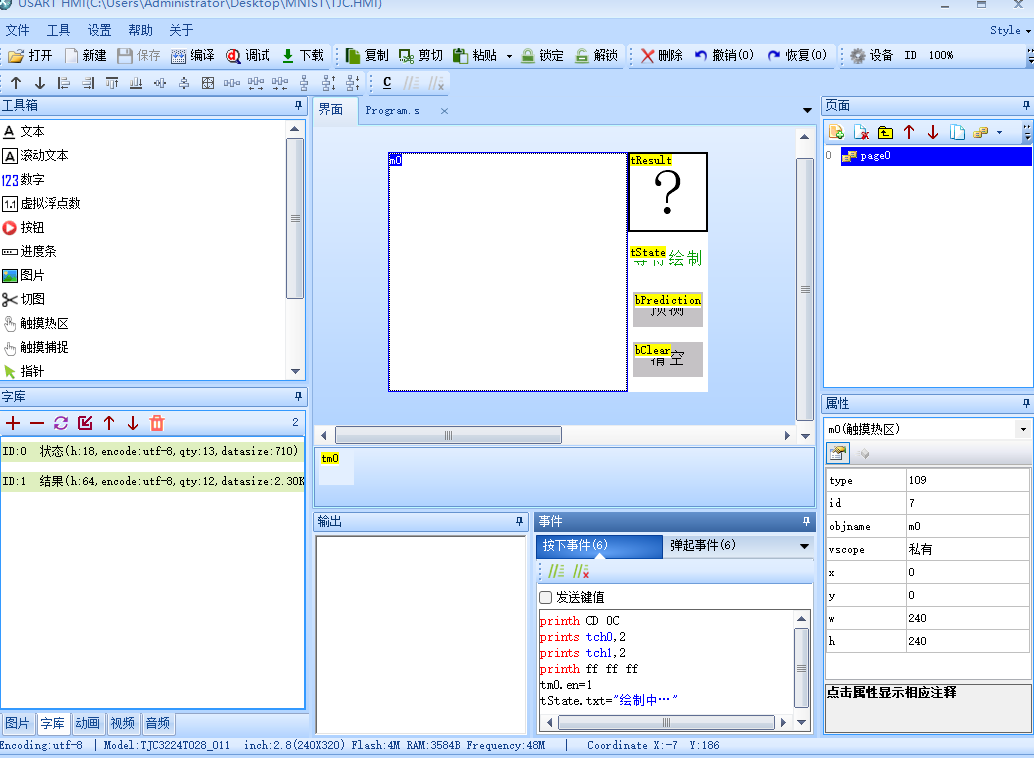
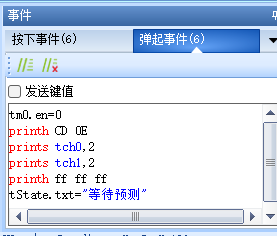
其中m0是触摸热区,它负责整个绘制过程中的消息发送。其弹起事件如下:
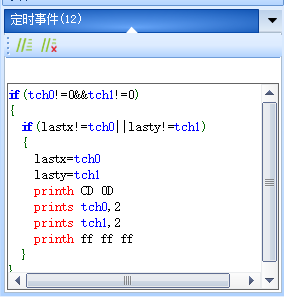
这和在GUI中编程逻辑差不多,使用了时间控件在按下后开始每隔一段时间发送触摸坐标到ESP32:
而预测和清空按钮的情况就要简单得多:
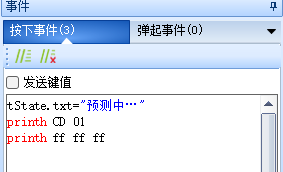
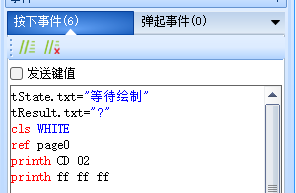
这样我们就差不多完成了液晶屏上通讯部分的编程(int lastx=0,lasty=0在Program.s中作为全局变量)。这时,你可以在IDE上进行调试,模拟一些输入和输出以确定其行为正确和测试一些赋值等指令的正确格式。
在ESP32上的情况要复杂一些,我们使用一个简单的有限状态机来处理相关指令部分:
// 指令缓冲区
struct CommandBuffer {
  uint8_t cmd;
  uint8_t xl;
  uint8_t xh;
  uint8_t yl;
  uint8_t yh;
  uint8_t endBytes[3];
  uint8_t endCount;
} cmdBuf;

// UART1对象
HardwareSerial MySerial1(1);

// 定义UART1使用的引脚
#define UART1_RX_PIN 16
#define UART1_TX_PIN 17

在Setup()中初始化它:
  // 初始化UART1
  MySerial1.begin(115200, SERIAL_8N1, UART1_RX_PIN, UART1_TX_PIN);
  while(!MySerial1){};


在loop()中读取并解析:
void loop() {
  // 处理UART接收数据
  while (MySerial1.available() > 0) {
    uint8_t receivedByte = MySerial1.read();
    parseByte(receivedByte);
  }
}


void parseByte(uint8_t byte) {
  switch (state) {
    case WAIT_START:
      if (byte == 0xCD) {
        state = WAIT_CMD;
      }
      break;

    case WAIT_CMD:
      if (byte == 0x0D) {
        cmdBuf.cmd = 0x0D;
        expectedDataBytes = 4;
        state = WAIT_DATA_L;
      } else if (byte == 0x0C) {
        cmdBuf.cmd = 0x0C;
        expectedDataBytes = 4;
        state = WAIT_DATA_L;
      } else if (byte == 0x0E) {
        cmdBuf.cmd = 0x0E;
        expectedDataBytes = 4;
        state = WAIT_DATA_L;
      } else if (byte == 0x01) {
        cmdBuf.cmd = 0x01;
        state = WAIT_END;
        cmdBuf.endCount = 0;
      } else if (byte == 0x02) {
        cmdBuf.cmd = 0x02;
        state = WAIT_END;
        cmdBuf.endCount = 0;
      } else {
        Serial.print("无效指令: 0x");
        Serial.println(byte, HEX);
        resetParser();
      }
      break;

    case WAIT_DATA_L:
      if (expectedDataBytes == 4) {
        cmdBuf.xl = byte;
        expectedDataBytes--;
        state = WAIT_DATA_H;
      } else if (expectedDataBytes == 2) {
        cmdBuf.yl = byte;
        expectedDataBytes--;
        state = WAIT_DATA_H;
      }
      break;

    case WAIT_DATA_H:
      if (expectedDataBytes == 3) {
        cmdBuf.xh = byte;
        expectedDataBytes--;
        state = WAIT_DATA_L;
      } else if (expectedDataBytes == 1) {
        cmdBuf.yh = byte;
        expectedDataBytes--;
        state = WAIT_END;
        cmdBuf.endCount = 0;
      }
      break;

    case WAIT_END:
      cmdBuf.endBytes[cmdBuf.endCount] = byte;

      if (byte == 0xFF) {
        cmdBuf.endCount++;

        if (cmdBuf.endCount == 3) {
          switch (cmdBuf.cmd) {
            case 0x0D:
              processCommand0D(cmdBuf.xl, cmdBuf.xh, cmdBuf.yl, cmdBuf.yh);
              break;
            case 0x0C:
              processCommand0C(cmdBuf.xl, cmdBuf.xh, cmdBuf.yl, cmdBuf.yh);
              break;
            case 0x0E:
              processCommand0E(cmdBuf.xl, cmdBuf.xh, cmdBuf.yl, cmdBuf.yh);
              break;
            case 0x01:
              processCommand01();
              break;
            case 0x02:
              processCommand02();
              break;
          }
          resetParser();
        }
      } else {
        resetParser();
      }
      break;
  }
}
我们首先校验指令,确认指令之后调用对应的函数进行处理即可。
对于指令发送,我们需要阅读液晶屏的说明书确定指令格式(前述测试过程中应该已经可以确定指令的正确格式),然后使用代码封装相同功能为函数进行调用即可,这个过程中可能涉及到发送内容的格式、不同语言编码(如果你需要发送中文可能需要一些额外的小代码)等问题,当然这都很容易就能克服。在此我们仅讨论本工程相关内容:
// ========== 发送函数 ==========

void resetParser() {
  state = WAIT_START;
  cmdBuf.endCount = 0;
  expectedDataBytes = 0;
}

void sendString(const char* str) {
  while (*str) {
    MySerial1.write(*str);
    str++;
  }
  MySerial1.write(0xFF);
  MySerial1.write(0xFF);
  MySerial1.write(0xFF);
}

void sendString(String str) {
  sendString(str.c_str());
}

void sendCirsCommandFull(int16_t x, int16_t y, uint8_t r, const char* color) {
  String command = "cirs ";
  command += String(x);
  command += ",";
  command += String(y);
  command += ",";
  command += String(r);
  command += ",";
  command += color;

  for (size_t i = 0; i < command.length(); i++) {
    MySerial1.write(command.charAt(i));
  }

  MySerial1.write(0xFF);
  MySerial1.write(0xFF);
  MySerial1.write(0xFF);
}
3、推理库的使用
线性插值、在液晶屏上回显都是很基础的代码,这里不再赘述。推理库的使用过程中需要注意的:
①初始化
bool setupTensorFlowLite() {
  unsigned long startTime = micros();  // 开始计时

  TFLMinterpreter = TFLMsetupModel<TFLMnumberOperators, 60000>(
      TFLM_trained_lstm_model, TFLMgetResolver, true);

  unsigned long endTime = micros();    // 结束计时
  unsigned long duration = endTime - startTime;

  if (!TFLMinterpreter) {
    Serial.println("模型初始化失败!");
    Serial.printf("初始化失败耗时: %lu 微秒 (%.2f 毫秒)\n",
                  duration, duration / 1000.0);
    return false;
  }

  Serial.printf("TensorFlow Lite 初始化成功,耗时: %lu 微秒 (%.2f 毫秒)\n",
                duration, duration / 1000.0);
  return true;
}注意其中60000这个参数,该参数过大你将无法正确加载模型,过小无法容纳模型无法正确推理,所以在使用不同模型时你应该进行一些计算(或者试探),对于“极小”这个模型来说,该参数是比较合适的。
推理的过程中,我们需要适配张量类型以及和量化\反量化操一点心。当我们适配成功,就可以执行推理函数进行推理,而后取其最大概率的类别,输出结果、置信度、资源消耗等信息:
int runInference() {
  // 获取输入张量
  TfLiteTensor* input = TFLMinput;
  if (!input) return -1;

  Serial.print("张量类型:");
  Serial.println(input->type);

  // 检查输入张量类型
  if (input->type == kTfLiteFloat32) {
    // float类型输入 (0-1)
    for (int y = 0; y < MNIST_SIZE; y++) {
      for (int x = 0; x < MNIST_SIZE; x++) {
        input->data.f[y * MNIST_SIZE + x] = mnistInput[y][x] / 255.0f;
      }
    }
  }
  else if (input->type == kTfLiteUInt8) {
    // uint8_t类型输入 (0-255)
    for (int y = 0; y < MNIST_SIZE; y++) {
      for (int x = 0; x < MNIST_SIZE; x++) {
        input->data.uint8[y * MNIST_SIZE + x] = mnistInput[y][x];
      }
    }
  }
  else if (input->type == kTfLiteInt8) {
    // int8_t类型输入 (-128 到 127)
    // 需要将 0-255 的 mnistInput 映射到 int8_t 范围
    // 常见的映射方式: (value - 128) 或者 value - 128
    for (int y = 0; y < MNIST_SIZE; y++) {
      for (int x = 0; x < MNIST_SIZE; x++) {
        // 方法1: 直接转换 0-255 -> -128 到 127
        //input->data.int8[y * MNIST_SIZE + x] = static_cast<int8_t>(mnistInput[y][x] - 128);

        //或者方法2: 使用量化参数 (如果有的话)
        if (input->params.scale != 0) {
          float float_val = mnistInput[y][x] / 255.0f;
          int8_t quantized_val = static_cast<int8_t>(float_val / input->params.scale + input->params.zero_point);
          input->data.int8[y * MNIST_SIZE + x] = quantized_val;
        }
      }
    }
  }
  else {
    Serial.printf("不支持的输入类型: %d\n", input->type);
    return -1;
  }

  // 运行推理

  if (!TFLMpredict()) {
    Serial.println("推理失败");
    return -1;
  }

  // 获取输出
  TfLiteTensor* output = TFLMoutput;
  if (!output) return -1;

  // 根据输出类型处理结果
  float output_data[10];

  if (output->type == kTfLiteFloat32) {
    // float输出
    for (int i = 0; i < 10; i++) {
      output_data[i] = output->data.f[i];
    }
  } else if (output->type == kTfLiteUInt8) {
    // uint8输出,需要反量化
    float scale = output->params.scale;
    int zero_point = output->params.zero_point;
    for (int i = 0; i < 10; i++) {
      output_data[i] = (output->data.uint8[i] - zero_point) * scale;
    }
  } else if (output->type == kTfLiteInt8) {
    // int8输出,需要反量化
    float scale = output->params.scale;
    int zero_point = output->params.zero_point;
    for (int i = 0; i < 10; i++) {
      output_data[i] = (output->data.int8[i] - zero_point) * scale;
    }
  } else {
    Serial.printf("不支持的输出类型: %d\n", output->type);
    return -1;
  }

  // 找到最大概率的类别
  int max_index = 0;
  float max_value = output_data[0];
  for (int i = 1; i < 10; i++) {
    if (output_data[i] > max_value) {
      max_value = output_data[i];
      max_index = i;
    }
  }

  Serial.printf("识别结果: %d (置信度: %.2f%%)\n", max_index, max_value * 100);
  Serial.printf("Total heap: %d bytes\n", ESP.getHeapSize());
  Serial.printf("Free heap: %d bytes\n", ESP.getFreeHeap());
  Serial.printf("PSRAM size: %d bytes\n", ESP.getPsramSize());
  Serial.printf("Free PSRAM: %d bytes\n", ESP.getFreePsram());
  return max_index;
}
需要注意的是,在我的代码中输入数据(绘制完毕的数字)的存储格式:
// MNIST输入数组 (28x28 单通道)
uint8_t mnistInput[MNIST_SIZE][MNIST_SIZE] = {0};
最后,如果你的识别效果不佳,先调节一下“所见”和“所得”的一致性:即液晶屏上显示的绘制内容和mnistInput中的内容尽可能保持一致,一下函数可以很有效的输出灰度效果:
void printMNISTInput() {
  Serial.println("MNIST输入数组 (28x28):");
  for (int y = 0; y < MNIST_SIZE; y++) {
    for (int x = 0; x < MNIST_SIZE; x++) {
      if (mnistInput[y][x] > 200) Serial.print("██");
      else if (mnistInput[y][x] > 100) Serial.print("▓▓");
      else if (mnistInput[y][x] > 50) Serial.print("▒▒");
      else if (mnistInput[y][x] > 0) Serial.print("░░");
      else Serial.print("  ");
    }
    Serial.println();
  }
}
最终效果和很多相关代码应该在上一篇中已经有了,这里不再重复,有需要可以查看上一篇。

免费领 150 小时云算力,进群参与显卡、AI PC 幸运抽奖
更多推荐

 8
8 0
0- 0


 已为社区贡献1条内容

所有评论(0)