
32GB显存服务器爆改:Nvidia RTX 5090成功部署Qwen3.5-27B大模型,速度惊人
本文详细介绍如何在拥有Nvidia RTX 5090 GPU的服务器上,通过安装miniconda、配置环境变量、安装Nvidia驱动和CUDA工具包、部署vLLM框架,最终成功部署Qwen3.5-27B大模型。文章还提供了使用docker-compose进行部署的详细步骤,并展示了显存占用情况和模型测试结果,为读者提供了实用的技术指导和参考。
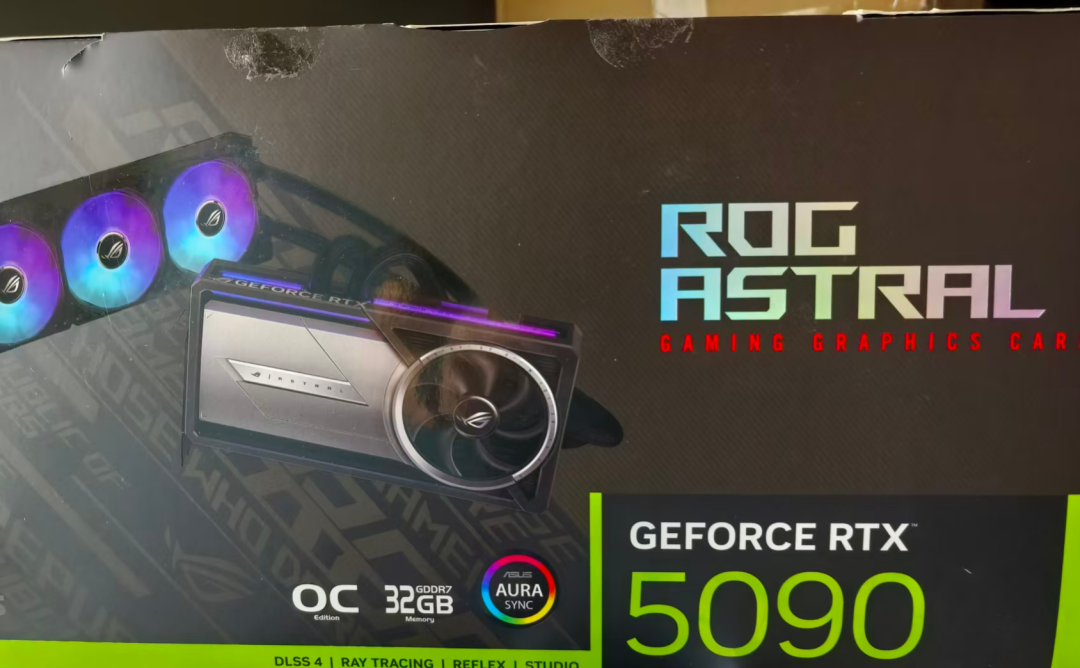
在仓库里我看到了一台很新的服务器,里面居然有Nvidia GEFORCE RTX 5090的GPU显卡,大小有32个G,既然没人用,那我可以拿过来部署下大模型Qwen3.5-27B。
vLLM框架是一个高效的大语言模型推理和部署服务系统。
高效的内存管理:PageAttention算法,vLLM实现了对KV缓存的高效管理,减少内存的浪费,优化了模型的运行效率。
高吞吐量:vLLM支持异步处理和连续批处理要求,显著地提高了模型推理的吞吐量,加速了文本生成和处理速度。
易用性:vLLM与HuggingFace模型无缝集成,支持多种流行的大型语言模型,简化了部署和推理过程,兼容了OpenAI的API服务器。
分布式推理:框架支持在多GPU环境中进行分布式推理,通过模型并行策略和高效的数据通信,提升了处理大型模型的能力。
开源共享:vLLM由于其开源的属性,拥有活跃的社区,这便于开发者贡献和改进,共同推进技术的发展。
vLLM只支持Linux环境,并且要具备GPU资源,如果没有GPU,那么CPU需要有特定的指令集的支持。
给服务器插上电源,安装好Ubuntu24.04的操作系统。
步骤一: 安装miniconda:
root@vllm:~# mkdir -p ~/miniconda3
root@vllm:~# wget https://repo.anaconda.com/miniconda/Miniconda3-latest-Linux-x86_64.sh -O ~/miniconda3/miniconda.sh
--2026-06-16 01:48:38--  https://repo.anaconda.com/miniconda/Miniconda3-latest-Linux-x86_64.sh
Resolving repo.anaconda.com (repo.anaconda.com)... 104.16.32.241, 104.16.191.158, 2606:4700::6810:20f1, ...
Connecting to repo.anaconda.com (repo.anaconda.com)|104.16.32.241|:443... connected.
HTTP request sent, awaiting response... 200 OK
Length: 163179296 (156M) [application/octet-stream]
Saving to: ‘/root/miniconda3/miniconda.sh’
/root/miniconda3/miniconda.sh    100%[=======================================================>] 155.62M  5.04MB/s    in 50s
2026-06-16 01:49:28 (3.11 MB/s) - ‘/root/miniconda3/miniconda.sh’ saved [163179296/163179296]
root@vllm:~# bash ~/miniconda3/miniconda.sh -b -u -p ~/miniconda3/
PREFIX=/root/miniconda3
Unpacking bootstrapper...
Unpacking payload...
Installing base environment...
Preparing transaction: ...working... done
Executing transaction: ...working... done
installation finished.
root@vllm:~# rm -f ~/miniconda3/miniconda.sh
# 激活、初始化bash
root@vllm:~# ~/miniconda3/bin/conda init bash
no change     /root/miniconda3/condabin/conda
no change     /root/miniconda3/bin/conda
no change     /root/miniconda3/bin/activate
no change     /root/miniconda3/bin/deactivate
no change     /root/miniconda3/etc/profile.d/conda.sh
no change     /root/miniconda3/etc/fish/conf.d/conda.fish
no change     /root/miniconda3/shell/condabin/Conda.psm1
no change     /root/miniconda3/shell/condabin/conda-hook.ps1
no change     /root/miniconda3/lib/python3.13/site-packages/xontrib/conda.xsh
no change     /root/miniconda3/etc/profile.d/conda.csh
modified      /root/.bashrc
==> For changes to take effect, close and re-open your current shell. <==
root@vllm:~# ~/miniconda3/bin/conda init zsh
no change     /root/miniconda3/condabin/conda
no change     /root/miniconda3/bin/conda
no change     /root/miniconda3/bin/activate
no change     /root/miniconda3/bin/deactivate
no change     /root/miniconda3/etc/profile.d/conda.sh
no change     /root/miniconda3/etc/fish/conf.d/conda.fish
no change     /root/miniconda3/shell/condabin/Conda.psm1
no change     /root/miniconda3/shell/condabin/conda-hook.ps1
no change     /root/miniconda3/lib/python3.13/site-packages/xontrib/conda.xsh
no change     /root/miniconda3/etc/profile.d/conda.csh
modified      /root/.zshrc
==> For changes to take effect, close and re-open your current shell. <==
root@vllm:~# source /root/.bashrc
(base) root@vllm:~# source /root/.zshrc
接下来修改镜像:
conda默认是国外镜像,需要第三方下载,速度比较慢。
(base) root@vllm:~# cat /root/miniconda3/.condarc
show_channel_urls: true
channels:
- https://mirrors.tuna.tsinghua.edu.cn/anaconda/cloud/pytorch/
- https://mirrors.tuna.tsinghua.edu.cn/anaconda/cloud/msys2/
- https://mirrors.tuna.tsinghua.edu.cn/anaconda/cloud/conda-forge/
- https://mirrors.tuna.tsinghua.edu.cn/anaconda/pkgs/main/
- https://mirrors.tuna.tsinghua.edu.cn/anaconda/pkgs/free/
- defaults
custom_channels:
conda-forge: https://mirrors.tuna.tsinghua.edu.cn/anaconda/cloud
msys2: https://mirrors.tuna.tsinghua.edu.cn/anaconda/cloud
bioconda: https://mirrors.tuna.tsinghua.edu.cn/anaconda/cloud
menpo: https://mirrors.tuna.tsinghua.edu.cn/anaconda/cloud
pytorch: https://mirrors.tuna.tsinghua.edu.cn/anaconda/cloud
pytorch-lts: https://mirrors.tuna.tsinghua.edu.cn/anaconda/cloud
simpleitk: https://mirrors.tuna.tsinghua.edu.cn/anaconda/cloud
可以看到Channel URLs已经生成:
(base) root@vllm:~# conda info
active environment : base
active env location : /root/miniconda3
shell level : 1
user config file : /root/.condarc
populated config files : /root/miniconda3/.condarc
/root/miniconda3/condarc.d/anaconda-auth.yml
conda version : 26.3.2
conda-build version : not installed
python version : 3.13.13.final.0
solver : libmamba (default)
virtual packages : __archspec=1=skylake
__conda=26.3.2=0
__glibc=2.39=0
__linux=6.8.0=0
__unix=0=0
base environment : /root/miniconda3  (writable)
conda av data dir : /root/miniconda3/etc/conda
conda av metadata url : None
channel URLs : https://mirrors.tuna.tsinghua.edu.cn/anaconda/cloud/pytorch/linux-64
https://mirrors.tuna.tsinghua.edu.cn/anaconda/cloud/pytorch/noarch
https://mirrors.tuna.tsinghua.edu.cn/anaconda/cloud/msys2/linux-64
https://mirrors.tuna.tsinghua.edu.cn/anaconda/cloud/msys2/noarch
https://mirrors.tuna.tsinghua.edu.cn/anaconda/cloud/conda-forge/linux-64
https://mirrors.tuna.tsinghua.edu.cn/anaconda/cloud/conda-forge/noarch
https://mirrors.tuna.tsinghua.edu.cn/anaconda/pkgs/main/linux-64
https://mirrors.tuna.tsinghua.edu.cn/anaconda/pkgs/main/noarch
https://mirrors.tuna.tsinghua.edu.cn/anaconda/pkgs/free/linux-64
https://mirrors.tuna.tsinghua.edu.cn/anaconda/pkgs/free/noarch
https://repo.anaconda.com/pkgs/main/linux-64
https://repo.anaconda.com/pkgs/main/noarch
https://repo.anaconda.com/pkgs/r/linux-64
https://repo.anaconda.com/pkgs/r/noarch
package cache : /root/miniconda3/pkgs
/root/.conda/pkgs
envs directories : /root/miniconda3/envs
/root/.conda/envs
temporary directory : /tmp
platform : linux-64
user-agent : conda/26.3.2 requests/2.33.1 CPython/3.13.13 Linux/6.8.0-124-generic ubuntu/24.04.2 glibc/2.39 solver/libmamba conda-libmamba-solver/26.4.0 libmambapy/2.3.2 aau/0.7.6 c/. s/. e/.
UID:GID : 0:0
netrc file : None
offline mode : False
(base) root@vllm:~#
miniconda只是一个虚拟环境的管理,不同包的管理,创建的是一个独立的环境。
(base) root@vllm:~# conda create --name vLLM python=3.11 -y
CondaToSNonInteractiveError: Terms of Service have not been accepted for the following channels. Please accept or remove them before proceeding:
- https://repo.anaconda.com/pkgs/main
- https://repo.anaconda.com/pkgs/r
To accept these channels' Terms of Service, run the following commands:
conda tos accept --override-channels --channel https://repo.anaconda.com/pkgs/main
conda tos accept --override-channels --channel https://repo.anaconda.com/pkgs/r
For information on safely removing channels from your conda configuration,
please see the official documentation:
https://www.anaconda.com/docs/tools/working-with-conda/channels
# 全部接受(推荐),系统会引导你完成有待同意条款的确认过程。
(base) root@vllm:~# conda tos accept
Terms of Service not found for https://mirrors.tuna.tsinghua.edu.cn/anaconda/cloud/pytorch
Terms of Service not found for https://mirrors.tuna.tsinghua.edu.cn/anaconda/cloud/msys2
Terms of Service not found for https://mirrors.tuna.tsinghua.edu.cn/anaconda/cloud/conda-forge
Terms of Service not found for https://mirrors.tuna.tsinghua.edu.cn/anaconda/pkgs/main
Terms of Service not found for https://mirrors.tuna.tsinghua.edu.cn/anaconda/pkgs/free
accepted Terms of Service for https://repo.anaconda.com/pkgs/main
accepted Terms of Service for https://repo.anaconda.com/pkgs/r
(base) root@vllm:~# conda create --name vLLM python=3.11 -y
2 channel Terms of Service accepted
Retrieving notices: done
Channels:
- pytorch
- msys2
- conda-forge
- https://mirrors.tuna.tsinghua.edu.cn/anaconda/pkgs/main
- https://mirrors.tuna.tsinghua.edu.cn/anaconda/pkgs/free
- defaults
Platform: linux-64
Collecting package metadata (repodata.json): done
Solving environment: done
==> WARNING: A newer version of conda exists. <==
current version: 26.3.2
latest version: 26.5.2
Please update conda by running
$ conda update -n base -c defaults conda
## Package Plan ##
environment location: /root/miniconda3/envs/vLLM
added / updated specs:
- python=3.11
The following packages will be downloaded:
package                    |            build
---------------------------|-----------------
_openmp_mutex-4.5          |           20_gnu          28 KB  conda-forge
bzip2-1.0.8                |       hda65f42_9         254 KB  conda-forge
ca-certificates-2026.5.20  |       hbd8a1cb_0         127 KB  conda-forge
ld_impl_linux-64-2.45.1    |default_hbd61a6d_102         711 KB  conda-forge
libexpat-2.8.1             |       hecca717_1          76 KB  conda-forge
libffi-3.5.2               |       h3435931_0          57 KB  conda-forge
libgcc-15.2.0              |      he0feb66_19        1017 KB  conda-forge
libgcc-ng-15.2.0           |      h69a702a_19          27 KB  conda-forge
libgomp-15.2.0             |      he0feb66_19         590 KB  conda-forge
liblzma-5.8.3              |       hb03c661_0         111 KB  conda-forge
libnsl-2.0.1               |       hb9d3cd8_1          33 KB  conda-forge
libsqlite-3.53.2           |       h0c1763c_0         935 KB  conda-forge
libuuid-2.42.1             |       h5347b49_0          39 KB  conda-forge
libxcrypt-4.4.36           |       hd590300_1          98 KB  conda-forge
libzlib-1.3.2              |       h25fd6f3_2          62 KB  conda-forge
ncurses-6.6                |       hdb14827_0         897 KB  conda-forge
openssl-3.6.3              |       h35e630c_0         3.0 MB  conda-forge
packaging-26.2             |     pyhc364b38_0          89 KB  conda-forge
pip-26.1.2                 |     pyh8b19718_0         1.1 MB  conda-forge
python-3.11.15             |h7508c33_1_cpython        29.5 MB  conda-forge
readline-8.3               |       h853b02a_0         337 KB  conda-forge
setuptools-82.0.1          |     pyh332efcf_0         625 KB  conda-forge
tk-8.6.13                  |noxft_h366c992_103         3.1 MB  conda-forge
tzdata-2025c               |       hc9c84f9_1         116 KB  conda-forge
wheel-0.47.0               |     pyhd8ed1ab_0          33 KB  conda-forge
zstd-1.5.7                 |       hb78ec9c_6         587 KB  conda-forge
------------------------------------------------------------
Total:        43.5 MB
The following NEW packages will be INSTALLED:
_openmp_mutex      conda-forge/linux-64::_openmp_mutex-4.5-20_gnu
bzip2              conda-forge/linux-64::bzip2-1.0.8-hda65f42_9
ca-certificates    conda-forge/noarch::ca-certificates-2026.5.20-hbd8a1cb_0
ld_impl_linux-64   conda-forge/linux-64::ld_impl_linux-64-2.45.1-default_hbd61a6d_102
libexpat           conda-forge/linux-64::libexpat-2.8.1-hecca717_1
libffi             conda-forge/linux-64::libffi-3.5.2-h3435931_0
libgcc             conda-forge/linux-64::libgcc-15.2.0-he0feb66_19
libgcc-ng          conda-forge/linux-64::libgcc-ng-15.2.0-h69a702a_19
libgomp            conda-forge/linux-64::libgomp-15.2.0-he0feb66_19
liblzma            conda-forge/linux-64::liblzma-5.8.3-hb03c661_0
libnsl             conda-forge/linux-64::libnsl-2.0.1-hb9d3cd8_1
libsqlite          conda-forge/linux-64::libsqlite-3.53.2-h0c1763c_0
libuuid            conda-forge/linux-64::libuuid-2.42.1-h5347b49_0
libxcrypt          conda-forge/linux-64::libxcrypt-4.4.36-hd590300_1
libzlib            conda-forge/linux-64::libzlib-1.3.2-h25fd6f3_2
ncurses            conda-forge/linux-64::ncurses-6.6-hdb14827_0
openssl            conda-forge/linux-64::openssl-3.6.3-h35e630c_0
packaging          conda-forge/noarch::packaging-26.2-pyhc364b38_0
pip                conda-forge/noarch::pip-26.1.2-pyh8b19718_0
python             conda-forge/linux-64::python-3.11.15-h7508c33_1_cpython
readline           conda-forge/linux-64::readline-8.3-h853b02a_0
setuptools         conda-forge/noarch::setuptools-82.0.1-pyh332efcf_0
tk                 conda-forge/linux-64::tk-8.6.13-noxft_h366c992_103
tzdata             conda-forge/noarch::tzdata-2025c-hc9c84f9_1
wheel              conda-forge/noarch::wheel-0.47.0-pyhd8ed1ab_0
zstd               conda-forge/linux-64::zstd-1.5.7-hb78ec9c_6
Downloading and Extracting Packages:
Preparing transaction: done
Verifying transaction: done
Executing transaction: done
#
# To activate this environment, use
#
#     $ conda activate vLLM
#
# To deactivate an active environment, use
#
#     $ conda deactivate
Channel "defaults" has the following notices:
[info] -- Tue Jun  9 00:00:00 2026
PyTorch 2.12 with CUDA support is now available to install with your current channel (Anaconda Main). Learn more: https://anaconda.org/main/pytorch?utm_source=channel_notices
然后激活环境:
(base) root@vllm:~# conda activate vLLM
(vLLM) root@vllm:~#
升级包,找到最新安装版本的包:
apt update
apt upgrade
安装nvidia 驱动的前置依赖项:
(vLLM) root@vllm:~# apt install -y build-essential dkms
nouveau这个nvidia驱动需要禁用,blacklist加属性就是禁用。按如下配置:
(base) root@ollama:~# cat /etc/modprobe.d/blacklist-nouveau.conf
blacklist nouveau
blacklist lbm-nouvean
options nouveau modeset=0
(base) root@ollama:~#
(vLLM) root@ollama:~# update-initramfs -u
update-initramfs: Generating /boot/initrd.img-6.8.0-124-generic
(vLLM) root@ollama:~#
步骤二:安装Nvidia驱动。
http://nvidia.cn/drivers/lookup/
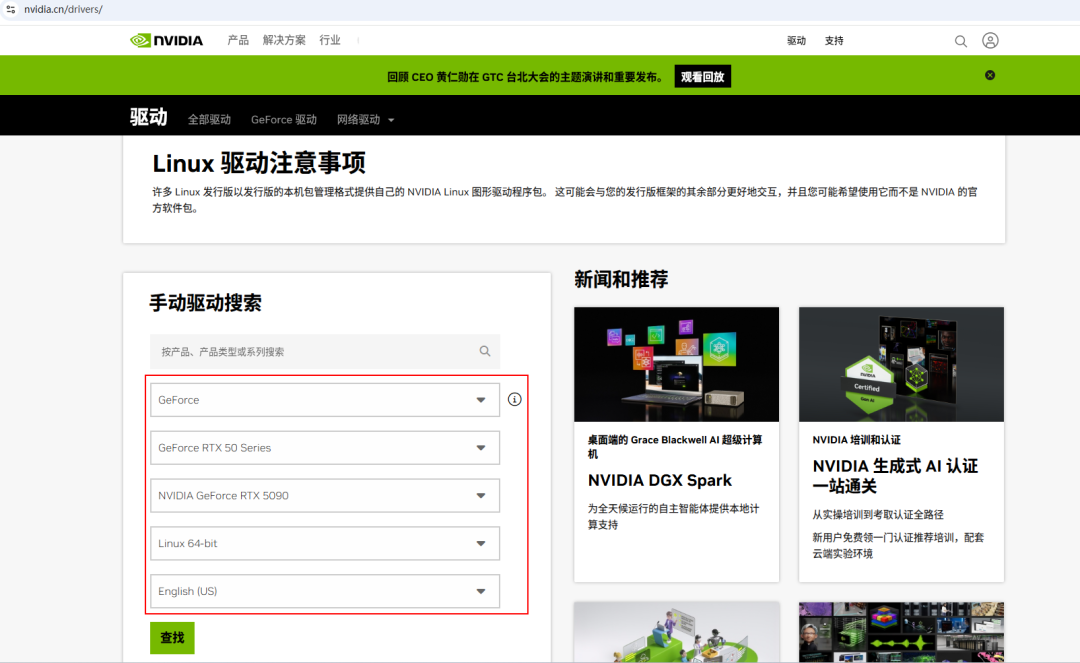
这个是我们的GPU的显卡。
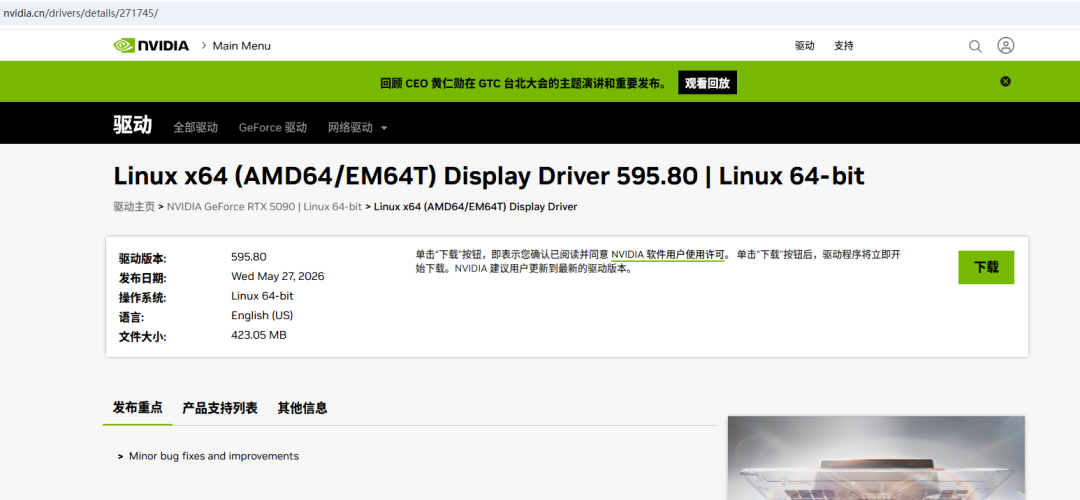
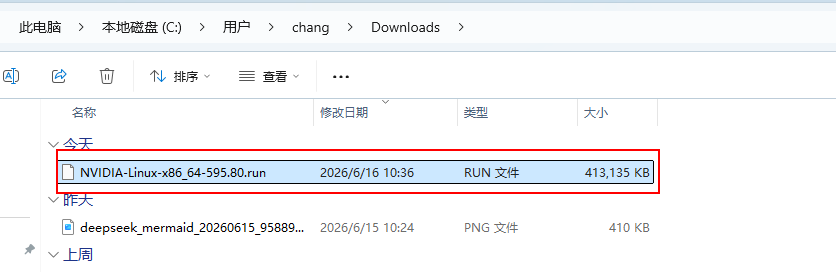
把文件上传到系统中:
chmod +x NVIDIA-Linux-x86_64-595.80.run
然后再执行:
./NVIDIA-Linux-x86_64-595.80.run
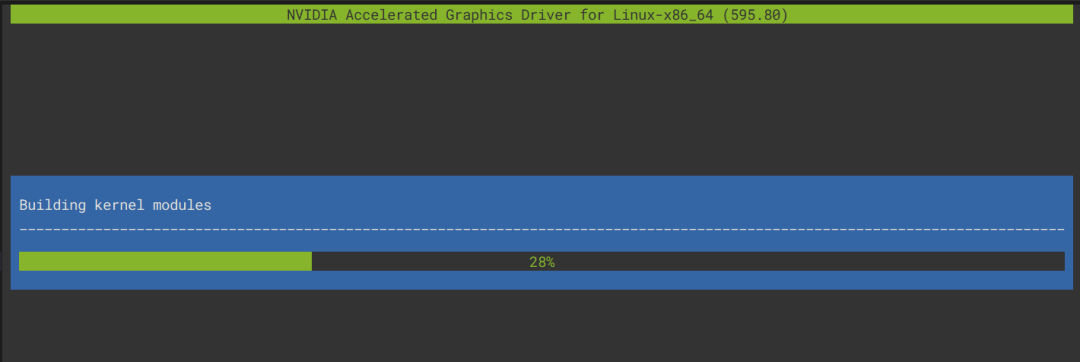
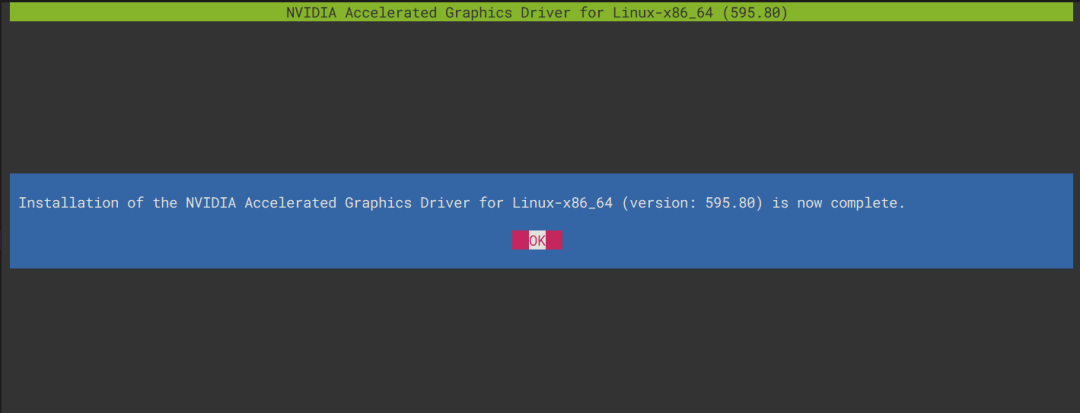
大体上这个驱动安装的过程应该就是这样的。驱动安装好之后,需要重启服务器。
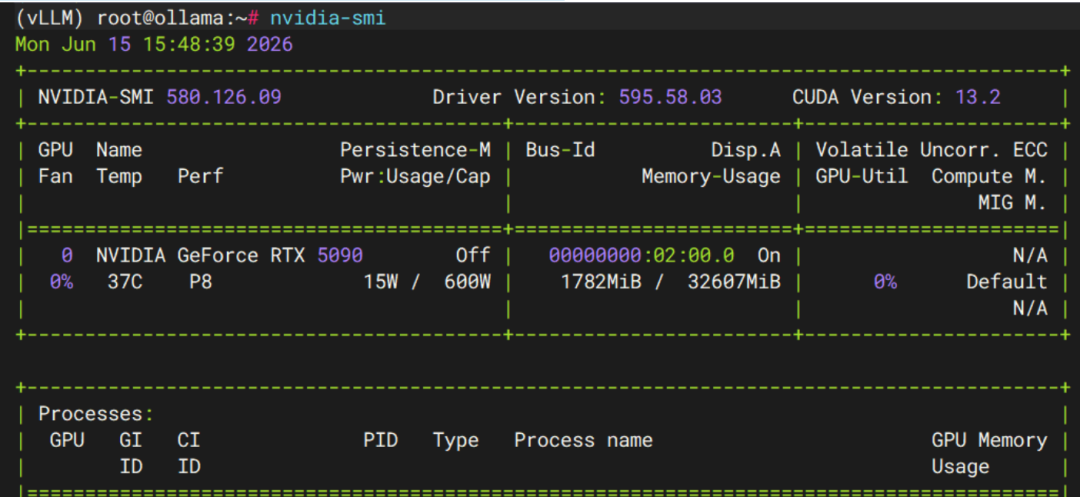
安装完毕,我们可以通过这个命令查看到驱动信息:
步骤三:安装cuda工具包:
https://developer.nvidia.com/ 到这个官网地址上进行下载:
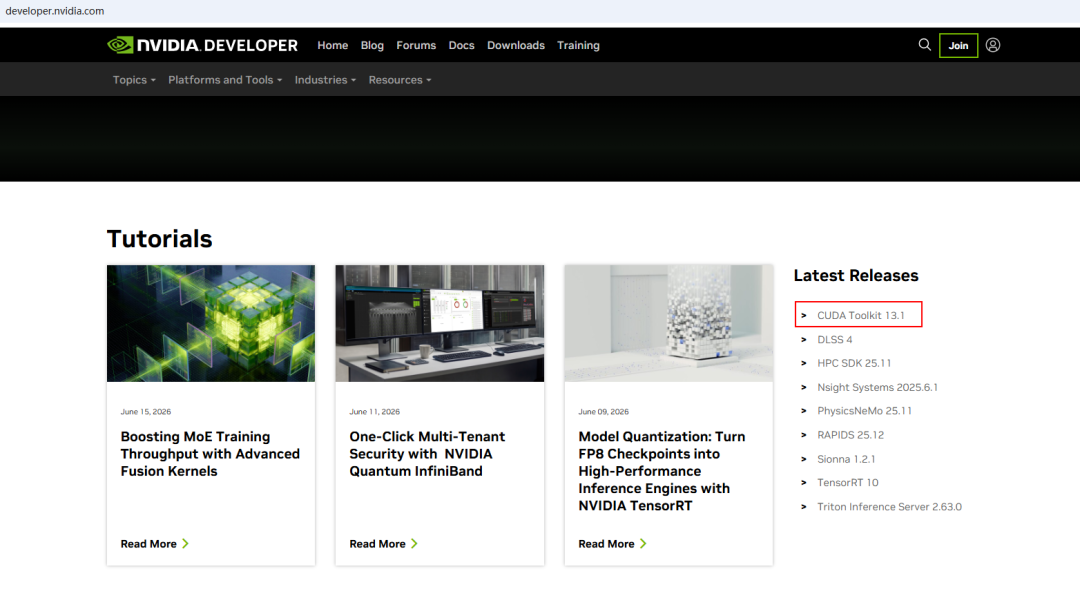
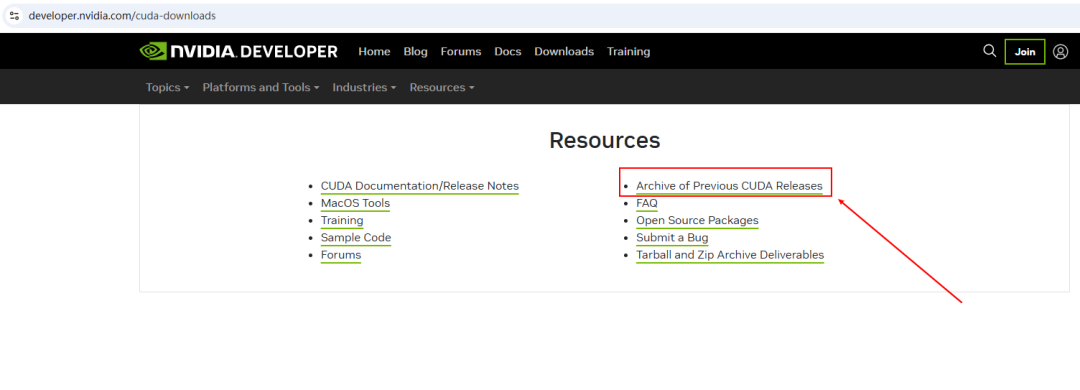
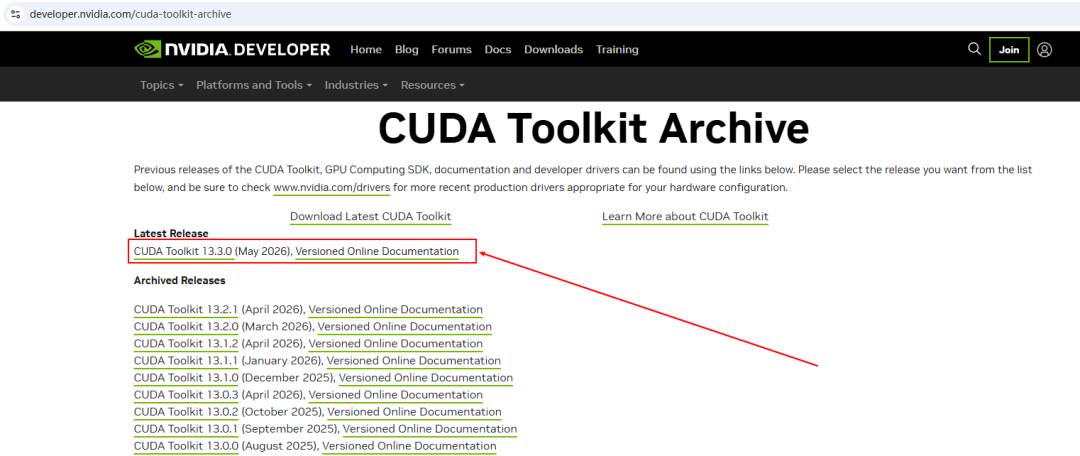
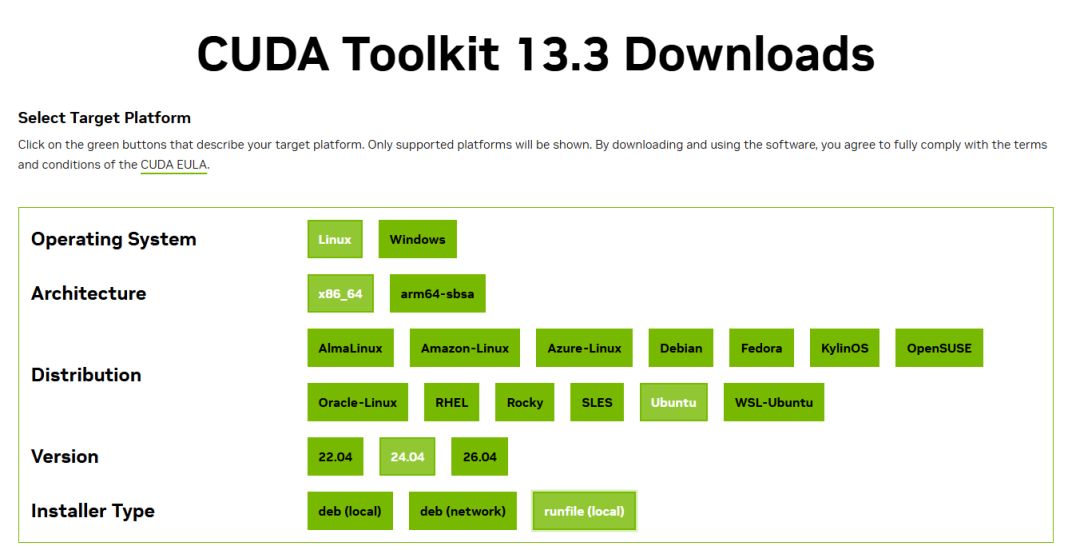
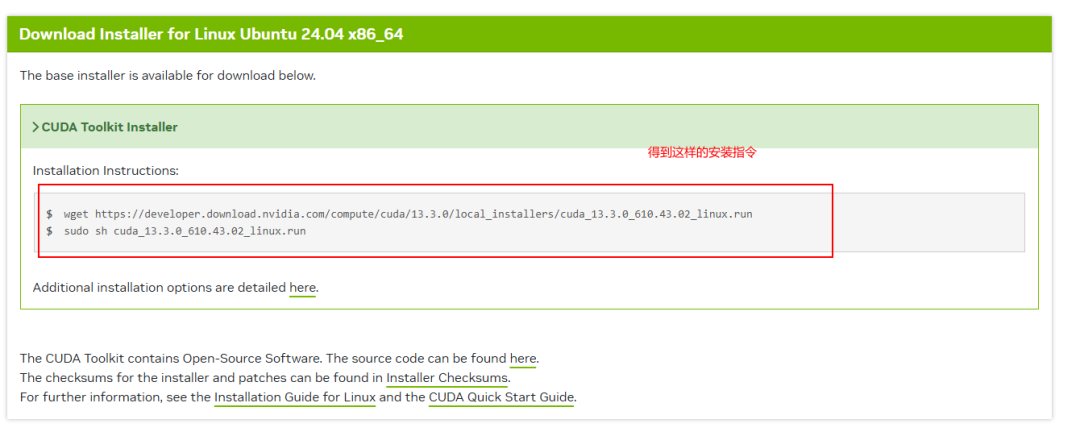
安装的最新的CUDA的安装文件:
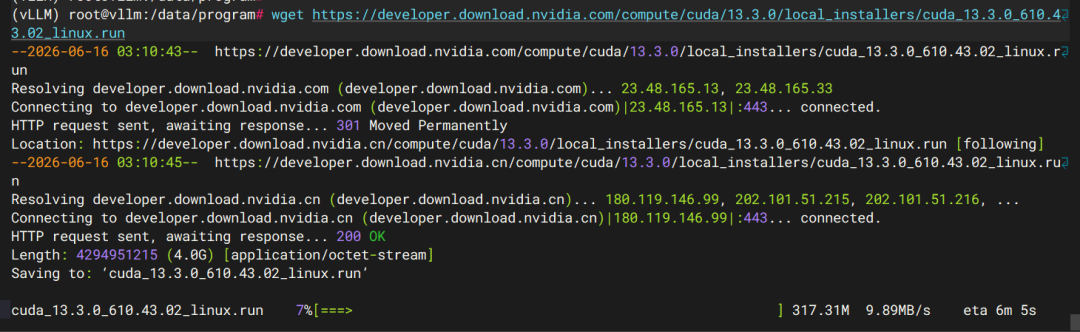
这个CUDA工具的大小有4G多,安装下:
(vLLM) root@vllm:/data/program# ll
total 4607440
drwxr-xr-x 2 root root       4096 Jun 16 03:10 ./
drwxr-xr-x 3 root root       4096 Jun 16 02:50 ../
-rw-r--r-- 1 root root 4294951215 May 19 19:38 cuda_13.3.0_610.43.02_linux.run
-rwxr-xr-x 1 root root  423049323 Jun 16 02:50 NVIDIA-Linux-x86_64-595.80.run*
(vLLM) root@vllm:/data/program#
(vLLM) root@vllm:/data/program#
(vLLM) root@vllm:/data/program# chmod a+x cuda_13.3.0_610.43.02_linux.run
(vLLM) root@vllm:/data/program# ll
total 4607440
drwxr-xr-x 2 root root       4096 Jun 16 03:10 ./
drwxr-xr-x 3 root root       4096 Jun 16 02:50 ../
-rwxr-xr-x 1 root root 4294951215 May 19 19:38 cuda_13.3.0_610.43.02_linux.run*
-rwxr-xr-x 1 root root  423049323 Jun 16 02:50 NVIDIA-Linux-x86_64-595.80.run*
(vLLM) root@vllm:/data/program#
(vLLM) root@vllm:/data/program# ./cuda_13.3.0_610.43.02_linux.run
如果之前有CUDA的版本,那建议先卸载之前的版本:
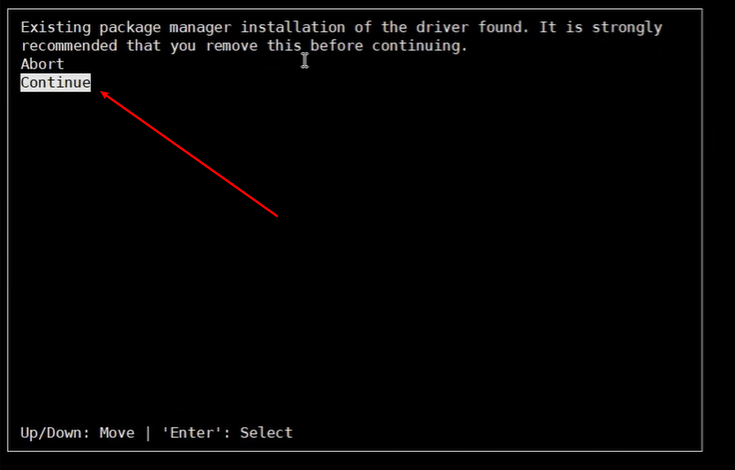
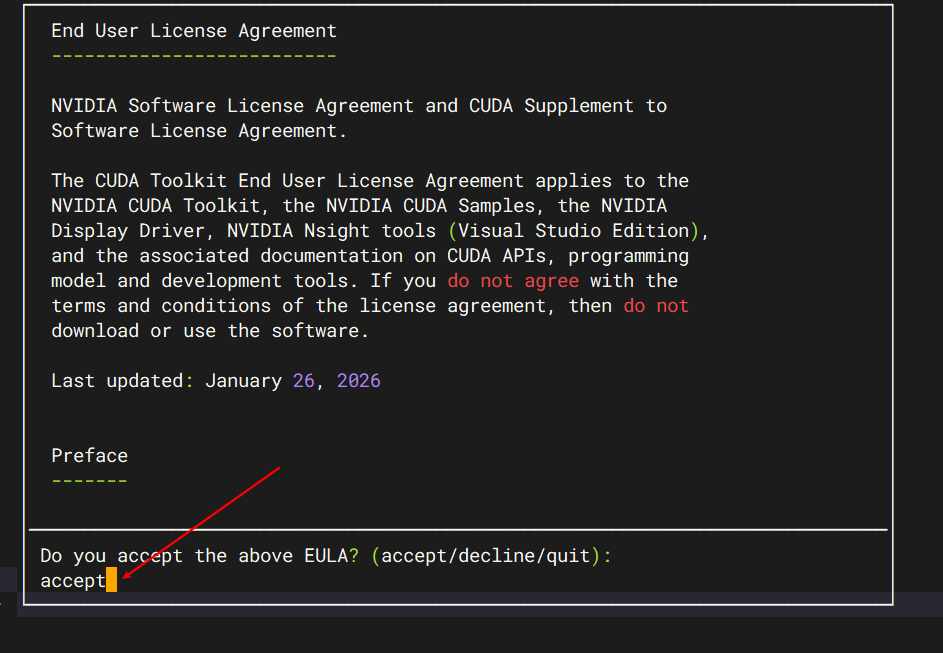
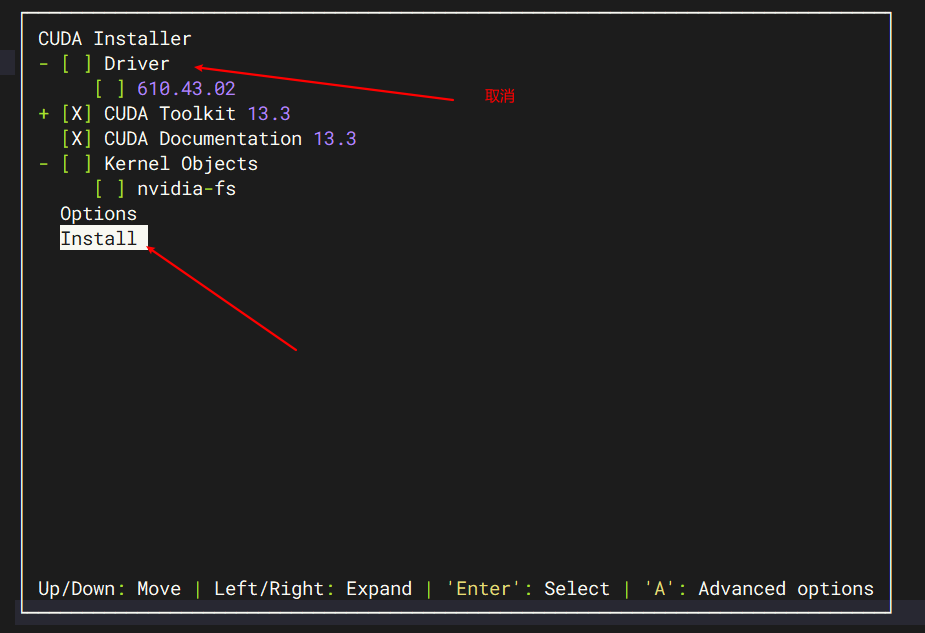
进入到cuda工具的安装过程:
(vLLM) root@vllm:/data/program# ./cuda_13.3.0_610.43.02_linux.run
===========
= Summary =
===========
Driver:   Not Selected
Toolkit:  Installed in /usr/local/cuda-13.3/
Please make sure that
-   PATH includes /usr/local/cuda-13.3/bin
-   LD_LIBRARY_PATH includes /usr/local/cuda-13.3/lib64, or, add /usr/local/cuda-13.3/lib64 to /etc/ld.so.conf and run ldconfig as root
To uninstall the CUDA Toolkit, run cuda-uninstaller in /usr/local/cuda-13.3/bin
***WARNING: Incomplete installation! This installation did not install the CUDA Driver. A driver of version at least 610.00 is required for CUDA 13.3 functionality to work.
To install the driver using this installer, run the following command, replacing <CudaInstaller> with the name of this run file:
sudo <CudaInstaller>.run --silent --driver
Logfile is /var/log/cuda-installer.log
(vLLM) root@vllm:/data/program#
然后我们到/root/.bashrc中配置下环境变量:
(base) root@ollama:/data/program# tail -3 /root/.bashrc
export CUDA_HOME=/usr/local/cuda-13.3
export PATH=$CUDA_HOME/bin:$PATH
export LD_LIBRARY_PATH=$CUDA_HOME/lib64:$LD_LIBRARY_PATH
然后使用source /root/.bashrc让配置文件生效。
(base) root@ollama:/data/program# source /root/.bashrc
(base) root@ollama:/data/program#
通过nvcc --version可以检查cuba的版本是13.3,说明cuda安装成功。
(base) root@ollama:/data/program# nvcc --version
nvcc: NVIDIA (R) Cuda compiler driver
Copyright (c) 2005-2026 NVIDIA Corporation
Built on Fri_Apr_24_07:22:02_PM_PDT_2026
Cuda compilation tools, release 13.3, V13.3.33
Build cuda_13.3.r13.3/compiler.37862127_0
至此,步骤三安装完毕。
步骤四:安装Pytorch:
(vLLM) root@vllm:/data/program# pip3 install torch torchvision torchaudio
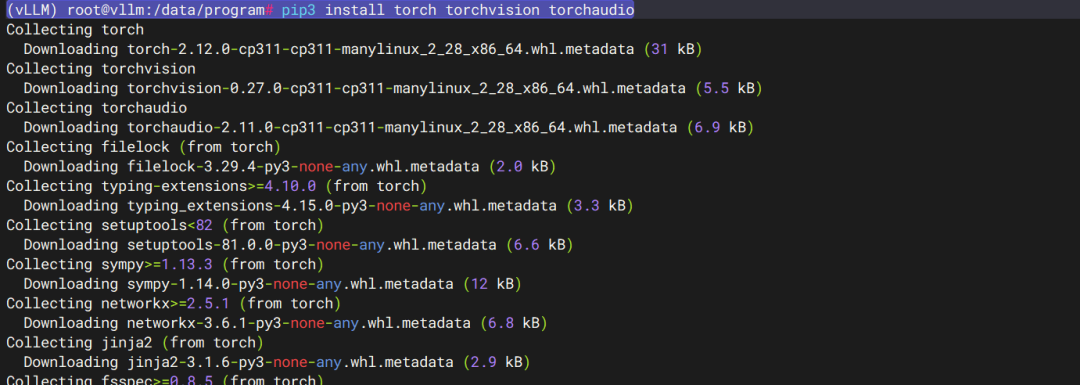
我安装的时候,服务器下载还是挺快的。如果直接命令比较慢,那我们可以下载whl文件,直接进行安装,速度应该比较快。
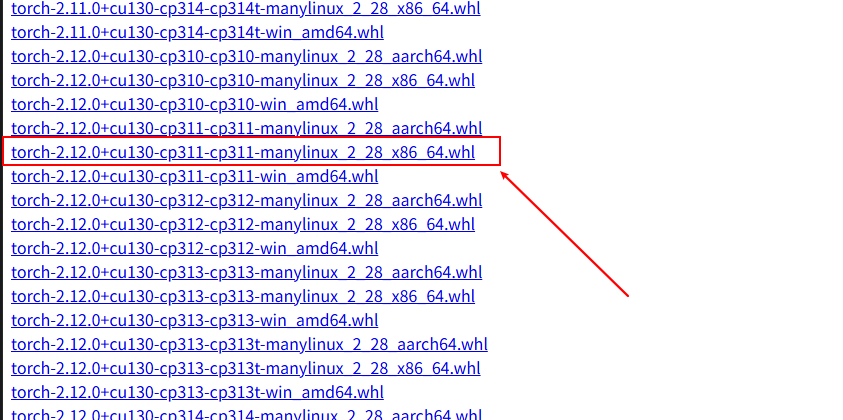
cuda是130版本,cp311是python的版本3.11版本。
然后通过命令安装:
(vLLM) root@vllm:/data/program# pip install torch-2.12.0+cu130-cp311-cp311-manylinux_2_28_x86_64.whl
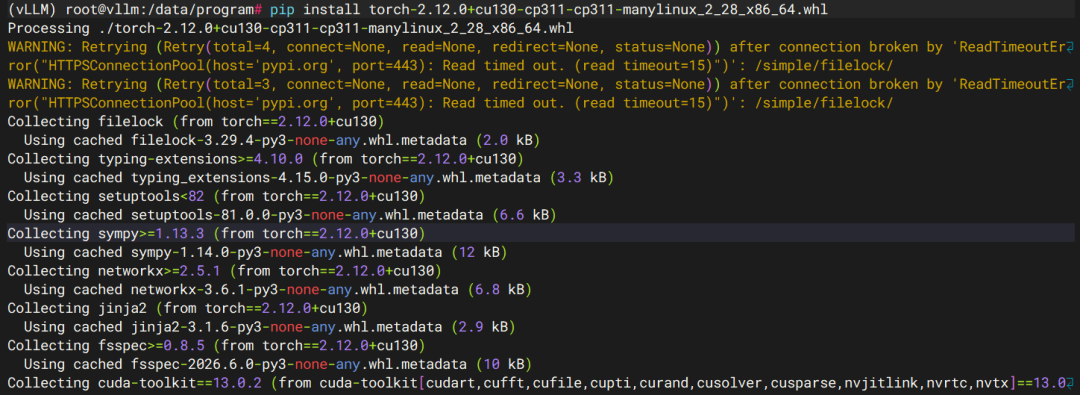
下载过程中,还是需要下载一些包。
步骤五:安装vLLM:
pip install vLLM
# 然后查看版本:
(vLLM) root@ollama:/data/program# vllm --version
0.23.0
最后这么显示,说明vLLM安装成功。
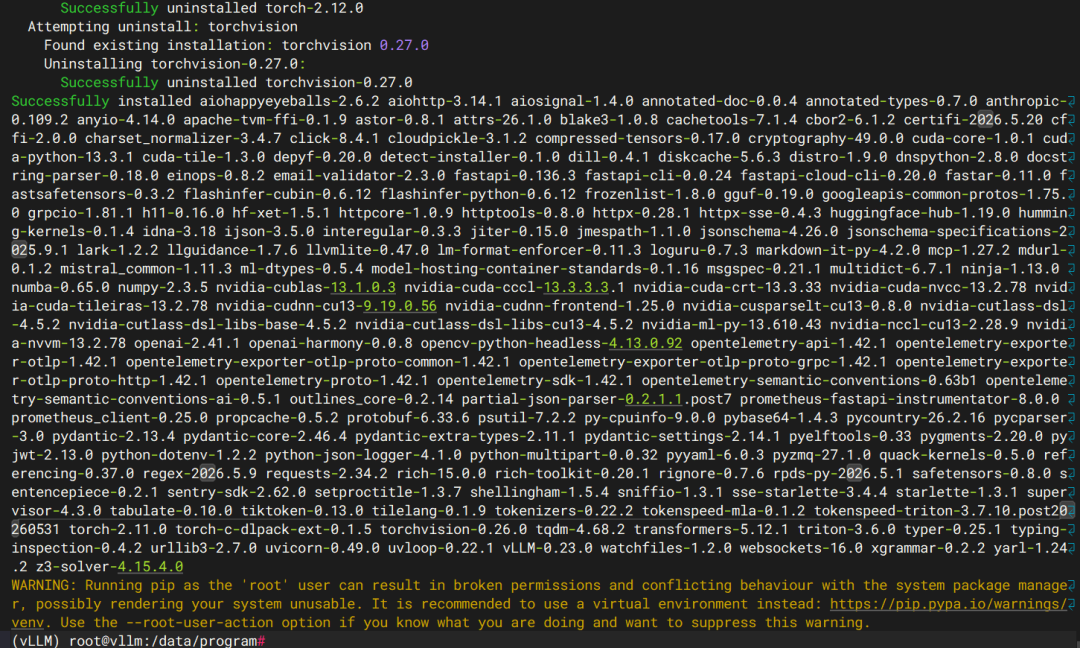
再看下版本:
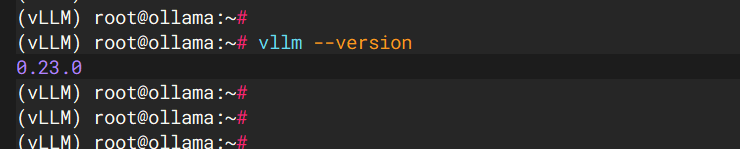
这样,vLLM就安装完毕。
步骤六:下载大模型:
到https://hf-mirror.com这个网站:
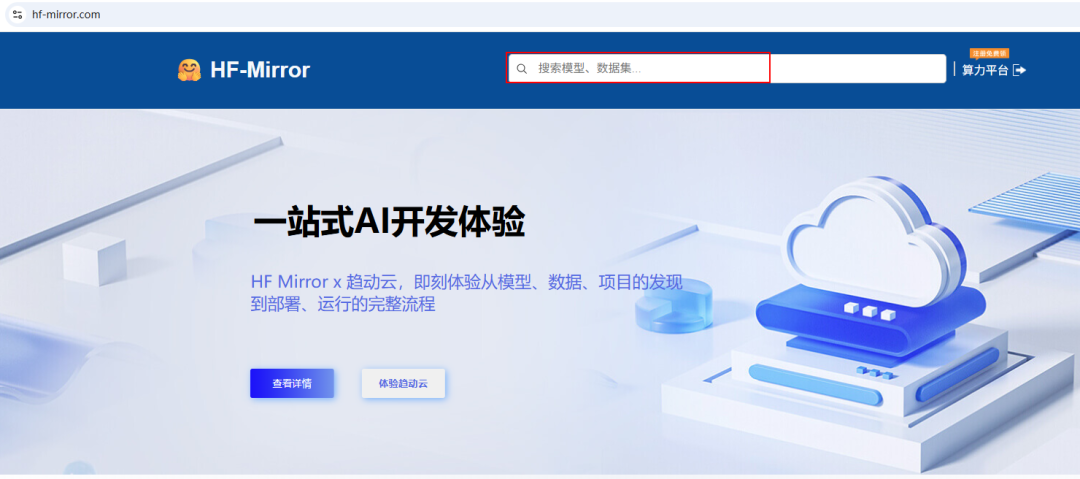
在搜索框中,查找Qwen3.5-27B-AWQ-4bit这个大模型。
然后我们可以使用hf工具来下载:
vim /root/.bashrc
export HF_ENDPOINT=https://hf-mirror.com
souce /root/.bashrc
下载命令:
hf download cyankiwi/Qwen3.5-27B-AWQ-4bit --local-dir cyankiwi/Qwen3.5-27B-AWQ-4bit
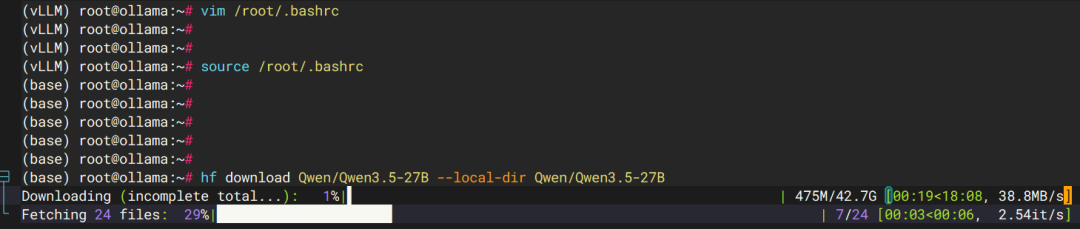
我这个截图不对,看这个截图,可以看到这个命令确实是可以执行的。
步骤七:运行大模型:
vllm serve Qwen/Qwen3.5-27B-AWQ-4bit \
--async-scheduling \
--gpu-memory-utilization 0.85 \
--host 0.0.0.0 \
--port 8000 \
--max_model_len 4096 \
--enforce-eager
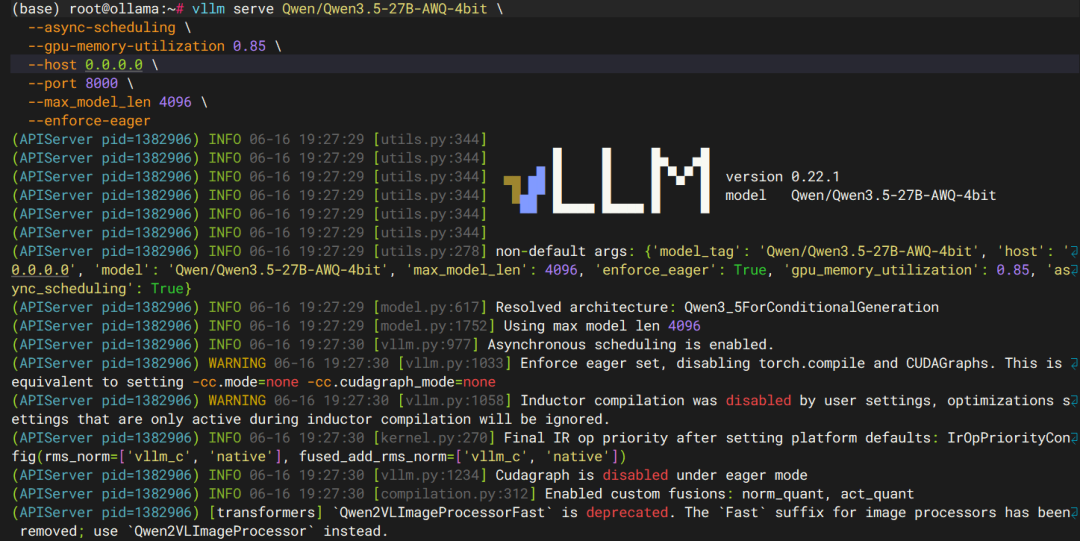
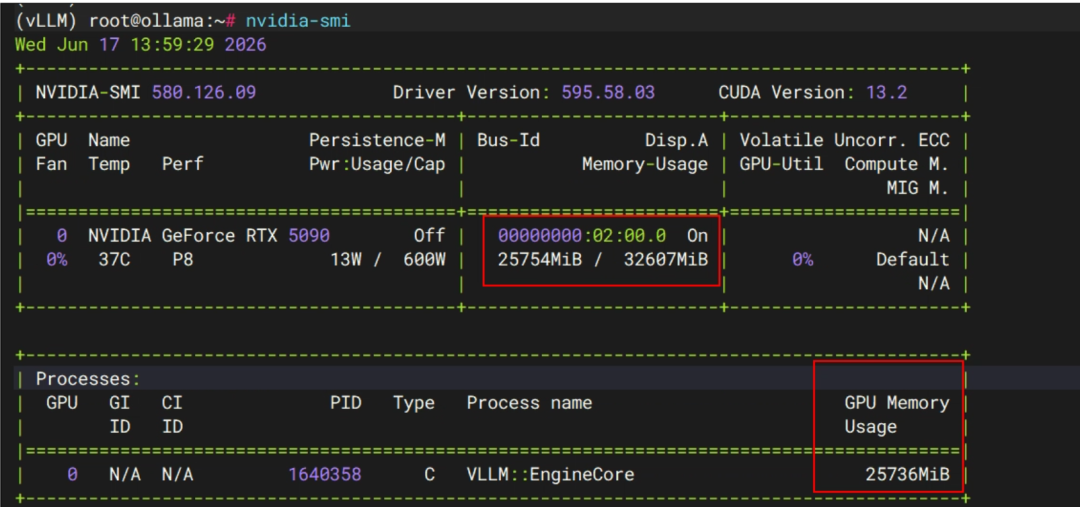
通过nvidia-smi检查显存占用情况:
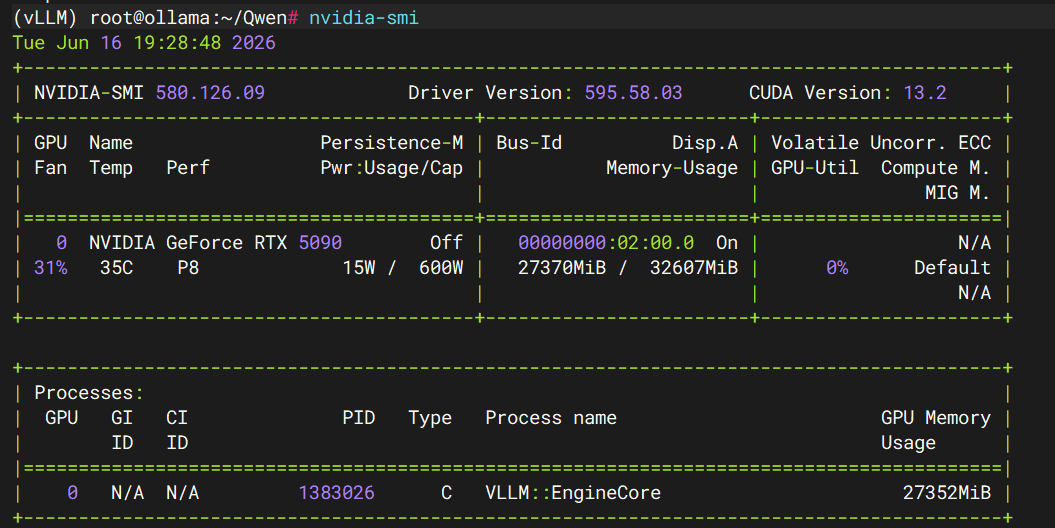
现在看到显存占用达到27个G。
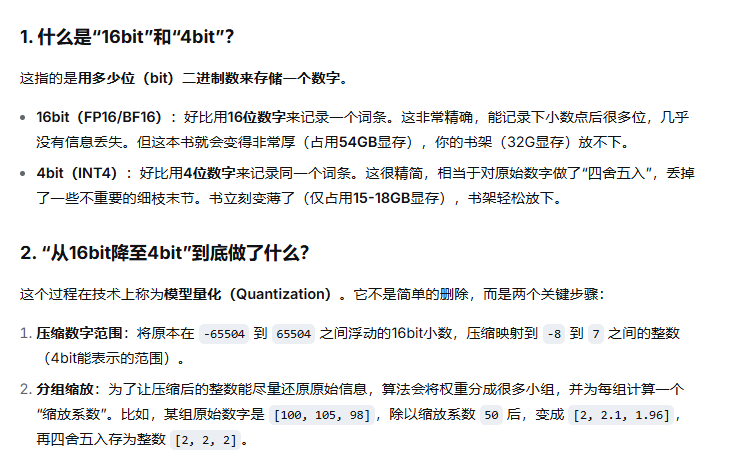
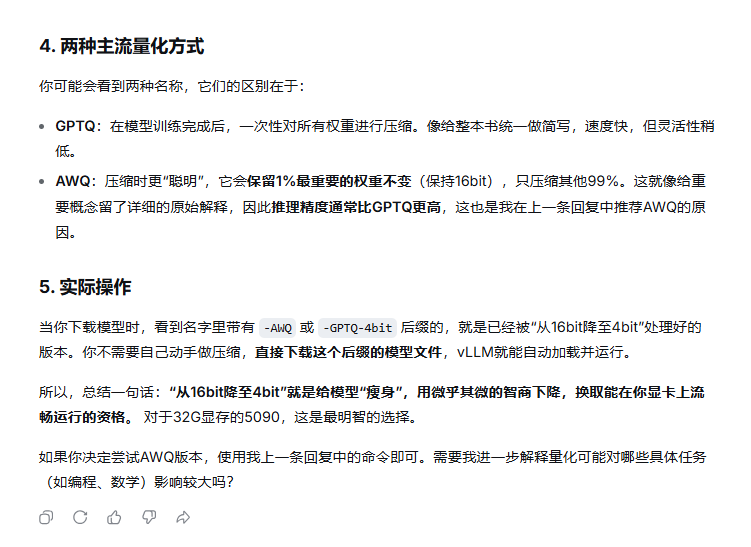
我为什么使用Qwen3.5-27B-AWQ-4bit这个模型呢?我在32G显存上跑不了Qwen3.5-27B大模型,在Deepseek上说是5090这张卡完全能满足,但是我跑了就报错,所以我才采用了Qwen3.5-27B-AWQ-4bit。
最后我们再使用一个脚本测试下:
(vLLM) root@ollama:~# cat python_script.py
import time
from openai import OpenAI
client = OpenAI(
api_key="EMPTY",
base_url="http://localhost:8000/v1",
timeout=3600
)
messages = [
{
"role": "user",
"content": [
{
"type": "image_url",
"image_url": {
"url": "https://modelscope.oss-cn-beijing.aliyuncs.com/resource/qwen.png"
}
},
{
"type": "text",
"text": "图⽚中有什么⽂字"
}
]
}
]
start = time.time()
response = client.chat.completions.create(
model="/cyankiwi/Qwen3.5-27B-AWQ-4bit",
messages=messages,
max_tokens=2048
)
print(f"Response costs: {time.time() - start:.2f}s")
print(f"Generated text: {response.choices[0].message.content}")
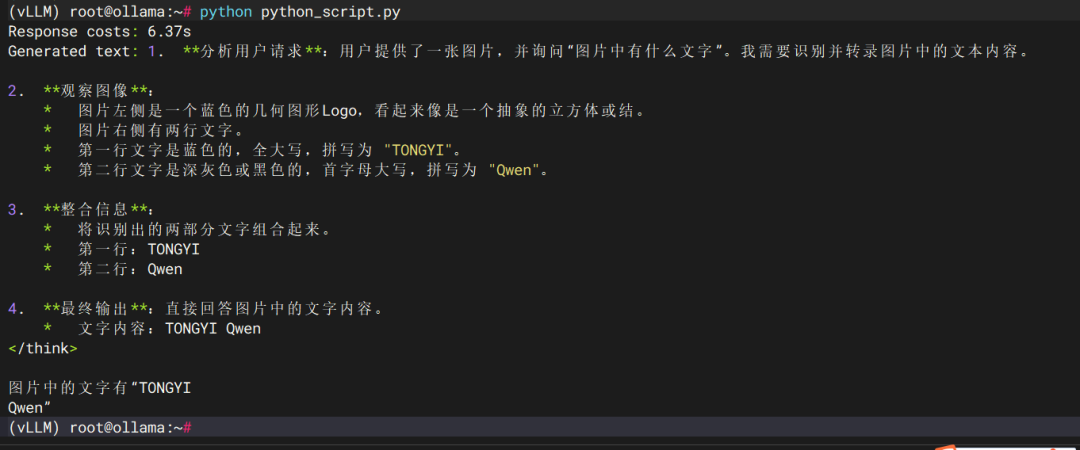
大模型部署完毕。
然后我这边也写了一个docker-compose.yml,也可以用来部署大模型:
(vLLM) root@ollama:/data/container/vllm# cat docker-compose.yml
version: '3.8'
services:
vllm-qwen:
image: vllm/vllm-openai:latest
container_name: vllm-qwen
runtime: nvidia
ipc: host
restart: unless-stopped
ports:
- "8000:8000"
volumes:
- /root/Qwen/Qwen3.5-27B-AWQ-4bit:/Qwen/Qwen3.5-27B-AWQ-4bit
environment:
- NVIDIA_VISIBLE_DEVICES=all
deploy:
resources:
reservations:
devices:
- driver: nvidia
count: all
capabilities: [gpu]
logging:
driver: "json-file"       # 日志驱动类型
options:
max-size: "100m"        # 单个日志文件最大大小
max-file: "3"           # 保留的日志文件数量
compress: "true"        # 是否压缩日志
command:
- --model
- /Qwen/Qwen3.5-27B-AWQ-4bit
- --gpu-memory-utilization
- "0.8"
- --max-model-len
- "8000"
- --enforce-eager
- --async-scheduling
操作命令:
docker stop vllm-qwen
docker rm vllm-qwen
docker compose up -d
docker compose down
再次检查显存的占用情况是25.7G。
测试脚本:
(vLLM) root@ollama:~# cat python_script.py
import time
from openai import OpenAI
client = OpenAI(
api_key="EMPTY",
base_url="http://localhost:8000/v1",
timeout=3600
)
messages = [
{
"role": "user",
"content": [
{
"type": "image_url",
"image_url": {
"url": "https://modelscope.oss-cn-beijing.aliyuncs.com/resource/qwen.png"
}
},
{
"type": "text",
"text": "图⽚中有什么⽂字"
}
]
}
]
start = time.time()
response = client.chat.completions.create(
model="/Qwen/Qwen3.5-27B-AWQ-4bit",
messages=messages,
max_tokens=2048
)
print(f"Response costs: {time.time() - start:.2f}s")
print(f"Generated text: {response.choices[0].message.content}")
测试也正常。
01
什么是AI大模型应用开发工程师?
如果说AI大模型是蕴藏着巨大能量的“后台超级能力”,那么AI大模型应用开发工程师就是将这种能量转化为实用工具的执行者。
AI大模型应用开发工程师是基于AI大模型,设计开发落地业务的应用工程师。
这个职业的核心价值,在于打破技术与用户之间的壁垒,把普通人难以理解的算法逻辑、模型参数,转化为人人都能轻松操作的产品形态。
无论是日常写作时用到的AI文案生成器、修图软件里的智能美化功能,还是办公场景中的自动记账工具、会议记录用的语音转文字APP,这些看似简单的应用背后,都是应用开发工程师在默默搭建技术与需求之间的桥梁。
他们不追求创造全新的大模型,而是专注于让已有的大模型“听懂”业务需求,“学会”解决具体问题,最终形成可落地、可使用的产品。
CSDN粉丝独家福利
给大家整理了一份AI大模型全套学习资料,这份完整版的 AI 大模型学习资料已经上传CSDN,朋友们如果需要可以扫描下方二维码&点击下方CSDN官方认证链接免费领取 【保证100%免费】

02
AI大模型应用开发工程师的核心职责
需求分析与拆解是工作的起点,也是确保开发不偏离方向的关键。
应用开发工程师需要直接对接业务方,深入理解其核心诉求——不仅要明确“要做什么”,更要厘清“为什么要做”以及“做到什么程度算合格”。
在此基础上,他们会将模糊的业务需求拆解为具体的技术任务,明确每个环节的执行标准,并评估技术实现的可行性,同时定义清晰的核心指标,为后续开发、测试提供依据。
这一步就像建筑前的图纸设计,若出现偏差,后续所有工作都可能白费。
技术选型与适配是衔接需求与开发的核心环节。
工程师需要根据业务场景的特点,选择合适的基础大模型、开发框架和工具——不同的业务对模型的响应速度、精度、成本要求不同,选型的合理性直接影响最终产品的表现。
同时,他们还要对行业相关数据进行预处理,通过提示词工程优化模型输出,或在必要时进行轻量化微调,让基础模型更好地适配具体业务。
此外,设计合理的上下文管理规则确保模型理解连贯需求,建立敏感信息过滤机制保障数据安全,也是这一环节的重要内容。
应用开发与对接则是将方案转化为产品的实操阶段。
工程师会利用选定的开发框架构建应用的核心功能,同时联动各类外部系统——比如将AI模型与企业现有的客户管理系统、数据存储系统打通,确保数据流转顺畅。
在这一过程中,他们还需要配合设计团队打磨前端交互界面,让技术功能以简洁易懂的方式呈现给用户,实现从技术方案到产品形态的转化。
测试与优化是保障产品质量的关键步骤。
工程师会开展全面的功能测试,找出并修复开发过程中出现的漏洞,同时针对模型的响应速度、稳定性等性能指标进行优化。
安全合规性也是测试的重点,需要确保应用符合数据保护、隐私安全等相关规定。
此外,他们还会收集用户反馈,通过调整模型参数、优化提示词等方式持续提升产品体验,让应用更贴合用户实际使用需求。
部署运维与迭代则贯穿产品的整个生命周期。
工程师会通过云服务器或私有服务器将应用部署上线,并实时监控运行状态,及时处理突发故障,确保应用稳定运行。
随着业务需求的变化,他们还需要对应用功能进行迭代更新,同时编写完善的开发文档和使用手册,为后续的维护和交接提供支持。
03
薪资情况与职业价值
市场对这一职业的高度认可,直接体现在薪资待遇上。
据猎聘最新在招岗位数据显示,AI大模型应用开发工程师的月薪最高可达60k。
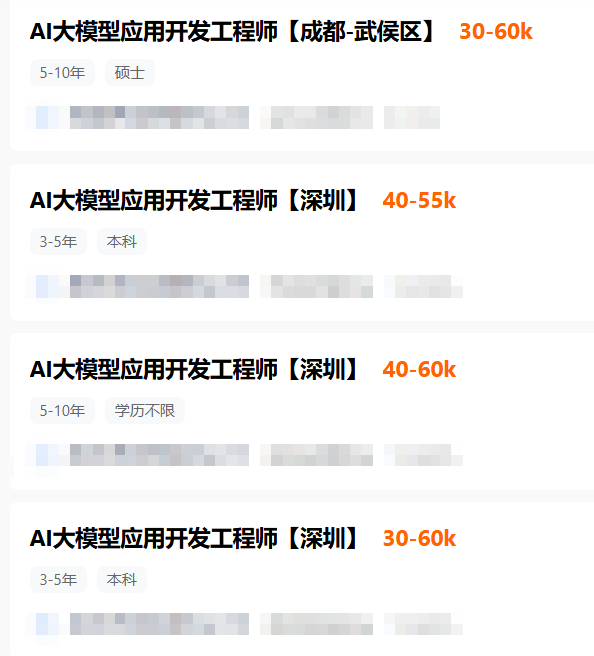
在AI技术加速落地的当下,这种“技术+业务”的复合型能力尤为稀缺,让该职业成为当下极具吸引力的就业选择。
AI大模型应用开发工程师是AI技术落地的关键桥梁。
他们用专业能力将抽象的技术转化为具体的产品,让大模型的价值真正渗透到各行各业。
随着AI场景化应用的不断深化,这一职业的重要性将更加凸显,也必将吸引更多人才投身其中,推动AI技术更好地服务于社会发展。
CSDN粉丝独家福利
给大家整理了一份AI大模型全套学习资料,这份完整版的 AI 大模型学习资料已经上传CSDN,朋友们如果需要可以扫描下方二维码&点击下方CSDN官方认证链接免费领取 【保证100%免费】


免费领 150 小时云算力,进群参与显卡、AI PC 幸运抽奖
更多推荐

 4
4 0
0- 0


 已为社区贡献5条内容

所有评论(0)