
Python+TypeScript打造AI应用,MCP服务器让大模型获取上下文
Composio 提供了一套规范和工具库,方便将 AI Agent 与 LLM 集成。•。
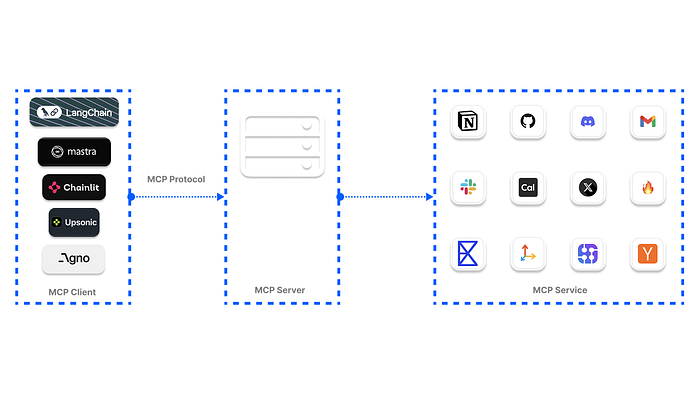
本文介绍了Model Context Protocol (MCP)标准,它为LLM和AI Agent提供上下文支持。文章详细解释了MCP的工作原理、优势,以及在7个不同Python和TypeScript框架(如OpenAI Agents SDK、LangChain、Chainlit等)中的实现方法。通过MCP,开发者可以集中管理工具,提升安全性和可扩展性,构建更强大的AI应用。
利用 Python 与 TypeScript 框架开发 AI 应用,并通过 MCP 服务器为大语言模型(LLM)提供所需的上下文信息
AI Agent 工具包[1]为开发者带来了多样化的 API,使 AI 方案能够执行任务、调用外部工具并确保结果可靠,从而优化用户体验。然而,将这些工具整合到 AI 应用并进行集中管理,常常既复杂又繁琐。
本文将介绍一种行业通用标准 ——Model Context Protocol(MCP),它能够为 LLM 和 AI Agent 提供必要的上下文支持。
LLM 上下文提供方式与相关规范
默认情况下,如果不给 LLM 或 AI 聊天机器人提供明确的上下文,它们将无法:
•获取实时信息•执行代码•调用外部工具和 API•代替用户使用网页浏览器
为了解决这一局限,开发者可以采用以下几种方法:
1. Composio[2]
•简介:Composio 提供了一套规范和工具库,方便将 AI Agent 与 LLM 集成。•优势:除了内置的大量现成工具包外,Composio 最近还推出了 Composio MCP[3],支持开发者连接 100+ 个 MCP 服务器(适用于 IDE)。•应用场景:通过 MCP 支持的 IDE(如 Cursor、Claude、Windsurf),可将多个应用连接到项目中。•提示:可访问官方链接查看 Composio MCP 工具类别。
2. Agents.json[4]
•简介:基于 OpenAI 标准 构建的规范,旨在让 AI Agent[5] 更好地访问 API 和外部工具,实现无缝交互。•现状:虽然 Agents.json 在设计上很优秀,但使用率不高,也没有像 MCP 那样被广泛采纳。•资源:可访问其 GitHub 仓库[6]获取更多信息并开始使用。
3. MCP(Model Context Protocol)
•核心作用:为开发者提供最佳方式,将上下文数据传递给 LLM 和 AI 助手,以便更好地解决问题。•应用示例:•搭建一个 MCP 文档服务器•让 IDE 与 Agent 框架能够完整访问你的文档•类似于在项目中使用 llms.txt[7] 文件,但功能更强大
MCP 的工作原理
在 LLM(大语言模型)和 AI Agent 的应用场景中,MCP 帮助它们在内置知识以外,依然能够对用户问题给出有价值的回答。
举个例子:
如果你让 ChatGPT 给某个 Slack 频道发消息、查看你的日程并为今天与同事安排会议,你会发现它根本做不到,因为它无法直接访问这些外部应用。
而在引入 MCP 后,这类 AI 助手就能完成这些任务,并产出真正有用的结果。
开发者最关心的问题之一就是:MCP 是如何工作的?
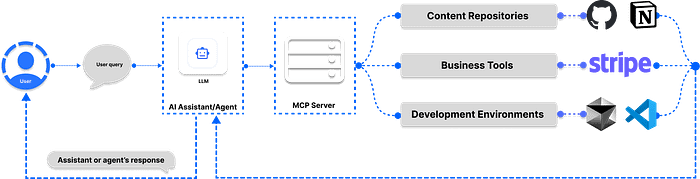
它的基本运行方式如下:
1.用户发送请求 → 用户向 Agent 提出一个问题或任务。2.Agent 决策调用 → Agent 判断应调用哪个 MCP 服务器及其工具,以获取执行任务所需的相关信息。3.获取数据并响应 → Agent 使用从 MCP 工具获得的数据,向用户返回结果。
为什么在 AI Agent 与 LLM 应用中采用 MCP?
MCP 正逐渐成为一种标准,让开发者能够构建 可高效与外部应用交互的 AI 系统。
•微软:已在其 Copilot Studio 中宣布集成 MCP,以简化 AI 应用和 Agent 访问工具的方式。•OpenAI:已宣布在多个产品中支持 MCP,例如 Agents SDK 和 ChatGPT 桌面版应用。
当然,你也可以直接将工具集成到 AI 助手中,但如果系统包含多个 多智能体(multi-agent),执行的任务多且复杂(如处理邮件、网页抓取、财务分析、实时天气查询等),直接集成会导致管理混乱且安全风险高。
使用MCP的优势
工具直连方式(传统方案)
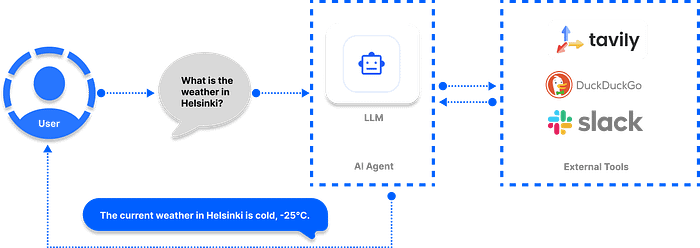
在下图示例中,LLM 直接连接了 3 个外部工具:
如果连接数量增加到 100+,管理与安全维护将会非常麻烦。
通过 MCP 集成工具(改进方案)
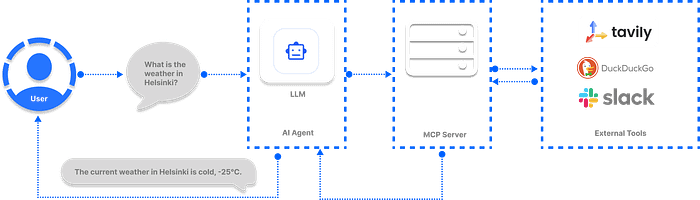
在这种架构下,所有 Agent 所需的工具都通过 MCP 服务器 统一访问。
这样带来的好处包括:
•集中管理:所有工具注册到 MCP 服务器,统一调用和维护。•安全性提升:减少分散的直连风险,集中管控访问权限。•可扩展性强:方便添加或更换工具,不影响主系统逻辑。•一致的用户体验:所有任务都通过 MCP 流程处理,交互更流畅。
访问 MCP 注册表与服务器生态
目前有多个开源的 MCP 托管工具库,可以增强 LLM 和 AI Agent 的能力,确保它们生成的回答更加可靠。
这些 MCP 托管工具库 称为 注册表(Registry),它们提供经过筛选和整理的服务集合。
开发者可以通过这些注册表中的工具,将 AI 应用连接到不同的 MCP 资源。
此外,你还可以选择不同类型的 MCP 服务器:
•uvx 类型:基于 Python 的工具,无需安装依赖即可使用。•Docker 方式:以容器方式运行 MCP 工具,方便部署。•npx 类型:基于 Node.js,需要先安装 Node.js 才能运行。
常见 MCP 注册表与服务器
1. MCP Servers on GitHub[8]
•社区维护的 MCP 服务器集合,包含额外的 MCP 资源。•适合想要探索社区贡献项目的开发者。
2. Glama Registry[9]
•面向生产环境且开源的 MCP 服务器集合。•提供稳定可靠的工具,适用于开发和上线阶段。
3. Smithery Registry[10]
•可访问 2000+ MCP 服务器,极大增强 AI Agent 与 LLM 的能力。•提供丰富的工具覆盖多种应用场景。
4. OpenTools[11]
•提供生成式 API(Generative APIs)供 MCP 工具使用。•特色功能:•可直接调用数百个现成的 MCP 工具集成到 AI 项目中•扩展 LLM 的网页搜索、实时位置数据获取、网页爬取等能力•API 支持语言:Curl、Python、TypeScript•快速示例[12](Python 版本):
from openai importOpenAI
client =OpenAI(
base_url="https://api.opentools.com",
api_key="<OPENTOOLS_API_KEY>"
)
completion = client.chat.completions.create(
model="anthropic/claude-3.7-sonnet",
messages=[
{"role":"user","content":"Compare specs of top 5 EVs on caranddriver.com"}
],
tools=[{"type":"mcp","ref":"firecrawl"}]
)
5. PulseMCP Registry[13]
•浏览托管的 MCP 工具和 AI 项目用例。•PulseMCP News[14] 提供最新热门 MCP 服务器与应用资讯。
6. mcp.run[15]
•为企业提供数百个 MCP 应用的访问权限,适合商业化项目。
7. Composio Registry[16]
•基于 SSE(Server-Sent Events) 的 MCP 服务器,•可轻松与不同 AI 框架集成,快速构建应用。
8. guMCP[17]
•Gumloop 提供的免费、开源、全托管 MCP 服务器。•可与任何 AI 应用无缝集成。
将 MCP 添加到 LLM 与 Agent 的 7 大客户端框架
虽然 MCP(Model Context Protocol)已经成为 AI 开发圈的热门话题,开发者社区讨论热烈,但对于要在 AI 应用和 Agent 中集成 MCP 时,该选择哪些客户端框架,很多人仍然不清楚。
我们调研后,发现以下 Python 与 TypeScript 的主流 MCP 客户端平台,适合构建基于 Agent 的工作流与 AI 助手。
说明:以下内容演示的是 MCP 在构建 AI 解决方案框架中的实现方式,而非在 AI 代码编辑器(如 Cursor 或 Windsurf)中的集成方法。
- 使用 OpenAI Agents SDK 构建 Git MCP Agent
在使用 OpenAI Agents SDK[18] 构建 Agent 时,可以通过 SDK 的 MCPServerStdio 与 MCPServerSse 类连接到社区构建的 MCP 服务器。
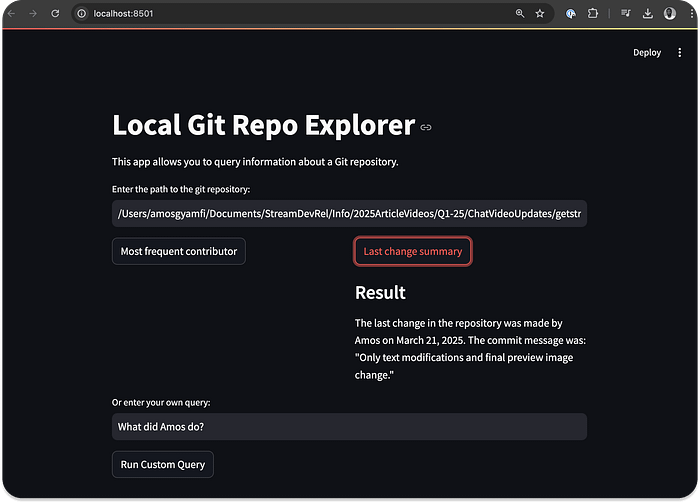
下面的示例展示了一个 Git MCP Agent,它可以访问本地 Git 仓库的根目录,并回答有关该仓库的问题。
功能演示
•查询本地 Git 仓库的贡献者信息•获取最后一次提交的变更摘要•支持自定义问题查询
示例代码(Python + Streamlit)
import asyncio
import shutil
import streamlit as st
from agents importAgent,Runner, trace
from agents.mcp importMCPServer,MCPServerStdio
async def query_git_repo(mcp_server:MCPServer, directory_path: str, query: str):
agent =Agent(
name="Assistant",
instructions=f"Answer questions about the local git repository at {directory_path}, use that for repo_path",
mcp_servers=[mcp_server],
)
with st.spinner(f"Running query: {query}"):
result = await Runner.run(starting_agent=agent, input=query)
return result.final_output
def run_query(directory_path, query):
ifnot shutil.which("uvx"):
st.error("uvx is not installed. Please install it with `pip install uvx`.")
return
async def execute_query():
async withMCPServerStdio(
cache_tools_list=True,
params={
"command":"python",
"args":[
"-m",
"mcp_server_git",
"--repository",
directory_path
]
},
)as server:
with trace(workflow_name="MCP Git Query"):
result = await query_git_repo(server, directory_path, query)
st.markdown("### Result")
st.write(result)
asyncio.run(execute_query())
if __name__ =="__main__":
st.set_page_config(
page_title="Local Git Repo Explorer",
page_icon="📊",
layout="centered"
)
def main_streamlit_app():
st.title("Local Git Repo Explorer")
st.write("This app allows you to query information about a Git repository.")
directory_path = st.text_input("Enter the path to the git repository:")
if directory_path:
col1, col2 = st.columns(2)
with col1:
if st.button("Most frequent contributor"):
query ="Who's the most frequent contributor?"
run_query(directory_path, query)
with col2:
if st.button("Last change summary"):
query ="Summarize the last change in the repository."
run_query(directory_path, query)
custom_query = st.text_input("Or enter your own query:")
if st.button("Run Custom Query")and custom_query:
run_query(directory_path, custom_query)
main_streamlit_app()
上面的代码把 Streamlit 与 OpenAI 的 MCP Agent 集成到一起,使你可以通过 Git MCP 服务器[19] 与本地 Git 仓库对话。要运行该示例,请先安装以下依赖:
•pip install streamlit openai-agents mcp-server-git•然后导出你的 OpenAI API Key:export OPENAI_API_KEY=sk-....,运行 Python 文件后,你应当能看到与预览图相似的结果(页面展示查询结果等)。Git MCP Agent(基于 OpenAI Agents SDK)
你可以在 GitHub[20] 上探索更多 OpenAI MCP 的示例。
核心优势
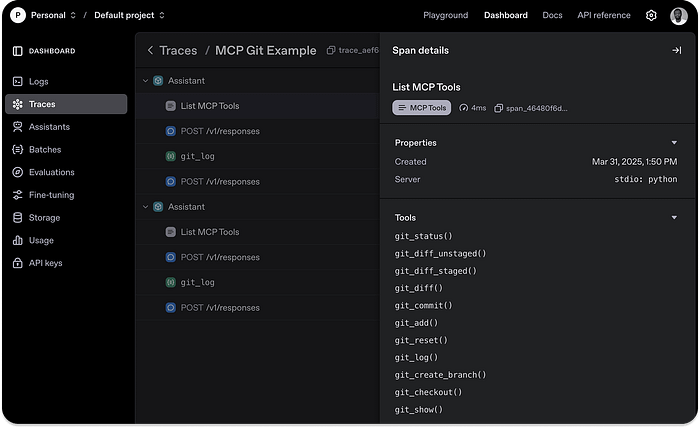
使用 Agents SDK 的 MCP 集成,最大亮点是其内置的 MCP Agent 监控系统[21],可以在 OpenAI 控制台(Dashboard) 中查看和分析运行情况。
该功能会自动捕获 Agent 的 MCP 操作,例如:
•工具列表(Tool Listing)•POST 请求响应•函数调用的数据获取情况
下图展示了运行上面 Git MCP 示例代码后的**调用追踪(Trace)**效果,你可以在 OpenAI 控制台中访问所有记录的数据与执行细节。
- 使用 Praison AI 构建 MCP AI Agents
Praison AI[22] 是一个基于 Python 的 AI 框架,用于快速构建「多智能体(team of agents)」。
它提供了最简单的方式,将 MCP 服务器工具添加到 Agent 工作流中 —— 只需一行代码,就像为 Agent 配置传统工具一样。
示例
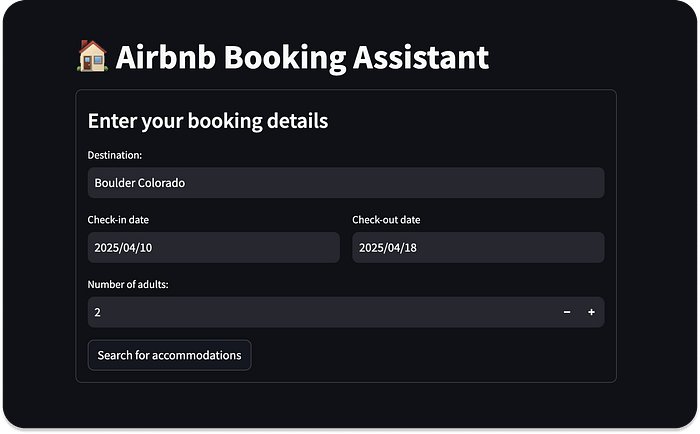
下面的案例将 Airbnb MCP 服务器[23] 集成到 Praison AI Agent 中,并使用 Streamlit 构建 UI,帮助在指定城市查找公寓。
•pip install praisonaiagents mcp streamlit•配置 OpenAI API Key,export OPENAI_API_KEY='sk-proj-qZIGbi... 这样就可以创建你的第一个基于 Praison AI 的 MCP Agent。
创建并运行 Praison AI + Airbnb MCP 示例
请新建一个 Python 文件(例如 streamlit_praison_airbnb_mcp_agent.py),并将下面的代码粘贴进去:
import streamlit as st
from praisonaiagents importAgent, MCP
st.title("🏠 Airbnb Booking Assistant")
# Create the agent
@st.cache_resource
def get_agent():
returnAgent(
instructions="""You help book apartments on Airbnb.""",
llm="gpt-4o-mini",
tools=MCP("npx -y @openbnb/mcp-server-airbnb --ignore-robots-txt")
)
# Initialize chat history
if"messages"notin st.session_state:
st.session_state.messages =[]
# Display chat history
for message in st.session_state.messages:
with st.chat_message(message["role"]):
st.markdown(message["content"])
# User input form
with st.form("booking_form"):
st.subheader("Enter your booking details")
destination = st.text_input("Destination:","Paris")
col1, col2 = st.columns(2)
with col1:
check_in = st.date_input("Check-in date")
with col2:
check_out = st.date_input("Check-out date")
adults = st.number_input("Number of adults:", min_value=1, max_value=10, value=2)
submitted = st.form_submit_button("Search for accommodations")
if submitted:
search_agent = get_agent()
# Format the query
query = f"I want to book an apartment in {destination} from {check_in.strftime('%m/%d/%Y')} to {check_out.strftime('%m/%d/%Y')} for {adults} adults"
# Add user message to chat history
st.session_state.messages.append({"role":"user","content": query})
# Display user message
with st.chat_message("user"):
st.markdown(query)
# Get response from the agent
with st.chat_message("assistant"):
with st.spinner("Searching for accommodations..."):
response = search_agent.start(query)
st.markdown(response)
# Add assistant response to chat history
st.session_state.messages.append({"role":"assistant","content": response})
# Allow for follow-up questions
if st.session_state.messages:
prompt = st.chat_input("Ask a follow-up question about the accommodations")
if prompt:
search_agent = get_agent()
# Add user message to chat history
st.session_state.messages.append({"role":"user","content": prompt})
# Display user message
with st.chat_message("user"):
st.markdown(prompt)
# Get response from the agent
with st.chat_message("assistant"):
with st.spinner("Thinking..."):
response = search_agent.start(prompt)
st.markdown(response)
# Add assistant response to chat history
st.session_state.messages.append({"role":"assistant","content": response})
运行上面的示例代码后,程序会调用所需的 Airbnb MCP 工具,在你指定的位置搜索可租公寓(如下图所示的效果)。

Praison AI 驱动的 MCP Agent 的交互页面预览
你会注意到,我们仅用一行代码就为 Agent 加上了 MCP 支持:tools = MCP("npx -y @openbnb/mcp-server-airbnb --ignore-robots-txt"),
•npx:用于启动 MCP 服务器的命令(执行 npm 包中的可执行脚本)。•-y:向命令传递的参数,表示自动确认(无需交互)。•@openbnb/mcp-server-airbnb:具体的 Airbnb MCP 服务器实现。•--ignore-robots-txt:传给该服务器的标志位参数。
想了解更多可参考 OpenAI Agents SDK 文档中的 MCP Servers[24] 章节。
- 在 LangChain AI 应用中使用 MCP
LangChain 已支持以工具调用(tool-calling)的方式集成 MCP。通过该能力,你可以在 Python 中配置函数连接到不同的 MCP 服务器,并获取工具来执行项目中的任务。
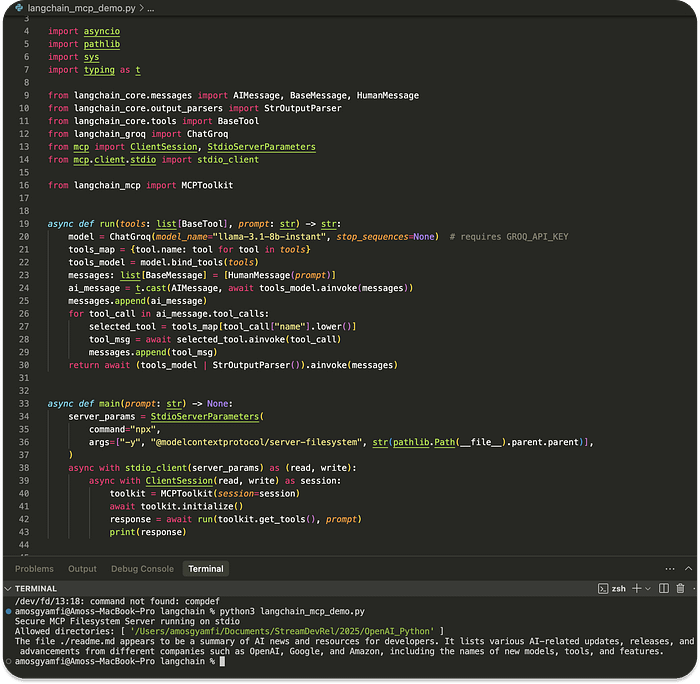
下面的示例代码连接到一个安全的 MCP 文件系统服务器,使 LLM 能够基于你提供的文件准确回答问题。
# Copyright (C) 2024 Andrew Wason
# SPDX-License-Identifier: MIT
import asyncio
import pathlib
import sys
import typing as t
from langchain_core.messages importAIMessage,BaseMessage,HumanMessage
from langchain_core.output_parsers importStrOutputParser
from langchain_core.tools importBaseTool
from langchain_groq importChatGroq
from mcp importClientSession,StdioServerParameters
from mcp.client.stdio import stdio_client
from langchain_mcp importMCPToolkit
async def run(tools: list[BaseTool], prompt: str)-> str:
model =ChatGroq(model_name="llama-3.1-8b-instant", stop_sequences=None)# 需要设置 GROQ_API_KEY
tools_map ={tool.name: tool for tool in tools}
tools_model = model.bind_tools(tools)
messages: list[BaseMessage]=[HumanMessage(prompt)]
ai_message = t.cast(AIMessage, await tools_model.ainvoke(messages))
messages.append(ai_message)
for tool_call in ai_message.tool_calls:
selected_tool = tools_map[tool_call["name"].lower()]
tool_msg = await selected_tool.ainvoke(tool_call)
messages.append(tool_msg)
return await (tools_model |StrOutputParser()).ainvoke(messages)
async def main(prompt: str)->None:
server_params =StdioServerParameters(
command="npx",
args=["-y","@modelcontextprotocol/server-filesystem", str(pathlib.Path(__file__).parent.parent)],
)
async with stdio_client(server_params)as(read, write):
async withClientSession(read, write)as session:
toolkit =MCPToolkit(session=session)
await toolkit.initialize()
response = await run(toolkit.get_tools(), prompt)
print(response)
if __name__ =="__main__":
prompt = sys.argv[1]if len(sys.argv)>1else"Read and summarize the file ./readme.md"
asyncio.run(main(prompt))
在运行上述 Python 脚本之前,请先安装必要依赖:
pip install langchain-core langchain-groq langchain-mcp
由于示例中的 MCP 配置使用的是 npx 服务器类型,还需要全局安装 server-filesystem 这个 MCP 服务器包:
npm install -g @modelcontextprotocol/server-filesystem
测试运行 确保上述依赖都已安装完毕。
在项目中放置一个文件(例如 readme.md)。
在运行脚本时引用该文件,例如示例代码中:
prompt = "Read and summarize the file ./readme.md"
运行脚本:
python your_script.py
运行成功后,你会看到模型调用 MCP 文件系统工具 对 readme.md文件进行读取与总结,并在终端输出与示例截图类似的结果。
注:本示例摘自 LangChain 的 GitHub 仓库[25]。
- 在 Chainlit AI 应用中使用 MCP
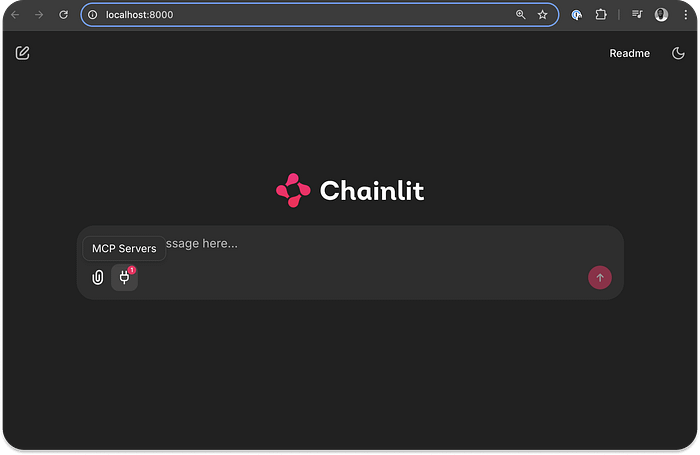
Chainlit[26] 是一个用 Python 构建 AI 应用的平台,原生支持 MCP 服务器。你可以在应用中自动发现可用的 MCP 工具,并将工具调用融入应用流程以提升效果。Chainlit 同时支持 SSE(Server-Sent Events[27]) 与 命令行[28](stdio) 类型的服务集成。
在下面的示例中,我们将把 Chainlit 应用连接到 Linear MCP 服务器[29],从而让应用能够管理 Linear 的 issue、项目与团队。你可以使用示例中提供的 Linear 工具来创建、更新、搜索、获取用户的 issue,或为某个 issue 添加评论。
配置 Chainlit 应用以连接 MCP 服务器
将 Chainlit 应用连接到某个 MCP 服务器以访问其工具,通常分两步:
1.注册 MCP 连接:实现 Chainlit 的 on_mcp_connect 异步函数以建立连接;(可选)处理断开:实现 on_mcp_disconnect 函数用于清理资源。
依赖安装:
pip install chainlit
示例代码:
import chainlit as cl
from mcp importClientSession
@cl.on_mcp_connect
async def on_mcp_connect(connection, session:ClientSession):
"""当建立 MCP 连接时触发"""
# 在此处进行连接初始化
# 注意:必须实现该处理器,MCP 才能正常工作
@cl.on_mcp_disconnect
async def on_mcp_disconnect(name: str, session:ClientSession):
"""当 MCP 连接被终止时触发"""
# 可选处理器:在此处进行资源清理
2.配置 MCP 客户端(Chainlit、LangChain、Mastra)
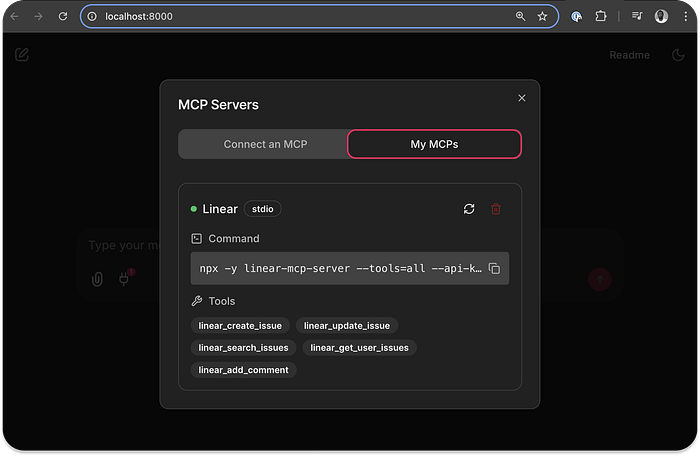
要让 MCP 服务器与 Chainlit 应用协同工作,客户端需要通过 Chainlit 的 UI 提供连接信息。主要包括以下内容:
配置项说明(见上图示意)
•连接唯一标识(Name/ID)
用于区分与识别本次 MCP 连接。•Client Type(客户端类型)
选择 sse 或 stdio:•SSE:需要填写 MCP 服务器的 URL 端点。•stdio:需要提供一条 完整的命令 来启动 MCP 服务器(例如 npx your-tool-package 或 uvx your-tool-package)。完整命令示例:npx -y linear-mcp-server --tools=all --api-key=lin_api_your_linear_API_Key
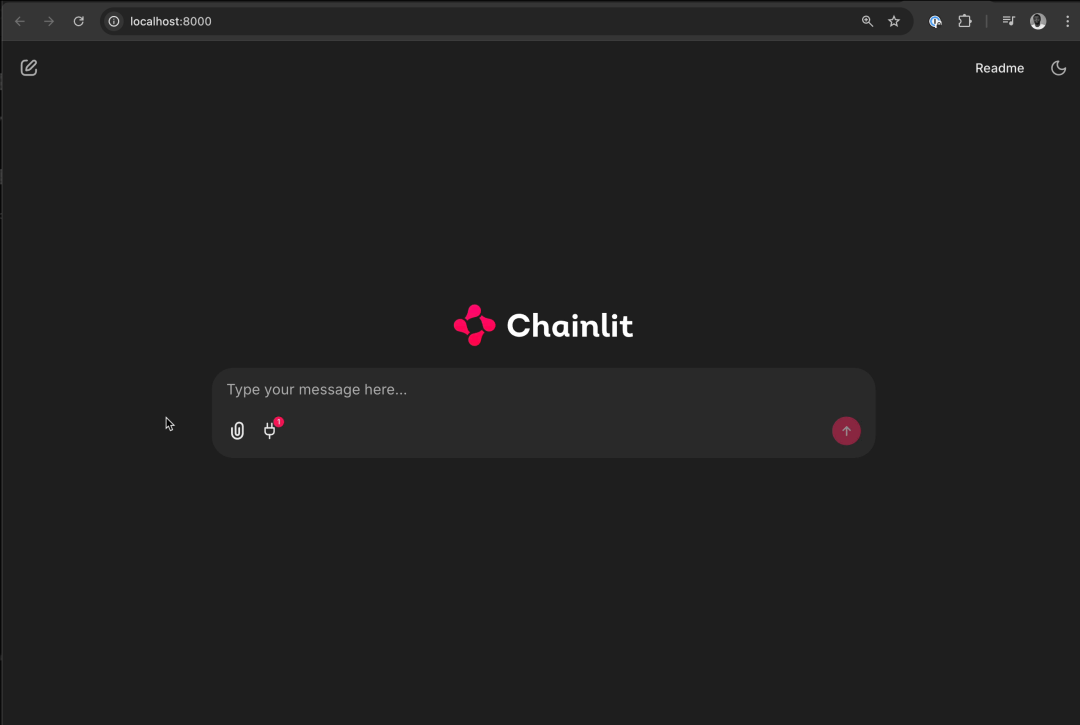
建立连接并调用工具
1.建立 MCP 连接 后,可通过 MCP Session 执行工具(tool)。2.最终将 MCP 工具以 Tool Call 的方式无缝集成到 Chainlit 应用的 模型/Agent 流程中。3.你可以在 GitHub[30] 的 Chainlit 示例应用 中找到该 Linear MCP 集成的完整源代码。
运行与示例(Linear 集成)
•从 Chainlit 的 GitHub 仓库获取上述源码后运行;•在 Chainlit 界面中设置以下命令以启动 Linear MCP 服务器:
npx -y linear-mcp-server --tools=all --api-key=lin_api_your_linear_API_Key
•随后你就可以在应用中 创建/更新 Linear 的 Issues 与 Projects。
注意:如示例所示,执行这些操作通常需要你所在 Linear 团队(Team)的 ID。
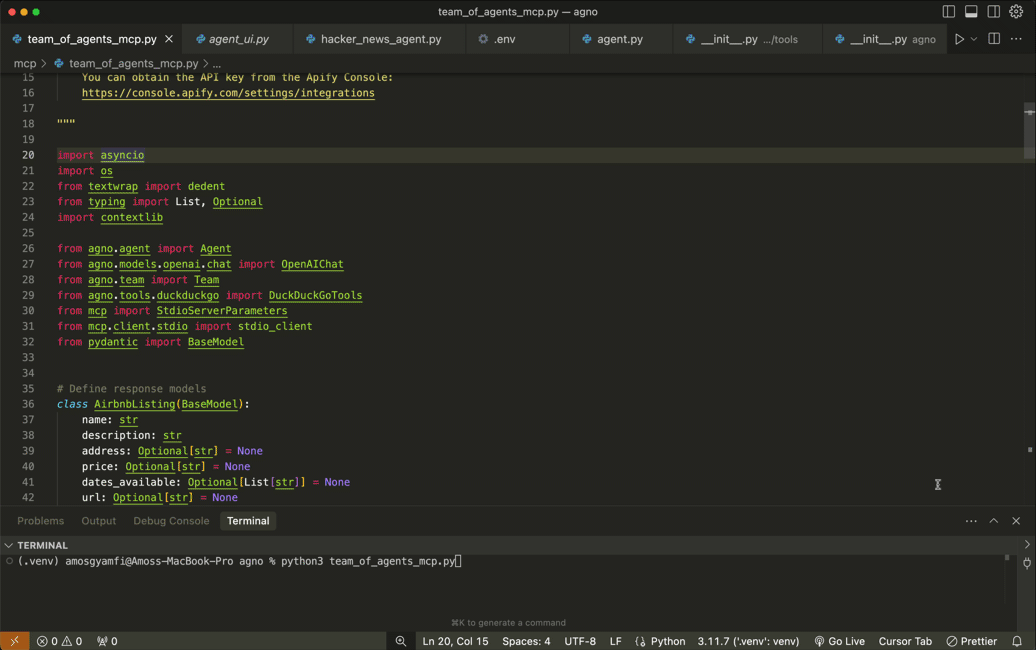
- 为 Agno AI Agents 集成 MCP
Agno[31] 是一个用于构建复杂智能体(agentic)工作流的 Python 框架。它因简单易用、上手门槛低以及与 MCP 服务器的无缝集成而广受欢迎。本节的 MCP 集成示例,演示了一个由四个“独立贡献型”智能体组成的多智能体团队(例如:Airbnb、Google Maps、网页搜索与天气 MCP 智能体)。这些 Agno 多智能体将协同工作,为指定地点的旅行提供信息。
先决条件(Prerequisites)
要体验本节的 Agno + MCP 集成示例,请完成以下准备:
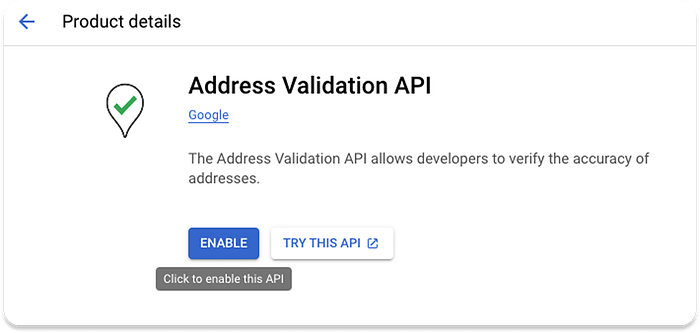
1.安装依赖:pip install -U openai agno duckduckgo-search exa-py2.申请并配置 GOOGLE_MAPS_API_KEY[32],将其写入项目的.env文件。3.申请并配置 APIFY_TOKEN[33],同样写入 .env 文件。4.验证 Google Address API[34](确保地址解析/验证服务可用)。
配置 Agno 的 MCP 多智能体团队
在这一步,你需要定义 MCP 服务器参数,并使用 AsyncExitStack 同时管理多个异步上下文管理器;随后创建各个智能体并运行。
代码示例
# 定义服务器参数
airbnb_server_params =StdioServerParameters(
command="npx",
args=["-y","@openbnb/mcp-server-airbnb","--ignore-robots-txt"],
env=env,
)
maps_server_params =StdioServerParameters(
command="npx", args=["-y","@modelcontextprotocol/server-google-maps"], env=env
)
# 使用 contextlib.AsyncExitStack 管理多个异步上下文管理器
async with contextlib.AsyncExitStack()as stack:
# 为每个服务器创建 stdio 客户端
airbnb_client, _ = await stack.enter_async_context(stdio_client(airbnb_server_params))
maps_client, _ = await stack.enter_async_context(stdio_client(maps_server_params))
# 创建各个智能体
airbnb_agent =Agent(
name="Airbnb",
role="Airbnb Agent",
model=OpenAIChat("gpt-4o"),
tools=[airbnb_client],
instructions=dedent("""\
You are an agent that can find Airbnb listings for a given location.\
"""),
add_datetime_to_instructions=True,
)
你可以在 Agno 的 GitHub 仓库获取完整源码[35]。当你安装所需依赖、完成上述配置并运行官方示例后,输出将与文中预览图相似:多智能体(如 Airbnb、Google Maps、网页搜索、天气等)会协同,为指定地点的行程提供整合信息。
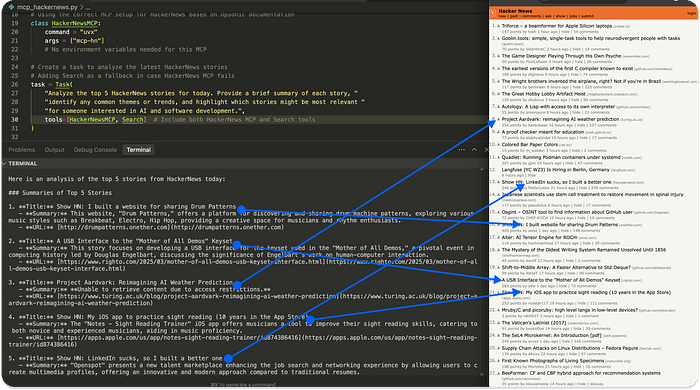
- 在 Upsonic Agents 中使用 MCP
Upsonic[36] 是一个用于创建 AI Agent 的 Python 框架。借助 Upsonic,你可以定义 Agent、为其设定任务(Task),并用 MCP 工具[37] 来处理每个任务的具体执行(如下方示例所示)。
下面的示例展示了:为 Agent 定义“分析 HackerNews 热门文章”的任务,并配置一个 HackerNews 的 MCP 工具;同时加入一个 Search 作为兜底工具(当 MCP 失败时回退使用)。
运行前准备:
•在项目根目录创建
.env,写入OPENAI_API_KEY=你的Key•安装依赖(按 Upsonic 文档要求),并确保本机可运行uvx与相应 MCP 工具(示例中为mcp-hn)
import os
from dotenv import load_dotenv
from upsonic importTask,Agent,Direct
from upsonic.client.tools importSearch# Adding Search as a fallback tool
# Load environment variables from .env file
load_dotenv()
# Get the OpenAI API key from environment variables
openai_api_key = os.getenv("OPENAI_API_KEY")
ifnot openai_api_key:
raiseValueError("OPENAI_API_KEY not found in .env file")
# Set your OpenAI API key for the session
os.environ["OPENAI_API_KEY"]= openai_api_key
# Define the HackerNews MCP tool
# Using the correct MCP setup for HackerNews based on Upsonic documentation
classHackerNewsMCP:
command ="uvx"
args =["mcp-hn"]
# No environment variables are needed for this MCP
# Create a task to analyze the latest HackerNews stories
# Adding Search as a fallback in case HackerNews MCP fails
task =Task(
"Analyze the top 5 HackerNews stories for today. Provide a brief summary of each story, "
"identify any common themes or trends, and highlight which stories might be most relevant "
"for someone interested in AI and software development.",
tools=[HackerNewsMCP,Search]# Include both HackerNews MCP and Search tools
)
# Create an agent specialized in tech news analysis
agent =Agent(
"Tech News Analyst",
company_url="https://news.ycombinator.com/",
company_objective="To provide insightful analysis of tech industry news and trends"
)
# Execute the task with the agent and print the results
print("Analyzing HackerNews stories...")
agent.print_do(task)
# Alternatively, you can use a Direct LLM call if the task is straightforward
# print("Direct analysis of HackerNews stories...")
# Direct.print_do(task)
# If you want to access the response programmatically:
# agent.do(task)
# result = task.response
# print(result)
- 在 Mastra Agents 中使用 MCP
Mastra 是一个基于 TypeScript 的框架,用于构建原型和可投入生产的 AI Agent。
与 Chainlit 类似,Mastra 提供了标准化方式来连接 MCP 服务器,从而通过 stdio 或 SSE 连接访问大量工具。
基本步骤
要将 Mastra Agent 连接到 MCP 服务器,需要使用 MCPConfiguration 类。
该类可在任意 Mastra Agent 工作流中处理多个 MCP 服务器连接的生命周期、命名空间(namespacing)以及工具管理。
1.创建 MCPConfiguration 实例,并添加服务器配置。2.获取 MCP 工具,使用 getTools() 或 getToolsets() 方法。3.在 Agent 中引入 MCP 工具,让 Agent 具备相应的外部调用能力。
示例代码
import{MCPConfiguration}from"@mastra/mcp";
import{Agent}from"@mastra/core/agent";
import{ openai }from"@ai-sdk/openai";
// 配置 MCP 服务器
const mcp =newMCPConfiguration({
servers:{
stockPrice:{
command:"npx",
args:["tsx","stock-price.ts"],
env:{
API_KEY:"your-api-key",
},
},
weather:{
url:new URL("http://localhost:8080/sse"),// SSE 服务器
},
},
});
// 创建 Agent,并赋予全部 MCP 工具的访问权限
const agent =newAgent({
name:"Multi-tool Agent",
instructions:"You have access to multiple tool servers.",
model: openai("gpt-4"),
tools: await mcp.getTools(),
});
📌 详情可参考 Mastra 官方文档中 MCPConfiguration[38] 章节。
MCP 支持的 7 大 AI 框架核心功能对比表
| 序号 | 框架名称 | 开发语言 | 主要用途 | MCP 集成方式 | 典型应用场景 | 优势亮点 |
|---|---|---|---|---|---|---|
| 1 | OpenAI Agents SDK | Python | 构建可调用外部工具的 LLM Agent | MCPServerStdio / MCPServerSse 连接社区 MCP 服务器 |
本地 Git 仓库分析、文档检索、API 调用 | 官方支持、MCP 监控系统、与 OpenAI 产品无缝集成 |
| 2 | Praison AI | Python | 构建多智能体(Team of Agents) | tools=MCP("npx ...") 一行接入 MCP 工具 |
Airbnb 房源搜索、任务分工执行 | 简单易用、一行代码添加 MCP、支持多 Agent 协作 |
| 3 | LangChain | Python | 构建可调用工具的多步骤推理链 | 通过 MCPToolkit 发现并调用 MCP 工具 |
文件系统访问、数据处理、知识库问答 | 生态成熟、工具调用链清晰、可与多模型结合 |
| 4 | Chainlit | Python | 快速构建 AI 应用前端和交互界面 | SSE / stdio 连接 MCP 服务器,支持 UI 配置 | Linear 项目管理、任务创建与更新 | 原生 UI 支持、工具发现方便、快速原型开发 |
| 5 | Agno | Python | 构建复杂工作流与多 Agent 系统 | StdioServerParameters 管理多 MCP 连接 |
旅游规划(Airbnb+地图+天气+搜索) | 多 Agent 协同、上下文管理灵活、适合复杂场景 |
| 6 | Upsonic | Python | 定义任务驱动的 AI Agent | 在 Task 中添加 MCP 工具类 | HackerNews 新闻分析、行业趋势洞察 | 任务定义简单、支持 MCP 与传统工具混用 |
| 7 | Mastra | TypeScript | 原型和生产级 AI Agent | MCPConfiguration 管理多服务器 |
股票查询、天气信息、数据分析 | 支持多语言模型、可同时管理多个 MCP 服务器、适合前后端一体化 |
MCP 在 LLM 应用与智能体中的挑战与未来展望
本教程向你介绍了 MCP(Model Context Protocol),并解释了它为何在开发者社区迅速走红。
我们不仅展示了 MCP 与 IDE(如 Cursor、Windsurf)的集成,还演示了如何在 7 个不同的 Python 与 TypeScript 框架 中实现 MCP,以构建基于 LLM 的应用、AI 助手与智能体。
MCP 的优势背后的挑战
尽管 MCP 十分强大,但在实际落地中仍面临一些挑战:
1.工具搜索与质量验证难度大•在为项目寻找 MCP 工具时,往往很难快速评估其质量,也难以准确判断其是否适用于你的 AI 项目。•主要原因在于:工具搜索与发现尚未形成标准化机制。2.配置体验不一致•不同 MCP 服务器提供商的**配置 Schema(结构)**存在差异,导致用户在配置时体验不统一。•缺乏跨服务的统一配置规范。
未来的发展方向
•生态标准化
MCP 社区正在讨论对 MCP 的多个方面进行标准化,例如:•统一的工具搜索与发现接口•一致的配置 Schema•明确的版本管理与依赖说明•简化安装方式
未来可能会出现类似 Python pip install 的一键安装 MCP 应用模式,大幅降低上手门槛。•生态工具探索•PulseMCP 已在尝试让 MCP 工具的浏览与发现更容易,提供更直观的工具探索体验。
📌 总结: MCP 作为为 LLM 和 AI Agent 提供上下文与外部能力的标准化协议,已经展现出强大的潜力。但要真正成为行业通用标准,还需要在工具发现、配置统一性和生态易用性上进一步提升。
https://medium.com/@amosgyamfi/the-top-7-mcp-supported-ai-frameworks-a8e5030c87ab
如何系统学习掌握AI大模型?
AI大模型作为人工智能领域的重要技术突破,正成为推动各行各业创新和转型的关键力量。抓住AI大模型的风口,掌握AI大模型的知识和技能将变得越来越重要。
学习AI大模型是一个系统的过程,需要从基础开始,逐步深入到更高级的技术。
这里给大家精心整理了一份
全面的AI大模型学习资源,包括:AI大模型全套学习路线图(从入门到实战)、精品AI大模型学习书籍手册、视频教程、实战学习、面试题等,资料免费分享!

1. 成长路线图&学习规划
要学习一门新的技术,作为新手一定要先学习成长路线图,方向不对,努力白费。
这里,我们为新手和想要进一步提升的专业人士准备了一份详细的学习成长路线图和规划。可以说是最科学最系统的学习成长路线。

2. 大模型经典PDF书籍
书籍和学习文档资料是学习大模型过程中必不可少的,我们精选了一系列深入探讨大模型技术的书籍和学习文档,它们由领域内的顶尖专家撰写,内容全面、深入、详尽,为你学习大模型提供坚实的理论基础。(书籍含电子版PDF)
3. 大模型视频教程
对于很多自学或者没有基础的同学来说,书籍这些纯文字类的学习教材会觉得比较晦涩难以理解,因此,我们提供了丰富的大模型视频教程,以动态、形象的方式展示技术概念,帮助你更快、更轻松地掌握核心知识。

4. 大模型行业报告
行业分析主要包括对不同行业的现状、趋势、问题、机会等进行系统地调研和评估,以了解哪些行业更适合引入大模型的技术和应用,以及在哪些方面可以发挥大模型的优势。

5. 大模型项目实战
学以致用 ,当你的理论知识积累到一定程度,就需要通过项目实战,在实际操作中检验和巩固你所学到的知识,同时为你找工作和职业发展打下坚实的基础。

6. 大模型面试题
面试不仅是技术的较量,更需要充分的准备。
在你已经掌握了大模型技术之后,就需要开始准备面试,我们将提供精心整理的大模型面试题库,涵盖当前面试中可能遇到的各种技术问题,让你在面试中游刃有余。

全套的AI大模型学习资源已经整理打包,有需要的小伙伴可以
微信扫描下方CSDN官方认证二维码,免费领取【保证100%免费】
References
[1] AI Agent 工具包:https://getstream.io/blog/ai-agent-toolkits/[2]Composio:https://composio.dev/[3]Composio MCP:https://mcp.composio.dev/?_gl=1*1tcsvb5*_ga*MTk0ODc0NjU2OS4xNzM3MjM1ODgx*_ga_J9WD56TEBS*MTc0MjQ1NTUwMC4yMC4wLjE3NDI0NTU1MDAuMC4wLjA.*_ga_YKMWVQS9W0*MTc0MjQ1NTUwMC4yMC4wLjE3NDI0NTU1MDAuNjAuMC4xNjQwNzI1NjY1[4]Agents.json:https://docs.wild-card.ai/agentsjson/introduction[5]AI Agent:https://getstream.io/blog/xai-python-multi-agent/[6]GitHub 仓库:https://github.com/wild-card-ai/agents-json[7]llms.txt:https://llmstxt.org/[8]MCP Servers on GitHub:https://github.com/modelcontextprotocol/servers[9]Glama Registry:https://glama.ai/mcp/servers?attributes=category%3Abrowser-automation[10]Smithery Registry:https://smithery.ai/[11]OpenTools:https://opentools.com/[12]快速示例:https://opentools.com/docs/quickstart[13]PulseMCP Registry:https://www.pulsemcp.com/[14]PulseMCP News:https://www.pulsemcp.com/posts[15]mcp.run:https://www.mcp.run/[16]Composio Registry:https://mcp.composio.dev/[17]guMCP:https://www.gumloop.com/mcp[18]OpenAI Agents SDK:https://openai.github.io/openai-agents-python/mcp/[19]Git MCP 服务器:https://github.com/modelcontextprotocol/servers/tree/main/src/git[20]GitHub:https://github.com/openai/openai-agents-python/tree/main/examples/mcp[21]内置的 MCP Agent 监控系统:https://openai.github.io/openai-agents-python/tracing/[22]Praison AI:https://docs.praison.ai/docs/index[23]Airbnb MCP 服务器:https://github.com/openbnb-org/mcp-server-airbnb[24]MCP Servers:https://openai.github.io/openai-agents-python/ref/mcp/server/[25]GitHub 仓库:https://github.com/rectalogic/langchain-mcp/tree/main[26]Chainlit:https://docs.chainlit.io/advanced-features/mcp[27]Server-Sent Events:https://modelcontextprotocol.io/specification/2025-06-18/basic/transports#server-sent-events-sse[28]命令行:https://introcs.cs.princeton.edu/python/code/stdio.py[29]Linear MCP 服务器:https://github.com/ibraheem4/linear-mcp[30]GitHub:https://github.com/Chainlit/cookbook/tree/main/mcp-linear[31]Agno:https://www.agno.com/[32]GOOGLE_MAPS_API_KEY:https://console.cloud.google.com/projectselector2/google/maps-apis/credentials[33]APIFY_TOKEN:https://console.apify.com/settings/integrations[34]Google Address API:https://console.cloud.google.com/apis/api/addressvalidation.googleapis.com[35]完整源码:https://github.com/agno-agi/agno/blob/main/cookbook/examples/teams/coordinate/travel_planner_mcp_team.py[36]Upsonic:https://docs.upsonic.ai/introduction[37]MCP 工具:https://docs.upsonic.ai/concepts/mcp_tools[38]MCPConfiguration: https://mastra.ai/en/reference/tools/mcp-client
更多推荐
 23
23 0
0- 0


 已为社区贡献47条内容

所有评论(0)