❤ Vue3 完整项目搭建 Vue3+Pinia+Vant3/ElementPlus+typerscript(一)yarn 版本控制
❤ Vue3+Pinia+Vant3/ElementPlus+typerscript项目搭建
❤ Vue3 完整项目搭建 Vue3+Pinia+Vant3/ElementPlus+typerscript(一)
1、项目介绍
项目体系:
Vue3全家桶+vite+TS+Pinia+Vant3/ElementPlus-搭建Vue3.x项目
项目开源地址:
https://gitee.com/lourance/spefvue
2、Vue3+Pinia+Vant3/ElementPlus+typerscript环境搭建
(1)环境准备
建议使用nvm 管理版本:
文章:window如何使用nvm管理node版本
了解主要的版本和体系
vue主要使用的版本和对应体系
node环境
已安装 16.0 或更高版本的 Node.js
检测 : node -v

npm 环境

(2)安装环境
安装 Vue-cli 脚手架工具
npm install -g @vue/cli
vite 安装
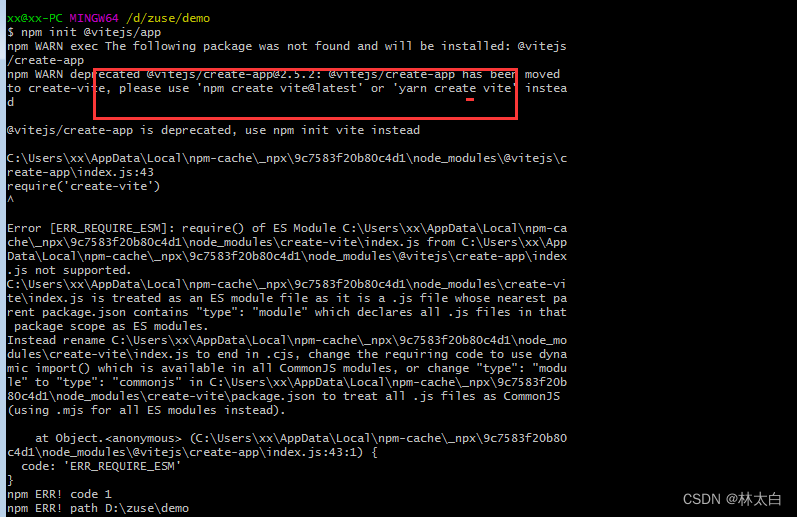
npm init @vitejs/app
报错

使用:
yarn create @vitejs/app

依然报错
转而使用推荐的:
npm create vite@latest
yarn create vite  //使用
创建项目名称
选择主要框架Vue
选择语言

项目运行成功以后提示:

依次输入命令:
cd spefev
npm install
npm run dev

成功以后的页面:

3、项目配置
(1)Vue Router
安装
vue3需要安装4.0以上版本
npm install vue-router@4
替换为
yarn add vue-router@4 --save
安装完成后,在package.json中查看vue-router是否安装成功

使用
1、router 文件夹下新建 index.ts

2、index.ts里面进行配置
import { createRouter, createWebHistory, RouteRecordRaw } from "vue-router";

// 1. 配置路由
const routes: Array<RouteRecordRaw> = [
  {
    path: "/", // 默认路由 home页面
    component: () => import("../views/home/index.vue"),
  },

];
// 2.返回一个 router 实列,为函数,配置 history 模式
const router = createRouter({
  history: createWebHistory(),
  routes,
});

// 3.导出路由   去 main.ts 注册 router.ts
export default router
也可以选择路由的history模式:
history: createWebHistory(), //(1)采用 history 模式
路由相关配置请参考文章:
3、在main.ts中引用router下的index.ts
import { createApp } from 'vue'
import './style.css'
import App from './App.vue'
// 挂载router
import router from "./router/index" // 引入router

const app = createApp(App)
app.use(router).mount('#app')
4、app.vue中添加路由组件router-view
<template>
  <router-view></router-view>
</template>
此时:路由的默认跳转就可以了,项目启动之后,就会跳转到第二步骤配置的默认页面
效果:

(2)pinia
介绍
类似vue2的vuex状态管理,简单来说就是一个存储数据的地方,存放在Vuex中的数据在各个组件中都能访问到,它是Vue生态中重要的组成部分。
使用
安装
npm install pinia
或者
yarn add pinia
修改main.ts,引入pinia提供的createPinia方法,创建根存储
import { createPinia } from 'pinia' // 引入pinia
app.use(createPinia()).use(router).mount('#app') //挂载
(3)项目配置axios
安装使用axios
npm install axios
(4)项目Vite 配置
Vite 配置代理 Proxy,解决跨域
// vite.config.js

import { defineConfig } from "vite";

export default defineConfig({
  server: {
    proxy: {
      "/api": {
        target: "http://localhost:3001",
        changeOrigin: true,
        rewrite: (path) => path.replace(/^\/api/, ""),
      },
    },
  },
});
(5)项目Element Plus 配置
安装使用Element Plus
npm install element-plus --save
具体可参考文章:
VUE3 项目具体配置(二)
(6)项目添加husky–非必须
添加husky
husky 是一个 Git Hook 工具。主要实现提交前 eslint 校验和 commit 信息的规范校验,也可以避免多人合作时代码格式化不统一造成的冲突;
1.安装 husky,lint-staged
npm i -D husky lint-staged
2.在package.json中新增如下配置
{
  ...
  "scripts": {
    ...
  },
  "husky": {
    "hooks": {
      "pre-commit": "lint-staged"
    }
  },
  "lint-staged": {
    "*.{js,json,md}": [
      "prettier --write",
      "git add"
    ]
  },
  "dependencies": {
    ...
  },
  "devDependencies": {
    ...
  },
  "engines": {
    "node": ">=8.9",
    "npm": ">= 3.0.0"
  },
  "browserslist": [
    "> 1%",
    "last 2 versions"
  ]
}
4、使用新一代Vue脚手架(create-vue)搭建
官网:
https://github.com/vuejs/create-vue
(1)使用
npm搭建项目的命令:(建议2)
npm init vue@latest
这个命令将会去创建一个create-vue脚手架,实际的本质就是去下载create-vue这个包,然后执行index.ts文件。
yarn搭建项目的命令:(建议1)
yarn create vite <ProjectName> --template vue
pnpm搭建项目的命令:(不建议)
pnpm create vite
可以看到项目已经给我们进行了一些基础配置:


项目具体配置迁移到
❤ VUE3 项目具体配置(二)
持续更新中…
更多推荐
 已为社区贡献6条内容


所有评论(0)