Vue学习计划-Vue3--核心语法(八)组件通信
注意:子组件中不用编写任何东西,是不受到任何打扰的。被子组件自己“消费”了)(相当于:组件中没被。提供的数据名称,第二个参数是默认值(假如未找到。中声明的属性(可以认为声明过的。接收两个参数,第一个参数是。【第二步】孙组件中使用。提供的数据名称就触发)
组件通信
Vue3组件通信和Vue2的区别:
- 移出事件总线,使用
mitt代替。
vuex换成了pinia。- 把
.sync优化到了v-model里面了。 - 把
$listeners所有的东西,合并到$attrs中了。 $children被砍掉了。
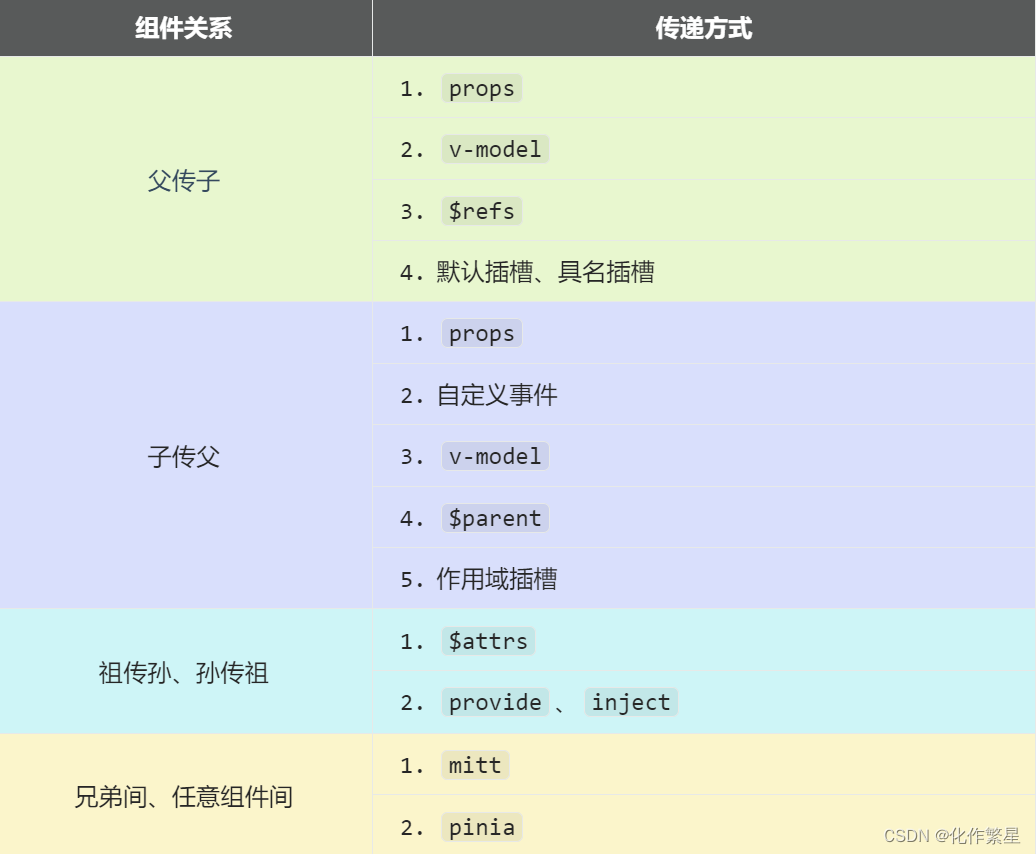
常见搭配形式:

props
概述:
props是使用频率最高的一种通信方式,常用与 :父 ↔ 子。
- 若 父传子:属性值是非函数。
- 若 子传父:属性值是函数。
父组件:
<template>
  <div class="father">
    <h3>父组件</h3>
		<h4>父组件内的值: {{ car }}</h4>
		<h4 v-show="toy">子传给父的值: {{ toy }}</h4>
		<Child :car="car" :sendToy="getToy"/>
  </div>
</template>

<script setup lang="ts" name="Father">
	import Child from './Child.vue'
	import { ref } from 'vue'
	let car = ref('奔驰')
	let toy = ref('')
	function getToy(value){
		toy.value = value
	}
</script>
子组件:
<template>
  <div class="child">
    <h3>子组件</h3>
		<h4>子组件内的值:{{ toy }}</h4>
		<h4>父亲传过来的值:{{ car }}</h4>
		<button @click="sendToy(toy)">将子组件的值传给父组件</button>
  </div>
</template>

<script setup lang="ts" name="Child">
import {ref,onMounted} from 'vue'
defineProps(['car', 'sendToy'])
let toy = ref('玩具熊')
</script>
-
【自定义事件】
- 概述:自定义事件常用于:子 => 父
- 注意区分好:原生事件、自定义事件
- 原生事件
- 事件名是特定的(
click,mouseenter等等) - 事件对象
$event:包含事件相关信息的对象(pageX,pageY,target,keyCode)
- 事件名是特定的(
- 自定义事件
- 事件名称是任意名称
- 事件对象
$event:是调用emit时所提供的数据,可以是任意类型 - 推荐使用
kebab-case规范
- 示例:
- 父组件
// 给子组件绑定自定义事件 <Child @send-toy="saveToy"/> function saveToy(val:string){ toy.value = val }- 子组件
<!-- 调用自定义事件 --> <button button @click="emit('send-toy', toy)">传递数据</button> // 声明自定义事件 const emit =defineEmits(['send-toy']) -
【mitt】
- 概述:与消息订阅与发布(
pubsub)功能类似,可以实现任意组件间通信 - 步骤
- 安装
mitt:npm i mitt - 新建文件:
src\utils\emitter.ts:
import mitt from 'mitt' // 创建emitter const emitter = mitt() // 绑定事件 // emitter.on('xxx', (val)=>{ // console.log(val) // }) // 触发事件 // emitter.emit('xxx', data) // 解绑事件 // emitter.off('xxx') // 清空事件 // emitter.all.clear() export default emitter- 接收数据组件中:绑定事件、同时在销毁前解绑事件:
<template> <div class="child2"> <h3>子组件2</h3> <h4>电脑:{{ computer }}</h4> <h4>哥哥给的玩具:{{ toy }}</h4> </div> </template> <script setup lang="ts" name="Child2"> import {ref,onUnmounted} from 'vue' import emitter from '@/utils/emitter'; // 数据 let computer = ref('联想') let toy = ref('') emitter.on('send-toy', (val: string)=>{ toy.value = val }) onUnmounted(()=>{ emitter.off('send-toy') }) </script>- 提供数据的组件中,在合适的时机触发事件:
<template> <div class="child1"> <h3>子组件1</h3> <h4>玩具:{{ toy }}</h4> <button @click="emitter.emit('send-toy', toy)">传递数据</button> </div> </template> <script setup lang="ts" name="Child1"> import {ref} from 'vue' import emitter from '@/utils/emitter' // 数据 let toy = ref('奥特曼') </script> - 安装
-
【
v-model】- 概述:实现 父↔子 之间相互通信。
- 前序知识 ——
v-model的本质
<!--原生DOM输入框使用v-model:双向绑定--> <input type="text" v-model="username"> <!--v-model本质: 传一个动态属性value,并在input事件修改username值 --> <input type="text" :value="username" @input="username = (<HTMLInputElement>$event.target).value" >- 组件标签上的
v-model的本质::moldeValue+update:modelValue事件。
父组件中:
<!-- 组件身上使用v-model -->
<MyInput v-mdoel="username"/>

<!-- 本质相当于 -->
<MyInput :modelValue="username" @update:modelValue="username = $event"/>
自定义组件中
<template> <div> <!--将接收的value值赋给input元素的value属性,目的是:为了呈现数据 --> <!--给input元素绑定原生input事件,触发input事件时,进而触发update:model-value事件--> <input type="text" :value="modelValue" @input="emits('update:modelValue', (<HTMLInputElement>$event.target).value)" > </div> </template> <script setup lang="ts" name="MyInput"> defineProps(['modelValue']) // 声明自定义事件 update:modelValue const emits = defineEmits(['update:modelValue']) </script>v-model后面跟自定义名称, 相当于别名,这样的话可以使用多次v-model
父组件中:
<MyInput v-model="username" v-model:abc="abc"/>子组件中:
<template> <div> <input type="text" :value="modelValue" @input="emits('update:modelValue', (<HTMLInputElement>$event.target).value)" > <br> <input type="text" :value="abc" @input="emits('update:abc', (<HTMLInputElement>$event.target).value)" > </div> </template> <script setup lang="ts" name="MyInput"> defineProps(['modelValue','abc']) // 声明自定义事件 update:modelValue const emits = defineEmits(['update:modelValue', 'update:abc']) </script> -
【
$attrs】- 概述:
$attrs用于实现当前组件的父组件,向当前组件的子组件通信(祖→孙)。 - 具体说明:
$attrs是一个对象,包含所有父组件传入的标签属性。
注意:
$attrs会自动排除props中声明的属性(可以认为声明过的props被子组件自己“消费”了)(相当于:组件中没被defineProps声明接收的属性)父组件
<Parent/><template> <div class="father"> <h3>父组件</h3> <h4>a:{{a}}</h4> <h4>b:{{b}}</h4> <Child :a="a" :b="b" v-bind="{x:100,y:200}" :updateA="updateA"/> </div> </template> <script setup lang="ts" name="Father"> import Child from './Child.vue' import {ref} from 'vue' let a = ref(1) let b = ref(2) function updateA(val :number){ a.value += val } </script>子组件
<Clild/><template> <div class="child"> <h3>子组件</h3> <GrandChild v-bind="$attrs"/> </div> </template> <script setup lang="ts" name="Child"> import GrandChild from './GrandChild.vue' </script>孙组件
<GrandChild/><template> <div class="grand-child"> <h3>孙组件</h3> <h4>a:{{ a }}</h4> <h4>b:{{ b }}</h4> <h4>x:{{ $attrs.x }}</h4> <h4>y:{{ y }}</h4> <button @click="updateA(6)">点我将爷爷那的a更新</button> </div> </template> <script setup lang="ts" name="GrandChild"> defineProps(['a','b','y','updateA']) </script> - 概述:
-
【 r e f s 、 refs、 refs、parent】
- 概述:
$refs用于 :父→子。$parent用于:子→父。
- 原理如下:
属性 说明 $refs值为对象,包含所有被 ref属性标识的DOM元素或组件实例。$parent值为对象,当前组件的父组件实例对象。 - 示例:
Father.vue
<template>
  <div>
    <h4>父组件内的数字:{{ num }}</h4>
    <!-- 需求一: 父组件内操作
        子组件Child1的玩具,让玩具的值变成读书,
        子组件Child2的电脑,让电脑的值变成手机,
        在子组件上加ref,获取到子组件的数据,进行更改
    -->
    <button @click="editComputer">修改child2的电脑</button>
    <button @click="editToy">修改child1的玩具</button>
    <button @click="editBook1">子组件内书加几本方法一</button>
    <button @click="editBook2($refs)">子组件内书加几本方法二(假如多个组件内的值修改一致)</button>

    <Chilld1 ref="c1"/>
    <Chilld2 ref="c2"/>
  </div>
</template>

<script setup lang="ts">
import { ref } from 'vue';
import Chilld1 from './Child1.vue'
import Chilld2 from './Child2.vue'
let num = ref(1)
let c1 = ref()
let c2 = ref()

function editToy(){
  // 响应读取组件的值,必须在组件内暴露, 父读子需要暴露,子读父也需要暴露
  c1.value.toy = '读书'
}
function editComputer(){
  c2.value.computer = '手机'
}

function editBook1(){
  c1.value.book += 3
  c2.value.book += 3
}
// function editBook2(refs: any){
function editBook2(refs: {[key: string]: any}){
  for (const key in refs) {
    refs[key].book += 2
  }
}

// 暴露数据
defineExpose({num})
</script>
Child1.vue
<template>
  <div class="child1">
    <h3>子组件1</h3>
    <h4>玩具:{{ toy }}</h4>
    <h4>书籍:{{ book }} 本</h4>
    <!-- $parent直接获取父组件实例对象 -->
    <button @click="editNum($parent)">修改父组件内的num</button>
  </div>
</template>

<script setup lang="ts" name="Child1">
  import { ref } from "vue";
  // 数据
  let toy = ref('奥特曼')
  let book = ref(3)

  function editNum(par: any){
    par.num += 1
  }
  defineExpose({toy, book})
</script>
Child2.vue
<template> <div class="child2"> <h3>子组件2</h3> <h4>电脑:{{ computer }}</h4> <h4>书籍:{{ book }} 本</h4> </div> </template> <script setup lang="ts" name="Child2"> import { ref } from "vue"; // 数据 let computer = ref('联想') let book = ref(6) defineExpose({computer, book}) </script> - 概述:
-
【provide、inject】
- 概述:实现祖孙组件直接通信
- 具体使用:
- 在祖先组件中通过
provide配置向后代组件提供数据 - 在后代组件中通过
inject配置来声明接收数据
- 具体编码:
【第一步】父组件中,使用provide提供数据
<template>
  <div class="father">
    <h3>父组件</h3>
    {{ haha }}
    <Child/>
  </div>
</template>

<script setup lang="ts" name="Father">
  import Child from './Child.vue'
  import {ref,reactive,provide} from 'vue'

  let haha = ref('哈哈')
  // 向后代提供数据
  provide('haha', {haha, editHaha})
  function editHaha(value: string){
    haha.value = value
  }
</script>
注意:子组件中不用编写任何东西,是不受到任何打扰的
【第二步】孙组件中使用
inject配置项接受数据。inject接收两个参数,第一个参数是provide提供的数据名称,第二个参数是默认值(假如未找到provide提供的数据名称就触发)<template> <div class="grand-child"> <h3>我是孙组件</h3> <h3>{{ haha }}</h3> <button @click="editHaha('嗨嗨')">修改哈哈</button> </div> </template> <script setup lang="ts" name="GrandChild"> import { inject } from "vue"; const {haha,editHaha} = inject('haha', {haha:'呵呵', editHaha:(v: string)=>{}}) </script>
更多推荐
 已为社区贡献1条内容


所有评论(0)