Vue2自定义指令使用—按钮级别权限控制 + vue3中按钮级别权限控制的扩展
Vue自定义指令使用——按钮级别权限控制 + vue3中按钮级别权限控制的扩展
目录
2.havePermission 插件(import { havePermission } from '@/utils')
此文为vue2的按钮控制使用
vue3版本如下链接:
vue3.0项目实战系列文章 - 自定义指令_BMG-Princess的博客-CSDN博客
vue.directive讲解
1、vue.directive的作用
vue.directive是我们除了内置的指令(如v-model和v-show)之外的自定义指令。自定义指令是对普通DOM元素进行的底层操作,它是一种有效的的补充和扩展,不仅可以用于定义任何的dom操作,并且是可以复用的,
2、vue.directive的使用场景
- 例如在图片加载完成前,用随机的背景色占位,图片加载完成后直接渲染出来
- 还有高亮类的操作
- 控制按钮的展示
- 自定义操作dom
-
使用自定义指令的方式
//会实例化一个指令,但这个指令没有参数
`v-xxx`
// -- 将值传到指令中
`v-xxx="value"`
// -- 将字符串传入到指令中,如`v-html="'<p>内容</p>'"`
`v-xxx="'string'"`
// -- 传参数(`arg`),如`v-bind:class="className"`
`v-xxx:arg="value"`
// -- 使用修饰符(`modifier`)
`v-xxx:arg.modifier="value"`
3、使用vue.directive的4个demo
import Vue from "vue";

// 1、输入框聚焦
Vue.directive("focus", {
  // 当被绑定的元素插入到 DOM 中时……
  inserted: function (el) {
    // 聚焦元素
    el.focus();
  },
});

// 2、绑定背景颜色
Vue.directive('pin', function(el, binding) { //背景颜色
    el.style.background = binding.value
})

// 3、文字显示
Vue.directive('demo', {
  bind: function (el, binding, vnode) {
    var s = JSON.stringify
    el.innerHTML =
      'name: '       + s(binding.name) + '<br>' +
      'value: '      + s(binding.value) + '<br>' +
      'expression: ' + s(binding.expression) + '<br>' +
      'argument: '   + s(binding.arg) + '<br>' +
      'modifiers: '  + s(binding.modifiers) + '<br>' +
      'vnode keys: ' + Object.keys(vnode).join(', ')
  }
})

//4、该指令的元素被插入到dom时自动获得焦点
Vue.directive('focus',{
        /*inserted函数表示当绑定了该指令的元素被插入到dom时候会自动触发*/
        inserted(el){
            console.log(el);
            /*获得焦点*/
            el.focus();
        }
    })
4.使用vue.directive的图片加载(此例子为子组件形式)
<template>
  <div>
    <div v-img="url" style="width: 500px; height: 500px;"></div>
  </div>
</template>
<script>
import Vue from "vue"; //需要引入
Vue.directive("img", {
    bind:function(el){
    var color = Math.floor(Math.random() * 1000000);
    el.style.backgroundColor = "#" + color;
    },
  inserted: function (el, binding) {
    var img = new Image();
    img.src = binding.value;
    img.onload = function () {
      el.style.backgroundImage = "url(" + binding.value + ")";
    };
  },
});

export default {
  name: "directive",
  data() {
    return {
      url: "../../../1.jpg",//据具体图片存储文件夹而定

    };
  },
};
</script>
5.钩子函数
自定义指令也像组件那样存在钩子函数:
bind:只调用一次,指令第一次绑定到元素时调用。在这里可以进行一次性的初始化设置
inserted:被绑定元素插入父节点时调用 (仅保证父节点存在,但不一定已被插入文档中)
update:所在组件的 VNode 更新时调用,但是可能发生在其子
VNode更新之前。指令的值可能发生了改变,也可能没有。但是你可以通过比较更新前后的值来忽略不必要的模板更新
componentUpdated:指令所在组件的 VNode 及其子 VNode 全部更新后调用
unbind:只调用一次,指令与元素解绑时调用
所有的钩子函数的参数都有以下:
el:指令所绑定的元素,可以用来直接操作 DOM
binding:一个对象,包含以下 property:
`name`:指令名,不包括 v- 前缀。
`value`:指令的绑定值,例如:v-my-directive="1 + 1" 中,绑定值为 2。
`oldValue`:指令绑定的前一个值,仅在 update 和 componentUpdated 钩子中可用。无论值是否改变都可用。
`expression`:字符串形式的指令表达式。例如 v-my-directive="1 + 1" 中,表达式为 "1 + 1"。
`arg`:传给指令的参数,可选。例如 v-my-directive:foo 中,参数为 "foo"。
`modifiers`:一个包含修饰符的对象。例如:v-my-directive.foo.bar 中,修饰符对象为 { foo: true, bar: true }
`vnode`:Vue 编译生成的虚拟节点
`oldVnode`:上一个虚拟节点,仅在 update 和 componentUpdated 钩子中可用
例子1:设置表格数据自动滚动
- scroll.js文件如下
- main.js引入scroll.js文件 import './assets/js/scroll'
- 组件中使用 <el-table stripe border :data="数据" height="400'" v-auto-scroll>
import Vue from 'vue';
let timer = null;
let scrollBlockX = 0; // 滚动条位置;
let moveDir = 1 // 移动发现 1 正向  -1  方向
let scrollTop = 0; // 移动的距离


// 设置表格数据自动滚动
function dataScroll(el) {
  clearTimeout(timer);
  timer = setTimeout(() => {
    dataScroll(el);
  }, 50);
  let oTable = el.querySelectorAll(".el-table__body-wrapper")[0];
  scrollBlockX += moveDir; // 滚动条位置+1;

  oTable.scrollTo(0, scrollBlockX); //0到滚动条位置发生滚动
  // 判断是否触底
  if (scrollTop == oTable.scrollTop) { // 移动的距离达到滚动条长度:开始逆序
    console.log(1);
    moveDir *= -1;
    scrollTop = scrollTop + 100;
  } else { // 移动的距离 < 滚动条长度:正常移动
    scrollTop = oTable.scrollTop;
  }
}
//清除轮询,初始化
function init(el) {
  clearTimeout(timer);
  scrollBlockX = 0;
  moveDir = 1;
  scrollTop = 0;
  //返回文档中匹配指定 CSS 选择器的所有元素,返回NodeList对象。
  //scrollTo() 方法将文档滚动到指定的坐标:接受两个参数,分别是目标位置的水平和垂直坐标
  el && el.querySelectorAll(".el-table__body-wrapper")[0].scrollTo(0, 0)
}
//自定义指令:不仅可以用于定义任何的dom操作,并且是可以复用的
Vue.directive('auto-scroll', {
  bind(el) {
    // console.log('bind函数只会调用一次,指令第一次被绑定到元素被触发');
    init(el);
  },
  /*inserted函数表示当绑定了该指令的元素被插入到dom时候会自动触发*/
  inserted() {
    // console.log('inserted函数在组件被渲染时候调用');
  },
  update() {
    // console.log('update函数在所有组件的VNode对象更新时调用');
  },
  /*
   * el表示当顶了该指令的dom对象
   * binding是一个包含了指令各种信息的对象:指令名,指令值,指令表达式和一个包含了修饰符的对象
   * */
  async componentUpdated(el, binding, vNode, oldVNode) {
    // console.log('componentUpdated指令所在组件的VNode对象和其子类VNode对象全部更新后调用');
    // 首次/点击查询
    if (oldVNode.child.data.length == 0 || !oldVNode.isRootInsert) {
      init(el);
    }
    await new Promise(resolve => setTimeout(() => resolve(), 200));
    // 当滚动条出现时开始滚动
    if (!Array.from(el.classList).includes("el-table--scrollable-y")) return false;
    dataScroll(el);
    // 穿过(进入)被选元素时
    let oTable = el.querySelectorAll(".el-table__body-wrapper")[0];
    oTable.addEventListener('mouseenter', () => {
      clearTimeout(timer);
    })
    // 离开被选元素时
    oTable.addEventListener('mouseleave', () => {
      clearTimeout(timer);
      let oTable = el.querySelectorAll(".el-table__body-wrapper")[0];
      scrollBlockX = oTable.scrollTop - moveDir // 滚动条位置
      scrollTop = scrollBlockX
      dataScroll(el);
    })
  },
  unbind() {
    // console.log('unbind指令解绑时候被调用');
  }
})
例子2:根据权限控制着按钮的展示
前提
- 项目中控制着按钮的展示
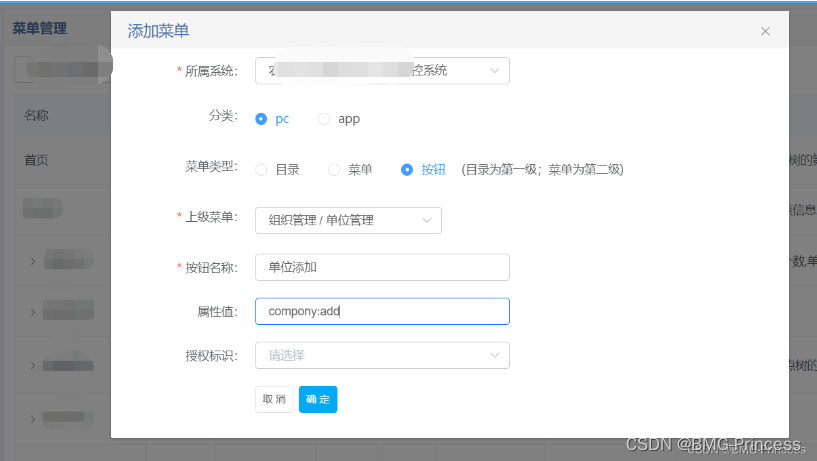
- 权限系统中添加需要控制的按钮

- 配置好后由接口返回按钮列表信息
["alarmReports:export",
"stationInfo:data",
 "stationSet:set5",
 "stationSet:set4",
 "stationSet:set3",
 "stationSet:set1",
 "stationList:use"
]
方案
1.新建 permissions.js 文件
import Vue from 'vue';
import { havePermission } from '@/utils'

// 检测是否有权限
// 使用Vue.directive声明自定义指令permission
Vue.directive('permission', {
  inserted(el, binding, vnode) {
    // console.log(el.localName, binding, vnode)
    const permission = binding.value
    const result = havePermission(permission)
    const tagName = el.localName
    if (!result) {
      // switch (tagName) {
      //   case 'button': // 按钮权限控制-删除tag
      //     el.remove()
      //     break
      //   case 'div':
      //     el.remove()
      //     break
      //   case 'span':
      //     el.remove()
      //     break
      //     case 'img':
      //       el.remove()
      //       break
      // }
      el.remove()
    }
  }
})
/**
 * @description: 表单防止重复提交指令
 * @param {*}
 * @return {*}
 * @author: gumingchen
 */
Vue.directive('repeat', {
  mounted(el, binding) {
    el.addEventListener('click', () => {
      if (!el.disabled) {
        el.disabled = true
        setTimeout(() => {
          el.disabled = false
        }, binding.value || 2000)
      }
    })
  }
})
2.havePermission 插件(import { havePermission } from '@/utils')
/**
 * @description: 判断是否有按钮级权限1
 * @param {String} permission 多个使用 & 或 | 分隔开
 * @param {String} separator 分隔符:&-并且 |-或者
 * @return {*}
 * @author: gumingchen
 */
 export function havePermission(permission, separator = '&') {
  let result = false
  const permissions = permission.split(separator)
  let fn = ''
  switch (separator) {
    case '&':
      fn = 'every'
      break
    case '|':
      fn = 'some'
      break
  }
  const list = JSON.parse(localStorage.getItem('buttonList')) || [];
  result = fn && permissions[fn](item => {
    return list.indexOf(item) !== -1
  })
  return result
}
3.在 main.js 文件中引入
//自定义指令
import './assets/js/permissions';
4.使用-登录成功后、将权限数组缓存
1.数据例子如上
// 接口返回 - 缓存权限数据
const buttonList = 返回数组
localStorage.setItem('buttonList',JSON.stringify(buttonList));
2.组件中:
<el-table-column label="操作" width="300" v-if="havePermission('sourceOfP:use|sourceOfP:change|sourceOfP:delete', '|')">
            <template slot-scope="scope">
              <dr-button v-permission="'sourceOfP:use'" v-if="!scope.row.disable" message="停用"
                icon="static/img/tingyong.png" csstyl="btn-tingyong" @click="handleStop(scope.row)"></dr-button>
              <dr-button v-permission="'sourceOfP:use'" v-else message="启用" icon="static/img/qiyong.png"
                csstyl="btn-qiyong" @click="handleStop(scope.row)"></dr-button>
              <dr-button v-permission="'sourceOfP:change'" message="编辑" icon="static/img/edits.png" csstyl="btn-bianji"
                @click="changeSourceOfPPage(scope.row)"></dr-button>
              <dr-button v-permission="'sourceOfP:delete'" message="删除" icon="static/img/delete1.png"
                csstyl="btn-shanchu" @deleteCommon="deleteCommon" :value="scope.row" name="此单位"></dr-button>
            </template>
          </el-table-column>
3.说明:havePermission调用全局方法
//判断是否有按钮级权限2
    Vue.prototype.havePermission = function(permission, separator = '&') {
      let result = false
      const permissions = permission.split(separator)
      let fn = ''
      switch (separator) {
        case '&':
          fn = 'every'
          break
        case '|':
          fn = 'some'
          break
      }
      const list = JSON.parse(localStorage.getItem('buttonList')) || [];
      result = fn && permissions[fn](item => {
        return list.indexOf(item) !== -1
      })
      return result
    };
  };
4.v-permission 控制按钮及标签的展示
更多推荐
 已为社区贡献15条内容


所有评论(0)