人脸检测和识别(中文标记)完整项目源代码(基于深度学习+python3.6+dlib+PIL+CNN+(tensorflow、keras)10分钟实现 区分欢乐颂中人物详细图文教程和完整项目代码)
转载请注明:https://blog.csdn.net/wyx100/article/details/80428424效果展示未完待续。。。环境配置win7sp1python 3.6.3dlib 19.7.0 tensorflow 1.3.0rc0keras ...
转载请注明:https://blog.csdn.net/wyx100/article/details/80428424
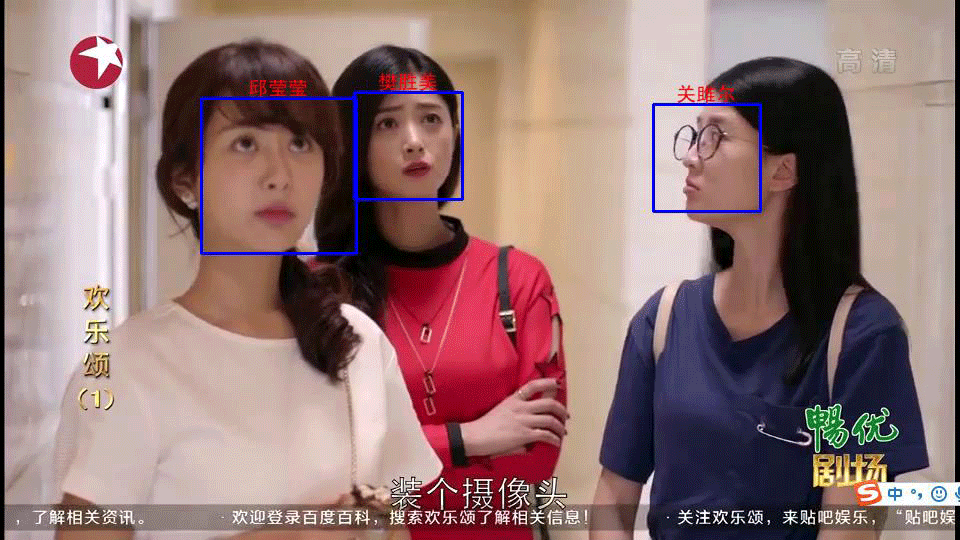
效果展示
未完待续。。。
环境配置
win7sp1
python 3.6.3
dlib 19.7.0
tensorflow 1.3.0rc0
keras 2.1.5
opencv-python 3.4.1+contrib
pillow 4.2.1
numpy 1.14.1+mkl
numpy 1.12.1
软件下载地址:https://www.lfd.uci.edu/~gohlke/pythonlibs/
软件安装参考:
https://blog.csdn.net/wyx100/article/details/78556402
http://www.cnblogs.com/neo-T/p/6426029.html
项目实现步骤
1.整理人脸图片(格式:jpg,150x150)
每个人物100张(80张训练(train),20张验证(validation))
data
train
fsm
0.jpg
1.jpg
。。。
79.jpg
gje
qyy
validation
fsm
80.jpg
81.jpg
。。。
99.jpg
gje
qyy
2.训练CNN(tensorflow、keras)模型
3.基于2训练的model(dlib检测人脸)识别视频某张图片中的人脸,并标记姓名
1)打开视频,截取一帧图片
2)检测1)中图片的人脸(1张或多张),未检测到人脸则结束本次循环
3)基于2训练的model识别图片中的人脸,并标记姓名
4)输出框出人脸并标记姓名的图片。
代码
请以本博客代码为主,对比下载实例和本博客的代码。
1. model_cnn_train.py
使用卷积神经网络训练人脸识别(不是检测)模型(模型结构见文章末尾)
# !/usr/bin/env python
# -*- coding: utf-8 -*-
from __future__ import print_function
import keras
from keras.datasets import cifar10
from keras.preprocessing.image import ImageDataGenerator
from keras.models import Sequential
from keras.layers import Dense, Dropout, Activation, Flatten
from keras.layers import Conv2D, MaxPooling2D
import os
import matplotlib.pyplot as plt
batch_size = 32 # 训练时每个批次的样本数 训练样本数/批次样本数 = 批次数(每个周期)
# num_classes = 10
num_classes = 3 # 3类别
# epochs = 100
epochs = 50 # 训练50周期,训练集所有样本(数据、记录)参与训练一次为一个周期
# data_augmentation = True
# num_predictions = 20
save_dir = os.path.join(os.getcwd(), 'saved_models')
model_name = 'keras_face_trained_model20180815.h5'
img_w = 150
img_h = 150
# LossHistory类,保存loss和acc
class LossHistory(keras.callbacks.Callback):
def on_train_begin(self, logs={}):
self.losses = {'batch': [], 'epoch': []}
self.accuracy = {'batch': [], 'epoch': []}
self.val_loss = {'batch': [], 'epoch': []}
self.val_acc = {'batch': [], 'epoch': []}
def on_batch_end(self, batch, logs={}):
self.losses['batch'].append(logs.get('loss'))
self.accuracy['batch'].append(logs.get('acc'))
self.val_loss['batch'].append(logs.get('val_loss'))
self.val_acc['batch'].append(logs.get('val_acc'))
def on_epoch_end(self, batch, logs={}):
self.losses['epoch'].append(logs.get('loss'))
self.accuracy['epoch'].append(logs.get('acc'))
self.val_loss['epoch'].append(logs.get('val_loss'))
self.val_acc['epoch'].append(logs.get('val_acc'))
def loss_plot(self, loss_type):
iters = range(len(self.losses[loss_type]))
plt.figure()
# acc
plt.plot(iters, self.accuracy[loss_type], 'r', label='train acc')
# loss
plt.plot(iters, self.losses[loss_type], 'g', label='train loss')
if loss_type == 'epoch':
# val_acc
plt.plot(iters, self.val_acc[loss_type], 'b', label='val acc')
# val_loss
plt.plot(iters, self.val_loss[loss_type], 'k', label='val loss')
plt.grid(True)
plt.xlabel(loss_type)
plt.ylabel('acc-loss')
plt.legend(loc="upper right")
plt.show()
'''
# The data, shuffled and split between train and test sets:
(x_train, y_train), (x_test, y_test) = cifar10.load_data()
print('x_train shape:', x_train.shape)
print(x_train.shape[0], 'train samples')
print(x_test.shape[0], 'test samples')
# Convert class vectors to binary class matrices.
y_train = keras.utils.to_categorical(y_train, num_classes)
y_test = keras.utils.to_categorical(y_test, num_classes)
'''
model = Sequential()
model.add(Conv2D(32, (3, 3), padding='same',
# input_shape=x_train.shape[1:]))
input_shape=(150, 150, 3))) # 输入数据是图片转换的矩阵格式,150(行)x 150(列) x 3 (通道)(每个像素点3个单位,分别表示RGB(红绿蓝))
model.add(Activation('relu'))
model.add(Conv2D(32, (3, 3)))
model.add(Activation('relu'))
model.add(MaxPooling2D(pool_size=(2, 2)))
model.add(Dropout(0.25))
model.add(Conv2D(64, (3, 3), padding='same'))
model.add(Activation('relu'))
model.add(Conv2D(64, (3, 3)))
model.add(Activation('relu'))
model.add(MaxPooling2D(pool_size=(2, 2)))
model.add(Dropout(0.25))
model.add(Flatten())
model.add(Dense(512))
model.add(Activation('relu'))
model.add(Dropout(0.5))
model.add(Dense(num_classes))
model.add(Activation('softmax'))
# initiate RMSprop optimizer
opt = keras.optimizers.rmsprop(lr=0.0001, decay=1e-6)
# Let's train the model using RMSprop
model.compile(loss='categorical_crossentropy',
optimizer=opt,
metrics=['accuracy'])
# x_train = x_train.astype('float32')
# x_test = x_test.astype('float32')
# x_train /= 255
# x_test /= 255
# 创建history实例
history = LossHistory()
'''
if not data_augmentation:
print('Not using data augmentation.')
model.fit(x_train, y_train,
batch_size=batch_size,
epochs=epochs,
validation_data=(x_test, y_test),
shuffle=True)
else:
print('Using real-time data augmentation.')
# This will do preprocessing and realtime data augmentation:
datagen = ImageDataGenerator(
featurewise_center=False, # set input mean to 0 over the dataset
samplewise_center=False, # set each sample mean to 0
featurewise_std_normalization=False, # divide inputs by std of the dataset
samplewise_std_normalization=False, # divide each input by its std
zca_whitening=False, # apply ZCA whitening
rotation_range=0, # randomly rotate images in the range (degrees, 0 to 180)
width_shift_range=0.1, # randomly shift images horizontally (fraction of total width)
height_shift_range=0.1, # randomly shift images vertically (fraction of total height)
horizontal_flip=True, # randomly flip images
vertical_flip=False) # randomly flip images
# Compute quantities required for feature-wise normalization
# (std, mean, and principal components if ZCA whitening is applied).
datagen.fit(x_train)
# Fit the model on the batches generated by datagen.flow().
model.fit_generator(datagen.flow(x_train, y_train,
batch_size=batch_size),
epochs=epochs,
validation_data=(x_test, y_test),
workers=4)
'''
train_datagen = ImageDataGenerator(
rescale=1. / 255,
shear_range=0.2,
zoom_range=0.2,
horizontal_flip=True)
test_datagen = ImageDataGenerator(rescale=1. / 255)
# 训练样本初始化处理:长宽调整,批次大小调整,数据打乱排序(shuffle=True),分类区分(binary:2分类、categorical:多分类)
train_generator = train_datagen.flow_from_directory(
'./data/train', # 本例,提供80 x 3 = 240 个训练样本
target_size=(img_w, img_h), # 图片格式调整为 150x150
batch_size=batch_size,
shuffle=True,
class_mode='categorical') # matt,多分类
validation_generator = test_datagen.flow_from_directory(
'./data/validation', # 本例,提供20 x 3 = 60 个验证样本
target_size=(img_w, img_h),
batch_size=batch_size,
shuffle=True,
class_mode='categorical') # matt,多分类
# 模型适配生成
model.fit_generator(
train_generator, # 训练集
samples_per_epoch=2400, # 训练集总样本数,如果提供样本数量不够,则调整图片(翻转、平移等)补足数量(本例,该函数补充2400-240个样本)
nb_epoch=epochs,
validation_data=validation_generator, # 验证集
nb_val_samples=800, # 验证集总样本数,如果提供样本数量不够,则调整图片(翻转、平移等)补足数量(本例,该函数补充800-60个样本)
callbacks=[history]) # 回调函数,绘制批次(epoch)和精确度(acc)关系图表函数
# Save model and weights
if not os.path.isdir(save_dir): # 没有save_dir对应目录则建立
os.makedirs(save_dir)
model_path = os.path.join(save_dir, model_name)
model.save(model_path)
print('Saved trained model at %s ' % model_path)
# 显示批次(epoch)和精确度(acc)关系图表
history.loss_plot('epoch')
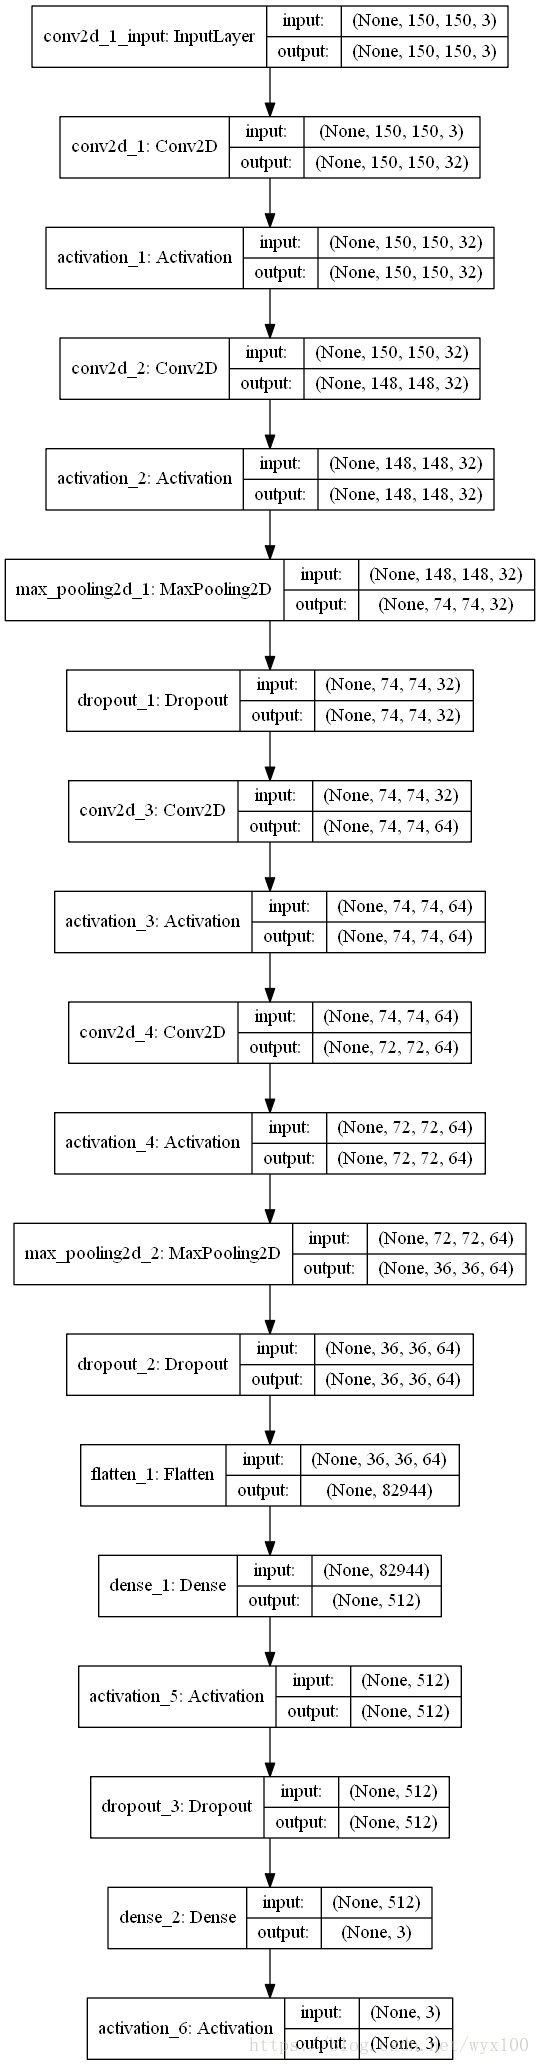
# 模型结构图
from keras.utils import plot_model
plot_model(model, to_file='model.png', show_shapes=True)
# Score trained model.
# scores = model.evaluate(x_test, y_test, verbose=1)
# print('Test loss:', scores[0])
# print('Test accuracy:', scores[1])
根据keras2.1.6中example(点击下载)下cifar10_cnn.py修改
英文文档
https://pypi.org/project/Keras/
https://pypi.org/project/Keras/#files
https://github.com/keras-team/keras.git (代码下载)
中文文档
http://keras-cn.readthedocs.io/en/latest/
'''Train a simple deep CNN on the CIFAR10 small images dataset.

It gets to 75% validation accuracy in 25 epochs, and 79% after 50 epochs.
(it's still underfitting at that point, though).
'''

from __future__ import print_function
import keras
from keras.datasets import cifar10
from keras.preprocessing.image import ImageDataGenerator
from keras.models import Sequential
from keras.layers import Dense, Dropout, Activation, Flatten
from keras.layers import Conv2D, MaxPooling2D
import os

batch_size = 32
num_classes = 10
epochs = 100
data_augmentation = True
num_predictions = 20
save_dir = os.path.join(os.getcwd(), 'saved_models')
model_name = 'keras_cifar10_trained_model.h5'

# The data, split between train and test sets:
(x_train, y_train), (x_test, y_test) = cifar10.load_data()
print('x_train shape:', x_train.shape)
print(x_train.shape[0], 'train samples')
print(x_test.shape[0], 'test samples')

# Convert class vectors to binary class matrices.
y_train = keras.utils.to_categorical(y_train, num_classes)
y_test = keras.utils.to_categorical(y_test, num_classes)

model = Sequential()
model.add(Conv2D(32, (3, 3), padding='same',
                 input_shape=x_train.shape[1:]))
model.add(Activation('relu'))
model.add(Conv2D(32, (3, 3)))
model.add(Activation('relu'))
model.add(MaxPooling2D(pool_size=(2, 2)))
model.add(Dropout(0.25))

model.add(Conv2D(64, (3, 3), padding='same'))
model.add(Activation('relu'))
model.add(Conv2D(64, (3, 3)))
model.add(Activation('relu'))
model.add(MaxPooling2D(pool_size=(2, 2)))
model.add(Dropout(0.25))

model.add(Flatten())
model.add(Dense(512))
model.add(Activation('relu'))
model.add(Dropout(0.5))
model.add(Dense(num_classes))
model.add(Activation('softmax'))

# initiate RMSprop optimizer
opt = keras.optimizers.rmsprop(lr=0.0001, decay=1e-6)

# Let's train the model using RMSprop
model.compile(loss='categorical_crossentropy',
              optimizer=opt,
              metrics=['accuracy'])

x_train = x_train.astype('float32')
x_test = x_test.astype('float32')
x_train /= 255
x_test /= 255

if not data_augmentation:
    print('Not using data augmentation.')
    model.fit(x_train, y_train,
              batch_size=batch_size,
              epochs=epochs,
              validation_data=(x_test, y_test),
              shuffle=True)
else:
    print('Using real-time data augmentation.')
    # This will do preprocessing and realtime data augmentation:
    datagen = ImageDataGenerator(
        featurewise_center=False,  # set input mean to 0 over the dataset
        samplewise_center=False,  # set each sample mean to 0
        featurewise_std_normalization=False,  # divide inputs by std of the dataset
        samplewise_std_normalization=False,  # divide each input by its std
        zca_whitening=False,  # apply ZCA whitening
        rotation_range=0,  # randomly rotate images in the range (degrees, 0 to 180)
        width_shift_range=0.1,  # randomly shift images horizontally (fraction of total width)
        height_shift_range=0.1,  # randomly shift images vertically (fraction of total height)
        horizontal_flip=True,  # randomly flip images
        vertical_flip=False)  # randomly flip images

    # Compute quantities required for feature-wise normalization
    # (std, mean, and principal components if ZCA whitening is applied).
    datagen.fit(x_train)

    # Fit the model on the batches generated by datagen.flow().
    model.fit_generator(datagen.flow(x_train, y_train,
                                     batch_size=batch_size),
                        epochs=epochs,
                        validation_data=(x_test, y_test),
                        workers=4)

# Save model and weights
if not os.path.isdir(save_dir):
    os.makedirs(save_dir)
model_path = os.path.join(save_dir, model_name)
model.save(model_path)
print('Saved trained model at %s ' % model_path)

# Score trained model.
scores = model.evaluate(x_test, y_test, verbose=1)
print('Test loss:', scores[0])
print('Test accuracy:', scores[1])
6个周期可以达到99%的准确率。
2. video_face_sign.py
使用dlib检测视频中的人脸,调用1中的训练的模型判断对应人(是谁)并标记中文姓名。
备注:调整模型(使用leNet、vgg16、vggg19等网络;增加模型的卷积过滤器(filter)数量提取更多特征等)、样本质量、样本数量、样本多样性调整可优化实际识别效果。
流程说明:
1.打开视频;
2.截取(截屏)视频中的一帧(一张图片)
3.检测2中截取图片中人脸(没有检测到人脸跳过,去2截取下一帧)
4.在3中检测到人脸(1或多张)依次识别(通过1. model_cnn_train.py 模型预测)每张人脸并标记目标框(图中蓝色框)和姓名(中文汉字)。
5.把4中图片、目标框、和姓名(中文汉字)合成为一张图片并显示。
6.重复2,只到终止条件。
#!/usr/bin/env python
# -*- coding: utf-8 -*-
import os
import numpy as np
import sys
import time
import cv2
import dlib

from keras.preprocessing import image as imagekeras
from keras.models import load_model
from PIL import Image, ImageDraw, ImageFont

size = 150
save_dir = os.path.join(os.getcwd(), 'saved_models')
model_name = 'keras_face_trained_model.h5'

# 类别编码转换为中文名称返回
def return_name(codelist):
    names = ['樊胜美', '关雎尔', '邱莹莹']
    for it in range(0, len(codelist), 1):
        if int(codelist[it]) == 1.0:
            return names[it]

# 类别编码转换为英文名称返回
def return_name_en(codelist):
    names = ['fsm', 'gje', 'qyy']
    for it in range(0, len(codelist), 1):
        if int(codelist[it]) == 1.0:
            return names[it]

# 区分和标记视频中截图的人脸
def face_rec():
    global  image_ouput
    model = load_model(os.path.join(save_dir, model_name))
    camera = cv2.VideoCapture("2.mp4") # 视频
    # camera = cv2.VideoCapture(0) # 摄像头

    while (True):
        read, img = camera.read()
        try:
            # 未截取视频图片结束本次循环
            if not (type(img) is np.ndarray):
                continue
            gray_img = cv2.cvtColor(img, cv2.COLOR_BGR2GRAY) # 图片转为灰度图
        except:
            print("Unexpected error:", sys.exc_info()[0])
            break

        # 使用detector进行人脸检测
        # 使用dlib自带的frontal_face_detector作为我们的特征提取器
        detector = dlib.get_frontal_face_detector()
        dets = detector(gray_img, 1) # 提取截图中所有人脸

        facelist = []
        for i, d in enumerate(dets): # 依次区分截图中的人脸
            x1 = d.top() if d.top() > 0 else 0
            y1 = d.bottom() if d.bottom() > 0 else 0
            x2 = d.left() if d.left() > 0 else 0
            y2 = d.right() if d.right() > 0 else 0

            img = cv2.rectangle(img, (x2, x1), (y2, y1), (255, 0, 0), 2) # 人脸画框

            face = img[x1:y1, x2:y2]
            face = cv2.resize(face, (size, size))

            x_input = np.expand_dims(face, axis=0)
            prey = model.predict(x_input)
            print(prey, 'prey')

            facelist.append([d,  return_name(prey[0])]) # 存储一张图中多张人脸坐标和标记(姓名)

        cv2_im = cv2.cvtColor(img, cv2.COLOR_BGR2RGB)  # cv2和PIL中颜色的hex码的储存顺序不同
        pil_im = Image.fromarray(cv2_im)

        draw = ImageDraw.Draw(pil_im)  # 括号中为需要打印的cqanvas,这里就是在图片上直接打印
        font = ImageFont.truetype("simhei.ttf", 20, encoding="utf-8")  # 第一个参数为字体文件路径,第二个为字体大小

        try:
            for i in facelist:
                # 人脸标记写入图片,第一个参数为打印的坐标,第二个为打印的文本,第三个为字体颜色,第四个为字体
                draw.text((i[0].left() + int((i[0].right() - i[0].left()) / 2 - len(i[1]) * 10), i[0].top() - 20), i[1],
                          (255, 0, 0), font=font)
        except:
            print("Unexpected error:", sys.exc_info()[0])
            continue

        # PIL图片转换为cv2图片
        cv2_char_img = cv2.cvtColor(np.array(pil_im), cv2.COLOR_RGB2BGR)
        # 显示图片
        cv2.imshow("camera", cv2_char_img)
        if cv2.waitKey(1) & 0xff == ord("q"):
            break
    cv2.destroyAllWindows()

if __name__ == "__main__":
    face_rec()
模型训练epoch-acc-loss图

模型结构图
完整项目下载
为方便没积分童鞋,请加企鹅,共享文件夹。
包括:代码、数据集合(图片)、已生成model、安装库文件等。
https://github.com/gbusr/ML/tree/master/facecnn
QQ(群:452205574)中文件:facecnn.rar
详细讲解
推荐阅读
https://blog.csdn.net/wyx100/article/details/80939360
https://blog.csdn.net/wyx100/article/details/80950499
https://blog.csdn.net/wyx100/article/details/80647379
http://www.cnblogs.com/neo-T/p/6426029.html


CSDN联合极客时间,共同打造面向开发者的精品内容学习社区,助力成长!
更多推荐


 18
18 0
0- 0


 已为社区贡献9条内容

所有评论(0)