
如何在Linux上让监控摄像头与Motion一起工作
如果你想通过比Zoneminder更简单、轻量的方式运行监控摄相头,不妨试试Motion。Motion是一个相当轻量级,但却能够在Linux上运行监控摄像头的应用。它可以和任何支持Linux的摄像头一起工作,包括所有V4L(译者注:Video4Linux,linux内核中关于视频设备的API接口)网络摄像头,许多IP网络摄像头和Axis(译者注:一个日本精工品牌)摄像头。Motion还
·
该文原文为How to Operate Linux Spycams With Motion,由 Carla Schroder发表于linux.com。
如果你想通过比Zoneminder更简单、轻量的方式运行监控摄相头,不妨试试Motion。
Motion是一个相当轻量级,但却能够在Linux上运行监控摄像头的应用。它可以和任何支持Linux的摄像头一起工作,包括所有V4L(译者注:Video4Linux,linux内核中关于视频设备的API接口)网络摄像头,许多IP网络摄像头和Axis(译者注:一个日本精工品牌)摄像头。Motion还能够控制云台功能。Motion以JPEG、PPM和MPEG格式存储影像和快照。由于Motion内置了Http服务器,你可以在网络浏览器中进行远程观看。虽然Motion支持MySQL和PostgreSQL数据库,但是它仍然可以在不需要数据库的情况下,将图片文件存储在你选择的目录。
首先让我们看看如何让一台我信赖的Foscam FI8905W网络摄像头(图1)与Motion一起工作,接着我们会增加一台USB网络摄像头。
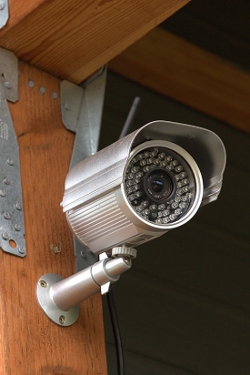
图1 我家用来欢迎访客的Foscam网络摄像头
安装程序会创建一个motion用户,并将motion用户添加到video组。如果程序没有创建motion用户,你需要自己创建一个。为避免权限问题,还要把你自己加到video组中。
现在运行motion看看它是否工作:
$ sudo motion
[0] Processing thread 0 - config file /etc/motion/motion.conf
[0] Motion 3.2.12 Started
[0] ffmpeg LIBAVCODEC_BUILD 3547904 LIBAVFORMAT_BUILD 3544067
[0] Thread 1 is from /etc/motion/motion.conf
[1] Thread 1 started
[0] motion-httpd/3.2.12 running, accepting connections
[1] Failed to open video device /dev/video0: No such file or directory
[0] motion-httpd: waiting for data on port TCP 8080
[1] Could not fetch initial image from camera
[1] Motion continues using width and height from config file(s)
[1] Resizing pre_capture buffer to 1 items
[1] Started stream webcam server in port 8081
[...]
这期间会有很多行文字出现,直到你看到下面的内容:
[1] Failed to open video device /dev/video0: No such file or directory
[1] Video signal lost - Adding grey image
将你的网络浏览器转到localhost:8081,你将会看到一幅灰色的图像:

图2 找到不到摄像头时Motion显示一幅灰色的图像
~$ mkdir .motion
~$ sudo cp /etc/motion/motion.conf .motion/
~$ sudo chown carla:carla .motion/motion.conf
你还需要一个目录来存储Motion拍下的照片:
~$ mkdir motion-images当你启动Motion,它会首先在当前目录下寻找配置文件,其次是~/.motion目录, 最后是/etc/motion目录。现在编辑你的~/.motion/motion.conf文件——这个例子包含了基本的配置,其中几行是关于我的Foscam网络摄像头的。
# Start in daemon (background) mode and release terminal (default: off)
daemon on
# Output 'normal' pictures when motion is detected (default: on)
[...]
output_normal off
# File to store the process ID, also called pid file. (default: not defined)
process_id_file /var/run/motion/motion.pid
# Image width (pixels). Valid range: Camera dependent, default: 352
width 640
# Image height (pixels). Valid range: Camera dependent, default: 288
height 480
# Maximum number of frames to be captured per second.
# Valid range: 2-100. Default: 100 (almost no limit).
framerate 7
# URL to use if you are using a network camera, size will be autodetected (incl http:// ftp:// or file:///)
# Must be a URL that returns single jpeg pictures or a raw mjpeg stream. Default: Not defined
netcam_url value http://http://192.168.10.250:8080/videostream.cgi
# Username and password for network camera (only if required). Default: not defined
# Syntax is user:password
netcam_userpass admin:mypassword
# Target base directory for pictures and films
# Recommended to use absolute path. (Default: current working directory)
target_dir /home/carla/motion-images
# Codec to used by ffmpeg for the video compression.
[...]
ffmpeg_video_codec mpeg4
正如motion.conf中所述,你需要创建一个目录来存储PID文件:
$ sudo mkdir /var/run/motion现在试着再一次启动Motion:
$ sudo motion
[0] Processing thread 0 - config file /home/carla/.motion/motion.conf
[0] Motion 3.2.12 Started
[0] Motion going to daemon mode
到目前为止还不错,现在再试试localhost:8081:

图3 从Motion看我家外面的马路
网络摄像头设置
How to Operate Your Spycams with ZoneMinder on Linux (part 1) 详细的介绍了摄像头的设置。你必须按照厂商的说明进行一些初始的设定,比如帧尺寸、移动敏感度,以及颜色深度或黑白设定。
得到正确的netcam_url有时会是个问题。对于我的Foscam,我在火狐浏览器中打开它的控制面板,右击图片(图4),然后点击显示图像信息。这将会打开一个图5那样的窗口,其中显示了视频流的完整URL。在Chrome浏览器中,应该使用 "审查元素"。

图4 Firefox中 Foscam的控制面板

图5 找到摄像头的视频流URL
调整配置值
你可以任意修改配置文件,比如图片尺寸、图片质量、帧速度、移动敏感度、在选定帧使用更大的敏感度、文件路径、HTTP服务器设定,以及时间戳格式。Motion Guide - Alphabetical Option Reference Manual 给出了相关选项的详细信息。记住如果你的摄像头有设置面板的话,要保持其中的设置于Motion中的一致。
USB摄像头
任何支持V4L的USB网络摄像头可以轻松的和Motion一起工作。这个视频设备将是/dev/video0。当摄像头与计算机直接相连后,/dev/video0将会出现。这个基本的例子配置了我的罗技摄像头:
videodevice /dev/video0
width 640
height 480
framerate 24
output_normal off
ffmpeg_video_codec mpeg4
target_dir /home/carla/motion
再一次记住帧速度和尺寸等设定依赖于你的摄像头的支持程度。
一旦你做好了所有工作,编辑/etc/default/motion,将start_motion_daemon=no改为start_motion_daemon=yes可以让你的Motion作为后台程序运行。现在Motion将会在每次开机后自动启动,你可以像任何后台进程一样开始和结束Motion。
控制多个摄像头
Motion可以轻松地控制多个摄像头——你所要做的仅仅是给每个摄像头一个配置文件,thread1.conf, thread1.conf等等。你还需要主配置文件motion.conf来进行一些公共配置,比如后台进程开启和文件路径。接下来每一个“线程”文件将会对所指定的摄像头进行配置。
更多推荐
 0
0 0
0- 0


 已为社区贡献1条内容

所有评论(0)