
在 Ubuntu 22.04 上部署 OpenClaw 并接入阿里云 Coding Plan
本文介绍了在Ubuntu 22.04 LTS系统上配置环境信息系统OpenClaw的完整流程。主要内容包括:1)安装系统依赖,如Node.js LTS版本和npm淘宝镜像配置;2)通过官方脚本安装OpenClaw并完成交互式配置;3)详细说明如何在WebUI中配置CodingPlan专属API Key,提供完整的JSON配置模板;4)介绍OpenClaw的两种使用方式(WebUI和TUI)。该指南
·
环境信息
-
系统:Ubuntu 22.04 LTS
一、安装依赖
1. 更新系统包索引
sudo apt update2. 安装 curl
sudo apt install -y curl3. 安装 Node.js LTS 版本
通过 NodeSource 安装最新稳定 LTS 版本:
curl -fsSL https://deb.nodesource.com/setup_lts.x | sudo -E bash -
sudo apt-get install -y nodejs
安装完成后,验证版本:
node -v
npm -v
示例输出:
v24.14.0
11.9.0
4. 设置 npm 镜像(可选,推荐淘宝镜像)
npm config set registry https://registry.npmmirror.com
npm config get registry
输出示例:
https://registry.npmmirror.com二、安装 OpenClaw
执行官方安装脚本:
curl -fsSL https://openclaw.ai/install.sh | bash注意:安装过程中会有多个交互选项,需要按提示操作。
安装过程常用配置
| 配置项 | 选择建议 |
|---|---|
| I understand this is powerful and inherently risky. Continue? | Yes |
| Onboarding mode | QuickStart |
| Model/auth provider | Skip for now |
| Filter models by provider | All providers |
| Default model | 默认即可 |
| Select channel (QuickStart) | Skip for now |
| Configure skills now? (recommended) | No |
| Enable hooks? | 按空格选中 → Skip for now |
| How do you want to hatch your bot? | Hatch in TUI |
三、在 OpenClaw 中配置 Coding Plan API Key
通过 Web UI 修改配置文件
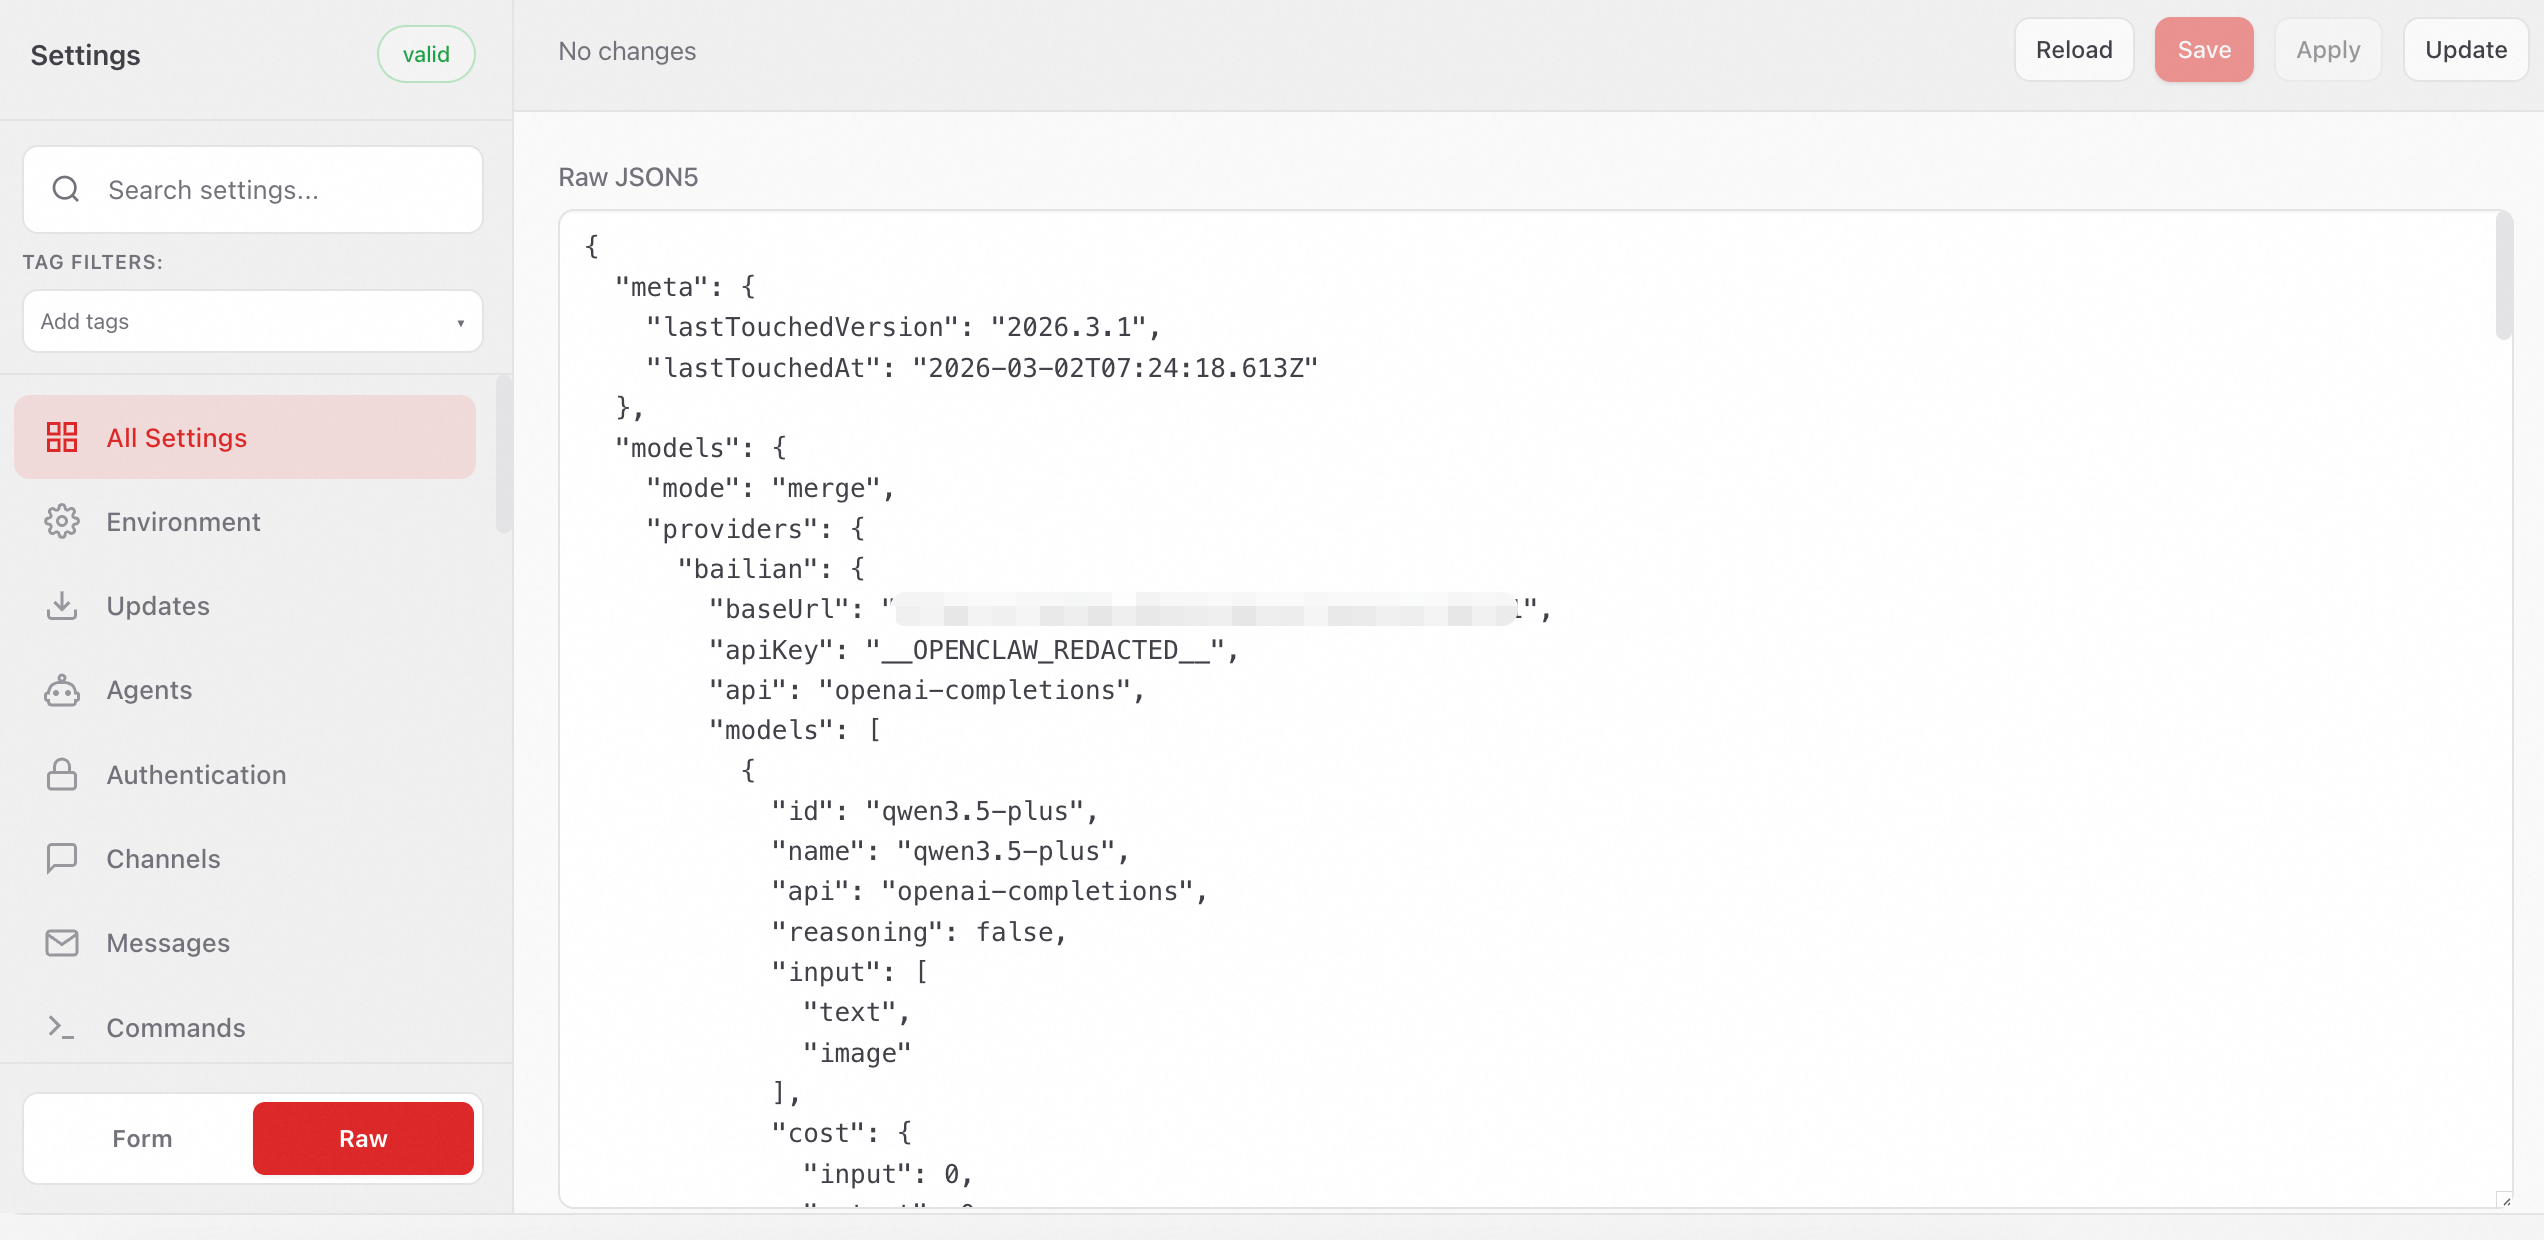
1.在终端启动 Web UI:
openclaw dashboard2.打开 Web UI 后,左侧菜单栏选择:
配置 > All Settings > RAW
复制以下内容到Raw JSONS输入框,替换已有内容。
若需保留已有配置,请勿直接全量替换。
3.将YOUR_API_KEY替换为Coding Plan 专属API Key。单击右上角 Save 保存,然后单击 Update使配置生效。
{
  "models": {
    "mode": "merge",
    "providers": {
      "bailian": {
        "baseUrl": "https://coding.dashscope.aliyuncs.com/v1",
        "apiKey": "YOUR_API_KEY",
        "api": "openai-completions",
        "models": [
          {
            "id": "qwen3.5-plus",
            "name": "qwen3.5-plus",
            "reasoning": false,
            "input": ["text", "image"],
            "cost": { "input": 0, "output": 0, "cacheRead": 0, "cacheWrite": 0 },
            "contextWindow": 1000000,
            "maxTokens": 65536
          },
          {
            "id": "qwen3-max-2026-01-23",
            "name": "qwen3-max-2026-01-23",
            "reasoning": false,
            "input": ["text"],
            "cost": { "input": 0, "output": 0, "cacheRead": 0, "cacheWrite": 0 },
            "contextWindow": 262144,
            "maxTokens": 65536
          },
          {
            "id": "qwen3-coder-next",
            "name": "qwen3-coder-next",
            "reasoning": false,
            "input": ["text"],
            "cost": { "input": 0, "output": 0, "cacheRead": 0, "cacheWrite": 0 },
            "contextWindow": 262144,
            "maxTokens": 65536
          },
          {
            "id": "qwen3-coder-plus",
            "name": "qwen3-coder-plus",
            "reasoning": false,
            "input": ["text"],
            "cost": { "input": 0, "output": 0, "cacheRead": 0, "cacheWrite": 0 },
            "contextWindow": 1000000,
            "maxTokens": 65536
          },
          {
            "id": "MiniMax-M2.5",
            "name": "MiniMax-M2.5",
            "reasoning": false,
            "input": ["text"],
            "cost": { "input": 0, "output": 0, "cacheRead": 0, "cacheWrite": 0 },
            "contextWindow": 204800,
            "maxTokens": 131072
          },
          {
            "id": "glm-5",
            "name": "glm-5",
            "reasoning": false,
            "input": ["text"],
            "cost": { "input": 0, "output": 0, "cacheRead": 0, "cacheWrite": 0 },
            "contextWindow": 202752,
            "maxTokens": 16384
          },
          {
            "id": "glm-4.7",
            "name": "glm-4.7",
            "reasoning": false,
            "input": ["text"],
            "cost": { "input": 0, "output": 0, "cacheRead": 0, "cacheWrite": 0 },
            "contextWindow": 202752,
            "maxTokens": 16384
          },
          {
            "id": "kimi-k2.5",
            "name": "kimi-k2.5",
            "reasoning": false,
            "input": ["text", "image"],
            "cost": { "input": 0, "output": 0, "cacheRead": 0, "cacheWrite": 0 },
            "contextWindow": 262144,
            "maxTokens": 32768
          }
        ]
      }
    }
  },
  "agents": {
    "defaults": {
      "model": {
        "primary": "bailian/qwen3.5-plus"
      },
      "models": {
        "bailian/qwen3.5-plus": {},
        "bailian/qwen3-max-2026-01-23": {},
        "bailian/qwen3-coder-next": {},
        "bailian/qwen3-coder-plus": {},
        "bailian/MiniMax-M2.5": {},
        "bailian/glm-5": {},
        "bailian/glm-4.7": {},
        "bailian/kimi-k2.5": {}
      }
    }
  },
  "gateway": {
    "mode": "local"
  }
}
4.保存成功后,apiKey将显示为“__OPENCLAW_REDACTED__”。脱敏保护,仅用于前端界面隐藏,不影响实际调用。
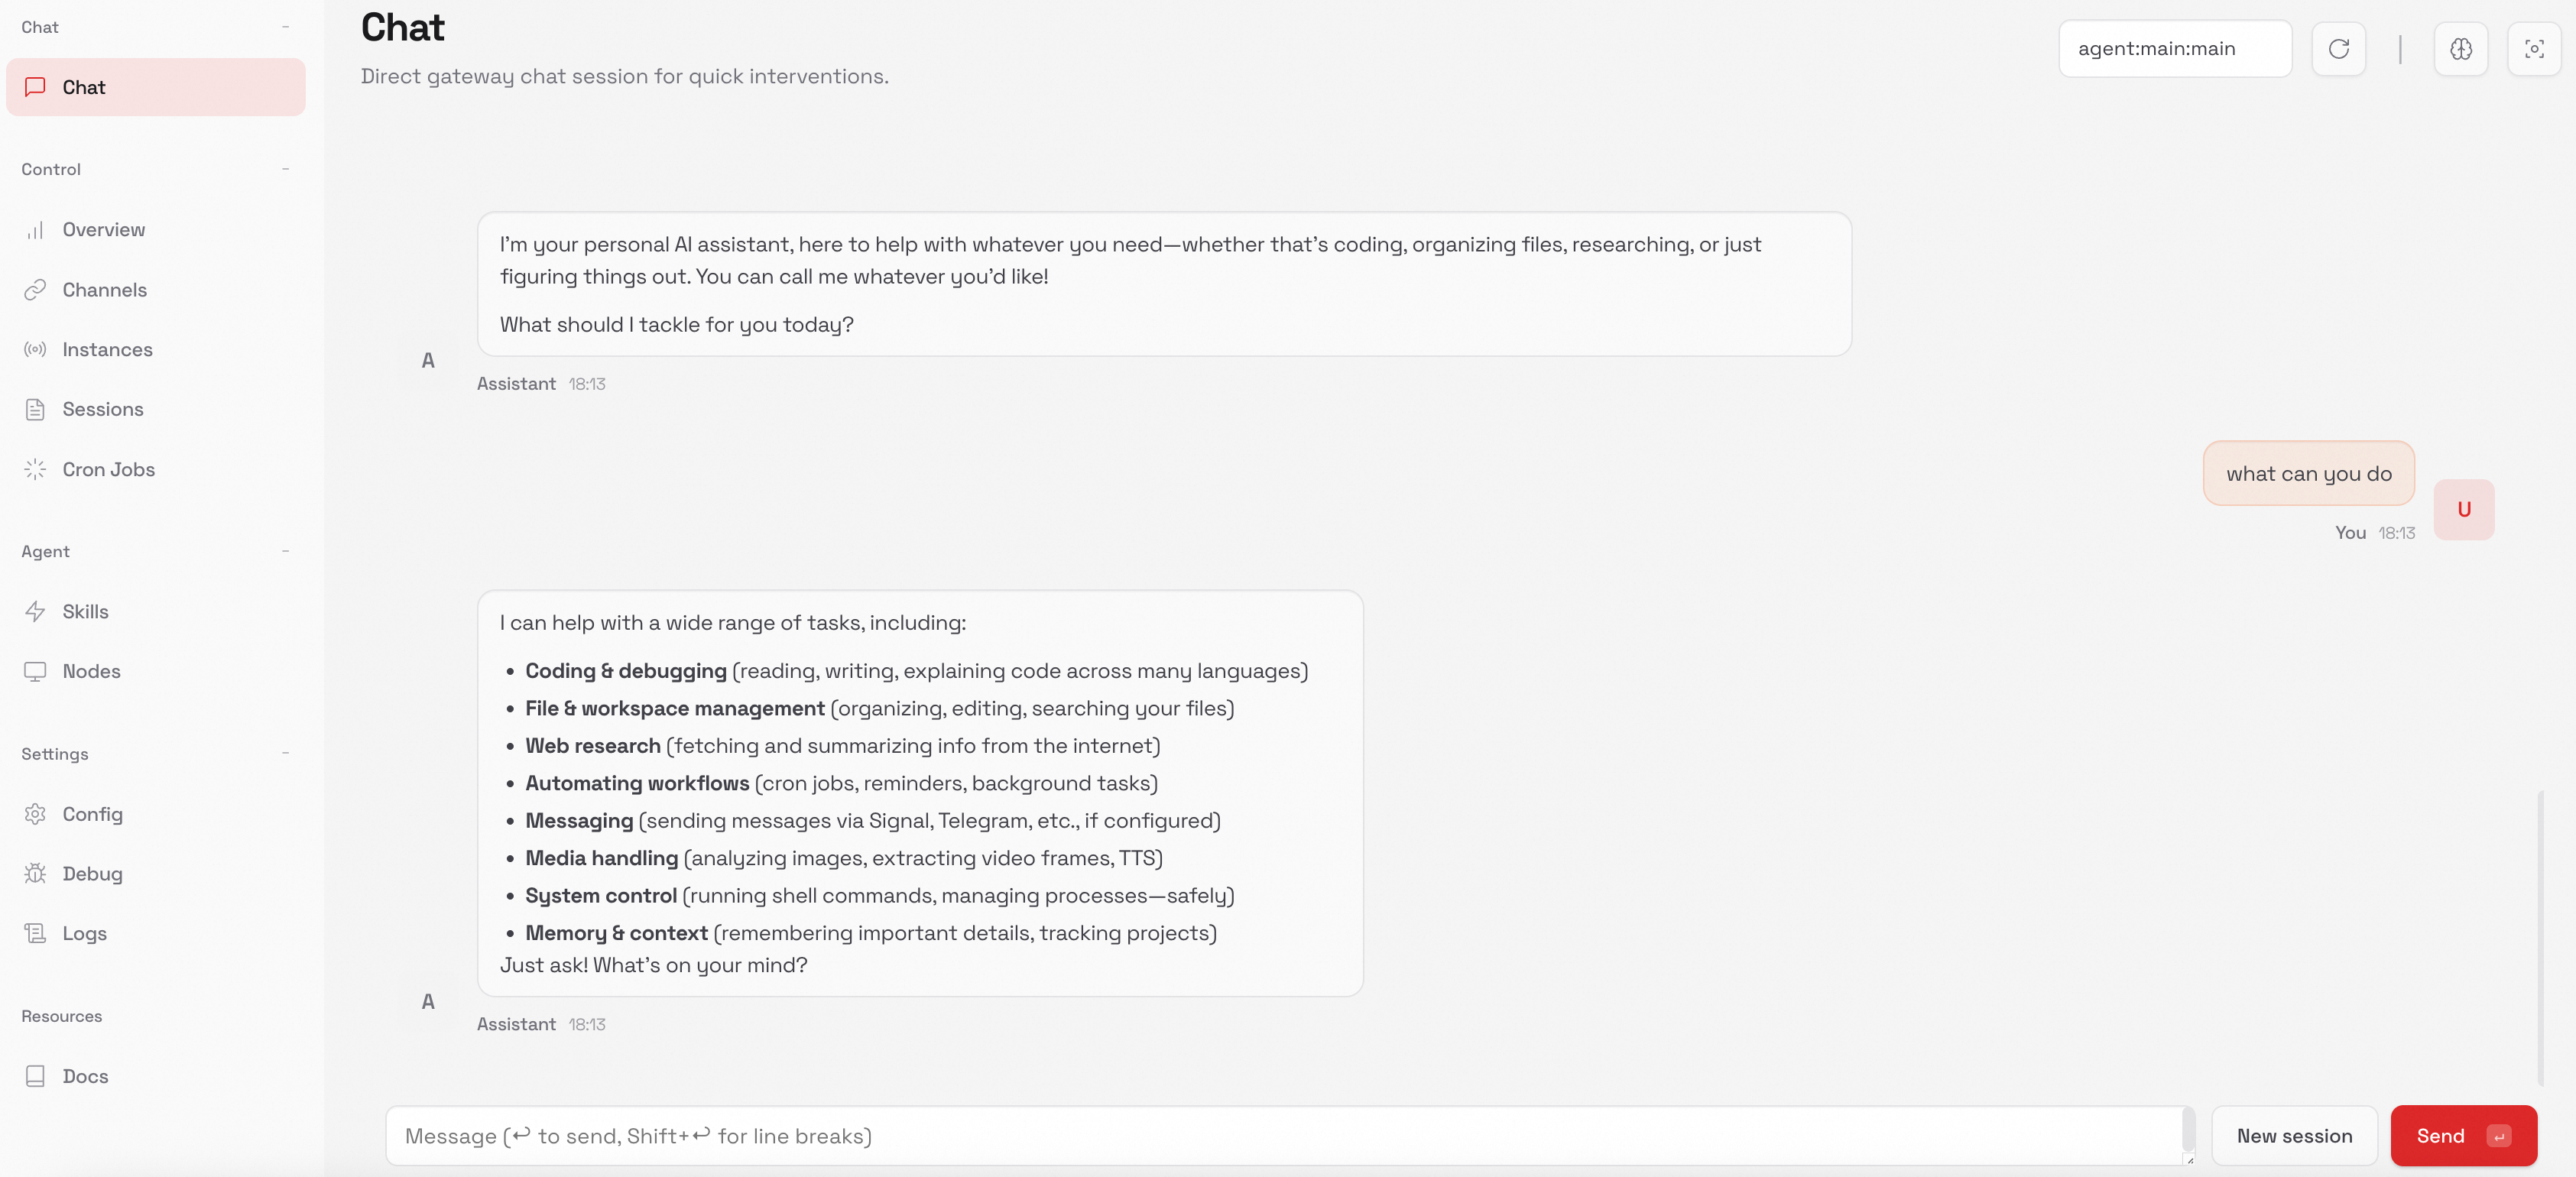
使用 OpenClaw
支持通过 Web UI 和 TUI 的方式使用 OpenClaw。
-
新开一个终端,运行以下命令。
openclaw dashboard -
在Web UI中进行对话。

小龙虾开发者社区是 CSDN 旗下专注 OpenClaw 生态的官方阵地,聚焦技能开发、插件实践与部署教程,为开发者提供可直接落地的方案、工具与交流平台,助力高效构建与落地 AI 应用
更多推荐
 7
7 0
0- 0


 已为社区贡献1条内容

所有评论(0)