
ubuntu16.04环境轻松安装和应用opencv4.9.0(基于源码编译)
位置:https://codeload.github.com/opencv/opencv/zip/refs/tags/4.9.0 [跟随至新的 URL]正在连接 codeload.github.com (codeload.github.com)|20.205.xxx.xxx|:443... 已连接。正在解析主机 codeload.github.com (codeload.github.com)..
目录
一、环境准备
1、安装cmake
sudo apt-get install cmake
2、安装依赖
sudo apt-get install build-essential libgtk2.0-dev libavcodec-dev libavformat-dev libjpeg-dev libswscale-dev libtiff5-dev pkg-config
3、从github上下载opencv4.9.0.zip
关于如何从github上快速下载需要的资源,在这里不详述,后面的文章进行补充😊
root@ubuntu-virtual-machine:/home/ubuntu/C++/opencv4.9.0# wget https://github.com/opencv/opencv/archive/4.9.0.zip
--2024-01-26 21:00:01-- https://github.com/opencv/opencv/archive/4.9.0.zip
正在解析主机 github.com (github.com)... 140.82.xxx.xxx
正在连接 github.com (github.com)|140.82.xxx.xxx|:443... 已连接。
已发出 HTTP 请求,正在等待回应... 302 Found
位置:https://codeload.github.com/opencv/opencv/zip/refs/tags/4.9.0 [跟随至新的 URL]
--2024-01-26 21:00:03-- https://codeload.github.com/opencv/opencv/zip/refs/tags/4.9.0
正在解析主机 codeload.github.com (codeload.github.com)... 20.205.xxx.xxx
正在连接 codeload.github.com (codeload.github.com)|20.205.xxx.xxx|:443... 已连接。
已发出 HTTP 请求,正在等待回应... 200 OK
长度: 未指定 [application/zip]
正在保存至: “4.9.0.zip”4.9.0.zip [ <=> ] 92.98M 3.04MB/s in 35s
2024-01-26 21:00:39 (2.64 MB/s) - “4.9.0.zip” 已保存 [97492524]
这里下载时间用了35秒就将opencv4.9.0(近100M)的安装包下载好了(●'◡'●)
二、安装opencv4.9.0
1、解压4.9.0.zip
unzip 4.9.0.zip
2、进入build目录编译
(1)cmake编译
cd opencv-4.9.0
mkdir build
cmake -D CMAKE_INSTALL_PREFIX=/usr/local -D CMAKE_BUILD_TYPE=Release ..
编译结束后看到最后三行日志表示编译OK
-- Configuring done
-- Generating done
-- Build files have been written to: /home/ubuntu/C++/opencv4.9.0/opencv-4.9.0/build
(2)make编译
make -j8......
[100%] Linking CXX executable ../../bin/opencv_test_objdetect
[100%] Built target opencv_perf_video
[100%] Built target opencv_test_objdetect
[100%] Linking CXX executable ../../bin/opencv_test_core
[100%] Built target opencv_test_core
3、安装编译好的相关库
sudo make install
执行后的日志最后几行:
-- Installing: /usr/local/bin/opencv_annotation
-- Set runtime path of "/usr/local/bin/opencv_annotation" to "/usr/local/lib"
-- Installing: /usr/local/bin/opencv_visualisation
-- Set runtime path of "/usr/local/bin/opencv_visualisation" to "/usr/local/lib"
-- Installing: /usr/local/bin/opencv_interactive-calibration
-- Set runtime path of "/usr/local/bin/opencv_interactive-calibration" to "/usr/local/lib"
-- Installing: /usr/local/bin/opencv_version
-- Set runtime path of "/usr/local/bin/opencv_version" to "/usr/local/lib"
-- Installing: /usr/local/bin/opencv_model_diagnostics
-- Set runtime path of "/usr/local/bin/opencv_model_diagnostics" to "/usr/local/lib"
4、修改opencv配置文件并使其生效
sudo vim /etc/ld.so.conf.d/opencv.conf
/usr/local/libsudo ldconfig
5、添加PKG_CONFIG路径,并使其生效
sudo vim /etc/bash.bashrc
PKG_CONFIG_PATH=$PKG_CONFIG_PATH:/usr/local/lib/pkgconfig
export PKG_CONFIG_PATHsource /etc/bash.bashrc
编译安装成功后,我们会发现/usr/local/lib目录中会存在一些opencv相关的so库。
关于PKG_CONFIG,在这里不详述,后续的文章进行补充😊
三、opencv环境验证
1、编译示例文件
root@ubuntu-virtual-machine:/home/ubuntu/C++/opencv4.9.0/opencv-4.9.0/samples/cpp/example_cmake# cmake .
-- The C compiler identification is GNU 5.4.0
-- The CXX compiler identification is GNU 5.4.0
-- Check for working C compiler: /usr/bin/cc
-- Check for working C compiler: /usr/bin/cc -- works
-- Detecting C compiler ABI info
-- Detecting C compiler ABI info - done
-- Detecting C compile features
-- Detecting C compile features - done
-- Check for working CXX compiler: /usr/bin/c++
-- Check for working CXX compiler: /usr/bin/c++ -- works
-- Detecting CXX compiler ABI info
-- Detecting CXX compiler ABI info - done
-- Detecting CXX compile features
-- Detecting CXX compile features - done
-- Found OpenCV: /usr/local (found version "4.9.0")
-- OpenCV library status:
-- config: /usr/local/lib/cmake/opencv4
-- version: 4.9.0
-- libraries: opencv_features2d;opencv_objdetect;opencv_photo;opencv_videoio;opencv_imgcodecs;opencv_dnn;opencv_stitching;opencv_ml;opencv_flann;opencv_highgui;opencv_imgproc;opencv_video;opencv_calib3d;opencv_core
-- include path: /usr/local/include/opencv4
-- Configuring done
-- Generating done
-- Build files have been written to: /home/ubuntu/C++/opencv4.9.0/opencv-4.9.0/samples/cpp/example_cmake
root@ubuntu-virtual-machine:/home/ubuntu/C++/opencv4.9.0/opencv-4.9.0/samples/cpp/example_cmake# make
Scanning dependencies of target opencv_example
[ 50%] Building CXX object CMakeFiles/opencv_example.dir/example.cpp.o
[100%] Linking CXX executable opencv_example
[100%] Built target opencv_example
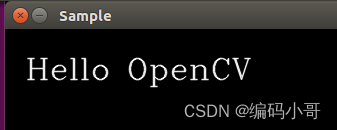
2、运行示例
root@ubuntu-virtual-machine:/home/ubuntu/C++/opencv4.9.0/opencv-4.9.0/samples/cpp/example_cmake#./opencv_example
运行结果:
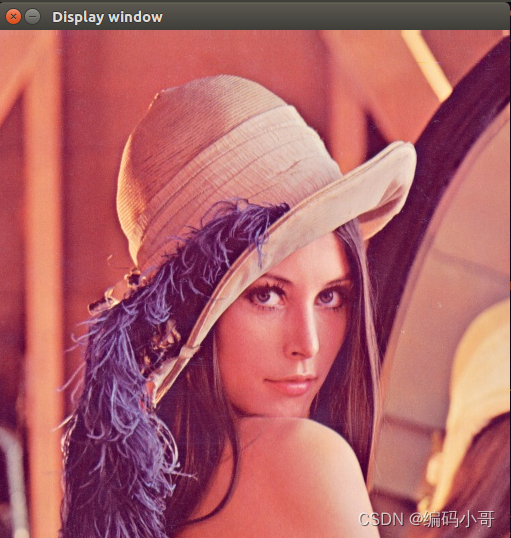
3、举一反三
在samples/cpp/test目录下,编写测试代码:
#include <opencv2/core.hpp>
#include <opencv2/imgcodecs.hpp>
#include <opencv2/highgui.hpp>
#include <iostream>

using namespace cv;

int main()
{
    std::string image_path = samples::findFile("test.jpg");
    Mat img = imread(image_path, IMREAD_COLOR);

    if(img.empty())
    {
        std::cout << "Could not read the image: " << image_path << std::endl;
        return 1;
    }

    imshow("Display window", img);

    return 0;
}
我们可以看到,将一张图片显示出来了
【欢迎关注编码小哥,学习更多实用的编程知识】

旨在为数千万中国开发者提供一个无缝且高效的云端环境,以支持学习、使用和贡献开源项目。
更多推荐


 26
26 0
0- 0


 已为社区贡献2条内容

所有评论(0)