

python软件包管理和环境管理神器conda的使用详解
Conda是一个开源的、跨平台、与语言无关软件包管理和环境管理工具,它可以在Windows、macOS和Linux上运行。Conda的设计目标是简化软件包和依赖项的管理和部署过程。Conda 使环境成为一等公民,甚至可以轻松地为 C 库创建独立的环境。官方介绍可以支持Python, R, Ruby, Lua, Scala, Java, JavaScript, C/ C++, FORTRAN等语言包
作者:程序员CKeen
博客:http://ckeen.cn
长期坚持做有价值的事!积累沉淀,持续成长,升维思考!希望把编码作为长期兴趣爱好😄
我们知道python2版本已于2020年1月1日终止维护, 现在都需要切到python3的版本, 那么之前python2的版本的程序需要维护, 那么我们经常就需要在python2和python3版本之间进行切换, 今天我们将通过 Conda 这一个工具就可以实现 Python包的管理。
1. Conda介绍
Conda是一个开源的、跨平台、与语言无关软件包管理和环境管理工具,它可以在Windows、macOS和Linux上运行。Conda的设计目标是简化软件包和依赖项的管理和部署过程。Conda 使环境成为一等公民,甚至可以轻松地为 C 库创建独立的环境。官方介绍可以支持Python, R, Ruby, Lua, Scala, Java, JavaScript, C/ C++, FORTRAN等语言包的管理。
Conda 完全用 Python 编写。并且是 BSD 许可的开源软件。
在本篇文章中,还是先重点关注 conda 的版本管理部分。
我们使用基本环境:
- 操作系统(OS):MacOs Catalina 10.15.7
- Conda 版本:23.11.0
- Python 3.11.5
在使用conda之前,我们有必要先区分一下Conda、Miniconda 和 Anaconda的区别
1.1 Conda、Miniconda 和 Anaconda的区别
Conda、Miniconda和Anaconda是与Python环境和软件包管理相关的三个相关但不同的概念:
- Conda:
- 定义:Conda是一个开源的包管理系统和环境管理系统。
- 功能:它能够安装、管理和卸载软件包,并创建、导出、列出和移除环境。
- 特点:Conda不仅限于Python,它可以管理任何语言的软件包。
- Miniconda:
- 定义:Miniconda是一个轻量级的发行版,只包含Conda、Python和一些基本的工具。
- 功能:Miniconda提供了一个最小化的Conda环境,使用户能够根据需要自定义安装所需的软件包。
- 特点:由于是精简版,安装时只包含基本组件,用户可以根据自己的需求逐步添加所需的工具和库。
- 地址:https://docs.conda.io/en/latest/miniconda.html)
- Anaconda:
- 定义: Anaconda 是一个更大的发行版,包含了 Conda、Python 以及一系列用于科学计算、数据分析和机器学习的预安装软件包(例如 NumPy、Pandas、Scikit-learn 等)。
- 功能: Anaconda 主要用于提供一个完整的数据科学工具链,使用户可以快速搭建数据科学环境而无需手动安装每个软件包。
- 地址:https://repo.anaconda.com/
基于以上Conda、Miniconda和Anaconda的区别, 这里我们主要使用Miniconda进行使用讲解
2. Conda的安装
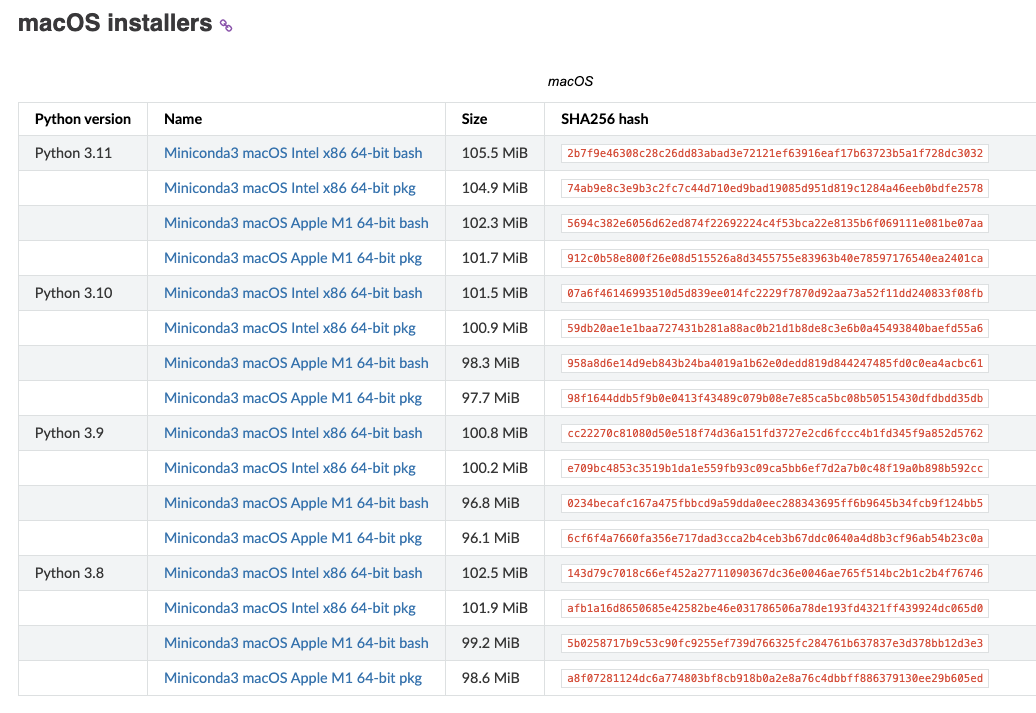
因为这里我们使用miniconda, 所以我们首先看下它需要的python环境, python版本可以参考以下链接:
python环境: https://docs.conda.io/projects/miniconda/en/latest/miniconda-other-installer-links.html
安装了python环境后, 我们可以使用以下集中方式安装conda
- 使用mac的brew
- 使用官方提供的安装脚本
2.1. 使用brew安装
使用brew
brew search conda
可以搜到miniconda的包

使用brew命令进行安装即可
brew install miniconda
安装完成后可以查询一下conda版本,看是否安装成功
➜  ~ conda --version
conda 23.11.0
2.2 使用官方脚本进行安装
脚本地址可以从官方获取, 地址:https://docs.conda.io/projects/miniconda/en/latest/
下载相对应的版本的脚本之后,执行使用bash进行执行即可,或者直接使用命令进行安装, 如下:
mkdir -p ~/miniconda3
curl https://repo.anaconda.com/miniconda/Miniconda3-latest-MacOSX-arm64.sh -o ~/miniconda3/miniconda.sh
bash ~/miniconda3/miniconda.sh -b -u -p ~/miniconda3
rm -rf ~/miniconda3/miniconda.sh
同样的,安装完成后可以查询一下conda版本,看是否安装成功
➜  ~ conda --version
conda 23.11.0
这里我们使用brew进行安装, 因为方便conda的管理, 我们卸载的时候,只需要执行
brew uninstall miniconda
即可
3. Conda的使用
首先我们通过conda --help看下conda支持的指令
➜  ~ conda --help
usage: conda [-h] [-v] [--no-plugins] [-V] COMMAND ...

conda is a tool for managing and deploying applications, environments and packages.

options:
  -h, --help          Show this help message and exit.
  -v, --verbose       Can be used multiple times. Once for detailed output,
                      twice for INFO logging, thrice for DEBUG logging, four
                      times for TRACE logging.
  --no-plugins        Disable all plugins that are not built into conda.
  -V, --version       Show the conda version number and exit.

commands:
  The following built-in and plugins subcommands are available.

  COMMAND
    activate          Activate a conda environment.
    clean             Remove unused packages and caches.
    compare           Compare packages between conda environments.
    config            Modify configuration values in .condarc.
    content-trust     Signing and verification tools for Conda
    create            Create a new conda environment from a list of specified
                      packages.
    deactivate        Deactivate the current active conda environment.
    doctor            Display a health report for your environment.
    env               See `conda env --help`.
    info              Display information about current conda install.
    init              Initialize conda for shell interaction.
    install           Install a list of packages into a specified conda
                      environment.
    list              List installed packages in a conda environment.
    notices           Retrieve latest channel notifications.
    package           Create low-level conda packages. (EXPERIMENTAL)
    remove (uninstall)
                      Remove a list of packages from a specified conda
                      environment.
    rename            Rename an existing environment.
    repoquery         Advanced search for repodata.
    run               Run an executable in a conda environment.
    search            Search for packages and display associated information
                      using the MatchSpec format.
    update (upgrade)  Update conda packages to the latest compatible version.
根据以上命令列表,我们主要讲解几个比较常用的命令
- 您可以通过运行以下命令查看已安装了哪些软件包:
$ conda list
- 如果我们想查询所有可以使用的软件包, 我们可以使用以下命令(查询比较耗时一点)
$ conda search
除了查询所有的可以使用的包, 我们也可以查询指定的包,比如我们查询一下requests包
$ conda search requests
- 要安装包,使用install命令
$ conda install <package-name>
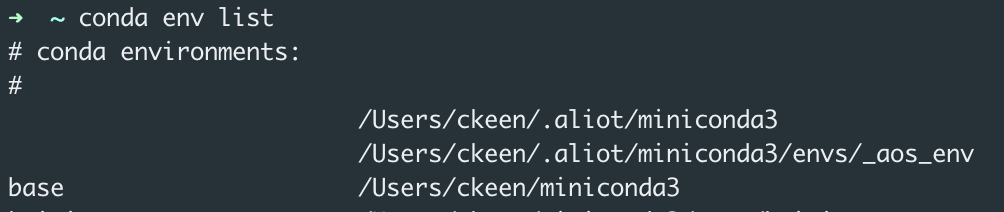
- 查看conda的创建的环境
$ conda env list
执行该指令,我们可以看到已创建的执行
注: 上面指令列表说明,使用conda env --help可以查到env的具体的命令
- 创建新的依赖项的执行环境
conda 的真正强大之处在于它管理环境的能力。在 conda 中,环境可以被视为完全独立的安装。如果可能,Conda默认情况下会使用硬链接有效地将包安装到环境中,因此环境可以节省空间,并且只需几秒钟即可创建。默认环境(conda其本身安装在其中)称为base。要创建另一个环境,请使用该conda create命令。例如,这里我们需要创建python2.7的环境:
$ conda create --name ckeen-python2.7 python=2.7
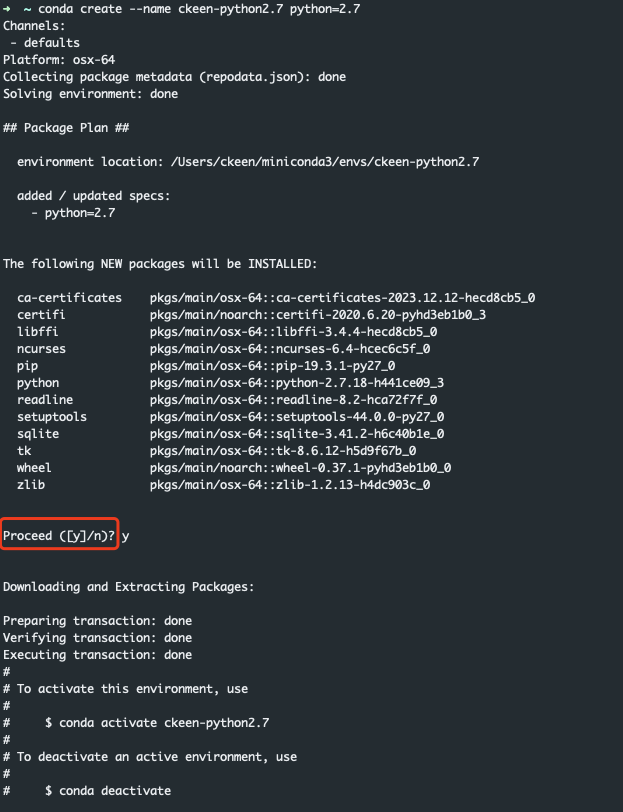
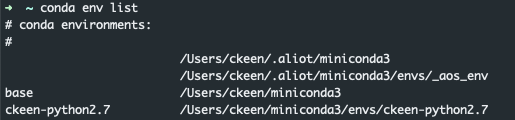
特别主要这里有提示需要输入y, 安装完成后我们可以看到它还会提示可以使用conda activate和conda deactivate对创建的环境进行激活和取消激活。创建成功后,执行conda env list命令,可以看到已经创建成功的conda环境实例
- 激活环境
$ ➜  ~ conda activate ckeen-python2.7
(ckeen-python2.7) ➜  ~ python --version
Python 2.7.18 :: Anaconda, Inc.
激活环境实例后, 我们看到在命令的输入前面已经有实例名称:(ckeen-python2.7) , 这里我们执行查看python版本指令,可以看到它给我们安装的python版本是2.7.18。 激活环境后, 我们使用pip安装一个requests库
$(ckeen-python2.7) ➜ ~ pip install requests
- 取消激活,要返回基本环境
$ conda deactivate
- 删除创建的环境实例
$ conda remove --name ckeen-python2.7 --all
通过conda remove指令可以移除创建的环境实例,–all意思是移除整个环境依赖的包。 其他指令可以使用conda remove --help进行查看。
4. conda配置
在安装完成后,您可能需要配置Conda。这包括设置镜像源、更改默认环境路径等。
我们先使用conda config --help 命令看下config命令的参数说明:
Modify configuration values in .condarc.

This is modeled after the git config command.  Writes to the user .condarc
file (/Users/ckeen/.condarc) by default. Use the
--show-sources flag to display all identified configuration locations on
your computer.

options:
  -h, --help            Show this help message and exit.

Output, Prompt, and Flow Control Options:
  --json                Report all output as json. Suitable for using conda programmatically.
  -v, --verbose         Can be used multiple times. Once for detailed output, twice for INFO logging, thrice for DEBUG logging, four times for
                        TRACE logging.
  -q, --quiet           Do not display progress bar.

Config File Location Selection:
  Without one of these flags, the user config file at '/Users/ckeen/.condarc' is used.

  --system              Write to the system .condarc file at '/Users/ckeen/miniconda3/.condarc'.
  --env                 Write to the active conda environment .condarc file (<no active environment>). If no environment is active, write to
                        the user config file (/Users/ckeen/.condarc).
  --file FILE           Write to the given file.

Config Subcommands:
  --show [SHOW ...]     Display configuration values as calculated and compiled. If no arguments given, show information for all configuration
                        values.
  --show-sources        Display all identified configuration sources.
  --validate            Validate all configuration sources. Iterates over all .condarc files and checks for parsing errors.
  --describe [DESCRIBE ...]
                        Describe given configuration parameters. If no arguments given, show information for all configuration parameters.
  --write-default       Write the default configuration to a file. Equivalent to `conda config --describe > ~/.condarc`.

Config Modifiers:
  --get [KEY ...]       Get a configuration value.
  --append KEY VALUE    Add one configuration value to the end of a list key.
  --prepend KEY VALUE, --add KEY VALUE
                        Add one configuration value to the beginning of a list key.
  --set KEY VALUE       Set a boolean or string key.
  --remove KEY VALUE    Remove a configuration value from a list key. This removes all instances of the value.
  --remove-key KEY      Remove a configuration key (and all its values).
  --stdin               Apply configuration information given in yaml format piped through stdin.
首先告诉我们通过conda config配置的参数会写入/Users/ckeen/.condarc的文件。conda 配置文件 .condarc 是一个可选的运行时配置文件,它允许高级用户配置 conda 的各个方面,例如它搜索包的渠道、代理设置和环境目录。
默认为的.condarc文件我们查看它是空的,使用以下配置指令也可以查看配置项
- 查看conda的设定配置项
$conda config --show-sources
- 您可以更改默认的环境路径,这是新创建环境的默认位置:
$ conda config --set envs_dirs /path/to/your/envs
- 查看当前的Conda配置信息:
$ conda config --show
使用show命令包含的是所有配置项, show-sources查看的是自己设定的配置项。
- 查看某个具体参数配置项(必须是自己配置的, 不是默认配置)
$ conda config --get key

$ conda config --get auto_activate_base
这里我们获取自动激活base的项,使用–show参数获取的默认值是True, 我们直接使用–get获取是空
- 设置某个配置项
$ conda config --set key=value
$ config config --set auto_activate_base False
通过使用以上–set指令设置后, 我们在使用–get指令获取,可以看到我们的设置值
$ conda config --get auto_activate_base
--set auto_activate_base False
- 通过–append,–add,–prepend给list配置项添加配置
例如,更改镜像源为清华大学的Conda镜像:
conda config --add channels https://mirrors.tuna.tsinghua.edu.cn/anaconda/pkgs/free/
conda config --set show_channel_urls yes
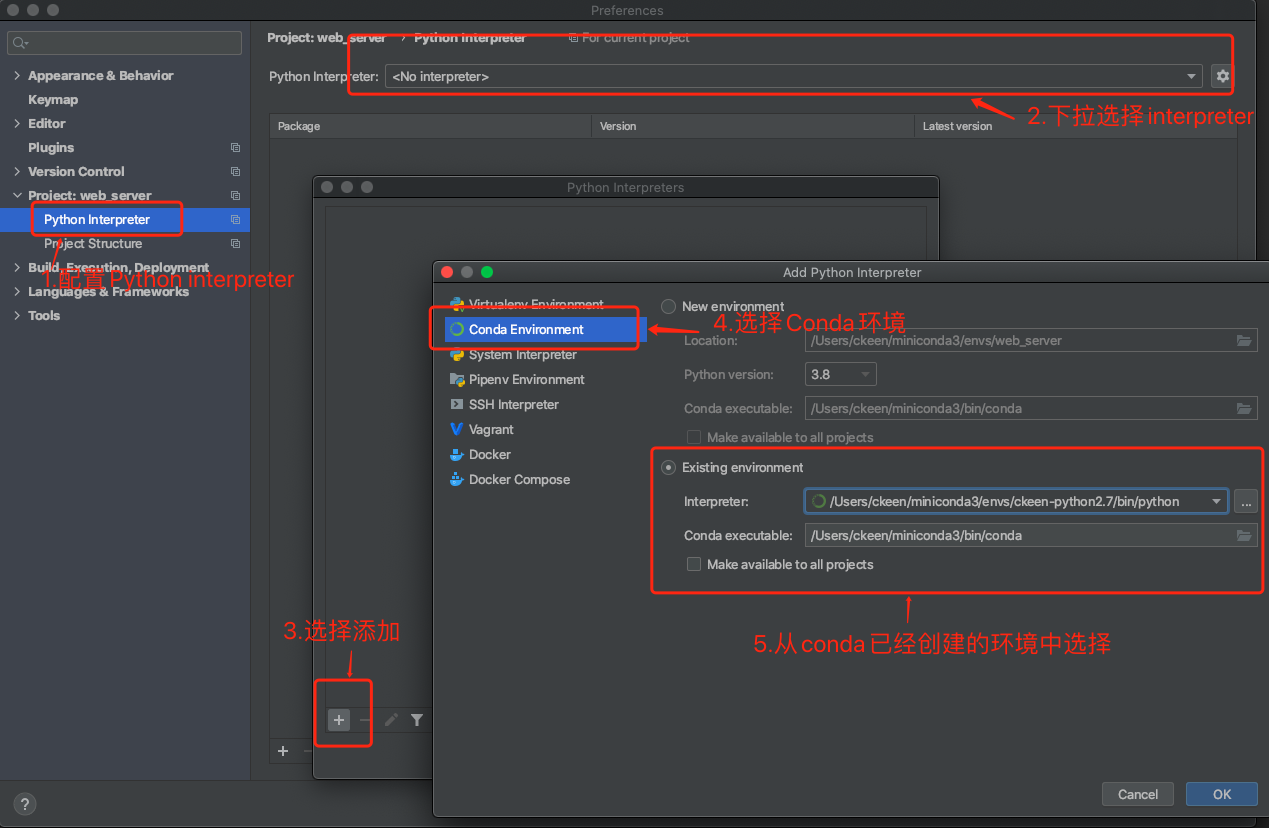
5. 在pycharm中配置conda环境
前面我们已经熟悉conda的使用,但是我们怎么在我们IDE中来使用我们配置的python开发环境呢, 下面我们使用一张图来完整的说明操作流程
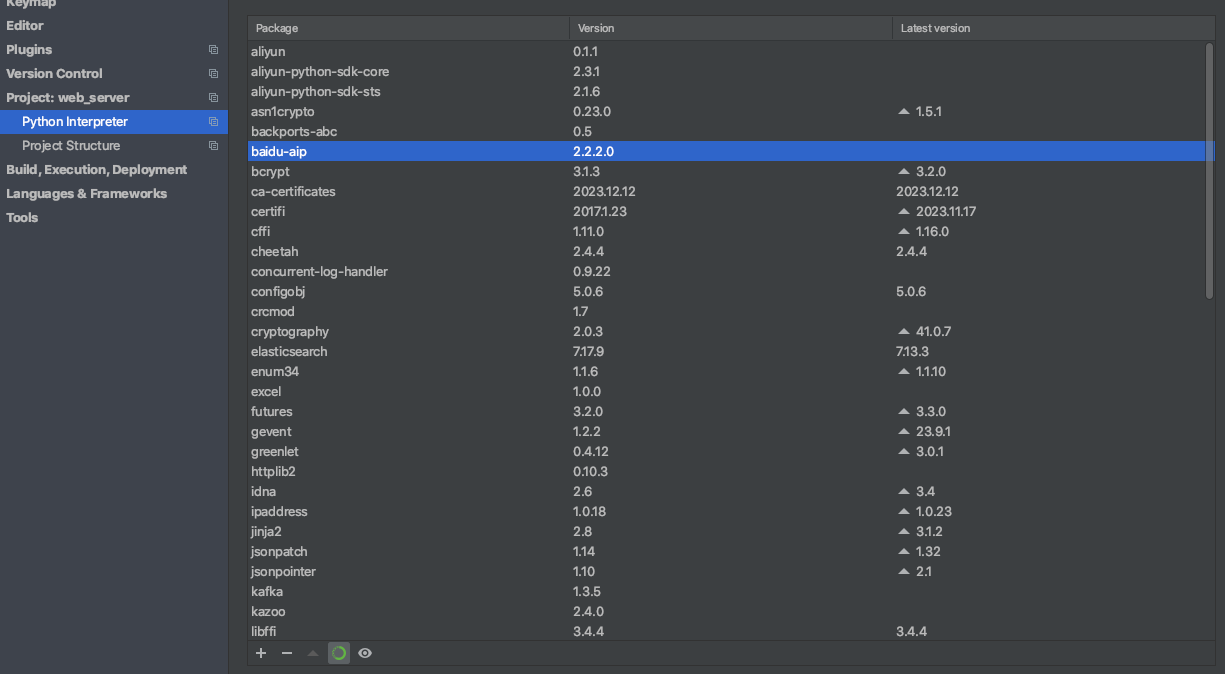
配置完成后,我们可以在Python interpreter看到该配置环境下, 完整的包信息

旨在为数千万中国开发者提供一个无缝且高效的云端环境,以支持学习、使用和贡献开源项目。
更多推荐


 22
22 0
0- 0


 已为社区贡献1条内容

所有评论(0)