
行为树基本概念与BehaviorTree.CPP库在C++的代码实现
文章介绍了行为树的基本概念以及介绍了MIT开源的行为树实现库——BehaviorTree.CPP的使用,包含部分C++的代码实现
目录
行为树基本概念与BehaviorTree.CPP库在C++的代码实现
我从事一些机器人开发学习工作,深感使用状态机在复杂的状态逻辑工程中往往会导致最后的逻辑链条十分混乱,同时可拓展性也很差,往往会导致“牵一发而动全身”的繁杂过程,此外频繁的使用各种标志位也导致最后的代码可读性很差。为此我开展学习了拓展性更强的行为树来取代状态机,并记录一些基础知识和库的教程。
此外,为了加深对代码实践过程中的理解,我自己设计了一个简单的Demo来进一步加深对行为树的理解,具体可以看:基于BehaviorTree.CPP库的简单Demo实现
基本概念
行为树的节点按照大类可分为:根节点(Root)、行为节点(Action)、条件节点(Conditional)、组合节点(Composite)、装饰节点(Decorator)。其中,组合节点包括了选择节点与序列节点。常用的非叶节点有选择节点和序列节点。常用的叶节点有条件节点和动作节点
根节点Root:行为树的最顶部节点,也是入口节点

行为(动作)节点ActionNode:没有子节点,用以执行具体行为的节点,当动作完成后会返回“成功”;当动作无法完成会返回“失败”;如果动作正在进行中,会返回“运行中”
条件节点ConditionNode:条件节点代表了一个判断,没有子节点,条件满足会返回“成功”状态;否则返回“失败”状态。
组合节点用于连接多个子节点,比较常见的组合节点有选择节点与序列节点
选择节点Fallback
选择节点按照自左向右的顺序计算每个子节点,一旦某个子节点返回了“成功”或“运行中”的状态,那么选择节点就会立刻将自身的状态相应地更改为“成功”或“运行中”,并不再执行后面的节点。选择节点类似于一种按照一定顺序判断的“或”逻辑,一旦存在一个成功执行的子节点,后续的子节点将不再执行。
序列节点Sequence
序列节点按照自左向右的顺序计算每个子结点,一旦某个子结点返回了“失败”或“运行中”的状态,那么序列节点就会立刻将自身的状态相应地更改为“失败”或“运行中”,并不再执行后面的节点。序列节点类似于“且”的逻辑,每个子节点按照顺序依次执行,一旦有一个子节点未能成功执行,后续的子节点将不会被调用。如果按照顺序所有的节点都返回了成功的状态,那么序列节点的状态对应被更新为“成功”。
装饰节点DecoratorNode:只有一个子节点,用以执行特定逻辑。
BehaviorTree.cpp在编译后生成的是一个静态库,可以将静态库链接到应用程序中。下面是库相关的主要概念。
MIT-BehaviorTree Lib官方教学(BehaviorTree.CPP)
BehaviorTree.CPP行为树基本组成
节点与树
用户需要创建自己的动作节点与条件节点(叶节点);BTC会帮助构建最后的行为树。自定义节点具有(或应该具有)高度的可重用性。
tick()回调函数
任何 TreeNode 都可以看作是调用回调(即运行一段代码)的机制。至于这个回调会做什么,就由你自己决定了。在下面的大多数教程中,我们的 Actions 会简单地在控制台打印信息或休眠一定时间,以模拟长时间的计算。在实际代码中,尤其是在模型驱动开发和基于组件的软件工程中,动作/条件很可能会与系统的其他组件或服务通信。
// The simplest callback you can wrap into a BT Action
NodeStatus HelloTick()
{
  std::cout << "Hello World\n";
  return NodeStatus::SUCCESS;
}

// Allow the library to create Actions that invoke HelloTick()
// (explained in the tutorials)
factory.registerSimpleAction("Hello", std::bind(HelloTick));
通过继承创建自定义节点
在上述的例子中,一个调用HelloTick()函数的特定树节点通过函数指针的方式完成了创建。通常情况下,为了定义一个自定义的树节点,需要从TreeNode继承,或者从它的派生节点:
ActionNodeBsaeConditionNodeDecoratorNode
数据流,接口以及黑板(Dataflow,Ports and Blackboard)
- 黑板是一个被所有树节点共享的键值存储空间
Ports是一种节点之间交换信息的机制- 接口的数量、名字以及类型在C++编译时必须是已知的。
Tutorials 01 第一棵行为树
行为树与状态机类似,只不过是一种在适当的条件下适时调用回调的机制。在这些回调中会发生什么取决于你。将交替使用 "调用回调 "和 "to tick "这两个表述。在本系列教程中,大多数情况下我们的虚拟 Actions 只是在控制台上打印一些信息,但请记住,真正的 "生产 "代码可能会做一些更复杂的事情。接下来,我们将创建这棵简单的树:

推荐的创建行为树的方式是通过继承:
// Example of custom SyncActionNode (synchronous action)
// without ports.
class ApproachObject : public BT::SyncActionNode
{
public:
  ApproachObject(const std::string& name) :
      BT::SyncActionNode(name, {})
  {}

  // You must override the virtual function tick()
  BT::NodeStatus tick() override
  {
    std::cout << "ApproachObject: " << this->name() << std::endl;
    return BT::NodeStatus::SUCCESS;
  }
};
可以看到:
- 任意一个
TreeNode的实例都有一个名称name,这个标签应当是具有可读性的,且不需要独一无二。 tick()方法是放置真正需要执行的动作的位置,必须有一个NodeStatus的返回量,也即RUNNING,SUCCESS或者FAILURE
另外,我们也可以使用输入参数来创建一个给定函数指针(即 “functor”)的 TreeNode。其中的回调函数必须有这样的特征:
BT::NodeStatus myFunction(BT::TreeNode& self)
例如:
using namespace BT;

// Simple function that return a NodeStatus
BT::NodeStatus CheckBattery()
{
  std::cout << "[ Battery: OK ]" << std::endl;
  return BT::NodeStatus::SUCCESS;
}

// We want to wrap into an ActionNode the methods open() and close()
class GripperInterface
{
public:
  GripperInterface(): _open(true) {}

  NodeStatus open()
  {
    _open = true;
    std::cout << "GripperInterface::open" << std::endl;
    return NodeStatus::SUCCESS;
  }

  NodeStatus close()
  {
    std::cout << "GripperInterface::close" << std::endl;
    _open = false;
    return NodeStatus::SUCCESS;
  }

private:
  bool _open; // shared information
};
可以通过以下这些函数建立一个SimpleActionNode:
CheckBattery()GripperInterface::open()GripperInterface::close()
使用XML动态创建行为树
可以使用名为my_tree.xml来描述功能树:
 <root BTCPP_format="4" >
     <BehaviorTree ID="MainTree">
        <Sequence name="root_sequence">
            <CheckBattery   name="check_battery"/>
            <OpenGripper    name="open_gripper"/>
            <ApproachObject name="approach_object"/>
            <CloseGripper   name="close_gripper"/>
        </Sequence>
     </BehaviorTree>
 </root>
必须首先在 BehaviorTreeFactory 中注册自定义树节点,然后从文件或文本中加载 XML。
#include "behaviortree_cpp/bt_factory.h"

// file that contains the custom nodes definitions
#include "dummy_nodes.h"
using namespace DummyNodes;

int main()
{
    // We use the BehaviorTreeFactory to register our custom nodes
  BehaviorTreeFactory factory;

  // The recommended way to create a Node is through inheritance.
  factory.registerNodeType<ApproachObject>("ApproachObject");

  // Registering a SimpleActionNode using a function pointer.
  // You can use C++11 lambdas or std::bind
  factory.registerSimpleCondition("CheckBattery", [&](TreeNode&) { return CheckBattery(); });

  //You can also create SimpleActionNodes using methods of a class
  GripperInterface gripper;
  factory.registerSimpleAction("OpenGripper", [&](TreeNode&){ return gripper.open(); } );
  factory.registerSimpleAction("CloseGripper", [&](TreeNode&){ return gripper.close(); } );

  // Trees are created at deployment-time (i.e. at run-time, but only
  // once at the beginning).

  // IMPORTANT: when the object "tree" goes out of scope, all the
  // TreeNodes are destroyed
   auto tree = factory.createTreeFromFile("./my_tree.xml");

  // To "execute" a Tree you need to "tick" it.
  // The tick is propagated to the children based on the logic of the tree.
  // In this case, the entire sequence is executed, because all the children
  // of the Sequence return SUCCESS.
  tree.tickWhileRunning();

  return 0;
}

/* Expected output:
*
  [ Battery: OK ]
  GripperInterface::open
  ApproachObject: approach_object
  GripperInterface::close
*/
Tutorials 02 Blackboard和ports
自定义 TreeNodes 可用于执行任意简单或复杂的软件。它们的目标是提供一个抽象程度更高的接口。因此,它们在概念上与函数并无不同。与函数类似,我们经常希望:
- 传递变量/参数到一个Node (inputs)
- 从一个节点(output)获取一些信息
- 一个节点的输出可以作为其他节点的输入
BTC通过接口(ports)提供了一个基础的数据流机制,易于使用。这份教程中我们将创建以下的树:

Blackboard是树的所有节点共享的简单键/值存储器。Blackboard的任何一个“条目”都是一个键值对- 一个
Input port可以读取黑板中的条目,同时一个Output port可以写入一个条目
Input ports
一个可用的输入节点可以是:
- 一个节点将会读取的静态字符串,或者
- 一个指向黑板中的条目的指针,通过key定义
假设我们期望创建一个ActionNode名为SaySomething,同时通过std::cout打印一个字符串。为了传递这个字符串,我们使用一个输入接口命名为message使用XML语言可以描述为:
<SaySomething name = "fist" 	message="hello word"/>
<SaySomething name = "second" 	message="{greetings}"/>
- 对于
first节点,接口直接接收了一个字符串“hello world” - 对于
second节点,不同的是它向黑板请求寻找一个使用条目greetings的值
条目“greetings”的值可以在程序运行时随时更改
动作节点SaySomething可以使用如下创建:
// SyncActionNode (synchronous action) with an input port.
class SaySomething : public SyncActionNode
{
public:
  // If your Node has ports, you must use this constructor signature
  SaySomething(const std::string& name, const NodeConfig& config)
    : SyncActionNode(name, config)
  { }

  // It is mandatory to define this STATIC method.
  static PortsList providedPorts()
  {
    // This action has a single input port called "message"
    return { InputPort<std::string>("message") };
  }

  // Override the virtual function tick()
  NodeStatus tick() override
  {
    Expected<std::string> msg = getInput<std::string>("message");
    // Check if expected is valid. If not, throw its error
    if (!msg)
    {
      throw BT::RuntimeError("missing required input [message]: ",
                              msg.error() );
    }
    // use the method value() to extract the valid message.
    std::cout << "Robot says: " << msg.value() << std::endl;
    return NodeStatus::SUCCESS;
  }
};
当一个自定义树节点有输入或输出接口时,这些接口必须通过静态方式声明:
static MyCustomNode::PortsList providedPorts();
可以使用模板方法 TreeNode::getInput<T>(key) 从端口信息中读取输入信息。
Output ports
只有当有其他节点向黑板中的指定条目已经写入了一些信息后,输入节点向黑板条目的指向才有效。
ThinkWhatToSay是一个使用一个输出接口来向条目中写入一个字符串的示例节点
class ThinkWhatToSay : public SyncActionNode
{
public:
  ThinkWhatToSay(const std::string& name, const NodeConfig& config)
    : SyncActionNode(name, config)
  { }

  static PortsList providedPorts()
  {
    return { OutputPort<std::string>("text") };
  }

  // This Action writes a value into the port "text"
  NodeStatus tick() override
  {
    // the output may change at each tick(). Here we keep it simple.
    setOutput("text", "The answer is 42" );
    return NodeStatus::SUCCESS;
  }
};
另外,出于调试目的,大多数情况下可以使用名为 Script 的内置操作将静态值写入条目。
<Script code=" the_answer:='The answer is 42' " />
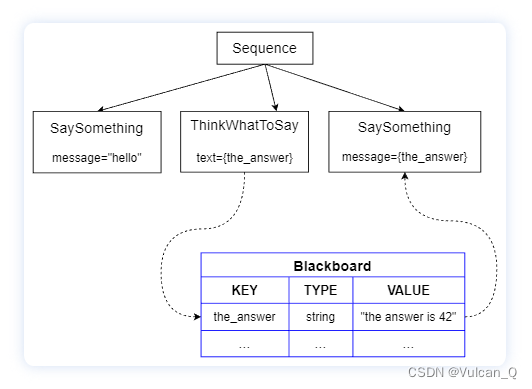
完整例子
在本例中,一个拥有3个动作的序列节点被创建:
- Action1 从一个静态字符串读取输入
message - Action2 向黑板的条目中写入
the_answer类的消息 - Action3 从黑板的条目中读取信息
the_answer
<root BTCPP_format="4" >
    <BehaviorTree ID="MainTree">
       <Sequence name="root_sequence">
           <SaySomething     message="hello" />
           <ThinkWhatToSay   text="{the_answer}"/>
           <SaySomething     message="{the_answer}" />
       </Sequence>
    </BehaviorTree>
</root>
C++代码用于注册并执行行为树:
#include "behaviortree_cpp/bt_factory.h"

// file that contains the custom nodes definitions
#include "dummy_nodes.h"
using namespace DummyNodes;

int main()
{
  BehaviorTreeFactory factory;
  factory.registerNodeType<SaySomething>("SaySomething");
  factory.registerNodeType<ThinkWhatToSay>("ThinkWhatToSay");

  auto tree = factory.createTreeFromFile("./my_tree.xml");
  tree.tickWhileRunning();
  return 0;
}

/*  Expected output:
  Robot says: hello
  Robot says: The answer is 42
*/
我们使用同一个键(the_answer)用来连接输出接口与输入接口;或者说,他们“指向”黑板的同一个条目。
Tutorials 03 使用自定义类型的接口
在之前的教程中介绍使用了输入与输出接口,同时使用的是std::string类型的信息,本节中将展示如何自定义C++接口类型。
解析字符串
BTC支持将字符串自动转换为常见类型,如 int、long、double、bool、NodeStatus 等。用户自定义类型也可以轻松支持。例如:
// We want to use this custom type
struct Position2D
{
  double x;
  double y;
};
为了允许 XML 加载器从字符串实例化 Position2D,我们需要提供 BT::convertFromString<Position2D>(StringView) 的模板特化。如何将 Position2D 序列化为字符串由您决定;在本例中,我们只需用分号分隔两个数字。
// Template specialization to converts a string to Position2D.
namespace BT
{
    template <> inline Position2D convertFromString(StringView str)
    {
        // We expect real numbers separated by semicolons
        auto parts = splitString(str, ';');
        if (parts.size() != 2)
        {
            throw RuntimeError("invalid input)");
        }
        else
        {
            Position2D output;
            output.x     = convertFromString<double>(parts[0]);
            output.y     = convertFromString<double>(parts[1]);
            return output;
        }
    }
} // end namespace BT
StringViewis a C++11 version of std::string_view. You can pass either astd::stringor aconst char*.- The library provides a simple
splitStringfunction. Feel free to use another one, like boost::algorithm::split. - We can use the specialization
convertFromString<double>().
示例
与上一教程一样,我们可以创建两个自定义操作,一个将写入端口,另一个将从端口读取数据。
class CalculateGoal: public SyncActionNode
{
  public:
    CalculateGoal(const std::string& name, const NodeConfig& config):
      SyncActionNode(name,config)
    {}

    static PortsList providedPorts()
    {
      return { OutputPort<Position2D>("goal") };
    }

    NodeStatus tick() override
    {
      Position2D mygoal = {1.1, 2.3};
      setOutput<Position2D>("goal", mygoal);
      return NodeStatus::SUCCESS;
    }
};

class PrintTarget: public SyncActionNode
{
  public:
    PrintTarget(const std::string& name, const NodeConfig& config):
        SyncActionNode(name,config)
    {}

    static PortsList providedPorts()
    {
      // Optionally, a port can have a human readable description
      const char*  description = "Simply print the goal on console...";
      return { InputPort<Position2D>("target", description) };
    }

    NodeStatus tick() override
    {
      auto res = getInput<Position2D>("target");
      if( !res )
      {
        throw RuntimeError("error reading port [target]:", res.error());
      }
      Position2D target = res.value();
      printf("Target positions: [ %.1f, %.1f ]\n", target.x, target.y );
      return NodeStatus::SUCCESS;
    }
};
现在我们可以像往常一样连接输入/输出端口,并指向 Blackboard 的同一条目。下一个例子中的树是一个有4个动作的序列:
- 使用动作
CalculateGoal在条目GoalPosition中存储一个Position2D类型的值 - 调用
PrintTarget,将会从黑板条目GoalPosition中读输入"target" - 使用内置操作
Script将字符串"-1;3 "分配给按键OtherGoal。从字符串到Position2D的转换将自动完成。 - 再次调用
PrintTarget,输入的"Target"将会从OtherGoal条目中被读取。
static const char* xml_text = R"(

 <root BTCPP_format="4" >
     <BehaviorTree ID="MainTree">
        <Sequence name="root">
            <CalculateGoal goal="{GoalPosition}" />
            <PrintTarget   target="{GoalPosition}" />
            <Script        code=" OtherGoal:='-1;3' " />
            <PrintTarget   target="{OtherGoal}" />
        </Sequence>
     </BehaviorTree>
 </root>
 )";

int main()
{
  BT::BehaviorTreeFactory factory;
  factory.registerNodeType<CalculateGoal>("CalculateGoal");
  factory.registerNodeType<PrintTarget>("PrintTarget");

  auto tree = factory.createTreeFromText(xml_text);
  tree.tickWhileRunning();

  return 0;
}
/* Expected output:

    Target positions: [ 1.1, 2.3 ]
    Converting string: "-1;3"
    Target positions: [ -1.0, 3.0 ]
*/

旨在为数千万中国开发者提供一个无缝且高效的云端环境,以支持学习、使用和贡献开源项目。
更多推荐


 22
22 0
0- 0


 已为社区贡献1条内容

所有评论(0)