
【笔记】YOLOv7重参数化(RepConV)原理+代码
一、代码入口
在detect时,将部分结构的参数进行融合,来达到提高推理速度而不损失精度的目的,前提是已经训练好了模型参数。
源代码地址:https://github.com/WongKinYiu/yolov7
该部分内容可以通过 detect.py/detect()函数中
model = attempt_load(weights, map_location=device)
进入attempt_load(),
model.append(ckpt['ema' if ckpt.get('ema') else 'model'].float().fuse().eval())
中的fuse()函数。该函数位于models/yolo.py/class Model下:
def fuse(self): # fuse model Conv2d() + BatchNorm2d() layers
print('Fusing layers... ')
for m in self.model.modules():
if isinstance(m, RepConv):
# print(f" fuse_repvgg_block")
m.fuse_repvgg_block()
elif isinstance(m, RepConv_OREPA):
# print(f" switch_to_deploy")
m.switch_to_deploy()
elif type(m) is Conv and hasattr(m, 'bn'):
m.conv = fuse_conv_and_bn(m.conv, m.bn) # update conv
delattr(m, 'bn') # remove batchnorm
m.forward = m.fuseforward # update forward
elif isinstance(m, (IDetect, IAuxDetect)):
m.fuse()
m.forward = m.fuseforward
self.info()
return self
主要看m.fuse_repvgg_block(),fuse_conv_and_bn(conv, bn)。
(m是IDetect时的融合是隐式implicit部分的融合,非本文重点)
二、Conv+BN
1、原理
其思想是将卷积与BN合并成为一个卷积,BN的公式如下: x ^ i = γ ⋅ x i − μ σ 2 + ε + β = γ σ 2 + ε ⋅ x i + ( β − γ ⋅ μ σ 2 + ε ) \begin{split} \hat{x}_i&=\gamma \cdot \frac{x_i-\mu}{\sqrt{\sigma^2+\varepsilon}}+\beta \\ &=\frac{\gamma}{\sqrt{\sigma^2+\varepsilon}}\cdot x_i+(\beta-\frac{\gamma\cdot \mu}{\sqrt{\sigma^2+\varepsilon}}) \end{split} x^i=γ⋅σ2+εxi−μ+β=σ2+εγ⋅xi+(β−σ2+εγ⋅μ)可以看成 y = w x + b y=wx+b y=wx+b 形式,其中 w B N = γ σ 2 + ε w_{BN}=\frac{\gamma}{\sqrt{\sigma^2+\varepsilon}} wBN=σ2+εγ, b B N = β − γ ⋅ μ σ 2 + ε b_{BN}=\beta-\frac{\gamma\cdot \mu}{\sqrt{\sigma^2+\varepsilon}} bBN=β−σ2+εγ⋅μ。
那么Conv+BN过程可以看作: x ^ = w B N ⋅ ( w c o n v ⋅ x + b c o n v ) + b B N = ( w B N ⋅ w c o n v ) ⋅ x + ( w B N ⋅ b c o n v + b B N ) \begin{split} \hat{x}&=w_{BN}\cdot(w_{conv}\cdot x+b_{conv})+b_{BN}\\ &=(w_{BN}\cdot w_{conv})\cdot x+(w_{BN}\cdot b_{conv}+b_{BN}) \end{split} x^=wBN⋅(wconv⋅x+bconv)+bBN=(wBN⋅wconv)⋅x+(wBN⋅bconv+bBN)我们得到合并后的卷积参数: { w = w B N ⋅ w c o n v b = w B N ⋅ b c o n v + b B N \begin{cases}w=w_{BN}\cdot w_{conv}\\b=w_{BN}\cdot b_{conv}+b_{BN} \end{cases} {w=wBN⋅wconvb=wBN⋅bconv+bBN
题外话, x ^ i = w B N x i + b B N \hat{x}_i=w_{BN}x_i+b_{BN} x^i=wBNxi+bBN形式的BN,可以看作是一种特殊的1*1卷积。1*1卷积是将一个值与通道内所有像素相乘,一个通道内进行的处理相同,所以将一个通道(w*h)简化成一个 □ \square □ ,就是一层图片,1*1卷积“画”成矩阵形式就是(忽略bias,输入是一张 c h i n ∗ w ∗ h ch_{in}*w*h chin∗w∗h的图片): ( □ □ □ ) c h o u t = ( □ □ □ □ □ □ □ □ □ □ □ □ ) c h o u t ∗ c h i n ⏟ w e i g h t s ∗ ( □ □ □ □ ) c h i n \begin{pmatrix}\square\\\square\\\square\end{pmatrix}_{ch_{out}}=\underbrace{\begin{pmatrix} \square&\square&\square&\square\\\square&\square&\square&\square\\\square&\square&\square&\square\end{pmatrix}_{ch_{out}*ch_{in}}}_{weights}*\begin{pmatrix}\square\\\square\\\square\\\square\end{pmatrix}_{ch_{in}} □□□ chout=weights □□□□□□□□□□□□ chout∗chin∗ □□□□ chin例如输入通道是4,输出通道是3,weights中的12个框就可以看作是12个1*1的“卷积片”(4层图片转成3层图片,有12个对应关系)。而BN是在每个通道上进行归一化,各通道相互独立,所以weights是个对角阵,BN可以看作输入与输出通道数相同,且一一对应的1*1卷积。 ( □ □ □ □ ) a f t e r B N = ( w B N c h 1 0 0 0 0 w B N c h 2 0 0 0 0 w B N c h 3 0 0 0 0 w B N c h 4 ) c h i n ∗ c h i n ⏟ w e i g h t s ∗ ( □ □ □ □ ) b e f o r e B N \begin{pmatrix}\square\\\square\\\square\\\square\end{pmatrix}_{afterBN}=\underbrace{\begin{pmatrix} w_{BN}^{ch1}&0&0&0\\0&w_{BN}^{ch2}&0&0\\0&0&w_{BN}^{ch3}&0\\0&0&0&w_{BN}^{ch4}\end{pmatrix}_{ch_{in}*ch_{in}}}_{weights}*\begin{pmatrix}\square\\\square\\\square\\\square\end{pmatrix}_{beforeBN} □□□□ afterBN=weights wBNch10000wBNch20000wBNch30000wBNch4 chin∗chin∗ □□□□ beforeBN
2、代码
conv与BN合并的代码位于 utils/torch_utils.py/fuse_conv_and_bn(conv, bn)函数内:
def fuse_conv_and_bn(conv, bn):
# Fuse convolution and batchnorm layers https://tehnokv.com/posts/fusing-batchnorm-and-conv/
# 创建一个合并后卷积对象,各尺寸与原卷积相同
fusedconv = nn.Conv2d(conv.in_channels,
conv.out_channels,
kernel_size=conv.kernel_size,
stride=conv.stride,
padding=conv.padding,
groups=conv.groups,
bias=True).requires_grad_(False).to(conv.weight.device)
# 更新参数
# prepare filters weights, w = w_bn * w_conv
w_conv = conv.weight.clone().view(conv.out_channels, -1) # ch_out*ch_in*ks*ks --> ch_out*(ch_in*ks*ks)
w_bn = torch.diag(bn.weight.div(torch.sqrt(bn.eps + bn.running_var))) # ch_out*ch_out
fusedconv.weight.copy_(torch.mm(w_bn, w_conv).view(fusedconv.weight.shape)) # ch_out*ch_in*ks*ks
# prepare spatial bias, b = w_bn * b_conv + b_bn
b_conv = torch.zeros(conv.weight.size(0), device=conv.weight.device) if conv.bias is None else conv.bias # ch_out
b_bn = bn.bias - bn.weight.mul(bn.running_mean).div(torch.sqrt(bn.running_var + bn.eps)) # ch_out
fusedconv.bias.copy_(torch.mm(w_bn, b_conv.reshape(-1, 1)).reshape(-1) + b_bn) # ch_out
return fusedconv
其中,由于卷积的weights是 c h o u t ∗ c h i n ∗ k s ∗ k s ch_{out}*ch_{in}*ks*ks chout∗chin∗ks∗ks结构的,而BN是每个输入通道(num_feature)一个weight,是个长度为 c h i n ch_{in} chin的一维向量,BN的 c h i n ch_{in} chin就等于卷积的 c h o u t ch_{out} chout。为实现两者的矩阵相乘,把 w c o n v w_{conv} wconv 转化为了 c h o u t ∗ ( c h i n ∗ k s ∗ k s ) ch_{out}*(ch_{in}*ks*ks) chout∗(chin∗ks∗ks), w B N w_{BN} wBN转化为 c h o u t ∗ c h o u t ch_{out}*ch_{out} chout∗chout 的对角矩阵,相乘后再转化维原来的 c h o u t ∗ c h i n ∗ k s ∗ k s ch_{out}*ch_{in}*ks*ks chout∗chin∗ks∗ks四维结构。
bias都可以看成一个长度为 c h o u t ch_{out} chout的向量。由于使用BN时,原卷积的bias不起作用,全部设为了0, b c o n v = 0 b_{conv}=0 bconv=0,所以实际合并时, b = b B N b=b_{BN} b=bBN。
三、RepConv
1、原理
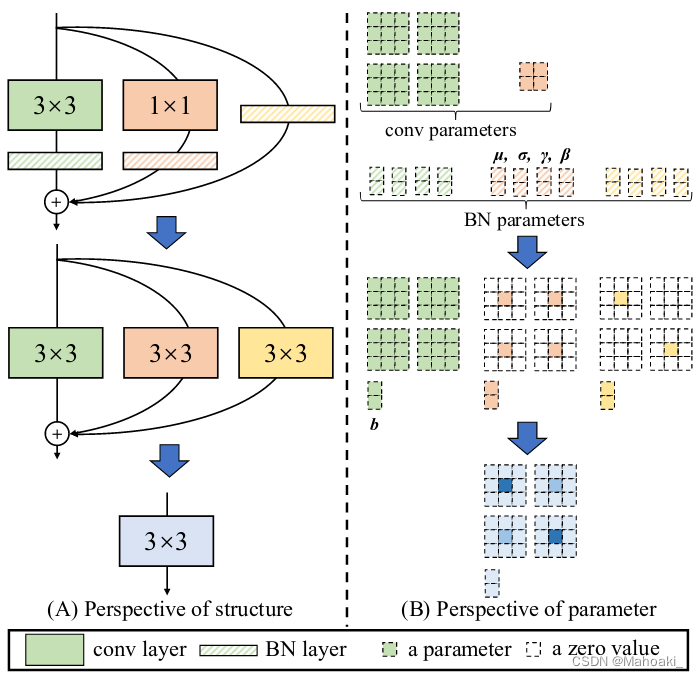
RepConv思想是将训练时检测头中使用的RepVGG block进行重参数化,将RepVGG中的1*1卷积与不进行处理两条路径都转化为一次3*3卷积,再进行融合。

图源:RepVGG: Making VGG-style ConvNets Great Again
整理一下参数变化的公式:
x
^
i
=
(
w
f
u
s
e
3
∗
3
x
i
+
b
f
u
s
e
3
∗
3
)
+
(
w
f
u
s
e
1
∗
1
x
i
+
b
f
u
s
e
1
∗
1
)
+
(
w
B
N
0
∗
0
x
i
+
b
B
N
0
∗
0
)
=
(
w
f
u
s
e
3
∗
3
+
w
f
u
s
e
1
∗
1
+
w
B
N
0
∗
0
)
⋅
x
i
+
(
b
f
u
s
e
3
∗
3
+
b
f
u
s
e
1
∗
1
+
b
B
N
0
∗
0
)
\begin{split} \hat{x}_i&=(w_{fuse}^{3*3}x_i+b_{fuse}^{3*3})+(w_{fuse}^{1*1}x_i+b_{fuse}^{1*1})+(w_{BN}^{0*0}x_i+b_{BN}^{0*0})\\&=(w_{fuse}^{3*3}+w_{fuse}^{1*1}+w_{BN}^{0*0})\cdot x_i+(b_{fuse}^{3*3}+b_{fuse}^{1*1}+b_{BN}^{0*0}) \end{split}
x^i=(wfuse3∗3xi+bfuse3∗3)+(wfuse1∗1xi+bfuse1∗1)+(wBN0∗0xi+bBN0∗0)=(wfuse3∗3+wfuse1∗1+wBN0∗0)⋅xi+(bfuse3∗3+bfuse1∗1+bBN0∗0)其中,fuse表示conv+BN融合后的卷积参数。
bias参数只与输出通道数有关,三个bias都是长度为 c h o u t ch_{out} chout的一维向量,可以直接相加。下面主要看weights的变化:
(1)1*1 to 3*3:
由于代码中一般都使用autopadding,也就是卷积时padding=[kernel_size/2],默认3*3卷积时图像的padding=1,1*1卷积时padding=0,利用这个特点,只要在1*1卷积核外pad一圈0形成3*3卷积核,就可以达到与原1*1卷积相等的结果。

标黄的即为1*1卷积过程与结果,可以看到,与pad一圈0后的3*3卷积结果相同。放到矩阵里面就是:
(
□
□
□
□
□
□
□
□
□
□
□
□
)
c
h
o
u
t
∗
c
h
i
n
⏟
w
e
i
g
h
t
s
\underbrace{\begin{pmatrix} \square&\square&\square&\square\\\square&\square&\square&\square\\\square&\square&\square&\square\end{pmatrix}_{ch_{out}*ch_{in}}}_{weights}
weights
□□□□□□□□□□□□
chout∗chin其中每个
□
\square
□都由一片1*1卷积核pad了一圈0,变成上图中kernel所示。(不会画T^T)
(2)0*0 to 3*3
0*0这条支路可以是什么处理都不做,也可以是只进行一次BN操作。什么都不做就相当于一个weights是单位阵的1*1卷积,而BN也是相当于一次1*1卷积,所以weights的矩阵形式如下
(
□
0
0
0
0
□
0
0
0
0
□
0
0
0
0
□
)
c
h
i
n
∗
c
h
i
n
⏟
w
e
i
g
h
t
s
\underbrace{\begin{pmatrix} \square&0&0&0\\0&\square&0&0\\0&0&\square&0\\0&0&0&\square\end{pmatrix}_{ch_{in}*ch_{in}}}_{weights}
weights
□0000□0000□0000□
chin∗chin其中
□
\square
□的填充形式就有如下两种:

但是可以注意到,0*0分支的weights是 c h i n ∗ c h i n ch_{in}*ch_{in} chin∗chin的方阵,在 c h o u t ch_{out} chout不等于 c h i n ch_{in} chin的情况下,无法直接与另外两个分支的weights相加,yolov7中该模块的输入输出通道数就不同。为了解决这个问题,代码中对 c h o u t ch_{out} chout不等于 c h i n ch_{in} chin的情况,直接将0*0分支的weights等于 c h o u t ∗ c h i n ch_{out}*ch_{in} chout∗chin大小的零矩阵,再与另外两个分支相加; c h o u t ch_{out} chout等于 c h i n ch_{in} chin时,就按照上面的填充方法。
2、代码
该部分代码位于models/common.py/class RepConv/fuse_repvgg_block()函数中:
def fuse_repvgg_block(self):
if self.deploy:
return
print(f"RepConv.fuse_repvgg_block")
self.rbr_dense = self.fuse_conv_bn(self.rbr_dense[0], self.rbr_dense[1]) # 3*3卷积
self.rbr_1x1 = self.fuse_conv_bn(self.rbr_1x1[0], self.rbr_1x1[1])
rbr_1x1_bias = self.rbr_1x1.bias # ch_out
# 填充[1,1,1,1]表示在左右上下个填充1个单位,即第三四维(h,w)各增加2
weight_1x1_expanded = torch.nn.functional.pad(self.rbr_1x1.weight, [1, 1, 1, 1]) # co*ci*(ks+2)*(ks+2)
# Fuse self.rbr_identity
if (isinstance(self.rbr_identity, nn.BatchNorm2d) or isinstance(self.rbr_identity, nn.modules.batchnorm.SyncBatchNorm)):
# 0*0支路是BatchNorm2d或SyncBatchNorm的前提是out_channels=in_channels,在RepConv的__init__()中可以看到
identity_conv_1x1 = nn.Conv2d(
in_channels=self.in_channels,
out_channels=self.out_channels,
kernel_size=1,
stride=1,
padding=0,
groups=self.groups,
bias=False) # (co, ci, 1, 1)
identity_conv_1x1.weight.data = identity_conv_1x1.weight.data.to(self.rbr_1x1.weight.data.device)
identity_conv_1x1.weight.data = identity_conv_1x1.weight.data.squeeze().squeeze() # (co, ci)
identity_conv_1x1.weight.data.fill_(0.0)
identity_conv_1x1.weight.data.fill_diagonal_(1.0) # 变成一个单位阵,每个元素可看成一个1*1卷积片
identity_conv_1x1.weight.data = identity_conv_1x1.weight.data.unsqueeze(2).unsqueeze(3) # (co, ci, 1, 1), 现在我们得到了一个0*0卷积
identity_conv_1x1 = self.fuse_conv_bn(identity_conv_1x1, self.rbr_identity) # 与BN融合
bias_identity_expanded = identity_conv_1x1.bias
weight_identity_expanded = torch.nn.functional.pad(identity_conv_1x1.weight, [1, 1, 1, 1]) # 将每个1*1卷积片pad一圈0,即在第3、4维各加2
else:
# channels_out不等于channels_in,零矩阵
bias_identity_expanded = torch.nn.Parameter(torch.zeros_like(rbr_1x1_bias))
weight_identity_expanded = torch.nn.Parameter(torch.zeros_like(weight_1x1_expanded))
self.rbr_dense.weight = torch.nn.Parameter(
self.rbr_dense.weight + weight_1x1_expanded + weight_identity_expanded)
self.rbr_dense.bias = torch.nn.Parameter(self.rbr_dense.bias + rbr_1x1_bias + bias_identity_expanded)
self.rbr_reparam = self.rbr_dense
self.deploy = True
if self.rbr_identity is not None:
del self.rbr_identity
self.rbr_identity = None
if self.rbr_1x1 is not None:
del self.rbr_1x1
self.rbr_1x1 = None
if self.rbr_dense is not None:
del self.rbr_dense
self.rbr_dense = None

旨在为数千万中国开发者提供一个无缝且高效的云端环境,以支持学习、使用和贡献开源项目。
更多推荐


 13
13 0
0- 0


 已为社区贡献2条内容

所有评论(0)