
Spring Security OAuth2详解
创建认证成功处理器和认证失败处理器,处理登录成功和登录失败请求@Component@Slf4j@Autowired@Autowired@Override// 1. 从请求头中获取 ClientIdthrow new UnapprovedClientAuthenticationException("请求头中无client信息");// 2. 通过 ClientDetailsService 获取 Cl
1、简介
spring security oauth2框架即spring security + OAuth2,spring security上一篇文章已经讲过,接下来讲讲OAuth2,它是行业标准的授权协议,旨在为开发人员提供简单易用的授权流程;OAuth 定义了四种角色:
- 资源所有者:能够授予对受保护资源的访问权限的实体,当资源所有者是一个人时,它被称为最终用户。
- 资源服务器:托管受保护资源的服务器,能够接受并使用访问令牌响应受保护的资源请求。
- 授权服务器:服务器成功后向客户端颁发访问令牌验证资源所有者并获得授权。
- 客户:一个应用程序代表资源所有者及其授权。“客户”一词确实不暗示任何特定的实现特征(例如,应用程序是在服务器、桌面还是其他平台上执行 设备)。
2、OAuth2授权模式
2.1 授权码模式
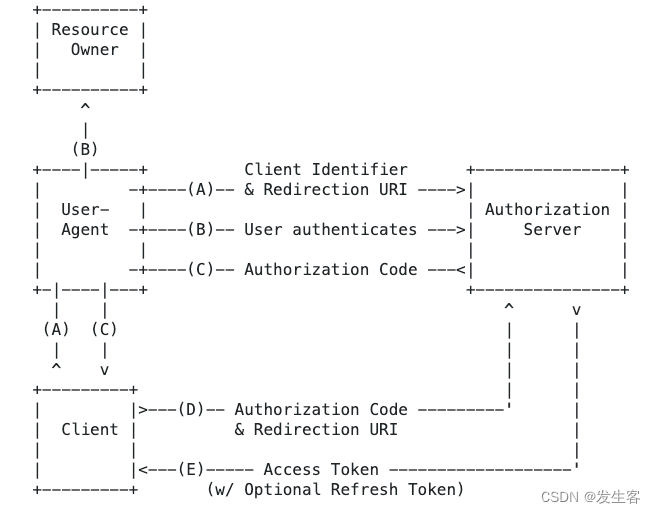
OAuth2有四种授权模式,其中授权码模式作为最常见的授权模式,在web端与app端都得到广泛的使用,比如微信账号授权登录京东、知乎等;
授权码模式与其他三种授权模式不同,其流程从客户端启动浏览器开始,具体步骤如下
- 客户端打开浏览器将用户信息发送到OAuth2认证服务器
- 用户看到授权提示并批准客户端的请求
- 认证服务器将页面重定向至redirect_uri,并在url中拼接授权码code
- 客户端通过code交换访问令牌token
刷新token流程

2.2 密码模式
密码模式作为最不安全的授权模式,它通过给定的用户名密码获取访问令牌token,已在最新的oauth2最佳安全当前实践OAuth 2.0 Security Best Current Practice中被禁止;OAuth2对密码模式的支持,是为了让OAuth之前的系统无需任何用户交互即可升级至OAuth;之前的认证方式是HTTP Basic Auth,浏览器会存储用户密码并在每次请求服务端时将其带上,这种方式存在很多局限性和安全隐患;密码模式允许用户继续在浏览器端通过用户名密码交换访问令牌,以便将来使用访问令牌无缝升级到 OAuth

2.3 客户端模式
客户端模式也叫客户端凭证模式,其旨在解决内部服务之间相互调用的鉴权问题;资源服务器A从认证服务器中获取token,携带token访问资源服务器B,资源服务器B请求认证服务器校验token;这种交互方式导致内部服务之间的每一次调用都需要向认证服务器发送一次请求,这极大地增加了客户端的响应时间。这种业务场景强烈推荐使用JSON Web Tokens(JWT),它无状态且支持本地验证;JWT 包含三个部分:标头、有效负载和签名。标头和有效负载是简单的 base64 编码字符串,可以轻松解密和读取。签名使用标头中列出的算法以及私钥来创建标头和有效负载的哈希值。没有私钥无法重新创建散列,但可以使用公钥对其进行验证;现代计算机需要数年时间才能暴力破解有效的 JWT 签名,但JWT有效期默认是一小时

2.4 隐式模式
隐式模式也叫简单模式,是一种简化的OAuth流程,起初推荐用于本机或者JavaScript应用程序,访问令牌立即返回,无需额外的授权步骤;强烈不建议使用该授权模式,因为在 HTTP 重定向中返回访问令牌存在极大风险;隐式模式与授权码模式流程类似,认证服务器重定向回客户端页面拼接在URL上的不再是授权码code,而是访问令牌token;具体步骤如下
- 客户端打开浏览器将用户名密码发送到OAuth认证服务器
- 用户看到授权提示并批准客户端的请求
- 认证服务器将页面重定向至redirect_uri,并在url中拼接授权码token

3、快速开始
3.1 创建工程
创建springboot工程并添加相关依赖,此处注意Spring-boot-starter-parent版本号
<?xml version="1.0" encoding="UTF-8"?>
<project xmlns="http://maven.apache.org/POM/4.0.0" xmlns:xsi="http://www.w3.org/2001/XMLSchema-instance"
         xsi:schemaLocation="http://maven.apache.org/POM/4.0.0 https://maven.apache.org/xsd/maven-4.0.0.xsd">
    <modelVersion>4.0.0</modelVersion>
    <parent>
        <groupId>org.springframework.boot</groupId>
        <artifactId>spring-boot-starter-parent</artifactId>
        <version>2.1.6.RELEASE</version>
        <relativePath/>
    </parent>
    <groupId>com.fsk</groupId>
    <artifactId>hello-security-oauth2-server</artifactId>
    <version>0.0.1-SNAPSHOT</version>
    <name>hello-security-oauth2-server</name>
    <description>hello-security-oauth2-server</description>
    <properties>
        <java.version>1.8</java.version>
    </properties>

    <dependencies>
        <dependency>
            <groupId>org.springframework.boot</groupId>
            <artifactId>spring-boot-starter-web</artifactId>
        </dependency>
        <dependency>
            <groupId>org.springframework.cloud</groupId>
            <artifactId>spring-cloud-starter</artifactId>
        </dependency>
        <dependency>
            <groupId>org.springframework.cloud</groupId>
            <artifactId>spring-cloud-starter-oauth2</artifactId>
        </dependency>
        <dependency>
            <groupId>org.springframework.cloud</groupId>
            <artifactId>spring-cloud-starter-security</artifactId>
        </dependency>
        <dependency>
            <groupId>org.projectlombok</groupId>
            <artifactId>lombok</artifactId>
        </dependency>
    </dependencies>

    <dependencyManagement>
        <dependencies>
            <dependency>
                <groupId>org.springframework.cloud</groupId>
                <artifactId>spring-cloud-dependencies</artifactId>
                <version>${spring-cloud.version}</version>
                <type>pom</type>
                <scope>import</scope>
            </dependency>
        </dependencies>
    </dependencyManagement>

    <build>
        <plugins>
            <plugin>
                <groupId>org.springframework.boot</groupId>
                <artifactId>spring-boot-maven-plugin</artifactId>
            </plugin>
        </plugins>
    </build>
</project>
创建认证服务器配置类AuthorizationServerConfig,继承WebSecurityConfigurerAdapter;并添加开启认证服务器注解@EnableAuthorizationServer
@EnableAuthorizationServer
@Configuration
public class AuthorizationServerConfig extends WebSecurityConfigurerAdapter{
}
此时启动服务控制台中打印password、client-id和client-secret信息
Using generated security password: 3317924e-7d73-4482-aa1d-307e6af50b18 security.oauth2.client.client-id = e5de4306-b216-408a-829e-9e57414a3c02 security.oauth2.client.client-secret = f341b207-5d33-4892-96b9-753ae7cc2219
在配置文件application.yml中添加如下配置指定client-id和client-secret
security:
  oauth2:
    client:
      client-id: fsk
      client-secret: fsk123
再次启动服务,控制台打印信息如下
security.oauth2.client.client-id = fsk
security.oauth2.client.client-secret = ****
创建配置类SecurityConfig、用户信息接口UserDetailService和用户实体类MyUser,重写用户登录逻辑;这与上一章spring Security认证逻辑一致,用户名随意,密码123456,并用BCryptPasswordEncoder进行加密处理,用户拥有admin权限
@Configuration
public class SecurityConfig {
    @Bean
    public PasswordEncoder passwordEncoder() {
        return new BCryptPasswordEncoder();
    }
}
@Data
public class MyUser {
private String userName;
private String password;
private boolean accountNonExpired = true;
private boolean accountNonLocked= true;
private boolean credentialsNonExpired= true;
private boolean enabled= true;
}@Service
public class UserDetailService implements UserDetailsService {
@Autowired
private PasswordEncoder passwordEncoder;
@Override
public UserDetails loadUserByUsername(String username) throws UsernameNotFoundException {
MyUser user = new MyUser();
user.setUserName(username);
user.setPassword(passwordEncoder.encode("123456"));
return new User(username,
user.getPassword(),
user.isEnabled(),
user.isAccountNonExpired(),
user.isCredentialsNonExpired(),
user.isAccountNonLocked(),
AuthorityUtils.commaSeparatedStringToAuthorityList("admin"));
}
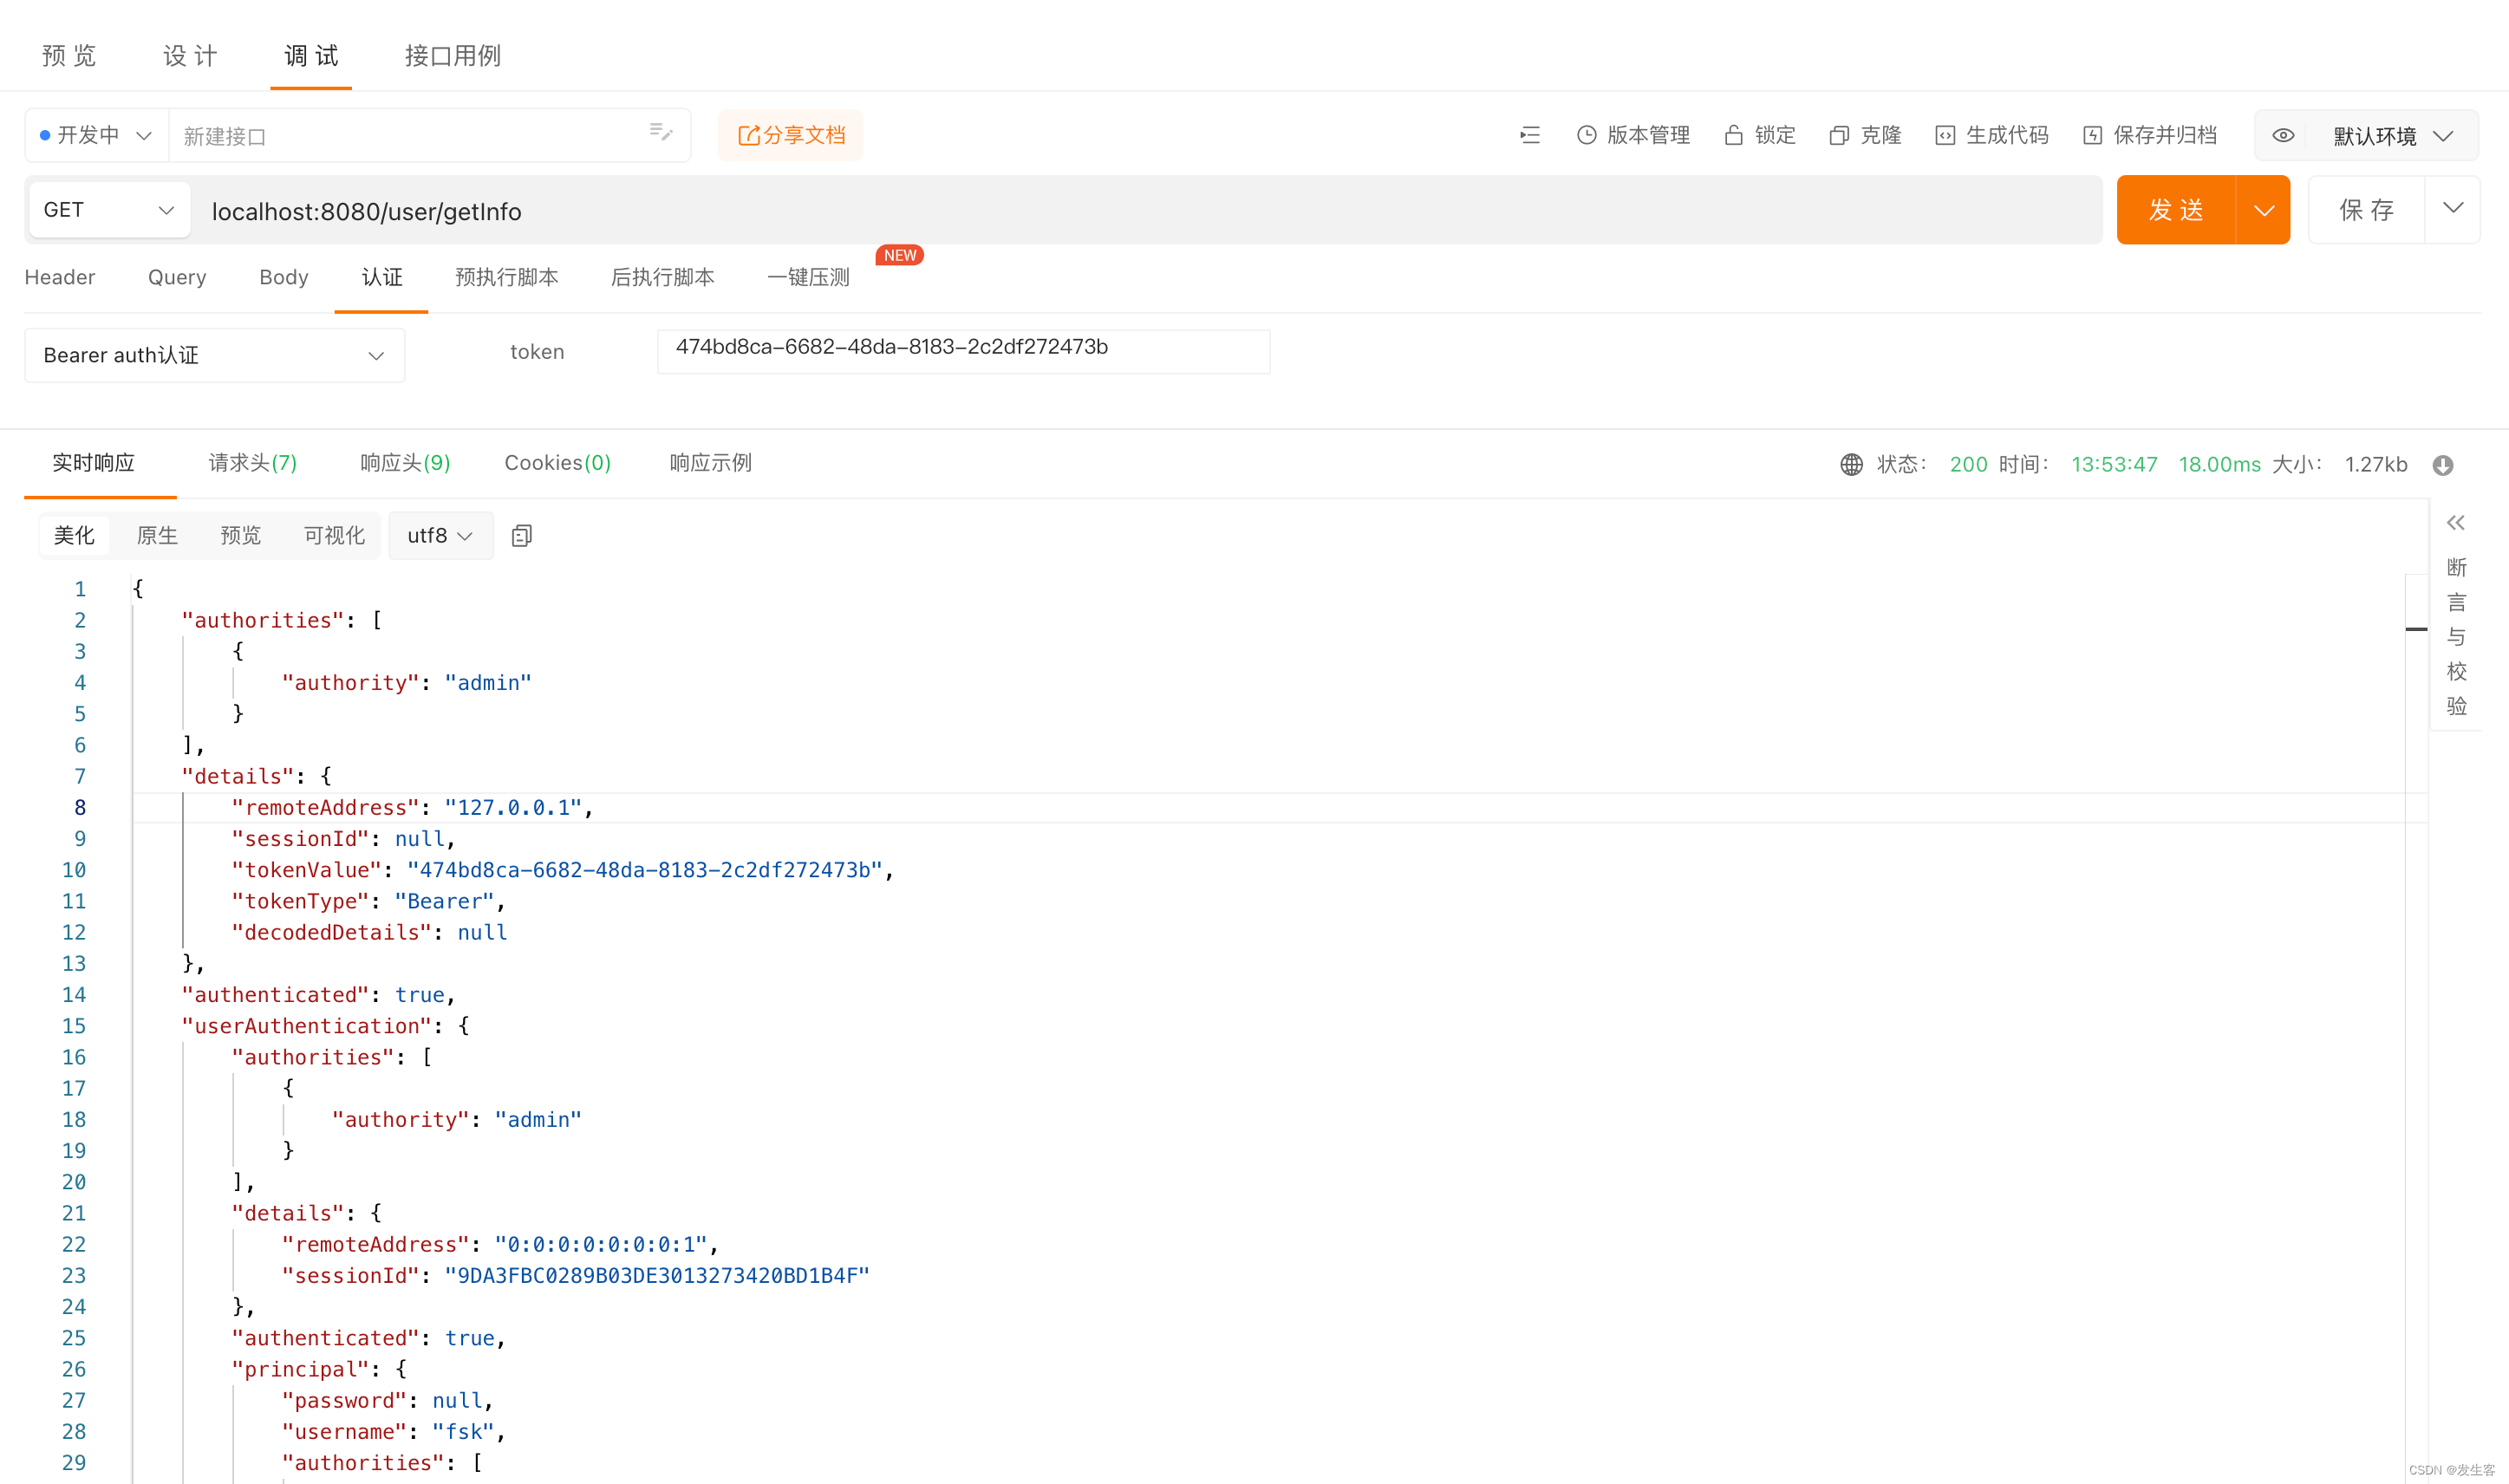
}创建用户接口/user/getInfo
@RestController
public class UserController {
    @GetMapping("/user/getInfo")
    public Object index(Authentication authentication){
        return authentication;
    }
}
创建资源服务器配置类ResourceServerConfig,继承ResourceServerConfigurerAdapter;并添加注解@EnableResourceServer开启资源服务器
@Configuration
@EnableResourceServer
public class ResourceServerConfig extends ResourceServerConfigurerAdapter {
    @Override
    public void configure(HttpSecurity http) throws Exception {
        http.authorizeRequests()
                .anyRequest()
                .authenticated()
                .and()
                .requestMatchers()
                .antMatchers("/user/**");
    }
}
在配置文件application.yml中添加注册重定向地址配置
security:
  oauth2:
    client:
      client-id: fsk
      client-secret: fsk123
      registered-redirect-uri: http://localhost:8081/callback
3.2 授权码模式

输入正确的用户名和密码,勾选Approve,并点击Authorize按钮
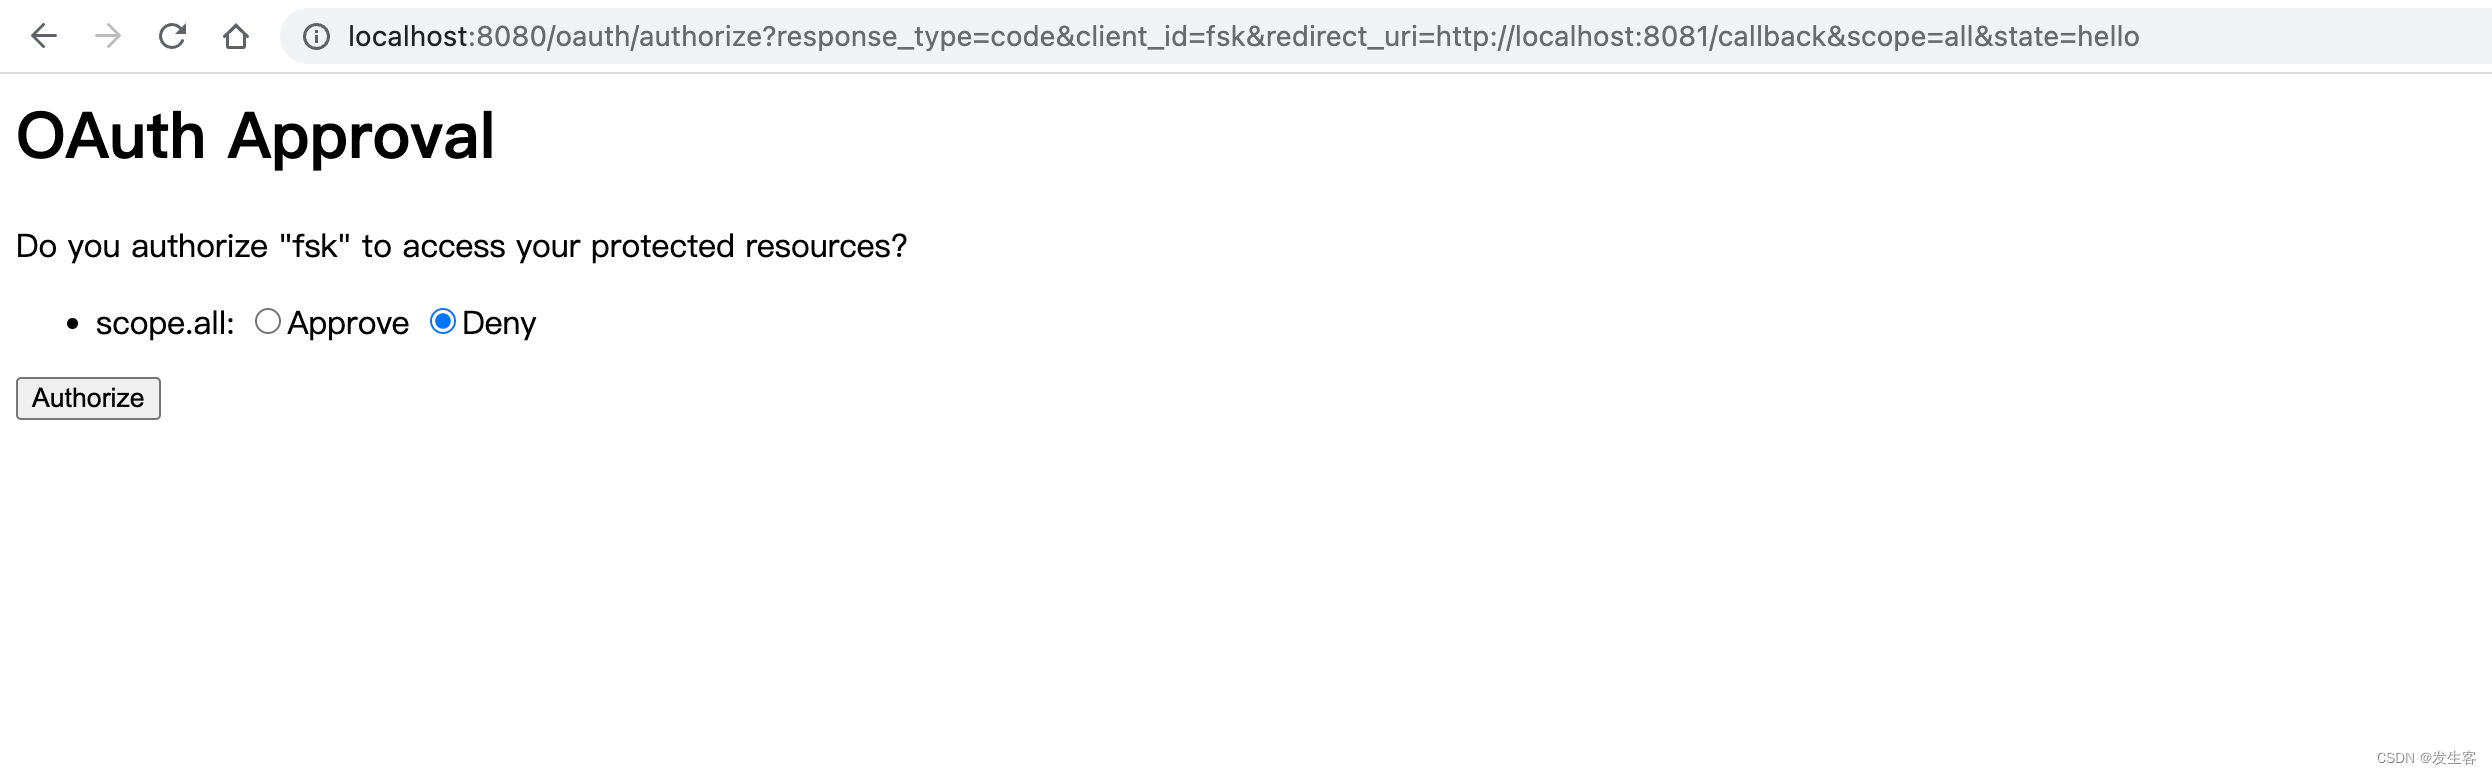
页面重定向至http://localhost:8081/callback?code=7kzq7B&state=hello;并在url中返回授权码code

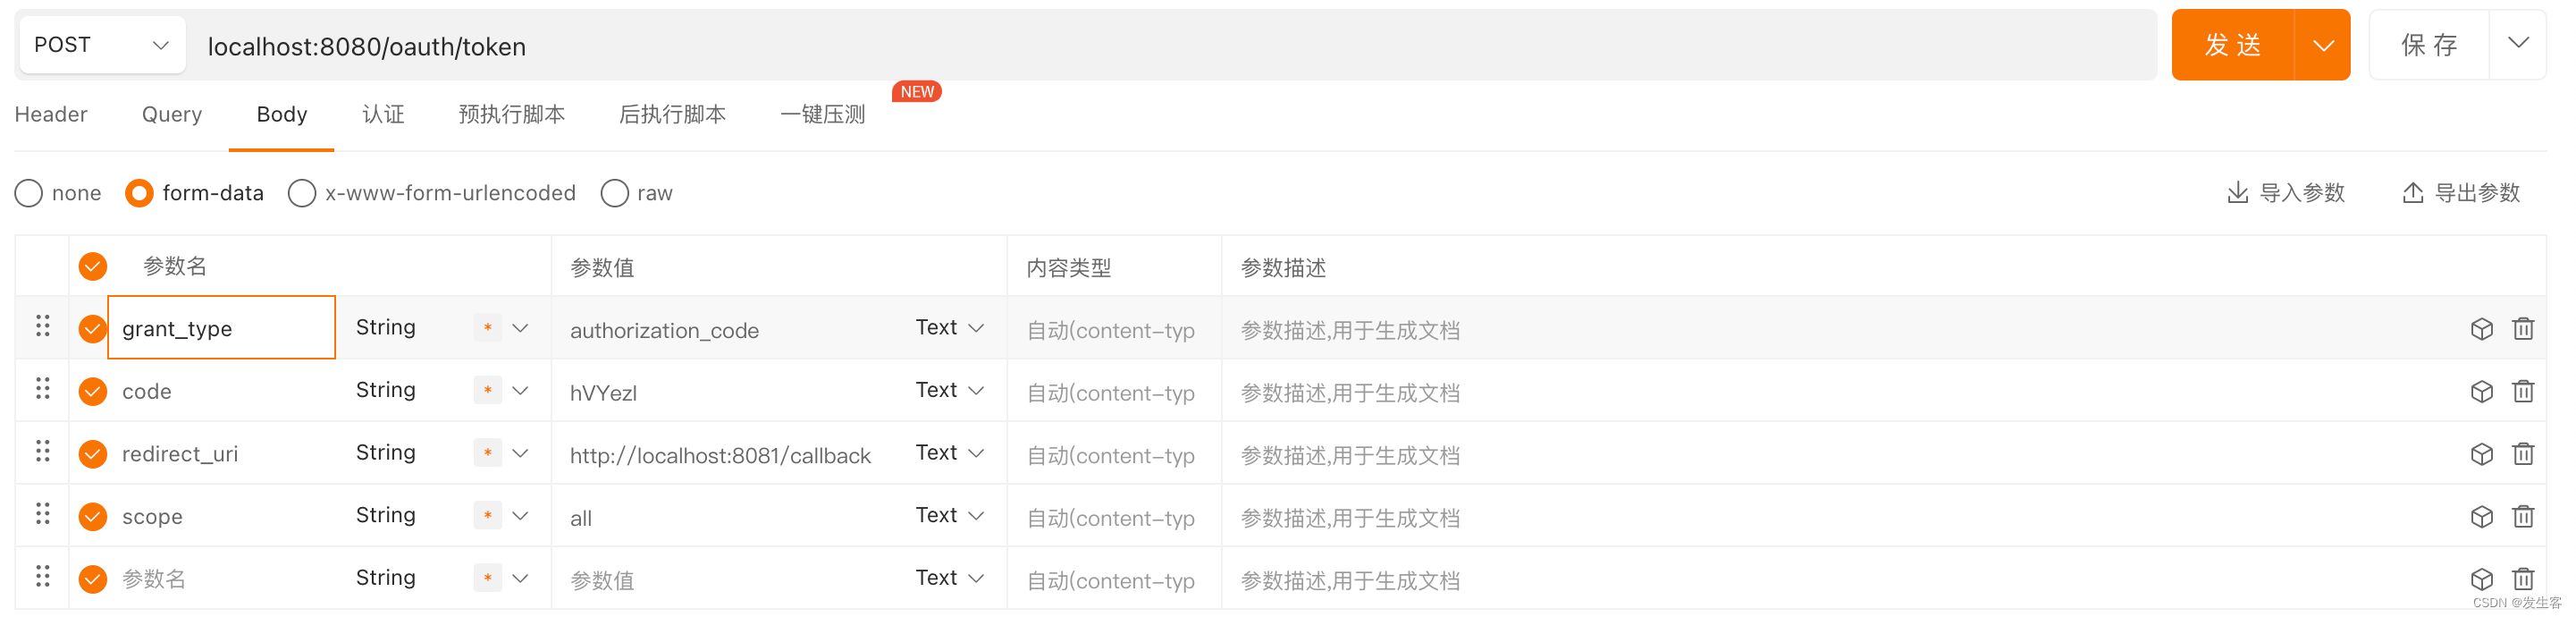
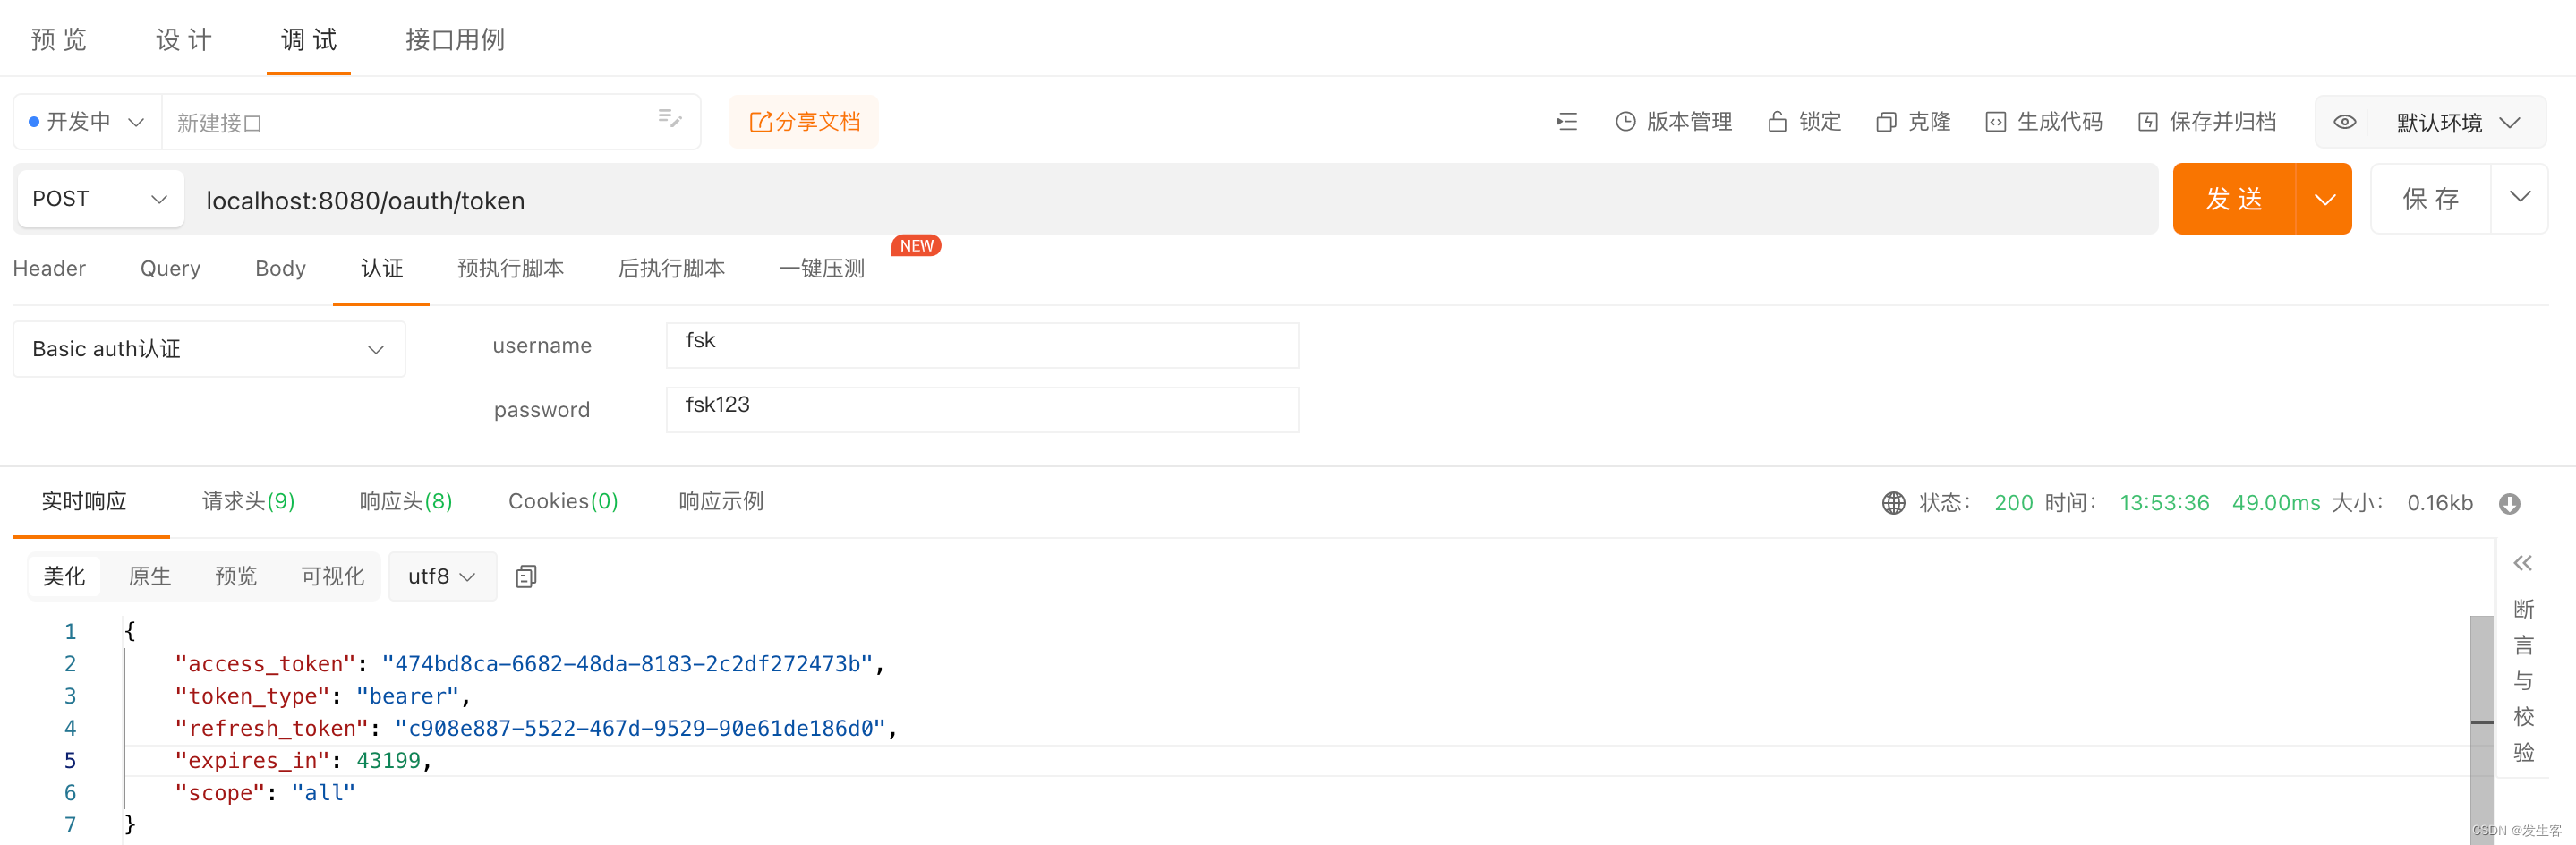
在postman上调用认证服务器/oauth/token接口获取访问令牌access_token,请求体和请求头如下,授权模式grant_type为固定值authorization_code,授权码code即为url中返回的,重定向地址redirect_uri与范围scope和/oauth/authorize接口入参保持一致,请求头中传入客户端信息;注意一个授权码只能获取一次令牌
请求用户接口/user/getInfo,请求头添加access_token
3.3 密码模式
密码模式获取access_token,grant_type默认为password,username和password为登录用户名密码,请求头中传入客户端信息


3.4 客户端模式
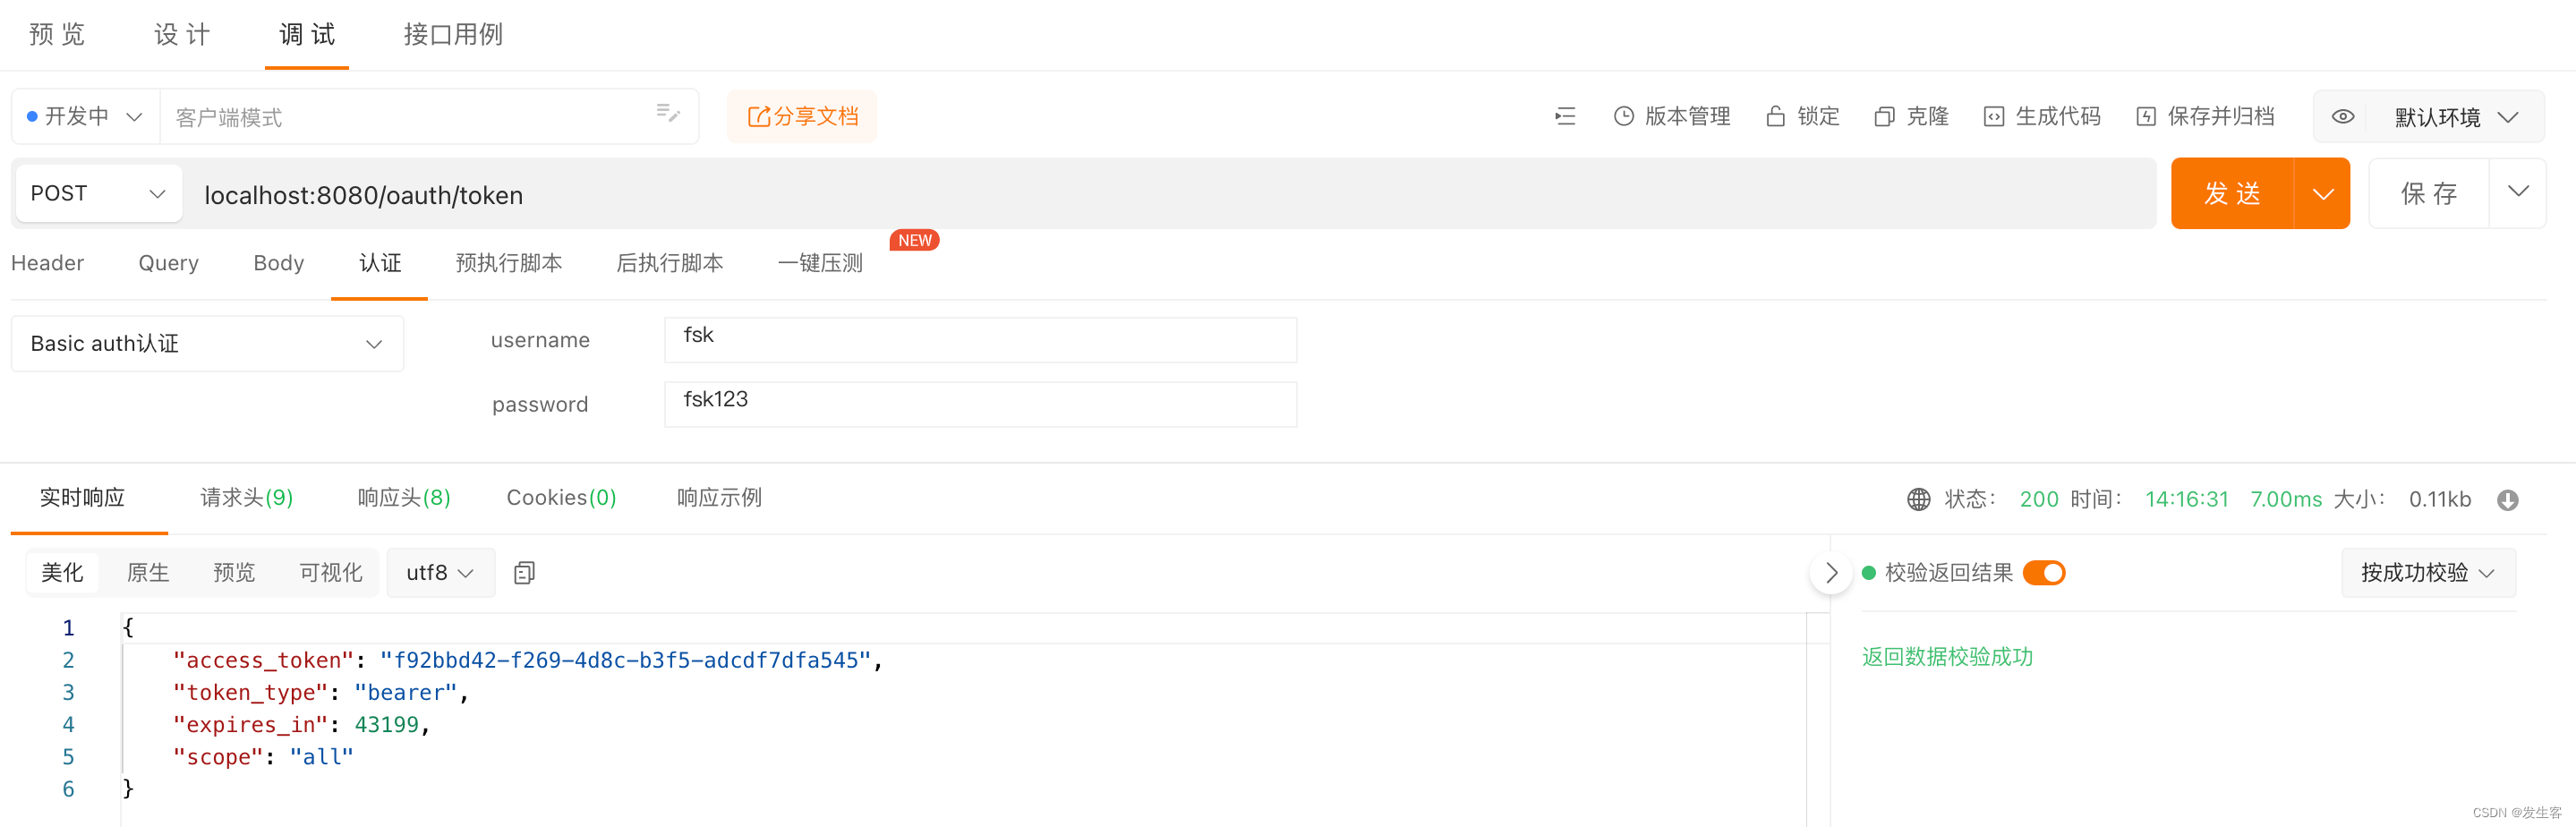
客户端模式获取token,grant_type默认为client_credentials,请求头中传入客户端信息

3.5 隐式模式
隐式模式与授权码模式类似,区别在于入参返回类型response_type不同,授权码模式返回参数为code,隐式模式为token;访问地址http://localhost:8080/oauth/authorize?response_type=token&client_id=fsk&redirect_uri=http://localhost:8081/callback&scope=all&state=hello,输入正确用户名密码,浏览器重定向到地址http://localhost:8081/callback,并携带access_token;通过以上四种模式获取到的访问令牌access_token,均可使用其访问用户接口/user/getInfo

4、自定义用户登录
创建认证成功处理器和认证失败处理器,处理登录成功和登录失败请求
@Component
@Slf4j
public class MyAuthenticationSucessHandler implements AuthenticationSuccessHandler {

    @Autowired
    private ClientDetailsService clientDetailsService;
    @Autowired
    private AuthorizationServerTokenServices authorizationServerTokenServices;

    @Override
    public void onAuthenticationSuccess(HttpServletRequest request, HttpServletResponse response, Authentication authentication) throws IOException {
        // 1. 从请求头中获取 ClientId
        String header = request.getHeader("Authorization");
        if (header == null || !header.startsWith("Basic ")) {
            throw new UnapprovedClientAuthenticationException("请求头中无client信息");
        }
        String[] tokens = this.extractAndDecodeHeader(header, request);
        String clientId = tokens[0];
        String clientSecret =tokens[1];
        // 2. 通过 ClientDetailsService 获取 ClientDetails
        ClientDetails clientDetails = clientDetailsService.loadClientByClientId(clientId);
        // 3. 校验 ClientId和 ClientSecret的正确性
        TokenRequest tokenRequest;
        if (clientDetails == null) {
            throw new UnapprovedClientAuthenticationException("clientId:" + clientId + "对应的信息不存在");
        } else if (!clientSecret.equals(clientDetails.getClientSecret())) {
            throw new UnapprovedClientAuthenticationException("clientSecret不正确");
        } else {
            // 4. 通过 TokenRequest构造器生成 TokenRequest
            tokenRequest = new TokenRequest(new HashMap<>(), clientId, clientDetails.getScope(), "all");
        }
        // 5. 通过 TokenRequest的 createOAuth2Request方法获取 OAuth2Request
        OAuth2Request oAuth2Request = tokenRequest.createOAuth2Request(clientDetails);
        // 6. 通过 Authentication和 OAuth2Request构造出 OAuth2Authentication
        OAuth2Authentication auth2Authentication = new OAuth2Authentication(oAuth2Request, authentication);
        // 7. 通过 AuthorizationServerTokenServices 生成 OAuth2AccessToken
        OAuth2AccessToken token = authorizationServerTokenServices.createAccessToken(auth2Authentication);
        // 8. 返回 Token
        log.info("登录成功");
        response.setContentType("application/json;charset=UTF-8");
        response.getWriter().write(new ObjectMapper().writeValueAsString(token));
    }

    private String[] extractAndDecodeHeader(String header, HttpServletRequest request) {
        byte[] base64Token = header.substring(6).getBytes(StandardCharsets.UTF_8);
        byte[] decoded;
        try {
            decoded = Base64.getDecoder().decode(base64Token);
        } catch (IllegalArgumentException var7) {
            throw new BadCredentialsException("Failed to decode basic authentication token");
        }
        String token = new String(decoded, StandardCharsets.UTF_8);
        int delim = token.indexOf(":");
        if (delim == -1) {
            throw new BadCredentialsException("Invalid basic authentication token");
        } else {
            return new String[]{token.substring(0, delim), token.substring(delim + 1)};
        }
    }
}
@Component
public class MyAuthenticationFailureHandler implements AuthenticationFailureHandler {
@Override
public void onAuthenticationFailure(HttpServletRequest request, HttpServletResponse response, AuthenticationException exception) throws IOException, ServletException {
System.out.println("登录失败");
response.setStatus(401);
response.setContentType("application/json;charset=utf-8");
response.getWriter().write(exception.getMessage());
}
}
在认证服务器中配置自定义登录接口
@EnableAuthorizationServer
@Configuration
public class AuthorizationServerConfig extends WebSecurityConfigurerAdapter {
@Autowired
private AuthenticationSuccessHandler authenticationSuccessHandler;
@Autowired
private AuthenticationFailureHandler authenticationFailureHandler;
@Override
protected void configure(HttpSecurity http) throws Exception {
http.formLogin()
.loginProcessingUrl("/login")
.successHandler(authenticationSuccessHandler)
.failureHandler(authenticationFailureHandler)
.and()
.csrf().disable();
}
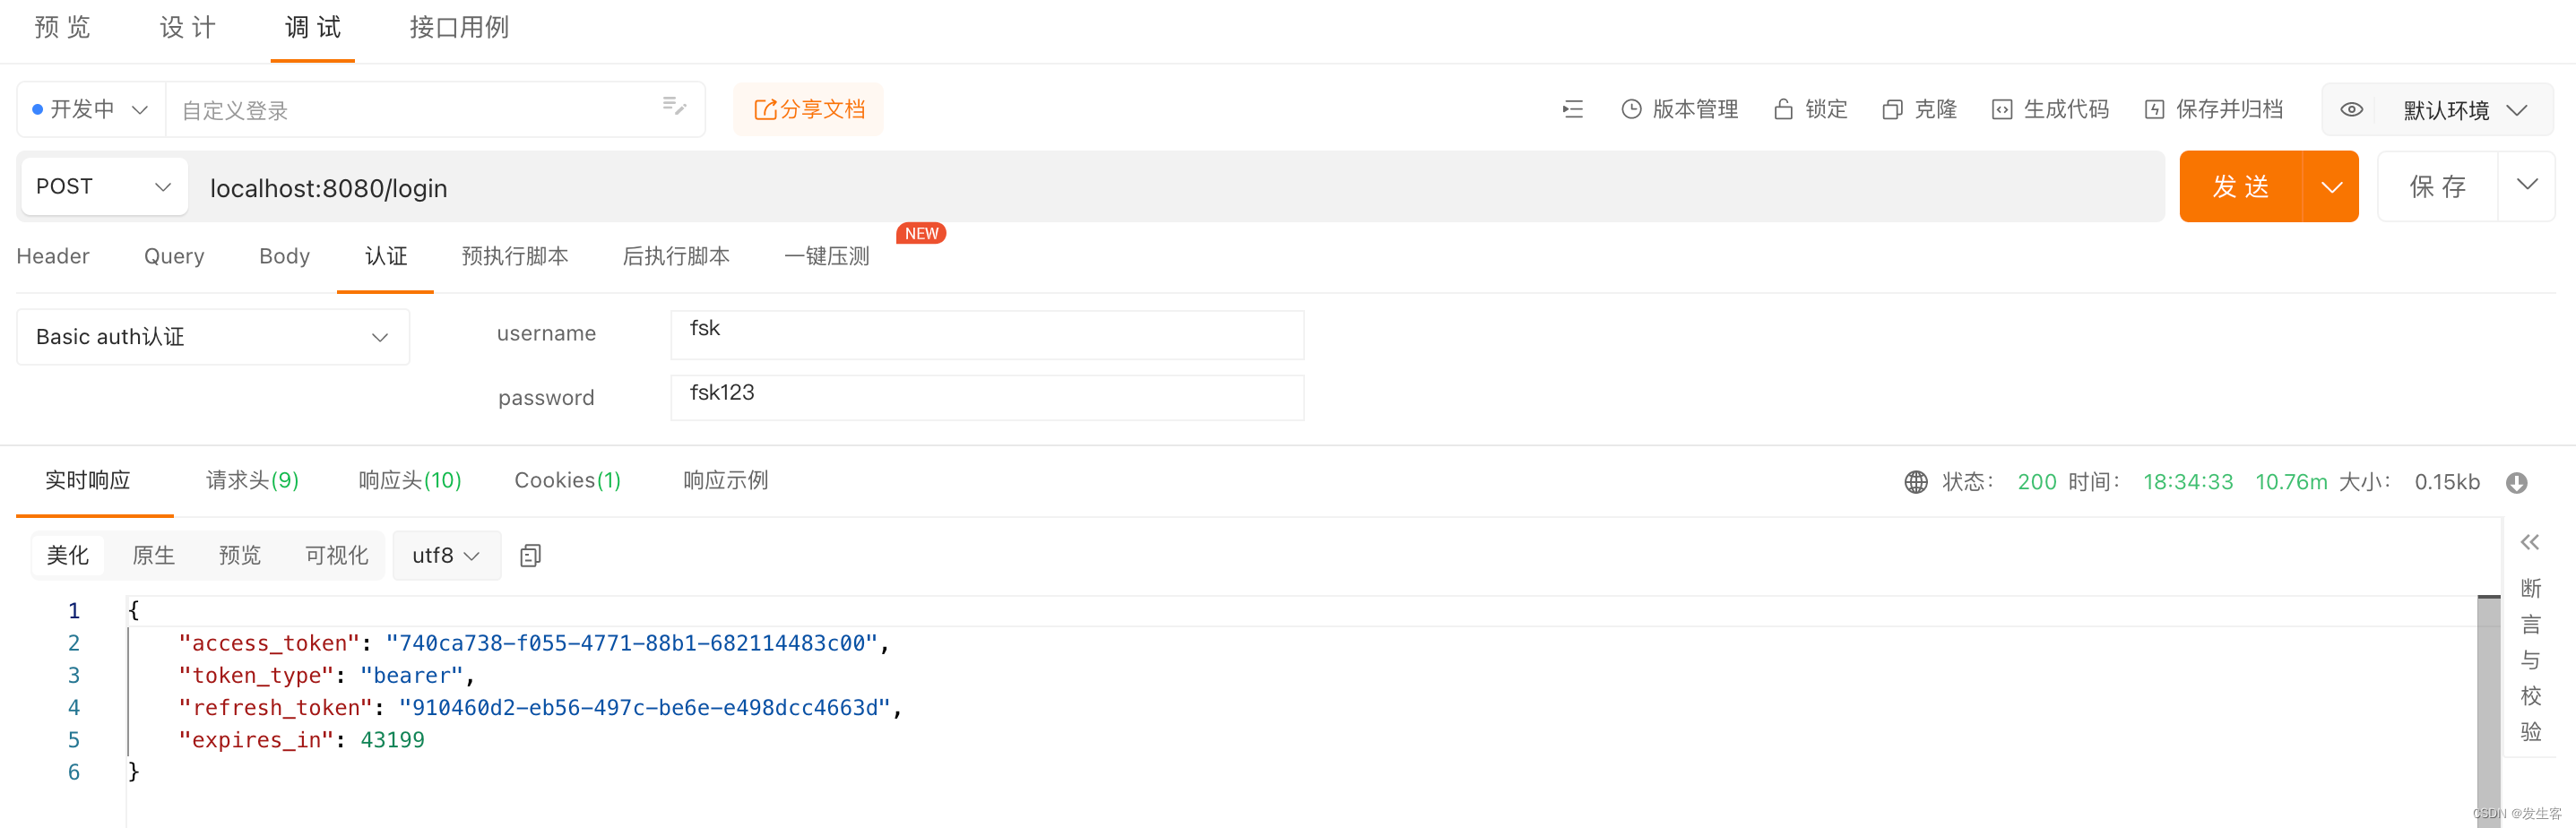
}在postman中请求自定义登录接口/login,请求参数传用户名和密码,请求头中传客户端信息

5、图形验证码与短信验证码
图形验证码与短信验证码功能与上节中讲到的Spring Security中几乎一致,将相关代码从中复制过来稍作修改即可;通过/code/image接口获取图形验证码code和uuid

请求登录接口/login,将code和uuid添加到请求体中即可获取访问令牌access_token

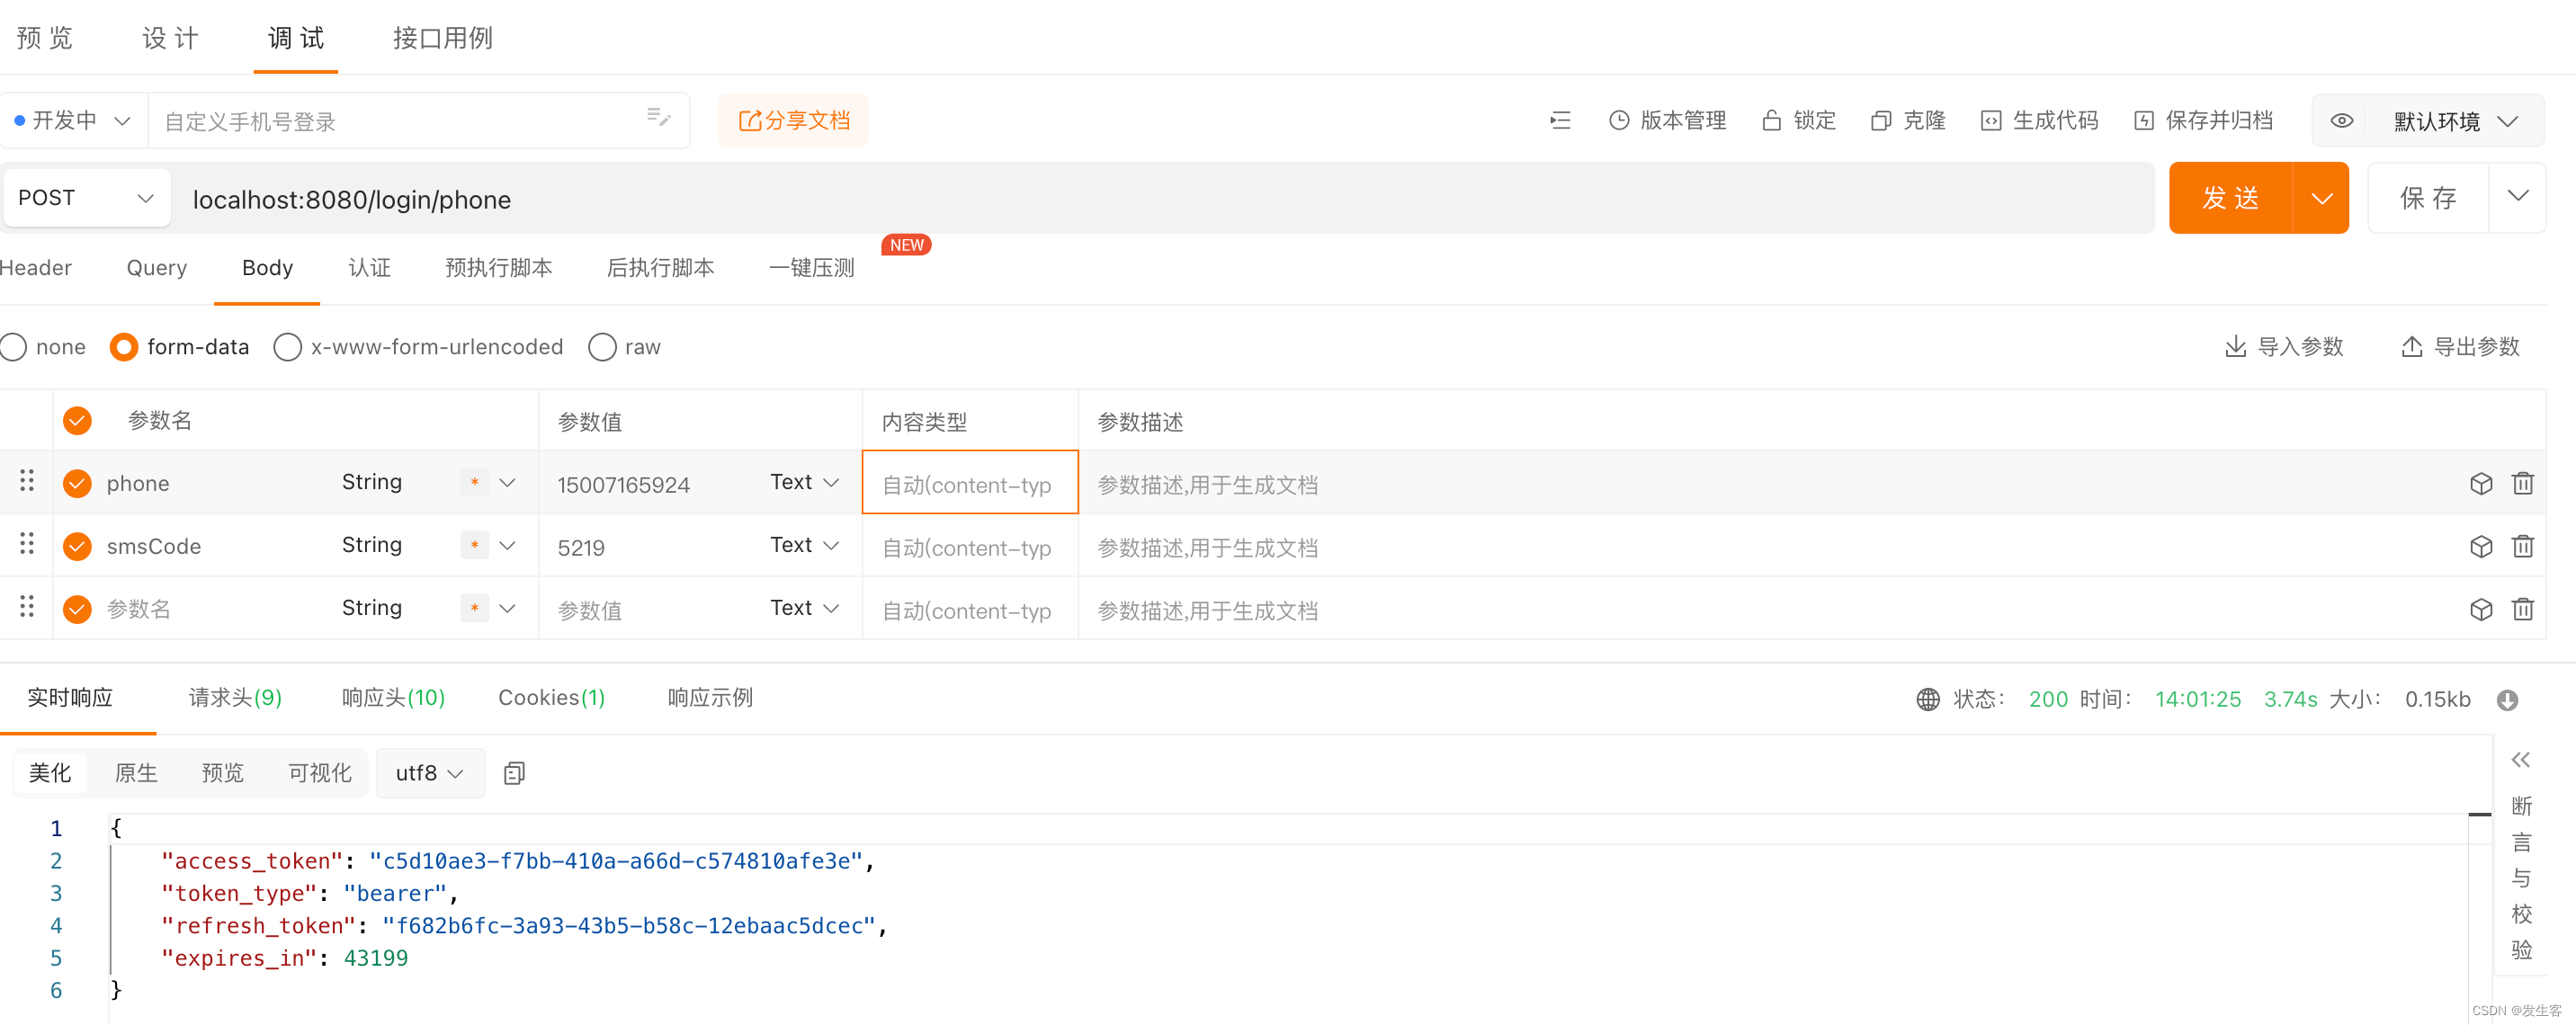
短信验证码登录时,调用/code/sms接口获取短信验证码

然后调用手机号登录接口/login/phone,通过手机号和短信验证码获取访问令牌access_token;以上两种登录方式都必须在请求头中携带客户端信息clientIId和clientSecret
给验证码添加开关,创建配置类SecurityProperties;codeSwitch为图形验证码开关,smsSwitch为短信验证码开关
@Component
@ConfigurationProperties(prefix = "validate")
@Data
public class SecurityProperties {
    private boolean codeSwitch;
    private boolean smsSwitch;
}
在图形验证码过滤器ValidateCodeFilter中新增开关
@Autowired
private SecurityProperties securityProperties;
@Override
protected void doFilterInternal(HttpServletRequest request, HttpServletResponse response, FilterChain filterChain) throws ServletException, IOException {
    if ("/login".equalsIgnoreCase(request.getRequestURI()) && "post".equalsIgnoreCase(request.getMethod()) && securityProperties.isCodeSwitch()) {
      ...
    }
    filterChain.doFilter(request, response);
}
在短信验证码过滤器SmsCodeFilter中新增开关
@Autowired
private SecurityProperties securityProperties;
@Override
protected void doFilterInternal(HttpServletRequest request, HttpServletResponse response, FilterChain filterChain) throws ServletException, IOException {
    if ("/login/phone".equals(request.getRequestURI()) && "post".equalsIgnoreCase(request.getMethod())  && securityProperties.isSmsSwitch()) {
       ...
    }
    filterChain.doFilter(request, response);
}
在配置文件application.yml中添加开关配置,为true是打开验证码校验,false或者不配置则关闭验证码校验;postman验证发现请求参数不传验证码信息登录成功
validate:
  codeSwitch: true
  smsSwitch: true
6、自定义客户端配置
在企业应用中,一个认证服务器会对应到多个客户端应用,这时候就要给每个客户端应用分配相应的客户端配置;接下来对项目就行改造,将认证服务器配置类AuthorizationServerConfig的父类由WebSecurityConfigurerAdapter换成AuthorizationServerConfigurerAdapter,并重写方法configure(ClientDetailsServiceConfigurer clients),此时可将配置文件中的客户端配置删除
@EnableAuthorizationServer
@Configuration
public class AuthorizationServerConfig extends AuthorizationServerConfigurerAdapter {
    @Autowired
    private AuthenticationManager authenticationManager;
    @Autowired
    private PasswordEncoder passwordEncoder;
    @Override
    public void configure(AuthorizationServerEndpointsConfigurer endpoints) throws Exception {
        endpoints.authenticationManager(authenticationManager)
    }
    @Override
    public void configure(ClientDetailsServiceConfigurer clients) throws Exception {
        clients.inMemory()
                .withClient("fsk")
                .secret(passwordEncoder.encode("fsk123"))
                .scopes("all")
                .authorizedGrantTypes("authorization_code","password","client_credentials")
                .and()
                .withClient("fsk1")
                .secret(passwordEncoder.encode("fsk1234"));
    }
}
父类中三个方法功能如下
- ClientDetailsServiceConfigurer:用来配置客户端详情服务(ClientDetailsService),客户端详情信息在这里进行初始化,生产实践中更多的是通过数据库来存储相关信息
- AuthorizationServerSecurityConfigurer:用来配置令牌端点(TokenEndpoint)的安全约束
- AuthorizationServerEndpointsConfigurer:用来配置授权(authorization)以及令牌(token)的访问端点和令牌服务(token services)
public class AuthorizationServerConfigurerAdapter implements AuthorizationServerConfigurer {
    public void configure(AuthorizationServerSecurityConfigurer security) throws Exception {}
    public void configure(ClientDetailsServiceConfigurer clients) throws Exception {}
    public void configure(AuthorizationServerEndpointsConfigurer endpoints) throws Exception {}
}
由于认证服务器端点配置类AuthorizationServerEndpointsConfigurer中,authenticationManager不为空的情况下才支持密码模式,源码如下
private List<TokenGranter> getDefaultTokenGranters() {
    ClientDetailsService clientDetails = this.clientDetailsService();
    AuthorizationServerTokenServices tokenServices = this.tokenServices();
    AuthorizationCodeServices authorizationCodeServices = this.authorizationCodeServices();
    OAuth2RequestFactory requestFactory = this.requestFactory();
    List<TokenGranter> tokenGranters = new ArrayList();
    tokenGranters.add(new AuthorizationCodeTokenGranter(tokenServices, authorizationCodeServices, clientDetails, requestFactory));
    tokenGranters.add(new RefreshTokenGranter(tokenServices, clientDetails, requestFactory));
    ImplicitTokenGranter implicit = new ImplicitTokenGranter(tokenServices, clientDetails, requestFactory);
    tokenGranters.add(implicit);
    tokenGranters.add(new ClientCredentialsTokenGranter(tokenServices, clientDetails, requestFactory));
    if (this.authenticationManager != null) {
        tokenGranters.add(new ResourceOwnerPasswordTokenGranter(this.authenticationManager, tokenServices, clientDetails, requestFactory));
    }
    return tokenGranters;
}
因此创建配置WebSecurityConfig并继承WebSecurityConfigurerAdapter;重写authenticationManagerBean方法,并将其添加到Spring容器中
@Configuration
public class WebSecurityConfig extends WebSecurityConfigurerAdapter {
@Bean
@Override
public AuthenticationManager authenticationManagerBean() throws Exception {
return super.authenticationManagerBean();
}
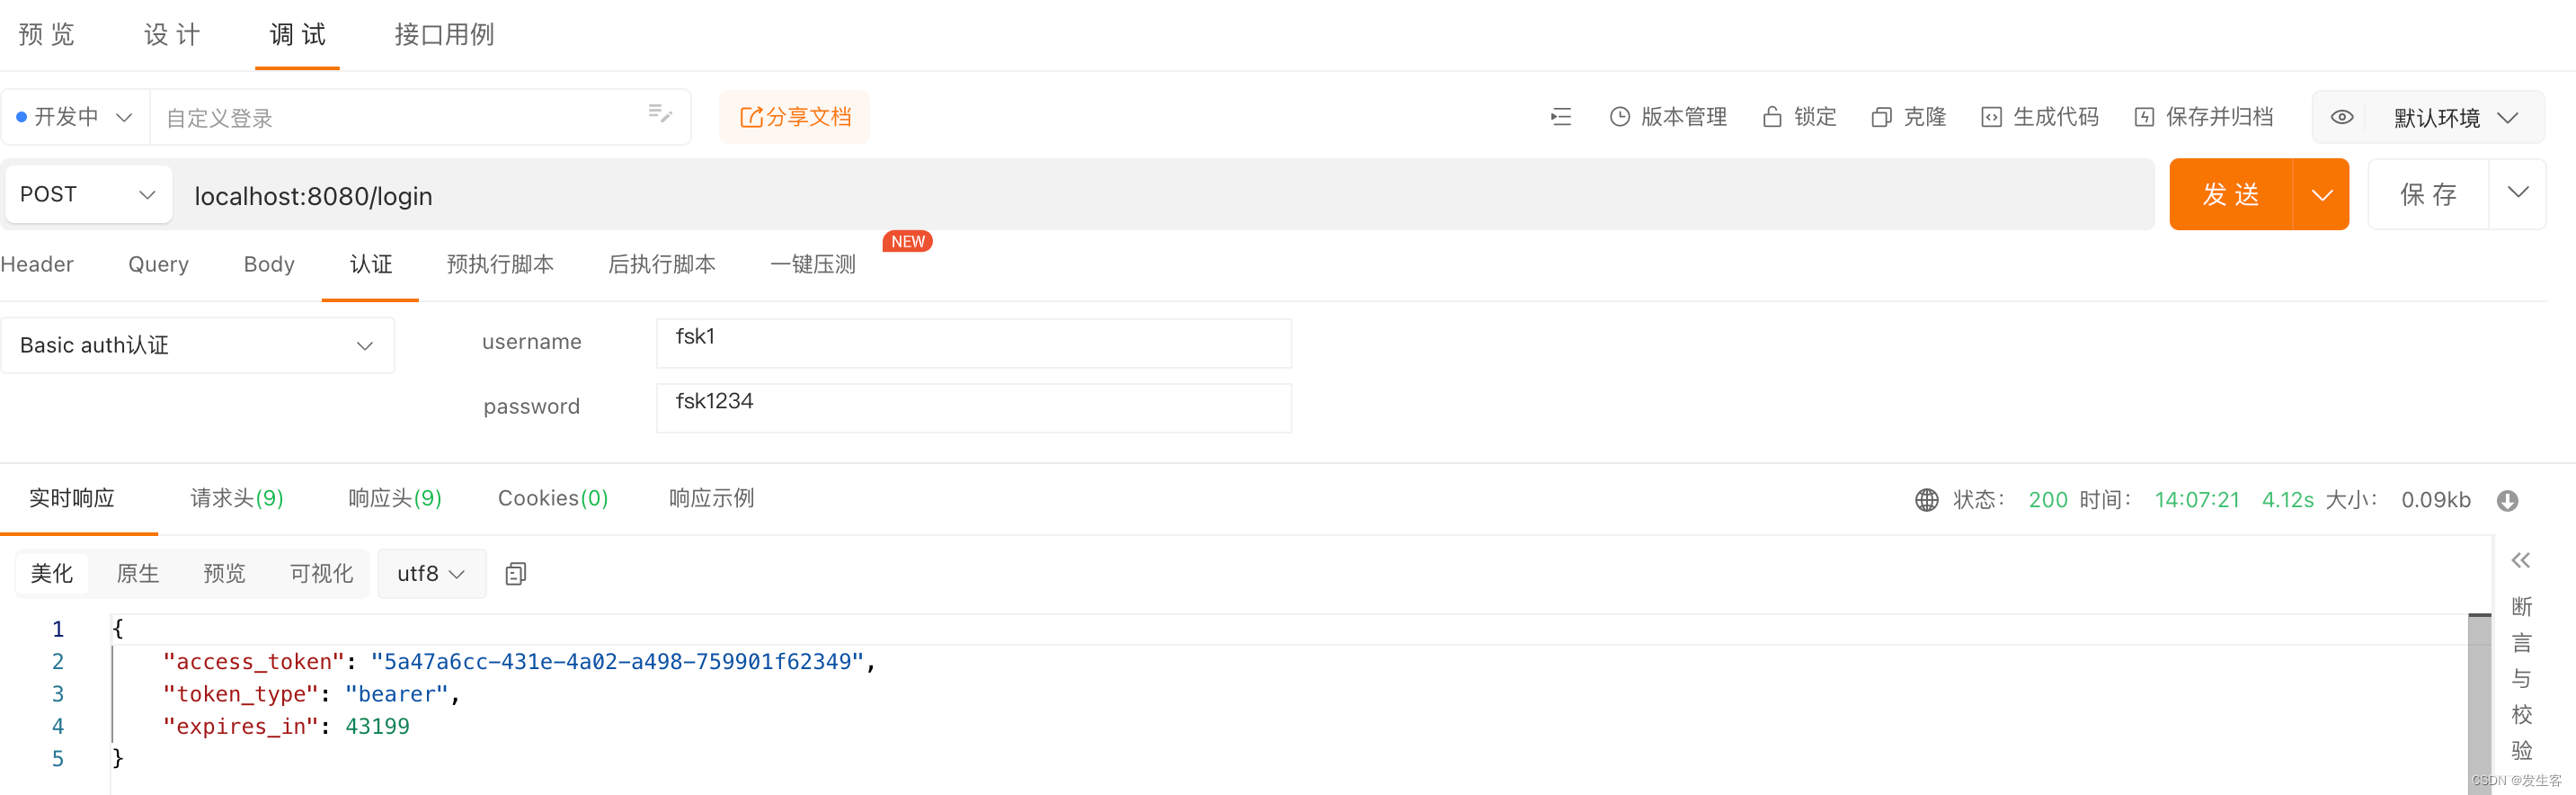
}此时启动服务,用两套客户端信息访问认证服务器登录接口,都可以成功获取访问令牌access_token

7、JWT
7.1 JWT介绍
JWT即Json Web Token的缩写,具体定义见JWT官网;它是由头Header、负荷payload和签名Signature三部分组成;它是无状态的,由于普通Token的相关信息基本都储存在认证服务器中,因此每次校验token时客户端服务都需要向认证服务器发送check_token请求,jwt则无需进行相关操作,直接可以在客户端校验并解析token
7.2 spring security oauth2 jwt
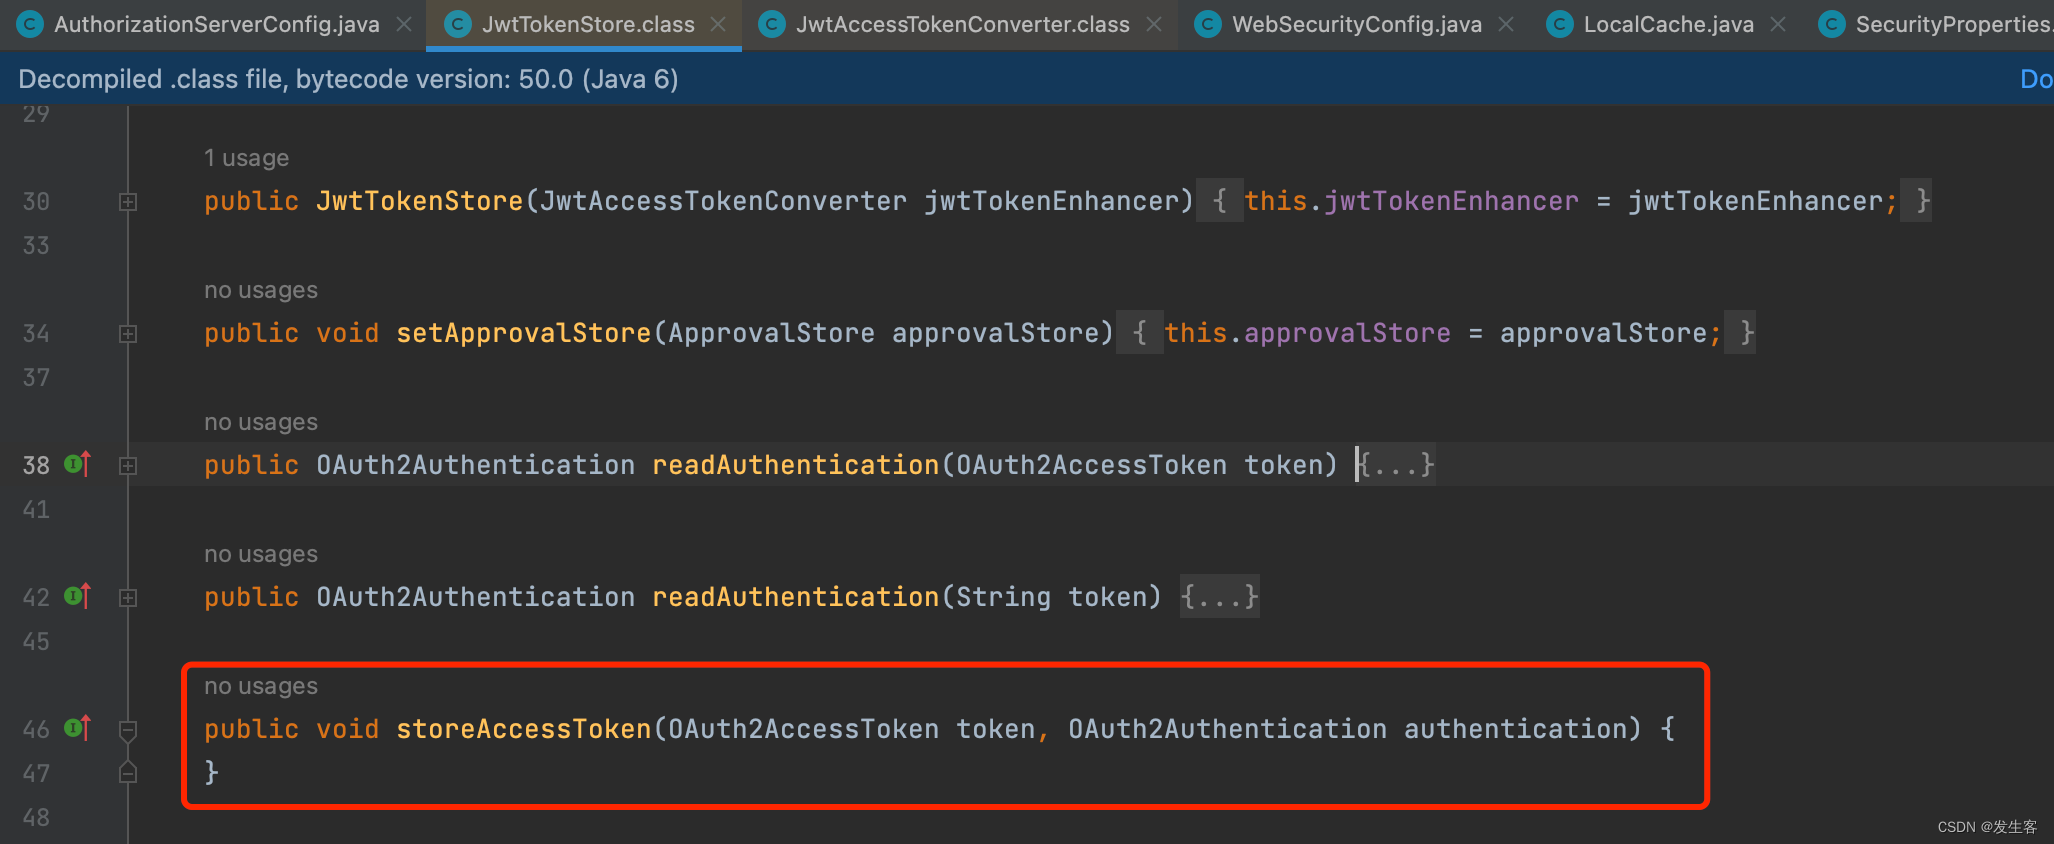
Spring Security Oauth2支持五种TokenStore,默认使用InMemoryTokenStore,将access_token存储在内存中,这种方式不支持认证服务器集群;生产实践中更多的是将其存储到数据库或者缓存中,如果是jwtToken则不存储,下图中可以发现JwtTokenStore类中保存access_token的方法storeAccessToken为空实现;下面是五种令牌仓库
- InMemoryTokenStore:默认存储,保存在内存
- JdbcTokenStore:access_token存储在数据库
- JwtTokenStore:JWT这种方式比较特殊,这是一种无状态方式的存储,不进行内存、数据库存储,只是JWT中携带全面的用户信息,保存在jwt中携带过去校验
- RedisTokenStore:将 access_token 存到 redis 中
- JwkTokenStore:将 access_token 保存到 JSON Web Key
在配置类SecurityConfig中添加jwtTokenStore
@Configuration
public class SecurityConfig {
    @Bean
    public TokenStore jwtTokenStore() {
        return new JwtTokenStore(jwtAccessTokenConverter());
    }
    @Bean
    public JwtAccessTokenConverter jwtAccessTokenConverter() {
        JwtAccessTokenConverter accessTokenConverter = new JwtAccessTokenConverter();
        accessTokenConverter.setSigningKey("jwtTest");
        return accessTokenConverter;
    }
在认证服务器端点配置中加入jwtTokenStore
@Autowired
private TokenStore jwtTokenStore;
@Autowired
private JwtAccessTokenConverter jwtAccessTokenConverter;
@Override
public void configure(AuthorizationServerEndpointsConfigurer endpoints) throws Exception {
endpoints.authenticationManager(authenticationManager)
.tokenStore(jwtTokenStore)
.accessTokenConverter(jwtAccessTokenConverter);
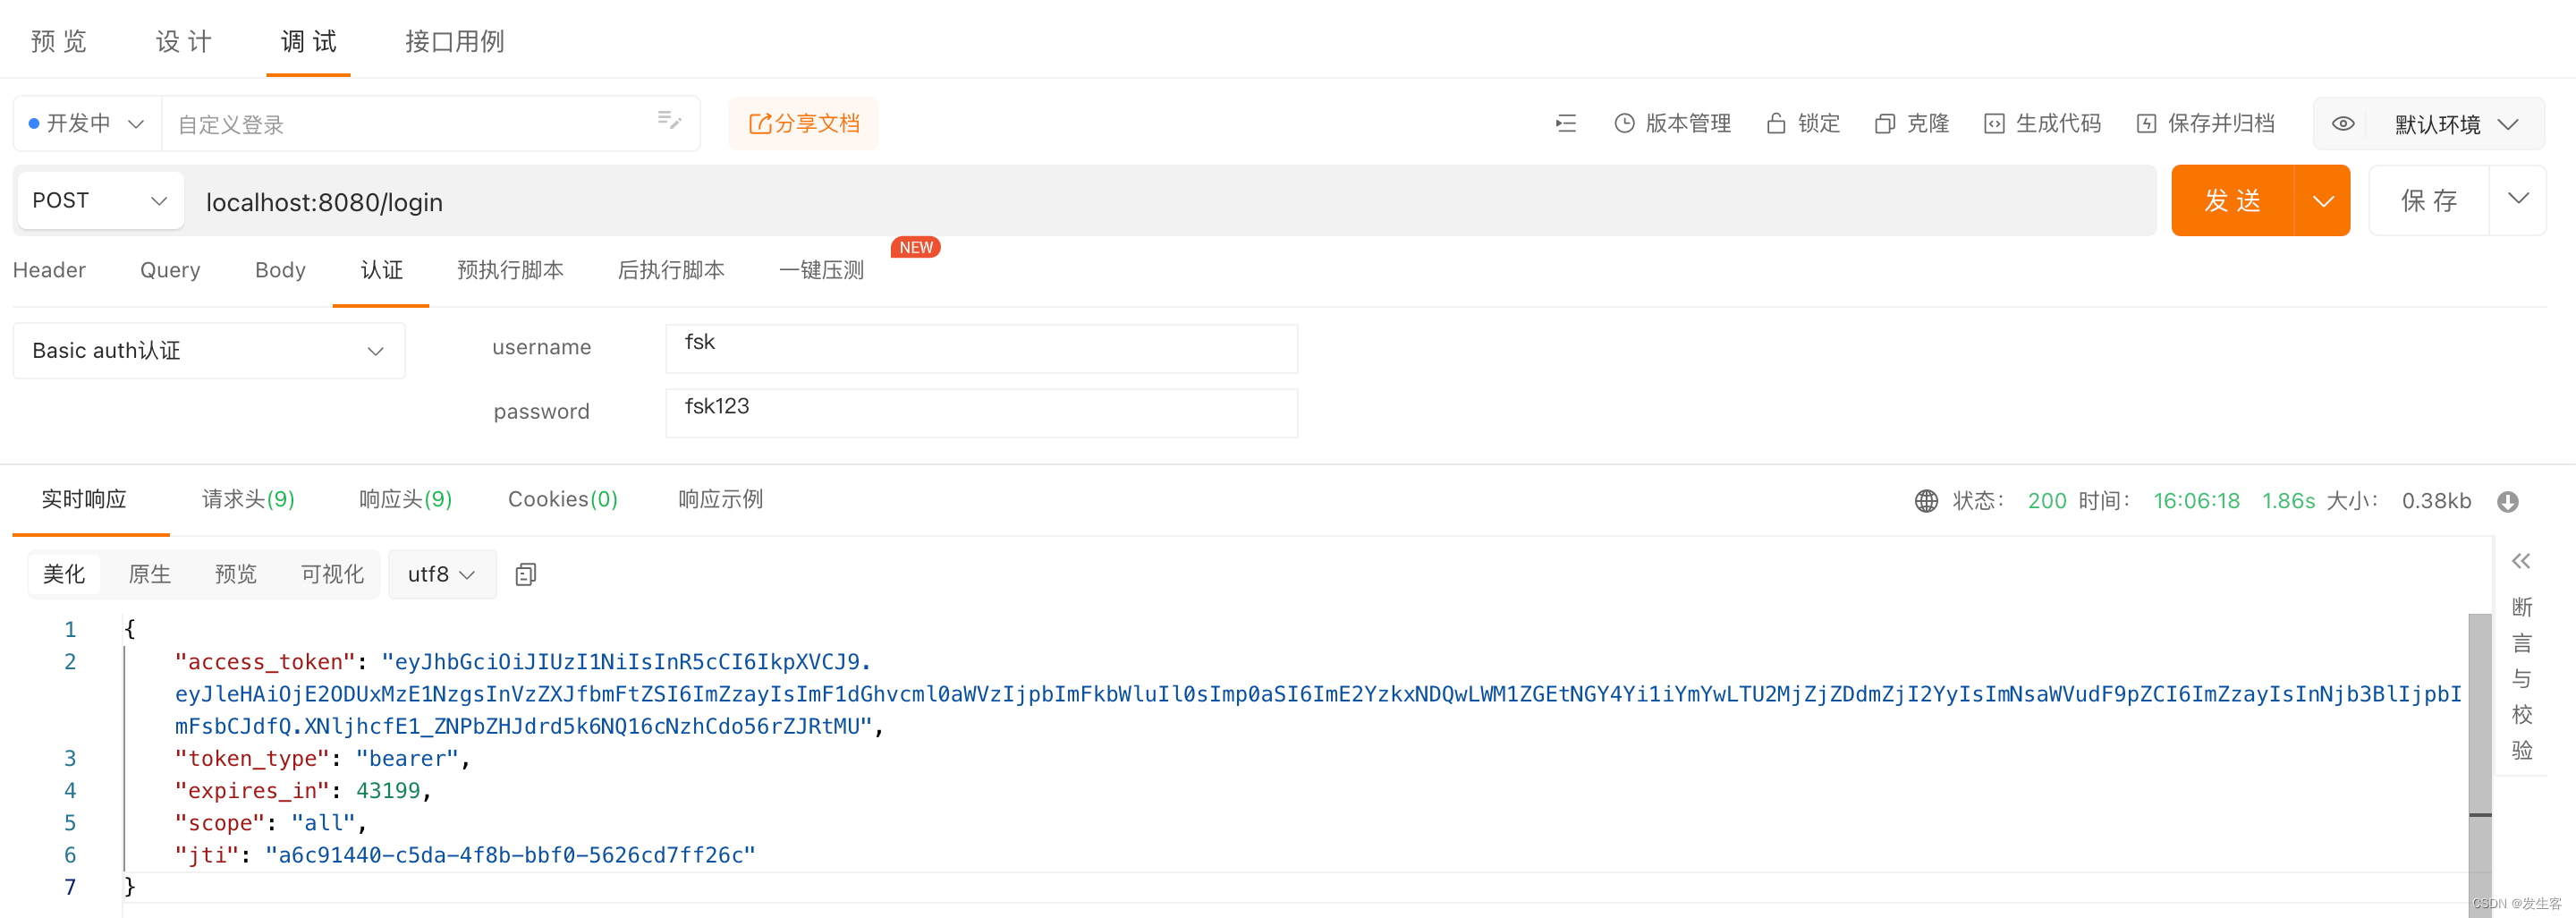
}启动服务并调用登录接口,可以发现返回的access_token不再是uuid
将token复制进JWT官网,可以在其右侧看到解析结果;exp是到期时间戳,jti是JwtID

7.3 JWT增强
在使用jwtToken进行认证时,原生token携带的字段可能不满足用户的需求,这里可以对token进行增强处理,根据业务需要在token中添加字段;首先创建Token增强类JWTokenEnhancer并实现TokenEnhancer接口,重写enhance方法;在这里向Token新增用户性别sex和年龄age字段
@Component
public class JWTokenEnhancer implements TokenEnhancer {
    @Override
    public OAuth2AccessToken enhance(OAuth2AccessToken oAuth2AccessToken, OAuth2Authentication oAuth2Authentication) {
        Map<String, Object> info = new HashMap<>();
        info.put("sex", "man");
        info.put("age", "25");
        ((DefaultOAuth2AccessToken) oAuth2AccessToken).setAdditionalInformation(info);
        return oAuth2AccessToken;
    }
}
在认证服务器配置类AuthorizationServerConfig中将其加入到端点配置中,由于token可以被多次增强,因此他被设计成链式结构
@Autowired
private JWTokenEnhancer jwtTokenEnhancer;
@Override
public void configure(AuthorizationServerEndpointsConfigurer endpoints) throws Exception {
endpoints.authenticationManager(authenticationManager)
.tokenStore(jwtTokenStore)
.accessTokenConverter(jwtAccessTokenConverter)
.tokenEnhancer(tokenEnhancerChain());
}
private TokenEnhancerChain tokenEnhancerChain(){
TokenEnhancerChain tokenEnhancerChain = new TokenEnhancerChain();
List<TokenEnhancer> tokenEnhancers = new ArrayList<>();
tokenEnhancers.add(jwtTokenEnhancer);
tokenEnhancers.add(jwtAccessTokenConverter);
tokenEnhancerChain.setTokenEnhancers(tokenEnhancers);
return tokenEnhancerChain;
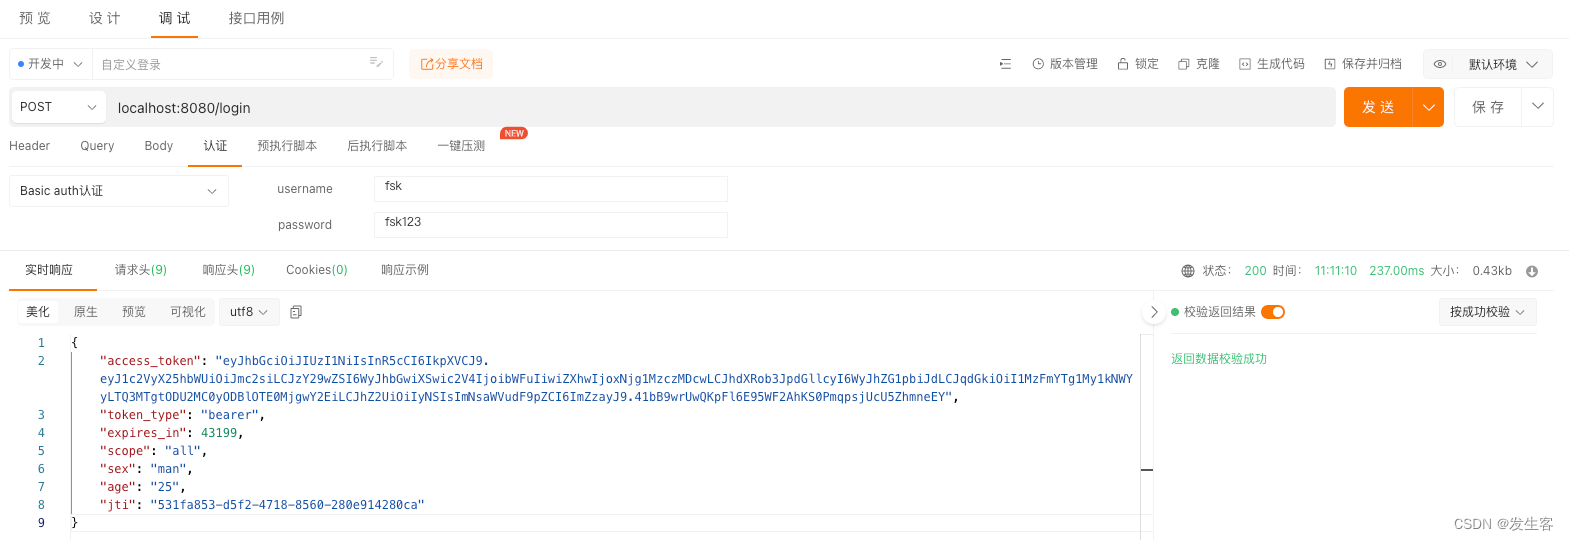
}启动服务并调用登录接口,可在返回结果中看到用户的性别和年龄
将token复制到JWT官网对其进行解析,可以在解析结果中看到用户性别和年龄字段

7.4 JWT资源服务器对接
创建资源服务器工程hello-security-oauth2-client,并添加相关依赖
<?xml version="1.0" encoding="UTF-8"?>
<project xmlns="http://maven.apache.org/POM/4.0.0" xmlns:xsi="http://www.w3.org/2001/XMLSchema-instance"
         xsi:schemaLocation="http://maven.apache.org/POM/4.0.0 https://maven.apache.org/xsd/maven-4.0.0.xsd">
    <modelVersion>4.0.0</modelVersion>
    <parent>
        <groupId>org.springframework.boot</groupId>
        <artifactId>spring-boot-starter-parent</artifactId>
        <version>2.1.6.RELEASE</version>
        <relativePath/>
    </parent>
    <groupId>com.fsk</groupId>
    <artifactId>hello-security-oauth2-client</artifactId>
    <version>0.0.1-SNAPSHOT</version>
    <name>hello-security-oauth2-client</name>
    <description>hello-security-oauth2-client</description>
    <properties>
        <java.version>1.8</java.version>
        <spring-cloud.version>Greenwich.SR1</spring-cloud.version>
    </properties>

    <dependencies>
        <dependency>
            <groupId>org.springframework.boot</groupId>
            <artifactId>spring-boot-starter-web</artifactId>
        </dependency>
        <dependency>
            <groupId>org.springframework.cloud</groupId>
            <artifactId>spring-cloud-starter</artifactId>
        </dependency>
        <dependency>
            <groupId>org.springframework.cloud</groupId>
            <artifactId>spring-cloud-starter-oauth2</artifactId>
        </dependency>
        <dependency>
            <groupId>org.springframework.cloud</groupId>
            <artifactId>spring-cloud-starter-security</artifactId>
        </dependency>
    </dependencies>
    <dependencyManagement>
        <dependencies>
            <dependency>
                <groupId>org.springframework.cloud</groupId>
                <artifactId>spring-cloud-dependencies</artifactId>
                <version>${spring-cloud.version}</version>
                <type>pom</type>
                <scope>import</scope>
            </dependency>
        </dependencies>
    </dependencyManagement>
    <build>
        <plugins>
            <plugin>
                <groupId>org.springframework.boot</groupId>
                <artifactId>spring-boot-maven-plugin</artifactId>
            </plugin>
        </plugins>
    </build>
</project>
创建资源服务器
@Configuration
@EnableResourceServer
public class ResourceServerConfig extends ResourceServerConfigurerAdapter {
    @Override
    public void configure(HttpSecurity http) throws Exception {
        http.authorizeRequests()
                .anyRequest().authenticated()
                .and().requestMatchers().antMatchers("/user/**");
    }
}
创建用户接口/user/getInfo
@RestController
public class UserController {
    @GetMapping("/user/getInfo")
    public Object index(Authentication authentication){
        return authentication;
    }
}
在配置文件中添加JWT配置,keyValue需和认证服务器JwtAccessTokenConverter类中保持一致
security:
oauth2:
resource:
jwt.key-value: jwtTest
server:
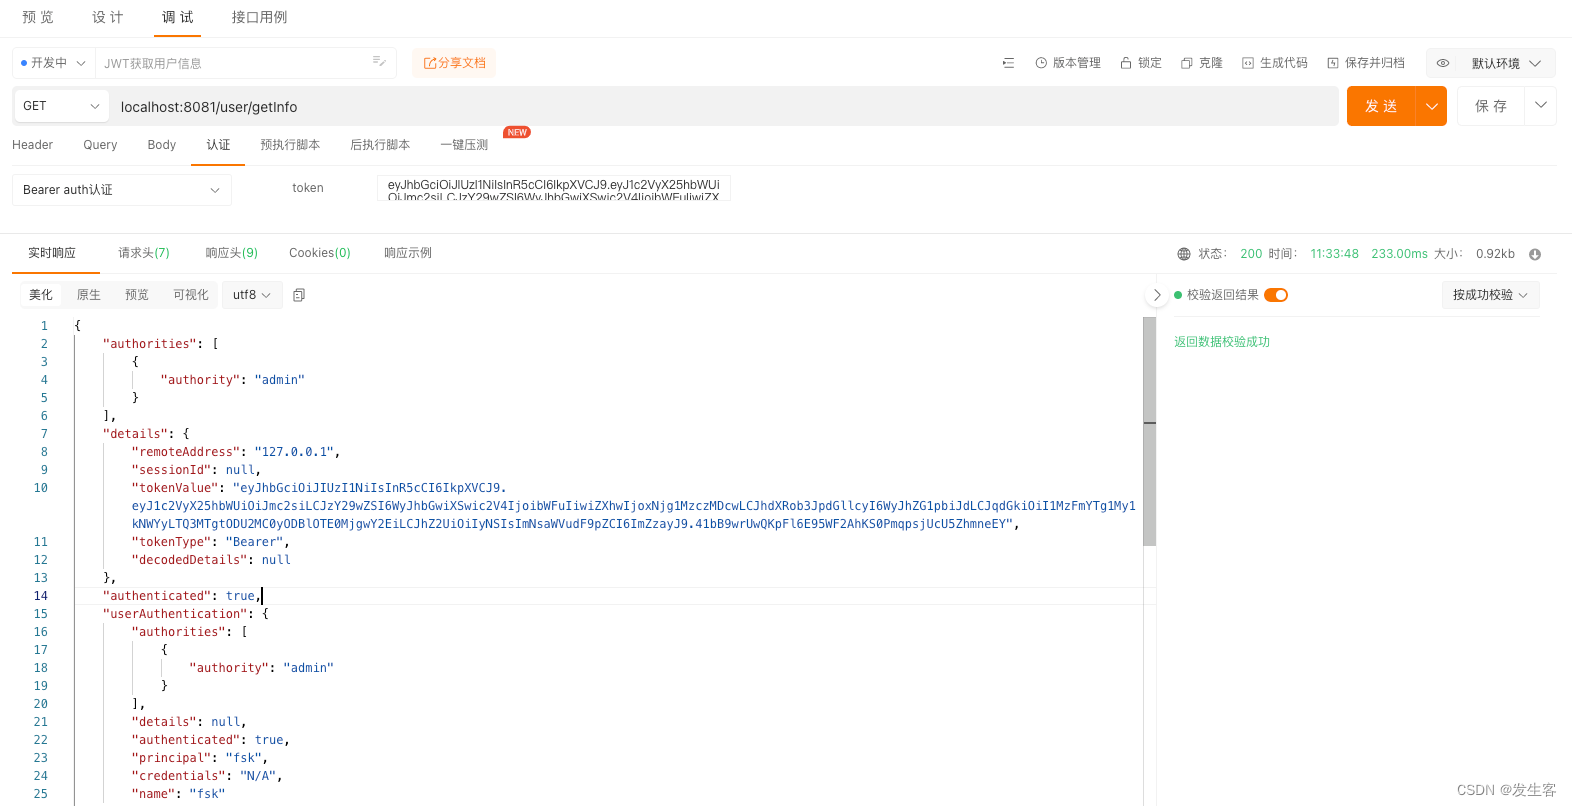
port: 8081用上一步的token访问资源服务器用户接口,访问成功并返回用户认证信息
7.5 解析JWT
如果客户端需要在代码里解析token,添加jwt依赖
<dependency>
    <groupId>io.jsonwebtoken</groupId>
    <artifactId>jjwt</artifactId>
    <version>0.9.1</version>
</dependency>
在控制器中创建获取用户详情接口,signingKey需和认证服务器JwtAccessTokenConverter类中保持一致
@GetMapping("/user/getDetail")
public Object getDetail(HttpServletRequest request){
    String authentication = request.getHeader("Authorization");
    String token = authentication.replace("Bearer ", "");
    return Jwts.parser().setSigningKey("jwtTest".getBytes()).parseClaimsJws(token).getBody();
}
启动服务并访问用户详情接口/user/getDetail

8、源码地址

旨在为数千万中国开发者提供一个无缝且高效的云端环境,以支持学习、使用和贡献开源项目。
更多推荐


 5
5 0
0- 0


 已为社区贡献1条内容

所有评论(0)