

Linux——ssh服务
ssh是一个远程登录相关的协议,主要的用途是登陆到远程电脑中执行命令。叫安全外壳协议(ecureell),是一种加密的网络传输协议,可在不安全的网络中为网络服务提供安全的传输环境。ssh服务: 实现远程登录和远程控制,在网络上传输的数据是加密的SSH 是一种协议, 存在多种实现,既有商业实现,也有开源实现(OSSH,OpenSSH)。本文使用的自有软件 OpenSSH, 毕竟它是目前最流行的 SS
ssh是什么?
ssh是一个远程登录相关的协议,主要的用途是登陆到远程电脑中执行命令。SSH 叫安全外壳协议(Secure Shell),是一种加密的网络传输协议,可在不安全的网络中为网络服务提供安全的传输环境。
ssh服务: 实现远程登录和远程控制,在网络上传输的数据是加密的
SSH 是一种协议, 存在多种实现,既有商业实现,也有开源实现(OSSH,OpenSSH)。本文使用的自有软件 OpenSSH, 毕竟它是目前最流行的 SSH 实现,而且是所有操作系统的默认组件。
Openssh 是一个安全的shell,是一个远程登录的程序,帮助我们在远程的机器上执行命令,控制远程机器
SSH服务--》守护进程(一直在内存里运行的进程)--》sshd
安装
默认linux系统是安装,centos系统默认安装
Ubuntu需要指定安装
[root@localhost lianxi]# rpm -qa|grep openssh
openssh-clients-7.4p1-21.el7.x86_64   --》提供工具的
openssh-7.4p1-21.el7.x86_64          --》提供工具的
openssh-server-7.4p1-21.el7.x86_64   --》提供ssh 服务的
查看sshd的进程树
[root@localhost lianxi]# pstree -p|grep sshd
           |-sshd(1179)-+-sshd(12759)---bash(12766)
| `-sshd(15353)---bash(15360)-+-grep(18956)查看sshd是否运行?(对这些命令不熟悉的可以看另一篇文档:Linux系统性能监控)
1.看进程
ps aux
pidof
pstree
[root@sanchuang ~]# ps aux|grep  sshd
root       1082  0.0  0.2 112900  4328 ?        Ss   09:42   0:00 /usr/sbin/sshd -D  主进程
root       1602  0.0  0.3 161512  6096 ?        Ss   09:42   0:00 sshd: root@pts/0   连接到linux系统里的进程
root       1656  0.0  0.0 112824   984 pts/0    S+   10:01   0:00 grep --color=auto sshd
[root@sanchuang ~]#
2.看端口
[root@sanchuang ~]# netstat -anplut  查看本机开放了哪些端口,允许其他人连接过来
Active Internet connections (servers and established)
Proto Recv-Q Send-Q Local Address           Foreign Address         State       PID/Program name
tcp        0      0 0.0.0.0:22              0.0.0.0:*               LISTEN      1664/sshd
tcp        0      0 127.0.0.1:25            0.0.0.0:*               LISTEN      1248/master
tcp        0      0 192.168.2.197:22        192.168.2.123:60946     ESTABLISHED 1665/sshd: root@pts
tcp        0     36 192.168.2.197:22        192.168.2.123:60447     ESTABLISHED 1602/sshd: root@pts
tcp6       0      0 :::22                   :::*                    LISTEN      1664/sshd
tcp6       0      0 ::1:25                  :::*                    LISTEN      1248/master
udp        0      0 127.0.0.1:323           0.0.0.0:*                           713/chronyd
udp        0      0 192.168.2.197:45460     116.203.151.74:123      ESTABLISHED 713/chronyd
udp6       0      0 ::1:323                 :::*                                713/chronyd
127.0.0.1 代表本机的地址 ---》自己,任何一台机器都有这个地址
192.168.2.197 就是ens33接口配置的ip地址
0.0.0.0 代表本机的任意ip,所有的ip地址
LISTEN 表示监听,理解为已经打开了的端口
ESTABLISHED 表示已经建立连接,通过网络有人已经连接到你的机器了
[root@sanchuang ~]# w  查看有哪些人登录进入我们的linux系统了

 10:13:44 up 32 min,  3 users,  load average: 0.01, 0.03, 0.05
USER     TTY      FROM             LOGIN@   IDLE   JCPU   PCPU WHAT
root     tty1                      09:42   31:12   0.02s  0.02s -bash
root     pts/0    192.168.2.123    09:42    7:44   0.13s  0.13s -bash
root     pts/1    192.168.2.123    10:04    0.00s  0.05s  0.00s w
[root@sanchuang ~]# ss -anplut
Netid State Recv-Q Send-Q Local Address:Port Peer Address:Port
udp UNCONN 0 0 127.0.0.1:323 *:* users:(("chronyd",pid=713,fd=5))
udp UNCONN 0 0 [::1]:323 [::]:* users:(("chronyd",pid=713,fd=6))
tcp LISTEN 0 128 *:22 *:* users:(("sshd",pid=1664,fd=3))
tcp LISTEN 0 100 127.0.0.1:25 *:* users:(("master",pid=1248,fd=13))
tcp LISTEN 0 128 [::]:22 [::]:* users:(("sshd",pid=1664,fd=4))
tcp LISTEN 0 100 [::1]:25 [::]:* users:(("master",pid=1248,fd=14))[root@sanchuang ~]# yum install lsof -y 安装lsof软件
[root@sanchuang ~]# lsof -i:22
COMMAND PID USER FD TYPE DEVICE SIZE/OFF NODE NAME
sshd 1602 root 3u IPv4 21189 0t0 TCP sanchuang:ssh->192.168.2.123:60447 (ESTABLISHED)
sshd 1664 root 3u IPv4 24115 0t0 TCP *:ssh (LISTEN)
sshd 1664 root 4u IPv6 24117 0t0 TCP *:ssh (LISTEN)
sshd 1665 root 3u IPv4 24982 0t0 TCP sanchuang:ssh->192.168.2.123:60946 (ESTABLISHED)[root@localhost lianxi]# rpm -qi openssh-server
Name : openssh-server
Version : 7.4p1
Release : 21.el7
Architecture: x86_64
Install Date: 2022年10月28日 星期五 21时21分56秒
Group : System Environment/Daemons
Size : 993586
License : BSD
Signature : RSA/SHA256, 2019年08月23日 星期五 05时37分29秒, Key ID 24c6a8a7f4a80eb5
Source RPM : openssh-7.4p1-21.el7.src.rpm
Build Date : 2019年08月09日 星期五 09时40分49秒
Build Host : x86-01.bsys.centos.org
Relocations : (not relocatable)
Packager : CentOS BuildSystem <http://bugs.centos.org>
Vendor : CentOS
URL : http://www.openssh.com/portable.html
Summary : An open source SSH server daemon
Description :
OpenSSH is a free version of SSH (Secure SHell), a program for logging
into and executing commands on a remote machine. This package contains
the secure shell daemon (sshd). The sshd daemon allows SSH clients to
securely connect to your SSH server.
[root@localhost lianxi]# 配置文件目录:/etc/ssh
配置文件的作用就是给应用程序传递参数
sshd_config --》服务器端的配置文件
ssh_config --》客户端命令的配置文件
进程名字: sshd -->sshd daemon
占用的端口号是:22
sshd_config --》sshd进程的配置文件
#Port 22 告诉sshd进程占用22号端口
端口号:
1~1024 都是一些(经典)常见的服务使用的,很多操作系统预留的端口
端口的范围:0~65535 1~65536
[root@localhost ssh]# service sshd restart 重启sshd服务
Redirecting to /bin/systemctl restart sshd.service
关闭selinux服务,这个服务会加强linux的安全性,当我们去修改sshd服务的端口号的时候,会被拒绝
配置
目录 /etc/ssh
配置文件:给进程传递参数的
[root@nameserver ssh]# cd /etc/ssh/
sshd_config  --》服务器端的配置文件  server   --》进程:sshd
ssh_config --》ssh命令使用的配置文件 client  --》进程:ssh
ssh_host_ecdsa_key.pub  --》ecdsa加密算法的公钥
ssh_host_ecdsa_key    --》ecdsa加密算法的私钥
日志文件
/var/log/secure
rsyslogd 是专门给linux系统和其他的程序记日志的服务
日志进行了分类:
authpriv :与权限认证相关的
crond : 计划任务
mail: 邮件
kern: 内核相关的
local7 : boot相关的
等
sshd 它自己没有日志记录功能,它外包给了rsyslogd

关闭selinux和防火墙
开机不要启动
关闭防火墙(开机不启动): systemctl disable firewalld
关闭selinux:
selinux 是linux系统里的一套安全机制,用来保护linux系统的安全,会限制进程去做某些对安全有威胁的事情
永久修改selinux的策略为disabled
root@localhost ssh]# vim /etc/selinux/config
SELINUX=disabled
[root@localhost ssh]# getenforce  查看selinux的状态
Enforcing
[root@localhost ssh]# setenforce 0  临时调整selinux的策略为宽容模式
[root@localhost ssh]# getenforce
Permissive
修改sshd进程的端口号和禁止root用户登录
修改端口号为2244端口 (在配置文件里修改 /etc/ssh/sshd_config)
Port 2244
禁用root用户登录
PermitRootLogin no
添加欢迎横幅文件
Banner /etc/ssh/welcome.txt
[root@fengdeyong ssh]# cat /etc/ssh/welcome.txt
welcome to sanchuang ssh server
[root@localhost ssh]# getenforce 查看selinux的状态
Enforcing 强制执行的
[root@localhost ssh]# setenforce 0 临时关闭selinux 1 开启selinux
[root@localhost ssh]# getenforce
Permissive 宽容模式[root@localhost ssh]# netstat -anplut 查看本机开放了哪些端口
Active Internet connections (servers and established)
Proto Recv-Q Send-Q Local Address Foreign Address State PID/Program name
tcp 0 0 0.0.0.0:3001 0.0.0.0:* LISTEN 20257/sshd
tcp 0 0 127.0.0.1:25 0.0.0.0:* LISTEN 1359/master
tcp 0 0 192.168.227.144:22 192.168.227.1:58818 ESTABLISHED 12759/sshd: root@pt
tcp 0 0 192.168.227.144:22 192.168.227.1:59598 ESTABLISHED 15353/sshd: root@pt
tcp6 0 0 :::3001 :::* LISTEN 20257/sshd
tcp6 0 0 ::1:25 :::* LISTEN 1359/master
udp 0 0 0.0.0.0:68 0.0.0.0:* 12585/dhclient
udp 0 0 127.0.0.1:323 0.0.0.0:* 842/chronyd
udp 0 0 192.168.227.144:45793 31.3.135.232:123 ESTABLISHED 842/chronyd
udp6 0 0 ::1:323 :::* 842/chronyd
[root@localhost ssh]# 0.0.0.0 代表任意ip地址
[root@localhost ssh]# netstat -anplut|grep LISTEN
tcp        0      0 0.0.0.0:3001            0.0.0.0:*               LISTEN      20257/sshd
tcp        0      0 127.0.0.1:25            0.0.0.0:*               LISTEN      1359/master
tcp6       0      0 :::3001                 :::*                    LISTEN      20257/sshd
tcp6       0      0 ::1:25                  :::*                    LISTEN      1359/master
关闭防火墙,因为防火墙开启不允许3001端口随便进入的
[root@localhost lianxi]# service firewalld stop
Redirecting to /bin/systemctl stop firewalld.service
需要关闭selinux和Firewalld防火墙服务,不然ssh不能正常的运行和访问。
ssh远程连接不上,如何排查??
1.sshd进程是否开启
[root@sanchuang ssh]# service sshd start
Redirecting to /bin/systemctl start sshd.service
[root@sanchuang ssh]# service sshd status
Redirecting to /bin/systemctl status sshd.service
● sshd.service - OpenSSH server daemon
   Loaded: loaded (/usr/lib/systemd/system/sshd.service; enabled; vendor preset: enabled)
   Active: active (running) since 一 2022-11-07 11:20:52 CST; 7s ago
     Docs: man:sshd(8)
           man:sshd_config(5)
 Main PID: 2001 (sshd)
   CGroup: /system.slice/sshd.service
           └─2001 /usr/sbin/sshd -D

11月 07 11:20:52 sanchuang systemd[1]: Starting OpenSSH server daemon...
11月 07 11:20:52 sanchuang sshd[2001]: Server listening on 0.0.0.0 port 22.
11月 07 11:20:52 sanchuang systemd[1]: Started OpenSSH server daemon.
11月 07 11:20:52 sanchuang sshd[2001]: Server listening on :: port 22.
2.查看ip地址是否发生改变
公司内部一般服务器都会使用固定ip,不会变化的
3.防火墙或者selinux
service firewalld stop
getenforce 查看selinux的状态
setenforce 0 临时关闭
永久关闭 vim /etc/selinux/config
SELINUX=disabled
4.查看端口号
查看主配置文件里的端口号和是否禁用root用户
远程登陆的命令
ssh的命令的使用
1.只是登陆
[root@manager161 .ssh]# ssh root@192.168.0.180  --》推荐
[daijun@manager161 ~]$ ssh 192.168.0.180  不指定登陆用户,默认会使用当前的用户名远程连接
[daijun@manager161 ~]$ ssh -l root 192.168.0.180
root@192.168.0.180's password:
Last login: Sat Jun 26 11:27:12 2021 from 192.168.0.163
[root@www ~]# exit  退出
登出
Connection to 192.168.0.180 closed.
[daijun@manager161 ~]$
2.运行远程机器上的脚本或者命令
[root@manager161 .ssh]# ssh 192.168.0.180  mkdir  /luogg{1..10}
[root@manager161 .ssh]# ssh 192.168.0.180  sudo mkdir  /danyh{1..10}
[root@manager161 .ssh]#
[root@manager161 .ssh]# ssh 192.168.0.180  sudo bash /lianxi/scan_lan_ip.sh
-p 指定端口号
sftp命令
SFTP(Secure File Transfer Protocol,安全文件传输协议)是一种基于可靠数据流(data stream),提供文件存取和管理的网络传输协议
因为 SFTP 是基于 SSH 协议的,所以默认的身份认证方法与 SSH 协议保持一致。通常我们使用 SSH Key 来进行连接,如果你已经可以使用 SSH 连接到远程服务器上,那么可以使用以下命令来连接 SFTP:
sftp user_name@remote_server_address[:path]如果远程服务器自定义了连接的端口,可以使用 -P 参数:
sftp -P remote_port user_name@remote_server_address[:path]从远程服务器拉取文件
使用 get 命令可以从远程服务器拉取文件到本地:
sftp> get remoteFile [newName]如果不指定 newName,将使用和远程服务器相同的文件名。
使用 -r 参数可以拉取整个目录:
sftp> get -r remoteDirectory从本地上传文件到服务器
使用 put 命令可以从本地上传文件到服务器:
sftp> put localFile同样的,可以使用 -r 参数来上传整个目录,但是有一点要注意,如果服务器上不存在这个目录需要首先新建:
sftp> mkdir folderName
sftp> put -r folderName
scp命令
scp命令推送文件在linux服务器之间
[root@manager161 lianxi9]# scp mkdir.sh root@192.168.0.180:/root
mkdir.sh                                                      100%   42    10.9KB/s   00:00
[root@manager161 lianxi9]#
[root@manager161 lianxi9]# scp root@192.168.0.180:/etc/passwd  .
passwd                                                        100% 1792   953.1KB/s   00:00
[root@manager161 lianxi9]# ls
mkdir.sh  passwd
[root@manager161 lianxi9]#
[root@manager161 lianxi9]# scp -r root@192.168.0.180:/boot  .   复制文件需要接-r选项


[root@manager161 lianxi9]# cat mkdir.sh    是具体需要做什么工作的脚本
for i in {1..10}
do
	mkdir -p feng$i
done
[root@manager161 lianxi9]# cat ctrl_mysql.sh   实现传递脚本到服务器,然后执行传递过去脚本
for i in {1..100}
do
	scp  /lianxi9/mkdir.sh root@192.168.0.$i:/root
	ssh root@192.168.0.$i bash /root/mkdir.sh
done
2台机器之间建立免密通道
密钥:
1.公钥 可以公开的钥匙--》给其他人使用的 public key
2.私钥 私人持有不公开的钥匙 --》自己使用 --》private key
公钥和私钥是成对出现的,2个不同的钥匙
对称加密: 2边使用的秘钥是一样的
非对称加密 : 2边使用的钥匙不一样
service firewalld stop 立即停止防火墙服务
systemctl disable firewalld 设置防火墙服务开机不要启动
[root@sanchuang ~]# vim /etc/ssh/sshd_config
启用运行root用户登录
PermitRootLogin yes
[root@sanchuang ~]# service sshd restart
Redirecting to /bin/systemctl restart sshd.service
2台机器默认是允许root用户登录,打开端口是22号
client: 192.168.223.205
server: 192.168.223.206
拓展:数字签名的过程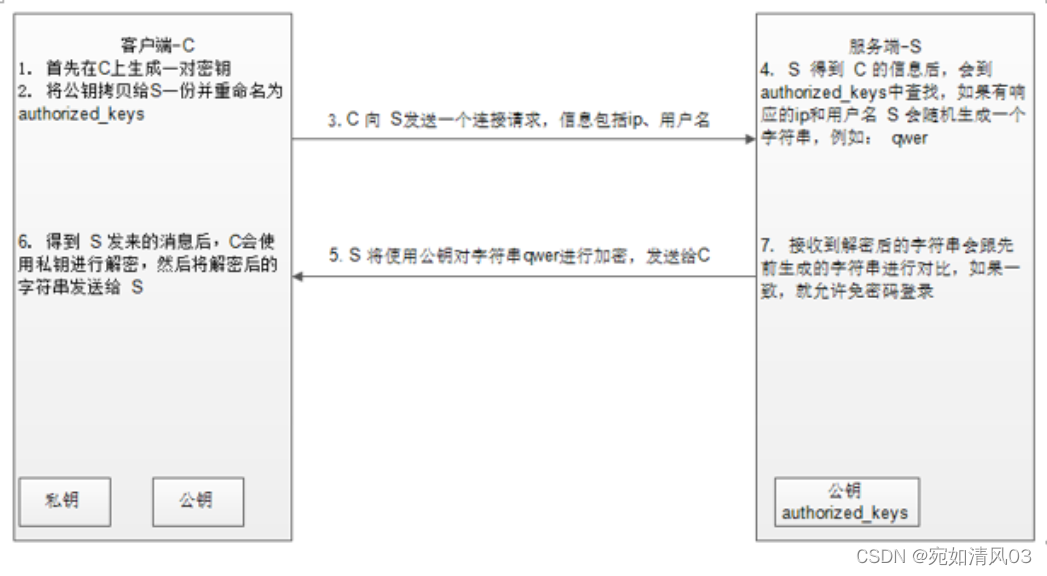
免密通道建立步骤如下:
单向信任关系
1.在主机①上使用root用户登录,产生公钥和私钥对
[root@web1 ~]# ssh-keygen
Generating public/private rsa key pair.
Enter file in which to save the key (/root/.ssh/id_rsa):
Enter passphrase (empty for no passphrase):              注意不要设置密码
Enter same passphrase again:
Your identification has been saved in /root/.ssh/id_rsa.
Your public key has been saved in /root/.ssh/id_rsa.pub.
The key fingerprint is:
SHA256:ZvOCnkzIgPloPf1NQG7G9i5NSUCGOxQ8JKUWnkSUCu8 root@web1
The key's randomart image is:
+---[RSA 2048]----+
|  o*=++o         |
|. o.==..         |
|...=. o..        |
| +o  o+  .       |
|o..   .BS .      |
| oEo..++o=       |
|...oo.o +o.      |
|.   .+.o+o       |
|      +..o       |
+----[SHA256]-----+
查看生成的密钥对
[root@web1 ~]# cd ~/.ssh
[root@web1 .ssh]# ls
authorized_keys  boot  hosts  id_rsa  id_rsa.pub  known_hosts
[root@web1 .ssh]# ll
总用量 20
-rw-------. 1 root root  397 11月  7 2022 authorized_keys
dr-xr-xr-x  4 root root  246 5月  14 15:13 boot
-rw-r--r--  1 root root  158 5月  14 15:12 hosts
-rw-------  1 root root 1679 5月  14 16:07 id_rsa      密钥对
-rw-r--r--  1 root root  391 5月  14 16:07 id_rsa.pub
-rw-r--r--  1 root root  184 5月  14 15:06 known_hosts
2.上传公钥到主机②
(如果端口号不是22的话要指定端口号,例如: ssh-copy-id -p 3001 root@192.168.223.206)
方法一:生成authorized_keys文件
cat ~/.ssh/id_dsa.pub >> ~/.ssh/authorized_keys生成authorized_keys文件完成后主机①对自己的所有操作都是免密了,同理我们只要将authorized_keys文件拷贝至主机②中,那么主机①对主机②的操作也可以达到免密效果
拷贝authorized_keys到主机②
先在主机②中执行命令(该命令的目的是为了生成.ssh目录)
ssh-keygen -t dsa -P ‘’ -f ~/.ssh/id_dsa在主机①中执行命令将authorized_keys拷贝至主机②:
scp ~/.ssh/authorized_keys root@centos2:~/.ssh方法二:ssh-copy-id 命令会自动将公钥上传到主机②的/root/.ssh/authorized_keys
[root@web1 .ssh]# ssh-copy-id root@192.168.223.206
/usr/bin/ssh-copy-id: INFO: Source of key(s) to be installed: "/root/.ssh/id_rsa.pub"
The authenticity of host '192.168.223.206 (192.168.223.206)' can't be established.
ECDSA key fingerprint is SHA256:tv3msGixbmim9N4hYLyqOqiajlci5JvPLv2gb4P7/3g.
ECDSA key fingerprint is MD5:04:b8:d8:6a:71:06:26:63:0a:1f:d3:67:0d:3a:07:2a.
Are you sure you want to continue connecting (yes/no)? yes
/usr/bin/ssh-copy-id: INFO: attempting to log in with the new key(s), to filter out any that are already installed
/usr/bin/ssh-copy-id: INFO: 1 key(s) remain to be installed -- if you are prompted now it is to install the new keys
root@192.168.223.206's password:

Number of key(s) added: 1

Now try logging into the machine, with:   "ssh 'root@192.168.223.206'"
and check to make sure that only the key(s) you wanted were added.
3.测试密钥认证,免密通道是否创建成功 (如果端口号不是22的话要指定端口号,例如: ssh -p ‘3001’ ‘root@192.168.223.206’)
第1次ssh过去或者ssh-copy-id都是需要输入yes接收公钥,然后再要求输入root的密码
[root@web1 .ssh]# ssh 'root@192.168.223.206'
Last login: Sun May 14 16:01:43 2023
[root@server ~]#
退出远程登陆连接,返回本地的Linux系统命令终端,再次查看.ssh目录下的文件
我们发现原来空空如也的.ssh目录下know_hosts文件
know_hosts : 已知的主机公钥清单
ssh命令远程连接不同服务器时可以选择接受到不同的公钥,会将这些主机的公钥都保存在这里,就是我们第一次连接远程Liunx主机的时候 ,提示给我们的一个授权信息,(就是步骤二中我们选填yes的那一项),只要我们选择yes同意授权后,该授权信息就会保存在本地主机,这样我们下一次连接该远程主机的时候就不会在终端提示是否授权的信息,直接输入密码即可!
双向信任关系
还要在服务器上执行一遍
1.生成密钥对
[root@server .ssh]# ssh-keygen
Generating public/private rsa key pair.
Enter file in which to save the key (/root/.ssh/id_rsa):
Enter passphrase (empty for no passphrase):   注意不要设置密码
Enter same passphrase again:
Your identification has been saved in /root/.ssh/id_rsa.
Your public key has been saved in /root/.ssh/id_rsa.pub.
The key fingerprint is:
SHA256:O4bm0hFhbiwfraagbg6GFxMB5QOV6HQYg1oLkQT4IaE root@server
The key's randomart image is:
+---[RSA 2048]----+
|@%*.             |
|O==o  o          |
|E==o + o         |
|..oo. * .        |
|  o  + +S        |
|. .o  =. .       |
|oo.. +o.+        |
|+o  oo.. .       |
|+o   ..          |
+----[SHA256]-----+
2.上传公钥到主机①
[root@server .ssh]# ssh-copy-id root@192.168.223.205
/usr/bin/ssh-copy-id: INFO: Source of key(s) to be installed: "/root/.ssh/id_rsa.pub"
/usr/bin/ssh-copy-id: INFO: attempting to log in with the new key(s), to filter out any that are already installed
/usr/bin/ssh-copy-id: INFO: 1 key(s) remain to be installed -- if you are prompted now it is to install the new keys
root@192.168.223.205's password:

Number of key(s) added: 1

Now try logging into the machine, with:   "ssh 'root@192.168.223.205'"
and check to make sure that only the key(s) you wanted were added.
3.验证
[root@server .ssh]# ssh root@192.168.223.205
Last login: Sun May 14 16:21:02 2023 from 192.168.223.206
[root@web1 ~]#
建立了免密通道后,有什么好处?
1.可以直接在远程机器上执行命令,不需要输入密码
2.可以直接传输文件,在2台机器直接
[root@ssh-server backup]# scp -P 3001   root@192.168.2.197:/etc/passwd  .
                                              源文件                    目的地
passwd                                                                       100% 4385     1.6MB/s   00:00
[root@ssh-server backup]# ls
passwd
经常可以先编写好脚本,然后scp脚本到其他的服务器,然后再去ssh执行脚本就可以了
举例演示
1.编写好脚本mkdir.sh
[root@ssh-server backup]# ls
mkdir.sh  passwd  sc
[root@ssh-server backup]# vim mkdir.sh
#!/bin/bash

mkdir -p /liujun
cd /liujun
for i in {1..20}
do
    touch liu$i.txt
    mkdir liujun$i
done
2.scp脚本到另外的机器的/root目录下
[root@ssh-server backup]# scp -P 3001  mkdir.sh  root@192.168.2.197:/root
mkdir.sh                                                                     100%  100    42.5KB/s   00:00
3.在远程服务器上执行脚本
[root@ssh-server backup]# ssh  root@192.168.2.197  bash  /root/mkdir.sh
[root@ssh-server backup]# ssh  root@192.168.2.197  ls /liujun
know_hosts文件
在~/.ssh
客户机使用ssh第一次连接服务器时
将服务器上sshd守护进程的公钥复制到本地
存放到本地~/.ssh/known_hosts文件中
每行存放一台服务器的公钥
用来验证服务器的身份
第一次连接过去服务器发送过来的
数据加密+服务器和客户端身份识别(数字签名)
authorized_keys文件
在~/.ssh
存放用来进行合法身份验证 证明你是linux系统的合法用户
登录linux使用
数据加密+服务器和客户端身份识别(数字签名)
删除know_hosts文件和/root/.ssh/authorized_keys有什么破坏作用?
认证方式:1.密码认证 2.密钥认证
密钥认证的过程

如何在xshell里生成密钥对,然后在xshell里使用密钥认证登录linux服务器?
如何在xshell里使用密钥登录你的linux 云服务器(腾讯云,阿里云等)?
参考下面这篇博客:
https://blog.csdn.net/fengyatao00/article/details/121371408
如何做的让内外的服务器只允许堡垒机/跳板机访问?
1.iptables
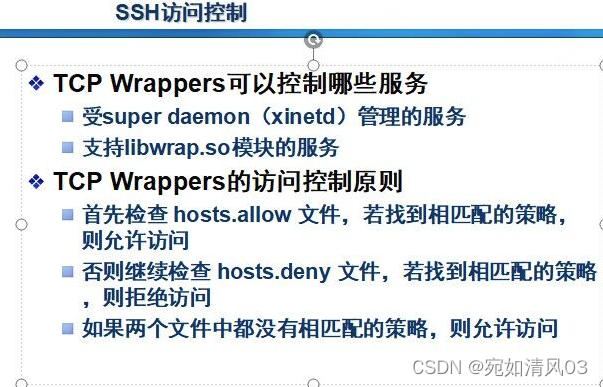
2.tcp wrappers
SSH使用TCP Wrappers实现访问控制
主要配置文件
/etc/hosts.allow --》白名单
/etc/hosts.deny --》黑名单
TCP Wrappers的访问控制原则
首先检查 hosts.allow 文件,若找到相匹配的策略,则允许访问
否则继续检查 hosts.deny 文件,若找到相匹配的策略,则拒绝访问
如果两个文件中都没有相匹配的策略,则允许访问
[root@sanchuang ~]# cat /etc/hosts.deny
sshd:all
[root@sanchuang ~]# cat /etc/hosts.allow
sshd:192.168.2.*,114.11.11.1
[root@sanchuang ~]#
[root@sanchuang ~]# tail   -f /var/log/secure
Nov  8 16:22:39 sanchuang sshd[3701]: refused connect from 192.168.2.198 (192.168.2.198)
Nov  8 16:22:40 sanchuang sshd[3702]: refused connect from 192.168.2.117 (192.168.2.117)
[root@ssh-server .ssh]# ssh -p 3001 root@192.168.2.197
ssh_exchange_identification: read: Connection reset by peer
[root@ssh-server .ssh]#

不需要刷新服务,立马生效
关闭窗口,ssh远程执行的脚本是否继续执行?
默认不运行,会停止
因为HUP信号 ,当父进程关闭的时候,会给子进程发生hup信号,收到hup信号的进程会被内核杀死
信号可以被屏蔽
使用nohup去屏蔽hup信号
& 将这个命令放到后台去运行
ssh连接不上的排错思路?
排错思路:
1.检查进程或者服务是否开启
ps aux|grep sshd
service sshd status
2.检查端口
netstat -anplut
查看sshd listen状态是否存在
3.看日志看错误提醒
[root@sanchuang ~]# service sshd restart
Redirecting to /bin/systemctl restart sshd.service
Job for sshd.service failed because the control process exited with error code. See "systemctl status sshd.service" and "journalctl -xe" for details.
[root@sanchuang ~]#journalctl -xe
4.网络是否通畅
ping
5. 查看tcp wrappers
/etc/hosts.allow
/etc/hosts.deny
第1次ssh过去或者ssh-copy-id都是需要输入yes接收公钥,然后再要求输入root的密码
问题:
需要脚本执行的时候,能自动帮助我们输入yes,然后自动输入密码
1. linux里expect 命令是可以实现交互操作,模拟人输入内容

旨在为数千万中国开发者提供一个无缝且高效的云端环境,以支持学习、使用和贡献开源项目。
更多推荐


 3
3 0
0- 0


 已为社区贡献2条内容

所有评论(0)