

RabbitMQ详解(三):消息模式(fanout、direct、topic、work)
消息模式详解
消费模式
参考官网:https://www.rabbitmq.com/getstarted.html
-
简单模式 Simple, 参考RabbitMQ详解(二):消息模式 Simple(简单)模式
简单模式是最简单的消息模式,它包含一个生产者、一个消费者和一个队列。生产者向队列里发送消息,消费者从队列中获取消息并消费。
-
发布订阅模式 fanout
同时向多个消费者发送消息的模式(类似广播的形式)
-
路由模式 direct
根据路由键选择性给多个消费者发送消息的模式
-
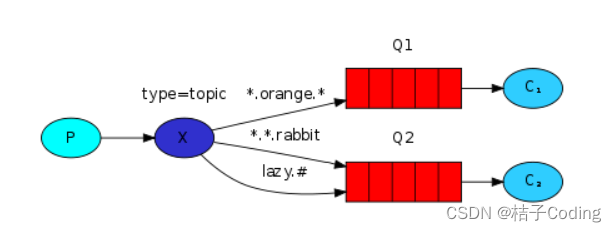
主题模式 topic
是direct模式上的一种叠加,增加了模糊路由RoutingKey的模式
-
工作模式 work
分发机制
-
…
消息模式-fanout(发布订阅)模式
![[外链图片转存失败,源站可能有防盗链机制,建议将图片保存下来直接上传(img-baD08LMN-1683707937152)(RabbitMQ.assets/image-20230429025709492.png)]](https://img-blog.csdnimg.cn/574a4a4bd09644d1b2faf428f91c81cf.png)
- 类型:fanout
- 特点:Fanout—发布与订阅模式,是一种广播机制,它是没有路由key的模式。
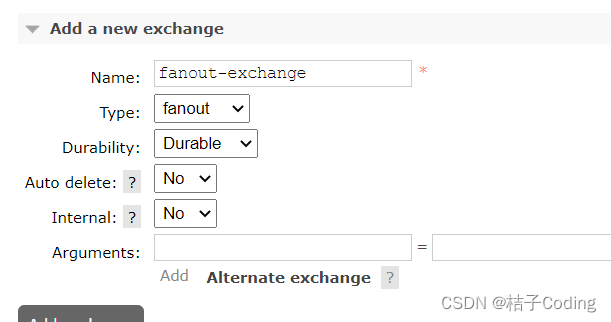
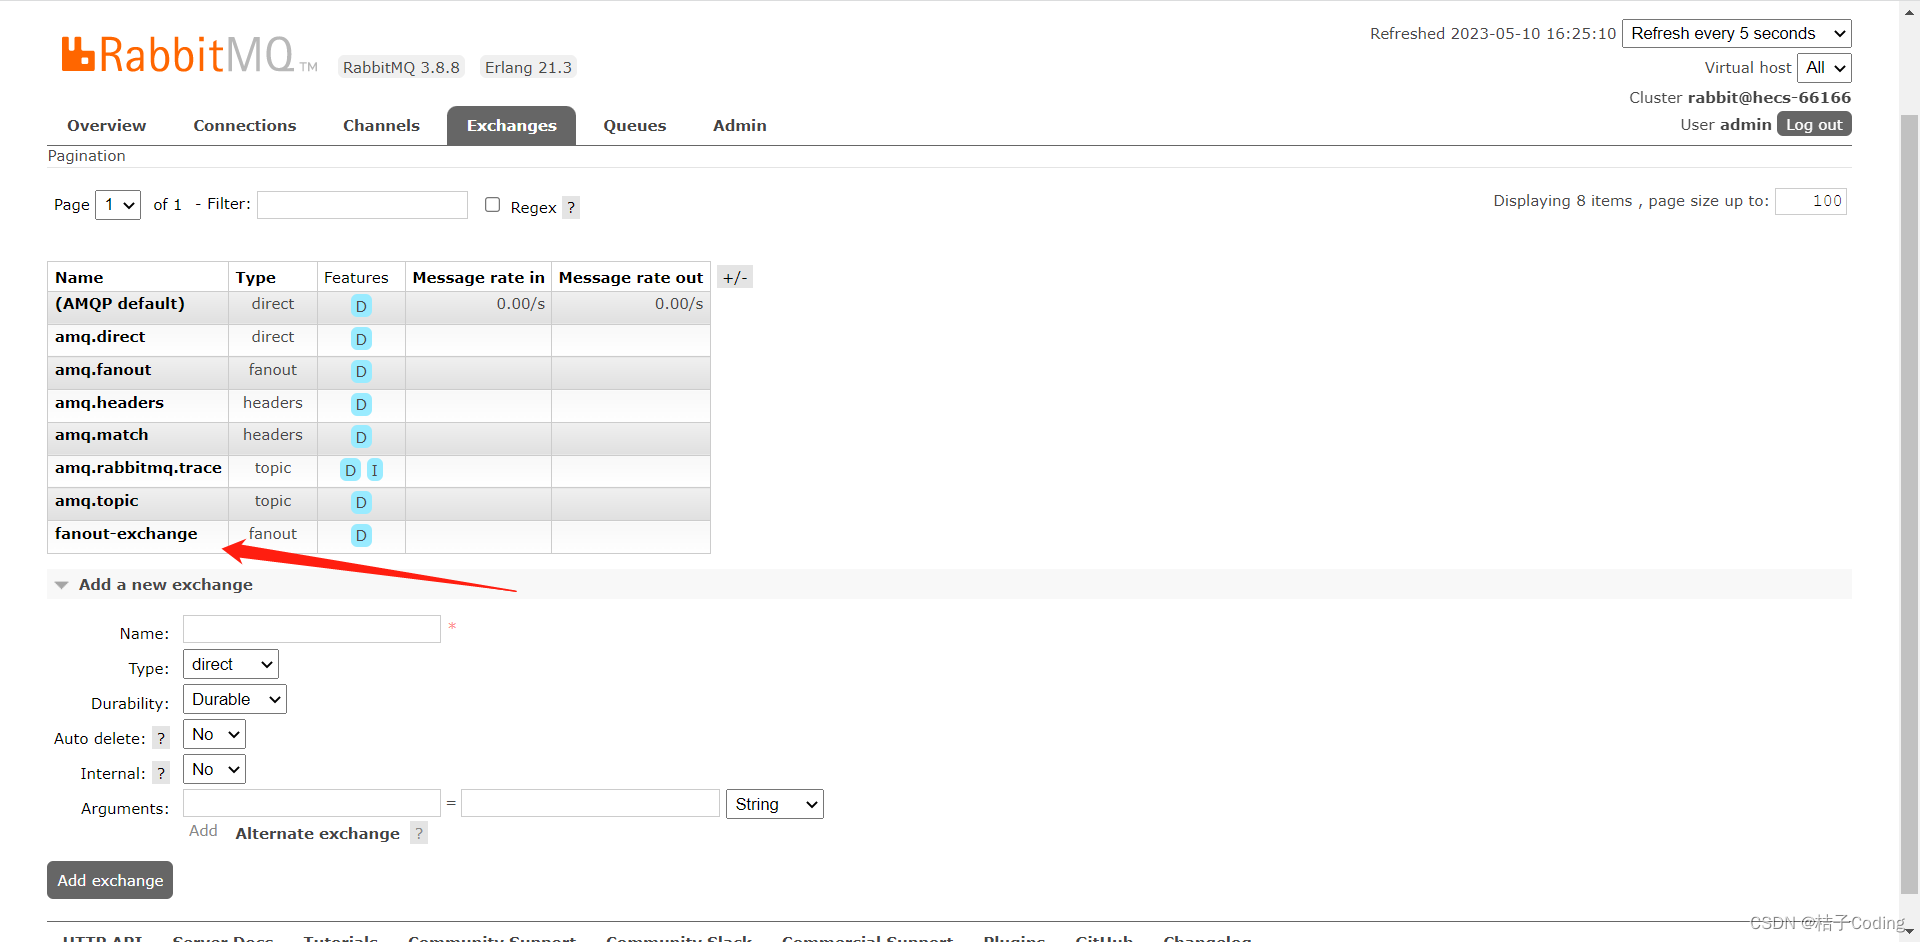
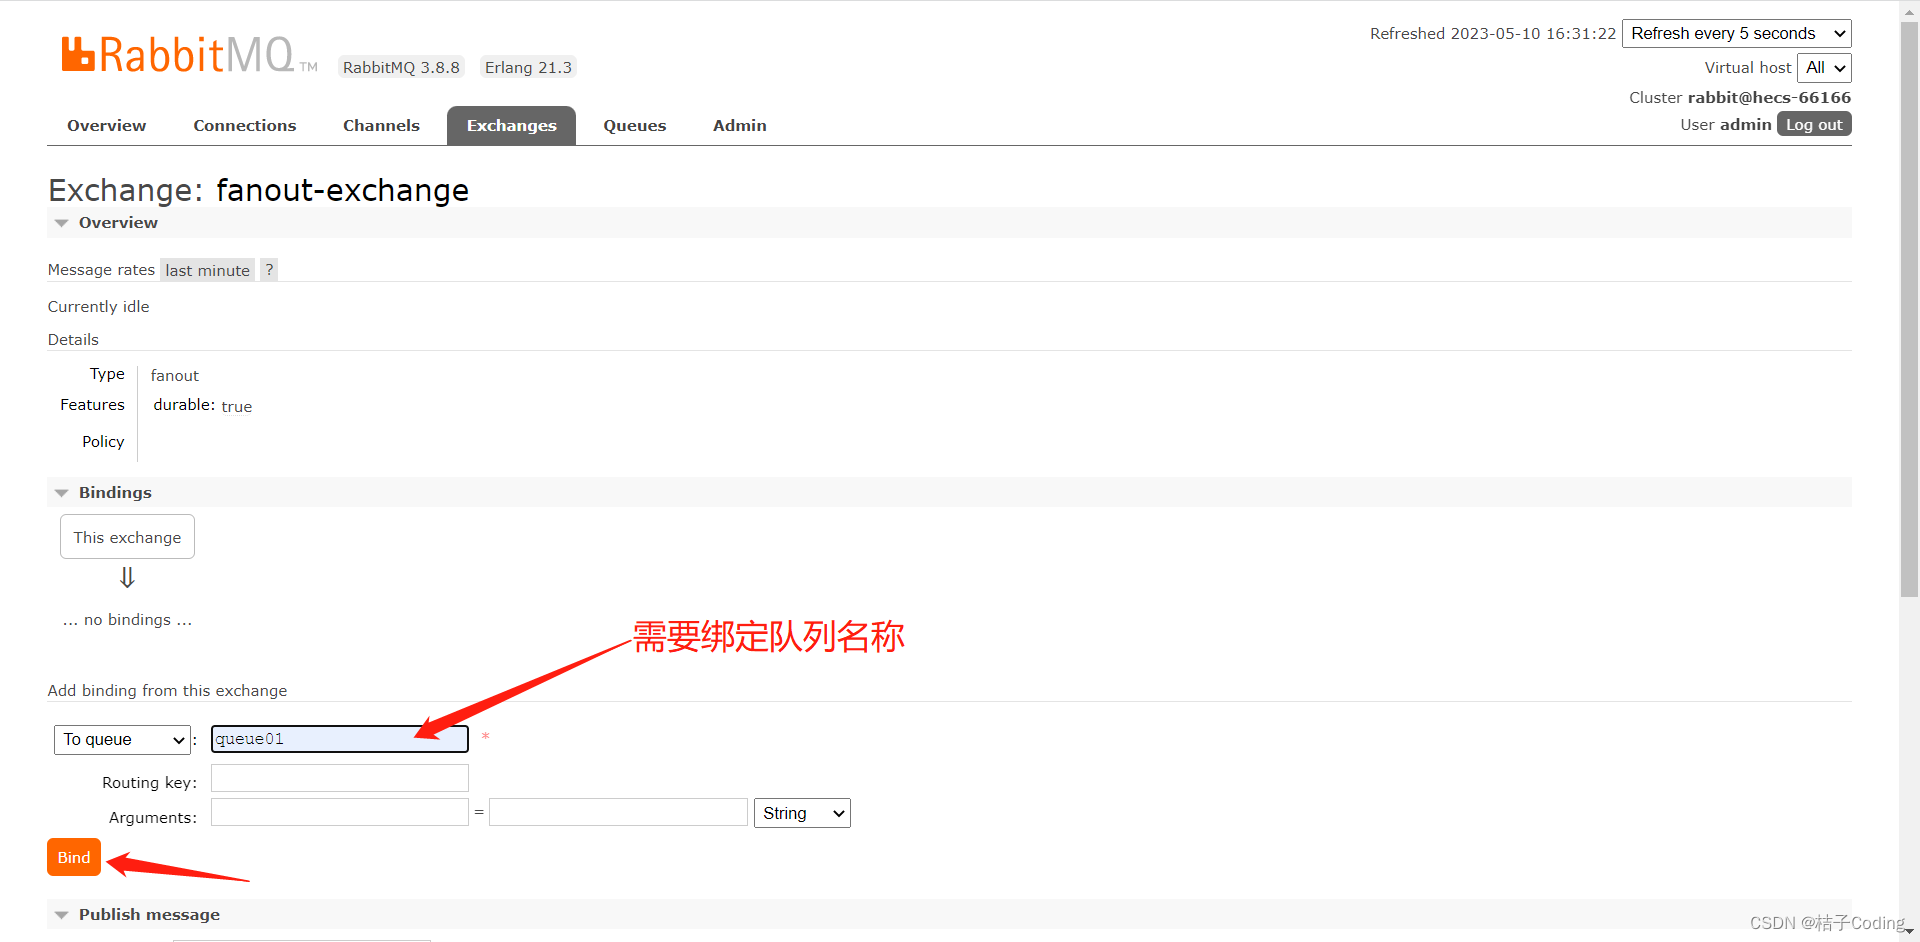
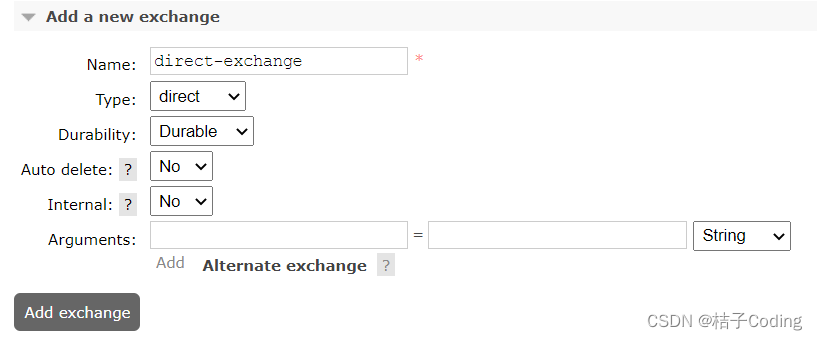
创建交换机
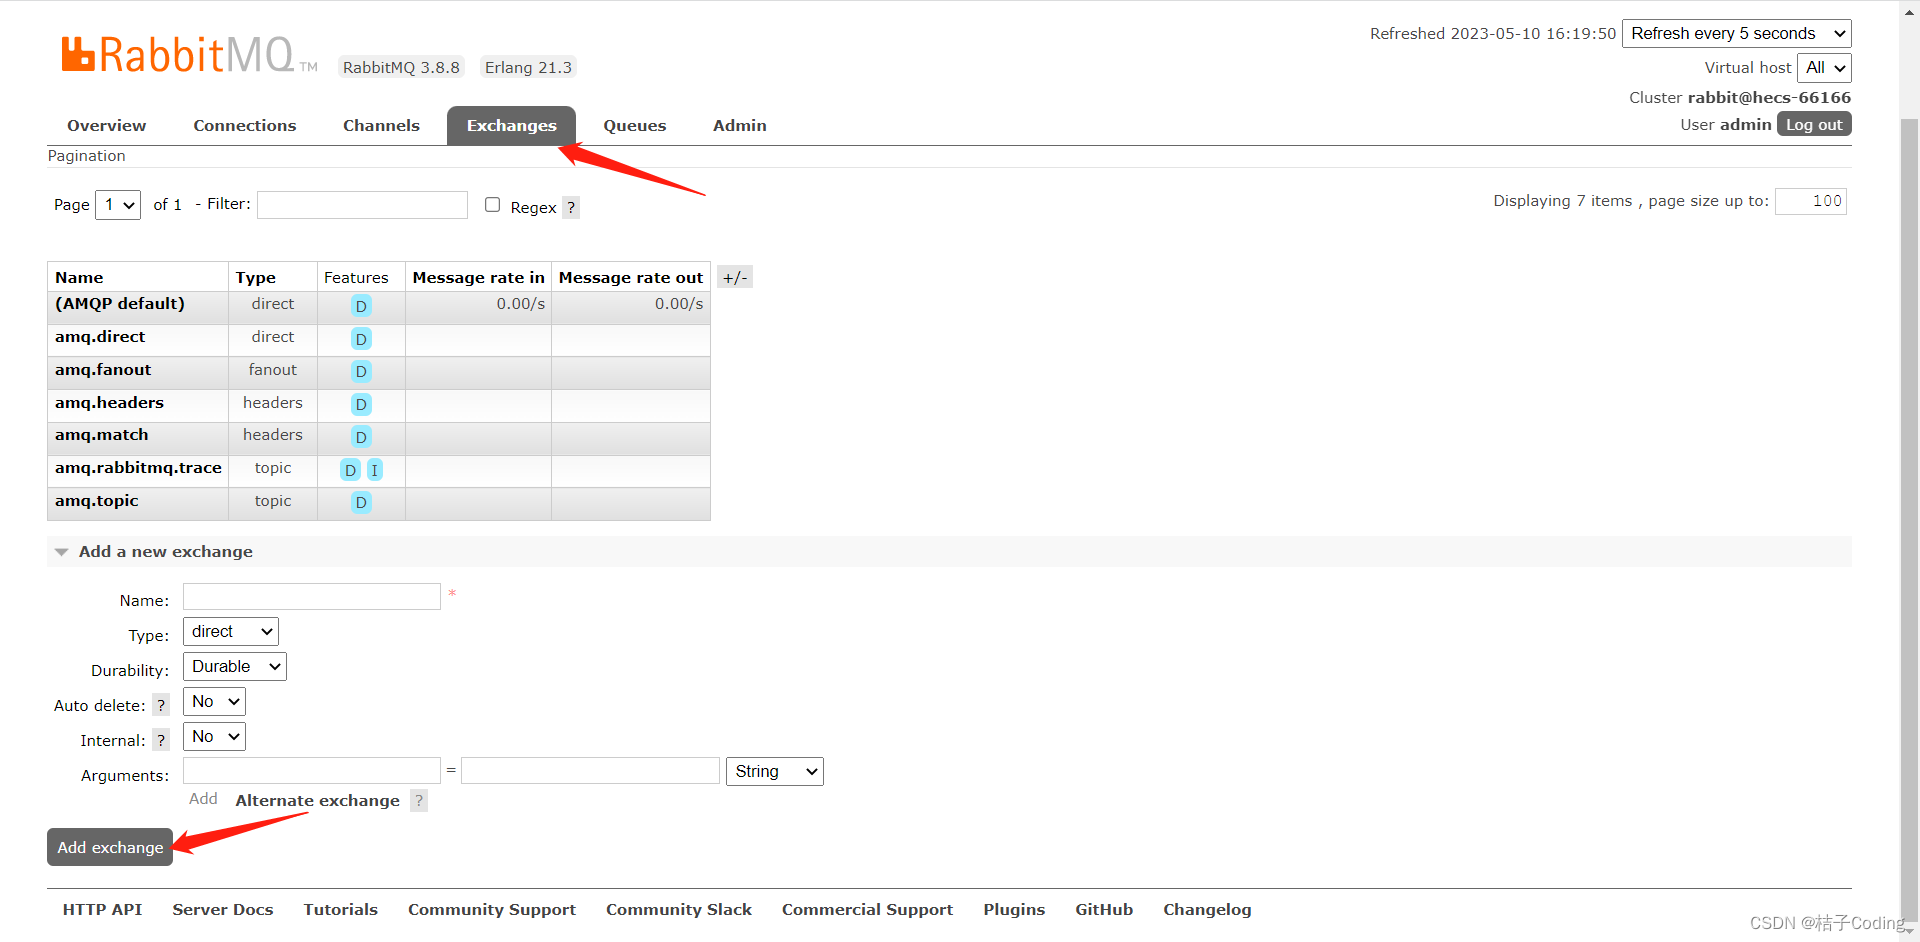
注意 type 类型为fanout
绑定队列
-
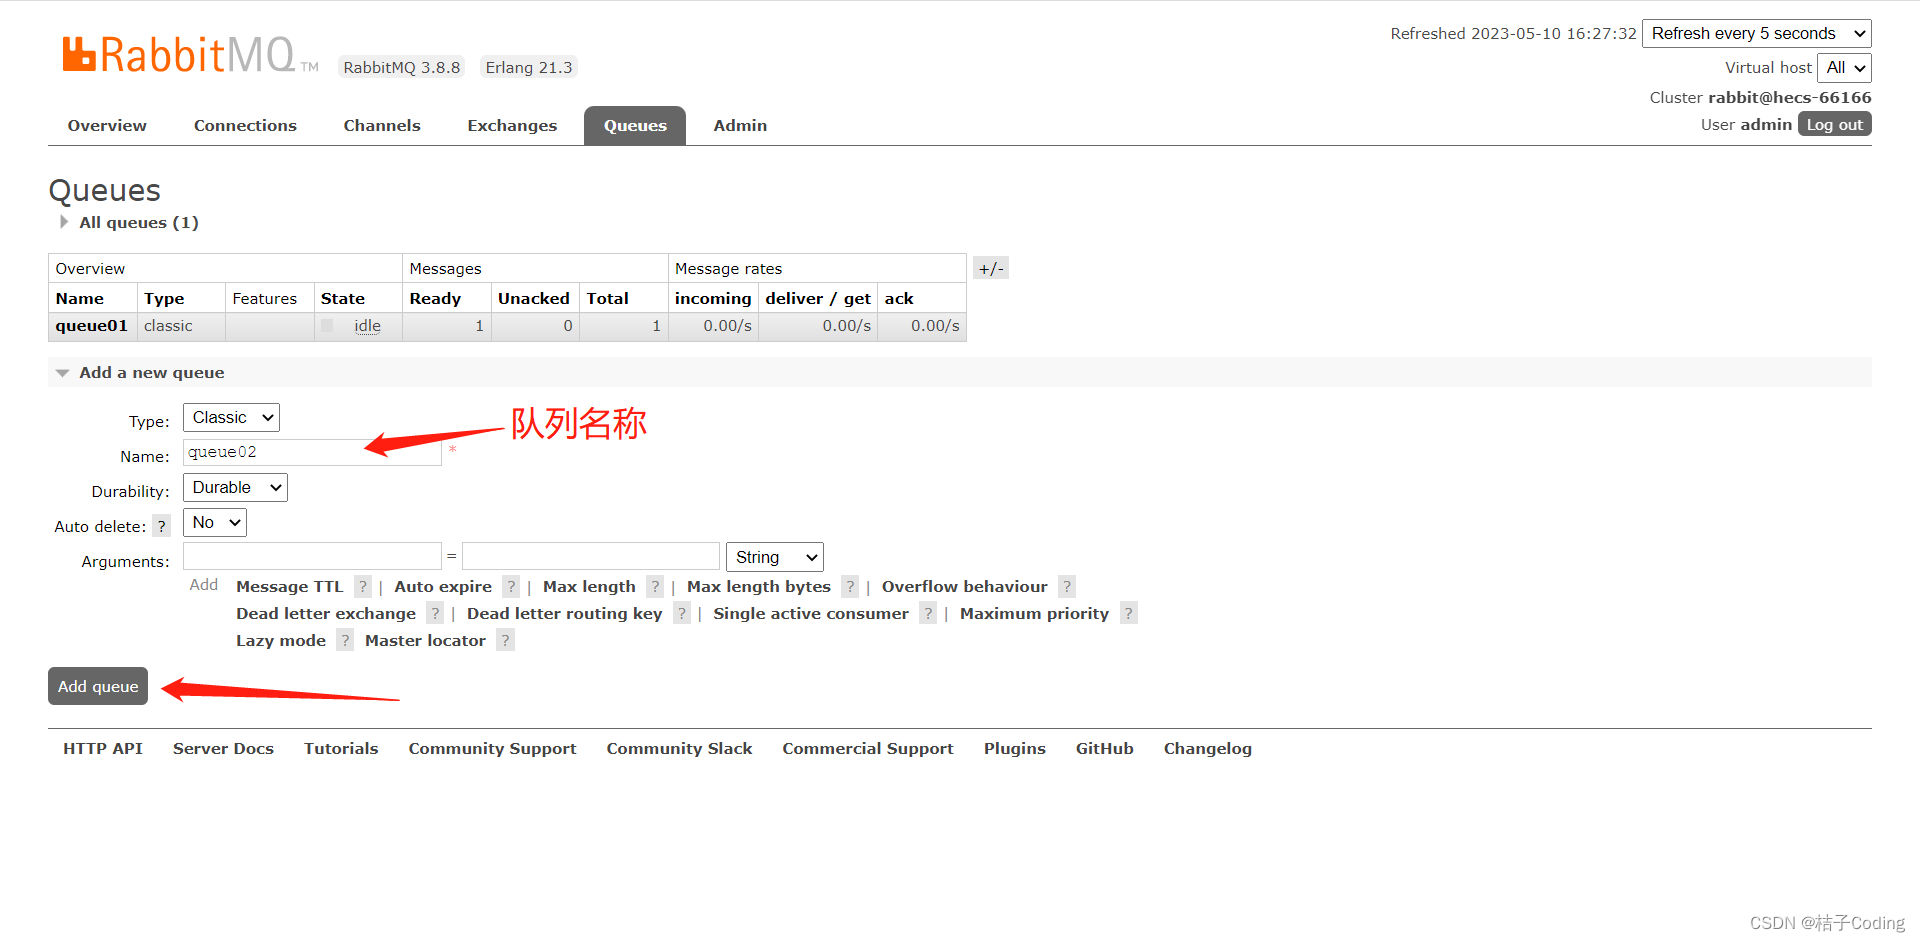
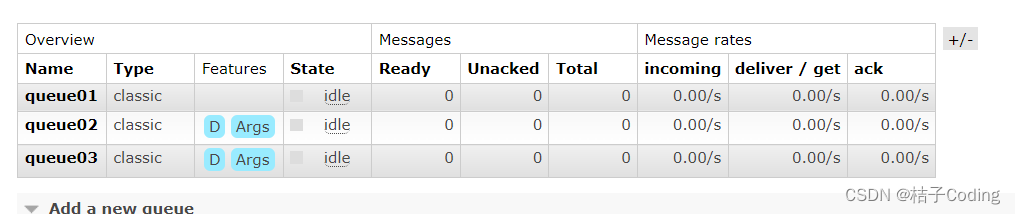
图像化管理页面新建queue02、queue03队列
-
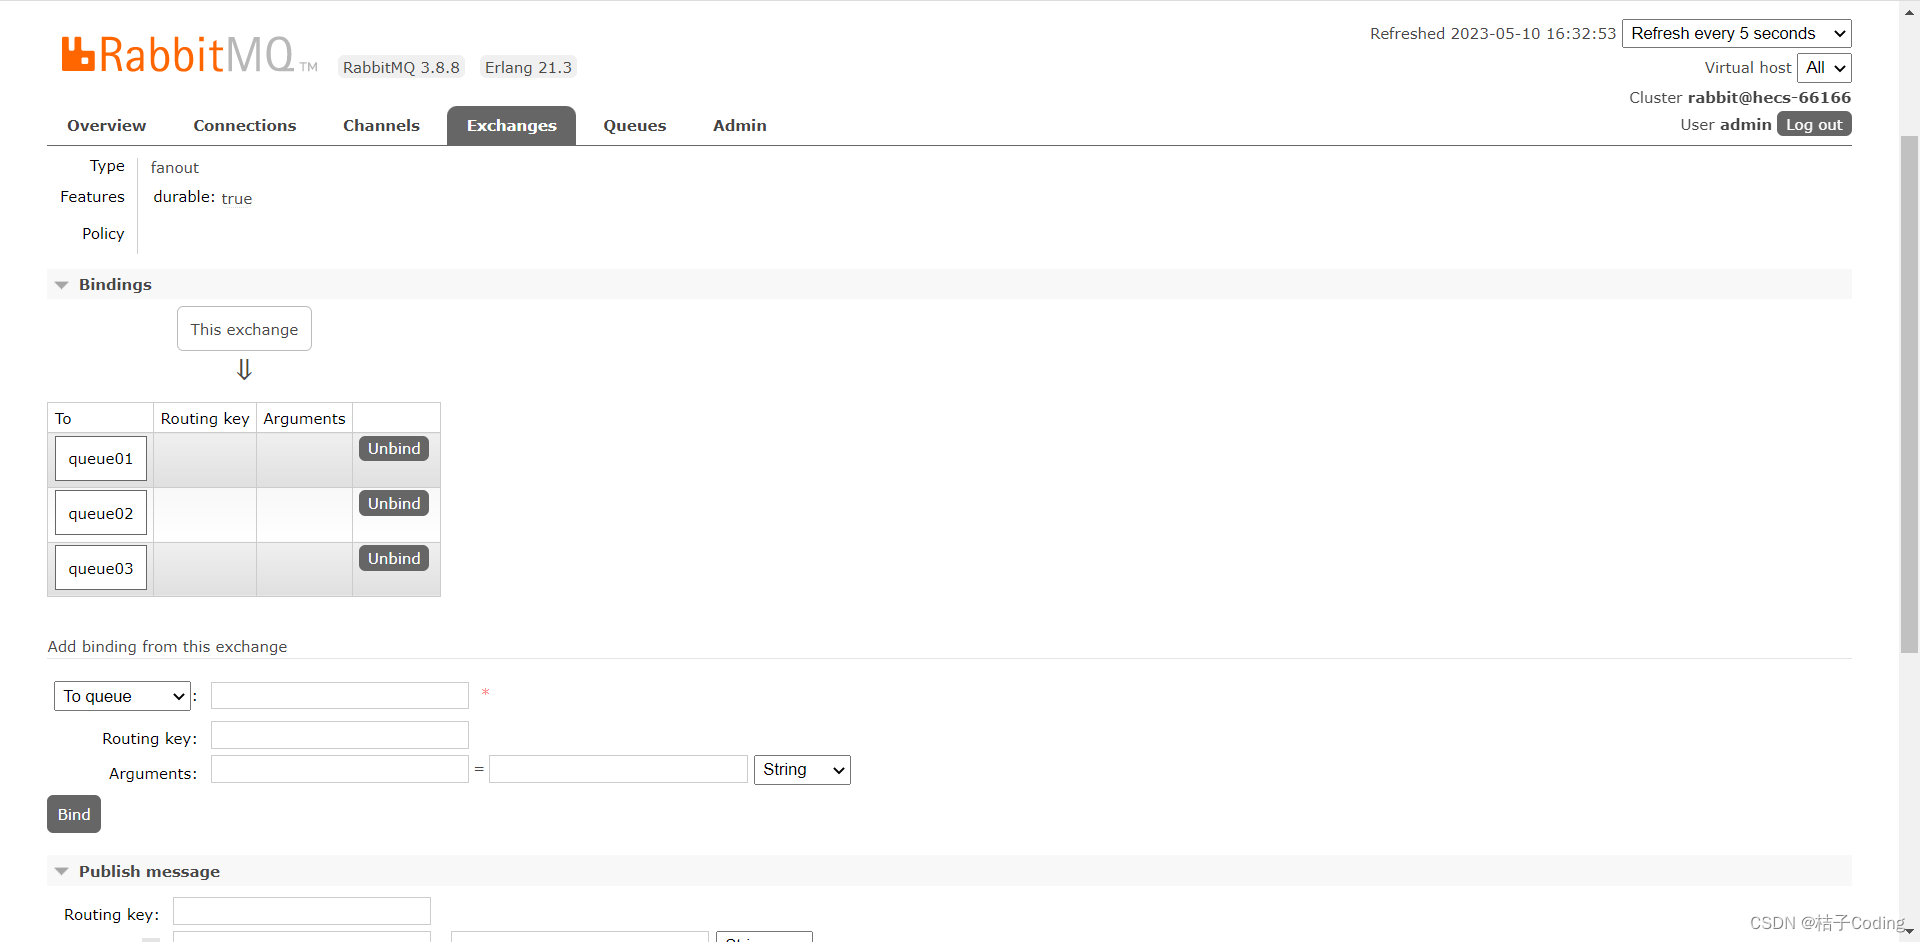
点击交换器后,绑定创建的三个队列
-
绑定成功后会如图所示
定义生产者
package com.cn.fanout;

import com.rabbitmq.client.Channel;
import com.rabbitmq.client.Connection;
import com.rabbitmq.client.ConnectionFactory;

/**
 * fanout(发布订阅) 生产者
 */
public class Producer {

    public static void main(String[] args) {

        //1.创建连接工厂
        ConnectionFactory factory = new ConnectionFactory();
        //2.设置工厂属性
        factory.setHost("请填写自己的ip地址");
        factory.setPort(5672);
        factory.setUsername("admin");
        factory.setPassword("admin");
        factory.setVirtualHost("/");

        Connection connection = null;
        Channel channel = null;
        try {
            //3.从连接工厂中获取连接
            connection = factory.newConnection("生产者1");
            //4.从连接中获取通道
            channel = connection.createChannel();
              //5.申请队列存储信息,此步骤不需要了,我们手动在图形管理页面创建好交换机及绑定好队列queue01、queue02、queue03
            //6.准备发送消息的内容
            String message = "hello,rabbitmq!";
            //7.1.准备交换机
            String exchangeName = "fanout-exchange";
            //7.2.定义路由key,fanout模式没有routingKey参数
            String routingKey = "";
            // 7.3: 发送消息给中间件rabbitmq-server
            /*
             * @params1: 交换机exchange
             * @params2: 队列名称/routingkey
             * @params3: 属性配置
             * @params4: 发送消息的内容
             */
            channel.basicPublish(exchangeName, routingKey, null, message.getBytes());
            System.out.println("消息发送成功!");
        } catch (Exception e) {
            e.printStackTrace();
            System.out.println("发送消息出现异常...");
        }  finally {
            // 8: 释放连接关闭通道
            if (channel != null && channel.isOpen()) {
                try {
                    channel.close();
                } catch (Exception ex) {
                    ex.printStackTrace();
                }
            }
            if (connection != null) {
                try {
                    connection.close();
                } catch (Exception ex) {
                    ex.printStackTrace();
                }
            }
        }
    }
}
-
启动生产者, 会看到每个队列都投递了一条消息

定义消费者
package com.cn.fanout;

import com.rabbitmq.client.*;

import java.io.IOException;
import java.nio.charset.Charset;

/**
 * fanout(发布订阅) 消费者
 */
public class Consumer {

    public static Runnable runnable =  new Runnable(){
        @Override
        public void run() {
            //1.创建连接工厂
            ConnectionFactory factory = new ConnectionFactory();
            //2.设置工厂属性
            factory.setHost("请填写自己的ip地址");
            factory.setPort(5672);
            factory.setUsername("admin");
            factory.setPassword("admin");
            factory.setVirtualHost("/");

            final String queueName = Thread.currentThread().getName();
            Connection connection = null;
            Channel channel = null;
            try {
                //3.从连接工厂中获取连接
                connection = factory.newConnection("生产者1");
                //4.从连接中获取通道
                channel = connection.createChannel();
                //5.接收消息
                channel.basicConsume(queueName, true, new DeliverCallback() {
                    public void handle(String s, Delivery delivery) throws IOException {
                        System.out.println(queueName + "收到消息是:" + new String(delivery.getBody(), Charset.defaultCharset()));
                    }
                }, new CancelCallback() {
                    public void handle(String s) throws IOException {
                        System.out.println("接收消息失败了...");
                    }
                });
                System.out.println(queueName + "开始接收消息 ");
                System.in.read();
            } catch (Exception e) {
                e.printStackTrace();
            } finally {
                // 6: 释放连接关闭通道
                if (channel != null && channel.isOpen()) {
                    try {
                        channel.close();
                    } catch (Exception ex) {
                        ex.printStackTrace();
                    }
                }
                if (connection != null) {
                    try {
                        connection.close();
                    } catch (Exception ex) {
                        ex.printStackTrace();
                    }
                }
            }
        }
    };


    public static void main(String[] args) {
        // 启动三个线程去执行
        new Thread(runnable, "queue01").start();
        new Thread(runnable, "queue02").start();
        new Thread(runnable, "queue03").start();
    }

}
-
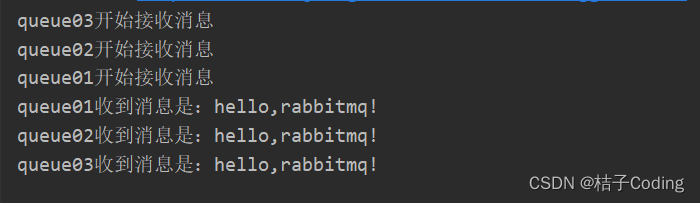
启动消费者,会看到队列中消息已经被消费
-
查看控制台打印日志
消费模式-Direct(路由)模式
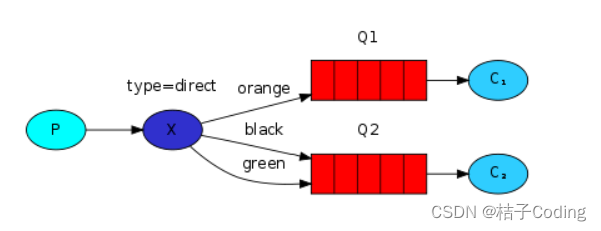
- 类型:direct
- 特点:Direct模式是fanout模式上的一种叠加,增加了路由RoutingKey的模式。
创建交换机
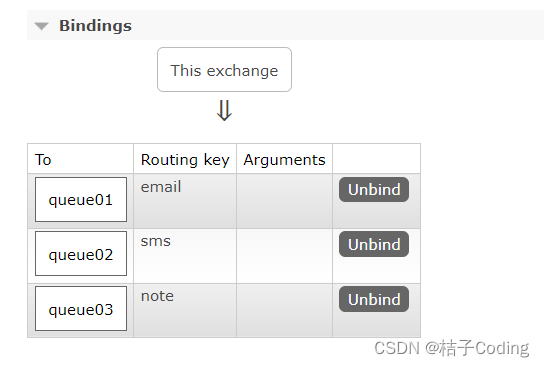
绑定队列
定义生产者
package com.cn.direct;

import com.rabbitmq.client.Channel;
import com.rabbitmq.client.Connection;
import com.rabbitmq.client.ConnectionFactory;

/**
 * direct(路由) 生产者
 */
public class Producer {

    public static void main(String[] args) {

        //1.创建连接工厂
        ConnectionFactory factory = new ConnectionFactory();
        //2.设置工厂属性
        factory.setHost("请填写自己的ip地址");
        factory.setPort(5672);
        factory.setUsername("admin");
        factory.setPassword("admin");
        factory.setVirtualHost("/");

        Connection connection = null;
        Channel channel = null;
        try {
            //3.从连接工厂中获取连接
            connection = factory.newConnection("生产者1");
            //4.从连接中获取通道
            channel = connection.createChannel();
            //5.申请队列存储信息,此步骤不需要了,我们手动在图形管理页面创建好交换机及绑定好队列queue01、queue02、queue03
            //6.准备发送消息的内容
            String message = "hello,rabbitmq,direct!";
            //7.1.准备交换机
            String exchangeName = "direct-exchange";
            //7.2.定义路由key, direct需要增加routingKey1参数
            String routingKey1 = "email";
//            String routingKey2 = "sms";
            // 7.3: 发送消息给中间件rabbitmq-server
            /*
             * @params1: 交换机exchange
             * @params2: 队列名称/routingkey
             * @params3: 属性配置
             * @params4: 发送消息的内容
             */
            channel.basicPublish(exchangeName, routingKey1, null, message.getBytes());
//            channel.basicPublish(exchangeName, routingKey2, null, message.getBytes());
            System.out.println("消息发送成功!");
        } catch (Exception e) {
            e.printStackTrace();
            System.out.println("发送消息出现异常...");
        }  finally {
            // 8: 释放连接关闭通道
            if (channel != null && channel.isOpen()) {
                try {
                    channel.close();
                } catch (Exception ex) {
                    ex.printStackTrace();
                }
            }
            if (connection != null) {
                try {
                    connection.close();
                } catch (Exception ex) {
                    ex.printStackTrace();
                }
            }
        }
    }
}
-
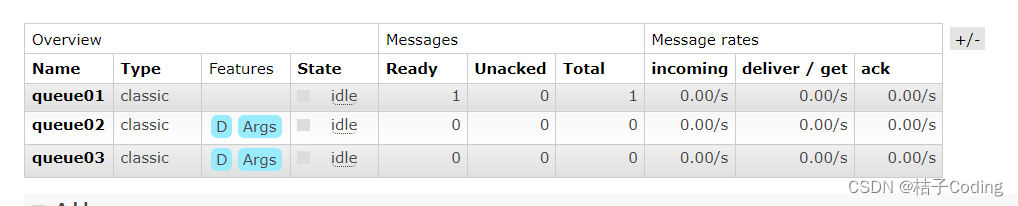
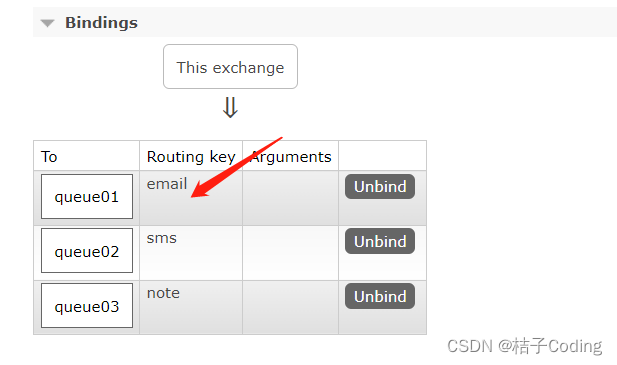
启动生产者, 会看到只有quque01队列投递了一条消息
-
因为我们的routingKey指定为email,绑定的队列信息如下,所有只有queue01接收到了消息
定义消费者
//同fanout模式消费者代码相同
-
启动消费者,会看到队列中消息已经被消费

-
查看控制台打印日志

消费模式-Topic(主题)模式
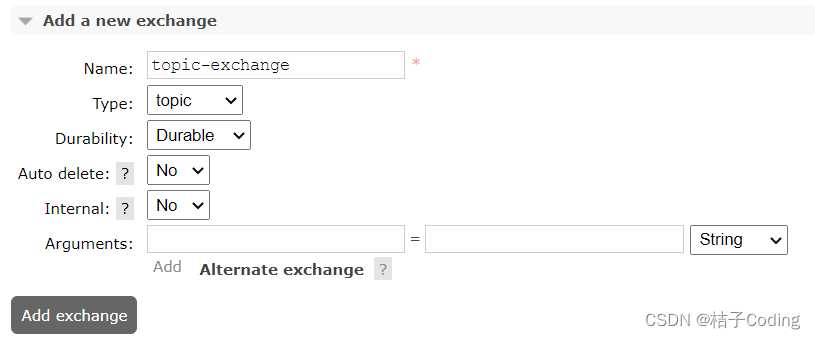
- 类型:topic
- 特点:Topic模式是direct模式上的一种叠加,增加了模糊路由RoutingKey的模式。
- “#” : 匹配一个或者多个
“**”:匹配一个*
创建交换机
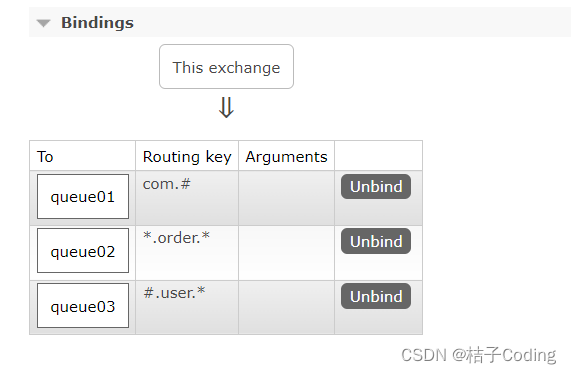
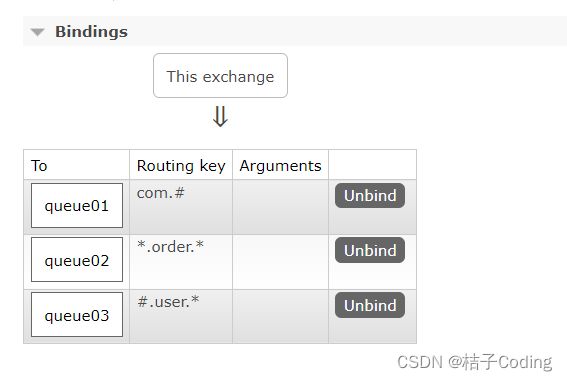
绑定队列
定义生产者
package com.cn.topic;

import com.rabbitmq.client.Channel;
import com.rabbitmq.client.Connection;
import com.rabbitmq.client.ConnectionFactory;

/**
 * topic(主题) 生产者
 */
public class Producer {

    public static void main(String[] args) {

        //1.创建连接工厂
        ConnectionFactory factory = new ConnectionFactory();
        //2.设置工厂属性
        factory.setHost("请填写自己的ip地址");
        factory.setPort(5672);
        factory.setUsername("admin");
        factory.setPassword("admin");
        factory.setVirtualHost("/");

        Connection connection = null;
        Channel channel = null;
        try {
            //3.从连接工厂中获取连接
            connection = factory.newConnection("生产者1");
            //4.从连接中获取通道
            channel = connection.createChannel();
            //5.申请队列存储信息,此步骤不需要了,我们手动在图形管理页面创建好交换机及绑定好队列queue01、queue02、queue03
            //6.准备发送消息的内容
            String message = "hello,rabbitmq,topic!";
            //7.1.准备交换机
            String exchangeName = "topic-exchange";
            //7.2.定义路由key, 模糊匹配
            String routingKey1 = "com.order.xxx";
            // 7.3: 发送消息给中间件rabbitmq-server
            /*
             * @params1: 交换机exchange
             * @params2: 队列名称/routingkey
             * @params3: 属性配置
             * @params4: 发送消息的内容
             */
            channel.basicPublish(exchangeName, routingKey1, null, message.getBytes());
            System.out.println("消息发送成功!");
        } catch (Exception e) {
            e.printStackTrace();
            System.out.println("发送消息出现异常...");
        }  finally {
            // 8: 释放连接关闭通道
            if (channel != null && channel.isOpen()) {
                try {
                    channel.close();
                } catch (Exception ex) {
                    ex.printStackTrace();
                }
            }
            if (connection != null) {
                try {
                    connection.close();
                } catch (Exception ex) {
                    ex.printStackTrace();
                }
            }
        }
    }
}
-
启动生产者, 会看到quque01、queue02队列分别投递了一条消息

-
因为我们的routingKey指定为com.order.xxx,绑定的队列信息如下,所有queue01、queue02接收到了消息
-
定义消费者
//同fanout模式消费者代码相同
-
启动消费者,会看到队列中消息已经被消费

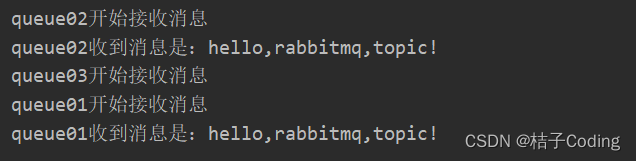
-
查看控制台打印日志
完整的声明创建方式
上面操作的案例 我们都是在管理页面端进行交换机的创建以及绑定,现在我们使用纯代码的方式进行操作
定义生产者
package com.cn.all;
import com.rabbitmq.client.Channel;
import com.rabbitmq.client.Connection;
import com.rabbitmq.client.ConnectionFactory;
/**
* 完整 生产者
*/
public class Producer {
public static void main(String[] args) {
//1.创建连接工厂
ConnectionFactory factory = new ConnectionFactory();
//2.设置工厂属性
factory.setHost("请填写自己的ip地址");
factory.setPort(5672);
factory.setUsername("admin");
factory.setPassword("admin");
factory.setVirtualHost("/");
Connection connection = null;
Channel channel = null;
try {
//3.从连接工厂中获取连接
connection = factory.newConnection("生产者1");
//4.从连接中获取通道
channel = connection.createChannel();
//5.准备发送消息的内容
String message = "hello,rabbitmq,all!";
//6.1.准备交换机
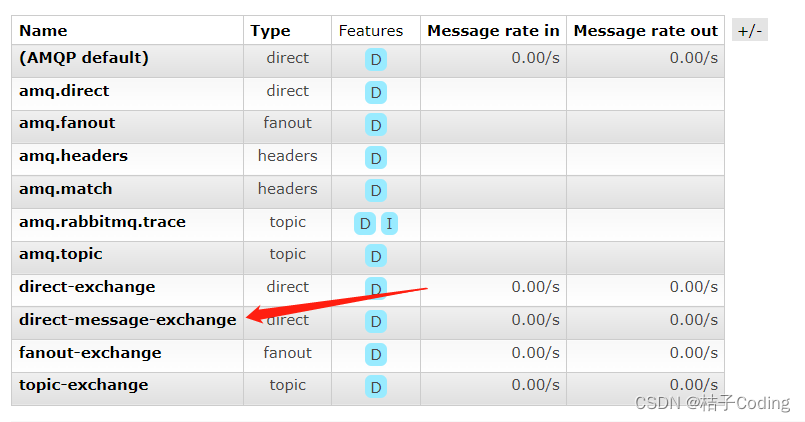
String exchangeName = "direct-message-exchange";
//6.2.交换机类型
String exchangeType = "direct";
//6.3.声明交换机(是否持久化,true代表交换机不会随着服务器重启丢失)
channel.exchangeDeclare(exchangeName,exchangeType,true);
//7.声明队列
channel.queueDeclare("queue04", true, false ,false, null);
channel.queueDeclare("queue05", true, false ,false, null);
channel.queueDeclare("queue06", true, false ,false, null);
//8.定义路由key
String routingKey1 = "order";
String routingKey2 = "course";
//9.队列和交换机进行绑定
channel.queueBind("queue04", exchangeName, routingKey1);
channel.queueBind("queue05", exchangeName, routingKey1);
channel.queueBind("queue06", exchangeName, routingKey2);
//10: 发送消息给中间件rabbitmq-server
/*
* @params1: 交换机exchange
* @params2: 队列名称/routingkey
* @params3: 属性配置
* @params4: 发送消息的内容
*/
channel.basicPublish(exchangeName, routingKey1, null, message.getBytes());
System.out.println("消息发送成功!");
} catch (Exception e) {
e.printStackTrace();
System.out.println("发送消息出现异常...");
} finally {
// 8: 释放连接关闭通道
if (channel != null && channel.isOpen()) {
try {
channel.close();
} catch (Exception ex) {
ex.printStackTrace();
}
}
if (connection != null) {
try {
connection.close();
} catch (Exception ex) {
ex.printStackTrace();
}
}
}
}
}
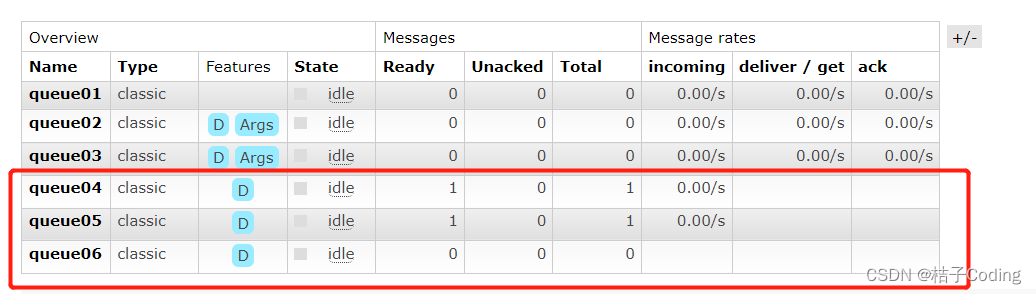
-
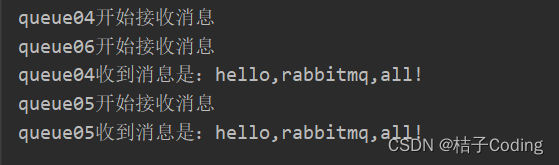
启动生产者, 会看到交换机和队列都已创建好,并且已经互相绑定好
定义消费者
同fanout模式消费者代码相同
-
启动消费者,会看到队列中消息已经被消费

-
查看控制台打印日志
消费模式-Work(工作)模式
![[外链图片转存失败,源站可能有防盗链机制,建议将图片保存下来直接上传(img-8Xal6iTH-1683712829119)(RabbitMQ.assets/image-20230504154716085.png)]](https://img-blog.csdnimg.cn/dcb0f9e7da724fbf858aa7e8f69edef3.png)
当有多个消费者时,我们的消费会被哪个消费者消费呢?我们该如何均衡消费者消费信息的多少呢?
- 轮询模式:一个消费者一条,按均分发
- 公平分发: 根据消费者消费能力进行公平分发,处理快的处理的快,处理慢的处理的少,按劳分配
轮询模式
- 类型:无
- 特点:该模式接收消息是当有多个消费者接入时,消息的分配模式是一个消费者分配一条,直至消息消费完成;
定义生产者
package com.cn.work.roundrobin;

import com.rabbitmq.client.Channel;
import com.rabbitmq.client.Connection;
import com.rabbitmq.client.ConnectionFactory;

public class Producer {

    public static void main(String[] args) {

        //1.创建连接工厂
        ConnectionFactory factory = new ConnectionFactory();
        //2.设置工厂属性
        factory.setHost("请填写自己的ip地址");
        factory.setPort(5672);
        factory.setUsername("admin");
        factory.setPassword("admin");
        factory.setVirtualHost("/");

        Connection connection = null;
        Channel channel = null;
        try {
            //3.从连接工厂中获取连接
            connection = factory.newConnection("生产者7");
            //4.从连接中获取通道
            channel = connection.createChannel();
            //5.申请队列存储信息
            /*
             *  如果队列不存在,则会创建
             *  Rabbitmq不允许创建两个相同的队列名称,否则会报错。
             *
             *  @params1: queue 队列的名称
             *  @params2: durable 队列是否持久化
             *  @params3: exclusive 是否排他,即是否私有的,如果为true,会对当前队列加锁,其他的通道不能访问,并且连接自动关闭
             *  @params4: autoDelete 是否自动删除,当最后一个消费者断开连接之后是否自动删除消息。
             *  @params5: arguments 可以设置队列附加参数,设置队列的有效期,消息的最大长度,队列的消息生命周期等等。
             */
            channel.queueDeclare("queue07", true ,false,false, null);
            //6.准备发送消息的内容
            for (int i = 0; i < 20; i++) {
                String message = "hello,rabbitmq,work!" + i;
                // 7: 发送消息给中间件rabbitmq-server
                /*
                 * @params1: 交换机exchange
                 * @params2: 队列名称/routing
                 * @params3: 属性配置
                 * @params4: 发送消息的内容
                 */
                channel.basicPublish("", "queue07", null, message.getBytes());
            }
            System.out.println("消息发送成功!");
        } catch (Exception e) {
            e.printStackTrace();
            System.out.println("发送消息出现异常...");
        }  finally {
            // 8: 释放连接关闭通道
            if (channel != null && channel.isOpen()) {
                try {
                    channel.close();
                } catch (Exception ex) {
                    ex.printStackTrace();
                }
            }
            if (connection != null) {
                try {
                    connection.close();
                } catch (Exception ex) {
                    ex.printStackTrace();
                }
            }
        }
    }
}
定义消费者1
package com.cn.work.roundrobin;

import com.rabbitmq.client.*;

import java.io.IOException;
import java.nio.charset.Charset;

public class Consumer1 {

    public static void main(String[] args) {

        //1.创建连接工厂
        ConnectionFactory factory = new ConnectionFactory();
        //2.设置工厂属性
        factory.setHost("请填写自己的ip地址");
        factory.setPort(5672);
        factory.setUsername("admin");
        factory.setPassword("admin");
        factory.setVirtualHost("/");

        Connection connection = null;
        Channel channel = null;
        try {
            //3.从连接工厂中获取连接
            connection = factory.newConnection("消费者1");
            //4.从连接中获取通道
            channel = connection.createChannel();
            //5.接收消息(应答机制参数为true  自动应答)
            channel.basicConsume("queue07", true, new DeliverCallback() {
                public void handle(String s, Delivery delivery) throws IOException {
                    System.out.println("Consumer1收到消息是:" + new String(delivery.getBody(), Charset.defaultCharset()));
                    try {
                        Thread.sleep(2000);
                    } catch (InterruptedException e) {
                        e.printStackTrace();
                    }
                }
            }, new CancelCallback() {
                public void handle(String s) throws IOException {
                    System.out.println("Consumer1接收消息失败了...");
                }
            });
            System.out.println("Consumer1开始接收消息");
            System.in.read();
        } catch (Exception e) {
            e.printStackTrace();
        } finally {
            // 6: 释放连接关闭通道
            if (channel != null && channel.isOpen()) {
                try {
                    channel.close();
                } catch (Exception ex) {
                    ex.printStackTrace();
                }
            }
            if (connection != null) {
                try {
                    connection.close();
                } catch (Exception ex) {
                    ex.printStackTrace();
                }
            }
        }
    }
}
定义消费者2
同上,名称稍修改即可
				    try {
                        Thread.sleep(200);
                    } catch (InterruptedException e) {
                        e.printStackTrace();
                    }
先在管理页面创建好队列queue,然后启动消费者1和2,最后启动生产者看页面日志
消费者1和消费者2
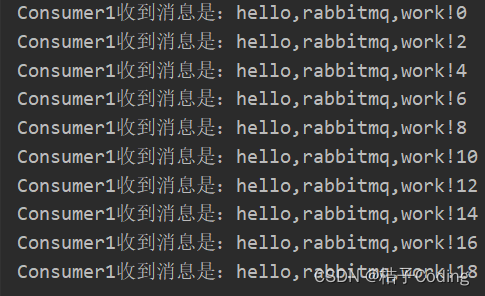
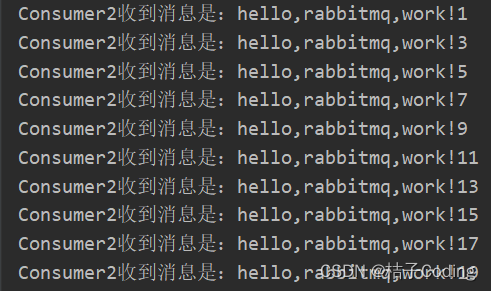
work1和work2的消息处理能力不同,但是最后处理的消息条数相同,是“按均分配”。
公平分发
- 类型:无
- 特点:由于消息接收者处理消息的能力不同,存在处理快慢的问题,我们就需要能者多劳,处理快的多处理,处理慢的少处理;
定义生产者
//同上轮询模式的生产者代码相同
定义消费者1
注意:
-
//设置消费消息指标
finalChannel.basicQos(1);
-
finalChannel.basicConsume(“queue1”, false, new DeliverCallback() { … })
-
//修改为手动应答
finalChannel.basicAck(delivery.getEnvelope().getDeliveryTag(),false);
package com.cn.work.fairdispatch;

import com.rabbitmq.client.*;

import java.io.IOException;
import java.nio.charset.Charset;

public class Consumer1 {

    public static void main(String[] args) {

        //1.创建连接工厂
        ConnectionFactory factory = new ConnectionFactory();
        //2.设置工厂属性
        factory.setHost("请填写自己的ip地址");
        factory.setPort(5672);
        factory.setUsername("admin");
        factory.setPassword("admin");
        factory.setVirtualHost("/");

        Connection connection = null;
        Channel channel = null;
        try {
            //3.从连接工厂中获取连接
            connection = factory.newConnection("消费者1");
            //4.从连接中获取通道
            channel = connection.createChannel();
            //5.接收消息(应答机制参数为false  手动应答)
            final Channel finalChannel = channel;
            finalChannel.basicQos(1);
            finalChannel.basicConsume("queue07", false, new DeliverCallback() {
                public void handle(String s, Delivery delivery) throws IOException {
                    System.out.println("Consumer1收到消息是:" + new String(delivery.getBody(), Charset.defaultCharset()));
                    try {
                        Thread.sleep(2000);
                    } catch (InterruptedException e) {
                        e.printStackTrace();
                    }
                    //修改为手动应答
                    finalChannel.basicAck(delivery.getEnvelope().getDeliveryTag(),false);
                }
            }, new CancelCallback() {
                public void handle(String s) throws IOException {
                    System.out.println("Consumer1接收消息失败了...");
                }
            });
            System.out.println("Consumer1开始接收消息");
            System.in.read();
        } catch (Exception e) {
            e.printStackTrace();
        } finally {
            // 6: 释放连接关闭通道
            if (channel != null && channel.isOpen()) {
                try {
                    channel.close();
                } catch (Exception ex) {
                    ex.printStackTrace();
                }
            }
            if (connection != null) {
                try {
                    connection.close();
                } catch (Exception ex) {
                    ex.printStackTrace();
                }
            }
        }
    }
}
定义消费者2
同上,名称稍修改即可
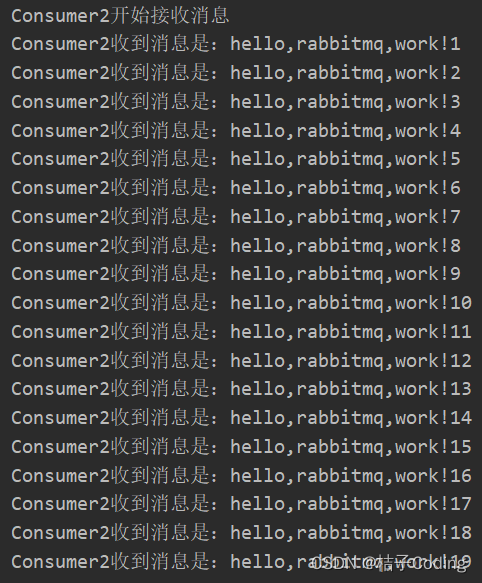
先在管理页面创建好队列queue,然后启动消费者1和2,最后启动生产者看页面日志
消费者1和消费者2

小结
- 消费者一次接收一条消息,代码channel.BasicQos(0, 1, false);
- 公平分发需要消费者开启手动应答,关闭自动应答
- 关闭自动应答代码channel.BasicConsume(“queue_test”, false, consumer);
- 消费者开启手动应答代码:channel.BasicAck(ea.DeliveryTag, false);

鸿蒙生态一站式服务平台。
更多推荐
 2
2 0
0- 0


 已为社区贡献1条内容

所有评论(0)