K8S高可用集群部署
分别在其他两个master ,k8s-master02,k8s-master03上执行k8s-master01 init后输出的join命令,如果找不到可以在k8s-master01执行会重新生成 kubeadm token create --print-join-command。尝试停掉k8s-master01的keepalived服务,查看vip是否能漂移到其他的master,并且重新启动k8
K8S高可用集群部署
一、服务器规划
| 主机名 | 操作系统 | IP | CPU | 内存 |
|---|---|---|---|---|
| K8S-master01 | Centos7.9 | 172.31.0.4 | 8C | 16G |
| K8S-master02 | Centos7.9 | 172.31.0.5 | 8C | 16G |
| K8S-master03 | Centos7.9 | 172.31.0.6 | 8C | 16G |
| K8S-node01 | Centos7.9 | 172.31.0.7 | 8C | 16G |
| K8S-node02 | Centos7.9 | 172.31.0.8 | 8C | 16G |
| vip | 172.31.0.99 |
二、初始化基础资源
所有机器执行以下操作
hostnamectl set-hostname xxxx
yum -y install ntpdate
ntpdate cn.pool.ntp.org
sudo setenforce 0.
sudo sed -i 's/^SELINUX=enforcing$/SELINUX=permissive/' /etc/selinux/config
swapoff -a
sed -ri 's/.*swap.*/#&/' /etc/fstab
cat <<EOF | sudo tee /etc/modules-load.d/k8s.conf
br_netfilter
EOF

cat <<EOF | sudo tee /etc/sysctl.d/k8s.conf
net.bridge.bridge-nf-call-ip6tables = 1
net.bridge.bridge-nf-call-iptables = 1
EOF
sudo sysctl --system
echo "* soft nofile 65536" >> /etc/security/limits.conf
echo "* hard nofile 65536" >> /etc/security/limits.conf
echo "* soft nproc 65536"  >> /etc/security/limits.conf
echo "* hard nproc 65536"  >> /etc/security/limits.conf
echo "* soft  memlock  unlimited"  >> /etc/security/limits.conf
echo "* hard memlock  unlimited"  >> /etc/security/limits.conf
cat <<EOF >>/etc/hosts
172.31.0.99 master.k8s.io k8s-vip
172.31.0.4 master01.k8s.io k8s-master01
172.31.0.5 master02.k8s.io k8s-master02
172.31.0.6 master03.k8s.io k8s-master03
172.31.0.7 node01.k8s.io k8s-node01
172.31.0.8 node02.k8s.io k8s-node02
EOF
yum install -y conntrack-tools libseccomp libtool-ltdl
三、部署keepalived(在3台master机器操作)
yum install -y conntrack-tools libseccomp libtool-ltdl keepalived
cat > /etc/keepalived/check_haproxy.sh <<EOF
#!/bin/bash
if [ $(ps -C haproxy --no-header | wc -l) -eq 0 ]; then    #这行代码检查是否没有正在运行的haproxy进程。ps命令列出所有正在运行的进程,-C haproxy过滤只有haproxy进程,--no-header从输出中移除标题,wc -l计算行数(进程)。如果没有haproxy进程,则执行if块内的代码。
   systemctl start haproxy        #这行代码使用systemd systemctl命令启动haproxy服务
   sleep 3                        #这行代码暂停脚本3秒钟,然后继续执行

   if [ $(ps -C haproxy --no-header | wc -l) -eq 0 ]; then  #这行代码再次检查haproxy进程是否仍未运行。如果没有haproxy进程,则执行嵌套在if块内的代码。
          systemctl stop keepalived
   fi
fi
EOF
chmod +x /etc/keepalived/check_haproxy.sh
cat > /etc/keepalived/keepalived.conf <<EOF
! Configuration File for keepalived

global_defs {
   router_id k8s
}

vrrp_script check_haproxy {
    #script "killall -0 haproxy"
    script "/etc/keepalived/check_haproxy.sh"   #刚刚配置的检测脚本
    interval 3  #此脚本每3秒执行一次
    weight -2   #权重
    fall 10     #如果脚本连续失败10次(fall),则keepalived将认为服务器已停止
    rise 2      #当脚本在失败后连续成功两次(rise)时,keepalived将再次将服务器视为已启动。
}

vrrp_instance VI_1 {
    state MASTER     #如果是主节点 则为MASTER ,其他则为 BACKUP
    interface ens33  #网卡名称
    virtual_router_id 51
    priority 250  #优先级高于另外两台即可
    nopreempt   #设置非抢占模式
    preempt_delay 10  #抢占延时10分钟
    advert_int 1      #检查间隔默认1s
    authentication {
        auth_type PASS    #  设置验证类型,主要有PASS和AH两种
        auth_pass ceb1b3ec013d66163d6ab11     #  设置验证密码,同一个vrrp_instance下,MASTER和BACKUP的密码必须一致才能正常通信
    }
    virtual_ipaddress {
        172.31.0.99    #VIP地址
    }
    track_script {
        check_haproxy
    }

}
EOF
cat > /etc/keepalived/keepalived.conf <<EOF
! Configuration File for keepalived

global_defs {
   router_id k8s
}

vrrp_script check_haproxy {
    #script "killall -0 haproxy"
    script "/etc/keepalived/check_haproxy.sh"   #刚刚配置的检测脚本
    interval 3  #此脚本每3秒执行一次
    weight -2   #权重
    fall 10     #如果脚本连续失败10次(fall),则keepalived将认为服务器已停止
    rise 2      #当脚本在失败后连续成功两次(rise)时,keepalived将再次将服务器视为已启动。
}

vrrp_instance VI_1 {
    state BACKUP     #如果是主节点 则为MASTER ,其他则为 BACKUP
    interface ens33  #网卡名称
    virtual_router_id 51
    priority 200 #优先级
    nopreempt   #设置非抢占模式
    preempt_delay 10  #抢占延时10分钟
    advert_int 1      #检查间隔默认1s
    authentication {
        auth_type PASS
        auth_pass ceb1b3ec013d66163d6ab11
    }
    virtual_ipaddress {
        172.31.0.99    #VIP地址
    }
    track_script {
        check_haproxy
    }

}
EOF
cat > /etc/keepalived/keepalived.conf <<EOF
! Configuration File for keepalived

global_defs {
   router_id k8s
}

vrrp_script check_haproxy {
    #script "killall -0 haproxy"
    script "/etc/keepalived/check_haproxy.sh"   #刚刚配置的检测脚本
    interval 3  #此脚本每3秒执行一次
    weight -2   #权重
    fall 10     #如果脚本连续失败10次(fall),则keepalived将认为服务器已停止
    rise 2      #当脚本在失败后连续成功两次(rise)时,keepalived将再次将服务器视为已启动。
}

vrrp_instance VI_1 {
    state BACKUP     #如果是主节点 则为MASTER ,其他则为 BACKUP
    interface ens33  #网卡名称
    virtual_router_id 51
    priority 150 #优先级
    nopreempt   #设置非抢占模式
    preempt_delay 10  #抢占延时10分钟
    advert_int 1      #检查间隔默认1s
    authentication {
        auth_type PASS
        auth_pass ceb1b3ec013d66163d6ab11
    }
    virtual_ipaddress {
        172.31.0.99    #VIP地址
    }
    track_script {
        check_haproxy
    }

}
EOF
#开启并设置开机自启
systemctl enable --now keepalived
#查看启动状态
systemctl status keepalived.service
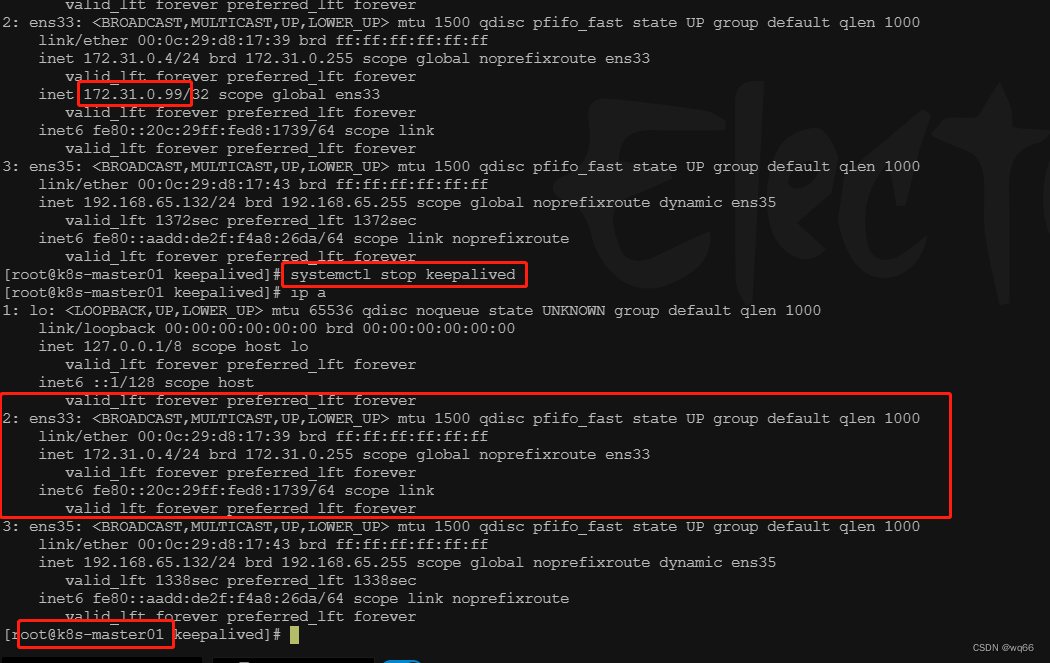
2: ens33: <BROADCAST,MULTICAST,UP,LOWER_UP> mtu 1500 qdisc pfifo_fast state UP group default qlen 1000
    link/ether 00:0c:29:d8:17:39 brd ff:ff:ff:ff:ff:ff
    inet 172.31.0.4/24 brd 172.31.0.255 scope global noprefixroute ens33
       valid_lft forever preferred_lft forever
    inet 172.31.0.99/32 scope global ens33
       valid_lft forever preferred_lft forever
    inet6 fe80::20c:29ff:fed8:1739/64 scope link
       valid_lft forever preferred_lft forever
尝试停掉k8s-master01的keepalived服务,查看vip是否能漂移到其他的master,并且重新启动k8s-master01的keepalived服务,查看vip是否能正常漂移回来,证明配置没有问题。


四、haproxy搭建(三台master上操作)
yum install -y haproxy
cat > /etc/haproxy/haproxy.cfg << EOF
#---------------------------------------------------------------------
# Global settings
#---------------------------------------------------------------------
global
    # to have these messages end up in /var/log/haproxy.log you will
    # need to:
    # 1) configure syslog to accept network log events.  This is done
    #    by adding the '-r' option to the SYSLOGD_OPTIONS in
    #    /etc/sysconfig/syslog
    # 2) configure local2 events to go to the /var/log/haproxy.log
    #   file. A line like the following can be added to
    #   /etc/sysconfig/syslog
    #
    #    local2.*                       /var/log/haproxy.log
    #
    log         127.0.0.1 local2

    chroot      /var/lib/haproxy
    pidfile     /var/run/haproxy.pid
    maxconn     4000
    user        haproxy
    group       haproxy
    daemon

    # turn on stats unix socket
    stats socket /var/lib/haproxy/stats
#---------------------------------------------------------------------
# common defaults that all the 'listen' and 'backend' sections will
# use if not designated in their block
#---------------------------------------------------------------------
defaults
    mode                    http
    log                     global
    option                  httplog
    option                  dontlognull
    option http-server-close
    option forwardfor       except 127.0.0.0/8
    option                  redispatch
    retries                 3
    timeout http-request    10s
    timeout queue           1m
    timeout connect         10s
    timeout client          1m
    timeout server          1m
    timeout http-keep-alive 10s
    timeout check           10s
    maxconn                 3000
#---------------------------------------------------------------------
# kubernetes apiserver frontend which proxys to the backends
#---------------------------------------------------------------------
frontend kubernetes-apiserver
    mode                 tcp
    bind                 *:16443
    option               tcplog
    default_backend      kubernetes-apiserver
#---------------------------------------------------------------------
# round robin balancing between the various backends
#---------------------------------------------------------------------
backend kubernetes-apiserver
    mode        tcp
    balance     roundrobin
    server      master01.k8s.io   172.31.0.4:6443 check
    server      master02.k8s.io   172.31.0.5:6443 check
    server      master03.k8s.io   172.31.0.6:6443 check
#---------------------------------------------------------------------
# collection haproxy statistics message
#---------------------------------------------------------------------
listen stats
    bind                 *:1080
    stats auth           admin:awesomePassword
    stats refresh        5s
    stats realm          HAProxy\ Statistics
    stats uri            /admin?stats
EOF
#开启并且设置开机自启
systemctl enable haproxy --now
#检查服务端口是否启动
[root@k8s-master01 haproxy]# netstat -anpt |grep haproxy
tcp        0      0 0.0.0.0:1080            0.0.0.0:*               LISTEN      13084/haproxy
tcp        0      0 0.0.0.0:16443           0.0.0.0:*               LISTEN      13084/haproxy
五、安装docker(所有节点)
yum install -y yum-utils device-mapper-persistent-data lvm2
sudo yum install -y yum-utils
sudo yum-config-manager \
--add-repo \
http://mirrors.aliyun.com/docker-ce/linux/centos/docker-ce.repo
yum install -y docker-ce-20.10.7 docker-ce-cli-20.10.7 containerd.io-1.4.6
systemctl enable docker --now
sudo mkdir -p /etc/docker
sudo tee /etc/docker/daemon.json <<-'EOF'
{
  "registry-mirrors": ["https://82m9ar63.mirror.aliyuncs.com"],
  "exec-opts": ["native.cgroupdriver=systemd"],
  "log-driver": "json-file",
  "log-opts": {
    "max-size": "100m"
  },
  "storage-driver": "overlay2"
}
EOF
sudo systemctl daemon-reload
sudo systemctl restart docker
六.安装kubeadm,kubelet,和kubectl(所有节点操作)
cat <<EOF | sudo tee /etc/yum.repos.d/kubernetes.repo
[kubernetes]
name=Kubernetes
baseurl=http://mirrors.aliyun.com/kubernetes/yum/repos/kubernetes-el7-x86_64
enabled=1
gpgcheck=0
repo_gpgcheck=0
gpgkey=http://mirrors.aliyun.com/kubernetes/yum/doc/yum-key.gpg
   http://mirrors.aliyun.com/kubernetes/yum/doc/rpm-package-key.gpg
exclude=kubelet kubeadm kubectl
EOF
sudo yum install -y kubelet-1.20.9 kubeadm-1.20.9 kubectl-1.20.9 --disableexcludes=kubernetes
sudo systemctl enable --now kubelet
安装 bash-completion 包

sudo yum -y install bash-completion

下载 kubectl 补全脚本

curl -LO https://storage.googleapis.com/kubernetes-release/release/$(curl -s https://storage.googleapis.com/kubernetes-release/release/stable.txt)/bin/linux/amd64/kubectl
chmod +x ./kubectl
sudo mv ./kubectl /usr/local/bin/kubectl
echo "source <(kubectl completion bash)" >> ~/.bashrc
source ~/.bashrc
mkdir /usr/local/kubernetes/manifests -p

cd /usr/local/kubernetes/manifests/

cat > kubeadm-config.yaml <<EOF
apiVersion: kubeadm.k8s.io/v1beta2    # 集群主版本,根据集群版本号决定
bootstrapTokens:
- groups:
  - system:bootstrappers:kubeadm:default-node-token
  token: abcdef.0123456789abcdef
  ttl: 24h0m0s
  usages:
  - signing
  - authentication
kind: InitConfiguration
localAPIEndpoint:
  advertiseAddress: 172.31.0.4    #本机ip
  bindPort: 6443              #apiserver集群端口号
nodeRegistration:
  criSocket: /var/run/dockershim.sock
  name: k8s-master01           #本机hostname
  taints:
  - effect: NoSchedule
    key: node-role.kubernetes.io/master
apiServer:
  certSANs:
    - k8s-master01
    - k8s-master02
    - k8s-master03
    - master.k8s.io
    - 172.31.0.4
    - 172.31.0.5
    - 172.31.0.6
    - 172.31.0.7
    - 127.0.0.1
  extraArgs:
    authorization-mode: Node,RBAC
  timeoutForControlPlane: 4m0s
apiVersion: kubeadm.k8s.io/v1beta1
certificatesDir: /etc/kubernetes/pki
clusterName: kubernetes
controlPlaneEndpoint: "master.k8s.io:16443"     #虚拟vip地址+haproxy绑定的端口号
controllerManager: {}
dns:
  type: CoreDNS
etcd:
  local:
    dataDir: /var/lib/etcd
imageRepository: registry.aliyuncs.com/google_containers
kind: ClusterConfiguration
kubernetesVersion: v1.16.3         #这里注意要和kubeadmin的版本一样
networking:
  dnsDomain: cluster.local
  podSubnet: 10.244.0.0/16             #所有网络范围不重叠
  serviceSubnet: 10.1.0.0/16
scheduler: {}
EOF
[root@k8s-master01 manifests]# kubeadm init --config kubeadm-config.yaml
W0510 09:30:06.966439  127276 common.go:77] your configuration file uses a deprecated API spec: "kubeadm.k8s.io/v1beta1". Please use 'kubeadm config migrate --old-config old.yaml --new-config new.yaml', which will write the new, similar spec using a newer API version.
[init] Using Kubernetes version: v1.20.9
[preflight] Running pre-flight checks
        [WARNING SystemVerification]: this Docker version is not on the list of validated versions: 20.10.7. Latest validated version: 19.03
[preflight] Pulling images required for setting up a Kubernetes cluster
[preflight] This might take a minute or two, depending on the speed of your internet connection
[preflight] You can also perform this action in beforehand using 'kubeadm config images pull'
[certs] Using certificateDir folder "/etc/kubernetes/pki"
[certs] Generating "ca" certificate and key
[certs] Generating "apiserver" certificate and key
[certs] apiserver serving cert is signed for DNS names [k8s-master01 k8s-master02 k8s-master03 kubernetes kubernetes.default kubernetes.default.svc kubernetes.default.svc.cluster.local master.k8s.io] and IPs [10.1.0.1 192.168.65.132 172.31.0.4 172.31.0.5 172.31.0.6 172.31.0.99 127.0.0.1]
[certs] Generating "apiserver-kubelet-client" certificate and key
[certs] Generating "front-proxy-ca" certificate and key
[certs] Generating "front-proxy-client" certificate and key
[certs] Generating "etcd/ca" certificate and key
[certs] Generating "etcd/server" certificate and key
[certs] etcd/server serving cert is signed for DNS names [k8s-master01 localhost] and IPs [192.168.65.132 127.0.0.1 ::1]
[certs] Generating "etcd/peer" certificate and key
[certs] etcd/peer serving cert is signed for DNS names [k8s-master01 localhost] and IPs [192.168.65.132 127.0.0.1 ::1]
[certs] Generating "etcd/healthcheck-client" certificate and key
[certs] Generating "apiserver-etcd-client" certificate and key
[certs] Generating "sa" key and public key
[kubeconfig] Using kubeconfig folder "/etc/kubernetes"
[endpoint] WARNING: port specified in controlPlaneEndpoint overrides bindPort in the controlplane address
[kubeconfig] Writing "admin.conf" kubeconfig file
[endpoint] WARNING: port specified in controlPlaneEndpoint overrides bindPort in the controlplane address
[kubeconfig] Writing "kubelet.conf" kubeconfig file
[endpoint] WARNING: port specified in controlPlaneEndpoint overrides bindPort in the controlplane address
[kubeconfig] Writing "controller-manager.conf" kubeconfig file
[endpoint] WARNING: port specified in controlPlaneEndpoint overrides bindPort in the controlplane address
[kubeconfig] Writing "scheduler.conf" kubeconfig file
[kubelet-start] Writing kubelet environment file with flags to file "/var/lib/kubelet/kubeadm-flags.env"
[kubelet-start] Writing kubelet configuration to file "/var/lib/kubelet/config.yaml"
[kubelet-start] Starting the kubelet
[control-plane] Using manifest folder "/etc/kubernetes/manifests"
[control-plane] Creating static Pod manifest for "kube-apiserver"
[control-plane] Creating static Pod manifest for "kube-controller-manager"
[control-plane] Creating static Pod manifest for "kube-scheduler"
[etcd] Creating static Pod manifest for local etcd in "/etc/kubernetes/manifests"
[wait-control-plane] Waiting for the kubelet to boot up the control plane as static Pods from directory "/etc/kubernetes/manifests". This can take up to 4m0s
[apiclient] All control plane components are healthy after 7.641464 seconds
[upload-config] Storing the configuration used in ConfigMap "kubeadm-config" in the "kube-system" Namespace
[kubelet] Creating a ConfigMap "kubelet-config-1.20" in namespace kube-system with the configuration for the kubelets in the cluster
[upload-certs] Skipping phase. Please see --upload-certs
[mark-control-plane] Marking the node k8s-master01 as control-plane by adding the labels "node-role.kubernetes.io/master=''" and "node-role.kubernetes.io/control-plane='' (deprecated)"
[mark-control-plane] Marking the node k8s-master01 as control-plane by adding the taints [node-role.kubernetes.io/master:NoSchedule]
[bootstrap-token] Using token: k5j27i.bo0clckst09xkb6t
[bootstrap-token] Configuring bootstrap tokens, cluster-info ConfigMap, RBAC Roles
[bootstrap-token] configured RBAC rules to allow Node Bootstrap tokens to get nodes
[bootstrap-token] configured RBAC rules to allow Node Bootstrap tokens to post CSRs in order for nodes to get long term certificate credentials
[bootstrap-token] configured RBAC rules to allow the csrapprover controller automatically approve CSRs from a Node Bootstrap Token
[bootstrap-token] configured RBAC rules to allow certificate rotation for all node client certificates in the cluster
[bootstrap-token] Creating the "cluster-info" ConfigMap in the "kube-public" namespace
[kubelet-finalize] Updating "/etc/kubernetes/kubelet.conf" to point to a rotatable kubelet client certificate and key
[addons] Applied essential addon: CoreDNS
[endpoint] WARNING: port specified in controlPlaneEndpoint overrides bindPort in the controlplane address
[addons] Applied essential addon: kube-proxy

Your Kubernetes control-plane has initialized successfully!

To start using your cluster, you need to run the following as a regular user:

  mkdir -p $HOME/.kube
  sudo cp -i /etc/kubernetes/admin.conf $HOME/.kube/config
  sudo chown $(id -u):$(id -g) $HOME/.kube/config

Alternatively, if you are the root user, you can run:

  export KUBECONFIG=/etc/kubernetes/admin.conf

You should now deploy a pod network to the cluster.
Run "kubectl apply -f [podnetwork].yaml" with one of the options listed at:
  https://kubernetes.io/docs/concepts/cluster-administration/addons/

You can now join any number of control-plane nodes by copying certificate authorities
and service account keys on each node and then running the following as root:

  kubeadm join master.k8s.io:16443 --token k5j27i.bo0clckst09xkb6t \
    --discovery-token-ca-cert-hash sha256:0a0e6689586e6c6529484ed947689f5aa292f268e9eae03377ac2bc0bc85a530 \
    --control-plane

Then you can join any number of worker nodes by running the following on each as root:

kubeadm join master.k8s.io:16443 --token k5j27i.bo0clckst09xkb6t \
    --discovery-token-ca-cert-hash sha256:0a0e6689586e6c6529484ed947689f5aa292f268e9eae03377ac2bc0bc85a530
  mkdir -p $HOME/.kube
  sudo cp -i /etc/kubernetes/admin.conf $HOME/.kube/config
  sudo chown $(id -u):$(id -g) $HOME/.kube/config


  创建一个名为 .kube 的目录,该目录位于当前用户的主目录下(即 $HOME 目录)。
  使用 sudo 命令将位于 /etc/kubernetes/admin.conf 路径下的 Kubernetes 集群配置文件复制到 .kube/config 文件中。
  使用 chown 命令将 .kube/config 文件的所有权赋予当前用户,以便该用户可以对其进行读写操作。
[root@k8s-master01 ~]# kubectl get nodes
NAME           STATUS     ROLES                  AGE     VERSION
k8s-master01   NotReady   control-plane,master   8m14s   v1.20.9
[root@k8s-master01 ~]# kubectl get pod -n kube-system
NAME                                   READY   STATUS    RESTARTS   AGE
coredns-7f89b7bc75-mmpj9               0/1     Pending   0          8m3s
coredns-7f89b7bc75-rzt8b               0/1     Pending   0          8m3s
etcd-k8s-master01                      1/1     Running   0          8m17s
kube-apiserver-k8s-master01            1/1     Running   0          8m17s
kube-controller-manager-k8s-master01   1/1     Running   0          8m17s
kube-proxy-4rmbb                       1/1     Running   0          8m3s
kube-scheduler-k8s-master01            1/1     Running   0          8m17s
#这里处于pending状态的原因是因为还没有安装网络组件
从官方地址获取到flannel的yaml,在k8s-master01上执行
# 创建文件夹
mkdir flannel
cd flannel
# 下载yaml文件
wget -c https://raw.githubusercontent.com/coreos/flannel/master/Documentation/kube-flannel.yml
可能因为网络原因拉不下来所以这里留一份yml文件
---
kind: Namespace
apiVersion: v1
metadata:
  name: kube-flannel
  labels:
    k8s-app: flannel
    pod-security.kubernetes.io/enforce: privileged
---
kind: ClusterRole
apiVersion: rbac.authorization.k8s.io/v1
metadata:
  labels:
    k8s-app: flannel
  name: flannel
rules:
- apiGroups:
  - ""
  resources:
  - pods
  verbs:
  - get
- apiGroups:
  - ""
  resources:
  - nodes
  verbs:
  - get
  - list
  - watch
- apiGroups:
  - ""
  resources:
  - nodes/status
  verbs:
  - patch
- apiGroups:
  - networking.k8s.io
  resources:
  - clustercidrs
  verbs:
  - list
  - watch
---
kind: ClusterRoleBinding
apiVersion: rbac.authorization.k8s.io/v1
metadata:
  labels:
    k8s-app: flannel
  name: flannel
roleRef:
  apiGroup: rbac.authorization.k8s.io
  kind: ClusterRole
  name: flannel
subjects:
- kind: ServiceAccount
  name: flannel
  namespace: kube-flannel
---
apiVersion: v1
kind: ServiceAccount
metadata:
  labels:
    k8s-app: flannel
  name: flannel
  namespace: kube-flannel
---
kind: ConfigMap
apiVersion: v1
metadata:
  name: kube-flannel-cfg
  namespace: kube-flannel
  labels:
    tier: node
    k8s-app: flannel
    app: flannel
data:
  cni-conf.json: |
    {
      "name": "cbr0",
      "cniVersion": "0.3.1",
      "plugins": [
        {
          "type": "flannel",
          "delegate": {
            "hairpinMode": true,
            "isDefaultGateway": true
          }
        },
        {
          "type": "portmap",
          "capabilities": {
            "portMappings": true
          }
        }
      ]
    }
  net-conf.json: |
    {
      "Network": "10.244.0.0/16",
      "Backend": {
        "Type": "vxlan"
      }
    }
---
apiVersion: apps/v1
kind: DaemonSet
metadata:
  name: kube-flannel-ds
  namespace: kube-flannel
  labels:
    tier: node
    app: flannel
    k8s-app: flannel
spec:
  selector:
    matchLabels:
      app: flannel
  template:
    metadata:
      labels:
        tier: node
        app: flannel
    spec:
      affinity:
        nodeAffinity:
          requiredDuringSchedulingIgnoredDuringExecution:
            nodeSelectorTerms:
            - matchExpressions:
              - key: kubernetes.io/os
                operator: In
                values:
                - linux
      hostNetwork: true
      priorityClassName: system-node-critical
      tolerations:
      - operator: Exists
        effect: NoSchedule
      serviceAccountName: flannel
      initContainers:
      - name: install-cni-plugin
        image: docker.io/flannel/flannel-cni-plugin:v1.1.2
       #image: docker.io/rancher/mirrored-flannelcni-flannel-cni-plugin:v1.1.2
        command:
        - cp
        args:
        - -f
        - /flannel
        - /opt/cni/bin/flannel
        volumeMounts:
        - name: cni-plugin
          mountPath: /opt/cni/bin
      - name: install-cni
        image: docker.io/flannel/flannel:v0.21.5
       #image: docker.io/rancher/mirrored-flannelcni-flannel:v0.21.5
        command:
        - cp
        args:
        - -f
        - /etc/kube-flannel/cni-conf.json
        - /etc/cni/net.d/10-flannel.conflist
        volumeMounts:
        - name: cni
          mountPath: /etc/cni/net.d
        - name: flannel-cfg
          mountPath: /etc/kube-flannel/
      containers:
      - name: kube-flannel
        image: docker.io/flannel/flannel:v0.21.5
       #image: docker.io/rancher/mirrored-flannelcni-flannel:v0.21.5
        command:
        - /opt/bin/flanneld
        args:
        - --ip-masq
        - --kube-subnet-mgr
        resources:
          requests:
            cpu: "100m"
            memory: "50Mi"
        securityContext:
          privileged: false
          capabilities:
            add: ["NET_ADMIN", "NET_RAW"]
        env:
        - name: POD_NAME
          valueFrom:
            fieldRef:
              fieldPath: metadata.name
        - name: POD_NAMESPACE
          valueFrom:
            fieldRef:
              fieldPath: metadata.namespace
        - name: EVENT_QUEUE_DEPTH
          value: "5000"
        volumeMounts:
        - name: run
          mountPath: /run/flannel
        - name: flannel-cfg
          mountPath: /etc/kube-flannel/
        - name: xtables-lock
          mountPath: /run/xtables.lock
      volumes:
      - name: run
        hostPath:
          path: /run/flannel
      - name: cni-plugin
        hostPath:
          path: /opt/cni/bin
      - name: cni
        hostPath:
          path: /etc/cni/net.d
      - name: flannel-cfg
        configMap:
          name: kube-flannel-cfg
      - name: xtables-lock
        hostPath:
          path: /run/xtables.lock
          type: FileOrCreate
安装flannel网络,执行完apply之后需要等待一会,pending状态才会变成running。
kubectl apply -f kube-flannel.yml
检查,都已经running,且k8s-master01已经ready。
[root@k8s-master01 flannel]# kubectl get nodes
NAME           STATUS   ROLES                  AGE   VERSION
k8s-master01   Ready    control-plane,master   16m   v1.20.9
[root@k8s-master01 flannel]# kubectl get pod -A
NAMESPACE      NAME                                   READY   STATUS    RESTARTS   AGE
kube-flannel   kube-flannel-ds-z5nwb                  1/1     Running   0          2m41s
kube-system    coredns-7f89b7bc75-mmpj9               1/1     Running   0          16m
kube-system    coredns-7f89b7bc75-rzt8b               1/1     Running   0          16m
kube-system    etcd-k8s-master01                      1/1     Running   0          16m
kube-system    kube-apiserver-k8s-master01            1/1     Running   0          16m
kube-system    kube-controller-manager-k8s-master01   1/1     Running   0          16m
kube-system    kube-proxy-4rmbb                       1/1     Running   0          16m
kube-system    kube-scheduler-k8s-master01            1/1     Running   0          16m
#建立免登录
#创建 SSH 密钥对
ssh-keygen -t rsa
#进入到.ssh目录
cd /root/.ssh/
ssh-copy-id -i id_rsa.pub 172.31.0.5
ssh-copy-id -i id_rsa.pub 172.31.0.6
复制文件到k8s-master02
ssh root@172.31.0.5 mkdir -p /etc/kubernetes/pki/etcd
scp /etc/kubernetes/admin.conf root@172.31.0.5:/etc/kubernetes
scp /etc/kubernetes/pki/{ca.*,sa.*,front-proxy-ca.*} root@172.31.0.5:/etc/kubernetes/pki
scp /etc/kubernetes/pki/etcd/ca.* root@172.31.0.5:/etc/kubernetes/pki/etcd
复制文件到k8s-master03
ssh root@172.31.0.6 mkdir -p /etc/kubernetes/pki/etcd
scp /etc/kubernetes/admin.conf root@172.31.0.6:/etc/kubernetes
scp /etc/kubernetes/pki/{ca.*,sa.*,front-proxy-ca.*} root@172.31.0.6:/etc/kubernetes/pki
scp /etc/kubernetes/pki/etcd/ca.* root@172.31.0.6:/etc/kubernetes/pki/etcd
分别在其他两个master ,k8s-master02,k8s-master03上执行k8s-master01 init后输出的join命令,如果找不到可以在k8s-master01执行会重新生成 kubeadm token create --print-join-command
注意第一次生成的token有效期只有俩小时,如果服务器有多网卡的情况下 加入集群命令需要加一条 不然他可能会使用其他IP加入
在k8s-master02上执行操作,需要带上参数–control-plane表示把master控制节点加入到集群
apiserver-advertise-address 需要指定自己本机IP 这个不加的话如果遇到多网卡的情况可能会随机添加一个网卡的IP
 kubeadm join master.k8s.io:16443 --token k5j27i.bo0clckst09xkb6t \
 --discovery-token-ca-cert-hash sha256:0a0e6689586e6c6529484ed947689f5aa292f268e9eae03377ac2bc0bc85a530 \
 --apiserver-advertise-address=172.31.0.5   \
 --control-plane

 mkdir -p $HOME/.kube
 sudo cp -i /etc/kubernetes/admin.conf $HOME/.kube/config
 sudo chown $(id -u):$(id -g) $HOME/.kube/config
在k8s-master-03上执行join命令
 kubeadm join master.k8s.io:16443 --token k5j27i.bo0clckst09xkb6t \
 --discovery-token-ca-cert-hash sha256:0a0e6689586e6c6529484ed947689f5aa292f268e9eae03377ac2bc0bc85a530 \
  --apiserver-advertise-address=172.31.0.6    \
 --control-plane

 mkdir -p $HOME/.kube
 sudo cp -i /etc/kubernetes/admin.conf $HOME/.kube/config
 sudo chown $(id -u):$(id -g) $HOME/.kube/config
检查master是否加入成功
[root@k8s-master01 ~]# kubectl get nodes
NAME           STATUS   ROLES                  AGE     VERSION
k8s-master01   Ready    control-plane,master   60m     v1.20.9
k8s-master02   Ready    control-plane,master   14m     v1.20.9
k8s-master03   Ready    control-plane,master   11m     v1.20.9
k8s-node01     Ready    <none>                 9m42s   v1.20.9
k8s-node02     Ready    <none>                 115s    v1.20.9
[root@k8s-master01 ~]# kubectl get pod -A
NAMESPACE      NAME                                   READY   STATUS    RESTARTS   AGE
kube-flannel   kube-flannel-ds-bf56s                  1/1     Running   0          2m3s
kube-flannel   kube-flannel-ds-jwtfz                  1/1     Running   0          14m
kube-flannel   kube-flannel-ds-vrmwn                  1/1     Running   0          9m50s
kube-flannel   kube-flannel-ds-wm5vn                  1/1     Running   0          11m
kube-flannel   kube-flannel-ds-z5nwb                  1/1     Running   0          46m
kube-system    coredns-7f89b7bc75-mmpj9               1/1     Running   0          60m
kube-system    coredns-7f89b7bc75-rzt8b               1/1     Running   0          60m
kube-system    etcd-k8s-master01                      1/1     Running   0          60m
kube-system    etcd-k8s-master02                      1/1     Running   0          14m
kube-system    etcd-k8s-master03                      1/1     Running   0          11m
kube-system    kube-apiserver-k8s-master01            1/1     Running   0          60m
kube-system    kube-apiserver-k8s-master02            1/1     Running   0          14m
kube-system    kube-apiserver-k8s-master03            1/1     Running   0          11m
kube-system    kube-controller-manager-k8s-master01   1/1     Running   1          60m
kube-system    kube-controller-manager-k8s-master02   1/1     Running   0          14m
kube-system    kube-controller-manager-k8s-master03   1/1     Running   0          11m
kube-system    kube-proxy-4rmbb                       1/1     Running   0          60m
kube-system    kube-proxy-7c9mm                       1/1     Running   0          2m3s
kube-system    kube-proxy-9g2r4                       1/1     Running   0          9m50s
kube-system    kube-proxy-b4l7f                       1/1     Running   0          14m
kube-system    kube-proxy-qdntb                       1/1     Running   0          11m
kube-system    kube-scheduler-k8s-master01            1/1     Running   1          60m
kube-system    kube-scheduler-k8s-master02            1/1     Running   0          14m
kube-system    kube-scheduler-k8s-master03            1/1     Running   0          11m
在k8s-node01上执行join命令
kubeadm join master.k8s.io:16443 --token k5j27i.bo0clckst09xkb6t \
--discovery-token-ca-cert-hash sha256:0a0e6689586e6c6529484ed947689f5aa292f268e9eae03377ac2bc0bc85a530
检查node是否加入成功
[root@k8s-master01 ~]# kubectl get nodes
NAME           STATUS   ROLES                  AGE     VERSION
k8s-master01   Ready    control-plane,master   60m     v1.20.9
k8s-master02   Ready    control-plane,master   14m     v1.20.9
k8s-master03   Ready    control-plane,master   11m     v1.20.9
k8s-node01     Ready    <none>                 9m42s   v1.20.9
k8s-node02     Ready    <none>                 115s    v1.20.9
[root@k8s-master01 ~]# kubectl get pod -A
NAMESPACE      NAME                                   READY   STATUS    RESTARTS   AGE
kube-flannel   kube-flannel-ds-bf56s                  1/1     Running   0          2m3s
kube-flannel   kube-flannel-ds-jwtfz                  1/1     Running   0          14m
kube-flannel   kube-flannel-ds-vrmwn                  1/1     Running   0          9m50s
kube-flannel   kube-flannel-ds-wm5vn                  1/1     Running   0          11m
kube-flannel   kube-flannel-ds-z5nwb                  1/1     Running   0          46m
kube-system    coredns-7f89b7bc75-mmpj9               1/1     Running   0          60m
kube-system    coredns-7f89b7bc75-rzt8b               1/1     Running   0          60m
kube-system    etcd-k8s-master01                      1/1     Running   0          60m
kube-system    etcd-k8s-master02                      1/1     Running   0          14m
kube-system    etcd-k8s-master03                      1/1     Running   0          11m
kube-system    kube-apiserver-k8s-master01            1/1     Running   0          60m
kube-system    kube-apiserver-k8s-master02            1/1     Running   0          14m
kube-system    kube-apiserver-k8s-master03            1/1     Running   0          11m
kube-system    kube-controller-manager-k8s-master01   1/1     Running   1          60m
kube-system    kube-controller-manager-k8s-master02   1/1     Running   0          14m
kube-system    kube-controller-manager-k8s-master03   1/1     Running   0          11m
kube-system    kube-proxy-4rmbb                       1/1     Running   0          60m
kube-system    kube-proxy-7c9mm                       1/1     Running   0          2m3s
kube-system    kube-proxy-9g2r4                       1/1     Running   0          9m50s
kube-system    kube-proxy-b4l7f                       1/1     Running   0          14m
kube-system    kube-proxy-qdntb                       1/1     Running   0          11m
kube-system    kube-scheduler-k8s-master01            1/1     Running   1          60m
kube-system    kube-scheduler-k8s-master02            1/1     Running   0          14m
kube-system    kube-scheduler-k8s-master03            1/1     Running   0          11m
七、设置允许POD调度到master上面
默认配置下Kubernetes不会将Pod调度到Master节点。如果希望将k8s-master也当作Node使用,可以执行如下命令:
#查看默认配置的污点
[root@k8s-master01 ~]#  kubectl describe node k8s-master01 |grep Taints
Taints:             node-role.kubernetes.io/master:NoSchedule
[root@k8s-master01 ~]#  kubectl describe node k8s-master02 |grep Taints
Taints:             node-role.kubernetes.io/master:NoSchedule
[root@k8s-master01 ~]#  kubectl describe node k8s-master03 |grep Taints
Taints:             node-role.kubernetes.io/master:NoSchedule
#去除污点
[root@k8s-master01 ~]# kubectl taint node k8s-master02 node-role.kubernetes.io/master-
node/k8s-master02 untainted
[root@k8s-master01 ~]# kubectl taint node k8s-master03 node-role.kubernetes.io/master-
node/k8s-master03 untainted
#再次查询
[root@k8s-master01 ~]#  kubectl describe node k8s-master02 |grep Taints
Taints:             <none>
[root@k8s-master01 ~]#  kubectl describe node k8s-master03 |grep Taints
Taints:             <none>
#这样POD就可以调度到master02和master03上面了
测试kubernetes集群

在Kubernetes集群中创建一个pod,验证是否可以正常调度到master02和master03上:

# 创建nginx deployment
kubectl create deployment nginx --image=nginx --replicas=20
# 暴露端口
kubectl expose deployment nginx --port=80 --target-port=80 --type=NodePort
# 查看状态
kubectl get pod,svc
#
[root@k8s-master01 ~]# kubectl get svc
NAME         TYPE        CLUSTER-IP    EXTERNAL-IP   PORT(S)        AGE
kubernetes   ClusterIP   10.1.0.1      <none>        443/TCP        5h3m
nginx        NodePort    10.1.89.205   <none>        80:31658/TCP   2m38s
#可以看到已经有pod已经调度到master02和master03上面了
[root@k8s-master01 ~]# kubectl get pod -owide
NAME                     READY   STATUS             RESTARTS   AGE     IP            NODE           NOMINATED NODE   READINESS GATES
nginx-6799fc88d8-22qvj   1/1     Running            0          101s    10.244.1.2    k8s-master02   <none>           <none>
nginx-6799fc88d8-26n7d   1/1     Running            0          101s    10.244.3.17   k8s-node01     <none>           <none>
nginx-6799fc88d8-26ptq   1/1     Running            0          2m3s    10.244.3.13   k8s-node01     <none>           <none>
nginx-6799fc88d8-5dl2z   1/1     Running            0          101s    10.244.2.2    k8s-master03   <none>           <none>
nginx-6799fc88d8-5f99h   1/1     Running            0          3m44s   10.244.3.9    k8s-node01     <none>           <none>
nginx-6799fc88d8-72dst   1/1     Running            0          101s    10.244.4.11   k8s-node02     <none>           <none>
nginx-6799fc88d8-bbn5d   1/1     Running            0          2m3s    10.244.4.9    k8s-node02     <none>           <none>
nginx-6799fc88d8-cnz9z   1/1     Running            0          101s    10.244.3.15   k8s-node01     <none>           <none>
nginx-6799fc88d8-f69w5   1/1     Running            0          2m3s    10.244.4.7    k8s-node02     <none>           <none>
nginx-6799fc88d8-g7b98   1/1     Running            0          43m     10.244.4.3    k8s-node02     <none>           <none>
nginx-6799fc88d8-j66bk   1/1     Running            0          3m44s   10.244.3.11   k8s-node01     <none>           <none>
nginx-6799fc88d8-j9vg2   1/1     Running            0          3m44s   10.244.3.10   k8s-node01     <none>           <none>
nginx-6799fc88d8-kbhc8   1/1     Running            0          101s    10.244.4.13   k8s-node02     <none>           <none>
nginx-6799fc88d8-m52dm   1/1     Running            0          2m3s    10.244.3.12   k8s-node01     <none>           <none>
nginx-6799fc88d8-mk8lw   1/1     Running            0          101s    10.244.3.16   k8s-node01     <none>           <none>
nginx-6799fc88d8-n6tkg   1/1     Running            0          101s    10.244.3.14   k8s-node01     <none>           <none>
nginx-6799fc88d8-rtxrg   1/1     Running            0          2m3s    10.244.4.8    k8s-node02     <none>           <none>
nginx-6799fc88d8-rxkjt   1/1     Running            0          43m     10.244.4.4    k8s-node02     <none>           <none>
nginx-6799fc88d8-t8fdl   1/1     Running            0          101s    10.244.4.12   k8s-node02     <none>           <none>
nginx-6799fc88d8-zwrwp   1/1     Running            0          101s    10.244.4.10   k8s-node02     <none>           <none>
八、集群的扩容,缩容
1.集群扩容

默认情况下加入集群的token是24小时过期,24小时后如果是想要新的node加入到集群,需要重新生成一个token,命令如下

# 显示获取token列表

$ kubeadm token list

# 生成新的token

$ kubeadm token create

除token外,join命令还需要一个sha256的值,通过以下方法计算

openssl x509 -pubkey -in /etc/kubernetes/pki/ca.crt | openssl rsa -pubin -outform der 2>/dev/null | openssl dgst -sha256 -hex | sed 's/^.* //'

用上面输出的token和sha256的值或者是利用kubeadm token create --print-join-command拼接join命令即可

2.集群的缩容

kubectl cordon <node name> #设置为不可调度

kubectl drain <node name> --delete-local-data --force --ignore-daemonsets 驱逐节点上的pod

kubectl delete node <node name>

3.初始化重新加入

需要把原来的配置清空

kubeadm reset

systemctl stop kubelet

systemctl stop docker

rm -rf /var/lib/cni/

rm -rf /var/lib/kubelet/*

rm -rf /etc/cni/

ifconfig cni0 down

ifconfig flannel.1 down

ifconfig docker0 down

ip link delete cni0

ip link delete flannel.1

systemctl start docker
九、模拟
我们现在有3个master节点,2个node节点,经过上述测试,发现集群可以正常访问nginx服务,因为三台master在正常运行,我们现在模拟挂掉一台master,让另外2台master正常运行,看一下会有什么效果:
#首先查询一下节点运行状态
[root@k8s-master01 ~]# kubectl get nodes
NAME           STATUS   ROLES                  AGE     VERSION
k8s-master01   Ready    control-plane,master   5h10m   v1.20.9
k8s-master02   Ready    control-plane,master   4h25m   v1.20.9
k8s-master03   Ready    control-plane,master   4h22m   v1.20.9
k8s-node01     Ready    <none>                 4h20m   v1.20.9
k8s-node02     Ready    <none>                 4h12m   v1.20.9
#我们现在把master01这台服务器关掉,再看集群状态,关掉一会之后,发现master01节点状态变成了NotReady
[root@k8s-master02 ~]# kubectl get nodes
NAME           STATUS     ROLES                  AGE     VERSION
k8s-master01   NotReady   control-plane,master   5h14m   v1.20.9
k8s-master02   Ready      control-plane,master   4h28m   v1.20.9
k8s-master03   Ready      control-plane,master   4h25m   v1.20.9
k8s-node01     Ready      <none>                 4h23m   v1.20.9
k8s-node02     Ready      <none>                 4h15m   v1.20.9
#可以看到vip地址成功转移到master02节点上
2: ens33: <BROADCAST,MULTICAST,UP,LOWER_UP> mtu 1500 qdisc pfifo_fast state UP group default qlen 1000
    link/ether 00:0c:29:e0:53:6e brd ff:ff:ff:ff:ff:ff
    inet 172.31.0.5/24 brd 172.31.0.255 scope global noprefixroute ens33
       valid_lft forever preferred_lft forever
    inet 172.31.0.99/32 scope global ens33
       valid_lft forever preferred_lft forever
    inet6 fe80::20c:29ff:fee0:536e/64 scope link
       valid_lft forever preferred_lft forever
#修改一下刚刚创建的deployment的副本数验证一下功能是否正常
kubectl scale --replicas=5 deployment/nginx
[root@k8s-master02 ~]# kubectl get pod
NAME                     READY   STATUS    RESTARTS   AGE
nginx-6799fc88d8-5dl2z   1/1     Running   0          16m
nginx-6799fc88d8-bbn5d   1/1     Running   0          16m
nginx-6799fc88d8-f69w5   1/1     Running   0          16m
nginx-6799fc88d8-g7b98   1/1     Running   0          58m
nginx-6799fc88d8-rxkjt   1/1     Running   0          58m
[root@k8s-master02 ~]# kubectl scale --replicas=10 deployment/nginx
deployment.apps/nginx scaled
[root@k8s-master02 ~]# kubectl get pod
NAME                     READY   STATUS              RESTARTS   AGE
nginx-6799fc88d8-5dl2z   1/1     Running             0          17m
nginx-6799fc88d8-b5tmh   0/1     ContainerCreating   0          2s
nginx-6799fc88d8-bbn5d   1/1     Running             0          18m
nginx-6799fc88d8-ck4nn   1/1     Running             0          2s
nginx-6799fc88d8-f69w5   1/1     Running             0          18m
nginx-6799fc88d8-g7b98   1/1     Running             0          59m
nginx-6799fc88d8-l6j59   1/1     Running             0          2s
nginx-6799fc88d8-n6lrr   0/1     ContainerCreating   0          2s
nginx-6799fc88d8-pwwgp   0/1     ContainerCreating   0          2s
nginx-6799fc88d8-rxkjt   1/1     Running             0          59m
#可以看到挂掉一台master还是可以正常跑的
我们再使用其他节点的IP加上端口号访问nginx试一下,发现可以正常访问;如果使用master01节点的IP加端口号就无法访问nginx,是因为master01服务器已经关闭。
 到现在为止,我们有2台正在运行的master,现在我们再关闭一台master,把master02也关掉,只留一台master,试一下会怎么样?
关闭前的状态:

关闭后再次执行kubectl get nodes命令,发现报错了,显示无法连接到服务器。

虽然这时候在访问nginx还是可以正常访问,但是此时的集群已经坏掉了。
所以,如果有3个master节点,必须要保证2个正常运行;如果有5个master,必须保证3个正常运行。假设有N个master节点,必须保证有(N+1)/2个节点正常运行,才能保证集群正常。

可以看到master01节点一启动vip地址就回来了

[root@k8s-master01 ~]# kubectl get nodes
NAME           STATUS     ROLES                  AGE     VERSION
k8s-master01   Ready      control-plane,master   5h26m   v1.20.9
k8s-master02   NotReady   control-plane,master   4h40m   v1.20.9
k8s-master03   Ready      control-plane,master   4h37m   v1.20.9
k8s-node01     Ready      <none>                 4h36m   v1.20.9
k8s-node02     Ready      <none>                 4h28m   v1.20.9
十、离线安装
在安装的时候可能会遇到客户环境没网的情况这时候就需要打包好离线包进行离线安装了
下面是我编写的一个一键执行脚本,主节点执行,其余节点需要删除部分内容之后再执行
脚本里面没写去除污点操作有需要的可以看上面
离线包下载地址:
链接:https://pan.baidu.com/s/1moe7MRKPqAtiIuY5R1uiAA?pwd=08sq
提取码:08sq
#!/bin/bash
echo ---设置hosts文件主机名---
read -p "输入k8s-vip地址:"  k8svip
echo "$k8svip master.k8s.io k8s-vip" >> /etc/hosts
read -p "输入k8s-master01,ip:"  master01
echo "$master01  master01.k8s.io  k8s-master01" >> /etc/hosts
read -p "输入k8s-master02,ip:"  master02
echo "$master02  master02.k8s.io  k8s-master02" >> /etc/hosts
read -p "输入k8s-master03,ip:"  master03
echo "$master03  master03.k8s.io  k8s-master03" >> /etc/hosts
read -p "输入k8s-node01,ip:"  node01
echo "$node01  node01.k8s.io  k8s-node01" >> /etc/hosts
read -p "输入k8s-node02,ip:"  node02
echo "$node02  node02.k8s.io  k8s-node02" >> /etc/hosts
echo ---更改主机名-----
read -p  "输入主机名:" name


if [ ! -n "$name" ];then
echo "请输入节点名称"
exit 1
else
echo $name
fi
hostnamectl set-hostname $name
echo ---关闭防火墙---
systemctl stop firewalld
systemctl disable firewalld

echo ---关闭selinux----
sed -i 's/enforcing/disabled/' /etc/selinux/config
setenforce 0

echo ---关闭swap---
swapoff -a
sed -i 's/.*swap.*/#&/' /etc/fstab

echo ---将桥接的IPv4流量传递到iptables的链---
cat > /etc/sysctl.d/k8s.conf << EOF
net.bridge.bridge-nf-call-ip6tables = 1
net.bridge.bridge-nf-call-iptables = 1
EOF

sysctl --system

echo --------------同步时间-----------------
#yum -y install ntpdate
#ntpdate cn.pool.ntp.org


echo  --------安装keepalived-----------
cd /root/k8s-master
tar xf pack.tar.gz
cd /root/k8s-master/pack
rpm -ivh  keepalived/*.rpm --nodeps --force


echo ------------------编写检测脚本一会会在keepalived配置文件中用到在3台master操作-----------------


cat > /etc/keepalived/check_haproxy.sh <<EOF
#!/bin/bash
if [ $(ps -C haproxy --no-header | wc -l) -eq 0 ]; then    #这行代码检查是否没有正在运行的haproxy进程。ps命令列出所有正在运行的进程,-C haproxy过滤只有haproxy进程,--no-header从输出中移除标题,wc -l计算行数(进程)。如果没有haproxy进程,则执行if块内的代码。
   systemctl start haproxy        #这行代码使用systemd systemctl命令启动haproxy服务
   sleep 3                        #这行代码暂停脚本3秒钟,然后继续执行

   if [ $(ps -C haproxy --no-header | wc -l) -eq 0 ]; then  #这行代码再次检查haproxy进程是否仍未运行。如果没有haproxy进程,则执行嵌套在if块内的代码。
          systemctl stop keepalived
   fi
fi
EOF
chmod +x /etc/keepalived/check_haproxy.sh


echo -------------------修改配置文件中----------------

read -p "输入网卡名称:"  NIC
read -p "输入keepalived优先级:" priority
read -p "输入选择如果是主节点 则为MASTER ,其他则为 BACKUP:" state

cat > /etc/keepalived/keepalived.conf <<EOF
! Configuration File for keepalived

global_defs {
   router_id k8s
}

vrrp_script check_haproxy {
    #script "killall -0 haproxy"
    script "/etc/keepalived/check_haproxy.sh"   #刚刚配置的检测脚本
    interval 3  #此脚本每3秒执行一次
    weight -2   #权重
    fall 10     #如果脚本连续失败10次(fall),则keepalived将认为服务器已停止
    rise 2      #当脚本在失败后连续成功两次(rise)时,keepalived将再次将服务器视为已启动。
}

vrrp_instance VI_1 {
    state MASTER     #如果是主节点 则为MASTER ,其他则为 BACKUP
    interface NIC  #网卡名称
    virtual_router_id 51
    priority 250  #优先级高于另外两台即可
    nopreempt   #设置非抢占模式
    preempt_delay 10  #抢占延时10分钟
    advert_int 1      #检查间隔默认1s
    authentication {
        auth_type PASS    #  设置验证类型,主要有PASS和AH两种
        auth_pass ceb1b3ec013d66163d6ab11     #  设置验证密码,同一个vrrp_instance下,MASTER和BACKUP的密码必须一致才能正常通信
    }
    virtual_ipaddress {
        172.31.0.99    #VIP地址
    }
    track_script {
        check_haproxy
    }

}
EOF

sed -i "s/NIC/$NIC/g"  /etc/keepalived/keepalived.conf
sed -i "s/250/$priority/g"  /etc/keepalived/keepalived.conf
sed -i "s/172.31.0.99/$k8svip/g"  /etc/keepalived/keepalived.conf
sed -i "s/MASTER/$state/g"  /etc/keepalived/keepalived.conf


echo ------设置开机并且设置开机自启---------
systemctl start keepalived && systemctl enable keepalived


echo -----------安装haproxy------------------

cd /root/k8s-master/pack
rpm -ivh  haproxy/*.rpm --nodeps --force

cat > /etc/haproxy/haproxy.cfg << EOF
#---------------------------------------------------------------------
# Global settings
#---------------------------------------------------------------------
global
    # to have these messages end up in /var/log/haproxy.log you will
    # need to:
    # 1) configure syslog to accept network log events.  This is done
    #    by adding the '-r' option to the SYSLOGD_OPTIONS in
    #    /etc/sysconfig/syslog
    # 2) configure local2 events to go to the /var/log/haproxy.log
    #   file. A line like the following can be added to
    #   /etc/sysconfig/syslog
    #
    #    local2.*                       /var/log/haproxy.log
    #
    log         127.0.0.1 local2

    chroot      /var/lib/haproxy
    pidfile     /var/run/haproxy.pid
    maxconn     4000
    user        haproxy
    group       haproxy
    daemon

    # turn on stats unix socket
    stats socket /var/lib/haproxy/stats
#---------------------------------------------------------------------
# common defaults that all the 'listen' and 'backend' sections will
# use if not designated in their block
#---------------------------------------------------------------------
defaults
    mode                    http
    log                     global
    option                  httplog
    option                  dontlognull
    option http-server-close
    option forwardfor       except 127.0.0.0/8
    option                  redispatch
    retries                 3
    timeout http-request    10s
    timeout queue           1m
    timeout connect         10s
    timeout client          1m
    timeout server          1m
    timeout http-keep-alive 10s
    timeout check           10s
    maxconn                 3000
#---------------------------------------------------------------------
# kubernetes apiserver frontend which proxys to the backends
#---------------------------------------------------------------------
frontend kubernetes-apiserver
    mode                 tcp
    bind                 *:16443
    option               tcplog
    default_backend      kubernetes-apiserver
#---------------------------------------------------------------------
# round robin balancing between the various backends
#---------------------------------------------------------------------
backend kubernetes-apiserver
    mode        tcp
    balance     roundrobin
    server      master01.k8s.io   172.31.0.4:6443 check
    server      master02.k8s.io   172.31.0.5:6443 check
    server      master03.k8s.io   172.31.0.6:6443 check
#---------------------------------------------------------------------
# collection haproxy statistics message
#---------------------------------------------------------------------
listen stats
    bind                 *:1080
    stats auth           admin:awesomePassword
    stats refresh        5s
    stats realm          HAProxy\ Statistics
    stats uri            /admin?stats
EOF

sed -i "s/172.31.0.4/$master01/g" /etc/haproxy/haproxy.cfg
sed -i "s/172.31.0.5/$master02/g" /etc/haproxy/haproxy.cfg
sed -i "s/172.31.0.6/$master03/g" /etc/haproxy/haproxy.cfg

# 启动 haproxy
systemctl start haproxy
# 设置开启自启
systemctl enable haproxy
# 查看启动状态
systemctl status haproxy

netstat -tunlp | grep haproxy

echo -----------------安装docker--------------
cd /root/k8s-master/pack
rpm -ivh  docker/*.rpm --nodeps --force

systemctl enable docker --now


sudo mkdir -p /etc/docker

cat > /etc/docker/daemon.json <<EOF
{
  "exec-opts": ["native.cgroupdriver=cgroupfs"],
  "insecure-registries": ["192.168.31.121:5000"],
  "registry-mirrors": ["http://hub-mirror.c.163.com"]
}
EOF
sed -i "s/192.168.31.121/$node02/g" /etc/docker/daemon.json

sudo systemctl daemon-reload
sudo systemctl restart docker


echo ------------安装k8s----------------
cd /root/k8s-master/pack
rpm -ivh  kubelet/*.rpm --nodeps --force


sudo systemctl enable --now kubelet


#安装 bash-completion 包

cd /root/k8s-master/pack
rpm -ivh  bash-completion/*.rpm --nodeps --force

#下载 kubectl 补全脚本
cd ./bash-completion
chmod +x ./kubectl
sudo mv ./kubectl /usr/local/bin/kubectl
echo "source <(kubectl completion bash)" >> ~/.bashrc
source ~/.bashrc


#导入镜像
cd /root/k8s-master
unzip images.zip
cd /root/k8s-master/images
for i in `ls`;do docker load -i $i ;done


echo ----------初始化主节点--------------------
mkdir /usr/local/kubernetes/manifests -p

cd /usr/local/kubernetes/manifests/

cat > kubeadm-config.yaml <<EOF
apiVersion: kubeadm.k8s.io/v1beta2    # 集群主版本,根据集群版本号决定
bootstrapTokens:
- groups:
  - system:bootstrappers:kubeadm:default-node-token
  token: abcdef.0123456789abcdef
  ttl: 24h0m0s
  usages:
  - signing
  - authentication
kind: InitConfiguration
localAPIEndpoint:
  advertiseAddress: 192.168.2.200    #本机ip
  bindPort: 6443              #apiserver集群端口号
nodeRegistration:
  criSocket: /var/run/dockershim.sock
  name: k8s-master01           #本机hostname
  taints:
  - effect: NoSchedule
    key: node-role.kubernetes.io/master
---
apiServer:
  certSANs:
    - k8s-master01
    - k8s-master02
    - k8s-master03
    - master.k8s.io
    - 172.31.0.4
    - 172.31.0.5
    - 172.31.0.6
    - 172.31.0.99
    - 127.0.0.1
  extraArgs:
    authorization-mode: Node,RBAC
  timeoutForControlPlane: 2m0s      # 注册时间2分钟
apiVersion: kubeadm.k8s.io/v1beta2
certificatesDir: /etc/kubernetes/pki
clusterName: kubernetes      # 集群名字
controlPlaneEndpoint: "master.k8s.io:16443"              # 虚拟ip + haproxy绑定的端口号
controllerManager: {}
dns:
  type: CoreDNS
etcd:
  local:
    dataDir: /var/lib/etcd
imageRepository: registry.aliyuncs.com/google_containers
kind: ClusterConfiguration
kubernetesVersion: v1.18.0               # 集群版本,需要与kubeadm版本一致
networking:
  dnsDomain: cluster.local
  podSubnet: 10.244.0.0/16                 # pod 内网ip网段
  serviceSubnet: 10.96.0.0/12               # svc 内网ip网段
scheduler: {}
EOF


version=$(kubeadm version -o short)
sed -i "s/172.31.0.4/$master01/g" kubeadm-config.yaml
sed -i "s/172.31.0.5/$master02/g" kubeadm-config.yaml
sed -i "s/172.31.0.6/$master03/g" kubeadm-config.yaml
sed -i "s/172.31.0.99/$k8svip/g" kubeadm-config.yaml
sed -i "s/v1.18.0/$version/g" kubeadm-config.yaml
sed -i "s/192.168.2.200/$master01/g" kubeadm-config.yaml


kubeadm init --config kubeadm-config.yaml

mkdir -p $HOME/.kube
sudo cp -i /etc/kubernetes/admin.conf $HOME/.kube/config
sudo chown $(id -u):$(id -g) $HOME/.kube/config


echo ------------安装集群网络---------------
mkdir -p /root/flannel
cd /root/flannel

cat > kube-flannel.yml <<EOF
kind: Namespace
apiVersion: v1
metadata:
  name: kube-flannel
  labels:
    k8s-app: flannel
    pod-security.kubernetes.io/enforce: privileged
---
kind: ClusterRole
apiVersion: rbac.authorization.k8s.io/v1
metadata:
  labels:
    k8s-app: flannel
  name: flannel
rules:
- apiGroups:
  - ""
  resources:
  - pods
  verbs:
  - get
- apiGroups:
  - ""
  resources:
  - nodes
  verbs:
  - get
  - list
  - watch
- apiGroups:
  - ""
  resources:
  - nodes/status
  verbs:
  - patch
- apiGroups:
  - networking.k8s.io
  resources:
  - clustercidrs
  verbs:
  - list
  - watch
---
kind: ClusterRoleBinding
apiVersion: rbac.authorization.k8s.io/v1
metadata:
  labels:
    k8s-app: flannel
  name: flannel
roleRef:
  apiGroup: rbac.authorization.k8s.io
  kind: ClusterRole
  name: flannel
subjects:
- kind: ServiceAccount
  name: flannel
  namespace: kube-flannel
---
apiVersion: v1
kind: ServiceAccount
metadata:
  labels:
    k8s-app: flannel
  name: flannel
  namespace: kube-flannel
---
kind: ConfigMap
apiVersion: v1
metadata:
  name: kube-flannel-cfg
  namespace: kube-flannel
  labels:
    tier: node
    k8s-app: flannel
    app: flannel
data:
  cni-conf.json: |
    {
      "name": "cbr0",
      "cniVersion": "0.3.1",
      "plugins": [
        {
          "type": "flannel",
          "delegate": {
            "hairpinMode": true,
            "isDefaultGateway": true
          }
        },
        {
          "type": "portmap",
          "capabilities": {
            "portMappings": true
          }
        }
      ]
    }
  net-conf.json: |
    {
      "Network": "10.244.0.0/16",
      "Backend": {
        "Type": "vxlan"
      }
    }
---
apiVersion: apps/v1
kind: DaemonSet
metadata:
  name: kube-flannel-ds
  namespace: kube-flannel
  labels:
    tier: node
    app: flannel
    k8s-app: flannel
spec:
  selector:
    matchLabels:
      app: flannel
  template:
    metadata:
      labels:
        tier: node
        app: flannel
    spec:
      affinity:
        nodeAffinity:
          requiredDuringSchedulingIgnoredDuringExecution:
            nodeSelectorTerms:
            - matchExpressions:
              - key: kubernetes.io/os
                operator: In
                values:
                - linux
      hostNetwork: true
      priorityClassName: system-node-critical
      tolerations:
      - operator: Exists
        effect: NoSchedule
      serviceAccountName: flannel
      initContainers:
      - name: install-cni-plugin
        image: docker.io/flannel/flannel-cni-plugin:v1.1.2
       #image: docker.io/rancher/mirrored-flannelcni-flannel-cni-plugin:v1.1.2
        command:
        - cp
        args:
        - -f
        - /flannel
        - /opt/cni/bin/flannel
        volumeMounts:
        - name: cni-plugin
          mountPath: /opt/cni/bin
      - name: install-cni
        image: docker.io/flannel/flannel:v0.21.5
       #image: docker.io/rancher/mirrored-flannelcni-flannel:v0.21.5
        command:
        - cp
        args:
        - -f
        - /etc/kube-flannel/cni-conf.json
        - /etc/cni/net.d/10-flannel.conflist
        volumeMounts:
        - name: cni
          mountPath: /etc/cni/net.d
        - name: flannel-cfg
          mountPath: /etc/kube-flannel/
      containers:
      - name: kube-flannel
        image: docker.io/flannel/flannel:v0.21.5
       #image: docker.io/rancher/mirrored-flannelcni-flannel:v0.21.5
        command:
        - /opt/bin/flanneld
        args:
        - --ip-masq
        - --kube-subnet-mgr
        resources:
          requests:
            cpu: "100m"
            memory: "50Mi"
        securityContext:
          privileged: false
          capabilities:
            add: ["NET_ADMIN", "NET_RAW"]
        env:
        - name: POD_NAME
          valueFrom:
            fieldRef:
              fieldPath: metadata.name
        - name: POD_NAMESPACE
          valueFrom:
            fieldRef:
              fieldPath: metadata.namespace
        - name: EVENT_QUEUE_DEPTH
          value: "5000"
        volumeMounts:
        - name: run
          mountPath: /run/flannel
        - name: flannel-cfg
          mountPath: /etc/kube-flannel/
        - name: xtables-lock
          mountPath: /run/xtables.lock
      volumes:
      - name: run
        hostPath:
          path: /run/flannel
      - name: cni-plugin
        hostPath:
          path: /opt/cni/bin
      - name: cni
        hostPath:
          path: /etc/cni/net.d
      - name: flannel-cfg
        configMap:
          name: kube-flannel-cfg
      - name: xtables-lock
        hostPath:
          path: /run/xtables.lock
          type: FileOrCreate
EOF

kubectl apply -f kube-flannel.yml


cd /root
#建立免登录
#创建 SSH 密钥对
ssh-keygen -t rsa
#进入到.ssh目录
cd /root/.ssh/
ssh-copy-id -i id_rsa.pub $master02
ssh-copy-id -i id_rsa.pub $master03


#复制文件到k8s-master02

ssh root@$master02 mkdir -p /etc/kubernetes/pki/etcd
scp /etc/kubernetes/admin.conf root@$master02:/etc/kubernetes
scp /etc/kubernetes/pki/{ca.*,sa.*,front-proxy-ca.*} root@$master02:/etc/kubernetes/pki
scp /etc/kubernetes/pki/etcd/ca.* root@$master02:/etc/kubernetes/pki/etcd

#复制文件到k8s-master03

ssh root@$master03 mkdir -p /etc/kubernetes/pki/etcd
scp /etc/kubernetes/admin.conf root@$master03:/etc/kubernetes
scp /etc/kubernetes/pki/{ca.*,sa.*,front-proxy-ca.*} root@$master03:/etc/kubernetes/pki
scp /etc/kubernetes/pki/etcd/ca.* root@$master03:/etc/kubernetes/pki/etcd

K8S/Kubernetes社区为您提供最前沿的新闻资讯和知识内容
更多推荐
 0
0 0
0- 0


 已为社区贡献2条内容

所有评论(0)