
一篇文章介绍使用PeerJS实现实时在线消息发送
PeerJS开源项目简化了WebrRTC的开发过程,对底层的细节做了封装,直接调用API即可。可以实现一端通过知道另一端的ID进行连接,ID可以自行设置也可以服务器随机分配,并且建立。发起者请求连接,接收者接收连接后,发送者上传一个png图片,接收者也能正常收到。,指的是一类指定元素类型的数组,而不是array的数组类型。功能实现的js功能包,提供丰富的、易用的并且可以配置的。连接到指定的远程pe
1.PeerJS介绍
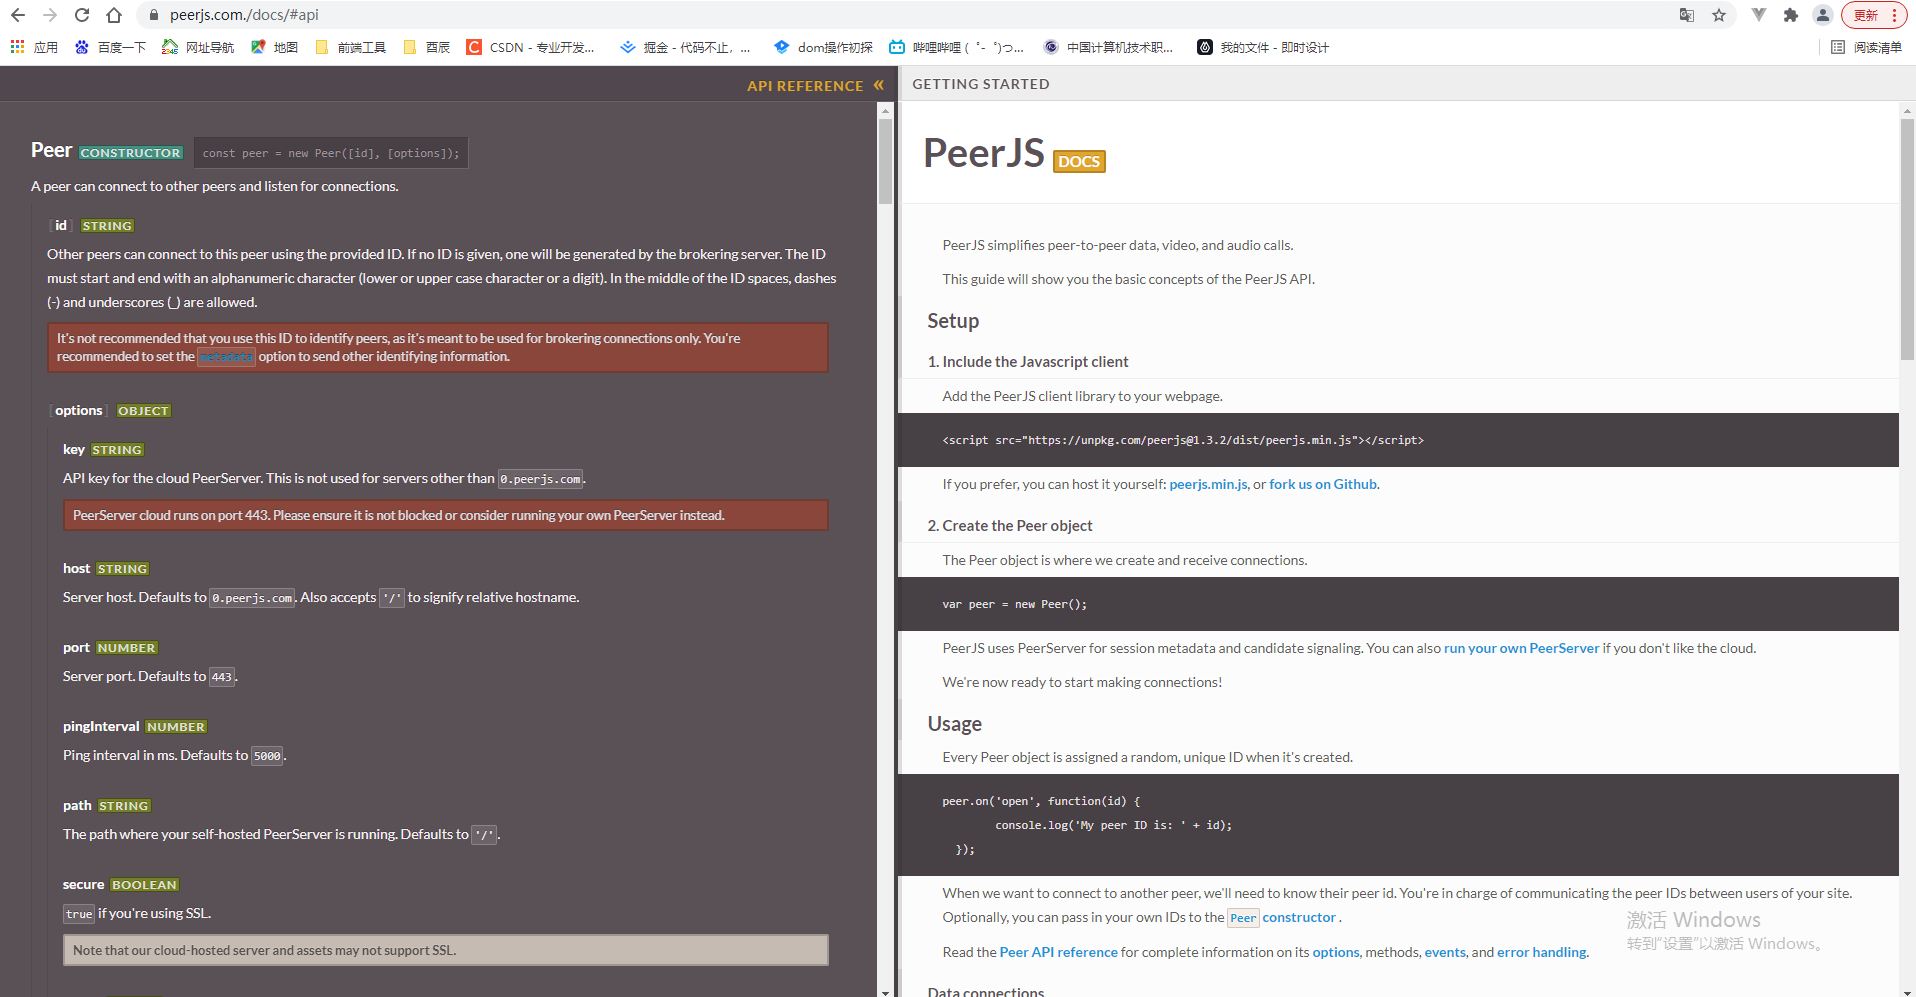
PeerJS 是一个基于浏览器WebRTC功能实现的js功能包,提供丰富的、易用的并且可以配置的P2P连接API,借助PeerJS可以实现一端通过知道另一端的ID进行连接,ID可以自行设置也可以服务器随机分配,并且建立Data或Media连接,实现data数据或者Media传输功能。
PeerJS开源项目简化了WebrRTC的开发过程,对底层的细节做了封装,直接调用API即可。
2.PeerJS 基础用法
PeerJS的核心对象是Peer,有以下常用的方法:
创建对等对象
Peer 对象是我们创建和接收连接的地方,每个 Peer 对象在创建时都会被分配一个随机的唯一 ID。
var peer = new Peer();
peer.on('open', function(id) {
    console.log('My peer ID is: ' + id);
  });
Peer连接
连接到指定的远程peer并返回数据连接。
peer.connect(id, [options])Peer调用
调用指定的远程Peer并返回媒体连接。
peer.call(id, stream, [options])Peer监听
为Peer事件设置侦听器。
peer.on(event, callback);
peer.on('open', function(id) { ... }); //打开事件
peer.on('connection', function(dataConnection) { ... });//连接事件
peer.on('call', function(mediaConnection) { ... }); //呼叫事件
peer.on('data', function(data) { ... }); //传输消息事件
peer.on('close', function() { ... }); //关闭事件
peer.on('disconnected', function() { ... });//断开连接事件
peer.on('error', function(err) { ... }); //错误事件Peer断开
关闭与服务器的连接,保持所有现有数据和媒体连接不变。
peer.disconnect();Peer重新连接
尝试使用另一方Peer的旧 ID 重新连接到服务器。只有断开连接的对等方才能重新连接。
peer.reconnect();Peer销毁
关闭与服务器的连接并终止所有现有连接。peer.destroy.将设置为 。true
peer.destroy();相关PeerJS介绍文档地址:https://www.npmjs.com/package/peerjs 和 https://peerjs.com。
可以参考API手册了解更多以及详细PeerJS内容
3.安装依赖
npm i peerjs4.在线聊天代码实现
SendMsg.vue 发起者代码示例
<template>
<h1>【WebRTC实例】 PeerJS 实现点对点聊天发起者</h1>
<div>
<button @click="requestCallFn">请求连接</button>
</div>
<input type="text"
@keyup="inputTxtFn">
<button @click="sendFn">发送信息</button>
<div>收到消息:{{ receiveVal }}</div>
</template>
<script setup>
import { ref } from 'vue'
import { Peer } from "peerjs";
var peer = new Peer() // peer对象
let peerId = null
let sendVal = ref('') // 输入文字框
let receiveVal = ref('') //接收信息
// 请求连接
const requestCallFn = () => {
// 生成自己的id,给接收者连接自己的时候调用
peer.on('open', id => {
peerId = id
console.log(id);
console.log('请求连接,保存peerId在本地存储中', peerId);
localStorage.setItem("peerId", peerId)
})
}
// 监听被接收者连接事件
peer.on('connection', (connObj) => {
console.log('被接收者连接:', connObj);
// 保存接收方的id,给发送按钮使用
localStorage.setItem("receiveId", connObj.peer)
// 监听接收消息
connObj.on('data', (data) => {
// console.log('接收到接收方的消息:', data);
receiveVal.value = data
})
})
// 输入信息时监听
const inputTxtFn = (e) => {
// console.log(e.target.value);
sendVal.value = e.target.value
}
// 发送按钮
const sendFn = () => {
// 获取接收方的id
let receiveId = localStorage.getItem('receiveId')
// 建立与对方的连接
let connObj = peer.connect(receiveId)
connObj.on('open', () => {
// 发送给对方消息
connObj.send(sendVal.value)
})
}
</script>
<style>
</style>ReceiveMsg.vue 接收者代码示例
<template>
<h1>【WebRTC实例】 PeerJS 实现点对点聊天接收者</h1>
<div>
<button @click="replayCallFn">接收连接</button>
</div>
<input type="text"
@keyup="replyTxtFn">
<button @click="replyBtn">回复信息</button>
<div>收到消息:{{ receiveVal }}</div>
</template>
<script setup>
import { ref, reactive } from 'vue'
import { Peer } from "peerjs";
let peerObj = reactive({ obj: null })
let receiveVal = ref('') //接收信息
// 接通
const replayCallFn = () => {
peerObj.obj = new Peer()
peerObj.obj.on('open', () => {
// 从本地存储中取得发送者的key
let peerId = localStorage.getItem('peerId')
console.log('获取到peerId', peerId);
// 建立发送者的连接
let conn = peerObj.obj.connect(peerId)
// 把接收者的id发送回去
conn.on('open', () => {
conn.send('你好发送者,我是接收者,我收到了你的请求。')
})
})
// 监听发送者的信息
peerObj.obj.on('connection', function (conn) {
conn.on('data', (data) => {
// console.log('收到发送者的消息', data);
receiveVal.value = data
});
})
}
// 输入文字框
let sendVal = ref('')
const replyTxtFn = (e) => {
// console.log(e.target.value);
sendVal.value = e.target.value
}
//回话
const replyBtn = () => {
let peerId = localStorage.getItem('peerId')
// 建立发送者的连接
let conn = peerObj.obj.connect(peerId)
// 发送信息
conn.on('open', () => {
conn.send(sendVal.value)
})
}
</script>
<style>
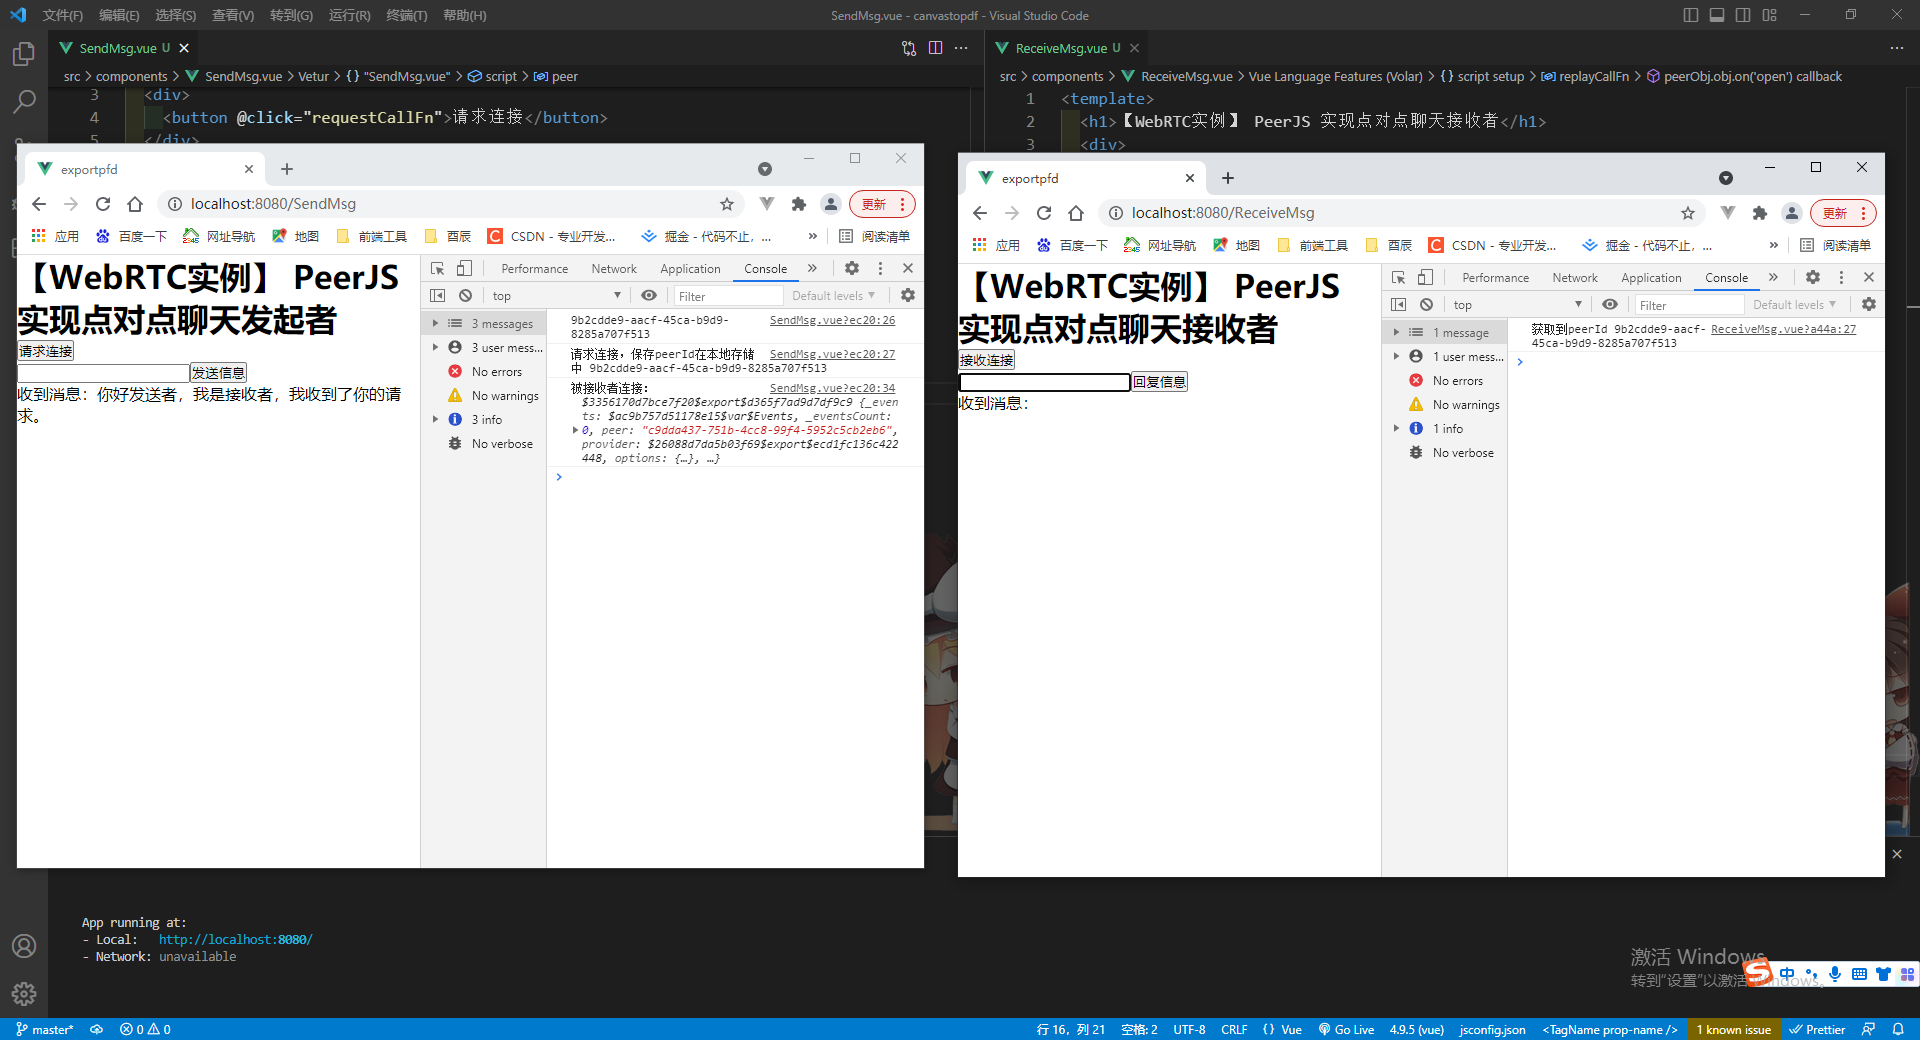
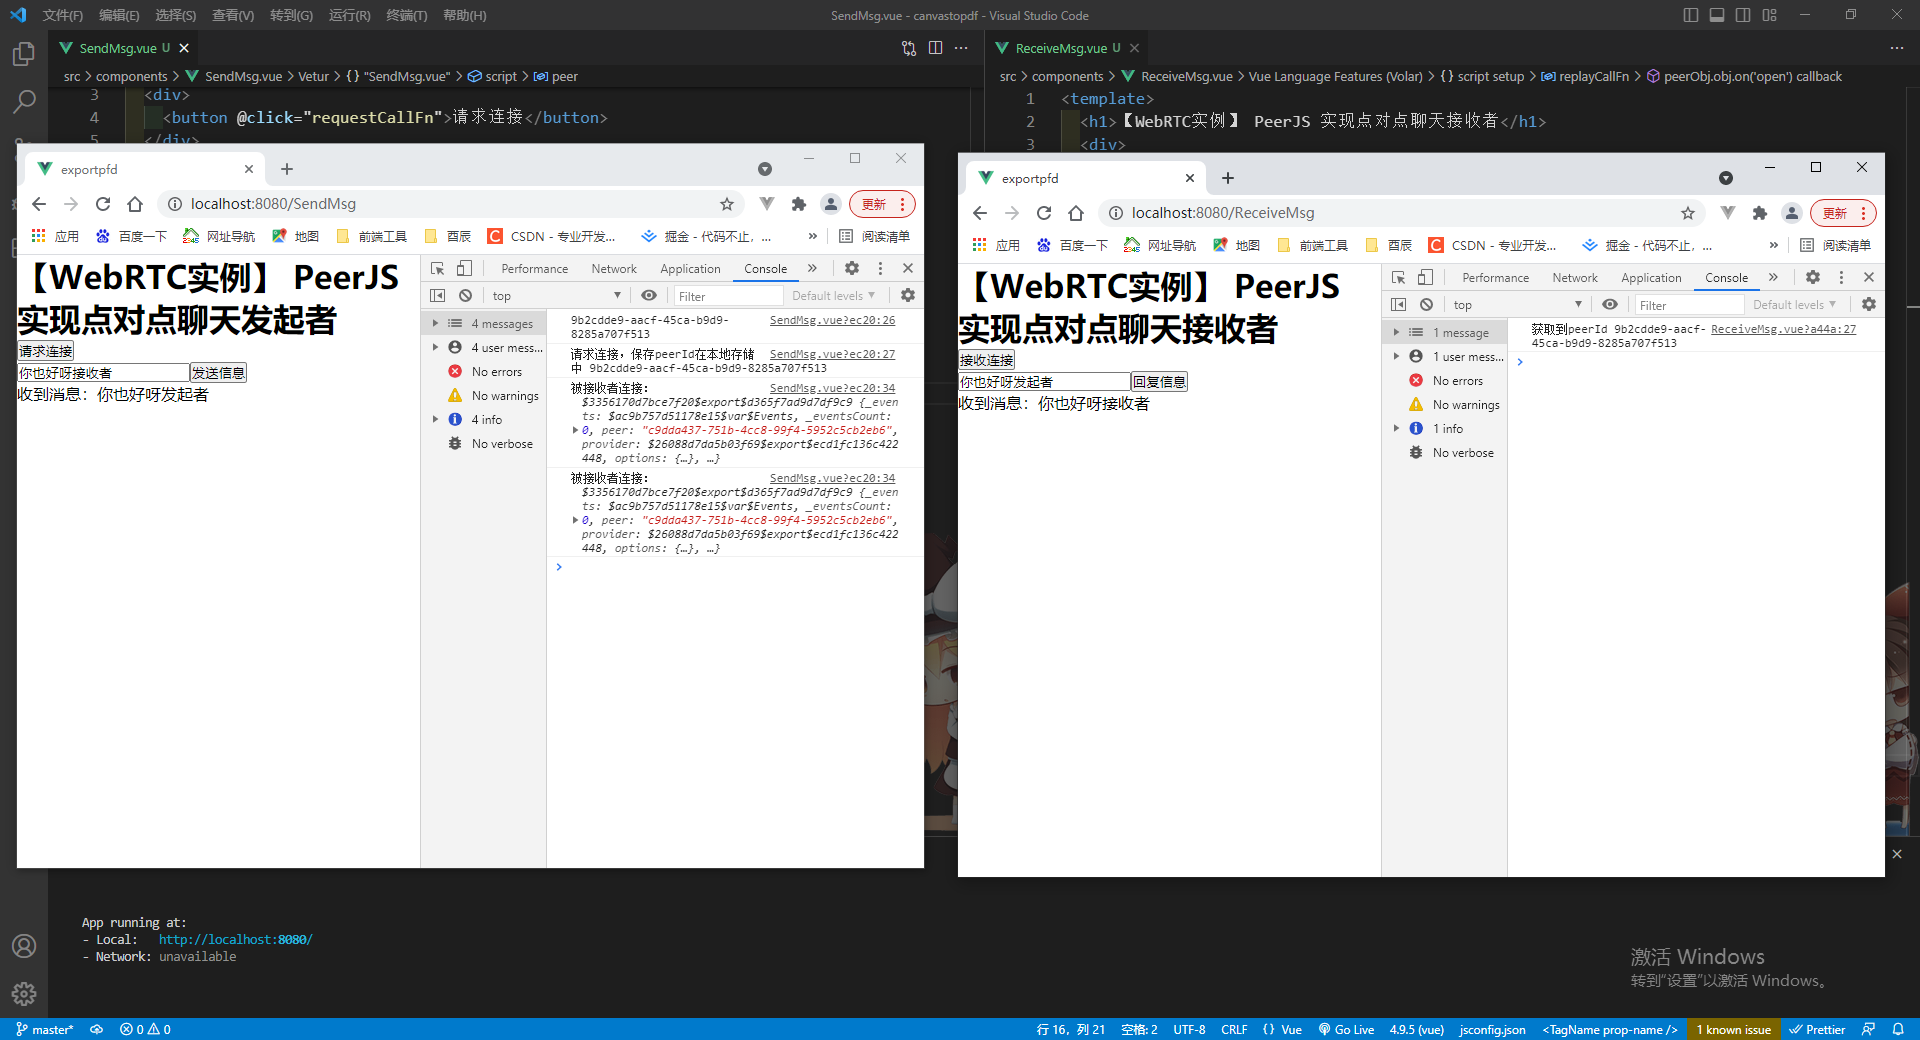
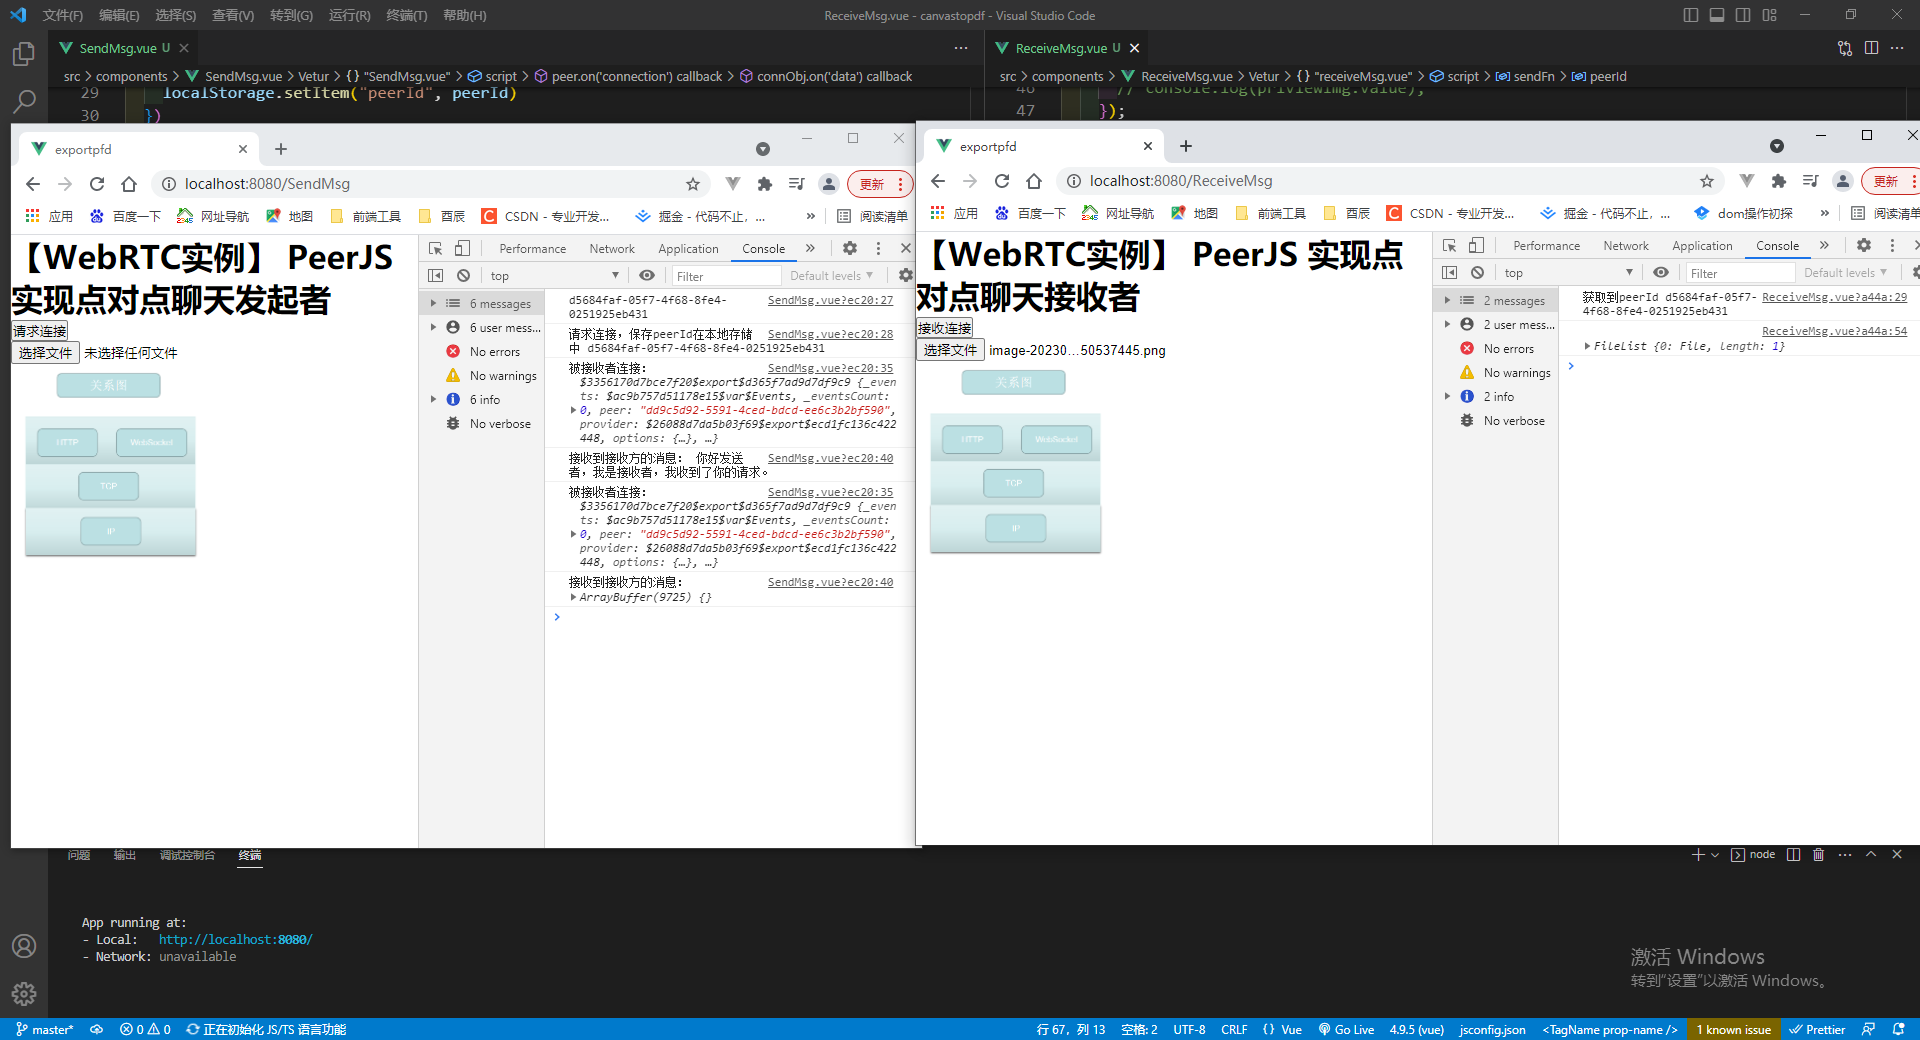
</style>结果显示

5.图片传输代码实现
将arraybuffer格式数据还原成图片的过程:
把arraybuffer格式 先转为二进制,再转成base64格式的图片
ArrayBuffer对象代表存储二进制数据的一段内存,不能直接读写,只能通过视图(TypedArray视图和DataView视图)来读写,视图的作用是以指定格式解读二进制数据。
new Uint8Array() 的返回值类型是 TypedArray,指的是一类指定元素类型的数组,而不是array的数组类型。
ArrayBuff 转 Base64 ,使用btoa() 方法用于创建一个 base-64 编码的字符串。该方法使用‘A-Z’,'a-z','0-9','+','/'和'=' 字符来编码字符串。
String.fromCharCode() 可接收一个指定的Unicode 值,然后返回一个字符串。
SendMsg.vue 发起者代码示例
<template>
<h1>【WebRTC实例】 PeerJS 实现点对点聊天发起者</h1>
<div>
<button @click="requestCallFn">请求连接</button>
</div>
<input type="file"
@change="upImgFn">
<div>
<img :style="{width:'200px',height:'200px'}"
:src="priviewImg"
alt="">
</div>
</template>
<script setup>
import { ref } from 'vue'
import { Peer } from "peerjs";
var peer = new Peer() // peer对象
let peerId = null
// 请求连接
const requestCallFn = () => {
// 生成自己的id,给接收者连接自己的时候调用
peer.on('open', id => {
peerId = id
console.log(id);
console.log('请求连接,保存peerId在本地存储中', peerId);
localStorage.setItem("peerId", peerId)
})
}
// 监听被接收者连接事件
peer.on('connection', (connObj) => {
console.log('被接收者连接:', connObj);
// 保存接收方的id,给发送按钮使用
localStorage.setItem("receiveId", connObj.peer)
// 监听接收消息
connObj.on('data', (data) => {
console.log('接收到接收方的消息:', data);
// 将data数据 通过Uint8Array()方法 转为TypedArray类型再进行读写
// console.log(new Uint8Array(data));
//使用 btoa() 方法用于创建一个 base-64 编码的字符串
// String.fromCharCode() 可接收一个指定的Unicode 值,然后返回一个字符串。
priviewImg.value = 'data:image/png;base64,' + btoa(new Uint8Array(data).reduce((data, byte) => data + String.fromCharCode(byte), ''))
// console.log(priviewImg.value);
})
})
// 上传图片
let priviewImg = ref('')
const upImgFn = (e) => {
console.log(e.target.files);
let obj = e.target.files[0]
// 转为二进制blob对象,用于保存大文件
const blobVal = new Blob(e.target.files, { type: obj.type })
// 通过URL.createObjectURL(blobVal) 可以获取一个当前文件的一个内存URL
priviewImg.value = URL.createObjectURL(blobVal)
// 发送图片给接收者
sendFn(blobVal)
}
// 发送事件
const sendFn = (blobVal) => {
// 获取对方ID
let receiveId = localStorage.getItem('receiveId')
// 建立连接
let connObj = peer.connect(receiveId)
connObj.on('open', () => {
// 发送信息给对方
connObj.send(blobVal)
})
}
</script>
<style>
</style>ReceiveMsg.vue 接收者代码示例
<template>
<h1>【WebRTC实例】 PeerJS 实现点对点聊天接收者</h1>
<div>
<button @click="replayCallFn">接收连接</button>
</div>
<input type="file"
@change="upImgFn">
<div>
<img :style="{width:'200px',height:'200px'}"
:src="priviewImg"
alt="">
</div>
</template>
<script setup>
import { ref, reactive } from 'vue'
import { Peer } from "peerjs";
let priviewImg = ref('')
let peerObj = reactive({ obj: null })
// 接通
const replayCallFn = () => {
peerObj.obj = new Peer()
peerObj.obj.on('open', () => {
// 从本地存储中取得发送者的key
let peerId = localStorage.getItem('peerId')
console.log('获取到peerId', peerId);
// 建立发送者的连接
let conn = peerObj.obj.connect(peerId)
// 把接收者的id发送回去
conn.on('open', () => {
conn.send('你好发送者,我是接收者,我收到了你的请求。')
})
})
// 监听发送者的信息
peerObj.obj.on('connection', function (conn) {
conn.on('data', (data) => {
console.log('收到发送者的消息', data);
// 将data数据 通过Uint8Array()方法 转为TypedArray类型再进行读写
// console.log(new Uint8Array(data));
//使用 btoa() 方法用于创建一个 base-64 编码的字符串
// String.fromCharCode() 可接收一个指定的Unicode 值,然后返回一个字符串。
priviewImg.value = 'data:image/png;base64,' + btoa(new Uint8Array(data).reduce((data, byte) => data + String.fromCharCode(byte), ''))
// console.log(priviewImg.value);
});
})
}
// 上传图片
const upImgFn = (e) => {
console.log(e.target.files);
let obj = e.target.files[0]
// 转为二进制blob对象,用于保存大文件
const blobVal = new Blob(e.target.files, { type: obj.type })
// 通过URL.createObjectURL(blobVal) 可以获取一个当前文件的一个内存URL
priviewImg.value = URL.createObjectURL(blobVal)
// 发送图片给接收者
sendFn(blobVal)
}
// 发送事件
const sendFn = (blobVal) => {
// 获取对方ID
let peerId = localStorage.getItem('peerId')
// 建立连接
let connObj = peerObj.obj.connect(peerId)
connObj.on('open', () => {
// 发送信息给对方
connObj.send(blobVal)
})
}
</script>
<style>
</style>结果显示
发起者请求连接,接收者接收连接后,发送者上传一个png图片,接收者也能正常收到。
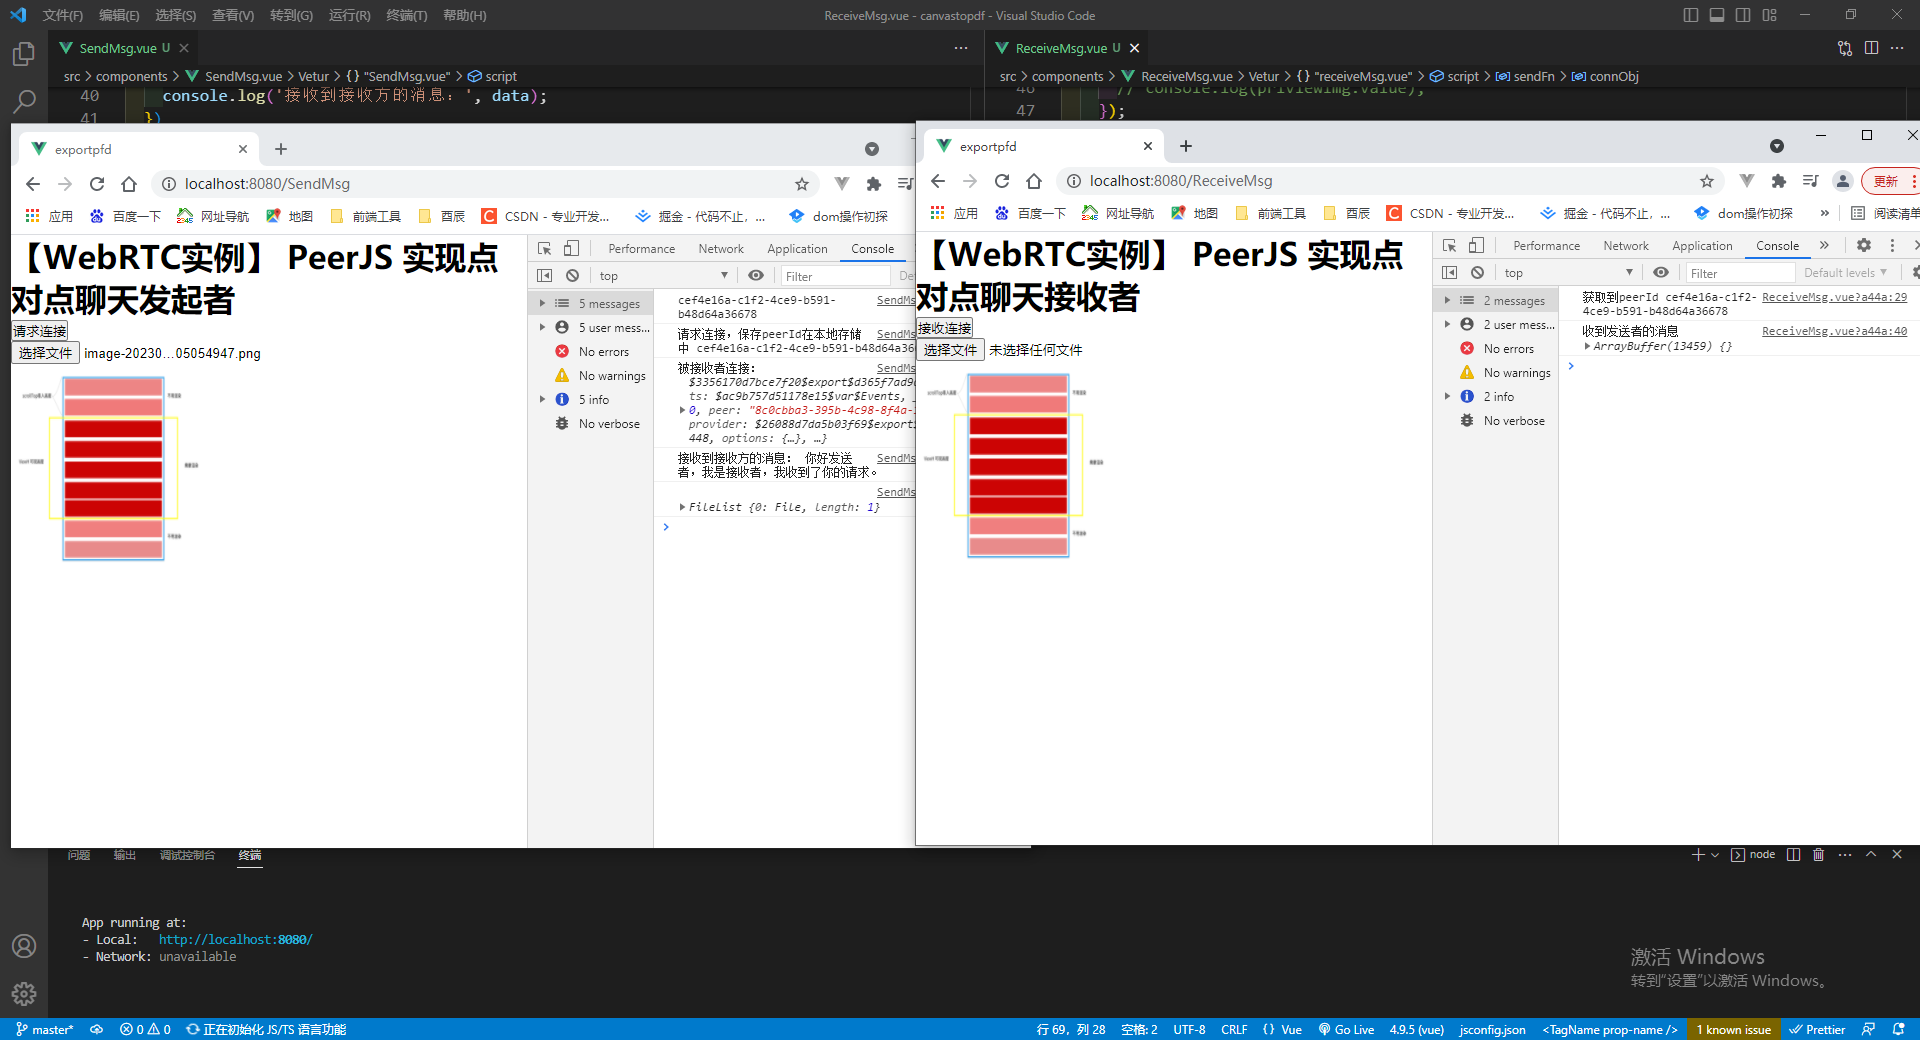
接收者上传png图片,发收者能正常接收到并显示。

旨在为数千万中国开发者提供一个无缝且高效的云端环境,以支持学习、使用和贡献开源项目。
更多推荐


 3
3 0
0- 0


 已为社区贡献1条内容

所有评论(0)