
Android开发TextView+LinearLayout实现底部导航栏
文章给出Android开发实现底部导航栏众多方法中的一种——TextView+LinearLayout。通过Click点击事件实现菜单的点击,其中使用Android Studio系统自带的图标;给出了GitHub源码并解决了下载源码常见的报错问题
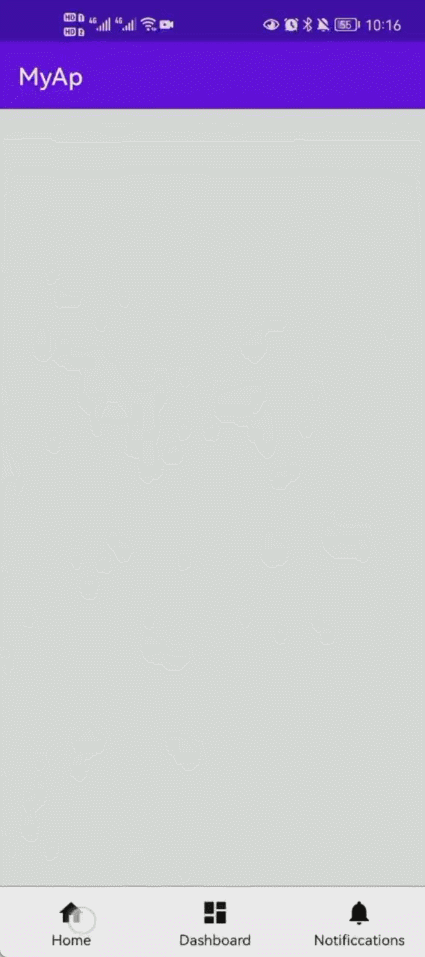
一、 成果
安卓开发底部导航栏的实现是基础内容,今天简单介绍一下用TextView+LinearLayout实现底部导航栏,先放一下成果
二、 代码部分
activity_main.xml将主界面部分做好,部分解释一下,Layout_weight的属性是设置它所占据屏幕的权重;onClick是点击事件
<?xml version="1.0" encoding="utf-8"?>
<LinearLayout xmlns:android="http://schemas.android.com/apk/res/android"
    xmlns:app="http://schemas.android.com/apk/res-auto"
    xmlns:tools="http://schemas.android.com/tools"
    android:layout_width="match_parent"
    android:layout_height="match_parent"
    tools:context=".MainActivity"
    android:orientation="vertical">

    <LinearLayout
        android:layout_height="0dp"
        android:layout_width="match_parent"
        android:layout_weight="11"
        android:id="@+id/App_name"
        android:background="#E8EAE8"
        android:orientation="horizontal">
    </LinearLayout>
    <View
        android:layout_width="match_parent"
        android:layout_height="1px"
        android:background="#454547"
        />

    <LinearLayout
        android:layout_width="match_parent"
        android:layout_height="0dp"
        android:layout_weight="1"
        android:orientation="horizontal"
        android:paddingTop="10dp"
        android:paddingBottom="5dp">

        <TextView
            android:id="@+id/text_home"
            android:layout_width="0dp"
            android:layout_height="match_parent"
            android:layout_weight="1"
            android:drawableTop="@drawable/ic_home_black_24dp"
            android:gravity="center"
            android:textColor="@drawable/bt_selector"
            android:onClick="Click"
            android:text="Home"
            android:textSize="12dp" />

        <TextView
            android:id="@+id/text_dashboard"
            android:layout_width="0dp"
            android:layout_height="match_parent"
            android:layout_weight="1"
            android:drawableTop="@drawable/ic_dashboard_black_24dp"
            android:gravity="center"
            android:textColor="@drawable/bt_selector"
            android:onClick="Click"
            android:text="Dashboard"
            android:textSize="12dp" />

        <TextView
            android:id="@+id/text_notifications"
            android:layout_width="0dp"
            android:layout_height="match_parent"
            android:layout_weight="1"
            android:drawableTop="@drawable/ic_notifications_black_24dp"
            android:gravity="center"
            android:onClick="Click"
            android:textColor="@drawable/bt_selector"
            android:text="Notificcations"
            android:textSize="12dp" />

    </LinearLayout>


</LinearLayout>
java
MainActivity点击事件
package com.ddj.myapplication;
import androidx.appcompat.app.AppCompatActivity;
import androidx.fragment.app.FragmentManager;
import androidx.fragment.app.FragmentTransaction;
import android.os.Bundle;
import android.view.View;
public class MainActivity extends AppCompatActivity {
@Override
protected void onCreate(Bundle savedInstanceState) {
super.onCreate(savedInstanceState);
setContentView(R.layout.activity_main);
}
public void Click(View v){
FragmentManager fm=getSupportFragmentManager();
FragmentTransaction ft=fm.beginTransaction();
HomeFragment Home=new HomeFragment();
DashboardFragment Dashboard=new DashboardFragment();
NotificationsFragment Notifications=new NotificationsFragment();
switch (v.getId()){
case R.id.text_home:;
ft.replace(R.id.App_name, Home);
break;
case R.id.text_dashboard:;
ft.replace(R.id.App_name, Dashboard);
break;
case R.id.text_notifications:;
ft.replace(R.id.App_name, Notifications);
break;
}
ft.commit();
}
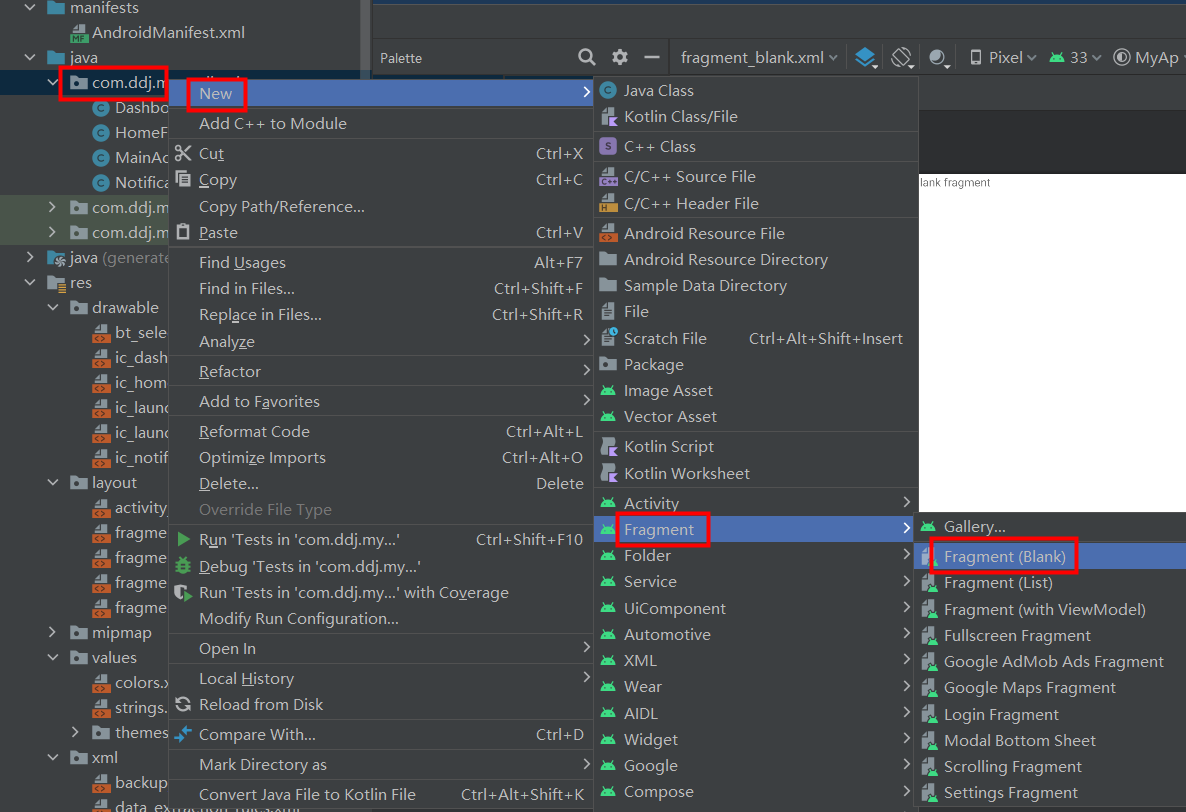
}在该文件夹下添加三个Fragment,分别为HomeFragment,DashboardFragment,NotificationsFragment
layout
随之自动生成对应的xml文件,我们分别创建对应页面文字
fragment_dashboard.xml
<?xml version="1.0" encoding="utf-8"?>
<FrameLayout xmlns:android="http://schemas.android.com/apk/res/android"
    xmlns:tools="http://schemas.android.com/tools"
    android:layout_width="match_parent"
    android:layout_height="match_parent"
    xmlns:app="http://schemas.android.com/apk/res-auto"
    tools:context=".DashboardFragment">

    <TextView
        android:layout_width="match_parent"
        android:layout_height="wrap_content"
        android:layout_marginStart="8dp"
        android:layout_marginTop="8dp"
        android:layout_marginEnd="8dp"
        android:text="This is dashboard fragment"
        android:textAlignment="center"
        android:textSize="20sp"
        />

</FrameLayout>
fragment_home.xml
<?xml version="1.0" encoding="utf-8"?>
<FrameLayout xmlns:android="http://schemas.android.com/apk/res/android"
    xmlns:tools="http://schemas.android.com/tools"
    android:layout_width="match_parent"
    android:layout_height="match_parent"
    tools:context=".HomeFragment">

    <!-- TODO: Update blank fragment layout -->
    <TextView
        android:layout_width="match_parent"
        android:layout_height="match_parent"
        android:text="This is home fragment"
        android:layout_marginStart="8dp"
        android:layout_marginTop="8dp"
        android:layout_marginEnd="8dp"
        android:textAlignment="center"
        android:textSize="20sp"
        />

</FrameLayout>
fragment_notifications.xml
<?xml version="1.0" encoding="utf-8"?>
<FrameLayout xmlns:android="http://schemas.android.com/apk/res/android"
    xmlns:tools="http://schemas.android.com/tools"
    android:layout_width="match_parent"
    android:layout_height="match_parent"
    tools:context=".NotificationsFragment">

    <!-- TODO: Update blank fragment layout -->
    <TextView
        android:layout_width="match_parent"
        android:layout_height="match_parent"
        android:text="This is notifications fragment"
        android:layout_marginStart="8dp"
        android:layout_marginTop="8dp"
        android:layout_marginEnd="8dp"
        android:textAlignment="center"
        android:textSize="20sp"
        />

</FrameLayout>
drawable
在drawable下创建一个选择器,当按下导航栏种某一选项时,文字颜色改变,可选择不加,不过对应引用部分也需要去掉
bt_selector.xml
<?xml version="1.0" encoding="utf-8"?>
<selector xmlns:android="http://schemas.android.com/apk/res/android">
<item android:color="@color/purple_500" android:state_pressed="true"/>
<item android:color="@color/black" />
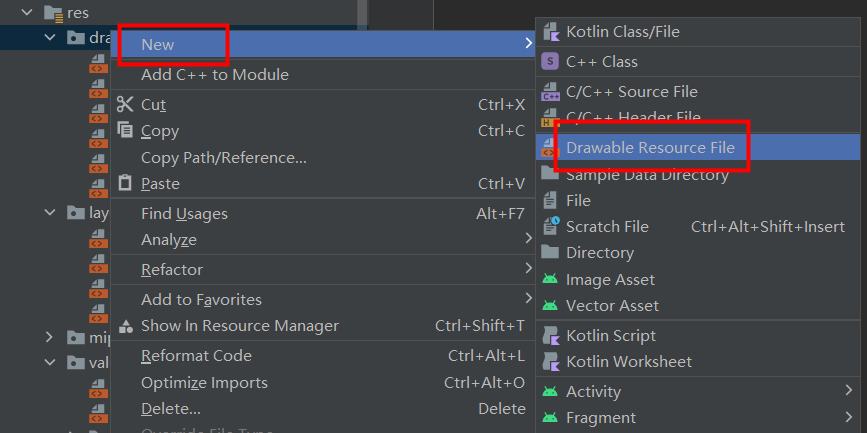
</selector>在菜单栏中加入图标,我们使用Android系统自带的图标
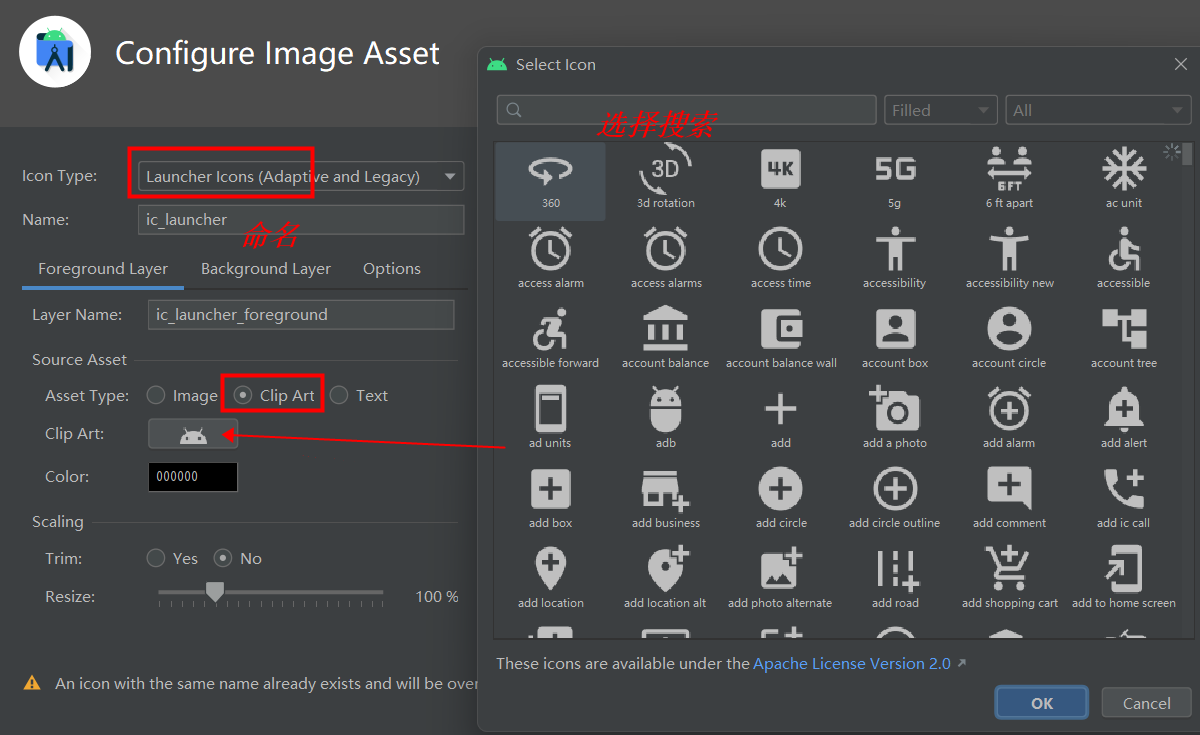
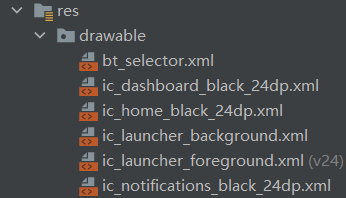
通过此方法我们选择三个图标,分别命名为ic_dashboard_black_24dp.xml,ic_home_black_24dp.xml,ic_notifications_black_24dp.xml
如图所示
values
res--value的colors.xml命名颜色
<?xml version="1.0" encoding="utf-8"?>
<resources>
    <color name="purple_200">#FFBB86FC</color>
    <color name="purple_500">#FF6200EE</color>
    <color name="purple_700">#FF3700B3</color>
    <color name="teal_200">#FF03DAC5</color>
    <color name="teal_700">#FF018786</color>
    <color name="black">#FF000000</color>
    <color name="white">#FFFFFFFF</color>
</resources>
strings.xml
<resources>
    <string name="app_name">MyAp</string>
    <string name="hello_blank_fragment">Hello blank fragment</string>
    <drawable name="unpressed">#000000</drawable>
    <drawable name="pressed">#FF6200EE</drawable>
</resources>
最后为防止加入selector报错,我们在res的xml种创建filepaths.xml文件
<?xml version="1.0" encoding="utf-8"?>
<paths xmlns:android="http://schemas.android.com/apk/res/android">

    <files-path
        name="Pictures"
        path="/"></files-path>
    <external-path
        name="files_root"
        path="Android/data/${applicationId}/" />
    <root-path
        name="root"
        path="/" />
</paths>
这样基本上就完成啦
三、 源代码
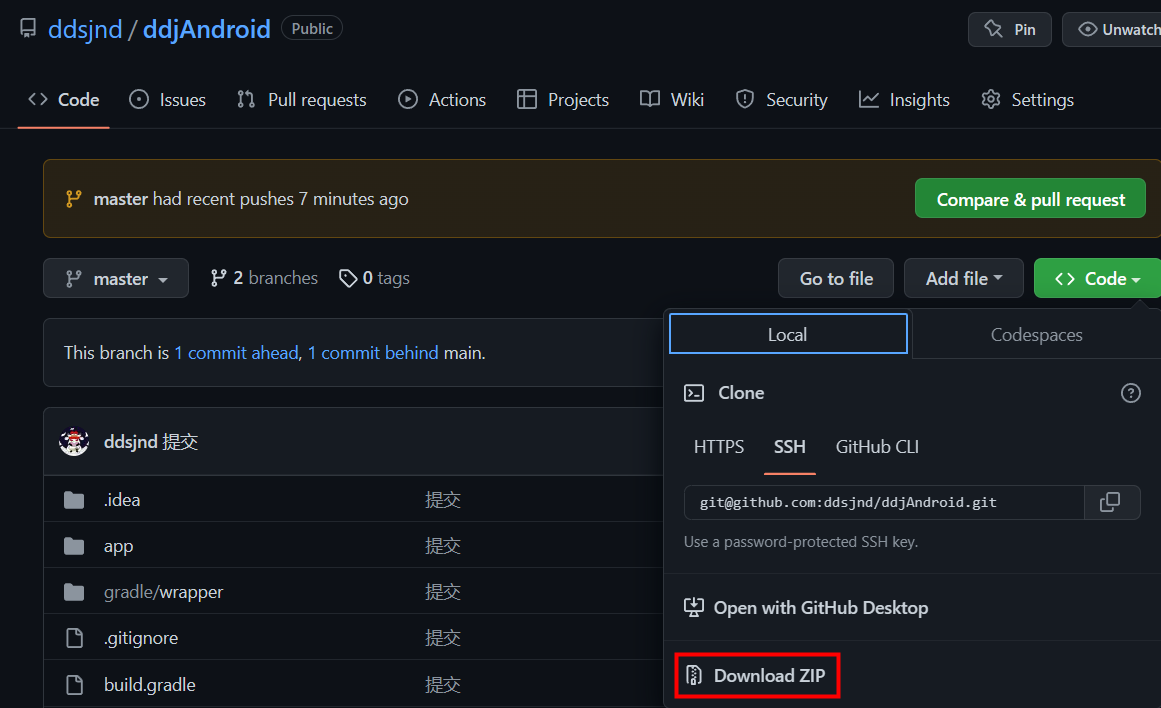
大家也可以参考GitHub上的源代码,欢迎star,fork
ddsjnd/ddjAndroid at master (github.com)
最方便简单的下载源码方式是点击Download ZIP,下载压缩包,解压之后用Android Studio打开
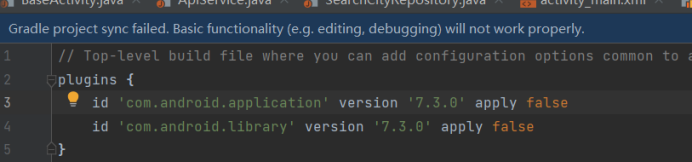
最常见可能会报的错是
Caused by: org.gradle.api.internal.plugins.PluginApplicationException: Failed to apply plugin 'com.android.internal.application'.
解决办法
在gradle.properties添加android.overridePathCheck=true即可
或者
The project is using an incompatible version (AGP 7.3.0) of the Android Gradle plugin. Latest supported version is AGP 7.2.2
版本问题,解决方法
在build.gradle的version中,将版本改为报错的修改意见即可,比如我的改为7.2.2就可以正常运行啦

旨在为数千万中国开发者提供一个无缝且高效的云端环境,以支持学习、使用和贡献开源项目。
更多推荐


 8
8 0
0- 0


 已为社区贡献2条内容

所有评论(0)