

物联网开发笔记(26)- 使用Micropython开发ESP32开发板之控制LCD1602显示屏(续)
使用Micropython开发ESP32开发板之通过GPIO控制(标准配置)LCD1602显示屏
上一节介绍了使用i2c来控制LCD1602显示屏,那么使用GPIO怎么控制LCD1602显示屏呢?使用GPIO又分为8bit和4bit两种模式,比较常用的4bit模式,因为它占用GPIO口比较少。
一、目的
使用MicroPython开发ESP32开发板,通过GPIO方法来控制LCD1602显示屏
二、环境
ESP32 + LCD1602显示屏 + Thonny IDE + 面包板(非必须)+ 一个220欧姆的色环电阻 + 几根杜邦线(为了方便讲解,这里使用Wokwi仿真)
三、接线图
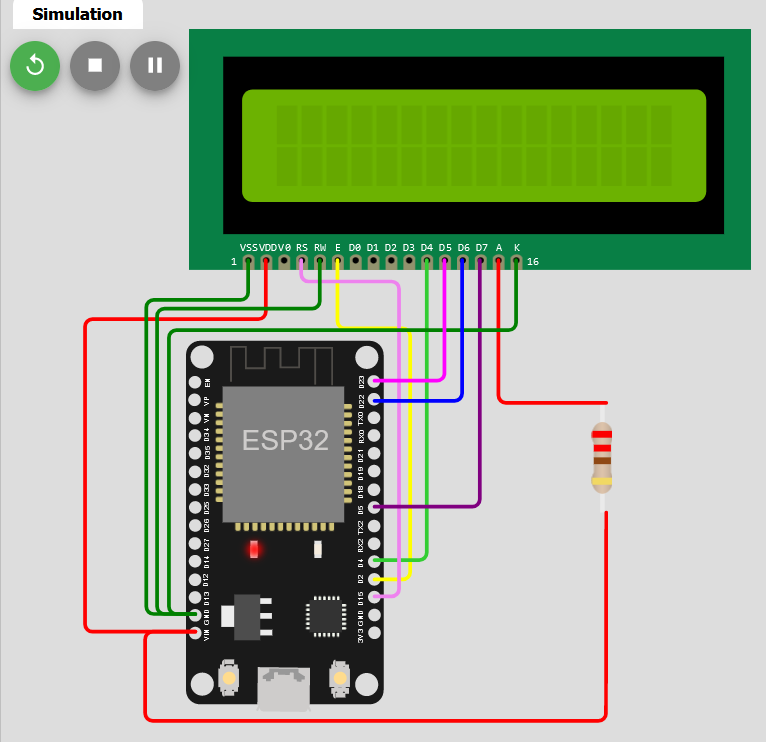
4bit接线方法:
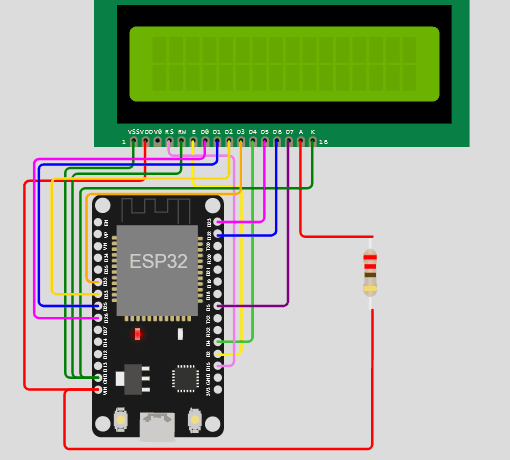
8bit接线方法:
四、开发代码
4bit模式:
main.py
"""Implements a HD44780 character LCD connected via ESP32 GPIO pins."""

from machine import Pin
from esp32_gpio_lcd import GpioLcd
from utime import sleep_ms, ticks_ms

# Wiring used for this example:
#
#  1 - Vss (aka Ground) - Connect to one of the ground pins on you pyboard.
#  2 - VDD - I connected to VIN which is 5 volts when your pyboard is powered via USB
#  3 - VE (Contrast voltage) - I'll discuss this below
#  4 - RS (Register Select) connect to D15 (as per call to GpioLcd)
#  5 - RW (Read/Write) - connect to ground
#  6 - EN (Enable) connect to D2 (as per call to GpioLcd)
#  7 - D0 - leave unconnected
#  8 - D1 - leave unconnected
#  9 - D2 - leave unconnected
# 10 - D3 - leave unconnected
# 11 - D4 - connect to D4 (as per call to GpioLcd)
# 12 - D5 - connect to D23 (as per call to GpioLcd)
# 13 - D6 - connect to D22 (as per call to GpioLcd)
# 14 - D7 - connect to D5 (as per call to GpioLcd)
# 15 - A (BackLight Anode) - Connect to VIN
# 16 - K (Backlight Cathode) - Connect to Ground
#
# On 14-pin LCDs, there is no backlight, so pins 15 & 16 don't exist.
#
# The Contrast line (pin 3) typically connects to the center tap of a
# 10K potentiometer, and the other 2 legs of the 10K potentiometer are
# connected to pins 1 and 2 (Ground and VDD)
#
# The wiring diagram on the following page shows a typical "base" wiring:
# http://www.instructables.com/id/How-to-drive-a-character-LCD-displays-using-DIP-sw/step2/HD44780-pinout/
# Add to that the EN, RS, and D4-D7 lines.


def test_main():
    """Test function for verifying basic functionality."""
    print("Running test_main")
    lcd = GpioLcd(rs_pin=Pin(15),
                  enable_pin=Pin(2),
                  d4_pin=Pin(4),
                  d5_pin=Pin(23),
                  d6_pin=Pin(22),
                  d7_pin=Pin(5),
                  num_lines=2, num_columns=16)

    lcd.clear()
    lcd.putstr("ESP32\nLCD1602")
    sleep_ms(1000)
    lcd.clear()
    lcd.putstr("Hi Micropython!\nWelcome!")
    sleep_ms(1000)
    lcd.clear()
    lcd.putstr("It Works!\nSecond Line\nThird Line\nFourth Line")
    sleep_ms(3000)
    lcd.clear()

    count = 0
    while True:
        lcd.move_to(0, 0)
        lcd.putstr("show number:")
        lcd.putstr("%7d" % (ticks_ms() // 1000))  # 改变%7d的数字就可以调节显示位置
        sleep_ms(1000)
        count += 1

test_main()
diagram.json
{
  "version": 1,
  "author": "Anonymous maker",
  "editor": "wokwi",
  "parts": [
    {
      "type": "wokwi-esp32-devkit-v1",
      "id": "esp",
      "top": 116.7,
      "left": -180.09,
      "attrs": { "env": "micropython-20220618-v1.19.1" }
    },
    { "type": "wokwi-lcd1602", "id": "lcd2", "top": -55.49, "left": -178.72, "attrs": {} },
    {
      "type": "wokwi-resistor",
      "id": "r1",
      "top": 171.18,
      "left": 14.74,
      "rotate": 90,
      "attrs": { "value": "220" }
    }
  ],
  "connections": [
    [ "esp:TX0", "$serialMonitor:RX", "", [] ],
    [ "esp:RX0", "$serialMonitor:TX", "", [] ],
    [ "esp:D2", "lcd2:E", "yellow", [ "h19.16", "v-134.85", "h-122.14" ] ],
    [ "lcd2:D4", "esp:D4", "limegreen", [ "v0" ] ],
    [ "esp:D15", "lcd2:RS", "violet", [ "h13.17", "v-169.2", "h-52.29" ] ],
    [ "lcd2:D7", "esp:D5", "purple", [ "v0" ] ],
    [ "lcd2:A", "r1:1", "red", [ "v0" ] ],
    [ "r1:2", "esp:VIN", "red", [ "h-0.16", "v111.92", "h-247.62", "v-46.75" ] ],
    [ "lcd2:VDD", "esp:VIN", "red", [ "v31.75", "h-97.14", "v17.89" ] ],
    [ "lcd2:VSS", "esp:GND.2", "green", [ "v21.46", "h-54.73", "v165.2" ] ],
    [ "lcd2:RW", "esp:GND.2", "green", [ "v26.1", "h-87.43", "v155.35" ] ],
    [ "lcd2:K", "esp:GND.2", "green", [ "v37.69", "h-186.56", "v149.55" ] ],
    [ "lcd2:D5", "esp:D23", "magenta", [ "v64.83", "h-4.83" ] ],
    [ "lcd2:D6", "esp:D22", "blue", [ "v75.64", "h0.91" ] ]
  ]
}
esp32_gpio_lcd.py
"""Implements a HD44780 character LCD connected via ESP32 GPIO pins."""

from lcd_api import LcdApi
from machine import Pin
from utime import sleep_ms, sleep_us


class GpioLcd(LcdApi):
    """Implements a HD44780 character LCD connected via ESP32 GPIO pins."""

    def __init__(self, rs_pin, enable_pin, d0_pin=None, d1_pin=None,
                 d2_pin=None, d3_pin=None, d4_pin=None, d5_pin=None,
                 d6_pin=None, d7_pin=None, rw_pin=None, backlight_pin=None,
                 num_lines=2, num_columns=16):
        """Constructs the GpioLcd object. All of the arguments must be machine.Pin
        objects which describe which pin the given line from the LCD is
        connected to.

        When used in 4-bit mode, only D4, D5, D6, and D7 are physically
        connected to the LCD panel. This function allows you call it like
        GpioLcd(rs, enable, D4, D5, D6, D7) and it will interpret that as
        if you had actually called:
        GpioLcd(rs, enable, d4=D4, d5=D5, d6=D6, d7=D7)

        The enable 8-bit mode, you need pass d0 through d7.

        The rw pin isn't used by this library, but if you specify it, then
        it will be set low.
        """
        self.rs_pin = rs_pin
        self.enable_pin = enable_pin
        self.rw_pin = rw_pin
        self.backlight_pin = backlight_pin
        self._4bit = True
        if d4_pin and d5_pin and d6_pin and d7_pin:
            self.d0_pin = d0_pin
            self.d1_pin = d1_pin
            self.d2_pin = d2_pin
            self.d3_pin = d3_pin
            self.d4_pin = d4_pin
            self.d5_pin = d5_pin
            self.d6_pin = d6_pin
            self.d7_pin = d7_pin
            if self.d0_pin and self.d1_pin and self.d2_pin and self.d3_pin:
                self._4bit = False
        else:
            # This is really 4-bit mode, and the 4 data pins were just
            # passed as the first 4 arguments, so we switch things around.
            self.d0_pin = None
            self.d1_pin = None
            self.d2_pin = None
            self.d3_pin = None
            self.d4_pin = d0_pin
            self.d5_pin = d1_pin
            self.d6_pin = d2_pin
            self.d7_pin = d3_pin
        self.rs_pin.init(Pin.OUT)
        self.rs_pin.value(0)
        if self.rw_pin:
            self.rw_pin.init(Pin.OUT)
            self.rw_pin.value(0)
        self.enable_pin.init(Pin.OUT)
        self.enable_pin.value(0)
        self.d4_pin.init(Pin.OUT)
        self.d5_pin.init(Pin.OUT)
        self.d6_pin.init(Pin.OUT)
        self.d7_pin.init(Pin.OUT)
        self.d4_pin.value(0)
        self.d5_pin.value(0)
        self.d6_pin.value(0)
        self.d7_pin.value(0)
        if not self._4bit:
            self.d0_pin.init(Pin.OUT)
            self.d1_pin.init(Pin.OUT)
            self.d2_pin.init(Pin.OUT)
            self.d3_pin.init(Pin.OUT)
            self.d0_pin.value(0)
            self.d1_pin.value(0)
            self.d2_pin.value(0)
            self.d3_pin.value(0)
        if self.backlight_pin is not None:
            self.backlight_pin.init(Pin.OUT)
            self.backlight_pin.value(0)

        # See about splitting this into begin

        sleep_ms(20)   # Allow LCD time to powerup
        # Send reset 3 times
        self.hal_write_init_nibble(self.LCD_FUNCTION_RESET)
        sleep_ms(5)    # need to delay at least 4.1 msec
        self.hal_write_init_nibble(self.LCD_FUNCTION_RESET)
        sleep_ms(1)
        self.hal_write_init_nibble(self.LCD_FUNCTION_RESET)
        sleep_ms(1)
        cmd = self.LCD_FUNCTION
        if not self._4bit:
            cmd |= self.LCD_FUNCTION_8BIT
        self.hal_write_init_nibble(cmd)
        sleep_ms(1)
        LcdApi.__init__(self, num_lines, num_columns)
        if num_lines > 1:
            cmd |= self.LCD_FUNCTION_2LINES
        self.hal_write_command(cmd)

    def hal_pulse_enable(self):
        """Pulse the enable line high, and then low again."""
        self.enable_pin.value(0)
        sleep_us(1)
        self.enable_pin.value(1)
        sleep_us(1)       # Enable pulse needs to be > 450 nsec
        self.enable_pin.value(0)
        sleep_us(100)     # Commands need > 37us to settle

    def hal_write_init_nibble(self, nibble):
        """Writes an initialization nibble to the LCD.

        This particular function is only used during initialization.
        """
        self.hal_write_4bits(nibble >> 4)

    def hal_backlight_on(self):
        """Allows the hal layer to turn the backlight on."""
        if self.backlight_pin:
            self.backlight_pin.value(1)

    def hal_backlight_off(self):
        """Allows the hal layer to turn the backlight off."""
        if self.backlight_pin:
            self.backlight_pin.value(0)

    def hal_write_command(self, cmd):
        """Writes a command to the LCD.

        Data is latched on the falling edge of E.
        """
        self.rs_pin.value(0)
        self.hal_write_8bits(cmd)
        if cmd <= 3:
            # The home and clear commands require a worst
            # case delay of 4.1 msec
            sleep_ms(5)

    def hal_write_data(self, data):
        """Write data to the LCD."""
        self.rs_pin.value(1)
        self.hal_write_8bits(data)

    def hal_write_8bits(self, value):
        """Writes 8 bits of data to the LCD."""
        if self.rw_pin:
            self.rw_pin.value(0)
        if self._4bit:
            self.hal_write_4bits(value >> 4)
            self.hal_write_4bits(value)
        else:
            self.d3_pin.value(value & 0x08)
            self.d2_pin.value(value & 0x04)
            self.d1_pin.value(value & 0x02)
            self.d0_pin.value(value & 0x01)
            self.hal_write_4bits(value >> 4)

    def hal_write_4bits(self, nibble):
        """Writes 4 bits of data to the LCD."""
        self.d7_pin.value(nibble & 0x08)
        self.d6_pin.value(nibble & 0x04)
        self.d5_pin.value(nibble & 0x02)
        self.d4_pin.value(nibble & 0x01)
        self.hal_pulse_enable()
lcd_api.py
"""Provides an API for talking to HD44780 compatible character LCDs."""

import time

class LcdApi:
    """Implements the API for talking with HD44780 compatible character LCDs.
    This class only knows what commands to send to the LCD, and not how to get
    them to the LCD.

    It is expected that a derived class will implement the hal_xxx functions.
    """

    # The following constant names were lifted from the avrlib lcd.h
    # header file, however, I changed the definitions from bit numbers
    # to bit masks.
    #
    # HD44780 LCD controller command set

    LCD_CLR = 0x01              # DB0: clear display
    LCD_HOME = 0x02             # DB1: return to home position

    LCD_ENTRY_MODE = 0x04       # DB2: set entry mode
    LCD_ENTRY_INC = 0x02        # --DB1: increment
    LCD_ENTRY_SHIFT = 0x01      # --DB0: shift

    LCD_ON_CTRL = 0x08          # DB3: turn lcd/cursor on
    LCD_ON_DISPLAY = 0x04       # --DB2: turn display on
    LCD_ON_CURSOR = 0x02        # --DB1: turn cursor on
    LCD_ON_BLINK = 0x01         # --DB0: blinking cursor

    LCD_MOVE = 0x10             # DB4: move cursor/display
    LCD_MOVE_DISP = 0x08        # --DB3: move display (0-> move cursor)
    LCD_MOVE_RIGHT = 0x04       # --DB2: move right (0-> left)

    LCD_FUNCTION = 0x20         # DB5: function set
    LCD_FUNCTION_8BIT = 0x10    # --DB4: set 8BIT mode (0->4BIT mode)
    LCD_FUNCTION_2LINES = 0x08  # --DB3: two lines (0->one line)
    LCD_FUNCTION_10DOTS = 0x04  # --DB2: 5x10 font (0->5x7 font)
    LCD_FUNCTION_RESET = 0x30   # See "Initializing by Instruction" section

    LCD_CGRAM = 0x40            # DB6: set CG RAM address
    LCD_DDRAM = 0x80            # DB7: set DD RAM address

    LCD_RS_CMD = 0
    LCD_RS_DATA = 1

    LCD_RW_WRITE = 0
    LCD_RW_READ = 1

    def __init__(self, num_lines, num_columns):
        self.num_lines = num_lines
        if self.num_lines > 4:
            self.num_lines = 4
        self.num_columns = num_columns
        if self.num_columns > 40:
            self.num_columns = 40
        self.cursor_x = 0
        self.cursor_y = 0
        self.implied_newline = False
        self.backlight = True
        self.display_off()
        self.backlight_on()
        self.clear()
        self.hal_write_command(self.LCD_ENTRY_MODE | self.LCD_ENTRY_INC)
        self.hide_cursor()
        self.display_on()

    def clear(self):
        """Clears the LCD display and moves the cursor to the top left
        corner.
        """
        self.hal_write_command(self.LCD_CLR)
        self.hal_write_command(self.LCD_HOME)
        self.cursor_x = 0
        self.cursor_y = 0

    def show_cursor(self):
        """Causes the cursor to be made visible."""
        self.hal_write_command(self.LCD_ON_CTRL | self.LCD_ON_DISPLAY |
                               self.LCD_ON_CURSOR)

    def hide_cursor(self):
        """Causes the cursor to be hidden."""
        self.hal_write_command(self.LCD_ON_CTRL | self.LCD_ON_DISPLAY)

    def blink_cursor_on(self):
        """Turns on the cursor, and makes it blink."""
        self.hal_write_command(self.LCD_ON_CTRL | self.LCD_ON_DISPLAY |
                               self.LCD_ON_CURSOR | self.LCD_ON_BLINK)

    def blink_cursor_off(self):
        """Turns on the cursor, and makes it no blink (i.e. be solid)."""
        self.hal_write_command(self.LCD_ON_CTRL | self.LCD_ON_DISPLAY |
                               self.LCD_ON_CURSOR)

    def display_on(self):
        """Turns on (i.e. unblanks) the LCD."""
        self.hal_write_command(self.LCD_ON_CTRL | self.LCD_ON_DISPLAY)

    def display_off(self):
        """Turns off (i.e. blanks) the LCD."""
        self.hal_write_command(self.LCD_ON_CTRL)

    def backlight_on(self):
        """Turns the backlight on.

        This isn't really an LCD command, but some modules have backlight
        controls, so this allows the hal to pass through the command.
        """
        self.backlight = True
        self.hal_backlight_on()

    def backlight_off(self):
        """Turns the backlight off.

        This isn't really an LCD command, but some modules have backlight
        controls, so this allows the hal to pass through the command.
        """
        self.backlight = False
        self.hal_backlight_off()

    def move_to(self, cursor_x, cursor_y):
        """Moves the cursor position to the indicated position. The cursor
        position is zero based (i.e. cursor_x == 0 indicates first column).
        """
        self.cursor_x = cursor_x
        self.cursor_y = cursor_y
        addr = cursor_x & 0x3f
        if cursor_y & 1:
            addr += 0x40    # Lines 1 & 3 add 0x40
        if cursor_y & 2:    # Lines 2 & 3 add number of columns
            addr += self.num_columns
        self.hal_write_command(self.LCD_DDRAM | addr)

    def putchar(self, char):
        """Writes the indicated character to the LCD at the current cursor
        position, and advances the cursor by one position.
        """
        if char == '\n':
            if self.implied_newline:
                # self.implied_newline means we advanced due to a wraparound,
                # so if we get a newline right after that we ignore it.
                self.implied_newline = False
            else:
                self.cursor_x = self.num_columns
        else:
            self.hal_write_data(ord(char))
            self.cursor_x += 1
        if self.cursor_x >= self.num_columns:
            self.cursor_x = 0
            self.cursor_y += 1
            self.implied_newline = (char != '\n')
        if self.cursor_y >= self.num_lines:
            self.cursor_y = 0
        self.move_to(self.cursor_x, self.cursor_y)

    def putstr(self, string):
        """Write the indicated string to the LCD at the current cursor
        position and advances the cursor position appropriately.
        """
        for char in string:
            self.putchar(char)

    def custom_char(self, location, charmap):
        """Write a character to one of the 8 CGRAM locations, available
        as chr(0) through chr(7).
        """
        location &= 0x7
        self.hal_write_command(self.LCD_CGRAM | (location << 3))
        self.hal_sleep_us(40)
        for i in range(8):
            self.hal_write_data(charmap[i])
            self.hal_sleep_us(40)
        self.move_to(self.cursor_x, self.cursor_y)

    def hal_backlight_on(self):
        """Allows the hal layer to turn the backlight on.

        If desired, a derived HAL class will implement this function.
        """
        pass

    def hal_backlight_off(self):
        """Allows the hal layer to turn the backlight off.

        If desired, a derived HAL class will implement this function.
        """
        pass

    def hal_write_command(self, cmd):
        """Write a command to the LCD.

        It is expected that a derived HAL class will implement this
        function.
        """
        raise NotImplementedError

    def hal_write_data(self, data):
        """Write data to the LCD.

        It is expected that a derived HAL class will implement this
        function.
        """
        raise NotImplementedError

    # This is a default implementation of hal_sleep_us which is suitable
    # for most micropython implementations. For platforms which don't
    # support `time.sleep_us()` they should provide their own implementation
    # of hal_sleep_us in their hal layer and it will be used instead.
    def hal_sleep_us(self, usecs):
        """Sleep for some time (given in microseconds)."""
        time.sleep_us(usecs)  # NOTE this is not part of Standard Python library, specific hal layers will need to override this
8bit模式:只有如下代码不一样,其他同4bit模式
Wokwi Arduino and ESP32 Simulator![]() https://wokwi.com/projects/345672685837091411
https://wokwi.com/projects/345672685837091411
main.py
"""Implements a HD44780 character LCD connected via ESP32 GPIO pins."""

from machine import Pin
from esp32_gpio_lcd import GpioLcd
from utime import sleep_ms, ticks_ms

# Wiring used for this example:
#
#  1 - Vss (aka Ground) - Connect to one of the ground pins on you board.
#  2 - VDD - I connected to VIN which is 5 volts when your board is powered via USB
#  3 - VE (Contrast voltage) - I'll discuss this below
#  4 - RS (Register Select) connect to D15 (as per call to GpioLcd)
#  5 - RW (Read/Write) - connect to ground
#  6 - EN (Enable) connect to D2 (as per call to GpioLcd)
#  7 - D0 - connect to D26 (as per call to GpioLcd)
#  8 - D1 - connect to D25 (as per call to GpioLcd)
#  9 - D2 - connect to D33 (as per call to GpioLcd)
# 10 - D3 - connect to D32 (as per call to GpioLcd)
# 11 - D4 - connect to D4 (as per call to GpioLcd)
# 12 - D5 - connect to D23 (as per call to GpioLcd)
# 13 - D6 - connect to D22 (as per call to GpioLcd)
# 14 - D7 - connect to D5 (as per call to GpioLcd)
# 15 - A (BackLight Anode) - Connect to VIN
# 16 - K (Backlight Cathode) - Connect to Ground
#
# On 14-pin LCDs, there is no backlight, so pins 15 & 16 don't exist.
#
# The Contrast line (pin 3) typically connects to the center tap of a
# 10K potentiometer, and the other 2 legs of the 10K potentiometer are
# connected to pins 1 and 2 (Ground and VDD)
#
# The wiring diagram on the following page shows a typical "base" wiring:
# http://www.instructables.com/id/How-to-drive-a-character-LCD-displays-using-DIP-sw/step2/HD44780-pinout/
# Add to that the EN, RS, and D4-D7 lines.


def test_main():
    """Test function for verifying basic functionality."""
    print("Running test_main")
    lcd = GpioLcd(rs_pin=Pin(15),
                  enable_pin=Pin(2),
                  d0_pin=Pin(26),
                  d1_pin=Pin(25),
                  d2_pin=Pin(33),
                  d3_pin=Pin(32),
                  d4_pin=Pin(4),
                  d5_pin=Pin(23),
                  d6_pin=Pin(22),
                  d7_pin=Pin(5),
                  num_lines=2, num_columns=16)

    lcd.clear()
    lcd.putstr("Hello world")
    sleep_ms(1000)
    lcd.clear()
    lcd.putstr("*** Welcome to CN ***")
    sleep_ms(1000)
    lcd.clear()
    lcd.putstr("I love Shanghai")
    sleep_ms(3000)
    lcd.clear()

    count = 0
    while True:
        lcd.move_to(0, 0)
        lcd.putstr("show number:")
        lcd.putstr("%10d" % (ticks_ms() // 1000))  # 改变%7d的数字就可以调节显示位置
        sleep_ms(1000)
        count += 1

test_main()
diagram.json
{
  "version": 1,
  "author": "Anonymous maker",
  "editor": "wokwi",
  "parts": [
    {
      "type": "wokwi-esp32-devkit-v1",
      "id": "esp",
      "top": 116.7,
      "left": -180.09,
      "attrs": { "env": "micropython-20220618-v1.19.1" }
    },
    { "type": "wokwi-lcd1602", "id": "lcd2", "top": -55.49, "left": -178.72, "attrs": {} },
    {
      "type": "wokwi-resistor",
      "id": "r1",
      "top": 171.18,
      "left": 14.74,
      "rotate": 90,
      "attrs": { "value": "220" }
    }
  ],
  "connections": [
    [ "esp:TX0", "$serialMonitor:RX", "", [] ],
    [ "esp:RX0", "$serialMonitor:TX", "", [] ],
    [ "esp:D2", "lcd2:E", "yellow", [ "h19.16", "v-134.85", "h-122.14" ] ],
    [ "lcd2:D4", "esp:D4", "limegreen", [ "v0" ] ],
    [ "esp:D15", "lcd2:RS", "violet", [ "h13.17", "v-169.2", "h-52.29" ] ],
    [ "lcd2:D7", "esp:D5", "purple", [ "v0" ] ],
    [ "lcd2:A", "r1:1", "red", [ "v0" ] ],
    [ "r1:2", "esp:VIN", "red", [ "h-0.16", "v111.92", "h-247.62", "v-46.75" ] ],
    [ "lcd2:VDD", "esp:VIN", "red", [ "v31.75", "h-97.14", "v17.89" ] ],
    [ "lcd2:VSS", "esp:GND.2", "green", [ "v21.46", "h-54.73", "v165.2" ] ],
    [ "lcd2:RW", "esp:GND.2", "green", [ "v26.1", "h-87.43", "v155.35" ] ],
    [ "lcd2:K", "esp:GND.2", "green", [ "v37.69", "h-186.56", "v149.55" ] ],
    [ "lcd2:D5", "esp:D23", "magenta", [ "v64.83", "h-4.83" ] ],
    [ "lcd2:D6", "esp:D22", "blue", [ "v75.64", "h0.91" ] ],
    [ "lcd2:D3", "esp:D32", "orange", [ "v42.27", "h-124.13", "v73.46" ] ],
    [ "lcd2:D2", "esp:D33", "gold", [ "v29.85", "h-142.72", "v23.77" ] ],
    [ "lcd2:D1", "esp:D25", "blue", [ "v18.51", "h-143.49", "v9.18" ] ],
    [ "lcd2:D0", "esp:D26", "magenta", [ "v14.19", "h-137.27", "v-1.62" ] ]
  ]
}
五、演示效果
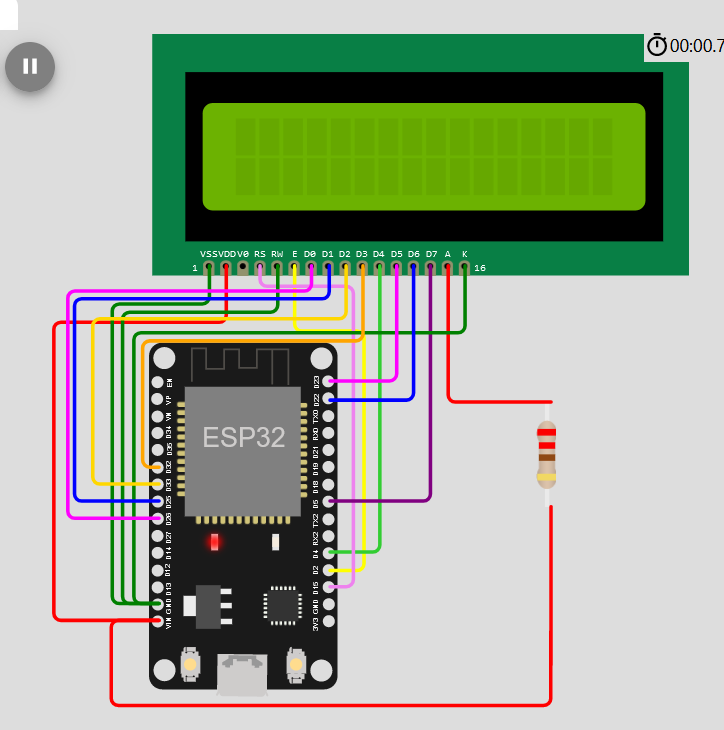
4bit模式效果:
Wokwi Arduino and ESP32 Simulator![]() https://wokwi.com/projects/345567867727512147
https://wokwi.com/projects/345567867727512147
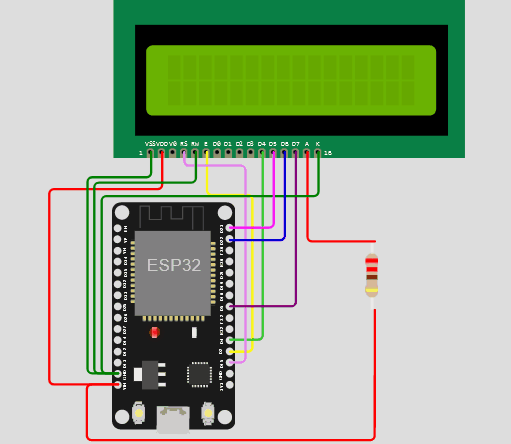
8bit模式效果:
Wokwi Arduino and ESP32 Simulator![]() https://wokwi.com/projects/345672685837091411
https://wokwi.com/projects/345672685837091411
六、1602LCD显示屏驱动
外国友人已经帮我们分析了芯片的底层,并且封装成了驱动,我们只需调用就可以了。
可从以下地址下载,支持pyboard,ESP32,ESP8266,circuitpython,nodemcu,onion等等开发板。
 https://github.com/dhylands/python_lcd
如果你登录不了GitHub,也可从百度网盘下载:
链接: https://pan.baidu.com/s/1J7-G1l7FFwW6SoOrevd0Yw 提取码: v5se
快来和我们一起学习吧。。。。。。

鸿蒙生态一站式服务平台。
更多推荐
 3
3 0
0- 0


 已为社区贡献9条内容

所有评论(0)