Vue3,Vite3,TS,Naive-UI整合TailwindCSS
Vue 作者尤大推荐的Vue组件库NaiveUI整合TailwindCSS,以及遇到的一些问题解决办法,使用目前最新的Vue3+Vite3+TS完成本案例
目录
前言
Naive UI :一个完全使用 TypeScript 编写的 Vue 3 组件库,也是Vue 作者尤大推荐的Vue组件库。
Tailwind CSS:能让你少写很多代码的css工具库。
本案例使用最新的Vue3,Vite3,TypeScript搭建
NaiveUI官网:www.naiveui.com
TailwindCSS官网:www.tailwindcss.cn
一、环境要求
a)NodeJS:这是必须的,安装就不在此赘述了
b)Vue3
c)Vite:Vite 需要 Node.js 版本 14.18+,16+
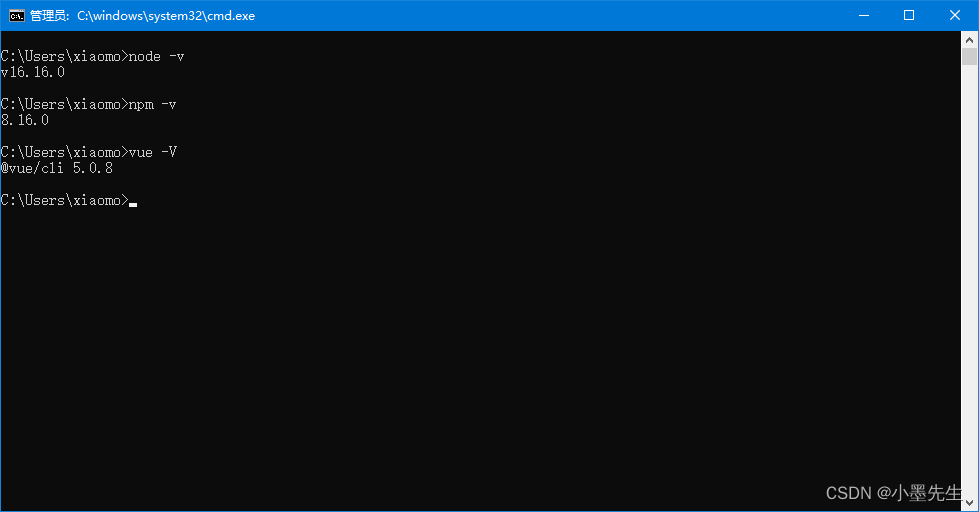
下图为nodejs,npm,vue对应的版本号
二、创建项目
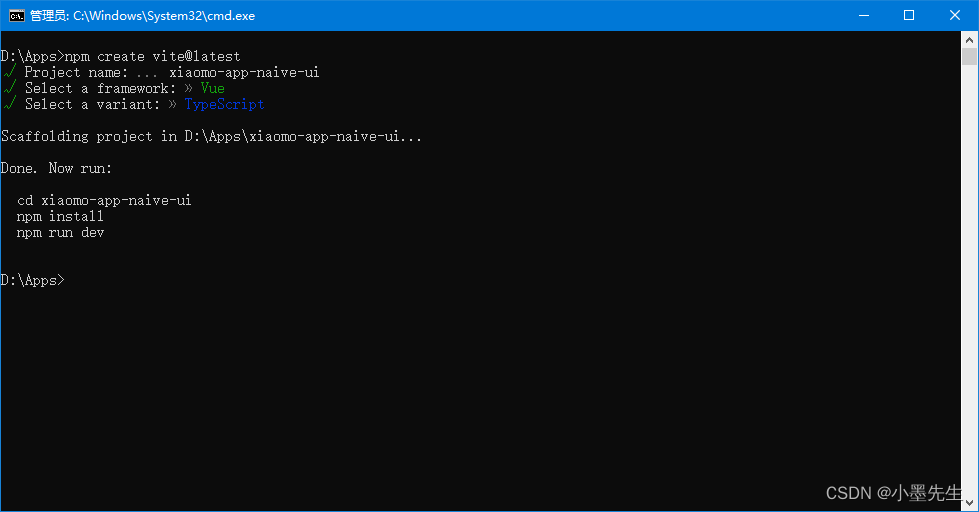
npm create vite@latest1、输入项目名称
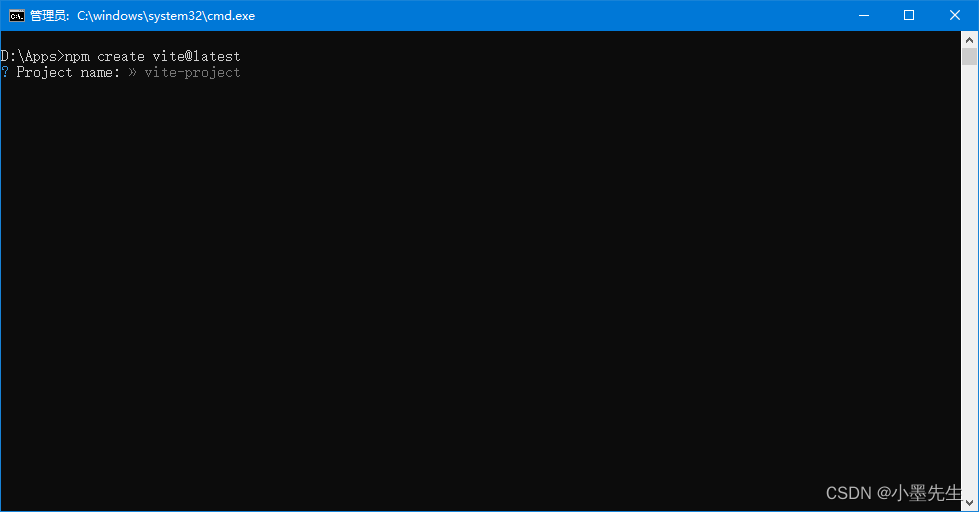
2、选择Vue
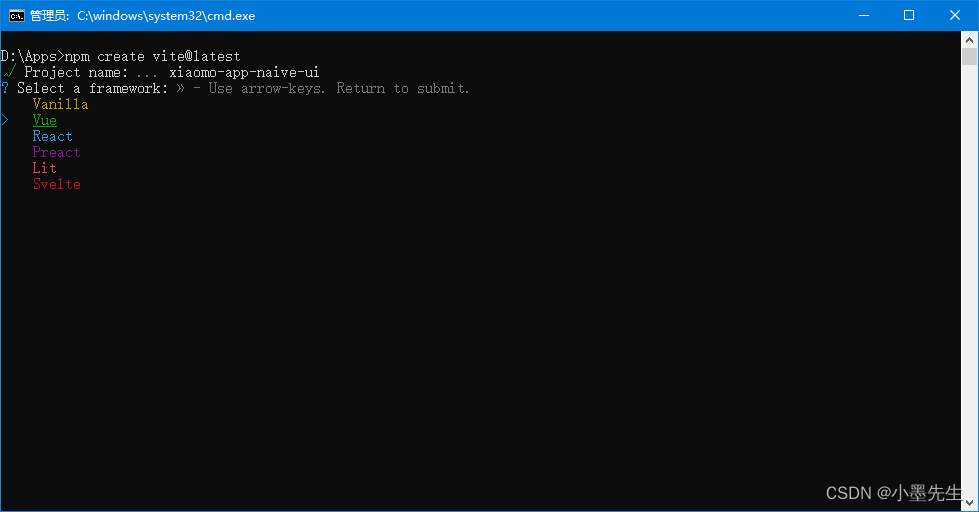
3、选择TypeScript

4、项目创建完成
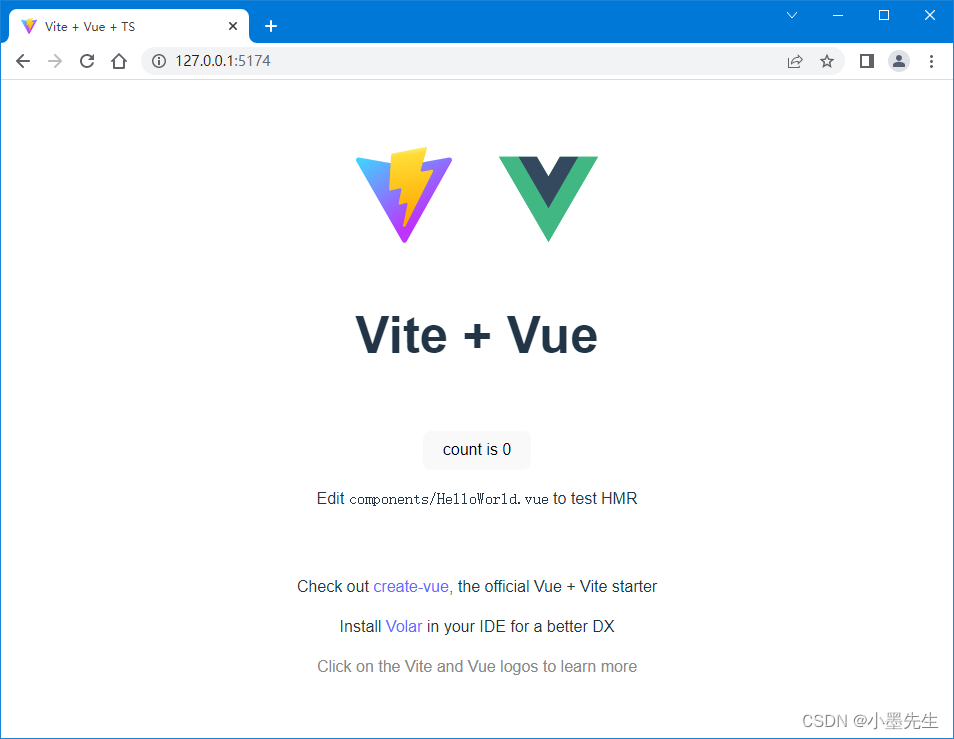
5、使用下面的命令安装、启动项目
cd xiaomo-app-naive-ui

npm insall

npm run dev
6、启动成功运行的项目
创建项目至此完成,下面开始安装Naive UI框架。
三、安装和使用Naive UI
Naive UI :一个完全使用 TypeScript 编写的 Vue 3 组件库,Naive UI 仅支持 Vue3
1、安装Naive UI
npm i -D naive-ui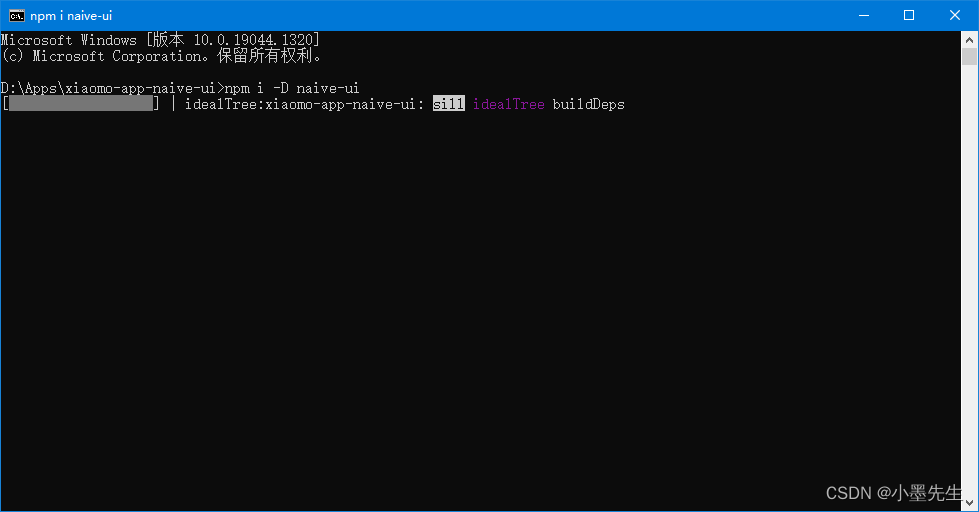
安装字体
npm i -D vfonts
安装图标
NaiveUI官方建议:使用 xicons 作为图标库。
支持很多图标库,下面我们选择一两个图标库来使用
# For vue3
npm i -D @vicons/fluent
npm i -D @vicons/ionicons4
npm i -D @vicons/ionicons5
npm i -D @vicons/antd
npm i -D @vicons/material
npm i -D @vicons/fa
npm i -D @vicons/tabler
npm i -D @vicons/carbon

npm i -D @ricons/utils  # react
npm i -D @vicons/utils  # vue3
npm i -D @v2icons/utils # vue2
安装 ionicons5
npm i -D @vicons/ionicons5
安装vicons/utils
npm i -D @vicons/utils # vue3
2、使用Naive UI(直接引入)
直接引入(推荐)
你可以直接导入组件并使用它。这种情况下,只有导入的组件才会被打包。
全局安装(不推荐)
安装全部组件
失去 tree-shaking 的能力,打包有冗余代码。
本案例使用直接引入的方式使用Naive UI框架
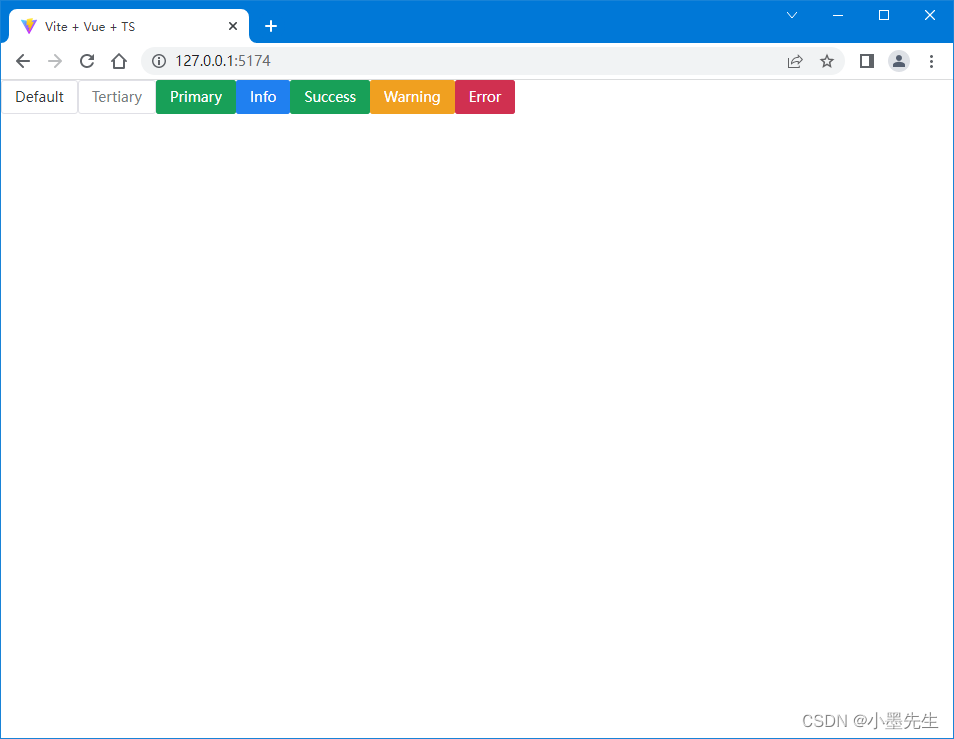
直接在App.vue里面编写如下代码:
<!-- App.vue -->
<template>
  <n-space>
    <n-button>Default</n-button>
    <n-button type="tertiary">Tertiary</n-button>
    <n-button type="primary">Primary</n-button>
    <n-button type="info">Info</n-button>
    <n-button type="success">Success</n-button>
    <n-button type="warning">Warning</n-button>
    <n-button type="error">Error</n-button>
  </n-space>
</template>

<script setup lang="ts">
import { NButton } from 'naive-ui'
</script>
main.ts 文件如下:
// main.ts
import { createApp } from 'vue'
import App from './App.vue'

createApp(App).mount('#app')
运行项目,最后呈现的效果如下
此时完整的package.json如下
{
  "name": "xiaomo-app-naive-ui",
  "private": true,
  "version": "0.0.0",
  "type": "module",
  "scripts": {
    "dev": "vite",
    "build": "vue-tsc --noEmit && vite build",
    "preview": "vite preview"
  },
  "dependencies": {
    "vue": "^3.2.37"
  },
  "devDependencies": {
    "@vicons/ionicons5": "^0.12.0",
    "@vicons/utils": "^0.1.4",
    "@vitejs/plugin-vue": "^3.1.0",
    "naive-ui": "^2.33.3",
    "typescript": "^4.6.4",
    "vfonts": "^0.0.3",
    "vite": "^3.1.0",
    "vue-tsc": "^0.40.4"
  }
}
以上为直接引入的方式,也就是需要使用的组件都需要 import 进入,这样使用起来很不方便,下面使用安装插件的方式来自动引入组件
3、使用Naive UI(自动引入)
# 安装自动导入组件的插件
npm install -D unplugin-vue-components unplugin-auto-import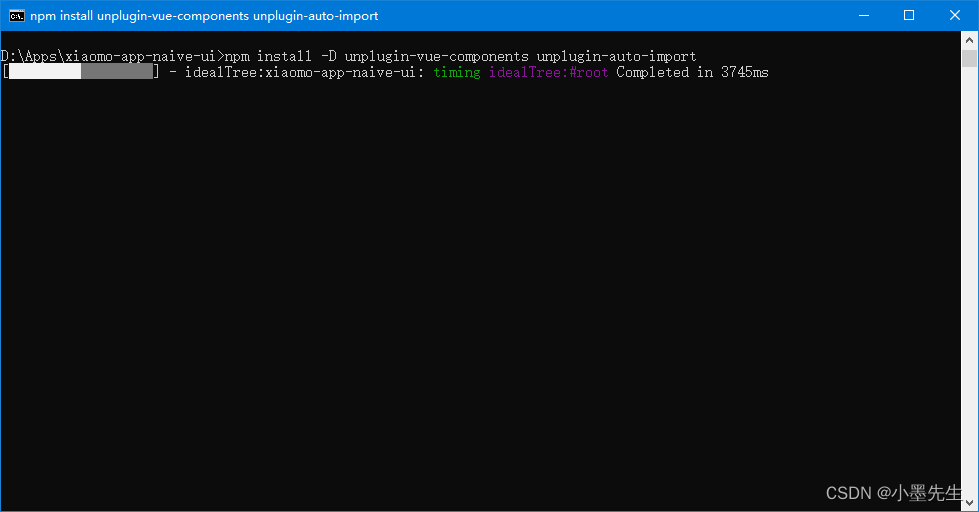
此时完整的package.json文件
{
  "name": "xiaomo-app-naive-ui",
  "private": true,
  "version": "0.0.0",
  "type": "module",
  "scripts": {
    "dev": "vite",
    "build": "vue-tsc --noEmit && vite build",
    "preview": "vite preview"
  },
  "dependencies": {
    "vue": "^3.2.37"
  },
  "devDependencies": {
    "@vicons/ionicons5": "^0.12.0",
    "@vicons/utils": "^0.1.4",
    "@vitejs/plugin-vue": "^3.1.0",
    "naive-ui": "^2.33.3",
    "typescript": "^4.6.4",
    "unplugin-auto-import": "^0.11.2",
    "unplugin-vue-components": "^0.22.7",
    "vfonts": "^0.0.3",
    "vite": "^3.1.0",
    "vue-tsc": "^0.40.4"
  }
}
修改vite.config.ts文件
// import区域加入下面三行代码
import AutoImport from 'unplugin-auto-import/vite'
import Components from 'unplugin-vue-components/vite'
import { NaiveUiResolver } from 'unplugin-vue-components/resolvers'

// plugins下面的vue(),下方加入下面的代码
AutoImport({
    imports: [
        'vue',
            {
                'naive-ui': [
                    'useDialog',
					'useMessage',
					'useNotification',
					'useLoadingBar'
				]
			}
	]
}),
Components({
	resolvers: [NaiveUiResolver()]
})
完整的 vite.config.ts文件如下
import { defineConfig } from 'vite'
import vue from '@vitejs/plugin-vue'
import AutoImport from 'unplugin-auto-import/vite'
import Components from 'unplugin-vue-components/vite'
import { NaiveUiResolver } from 'unplugin-vue-components/resolvers'

// https://vitejs.dev/config/
export default defineConfig({
	plugins: [
		vue(),
		AutoImport({
			imports: [
				'vue',
				{
					'naive-ui': [
						'useDialog',
						'useMessage',
						'useNotification',
						'useLoadingBar'
					]
				}
			]
		}),
		Components({
			resolvers: [NaiveUiResolver()]
		})
	]
})
目录结构如下:
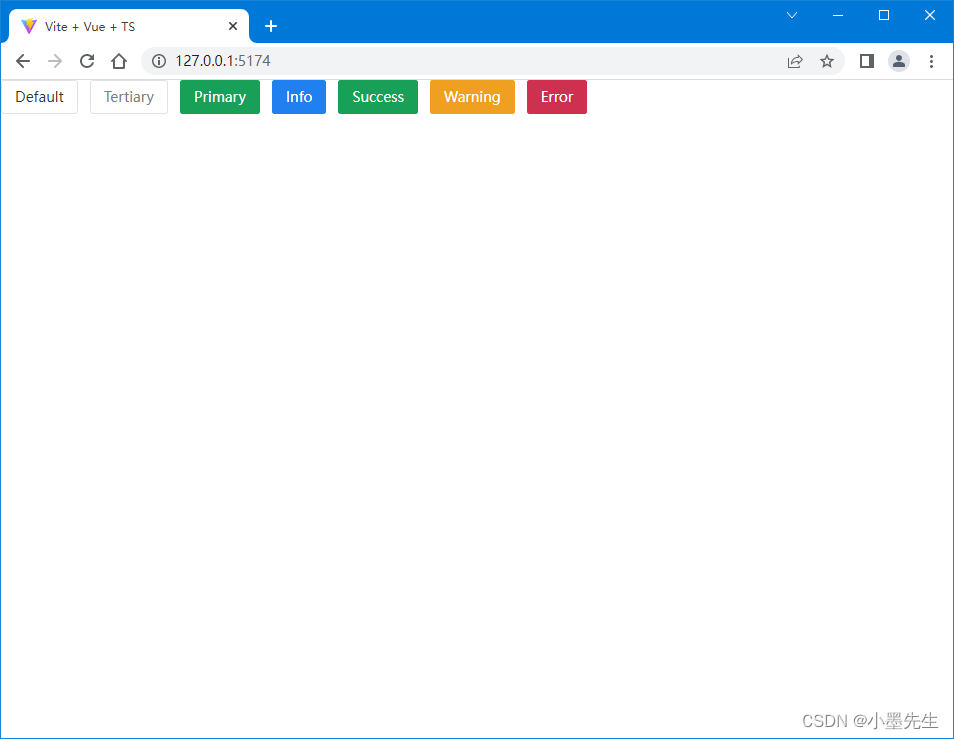
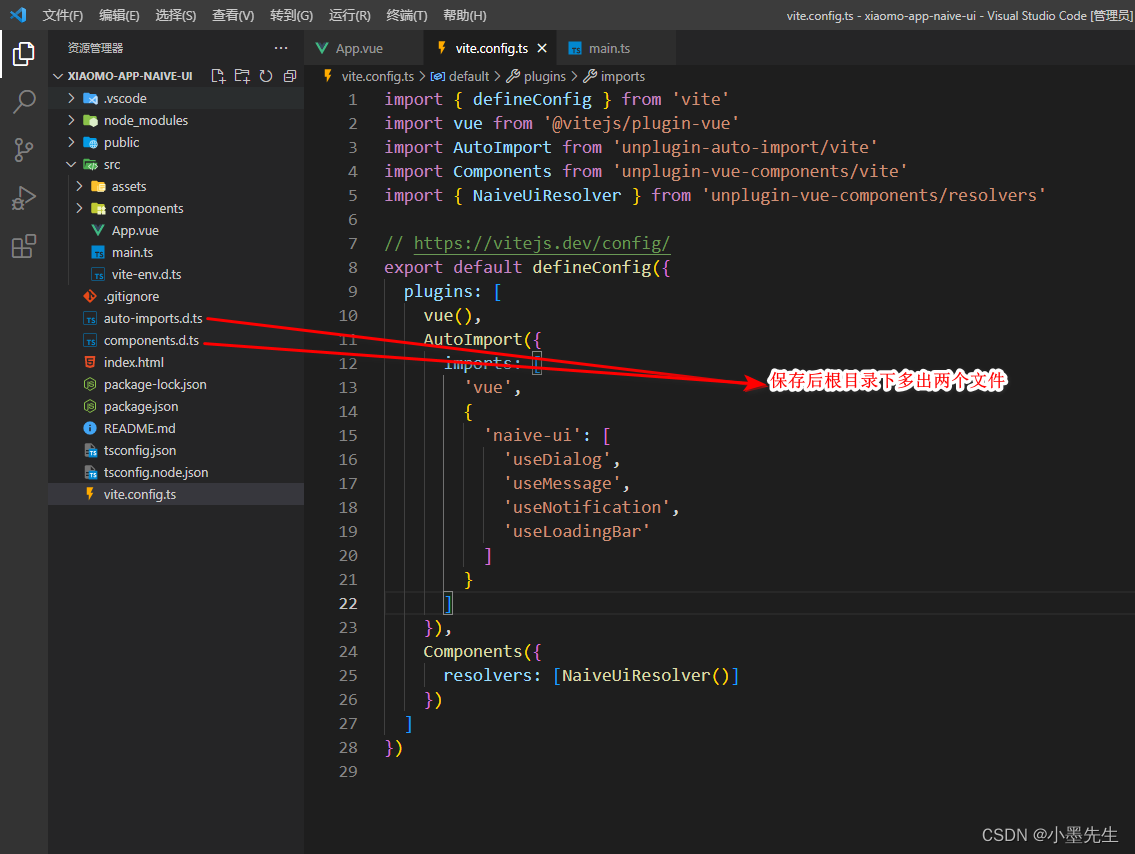 再次编辑App.vue,删除组件的引入,保存后刷新页面,一样的效果,即说明自动引入组件成功了
<!-- App.vue -->
<template>
  <n-space>
    <n-button>Default</n-button>
    <n-button type="tertiary">Tertiary</n-button>
    <n-button type="primary">Primary</n-button>
    <n-button type="info">Info</n-button>
    <n-button type="success">Success</n-button>
    <n-button type="warning">Warning</n-button>
    <n-button type="error">Error</n-button>
  </n-space>
</template>

<script setup lang="ts">
</script>
删除了 import { NButton } from 'naive-ui'
保存后运行的效果如下:
4、使用图标
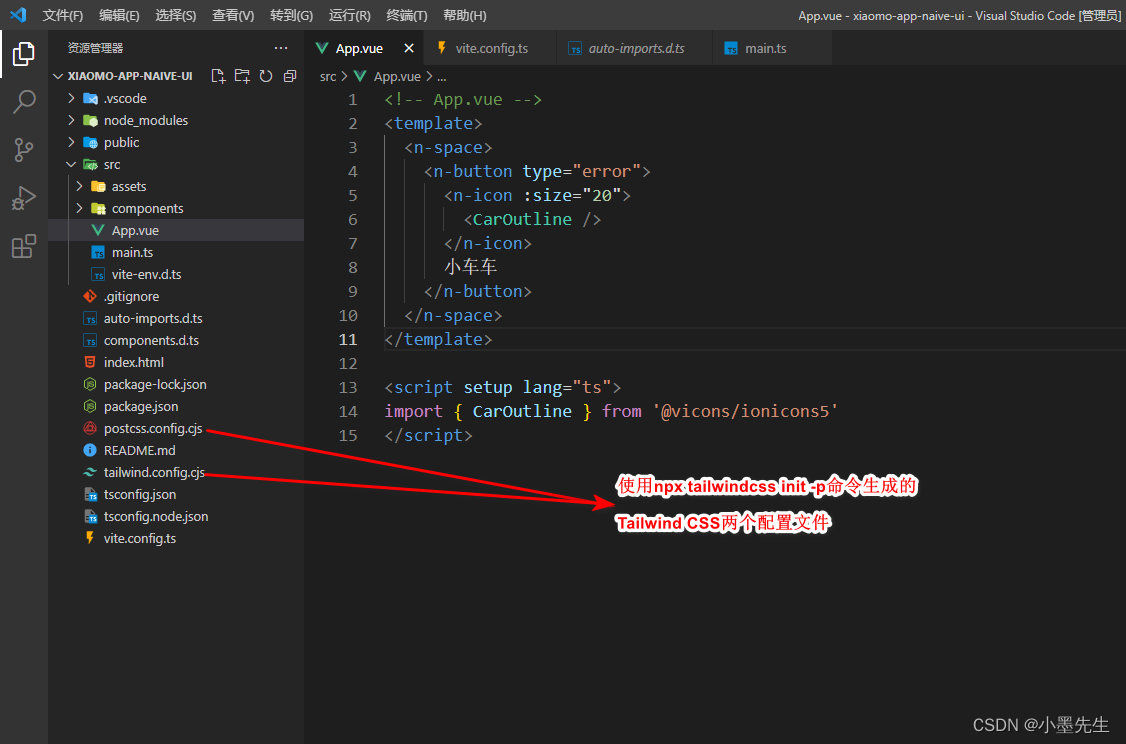
图标使用方法一(用xicons的Icon组件进行icon 的控制)
<!-- App.vue -->
<template>
  <n-space>
    <n-button type="success">
      <Icon :size="20">
        <CarOutline />
      </Icon>
      小车
    </n-button>
  </n-space>
</template>

<script setup lang="ts">
import { CarOutline } from '@vicons/ionicons5'
import { Icon } from '@vicons/utils'
</script>
效果图

图标使用方法二(用naive-ui中<n-icon/ >)
<!-- App.vue -->
<template>
  <n-space>
    <n-button type="error">
      <n-icon :size="20">
        <CarOutline />
      </n-icon>
      小车车
    </n-button>
  </n-space>
</template>

<script setup lang="ts">
import { CarOutline } from '@vicons/ionicons5'
</script>
效果图

四、安装Tailwind CSS
Tailwind CSS非常的好用,能让你用很少的代码做出很炫的效果
安装 Tailwind 以及其它依赖项:
npm install -D tailwindcss@latest postcss@latest autoprefixer@latest创建配置文件
# 使用下面的命令会生成 tailwind.config.cjs 和 postcss.config.cjs 两个配置文件
npx tailwindcss init -p
此时完整的package.json文件
{
  "name": "xiaomo-app-naive-ui",
  "private": true,
  "version": "0.0.0",
  "type": "module",
  "scripts": {
    "dev": "vite",
    "build": "vue-tsc --noEmit && vite build",
    "preview": "vite preview"
  },
  "dependencies": {
    "vue": "^3.2.37"
  },
  "devDependencies": {
    "@vicons/ionicons5": "^0.12.0",
    "@vicons/utils": "^0.1.4",
    "@vitejs/plugin-vue": "^3.1.0",
    "autoprefixer": "^9.8.8",
    "naive-ui": "^2.33.3",
    "postcss": "^8.4.16",
    "tailwindcss": "^3.1.8"
    "typescript": "^4.6.4",
    "unplugin-auto-import": "^0.11.2",
    "unplugin-vue-components": "^0.22.7",
    "vfonts": "^0.0.3",
    "vite": "^3.1.0",
    "vue-tsc": "^0.40.4"
  }
}
tailwind.config.cjs文件
// tailwind.config.cjs
module.exports = {
  purge: ['./index.html', './src/**/*.{vue,js,ts,jsx,tsx}'],
  darkMode: false, // or 'media' or 'class'
  theme: {
    extend: {}
  },
  variants: {
    extend: {}
  },
  plugins: []
  // 若不想要默认的设置生效,添加下面的配置
  // corePlugins: {
  //   preflight: false
  // }
}
postcss.config.cjs文件
// postcss.config.cjs
module.exports = {
  plugins: {
    tailwindcss: {},
    autoprefixer: {}
  }
}
目录结构如下:
接下来在src目录下新建styles目录,在styles目录下新建tailwind.css文件,内容如下:
/* tailwind.css */
@tailwind base;
@tailwind components;
@tailwind utilities;
在main.ts中引入tailwind.css
import { createApp } from 'vue'
import App from './App.vue'
import './styles/tailwind.css' // 引入tailwind.css

createApp(App).mount('#app')
修改App.vue,实现tailwind css 的一个小案例
<!-- App.vue -->
<template>
<ul class="space-y-4">
<li>
<div class="w-64 h-3 bg-gradient-to-br from-fuchsia-500 to-purple-600"></div>
</li>
<li>
<div class="w-56 h-3 bg-gradient-to-br from-fuchsia-500 to-purple-600"></div>
</li>
<li>
<div class="w-48 h-3 bg-gradient-to-br from-fuchsia-500 to-purple-600"></div>
</li>
<li>
<div class="w-40 h-3 bg-gradient-to-br from-fuchsia-500 to-purple-600"></div>
</li>
<li>
<div class="w-32 h-3 bg-gradient-to-br from-fuchsia-500 to-purple-600"></div>
</li>
<li>
<div class="w-24 h-3 bg-gradient-to-br from-fuchsia-500 to-purple-600"></div>
</li>
<li>
<div class="w-20 h-3 bg-gradient-to-br from-fuchsia-500 to-purple-600"></div>
</li>
<li>
<div class="w-16 h-3 bg-gradient-to-br from-fuchsia-500 to-purple-600"></div>
</li>
<li>
<div class="w-12 h-3 bg-gradient-to-br from-fuchsia-500 to-purple-600"></div>
</li>
<li>
<div class="w-10 h-3 bg-gradient-to-br from-fuchsia-500 to-purple-600"></div>
</li>
</ul>
</template>
<script setup lang="ts">
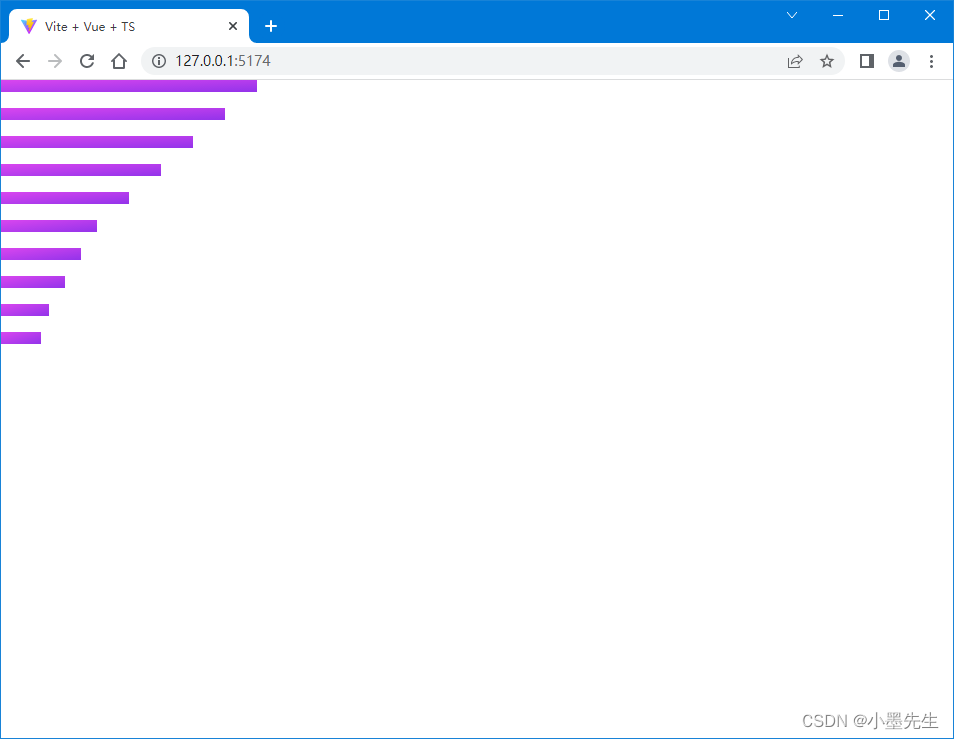
</script>效果如下:
五、NaiveUI整合TailwindCSS 及遇到的问题
整合之前先全局配置一下NaiveUI
<!-- App.vue -->
<template>
  <NConfigProvider :locale="zhCN" :date-locale="dateZhCN" :theme="getDarkTheme" :theme-overrides="getThemeOverrides" >
  </NConfigProvider>
</template>

<script setup lang="ts">
  import { computed } from 'vue'
  import { zhCN, dateZhCN, darkTheme } from 'naive-ui'
  import { lighten } from '@/utils/index'

  const designStore = {
    appTheme: '#2d8cf0',
    darkTheme: false
  }

  /**
   * 获取主题覆盖
   */
  const getThemeOverrides = computed(() => {
    const appTheme = designStore.appTheme
    const lightenStr = lighten(designStore.appTheme, 6)
    return {
      common: {
        primaryColor: appTheme,
        primaryColorHover: lightenStr,
        primaryColorPressed: lightenStr
      },
      LoadingBar: {
        colorLoading: appTheme
      }
    }
  })

  /**
   * 获取暗黑主题
   */
  const getDarkTheme = computed(() =>
    designStore.darkTheme ? darkTheme : undefined
  )
</script>
utils/index.ts文件
/**
 * 将通过的百分比与十六进制颜色的R、G或B相加
 * @param {string} color 要更改的颜色
 * @param {number} amount 改变颜色的量
 * @returns {string} 颜色的处理部分
 */
 function addLight(color: string, amount: number) {
  const cc = parseInt(color, 16) + amount
  const c = cc > 255 ? 255 : cc
  return c.toString(16).length > 1 ? c.toString(16) : `0${c.toString(16)}`
}

/**
 * 根据通过的百分比点亮6个字符的十六进制颜色
 * @param {string} color 要更改的颜色
 * @param {number} amount 改变颜色的量
 * @returns {string} 已处理的颜色,表示为十六进制
 */
export function lighten(color: string, amount: number) {
  color = color.indexOf('#') >= 0 ? color.substring(1, color.length) : color
  amount = Math.trunc((255 * amount) / 100)
  return `#${addLight(color.substring(0, 2), amount)}${addLight(
    color.substring(2, 4),
    amount
  )}${addLight(color.substring(4, 6), amount)}`
}

/**
 * 判断是否 url
 */
export function isUrl(url: string) {
  return /^(http|https):\/\//g.test(url)
}
修改App.vue
<!-- App.vue -->
<template>
  <NConfigProvider :locale="zhCN" :date-locale="dateZhCN" :theme="getDarkTheme" :theme-overrides="getThemeOverrides">
    <div class="flex h-screen items-center justify-center bg-green-100">
      <n-space>
        <n-button>Default</n-button>
        <n-button type="tertiary">Tertiary</n-button>
        <n-button type="primary">Primary</n-button>
        <n-button type="info">Info</n-button>
        <n-button type="success">Success</n-button>
        <n-button type="warning">Warning</n-button>
        <n-button type="error">Error</n-button>
      </n-space>
    </div>
  </NConfigProvider>
</template>

<script setup lang="ts">
import { computed } from 'vue'
import { zhCN, dateZhCN, darkTheme } from 'naive-ui'
import { lighten } from '@/utils/index'

const designStore = {
  appTheme: '#2d8cf0',
  darkTheme: false
}

/**
 * 获取主题覆盖
 */
const getThemeOverrides = computed(() => {
  const appTheme = designStore.appTheme
  const lightenStr = lighten(designStore.appTheme, 6)
  return {
    common: {
      primaryColor: appTheme,
      primaryColorHover: lightenStr,
      primaryColorPressed: lightenStr
    },
    LoadingBar: {
      colorLoading: appTheme
    }
  }
})

/**
 * 获取暗黑主题
 */
const getDarkTheme = computed(() =>
  designStore.darkTheme ? darkTheme : undefined
)
</script>
运行效果如下:
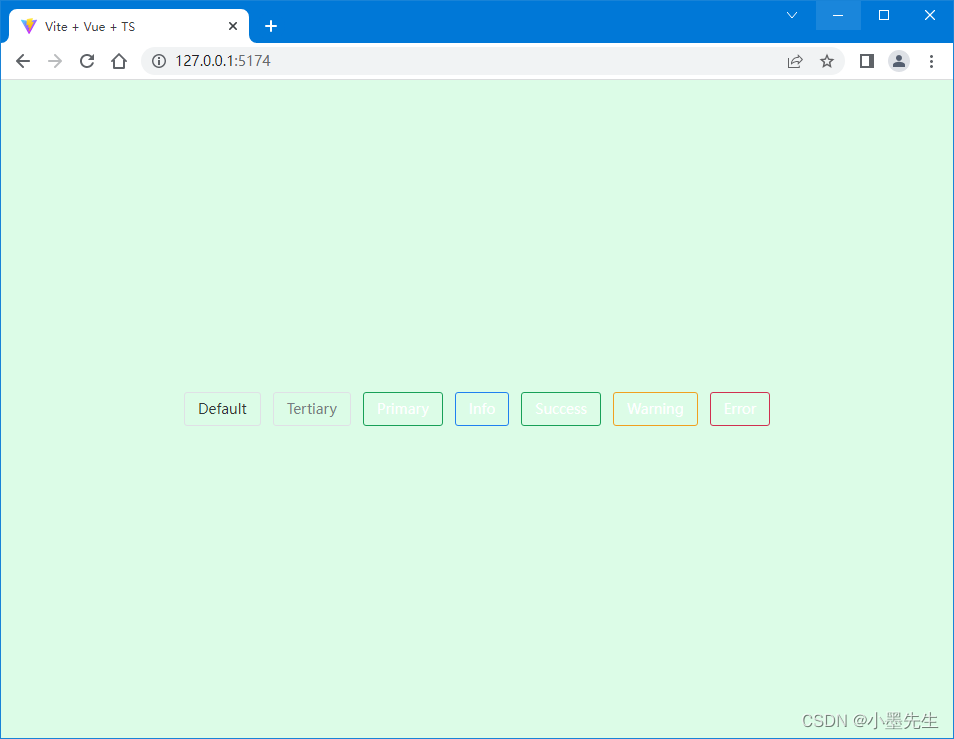
可以很清楚的看到每个NaiveUI的按钮背景颜色没了,这也就是整合出现的第一个问题(兼容性问题)
TailwindCSS官方描述:从 v2.0 版本开始,Tailwind CSS 依赖于 PostCSS 8。由于 PostCSS 8 才使用了几个月,因此生态系统中的许多其他工具尚未更新,这意味着在安装 Tailwind,并尝试编译 CSS 时,您可能会在终端中看到这样的错误:
先卸载tailwindcss postcss autoprefixer
npm uninstall tailwindcss postcss autoprefixer再安装PostCSS 7 兼容性版本
npm install -D tailwindcss@npm:@tailwindcss/postcss7-compat postcss@^7 autoprefixer@^9此时完整的package.json文件:
{
  "name": "xiaomo-app-naive-ui",
  "private": true,
  "version": "0.0.0",
  "type": "module",
  "scripts": {
    "dev": "vite",
    "build": "vue-tsc --noEmit && vite build",
    "preview": "vite preview"
  },
  "dependencies": {
    "vue": "^3.2.37"
  },
  "devDependencies": {
    "@vicons/ionicons5": "^0.12.0",
    "@vicons/utils": "^0.1.4",
    "@vitejs/plugin-vue": "^3.1.0",
    "autoprefixer": "^9.8.8",
    "naive-ui": "^2.33.3",
    "postcss": "^7.0.39",
    "tailwindcss": "npm:@tailwindcss/postcss7-compat@^2.2.17",
    "typescript": "^4.6.4",
    "unplugin-auto-import": "^0.11.2",
    "unplugin-vue-components": "^0.22.7",
    "vfonts": "^0.0.3",
    "vite": "^3.1.0",
    "vue-tsc": "^0.40.4"
  }
}
postcss版本由原来的8.4.16变成了7.0.39
tailwindcss版本由原来的3.1.8变成了npm:@tailwindcss/postcss7-compat@^2.2.17
再次运行效果如下:
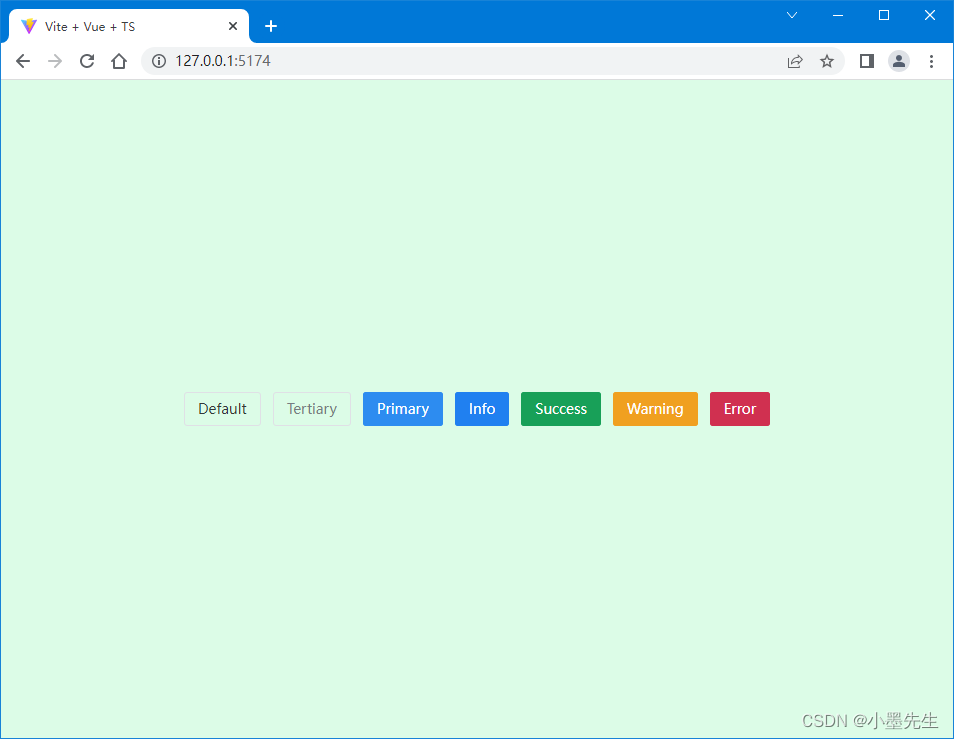
从上面的代码也看出来了要让所有的内容垂直水平居中,使用TailwindCSS只需要添加class="flex h-screen items-center justify-center",即可搞定了,是不是很方便
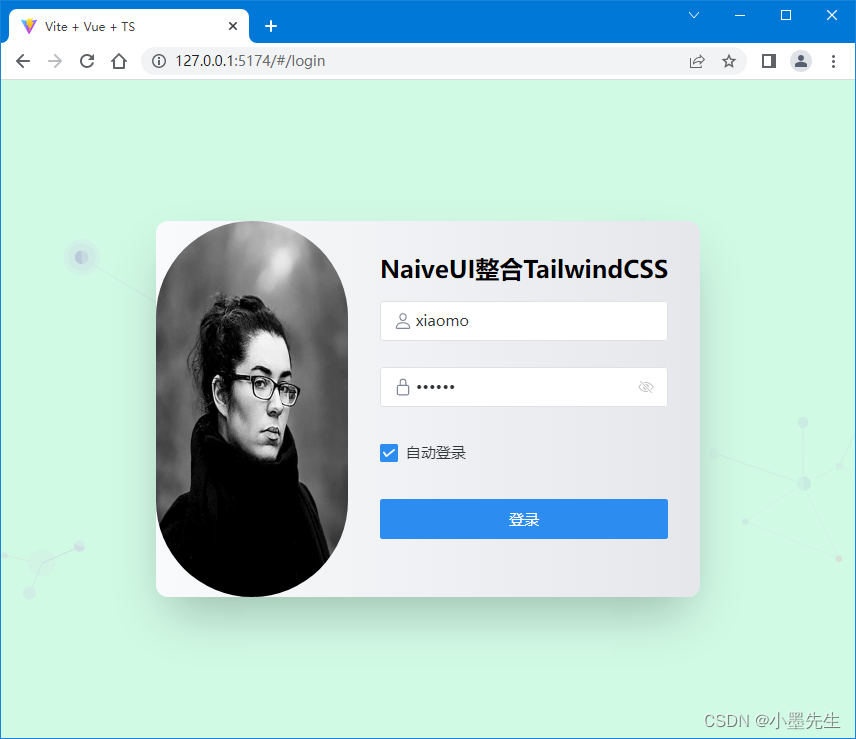
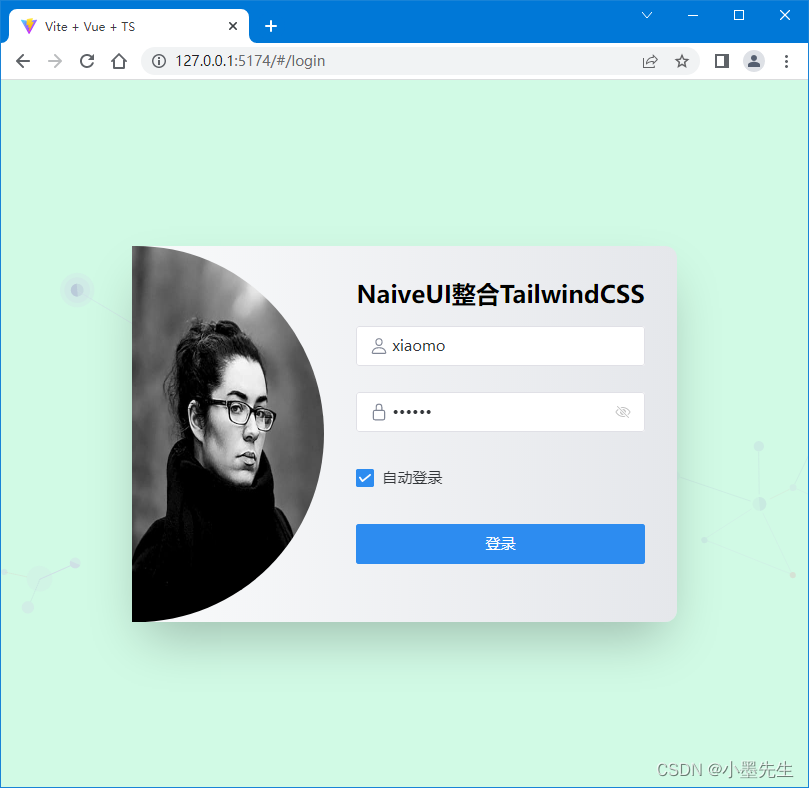
login.vue
<template>
  <div class="flex h-screen items-center justify-center bg-green-100 view-account">
    <div class="md:flex bg-gradient-to-r from-gray-50 to-gray-200 shadow-2xl rounded-xl p-8 md:p-0 ">
      <img class="w-32 h-32 md:w-48 md:h-auto md:rounded-l-2xl-none rounded-full mx-auto" :src="appConfig.loginLogo"
        alt="" width="384" height="512" />
      <div class="pt-6 md:p-8 text-center md:text-left space-y-4">
        <div>
          <p class="text-2xl font-semibold">{{ appConfig.loginDesc }}</p>
        </div>
        <div class="font-medium">
          <n-form ref="loginFormRef" label-placement="left" size="large" :model="loginForm" :rules="loginRules">
            <n-form-item path="userName">
              <n-input v-model:value="loginForm.userName" placeholder="请输入用户名">
                <template #prefix>
                  <n-icon size="18" color="#808695">
                    <PersonOutline />
                  </n-icon>
                </template>
              </n-input>
            </n-form-item>
            <n-form-item path="password">
              <n-input v-model:value="loginForm.password" type="password" show-password-on="click" placeholder="请输入密码">
                <template #prefix>
                  <n-icon size="18" color="#808695">
                    <LockClosedOutline />
                  </n-icon>
                </template>
              </n-input>
            </n-form-item>
            <n-form-item>
              <n-checkbox v-model:checked="autoLogin">自动登录</n-checkbox>
            </n-form-item>
            <n-form-item>
              <n-button type="primary" @click="handleLogin" size="large" :loading="loading" block>登录
              </n-button>
            </n-form-item>
          </n-form>
        </div>
      </div>
    </div>
  </div>
</template>

<script setup lang="ts">
import { ref, reactive } from 'vue'
import { appConfig } from '@/config/AppConfig'
import { PersonOutline, LockClosedOutline } from '@vicons/ionicons5'

const autoLogin = ref(true)
const loading = ref(false) // 加载图标 默认false

const loginForm = reactive({
  userName: 'xiaomo',
  password: '123456',
  isCaptcha: true
})

const loginRules = {
  userName: { required: true, message: '请输入用户名', trigger: 'blur' },
  password: { required: true, message: '请输入密码', trigger: 'blur' }
}

const handleLogin = (e: any) => {
  // 登录逻辑
}
</script>

<style scoped>
@media (min-width: 768px) {
  .view-account {
    background-image: url('@/assets/images/login.svg');
    background-repeat: no-repeat;
    background-position: 50%;
    background-size: 100%;
  }
}
</style>
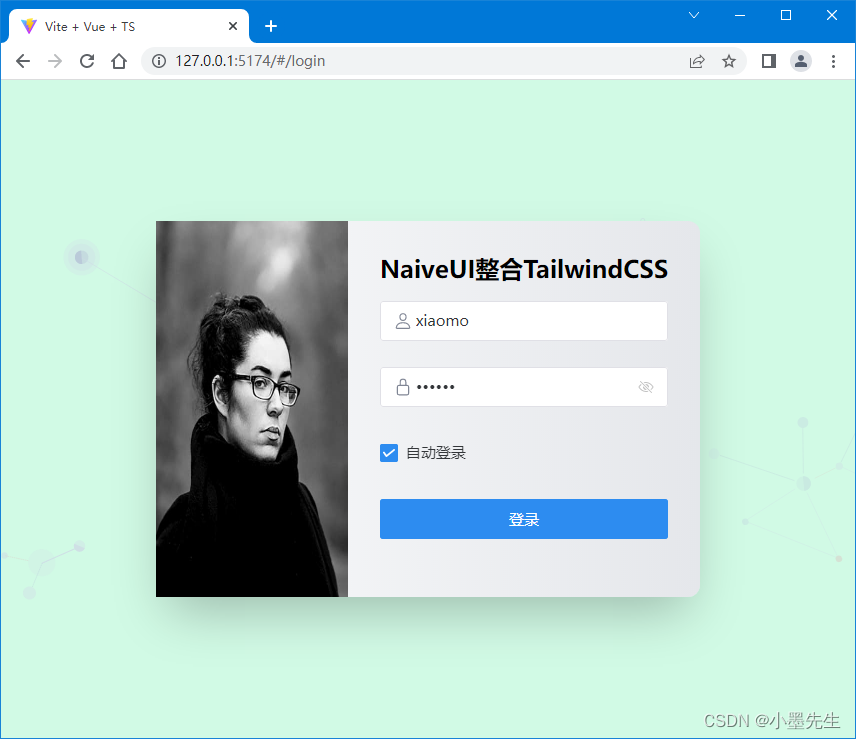
效果图如下 :


腾讯云面向开发者汇聚海量精品云计算使用和开发经验,营造开放的云计算技术生态圈。
更多推荐


 9
9 0
0- 0


 已为社区贡献1条内容

所有评论(0)