
Linux二进制方式安装mysql8
项目是银行项目,不能wget+下载地址形式下载安装包,所以下载好安装包进行安装linux版本centos7.9。
项目是银行项目,不能wget+下载地址形式下载安装包,所以下载好安装包进行安装
查看当前centos版本和内核
linux版本:centos7.9
cat /etc/redhat-release
cat /proc/version
uname -a

一.下载
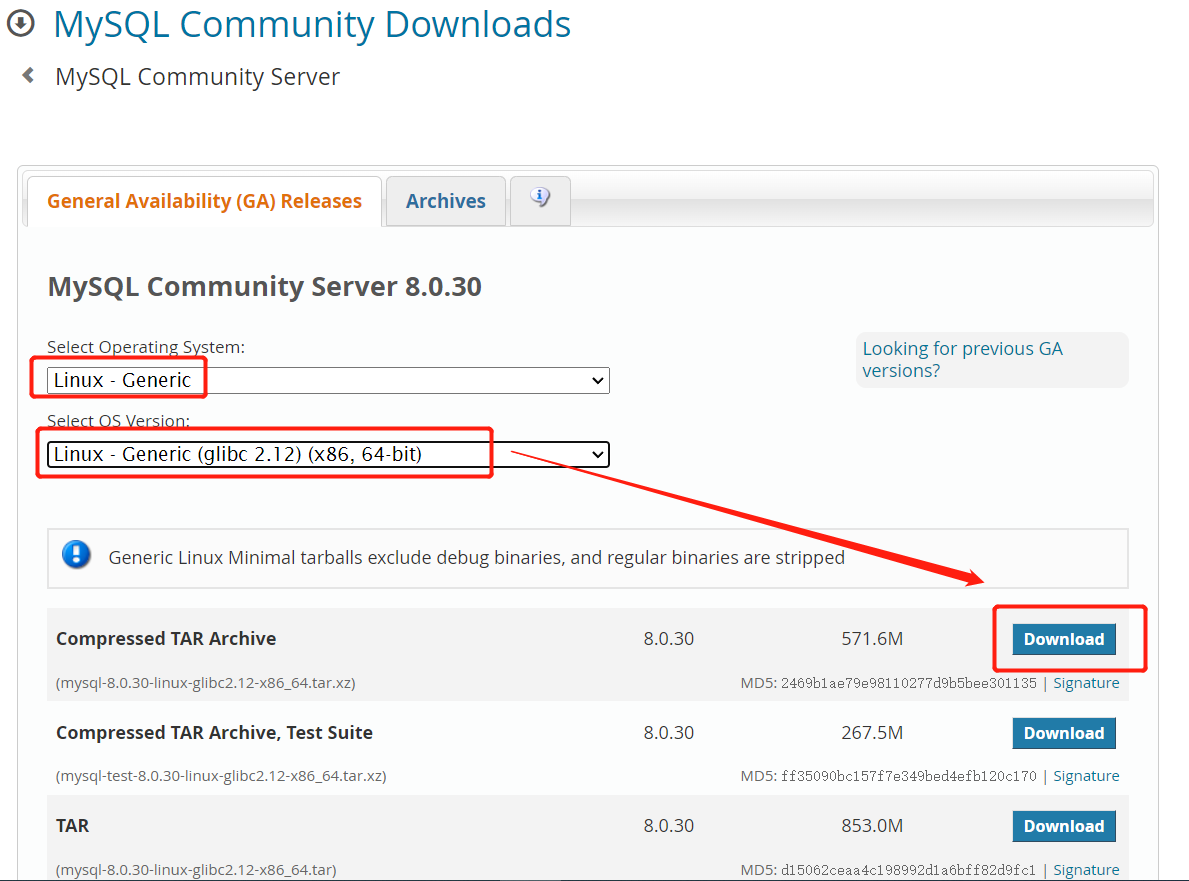
mysql官网下载地址:https://dev.mysql.com/downloads/mysql/

上图显示第一个是二进制源码包,第二个是二进制测试包,第三个是源码包,选择第一个二进制版本的mysql是已经编译好的,无需 configure ,make make install 等步骤,只需配置一下即可使用,卸载也方便,直接删除即可。可以自行调整编译参数,最大化地定制安装结果。

服务器如果能够连接网络,可以使用wget命令下载
wget https://dev.mysql.com/get/Downloads/MySQL-8.0/mysql-8.0.30-linux-glibc2.12-x86_64.tar.xz
拓展下载:
下载1:官网

下载2: 清华大学开源软件镜像站
从清华的镜像下载了一个gz形式的压缩包mysql-8.0.21-el7-x86_64.tar.gz,版本可以自行选择.
使用命令解压:tar -zxvf XXX.tar.gz
全已存放在百度网盘:链接:https://pan.baidu.com/s/1vOJyW3vlBHKItrwxdaFutw?pwd=cgfy
提取码:cgfy
下载之后,通过ssh工具sftp/ftp方式上传到你服务器centos7指定的目录即可/usr/local/
通过xftp把安装包上传到服务器

二.解压,移动,重命名
1.解压:
使用命令:tar -Jxf mysql-8.0.30-linux-glibc2.12-x86_64.tar.xz
1. 解压 xz 格式文件

方法一:
需要用到两步命令:
  首先利用 xz-utils 的 xz 命令将 linux-3.12.tar.xz 解压为 linux-3.12.tar,
  其次用 tar 命令将 linux-3.12.tar 完全解压。
xz -d linux-3.12.tar.xz
tar -xf linux-3.12.tar
方法二(推荐)
tar -Jxf linux-3.12.tar.xz

2. 创建 xz 格式文件
方法一:
也是用到两步命令:
  首先利用 tar 命令将 linux-3.12 文件夹打包成 linux-3.12.tar
  其次用 xz-utils 的 xz 命令将 linux-3.12.tar 压缩成 linux-3.12.tar.xz。
tar -cf linux-3.12.tar linux-3.12/
xz -z linux-3.12.tar
方法二(推荐)
tar -Jcf linux-3.12.tar.xz linux-3.12/


###########################################################################


拓展:解压命令学习
.tar
解包:tar xvf FileName.tar
打包:tar cvf FileName.tar DirName
(注:tar是打包,不是压缩!)
———————————————
.gz
解压1:gunzip FileName.gz
解压2:gzip -d FileName.gz
压缩:gzip FileName
.tar.gz 和 .tgz
解压:tar zxvf FileName.tar.gz
压缩:tar zcvf FileName.tar.gz DirName
———————————————
.zip
解压:unzip FileName.zip
压缩:zip FileName.zip DirName
———————————————
.rar
解压:rar x FileName.rar
压缩:rar a FileName.rar DirName
———————————————
.bz
解压1:bzip2 -d FileName.bz
解压2:bunzip2 FileName.bz
压缩:未知
.tar.bz
解压:tar jxvf FileName.tar.bz
压缩:未知
———————————————
2.移动
若上传的地方不是/usr/local/路径可以用mv命令移动
mv mysql-8.0.30-linux-glibc2.12-x86_64 /usr/local/3.重命名
mv mysql-8.0.30-linux-glibc2.12-x86_64 mysql
三.添加用户和组
#进入到安装目录
[root@hecs-412019 local]# cd /usr/local/mysql/

#创建组
[root@hecs-412019 mysql]# groupadd mysql

#创建用户
[root@hecs-412019 mysql]# useradd -r -g mysql mysql

#设置/usr/local/mysql/文件夹的拥有者
[root@hecs-412019 mysql]# chown -R mysql:mysql ./

四.初始化mysql数据库,生成默认密码
#创建数据库文件存放的文件夹。这个文件夹将来存放每个数据库的库文件
[root@hecs-412019 mysql]# mkdir data

#执行命令,
[root@hecs-412019 mysql]# bin/mysqld --initialize --user=mysql --lower_case_table_names=1 --basedir=/usr/local/mysql --datadir=/usr/local/mysql/data/

#参数说明
    #--user=mysql 指定用户
    #--basedir=/usr/local/mysql/ 指定安装目录
    #--datadir=/usr/local/mysql/data/ 指定初始化数据目录
#注:有些centos版本缺少libaio.so.1文件,就会执行不成功,使用yum install -y libaio安装


#设置数据库存储文件夹的拥有者
[root@hecs-412019 mysql]# chown -R root:root ./
[root@hecs-412019 mysql]# chown -R mysql:mysql data
记住初始密码,后面登录时使用
五.修改配置
默认读取配置文件的顺序:
1. /etc/my.cnf
2./etc/mysql/my.cnf
3./usr/local/mysql/etc/my.cnf
4.~/.my.cnf
修改mysql配置文件
[root@hecs-412019 mysql]# vi /etc/my.cnf 修改mysql配置文件,将里面的命令都删除掉,然后添加以下命令,保存并退出
[mysql]
# 设置mysql客户端默认字符集
default-character-set=utf8


[mysqld]
# 设置3306端口
port=3306
# 设置mysql的安装目录
basedir=/usr/local/mysql
# 设置mysql数据库的数据的存放目录
datadir=/usr/local/mysql/data
# 允许最大连接数
max_connections=1500
# 服务端使用的字符集默认为8比特编码的latin1字符集
character-set-server=utf8
# 创建新表时将使用的默认存储引擎
default-storage-engine=INNODB
# 默认使用"mysql_native_password"插件认证
default_authentication_plugin=mysql_native_password
# 区分大小写,0区分,1不区分,填写这个配置前提是在initialize初始化数据库的时候加参数--lower_case_table_names=1,否则报错
lower_case_table_names=1


[client]
# 设置mysql客户端连接服务端时默认使用的端口
default-character-set=utf8
拓展:
如果需要使用mysql的select xxxx into outfile --- load data 导入导出数据,进行数据迁移,需要增加配置
1.[mysqld],[mysql],[client]后面各自加上local_infile=ON,打开local data开关,用于数据文件导入
2.[mysqld]后面加上secure_file_priv='',不对mysqld的导入导出做限制,使用show variables like '%secure%'查看值
编辑完后 按esc 后按住 shift+: 输入 wq表示保存并退出 :wq
lower_case_table_names参数说明
MySQL8.0 新增了data dictionary的概念,数据初始化的时候在linux下默认使用lower_case_table_names=0的参数,数据库启动的时候读取的my.cnf文件中的值。若二者值不一致则在mysql的错误日志中记录报错信息。而在MySQL 5.7之前则允许数据库初始化和启动的值不一致且以启动值为准,修改数据库默认策略,要在 mysql8.0安装完成之后,第一次启动初始化之前,否则会启动报错,无法启动。
简单来说就是,unix默认是0,windows默认是1,mac是2,0是区分大小写的,1是不区分的,也就是windows是默认不区分大小写的。翻阅资料,都是说在配置文件配置lower_case_table_names=1,重启服务可以解决问题。后来经过查阅mysql官方文档资料发现:该解决方案只能在5.6/5.7低版本的mysql中有效。但是在8.0版本下是行不通的,就算怎么做lower_case_table_names变量也没有得到更新。也就是说在8.0版本,你的mysql已经初始化过就不支持修改lower_case_table_names参数了!
https://blog.csdn.net/qq_26007225/article/details/121172462
六.启动mysql服务
[root@hecs-412019 mysql]# cd /usr/local/mysql/support-files
[root@hecs-412019 support-files]# ./mysql.server start
#如果执行有问题
[root@hecs-412019 support-files]# chmod -R 777 /usr/local/mysql
如果您的安装包含systemd支持,请按以下方式启动服务器:
1. systemctl {start|stop|restart|status} mysqld
启动:systemctl start mysqld
停止:systemctl stop mysqld
重启:systemctl restart mysqld
查看状态systemctl status mysql

2. 使用与System V系统兼容的service命令(具有相反的参数):
service mysqld {start|stop|restart|status}
启动:service mysqld start
停止:service mysqld stop
重启:service mysqld restart
重载配置:service mysqld reload
七.其他操作
1.查看是否启动
ps -ef|grep mysql #查看mysql 进程
netstat -ano |grep "3306" #查看3306端口
2.修改root用户登录密码
[root@hecs-412019 bin]# cd /usr/local/mysql/bin/
[root@hecs-412019 bin]# ./mysql -u root -p
执行后,输入我们初始化时记录下的随机密码,就会进入mysql
mysql> alter user 'root'@'localhost' IDENTIFIED WITH mysql_native_password BY '123456';
#设置允许远程登录
mysql> use mysql;
mysql> update user set user.Host='%'where user.User='root';
mysql> flush privileges;
mysql> quit;
3.设置mysql自启动
#将mysql添加到系统进程中
[root@hecs-412019 bin]# cp /usr/local/mysql/support-files/mysql.server /etc/init.d/mysqld
[root@hecs-412019 bin]# chown 777 /etc/my.cnf
[root@hecs-412019 bin]# chmod +x /etc/init.d/mysqld
???
[root@hecs-412019 bin]# systemctl enable mysqld
重启linux后测试自启动(可选)
[root@hecs-412019 support-files]# reboot4.查看防火墙开放端口
[root@hecs-412019 bin]# firewall-cmd --list-all
 在防火墙中将3306端口开放
[root@hecs-412019 bin]# firewall-cmd --zone=public --add-port=3306/tcp --permanent
[root@hecs-412019 bin]# firewall-cmd --reload
 //--permanent为永久生效,没有此参数 服务器重启后配置失效
拓展命令:
netstat -lptn //查看当前所有tcp端口·
netstat -lptn |grep 3306 //查看所有3306端口使用情况
systemctl start firewalld //启动防火墙
systemctl stop firewalld //关闭防火墙
5.设置环境变量(可选)
vim /etc/profile
export MYSQL_HOME="/usr/local/mysql"
export PATH="$PATH:$MYSQL_HOME/bin"
#保存退出
. /etc/profile
#让配置文件立马生效
source /etc/profile
linux安装mysql客户端
有时候我们只想在某个机器上安装mysql 客户度,而不是安装整个mysql服务,因为服务已经存在了,而我们又因为某些原因我们不能直接登录到这台服务器上,或者是我们要在其他机器上查询mysql 的数据
#安装mysql客户端
yum install mysql -y (安装mysql 服务我们用的是y um install -y mysql-server 这个命令)
#连接目标主机mysql
mysql -h192.168.123.119 -uroot -pwww1234
【CentOS7.9】防火墙配置使用
1.firewall 防火墙

基本使用

# 启动
systemctl start firewalld.service

# 停止
systemctl stop firewalld.service

# 重启
systemctl restart firewalld.service

# 查看状态
systemctl status firewalld.service

# 启用, 开机自启服务
systemctl enable firewalld.service

# 禁用, 开机自启服务
systemctl disable firewalld.service

# 查看是否开机启动
systemctl is-enabled firewalld.service

# 查看已启动的服务列表
systemctl list-unit-files | grep enabled

# 查看启动失败的服务列表
systemctl --failed
命令后 .service 不加也可以


基本配置 firewalld-cmd

# 查看版本
firewall-cmd --version

# 查看帮助
firewall-cmd --help

# 显示状态
firewall-cmd --state

# 开发一个端口
firewall-cmd --zone=public --permanent --add-port=端口/tcp

参数:--permanent永久生效,没有此参数重启后失效
      --add-port 端口

# 更新防火墙规则
firewall-cmd --reload

# 删除端口
firewall-cmd --zone=public --permanent --remove-port=端口/tcp

# 查看端口是否开放
firewall-cmd --zone=public --query-port=端口/tcp

# 查看所有打开的端口
firewall-cmd --zone=public --list-ports

# 查看防火墙规则
firewall-cmd --list-all

# 查看区域信息
firewall-cmd --get-active-zones

# 查看指定接口所属区域
firewall-cmd --get-zone-of-interface=eth0

# 拒绝所有包
firewall-cmd --panic-on

# 取消拒绝状态
firewall-cmd --panic-off

# 查看是否拒绝
firewall-cmd --query-panic


2.iptables 防火墙

安装 iptables

# 检查状态
systemctl status iptables.service

# 停止firewall
systemctl stop firewalld.service

# 禁用开机启动firewall
systemctl disable firewalld.service

# 安装 iptables
yum install -y iptables iptables-services

# 启动 iptables
systemctl start iptables.service

# 启用开机启动 iptables
systemctl enable iptables.service


设置规则

参数:
-t<表>:指定要操纵的表
-A:向规则链中添加条目
-D:从规则链中删除条目
-i:向规则链中插入条目
-R:替换规则链中的条目
-L:显示规则链中已有的条目
-F:清除规则链中已有的条目
-Z:清空规则链中的数据包计算器和字节计数器
-N:创建新的用户自定义规则链
-P:定义规则链中的默认目标
-h:显示帮助信息
-p:指定要匹配的数据包协议类型
-s:指定要匹配的数据包源ip地址
-j<目标>:指定要跳转的目标
-i<网络接口>:指定数据包进入本机的网络接口
-o<网络接口>:指定数据包要离开本机所使用的网络接口
# 查看iptables现有规则
iptables -L -n

# 先允许所有,不然有可能会杯具
iptables -P INPUT ACCEPT

# 清空所有默认规则
iptables -F

# 清空所有自定义规则
iptables -X

# 所有计数器归0
iptables -Z

# 允许来自于lo接口的数据包(本地访问)
iptables -A INPUT -i lo -j ACCEPT

开放端口
iptables -A INPUT -p tcp -s IP地址 --dport 端口 -j ACCEPT

# 保存规则
service iptables save

# 允许ping
iptables -A INPUT -p icmp --icmp-type 8 -j ACCEPT

# 允许接受本机请求之后的返回数据 RELATED,是为FTP设置的
iptables -A INPUT -m state --state  RELATED,ESTABLISHED -j ACCEPT

# 其他入站一律丢弃
iptables -P INPUT DROP

# 所有出站一律绿灯
iptables -P OUTPUT ACCEPT

# 所有转发一律丢弃
iptables -P FORWARD DROP

# 如果要添加内网ip信任
iptables -A INPUT -p tcp -s 45.96.174.68 -j ACCEPT

# 过滤所有非以上规则的请求
iptables -P INPUT DROP

# 要封停一个IP,使用下面这条命令:
iptables -I INPUT -s IP地址 -j DROP

# 要解封一个IP,使用下面这条命令:
iptables -D INPUT -s IP地址 -j DROP


常用端口

# http 80
# https 443
# https 443
# mysql 3306
# mongodb 27017
# postgre 5432
# elasticsearch 9200
# redis 6379
# rabbitmq 15672, 5672
# consul 8500
# nacos 8848
# ftp 21
# ssh 22
# telnet 23
# smtp 25


firewall 实例

# 开放 mysql 端口
firewall-cmd --zone=public --permanent --add-port=3306/tcp

# 重新载入规则
firewall-cmd --reload

# 删除 mysql 端口
firewall-cmd --zone=public --permanent --remove-port=3306/tcp


iptables 实列

开放端口
iptables -A INPUT -p tcp --dport 3306 -j ACCEPT

# 保存规则
service iptables save

删除端口
iptables -D INPUT -p tcp --dport 3306 -j ACCEPT
参考:
Centos7环境下安装Mysql8详细教程(超详细,亲测百分百成功)_m0_67401835的博客-CSDN博客_centos7编译安装mysql8
Linux 安装mysql8详细教程_sh_c_1314的博客-CSDN博客_linux安装mysql8
Linux下安装mysql-8.0.13-linux-glibc2.12-x86_64.tar.xz_IT_YaoBlog的博客-CSDN博客_linux安装mysql8.0.13
更多推荐
 2
2 0
0- 0


 已为社区贡献1条内容

所有评论(0)