Kubernetes(K8s)集群安装部署
Kubernetes(K8s)二进制安装部署,使用2台centos 7.9
Kubernetes(K8s)集群安装
Kubernetes(K8s)集群安装
1 、基本环境配置
Kubeadm安装方式自1.14版本以后,安装方法几乎没有任何变化,此文档可以尝试安装最新的k8s集群,centos采用的是7.9版本
K8S官网:https://kubernetes.io/docs/setup/
最新版高可用安装:https://kubernetes.io/docs/setup/production-environment/tools/kubeadm/high-availability/
1.1、Kubernetes集群规划
| 主机名 | IP地址 | 说明 |
|---|---|---|
| k8s-master01 | 172.19.204.205 | master节点 |
| k8s-node01 | 172.19.204.206 | worker节点 |
请统一替换这些网段,Pod网段和service和宿主机网段不要重复!!!
| 配置信息 | 备注 |
|---|---|
| 系统版本 | CentOS 7.9 |
| Docker版本 | 20.10.x |
| Pod网段 | 17.16.0.0/12 |
| Service网段 | 192.168.0.0/16 |
宿主机网段、K8s Service网段、Pod网段不能重复,
1.2、基础环境配置(所有节点)
1.2.1、Host文件修改
所有节点配置hosts,修改/etc/hosts如下:
[root@k8s-master01 ~]# vi /etc/hostsc
172.19.204.205 k8s-master01
172.19.204.206 k8s-node01
1.2.1、yum源替换
所有节点替换yum源。
[root@k8s-master01 ~]# curl -o /etc/yum.repos.d/CentOS-Base.repo https://mirrors.aliyun.com/repo/Centos-7.repo
[root@k8s-master01 ~]# yum install -y yum-utils device-mapper-persistent-data lvm2
[root@k8s-master01 ~]# yum-config-manager --add-repo https://mirrors.aliyun.com/docker-ce/linux/centos/docker-ce.repo

[root@k8s-master01 ~]# cat <<EOF > /etc/yum.repos.d/kubernetes.repo
[kubernetes]
name=Kubernetes
baseurl=https://mirrors.aliyun.com/kubernetes/yum/repos/kubernetes-el7-x86_64/
enabled=1
gpgcheck=0
repo_gpgcheck=0
gpgkey=https://mirrors.aliyun.com/kubernetes/yum/doc/yum-key.gpg https://mirrors.aliyun.com/kubernetes/yum/doc/rpm-package-key.gpg
EOF

[root@k8s-master01 ~]# sed -i -e '/mirrors.cloud.aliyuncs.com/d' -e '/mirrors.aliyuncs.com/d' /etc/yum.repos.d/CentOS-Base.repo
1.2.2、必备工具安装
[root@k8s-master01 ~]# yum install wget jq psmisc vim net-tools telnet yum-utils device-mapper-persistent-data lvm2 git -y
1.2.3、关闭防火墙
所有节点关闭防火墙、selinux、dnsmasq、swap。
[root@k8s-master01 ~]# systemctl disable --now firewalld
[root@k8s-master01 ~]# systemctl disable --now dnsmasq
[root@k8s-master01 ~]# systemctl disable --now NetworkManager

[root@k8s-master01 ~]# setenforce 0
[root@k8s-master01 ~]# sed -i 's#SELINUX=enforcing#SELINUX=disabled#g' /etc/sysconfig/selinux
[root@k8s-master01 ~]# sed -i 's#SELINUX=enforcing#SELINUX=disabled#g' /etc/selinux/config
1.2.4、关闭Swap分区
[root@k8s-master01 ~]# swapoff -a && sysctl -w vm.swappiness=0
[root@k8s-master01 ~]# sed -ri '/^[^#]*swap/s@^@#@' /etc/fstab
1.2.5、NTP时间同步
安装ntpdate
[root@k8s-master01 ~]# rpm -ivh http://mirrors.wlnmp.com/centos/wlnmp-release-centos.noarch.rpm
[root@k8s-master01 ~]# yum install ntpdate -y
所有节点同步时间。
[root@k8s-master01 ~]# ln -sf /usr/share/zoneinfo/Asia/Shanghai /etc/localtime
echo 'Asia/Shanghai' >/etc/timezone
[root@k8s-master01 ~]# ntpdate time2.aliyun.com
[root@k8s-master01 ~]# crontab -e
*/5 * * * * /usr/sbin/ntpdate time2.aliyun.com
[root@k8s-master01 ~]# systemctl restart crond
1.2.6、所有节点配置limit
[root@k8s-master01 ~]# ulimit -SHn 65535
[root@k8s-master01 ~]# vim /etc/security/limits.conf
# 末尾添加如下内容
* soft nofile 65536
* hard nofile 131072
* soft nproc 65535
* hard nproc 655350
* soft memlock unlimited
* hard memlock unlimited
1.2.7、Master01节点免密钥登录其他节点
Master01节点免密钥登录其他节点,安装过程中生成配置文件和证书均在Master01上操作,集群管理也在Master01上操作。
以下配置不知道的可以直接回车使用默认。
[root@k8s-master01 ~]# ssh-keygen -t rsa
Generating public/private rsa key pair.
Enter file in which to save the key (/root/.ssh/id_rsa):
/root/.ssh/id_rsa already exists.
Overwrite (y/n)? y
Enter passphrase (empty for no passphrase):
Enter same passphrase again:
Your identification has been saved in /root/.ssh/id_rsa.
Your public key has been saved in /root/.ssh/id_rsa.pub.
The key fingerprint is:
SHA256:U4GtYVh/FF9JET79oziKBmY0eC8SvjvED9gYfFjoE1c root@k8s-master01
The key's randomart image is:
+---[RSA 2048]----+
|  . .E o.o. o..+=|
| o o  . +..o ..o.|
|o = .  . oo . .o.|
| * + +  .. .    o|
|  X + o S      ..|
| o B = . .  . . .|
|  . B o    o .   |
|   o . .. . .    |
|   .o .. .       |
+----[SHA256]-----+
配置免秘钥登录其他节点
[root@k8s-master01 ~]# for i in k8s-master01 k8s-node01;do ssh-copy-id -i .ssh/id_rsa.pub $i;done
/usr/bin/ssh-copy-id: INFO: Source of key(s) to be installed: ".ssh/id_rsa.pub"
/usr/bin/ssh-copy-id: INFO: attempting to log in with the new key(s), to filter out any that are already installed
/usr/bin/ssh-copy-id: INFO: 1 key(s) remain to be installed -- if you are prompted now it is to install the new keys
root@k8s-master01's password:

Number of key(s) added: 1

Now try logging into the machine, with:   "ssh 'k8s-master01'"
and check to make sure that only the key(s) you wanted were added.

/usr/bin/ssh-copy-id: INFO: Source of key(s) to be installed: ".ssh/id_rsa.pub"
/usr/bin/ssh-copy-id: INFO: attempting to log in with the new key(s), to filter out any that are already installed
/usr/bin/ssh-copy-id: INFO: 1 key(s) remain to be installed -- if you are prompted now it is to install the new keys
root@k8s-node01's password:

Number of key(s) added: 1

Now try logging into the machine, with:   "ssh 'k8s-node01'"
and check to make sure that only the key(s) you wanted were added.
下载安装所有的源码文件:
[root@k8s-master01 ~]# cd /root/ ; git clone https://github.com/dotbalo/k8s-ha-install.git
如果无法下载就下载:https://gitee.com/dukuan/k8s-ha-install.git
1.2.8、系统升级
所有节点升级系统并重启
[root@k8s-master01 ~]# yum update -y --exclude=kernel* && reboot
1.2.9、内核升级
CentOS7 需要升级内核至4.18+,本地升级的版本为4.19
[root@k8s-master01 ~]# cd /root
[root@k8s-master01 ~]# wget http://193.49.22.109/elrepo/kernel/el7/x86_64/RPMS/kernel-ml-devel-4.19.12-1.el7.elrepo.x86_64.rpm
[root@k8s-master01 ~]# wget http://193.49.22.109/elrepo/kernel/el7/x86_64/RPMS/kernel-ml-4.19.12-1.el7.elrepo.x86_64.rpm
所有节点安装内核
[root@k8s-master01 ~]# cd /root && yum localinstall -y kernel-ml*
所有节点更改内核启动顺序
[root@k8s-master01 ~]# grub2-set-default  0 && grub2-mkconfig -o /etc/grub2.cfg
Generating grub configuration file ...
Found linux image: /boot/vmlinuz-4.19.12-1.el7.elrepo.x86_64
Found initrd image: /boot/initramfs-4.19.12-1.el7.elrepo.x86_64.img
Found linux image: /boot/vmlinuz-3.10.0-1160.el7.x86_64
Found initrd image: /boot/initramfs-3.10.0-1160.el7.x86_64.img
Found linux image: /boot/vmlinuz-0-rescue-dadf611991db48e3b1eef115a841fbff
Found initrd image: /boot/initramfs-0-rescue-dadf611991db48e3b1eef115a841fbff.img
done
[root@k8s-master01 ~]# grubby --args="user_namespace.enable=1" --update-kernel="$(grubby --default-kernel)"
检查默认内核是不是4.19
[root@k8s-master01 ~]# grubby --default-kernel
/boot/vmlinuz-4.19.12-1.el7.elrepo.x86_64
所有节点重启,然后检查内核是不是4.19
[root@k8s-master01 ~]# reboot
[root@k8s-master01 ~]# uname -r
4.19.12-1.el7.elrepo.x86_64
1.2.10、安装ipvsadm
[root@k8s-master01 ~]# yum install ipvsadm ipset sysstat conntrack libseccomp -y
所有节点配置ipvs模块,在内核4.19+版本nf_conntrack_ipv4已经改为nf_conntrack, 4.18以下使用nf_conntrack_ipv4即可:
[root@k8s-master01 ~]# modprobe -- ip_vs
[root@k8s-master01 ~]# modprobe -- ip_vs_rr
[root@k8s-master01 ~]# modprobe -- ip_vs_wrr
[root@k8s-master01 ~]# modprobe -- ip_vs_sh
[root@k8s-master01 ~]# modprobe -- nf_conntrack
[root@k8s-master01 ~]# vim /etc/modules-load.d/ipvs.conf
ip_vs
ip_vs_lc
ip_vs_wlc
ip_vs_rr
ip_vs_wrr
ip_vs_lblc
ip_vs_lblcr
ip_vs_dh
ip_vs_sh
ip_vs_fo
ip_vs_nq
ip_vs_sed
ip_vs_ftp
ip_vs_sh
nf_conntrack
ip_tables
ip_set
xt_set
ipt_set
ipt_rpfilter
ipt_REJECT
ipip
[root@k8s-master01 ~]# systemctl enable --now systemd-modules-load.service
1.2.11、修改内核参数
开启一些k8s集群中必须的内核参数,所有节点配置k8s内核:
[root@k8s-master01 ~]# cat <<EOF > /etc/sysctl.d/k8s.conf
> net.ipv4.ip_forward = 1
> net.bridge.bridge-nf-call-iptables = 1
> net.bridge.bridge-nf-call-ip6tables = 1
> fs.may_detach_mounts = 1
> net.ipv4.conf.all.route_localnet = 1
> vm.overcommit_memory=1
> vm.panic_on_oom=0
> fs.inotify.max_user_watches=89100
> fs.file-max=52706963
> fs.nr_open=52706963
> net.netfilter.nf_conntrack_max=2310720
>
> net.ipv4.tcp_keepalive_time = 600
> net.ipv4.tcp_keepalive_probes = 3
> net.ipv4.tcp_keepalive_intvl =15
> net.ipv4.tcp_max_tw_buckets = 36000
> net.ipv4.tcp_tw_reuse = 1
> net.ipv4.tcp_max_orphans = 327680
> net.ipv4.tcp_orphan_retries = 3
> net.ipv4.tcp_syncookies = 1
> net.ipv4.tcp_max_syn_backlog = 16384
> net.ipv4.ip_conntrack_max = 65536
> net.ipv4.tcp_max_syn_backlog = 16384
> net.ipv4.tcp_timestamps = 0
> net.core.somaxconn = 16384
> EOF
[root@k8s-master01 ~]# reboot
所有节点配置完内核后,重启服务器,保证重启后内核依旧加载
[root@k8s-master01 ~]# lsmod | grep --color=auto -e ip_vs -e nf_conntrack
ip_vs_ftp              16384  0
nf_nat                 32768  1 ip_vs_ftp
ip_vs_sed              16384  0
ip_vs_nq               16384  0
ip_vs_fo               16384  0
ip_vs_sh               16384  0
ip_vs_dh               16384  0
ip_vs_lblcr            16384  0
ip_vs_lblc             16384  0
ip_vs_wrr              16384  0
ip_vs_rr               16384  0
ip_vs_wlc              16384  0
ip_vs_lc               16384  0
ip_vs                 151552  24 ip_vs_wlc,ip_vs_rr,ip_vs_dh,ip_vs_lblcr,ip_vs_sh,ip_vs_fo,ip_vs_nq,ip_vs_lblc,ip_vs_wrr,ip_vs_lc,ip_vs_sed,ip_vs_ftp
nf_conntrack          143360  2 nf_nat,ip_vs
nf_defrag_ipv6         20480  1 nf_conntrack
nf_defrag_ipv4         16384  1 nf_conntrack
libcrc32c              16384  4 nf_conntrack,nf_nat,xfs,ip_vs
1.3 K8s组件和Runtime安装
1.3.1、安装Docker
所有节点安装docker-ce 20.10
[root@k8s-master01 ~]# yum install docker-ce-20.10.* docker-ce-cli-20.10.* -y
由于新版Kubelet建议使用systemd,所以把Docker的CgroupDriver也改成systemd:
[root@k8s-master01 ~]# mkdir /etc/docker
[root@k8s-master01 ~]# cat > /etc/docker/daemon.json <<EOF
{
  "exec-opts": ["native.cgroupdriver=systemd"]
}
EOF
设置开机自启动Docker
[root@k8s-master01 ~]# systemctl daemon-reload && systemctl enable --now docker
1.3.2、安装Kubernetes组件
所有节点安装1.23最新版本kubeadm、kubelet和kubectl:
[root@k8s-master01 ~]# yum install kubeadm-1.23* kubelet-1.23* kubectl-1.23* -y
所有节点设置Kubelet开机自启动(由于还未初始化,没有kubelet的配置文件,此时kubelet无法启动,无需管理)
[root@k8s-master01 ~]# systemctl daemon-reload
[root@k8s-master01 ~]# systemctl enable --now kubelet
Created symlink from /etc/systemd/system/multi-user.target.wants/kubelet.service to /usr/lib/systemd/system/kubelet.service.
2、集群初始化
以下操作只在master01节点执行
[root@k8s-master01 ~]# vim kubeadm-config.yaml
apiVersion: kubeadm.k8s.io/v1beta2
bootstrapTokens:
- groups:
  - system:bootstrappers:kubeadm:default-node-token
  token: 7t2weq.bjbawausm0jaxury
  ttl: 24h0m0s
  usages:
  - signing
  - authentication
kind: InitConfiguration
localAPIEndpoint:
  advertiseAddress: 10.103.236.201
  bindPort: 6443
nodeRegistration:
  criSocket: /var/run/dockershim.sock
  name: k8s-master01
  taints:
  - effect: NoSchedule
    key: node-role.kubernetes.io/master
---
apiServer:
  certSANs:
  - 172.19.204.205
  timeoutForControlPlane: 4m0s
apiVersion: kubeadm.k8s.io/v1beta2
certificatesDir: /etc/kubernetes/pki
clusterName: kubernetes
controlPlaneEndpoint: 172.19.204.205:6443
controllerManager: {}
dns:
  type: CoreDNS
etcd:
  local:
    dataDir: /var/lib/etcd
imageRepository: registry.cn-hangzhou.aliyuncs.com/google_containers
kind: ClusterConfiguration
kubernetesVersion: v1.23.0
networking:
  dnsDomain: cluster.local
  podSubnet: 17.16.0.0/12
  serviceSubnet: 192.168.0.0/16
scheduler: {}
更新kubeadm文件
[root@k8s-master01 ~]# kubeadm config migrate --old-config kubeadm-config.yaml --new-config new.yaml
[root@k8s-master01 ~]# kubeadm config images pull --config /root/new.yaml
开机自启动kubelet
systemctl enable --now kubelet
如果启动失败无需管理,初始化成功以后即可启动
Master01节点初始化,初始化以后会在/etc/kubernetes目录下生成对应的证书和配置文件,
[root@k8s-master01 ~]# kubeadm init --config /root/new.yaml --upload-certs
初始化失败
kubelet-check] The HTTP call equal to 'curl -sSL http://localhost:10248/healthz' failed with error: Get "http://localhost:10248/healthz": dial tcp: lookup localhost on 114.114.114.114:53: no such host.

	Unfortunately, an error has occurred:
		timed out waiting for the condition

	This error is likely caused by:
		- The kubelet is not running
		- The kubelet is unhealthy due to a misconfiguration of the node in some way (required cgroups disabled)

	If you are on a systemd-powered system, you can try to troubleshoot the error with the following commands:
		- 'systemctl status kubelet'
		- 'journalctl -xeu kubelet'

	Additionally, a control plane component may have crashed or exited when started by the container runtime.
	To troubleshoot, list all containers using your preferred container runtimes CLI.

	Here is one example how you may list all Kubernetes containers running in docker:
		- 'docker ps -a | grep kube | grep -v pause'
		Once you have found the failing container, you can inspect its logs with:
		- 'docker logs CONTAINERID'

error execution phase wait-control-plane: couldn't initialize a Kubernetes cluster
To see the stack trace of this error execute with --v=5 or higher
提示无法解析localhost
添加本地解析
[root@k8s-master01 ~]# vi /etc/hosts
127.0.0.1 localhost localhost.localdomain
初始化失败,重置后再次初始化,命令如下
[root@k8s-master01 ~]# kubeadm reset -f ; ipvsadm --clear  ; rm -rf ~/.kube
[root@k8s-master01 ~]# kubeadm init --config /root/new.yaml  --upload-certs
仍然报错
[etcd] Creating static Pod manifest for local etcd in "/etc/kubernetes/manifests"
[wait-control-plane] Waiting for the kubelet to boot up the control plane as static Pods from directory "/etc/kubernetes/manifests". This can take up to 4m0s
[kubelet-check] Initial timeout of 40s passed.

	Unfortunately, an error has occurred:
		timed out waiting for the condition

	This error is likely caused by:
		- The kubelet is not running
		- The kubelet is unhealthy due to a misconfiguration of the node in some way (required cgroups disabled)

	If you are on a systemd-powered system, you can try to troubleshoot the error with the following commands:
		- 'systemctl status kubelet'
		- 'journalctl -xeu kubelet'

	Additionally, a control plane component may have crashed or exited when started by the container runtime.
	To troubleshoot, list all containers using your preferred container runtimes CLI.

	Here is one example how you may list all Kubernetes containers running in docker:
		- 'docker ps -a | grep kube | grep -v pause'
		Once you have found the failing container, you can inspect its logs with:
		- 'docker logs CONTAINERID'

error execution phase wait-control-plane: couldn't initialize a Kubernetes cluster
To see the stack trace of this error execute with --v=5 or higher
查看kubelet报错信息。提示没有找到k8s-master01
[root@k8s-master01 etc]# journalctl -xeu kubelet

Jul 20 11:29:59 k8s-master01 kubelet[20085]: E0720 11:29:59.478713   20085 kubelet.go:2466] "Error getting node" err="node \"k8s-master01\" not found"
Jul 20 11:29:59 k8s-master01 kubelet[20085]: E0720 11:29:59.579359   20085 kubelet.go:2466] "Error getting node" err="node \"k8s-master01\" not found"
修改kubeadm-config.yaml
advertiseAddress: 修改为k8s-master01 IP
[root@k8s-master01 ~]# vim kubeadm-config.yaml
apiVersion: kubeadm.k8s.io/v1beta2
bootstrapTokens:
- groups:
  - system:bootstrappers:kubeadm:default-node-token
  token: 7t2weq.bjbawausm0jaxury
  ttl: 24h0m0s
  usages:
  - signing
  - authentication
kind: InitConfiguration
localAPIEndpoint:
  advertiseAddress: 172.19.204.205			#k8s-master01
  bindPort: 6443
nodeRegistration:
更新kubeadm文件,删除配置再重新初始化。
[root@k8s-master01 ~]# kubeadm config migrate --old-config kubeadm-config.yaml --new-config new.yaml
[root@k8s-master01 ~]# kubeadm reset -f ; ipvsadm --clear ; rm -rf ~/.kube
[root@k8s-master01 ~]# kubeadm init --config /root/new.yaml --upload-certs
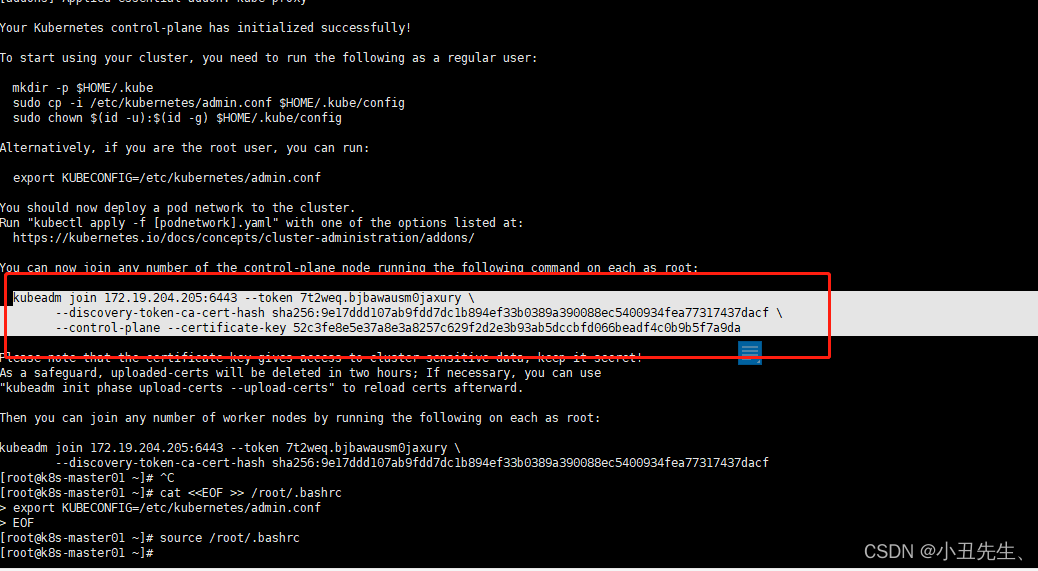
[addons] Applied essential addon: CoreDNS
[addons] Applied essential addon: kube-proxy
Your Kubernetes control-plane has initialized successfully!
To start using your cluster, you need to run the following as a regular user:
mkdir -p $HOME/.kube
sudo cp -i /etc/kubernetes/admin.conf $HOME/.kube/config
sudo chown $(id -u):$(id -g) $HOME/.kube/config
Alternatively, if you are the root user, you can run:
export KUBECONFIG=/etc/kubernetes/admin.conf
You should now deploy a pod network to the cluster.
Run "kubectl apply -f [podnetwork].yaml" with one of the options listed at:
https://kubernetes.io/docs/concepts/cluster-administration/addons/
You can now join any number of the control-plane node running the following command on each as root:
kubeadm join 172.19.204.205:6443 --token 7t2weq.bjbawausm0jaxury \
--discovery-token-ca-cert-hash sha256:9e17ddd107ab9fdd7dc1b894ef33b0389a390088ec5400934fea77317437dacf \
--control-plane --certificate-key 52c3fe8e5e37a8e3a8257c629f2d2e3b93ab5dccbfd066beadf4c0b9b5f7a9da
Please note that the certificate-key gives access to cluster sensitive data, keep it secret!
As a safeguard, uploaded-certs will be deleted in two hours; If necessary, you can use
"kubeadm init phase upload-certs --upload-certs" to reload certs afterward.
Then you can join any number of worker nodes by running the following on each as root:
kubeadm join 172.19.204.205:6443 --token 7t2weq.bjbawausm0jaxury \
--discovery-token-ca-cert-hash sha256:9e17ddd107ab9fdd7dc1b894ef33b0389a390088ec5400934fea77317437dacf
[root@k8s-master01 ~]# ^C
Master01节点配置环境变量,用于访问Kubernetes集群
[root@k8s-master01 ~]# cat <<EOF >> /root/.bashrc
> export KUBECONFIG=/etc/kubernetes/admin.conf
> EOF
[root@k8s-master01 ~]# source /root/.bashrc
查看节点状态
[root@k8s-master01 ~]# kubectl get node
NAME           STATUS     ROLES                  AGE   VERSION
k8s-master01   NotReady   control-plane,master   15m   v1.23.9
采用初始化安装方式,所有的系统组件均以容器的方式运行并且在kube-system命名空间内,此时可以查看Pod状态:
[root@k8s-master01 ~]# kubectl get po -n kube-system
NAME                                   READY   STATUS    RESTARTS   AGE
coredns-65c54cc984-5jlsb               0/1     Pending   0          16m
coredns-65c54cc984-l6pvm               0/1     Pending   0          16m
etcd-k8s-master01                      1/1     Running   0          16m
kube-apiserver-k8s-master01            1/1     Running   0          16m
kube-controller-manager-k8s-master01   1/1     Running   6          16m
kube-proxy-2pc2l                       1/1     Running   0          16m
kube-scheduler-k8s-master01            1/1     Running   6          16m
[root@k8s-master01 ~]#
3、Node节点加入
复制刚刚初始化成功后的token参数
去到k8s-node01节点上运行。
[root@k8s-node01 ~]# kubeadm join 172.19.204.205:6443 --token 7t2weq.bjbawausm0jaxury \
> --discovery-token-ca-cert-hash sha256:9e17ddd107ab9fdd7dc1b894ef33b0389a390088ec5400934fea77317437dacf \
> --control-plane --certificate-key 52c3fe8e5e37a8e3a8257c629f2d2e3b93ab5dccbfd066beadf4c0b9b5f7a9da
回到K8s-master节点查看node
[root@k8s-master01 ~]# kubectl get nodes
NAME           STATUS     ROLES                  AGE     VERSION
k8s-master01   NotReady   control-plane,master   28m     v1.23.9
k8s-node01     NotReady   control-plane,master   2m30s   v1.23.9
4、Calico组件安装
以下步骤只在master01执行
[root@k8s-master01 calico]# cd /root/k8s-ha-install && git checkout manual-installation-v1.23.x && cd calico/
Branch manual-installation-v1.23.x set up to track remote branch manual-installation-v1.23.x from origin.
Switched to a new branch 'manual-installation-v1.23.x'
修改Pod网段
[root@k8s-master01 calico]# POD_SUBNET=`cat /etc/kubernetes/manifests/kube-controller-manager.yaml | grep cluster-cidr= | awk -F= '{print $NF}'`
[root@k8s-master01 calico]# sed -i "s#POD_CIDR#${POD_SUBNET}#g" calico.yaml
[root@k8s-master01 calico]# kubectl apply -f calico.yaml
configmap/calico-config unchanged
customresourcedefinition.apiextensions.k8s.io/bgpconfigurations.crd.projectcalico.org configured
customresourcedefinition.apiextensions.k8s.io/bgppeers.crd.projectcalico.org configured
customresourcedefinition.apiextensions.k8s.io/blockaffinities.crd.projectcalico.org configured
customresourcedefinition.apiextensions.k8s.io/caliconodestatuses.crd.projectcalico.org configured
customresourcedefinition.apiextensions.k8s.io/clusterinformations.crd.projectcalico.org configured
customresourcedefinition.apiextensions.k8s.io/felixconfigurations.crd.projectcalico.org configured
customresourcedefinition.apiextensions.k8s.io/globalnetworkpolicies.crd.projectcalico.org configured
customresourcedefinition.apiextensions.k8s.io/globalnetworksets.crd.projectcalico.org configured
customresourcedefinition.apiextensions.k8s.io/hostendpoints.crd.projectcalico.org configured
customresourcedefinition.apiextensions.k8s.io/ipamblocks.crd.projectcalico.org configured
customresourcedefinition.apiextensions.k8s.io/ipamconfigs.crd.projectcalico.org configured
customresourcedefinition.apiextensions.k8s.io/ipamhandles.crd.projectcalico.org configured
customresourcedefinition.apiextensions.k8s.io/ippools.crd.projectcalico.org configured
customresourcedefinition.apiextensions.k8s.io/ipreservations.crd.projectcalico.org configured
customresourcedefinition.apiextensions.k8s.io/kubecontrollersconfigurations.crd.projectcalico.org configured
customresourcedefinition.apiextensions.k8s.io/networkpolicies.crd.projectcalico.org configured
customresourcedefinition.apiextensions.k8s.io/networksets.crd.projectcalico.org configured
clusterrole.rbac.authorization.k8s.io/calico-kube-controllers unchanged
clusterrolebinding.rbac.authorization.k8s.io/calico-kube-controllers unchanged
clusterrole.rbac.authorization.k8s.io/calico-node unchanged
clusterrolebinding.rbac.authorization.k8s.io/calico-node unchanged
service/calico-typha unchanged
deployment.apps/calico-typha unchanged
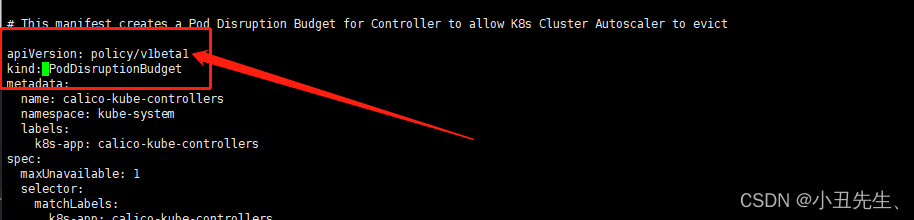
Warning: policy/v1beta1 PodDisruptionBudget is deprecated in v1.21+, unavailable in v1.25+; use policy/v1 PodDisruptionBudget
poddisruptionbudget.policy/calico-typha configured
daemonset.apps/calico-node configured
serviceaccount/calico-node unchanged
deployment.apps/calico-kube-controllers unchanged
serviceaccount/calico-kube-controllers unchanged
poddisruptionbudget.policy/calico-kube-controllers configured
[root@k8s-master01 calico]#
报错提示calico.yaml 文件里的 用的是 v1beta1 PodDisruptionBudget ,而在K8S 1.21 版本之后就不支持v1beta1 PodDisruptionBudget ,改为支持v1 PodDisruptionBudget
[root@k8s-master01 calico]# vi calico.yaml
查看容器和节点状态
[root@k8s-master01 calico]# kubectl get node -owide
NAME           STATUS   ROLES                  AGE     VERSION   INTERNAL-IP      EXTERNAL-IP   OS-IMAGE                KERNEL-VERSION                CONTAINER-RUNTIME
k8s-master01   Ready    control-plane,master   34m     v1.23.9   172.19.204.205   <none>        CentOS Linux 7 (Core)   4.19.12-1.el7.elrepo.x86_64   docker://20.10.17
k8s-node01     Ready    control-plane,master   8m24s   v1.23.9   172.19.204.206   <none>        CentOS Linux 7 (Core)   4.19.12-1.el7.elrepo.x86_64   docker://20.10.17
[root@k8s-master01 calico]# kubectl get po -n kube-system
NAME                                       READY   STATUS    RESTARTS        AGE
calico-kube-controllers-6f6595874c-87wls   1/1     Running   0               2m54s
calico-node-8wv6f                          0/1     Running   1 (43s ago)     2m54s
calico-node-hlpg5                          0/1     Running   1 (53s ago)     2m54s
calico-typha-6b6cf8cbdf-6b4jg              0/1     Pending   0               2m54s
coredns-65c54cc984-5jlsb                   1/1     Running   0               34m
coredns-65c54cc984-l6pvm                   1/1     Running   0               34m
etcd-k8s-master01                          1/1     Running   0               34m
etcd-k8s-node01                            1/1     Running   0               8m52s
kube-apiserver-k8s-master01                1/1     Running   0               34m
kube-apiserver-k8s-node01                  1/1     Running   0               8m54s
kube-controller-manager-k8s-master01       1/1     Running   7 (8m40s ago)   34m
kube-controller-manager-k8s-node01         1/1     Running   0               8m55s
kube-proxy-2pc2l                           1/1     Running   0               34m
kube-proxy-qt56k                           1/1     Running   0               8m57s
kube-scheduler-k8s-master01                1/1     Running   7 (8m40s ago)   34m
kube-scheduler-k8s-node01                  1/1     Running   0               8m55s
[root@k8s-master01 calico]#
calico-node一直处于Panding状态
查看pods日志
[root@k8s-master01 calico]# kubectl logs -f -n kube-system calico-node-8wv6f
Warning  FailedScheduling  18s (x2 over 18s)  default-scheduler  0/2 nodes are available: 2 node(s) didn't match node selector
系统无法调度pods使用一下命令解决
[root@k8s-master01 calico]# kubectl taint nodes --all node-role.kubernetes.io/master
5、Metrics部署
在新版的Kubernetes中系统资源的采集均使用Metrics-server,可以通过Metrics采集节点和Pod的内存、磁盘、CPU和网络的使用率。
将Master01节点的front-proxy-ca.crt复制到所有Node节点
[root@k8s-master01 calico]# scp /etc/kubernetes/pki/front-proxy-ca.crt k8s-node01:/etc/kubernetes/pki/front-proxy-ca.crt
front-proxy-ca.crt
安装metrics server
[root@k8s-master01 calico]# cd /root/k8s-ha-install/kubeadm-metrics-server
[root@k8s-master01 kubeadm-metrics-server]# kubectl  create -f comp.yaml
serviceaccount/metrics-server created
clusterrole.rbac.authorization.k8s.io/system:aggregated-metrics-reader created
clusterrole.rbac.authorization.k8s.io/system:metrics-server created
rolebinding.rbac.authorization.k8s.io/metrics-server-auth-reader created
clusterrolebinding.rbac.authorization.k8s.io/metrics-server:system:auth-delegator created
clusterrolebinding.rbac.authorization.k8s.io/system:metrics-server created
service/metrics-server created
deployment.apps/metrics-server created
apiservice.apiregistration.k8s.io/v1beta1.metrics.k8s.io created
查看状态
[root@k8s-master01 calico]# kubectl top node
NAME           CPU(cores)   CPU%   MEMORY(bytes)   MEMORY%
k8s-master01   182m         3%     2008Mi          34%
k8s-node01     172m         2%     1626Mi          20%
[root@k8s-master01 calico]# kubectl top po -A
NAMESPACE              NAME                                         CPU(cores)   MEMORY(bytes)
kube-system            calico-kube-controllers-6f6595874c-87wls     3m           27Mi
kube-system            calico-node-8wv6f                            23m          136Mi
kube-system            calico-node-hlpg5                            18m          141Mi
kube-system            calico-typha-6b6cf8cbdf-sfhcs                1m           30Mi
kube-system            coredns-65c54cc984-5jlsb                     2m           22Mi
kube-system            coredns-65c54cc984-l6pvm                     2m           20Mi
kube-system            etcd-k8s-master01                            27m          85Mi
kube-system            etcd-k8s-node01                              26m          82Mi
kube-system            kube-apiserver-k8s-master01                  46m          400Mi
kube-system            kube-apiserver-k8s-node01                    42m          326Mi
kube-system            kube-controller-manager-k8s-master01         2m           27Mi
kube-system            kube-controller-manager-k8s-node01           12m          62Mi
kube-system            kube-proxy-2pc2l                             1m           20Mi
kube-system            kube-proxy-qt56k                             1m           20Mi
kube-system            kube-scheduler-k8s-master01                  4m           26Mi
kube-system            kube-scheduler-k8s-node01                    2m           24Mi
kube-system            metrics-server-5cf8885b66-9gt6l              3m           15Mi
kubernetes-dashboard   dashboard-metrics-scraper-7fcdff5f4c-dlmxk   1m           9Mi
kubernetes-dashboard   kubernetes-dashboard-85f59f8ff7-4pqhj        1m           17Mi
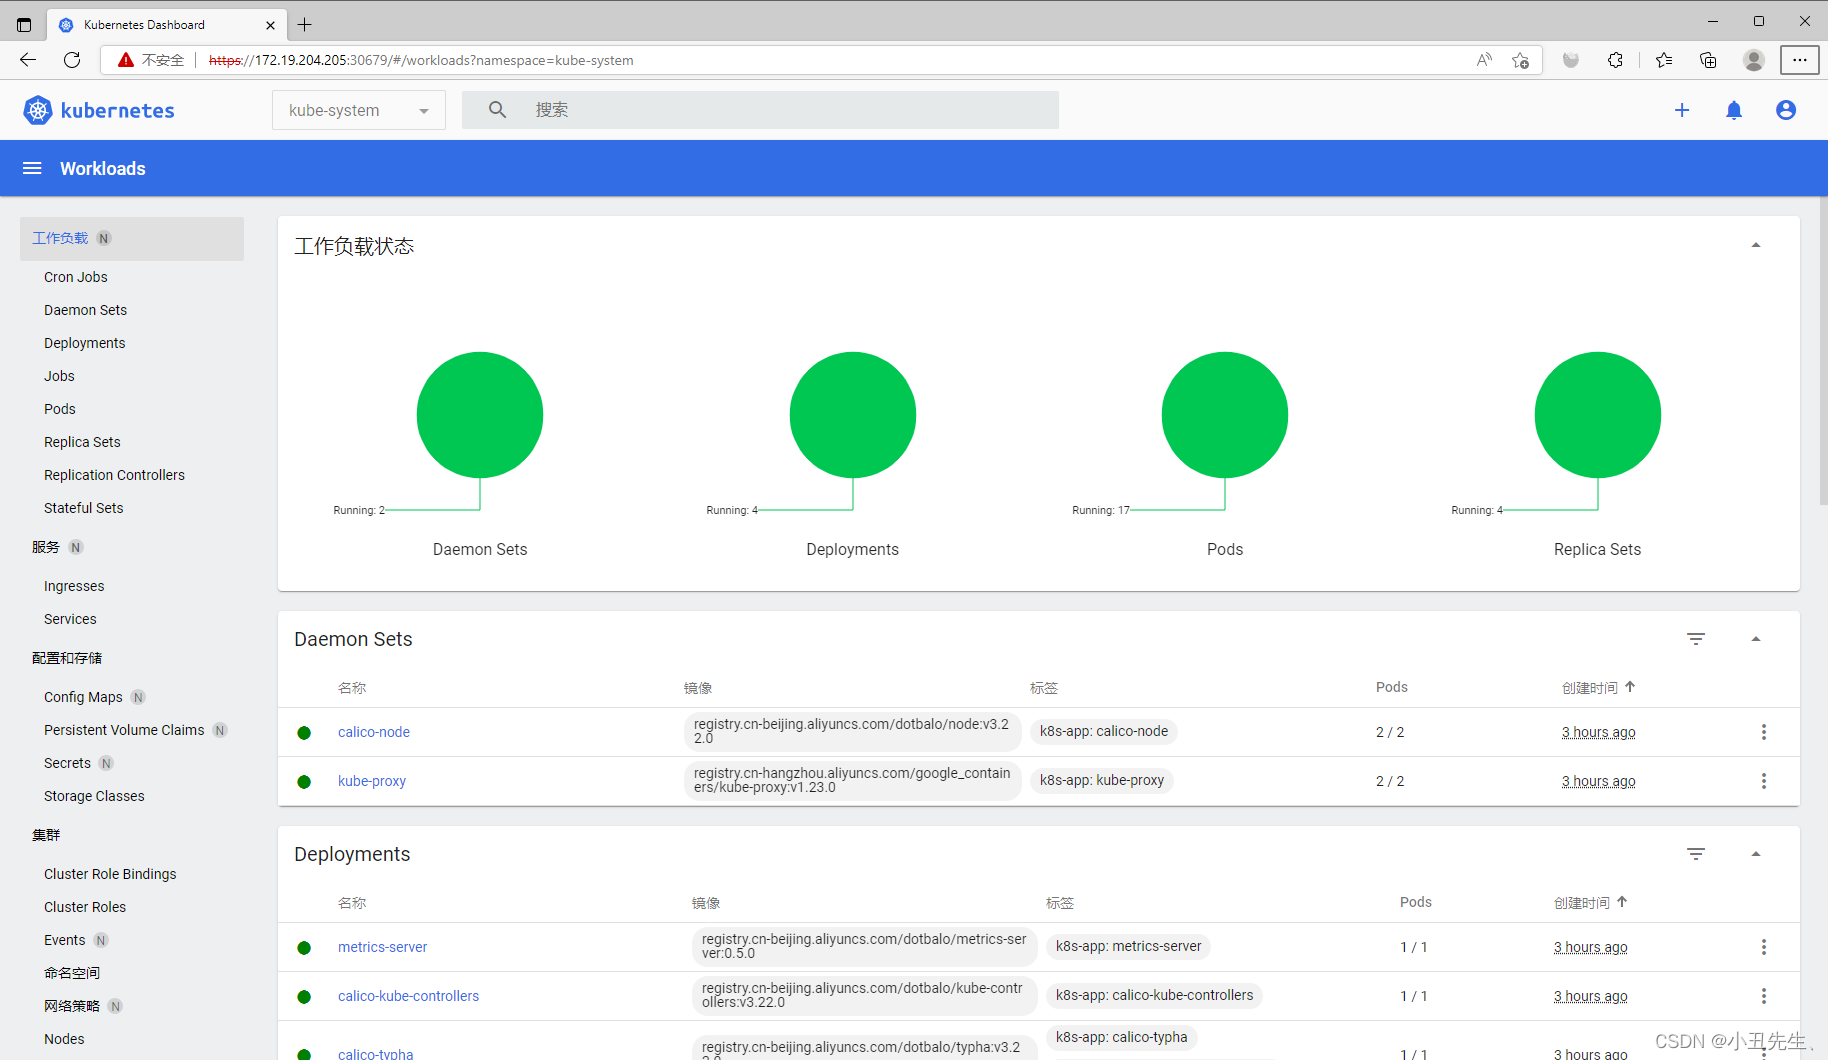
6 、Dashboard部署
Dashboard用于展示集群中的各类资源,同时也可以通过Dashboard实时查看Pod的日志和在容器中执行一些命令等。
cd /root/k8s-ha-install/dashboard/

[root@k8s-master01 dashboard]# kubectl  create -f .
serviceaccount/admin-user created
clusterrolebinding.rbac.authorization.k8s.io/admin-user created
namespace/kubernetes-dashboard created
serviceaccount/kubernetes-dashboard created
service/kubernetes-dashboard created
secret/kubernetes-dashboard-certs created
secret/kubernetes-dashboard-csrf created
secret/kubernetes-dashboard-key-holder created
configmap/kubernetes-dashboard-settings created
role.rbac.authorization.k8s.io/kubernetes-dashboard created
clusterrole.rbac.authorization.k8s.io/kubernetes-dashboard created
rolebinding.rbac.authorization.k8s.io/kubernetes-dashboard created
clusterrolebinding.rbac.authorization.k8s.io/kubernetes-dashboard created
deployment.apps/kubernetes-dashboard created
service/dashboard-metrics-scraper created
deployment.apps/dashboard-metrics-scraper created
查看pods状态
[root@k8s-master01 calico]# kubectl get pods -n kubernetes-dashboard
NAME                                         READY   STATUS    RESTARTS       AGE
dashboard-metrics-scraper-7fcdff5f4c-dlmxk   1/1     Running   0              133m
kubernetes-dashboard-85f59f8ff7-4pqhj        1/1     Running   1 (132m ago)   133m
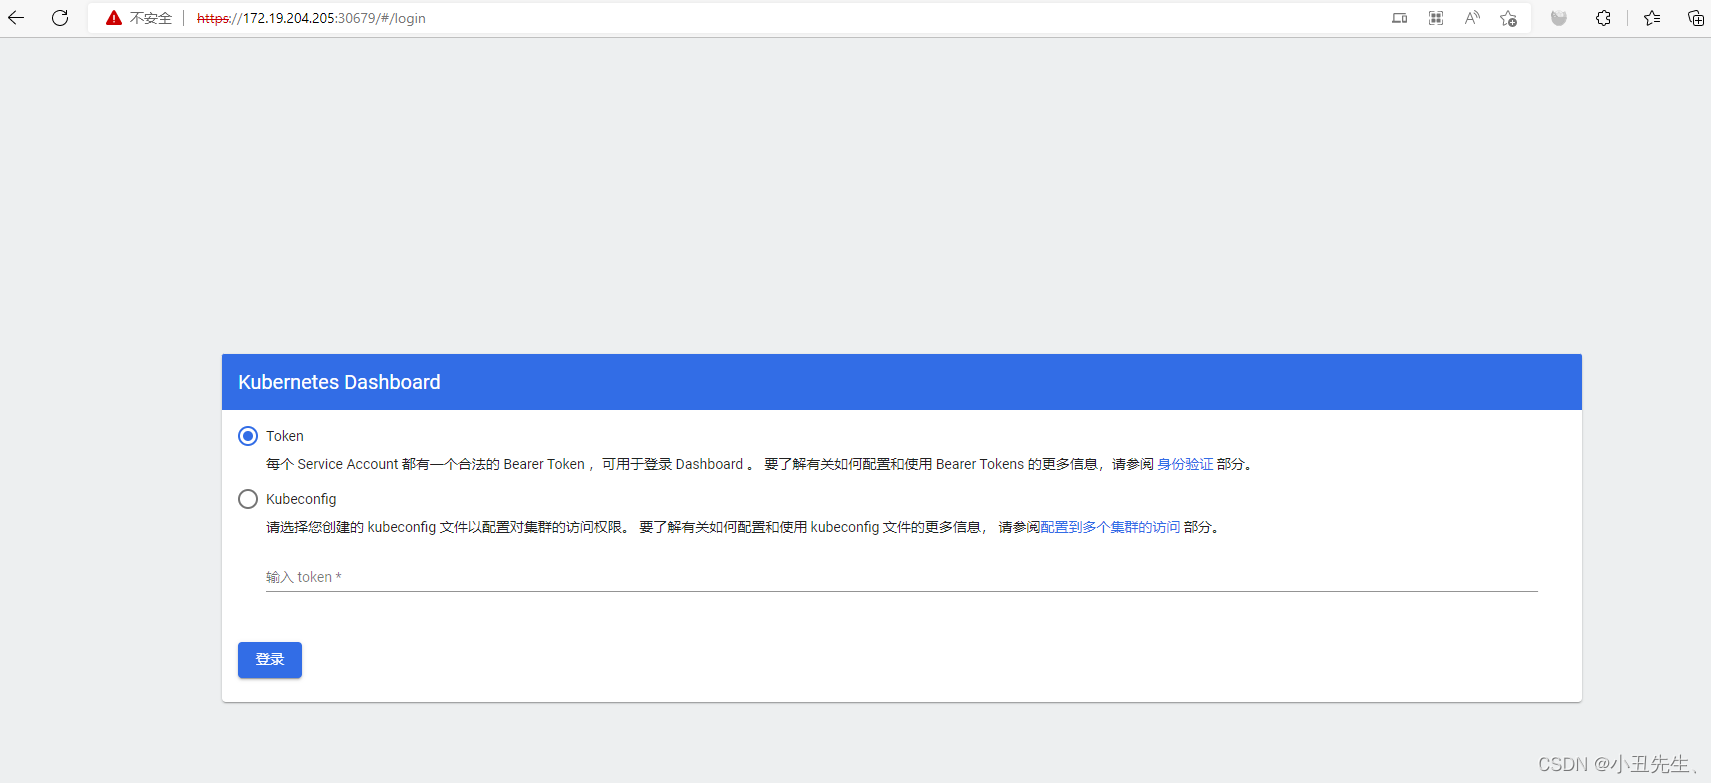
查看端口号:30679
[root@k8s-master01 calico]# kubectl get svc kubernetes-dashboard -n kubernetes-dashboard
NAME                   TYPE       CLUSTER-IP        EXTERNAL-IP   PORT(S)         AGE
kubernetes-dashboard   NodePort   192.168.225.150   <none>        443:30679/TCP   131m
使用IP+端口访问 选择登录方式为令牌(即token方式)
查看token值:
[root@k8s-master01 calico]# kubectl -n kube-system describe secret
Name:         admin-user-token-kc49w
Namespace:    kube-system
Labels:       <none>
Annotations:  kubernetes.io/service-account.name: admin-user
              kubernetes.io/service-account.uid: 144c152e-171e-4c97-8a6d-5e8ffe04e7ed

Type:  kubernetes.io/service-account-token

Data
====
namespace:  11 bytes
token:      eyJhbGciOiJSUzI1NiIsImtpZCI6Ikd6Q2hmMHpyRmN5OHRudHJmRW92OXpvdTQ1eGdCUUpubzJQTjZwYTFDOG8ifQ.eyJpc3MiOiJrdWJlcm5ldGVzL3NlcnZpY2VhY2NvdW50Iiwia3ViZXJuZXRlcy5pby9zZXJ2aWNlYWNjb3VudC9uYW1lc3BhY2UiOiJrdWJlLXN5c3RlbSIsImt1YmVybmV0ZXMuaW8vc2VydmljZWFjY291bnQvc2VjcmV0Lm5hbWUiOiJhZG1pbi11c2VyLXRva2VuLWtjNDl3Iiwia3ViZXJuZXRlcy5pby9zZXJ2aWNlYWNjb3VudC9zZXJ2aWNlLWFjY291bnQubmFtZSI6ImFkbWluLXVzZXIiLCJrdWJlcm5ldGVzLmlvL3NlcnZpY2VhY2NvdW50L3NlcnZpY2UtYWNjb3VudC51aWQiOiIxNDRjMTUyZS0xNzFlLTRjOTctOGE2ZC01ZThmZmUwNGU3ZWQiLCJzdWIiOiJzeXN0ZW06c2VydmljZWFjY291bnQ6a3ViZS1zeXN0ZW06YWRtaW4tdXNlciJ9.Jy_GBX-j9Y4R6QzkQKvCKipVdSnFL5eQ_nRJPGlNkp53s7lr3bZJGWKqp-FXewOqVGr0jS4N3QsoMS4H4HGfDAjWVBdc7WSweC5fduCsyPAICEAjYXmKdRDoHgQRzXZzhQQ_3QuXA_lc-C_flQoiMUOubwTB9yJMqYxZ49R_HeJD_2HQOCmPHcnM1DySJzgJOcNPmWfjQF6D9zwbJRpOTp0xDUahHMoUJ_j6Hb7OTLKeVGX4CwQN2ekQ1Qoochj4F1k7RmQtW8LrXDJc7YAEOsIAkKoceB94C0q6I8BvjKOKc_v33_Re87-EU8iI8tgrig5JsJTzjm-GPGlhfws2SA
单击登录即可访问Dashboard
7、一些必须的配置更改
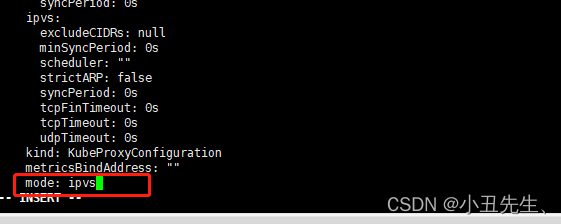
将Kube-proxy改为ipvs模式,因为在初始化集群的时候注释了ipvs配置,所以需要自行修改一下:在master01节点执行
[root@k8s-master01 calico]# kubectl edit cm kube-proxy -n kube-system
configmap/kube-proxy edited
更新Kube-Proxy的Pod:
[root@k8s-master01 calico]# kubectl patch daemonset kube-proxy -p "{\"spec\":{\"template\":{\"metadata\":{\"annotations\":{\"date\":\"`date +'%s'`\"}}}}}" -n kube-system
daemonset.apps/kube-proxy patched
验证Kube-Proxy模式
[root@k8s-master01 calico]# curl 127.0.0.1:10249/proxyMode
ipvs
注意事项
注意:kubeadm安装的集群,证书有效期默认是一年。master节点的kube-apiserver、kube-scheduler、kube-controller-manager、etcd都是以容器运行的。可以通过kubectl get po -n kube-system查看。
启动和二进制不同的是,
kubelet的配置文件在/etc/sysconfig/kubelet和/var/lib/kubelet/config.yaml,修改后需要重启kubelet进程
其他组件的配置文件在/etc/kubernetes/manifests目录下,比如kube-apiserver.yaml,该yaml文件更改后,kubelet会自动刷新配置,也就是会重启pod。不能再次创建该文件
kube-proxy的配置在kube-system命名空间下的configmap中,可以通过
kubectl edit cm kube-proxy -n kube-system
进行更改,更改完成后,可以通过patch重启kube-proxy
kubectl patch daemonset kube-proxy -p "{\"spec\":{\"template\":{\"metadata\":{\"annotations\":{\"date\":\"`date +'%s'`\"}}}}}" -n kube-system
Kubeadm安装后,master节点默认不允许部署pod,可以通过以下方式打开:
查看Taints:
[root@k8s-master01 ~]# kubectl  describe node -l node-role.kubernetes.io/master=  | grep Taints
Taints:             node-role.kubernetes.io/master:NoSchedule
Taints:             node-role.kubernetes.io/master:NoSchedule
Taints:             node-role.kubernetes.io/master:NoSchedule
删除Taint:
[root@k8s-master01 ~]# kubectl  taint node  -l node-role.kubernetes.io/master node-role.kubernetes.io/master:NoSchedule-
node/k8s-master01 untainted
node/k8s-master02 untainted
node/k8s-master03 untainted
[root@k8s-master01 ~]# kubectl  describe node -l node-role.kubernetes.io/master=  | grep Taints
Taints:             <none>
Taints:             <none>
Taints:             <none>

开源、云原生的融合云平台
更多推荐
 0
0 0
0- 0


 已为社区贡献1条内容

所有评论(0)