vue + 高德地图 + 标记点(变大变小闪烁动画、多标记点、同一位置标记点显示个数)
高德地图引入及使用 可参考:vue + 高德地图 + 图例vue + 高德地图 + 普通标记点 可参考:vue + 高德地图 + 标记点先上效果图://绘制地图this.map = new AMap.Map('map', {resizeEnable: true,center: center,zoom: 12})// 标记点的数据this.deviceList = [{lon
·
其他:
高德地图引入及使用
vue + 高德地图 + 普通标记点
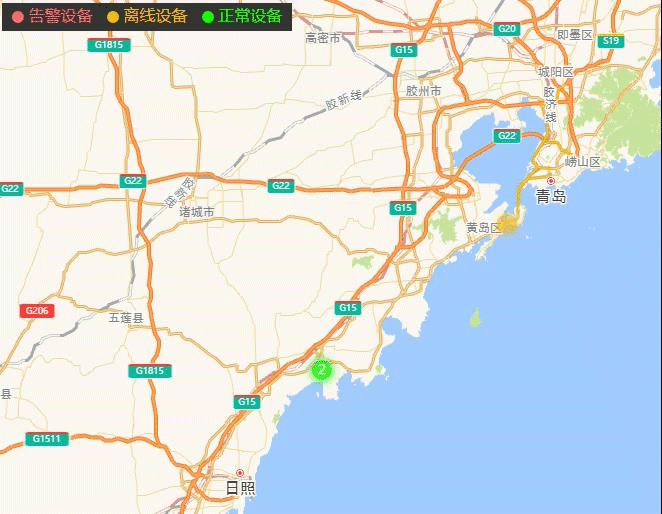
先上效果图:
	  //绘制地图
	  this.map = new AMap.Map('map', {
        resizeEnable: true,
        center: center,
        zoom: 12
      })
      // 标记点的数据
	  this.deviceList = [
	  	{
	  	  longitude:120,
	  	  latitude:35,
	  	  statusType:'alarmDevice'
	  	},
	  	{
	  	  longitude:120,
	  	  latitude:30,
	  	  statusType:'alarmDevice'
	  	},
	  	{
	  	  longitude:120,
	  	  latitude:30,
	  	  statusType:'alarmDevice'
	  	}
	  ]
	  // 清除先前标记点
      if (this.markerPointList.length !== 0) { // 定时获取点数据,更新前需先清掉原来点
        this.map.remove(this.markerPointList)
        this.markerPointList = []
      }
      // 绘制标记点
      this.deviceList.forEach(value => {
        if (value.longitude !== null && value.latitude !== null) {
          var markerPoint = new AMap.Marker({
            position: [value.longitude, value.latitude],
            offset: new AMap.Pixel(-15.1, -15.9) //点偏移量
          })
          // 创建标记点的div
          var markerDiv = document.createElement('div')
          // 设置标记点className,用于设置点的样式(动画)
          markerDiv.className = value.statusType
          // 点内部文字:找到相同经纬度点列表:sameLonLatPoint,列表长度即为该点显示个数
          var sameLonLatPoint = this.deviceList.filter((val) => {
            return val.longitude === value.longitude && val.latitude === value.latitude
          })
          // 创建标记点内容span
          var markerSpan = document.createElement('span')
          // 某位置点不唯一时展示个数
          markerSpan.innerText = sameLonLatPoint.length !== 1 ? sameLonLatPoint.length : ''
          // 将内容span放到标记点div
          markerDiv.appendChild(markerSpan)
		  // 将标记点div,设置为标记点内容
          markerPoint.setContent(markerDiv)
          // 标记点的list,清空点时用
          this.markerPointList.push(markerPoint)
          // 将标记点绘制到地图
          this.map.add(markerPoint)
        }
      })
标记点样式(此处只写了.alarmDevice的样式,其他的都一样了,只有颜色不同)
<style>
.alarmDevice{
  text-align:center;
  margin: 0 auto;
  width: 30px;
  height: 30px;
  background-color: #f13737;
  box-shadow:0px 0px 15px #f61212;
  border-radius: 50%;
  -webkit-animation-name: 'alarmDeviceBreath';/*动画属性名,也就是我们前面keyframes定义的动画名*/
  -webkit-animation-duration: 1s;/*动画持续时间*/
  -webkit-animation-timing-function: ease; /*动画频率,和transition-timing-function是一样的*/
  -webkit-animation-delay: 0s;/*动画延迟时间*/
  -webkit-animation-iteration-count: infinite;/*定义循环资料,infinite为无限次*/
  -webkit-animation-direction: alternate;/*定义动画方式*/
}
@keyframes alarmDeviceBreath{
  0% {margin-left: 0;margin-top: 0;width:30px;height:30px;box-shadow:0px 0px 15px #f61212;opacity: 1.2;}

  100% {margin-left: 5px;margin-top: 5px;width:20px;height:20px;box-shadow:0px 0px 10px #f61212;opacity: 0.6;}
}
.normalDevice span,
.offLineDevice span,
.alarmDevice span{
  line-height:30px;
  font-size:13px;
  -webkit-animation-name: 'breathSpan';
  -webkit-animation-duration: 1s;
  -webkit-animation-timing-function: ease;
  -webkit-animation-delay: 0s;
  -webkit-animation-iteration-count: infinite;
  -webkit-animation-direction: alternate;
}
@keyframes breathSpan{
  0% {line-height:30px}

  100% {line-height:20px}
}
</style>

前往低代码交流专区
更多推荐

 5
5 0
0- 0


 已为社区贡献3条内容

所有评论(0)