
Docker搭建lnmp详解
Docker搭建lnmp详解整合最简便的docker环境搭建,用于记录;所有步骤均已验证;目的是为了快速配置,若需要配置更详细,可自行扩展1.安装dockerapt-get install curlcurl -sSL https://get.daocloud.io/docker | sh菜鸟教程:http://www.runoob.com/docker/ubuntu-docker-install.
Docker搭建lnmp详解
项目架构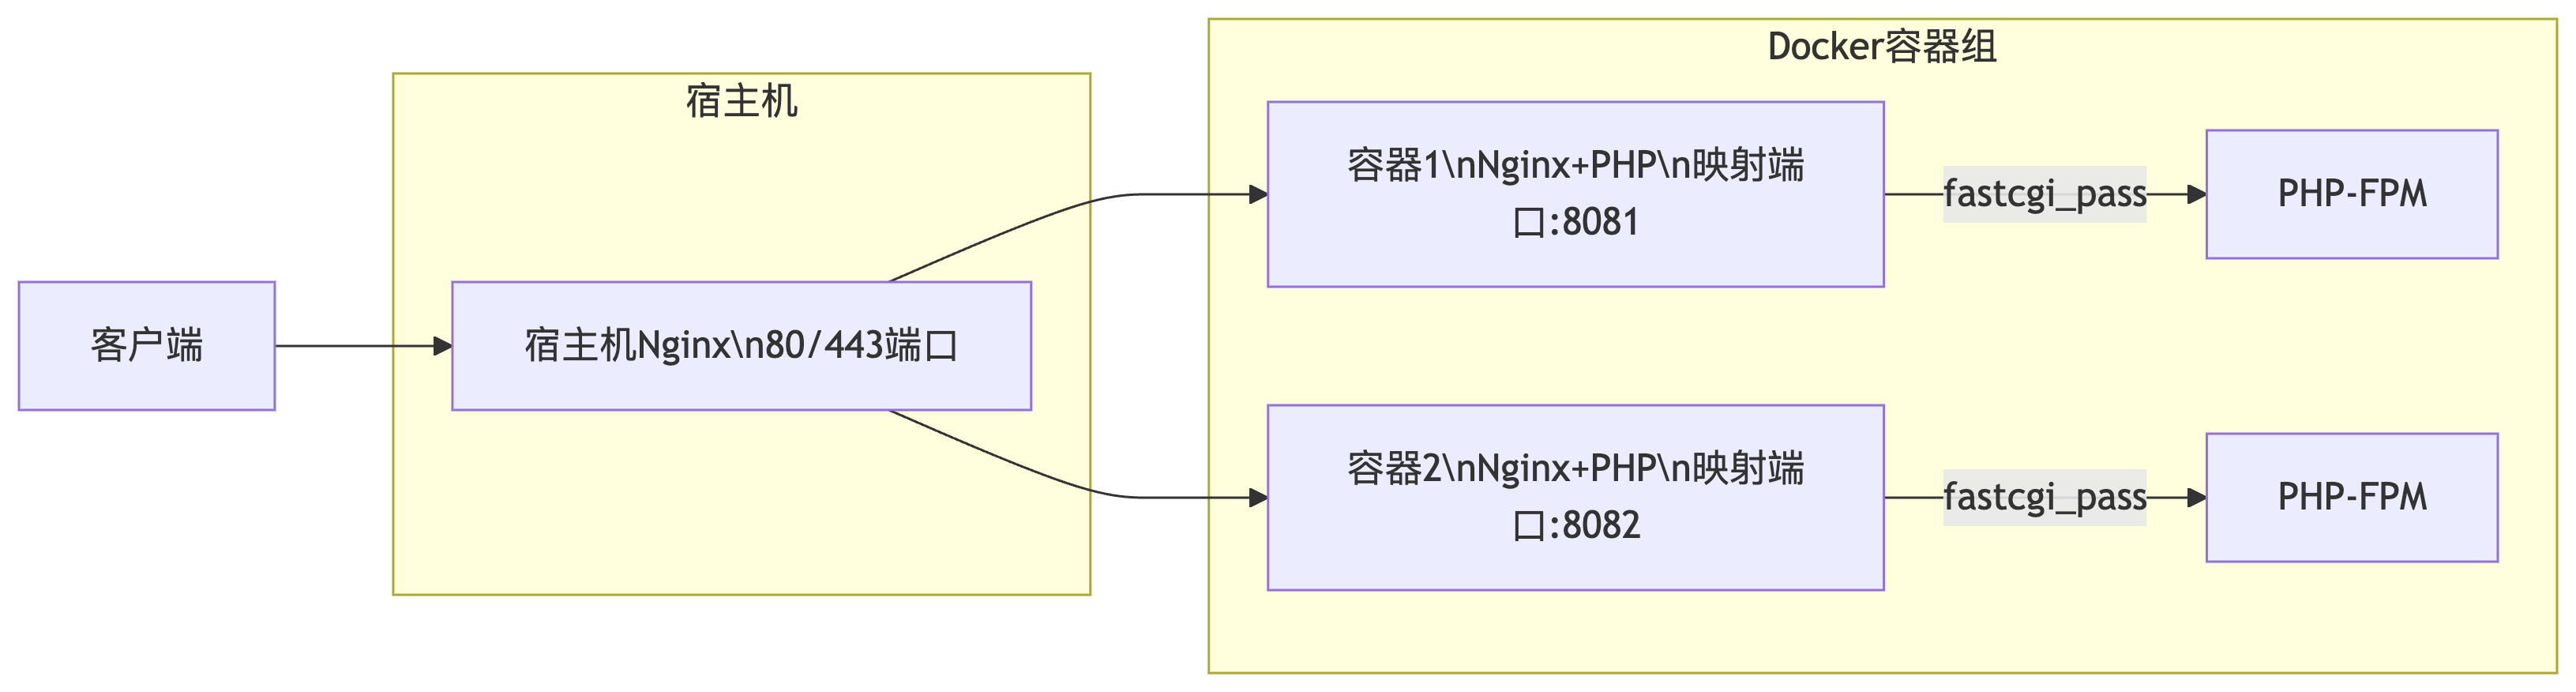
整合最简便的docker环境搭建,用于记录;所有步骤均已验证;
目的是为了快速配置,若需要配置更详细,可自行扩展
1.安装docker
apt-get install curl
curl -sSL https://get.daocloud.io/docker | sh
菜鸟教程:http://www.runoob.com/docker/ubuntu-docker-install.html
2.拉取Ubuntu镜像
注意:此处使用ubuntu20.04 ;使用16.04后续可能会有问题
docker pull ubuntu:20.04
docker images
3.使用拉取的镜像创建容器,启动并进入容器
docker run -dit --name my-lnmp ubuntu:20.04
docker ps
docker exec -it my-lnmp /bin/bash
4.更新apt,安装curl、vim
apt-get update
apt-get install curl
apt-get install vim
apt-get install unzip
5.安装php
php5.6安装 https://www.cnblogs.com/codeaaa/p/16534091.html
apt-get install php7.4
apt-get install php7.4-mysql php7.4-curl php7.4-xml php7.4-json php7.4-fpm php7.4-gd php7.4-mbstring php-mongodb php-memcached php-redis
php -v
安装其他版本的PHP,如果ppa包没有对应版本 可以执行更新操作
例:
sudo apt update && apt install -y software-properties-common
sudo add-apt-repository ppa:ondrej/php
sudo apt update && sudo apt install -y php8.1
php -v # Outputs “PHP 8.1.3 …”
切换php版本,运行
service php8.1-fpm restart
即可生成php8.1-fpm.sock,配置nginx指向新的fpm即可
配置php.ini
vim /etc/php/7.4/fpm/php.ini
#将cgi.fix_pathinfo=1这一行去掉注释,将1改为0
配置php-fpm
vim /etc/php/7.4/fpm/pool.d/www.conf
修改 listen = /var/run/php/php7.4-fpm.sock
启动php
service php7.4-fpm start
6.安装nginx
apt-get install nginx
配置nginx(nginx配置文件位置:etc/nginx)
vim /etc/nginx/sites-enabled/default
在service里面,location /{}中 解除 location ~ .php$ {}中的注释 与fpm建立连接
示例:
1 ##
  2 # You should look at the following URL's in order to grasp a solid understanding
  3 # of Nginx configuration files in order to fully unleash the power of Nginx.
  4 # https://www.nginx.com/resources/wiki/start/
  5 # https://www.nginx.com/resources/wiki/start/topics/tutorials/config_pitfalls/
  6 # https://wiki.debian.org/Nginx/DirectoryStructure
  7 #
  8 # In most cases, administrators will remove this file from sites-enabled/ and
  9 # leave it as reference inside of sites-available where it will continue to be
 10 # updated by the nginx packaging team.
 11 #
 12 # This file will automatically load configuration files provided by other
 13 # applications, such as Drupal or Wordpress. These applications will be made
 14 # available underneath a path with that package name, such as /drupal8.
 15 #
 16 # Please see /usr/share/doc/nginx-doc/examples/ for more detailed examples.
 17 ##
 18
 19 # Default server configuration
 20 #
 21 server {
 22         listen 80 default_server;
 23         listen [::]:80 default_server;
 24
 25         # SSL configuration
 26         #
 27         # listen 443 ssl default_server;
 28         # listen [::]:443 ssl default_server;
 29         #
 29         #
 30         # Note: You should disable gzip for SSL traffic.
 31         # See: https://bugs.debian.org/773332
 32         #
 33         # Read up on ssl_ciphers to ensure a secure configuration.
 34         # See: https://bugs.debian.org/765782
 35         #
 36         # Self signed certs generated by the ssl-cert package
 37         # Don't use them in a production server!
 38         #
 39         # include snippets/snakeoil.conf;
 40
 41         root /var/www/fs-new-livechat/public;
 42
 43         # Add index.php to the list if you are using PHP
 44         index index.html index.php index.htm index.nginx-debian.html;
 45
 46         server_name _;
 47
 48         location / {
 49                 # First attempt to serve request as file, then
 50                 # as directory, then fall back to displaying a 404.
 51                 try_files $uri $uri/ /index.php?$query_string;
 52                 index  index.html index.htm index.php;
 53                 autoindex  on;
 54                 if (!-e $request_filename) {
 55                         rewrite  ^(.*)$ /index.php?s=/$1  last;
 56                         break;
 57                  }
 58                 #try_files $uri $uri/ =404;
 59         }
 60
 61         # pass PHP scripts to FastCGI server
 62         #
 63         location ~ \.php$ {
 64                 include snippets/fastcgi-php.conf;
 65
 66                 # With php-fpm (or other unix sockets):
 67                 fastcgi_pass unix:/var/run/php/php7.4-fpm.sock;
 68                 # With php-cgi (or other tcp sockets):
 69                 # fastcgi_pass 127.0.0.1:9000;
 70         }
 71
 72         # deny access to .htaccess files, if Apache's document root
 73         # concurs with nginx's one
 74         #
 75         #location ~ /\.ht {
 76         #       deny all;
 77         #}
 78 }
 79
 80
 81 # Virtual Host configuration for example.com
 82 #
 83 # You can move that to a different file under sites-available/ and symlink that
 84 # to sites-enabled/ to enable it.
 85 #
 86 #server {
 87 #       listen 80;
 88 #       listen [::]:80;
 89 #
 90 #       server_name example.com;
 91 #
 92 #       root /var/www/example.com;
 93 #       index index.html;
 94 #
 95 #       location / {
 96 #               try_files $uri $uri/ =404;
 97 #       }
 98 #}                                                                                                                           66,1-8        46%
启动nginx
service nginx start
测试nginx运行
1.新建index.php 写入内容
vim /var/www/html index.php
2.使用curl访问
curl localhost
3.若成功输出,则ok 若有报错 则可在/var/log/nginx中查看错误日志
问题多数为nginx配置文件有问题
7.安装mysql
apt-get install mysql-server
启动mysql
service mysql start
8.设置开机自启动
vim ~/.bashrc
在文件开头加入以下内容
#auto start
service php7.4-fpm start
service mysql start
service nginx start
9.打包容器镜像
上述安装全部完成后,可exit;退出docker容器,开始打包镜像
打包容器镜像有多种方式,可上传到阿里云,也可上传到docker注册中心或者打包到本地
此处打包到本地rar文件
查看容器对应的id,制作镜像
docker ps
docker commit -p <容器的id> <镜像名称>
打包镜像为rar文件
docker save -o ~/文件名.tar 镜像名称
10.使用打包好的文件解压成docker镜像
使用 (find / -name 文件名称)查找文件位置
load加载镜像rar文件,加载完成后即可解压成镜像
docker load -i 文件位置/文件名.tar
docker images
11.创建容器
映射docker端口、项目地址到本地(var/www)
docker run -dit -p 80:80 -p 3306:3306 -p 9000:22 -v /var/www/:/var/www/  --name <容器名> <镜像名> /bin/bash
docker ps
设置时区:-v /usr/share/zoneinfo/Asia/Shanghai:/usr/share/zoneinfo/Asia/Shanghai
-e TZ=Asia/Shanghai
12.浏览器访问
使用docker虚拟机ip(ifconfig)即可访问项目
Docker命令
docker images 查看所有镜像
docker rmi -f <镜像名> 删除镜像
docker ps -a 查看容器
docker start/stop <容器名>
docker rm <容器id> 删除容器
docker exec -it <容器名> /bin/bash 进入容器
参考文献:
https://blog.csdn.net/sinat_34496643/article/details/78602723
https://www.cnblogs.com/yizhipanghu/p/9681225.html
其他方式:服务器单nginx+多php容器
还可以使用服务器单nginx+多php容器的方式,实现更简洁并可节省nginx内存开销
Docker-LNMP架构 创建多项目服务
ngixn端口代理

权威|前沿|技术|干货|国内首个API全生命周期开发者社区
更多推荐


 1
1 0
0- 0


 已为社区贡献1条内容

所有评论(0)