
PyTorch模型训练完毕后静态量化、保存、加载int8量化模型
1. Pytorch模型量化方法Pytorch模型量化方法介绍有很多可以参考的,这里推荐两篇文章写的很详细可以给大家一个大致的参考Pytorch的量化,官方量化文档Pytorch的量化大致分为三种:模型训练完毕后动态量化、模型训练完毕后静态量化、模型训练中开启量化,本文从一个工程项目(Pose Estimation)给大家介绍模型训练后静态量化的过程。具体量化知识可以从推荐的两篇文章中学习。2.
1. PyTorch模型量化方法
Pytorch模型量化方法介绍有很多可以参考的,这里推荐两篇文章写的很详细可以给大家一个大致的参考Pytorch的量化,官方量化文档
Pytorch的量化大致分为三种:模型训练完毕后动态量化、模型训练完毕后静态量化、模型训练中开启量化,本文从一个工程项目(Pose Estimation)给大家介绍模型训练后静态量化的过程。
具体量化知识可以从推荐的两篇文章中学习。
2. 量化过程准备工作。
代码运行环境:PyTorch1.9.0, Python3.6.4.
1.数据集下载(在做静态量化时需要对数据集进行推理获取数据的分布特点、定标),用MSCOCO的验证集,选100张左右MSCOCO_val2017
2.Pytorch模型文件可以从这里下载Pose_Model提取密码:s7qh.
3.量化代码下载Pytorch_Model_Quantization

代码下载后如上图,把下载的MSCOC数据集选100张放在data目录,把下载的模型文件coco_pose_iter_440000.pth.tar放在models目录。
pth_to_int.py是对Pytorch的float32模型转成int8模型。
evaluate_model.py里加载int8模型进行推理。
3. 模型静态量化
模型静态量化主要代码如下,读取float32模型,然后转成int8模型保存为openpose_vgg_quant.pth。完整代码可以从pth_to_int.py文件中看到。具体每一步做什么工作在注释中详细说明了。
# loading model
state_dict = torch.load('./models/coco_pose_iter_440000.pth.tar')['state_dict']

# create a model instance
model_fp32 = get_pose_model()
model_fp32.load_state_dict(state_dict)
model_fp32.float()

# model must be set to eval mode for static quantization logic to work
model_fp32.eval()

# attach a global qconfig, which contains information about what kind
# of observers to attach. Use 'fbgemm' for server inference and
# 'qnnpack' for mobile inference. Other quantization configurations such
# as selecting symmetric or assymetric quantization and MinMax or L2Norm
# calibration techniques can be specified here.
model_fp32.qconfig = torch.quantization.get_default_qconfig('fbgemm')

# Prepare the model for static quantization. This inserts observers in
# the model that will observe activation tensors during calibration.
model_fp32_prepared = torch.quantization.prepare(model_fp32)

# calibrate the prepared model to determine quantization parameters for activations
# in a real world setting, the calibration would be done with a representative dataset
evaluate(model_fp32_prepared)

# Convert the observed model to a quantized model. This does several things:
# quantizes the weights, computes and stores the scale and bias value to be
# used with each activation tensor, and replaces key operators with quantized
# implementations.
model_int8 = torch.quantization.convert(model_fp32_prepared)
print("model int8", model_int8)
# save model
torch.save(model_int8.state_dict(),"./openpose_vgg_quant.pth")
4. 量化模型加载进行推理
注意:量化后模型的forward代码稍有改动,需要在模型输入前后安插量化和解量化。如下示例:
 class Net(nn.Module):

    def __init__(self):
        # 对输入数据量化
        self.quant = torch.quantization.QuantStub()
        # model structure.
        layer = self.layer()
        # 对输出数据解量化
        self.dequant = torch.quantization.DeQuantStub()
    def forward(self,input):
        x = self.quant(input)
        x = self.layer(x)
        x = self.dequant(x)
量化和解量化在pose_estimation.py文件34-86行可以看到.
加载int8模型不能和之前加载float32模型一样,需要将模型通过prepare() , convert()操作转成量化模型,然后load_state_dict加载进模型。
# Load int8 model
state_dict = torch.load('./openpose_vgg_quant.pth')
model_fp32 = get_pose_model()
model_fp32.qconfig = torch.quantization.get_default_qconfig('fbgemm')
model_fp32_prepared = torch.quantization.prepare(model_fp32)
model_int8 = torch.quantization.convert(model_fp32_prepared)
model_int8.load_state_dict(state_dict)
model = model_int8
model.eval()
5. 性能
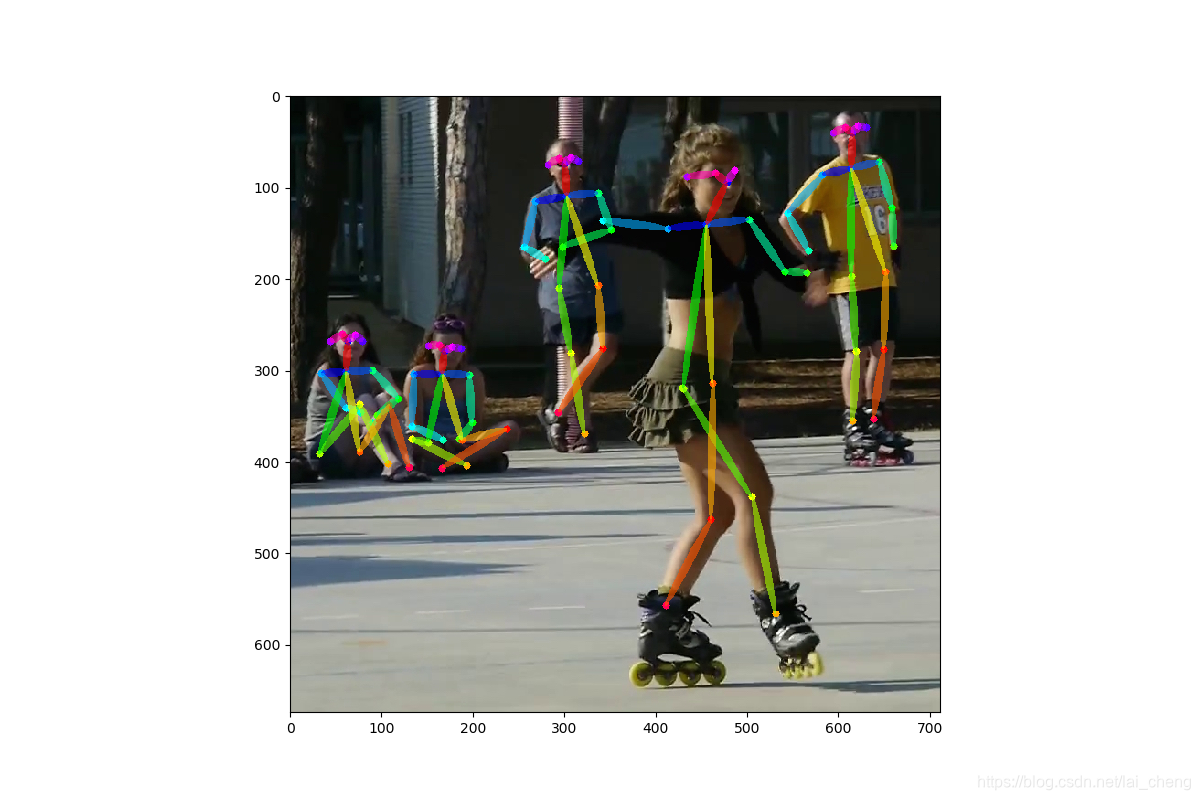
下图为量化后结果,整体来说损失不大。其中模型大小200M->50M,模型运行时间5.7s->3.4s。整体来说,模型大小压缩为原来的1/4, 模型运行时间减少20%左右
GitHub上有完整代码,可自行复现。欢迎一起讨论!!

旨在为数千万中国开发者提供一个无缝且高效的云端环境,以支持学习、使用和贡献开源项目。
更多推荐


 37
37 0
0- 0


 已为社区贡献1条内容

所有评论(0)