【鸿蒙】HarMonyOS的UI组件学习七之图片轮播
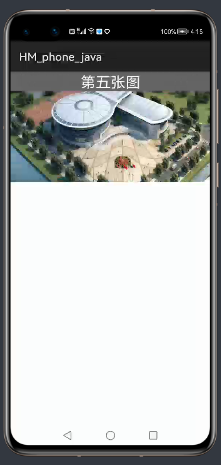
图片轮播功能也是我们在很多应用中常见的一种效果,今天分享鸿蒙系统中展示图片轮播功能。在鸿蒙系统中,实现轮播效果,主要使用的组件是PageSlider
·
图片轮播功能也是我们在很多应用中常见的一种效果,今天分享鸿蒙系统中展示图片轮播功能。

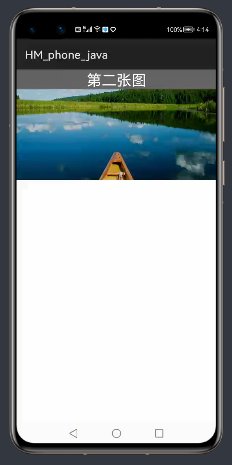
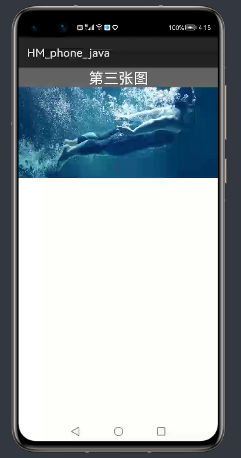
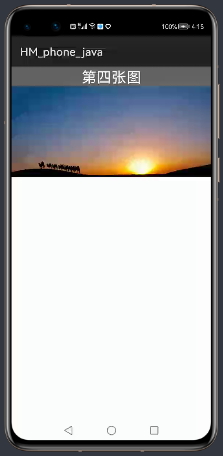

在鸿蒙系统中,实现轮播效果,主要使用PageSlider组件
接下来创建主布局,代码如下:
<?xml version="1.0" encoding="utf-8"?>
<DirectionalLayout
    xmlns:ohos="http://schemas.huawei.com/res/ohos"
    ohos:height="match_parent"
    ohos:width="match_parent"
    ohos:orientation="vertical">

    <PageSlider
        ohos:id="$+id:ps"
        ohos:height="200fp"
        ohos:orientation="horizontal"
        ohos:width="match_parent"/>

</DirectionalLayout>
ohos:orientation="horizontal"设置轮播滑动方向为横向
private int[] images = {
            ResourceTable.Media_jinriteyue,
            ResourceTable.Media_ydqbannerbeihai,
            ResourceTable.Media_ydqbannershouti,
            ResourceTable.Media_i_back,
            ResourceTable.Media_spic};
    private String[] names={
            "第一张图",
            "第二张图",
            "第三张图",
            "第四张图",
            "第五张图"
    };
添加五张图片,定义其图片的引用id数组和每张图片对应的文字信息数组
定义实体类,将图片和文字封装成实体类
package com.example.hm_phone_java.entity;

public class Page {
    private int image;
    private String name;

    public int getImage() {
        return image;
    }

    public void setImage(int image) {
        this.image = image;
    }

    public String getName() {
        return name;
    }

    public void setName(String name) {
        this.name = name;
    }

    public Page(int image, String name) {
        this.image = image;
        this.name = name;
    }

    @Override
    public String toString() {
        return "Page{" +
                "image=" + image +
                ", name='" + name + '\'' +
                '}';
    }
}
定义集合存储所有封装好的实体类
private List<Page> pages=new ArrayList<>();将数据进行封装
private void initPage() {
        for (int i = 0; i < images.length; i++) {
            Page page=new Page(images[i],names[i]);
            pages.add(page);
        }
    }
创建滑动页面组件的适配器类
package com.example.hm_phone_java.adapter;

import com.example.hm_phone_java.entity.Page;
import ohos.aafwk.ability.AbilitySlice;
import ohos.agp.colors.RgbColor;
import ohos.agp.components.*;
import ohos.agp.components.element.ShapeElement;
import ohos.agp.utils.Color;
import ohos.agp.utils.TextAlignment;

import java.util.List;

public class PageItemAdapter extends PageSliderProvider {

    private List<Page> pages;
    private AbilitySlice context;

    public PageItemAdapter(List<Page> pages,AbilitySlice context) {
        this.pages = pages;
        this.context=context;
    }

    @Override
    public int getCount() {
        return pages.size();
    }

    @Override
    public Object createPageInContainer(ComponentContainer componentContainer, int i) {
        Page page=pages.get(i);
        //创建图片组件
        Image image=new Image(context);
        //创建文本组件
        Text text=new Text(context);
        //设置图片平铺Image组件的所有宽高
        image.setScaleMode(Image.ScaleMode.STRETCH);
        //设置图片的高宽
        image.setLayoutConfig(
                new StackLayout.LayoutConfig(
                        StackLayout.LayoutConfig.MATCH_PARENT,
                        StackLayout.LayoutConfig.MATCH_PARENT));
        //添加图片
        image.setPixelMap(pages.get(i).getImage());
        StackLayout.LayoutConfig lc=new StackLayout.LayoutConfig(
                StackLayout.LayoutConfig.MATCH_PARENT,
                StackLayout.LayoutConfig.MATCH_CONTENT);
        //设置文本高宽
        text.setLayoutConfig(lc);
        //设置文本对齐方式
        text.setTextAlignment(TextAlignment.CENTER);
        //设置文本文字
        text.setText(pages.get(i).getName());
        //设置文本大小
        text.setTextSize(80);
        //设置相对于其他组件的对齐方式
        //设置文字颜色为白色
        text.setTextColor(Color.WHITE);
        //设置文本背景颜色
        RgbColor color=new RgbColor(100,100,100);
        ShapeElement se=new ShapeElement();
        se.setRgbColor(color);
        text.setBackground(se);
        //创建层布局
        StackLayout sl=new StackLayout(context);
        sl.setLayoutConfig(new StackLayout.LayoutConfig(StackLayout.LayoutConfig.MATCH_PARENT,
                StackLayout.LayoutConfig.MATCH_PARENT));
        //将图片和文本组件添加至层布局
        sl.addComponent(image);
        sl.addComponent(text);
        //将层布局放入滑页组件中
        componentContainer.addComponent(sl);
        return sl;
    }

    @Override
    public void destroyPageFromContainer(ComponentContainer componentContainer, int i, Object o) {
        //滑出屏幕的组件进行移除
        componentContainer.removeComponent((Component) o);
    }

    @Override
    public boolean isPageMatchToObject(Component component, Object o) {
        //判断滑页上的每一页的组件和内容是否保持一致
        return true;
    }


}
适配器中采用java代码动态创建子布局的形式,这里也可以使用xml的方式创建子布局然后进行加载进来,这里就不做操作了,可以自行调整页面
接着主界面上定义适配器
private PageItemAdapter adapter;重写onStart方法,加载主布局,根据id获得滑动页面对象
 @Override
    protected void onStart(Intent intent) {
        super.onStart(intent);
//加载主布局
        this.setUIContent(ResourceTable.Layout_ability_page);
//根据id获得滑动页面组件对象
        PageSlider ps = (PageSlider) this.findComponentById(ResourceTable.Id_ps);
//初始化图片和文字数据封装在集合中
        initPage();
//创建适配器对象,将当前界面对象和封装好的集合发送过去
        adapter=new PageItemAdapter(pages,this);
//将适配器加载至滑动组件上,完成同步组装
        ps.setProvider(adapter);

    }
接下来开启华为模拟器,运行项目即可,界面可以自行设计的更美观。
至此该文章分享到这里,感谢大家的关注和阅读,后期会分享更多鸿蒙技术文章!!!
需要相关图片的,可以使用:


更多推荐
 已为社区贡献5条内容




所有评论(0)