TensorFlow入门教程(22)将图像超分辨率模型SRGAN移植到安卓APP(上)
##作者:韦访#博客:https://blog.csdn.net/rookie_wei#微信:1007895847#添加微信的备注一下是CSDN的#欢迎大家一起学习#1、概述之前的博客都是讲在python上怎么用tensorflow,那么,现在就来说说怎么将训练好的模型移植到安卓上。为了照顾不会安卓APP开发的童鞋,我将分为两讲,第一讲就是纯粹的python开发,主要是介绍怎么转换和验证模型。第二
#
#作者:韦访
#博客:https://blog.csdn.net/rookie_wei
#微信:1007895847
#添加微信的备注一下是CSDN的
#欢迎大家一起学习
#
1、概述
之前的博客都是讲在python上怎么用tensorflow,那么,现在就来说说怎么将训练好的模型移植到安卓上。为了照顾不会安卓APP开发的童鞋,我将分为两讲,第一讲就是纯粹的python开发,主要是介绍怎么转换和验证模型。第二讲则是纯粹的安卓APP开发。这讲,我们先做些预备工作,先将模型转成tflite格式,并使用tflite将模型跑起来,以验证我们的tflite模型没问题。
环境配置:
操作系统:Win10 64位
显卡:GTX 1080ti
Python:Python3.7
TensorFlow:2.3.0
2、SRGAN模型简介
图像超分辨率(Image Super Resolution),是指将一幅低分辨率图像,恢复成高分辨率图像的技术。

如上图所示,图四表示原始的高清图,图一表示使用bicubic算法将图四缩小4倍后的低分辨率图,图二和图三则是使用SR算法处理以后恢复的高清图。
SRGAN是通过生成对抗网络(GAN)来实现超分辨率的技术,论文地址:https://arxiv.org/abs/1609.04802。有兴趣可以看看原论文,这个模型本身的知识不是今天的重点,这里简单说一下概念就可以了。
由于使用的是GAN技术,所以它由一个生成器Generator和一个判别器Discriminator构成,网络结构如下图所示。

由于GitHub上有很多开源的代码了( https://github.com/krasserm/super-resolution),所以我们就不重复造轮子了,直接拿人家训练好的模型来用就可以了。首先下载源码,
git clone https://github.com/krasserm/super-resolution.git然后,下载它训练好的SRGAN模型:
https://drive.google.com/open?id=1u9ituA3ScttN9Vi-UkALmpO0dWQLm8Rv
上面的模型需要翻墙才能下载。不过放心,我博客末尾会给下载链接的。
下载模型后,解压到上面下载的源码的根目录下,如下图所示,

模型文件在weights文件夹下,如下图所示,

其中,gan_discriminator.h5和pre_generator.h5是判别器和预训练的生成器,我们不用它。gan_generator.h5是GAN训练出来的生成器,这个就是我们要用的模型。
3、使用SRGAN
下载完源码和模型后,我们先看看怎么在python中使用它。代码如下,
from model.srgan import generator
from utils import load_image, plot_sample
from model import resolve_single
import tensorflow as tf
import os

model = generator()
model.load_weights('weights/srgan/gan_generator.h5')
print(model.summary())
lr = load_image('./demo/0869x4-crop.png')
sr = resolve_single(model, lr)
plot_sample(lr, sr)
在运行代码之前,先修改一下utils.py文件,否则运行结果不会显示出来,将,
def plot_sample(lr, sr):
    plt.figure(figsize=(20, 10))

    images = [lr, sr]
    titles = ['LR', f'SR (x{sr.shape[0] // lr.shape[0]})']

    for i, (img, title) in enumerate(zip(images, titles)):
        plt.subplot(1, 2, i+1)
        plt.imshow(img)
        plt.title(title)
        plt.xticks([])
        plt.yticks([])
改成
def plot_sample(lr, sr):
    plt.figure(figsize=(20, 10))

    images = [lr, sr]
    titles = ['LR', f'SR (x{sr.shape[0] // lr.shape[0]})']

    for i, (img, title) in enumerate(zip(images, titles)):
        plt.subplot(1, 2, i+1)
        plt.imshow(img)
        plt.title(title)
        plt.xticks([])
        plt.yticks([])
    plt.show()
然后再运行,运行结果如下,

可以看到,左边是低分辨率的图片,右边是通过SRGAN恢复的高分辨率图片(大小为原来图像的宽高分别乘以4)。可以看到,右边图片中,猫的猫发和眼睛比左边的图片清晰了很多。
4、将模型转成tflite格式
由于到移植到安卓APP上,所以推荐使用tflite,因为它有实现手机上的GPU加速等优点。现在我们就将gan_generator.h5转成tflite,直接参考tensorflow官方的示例https://tensorflow.google.cn/lite/convert,运行下面的命令行即可,
tflite_convert --keras_model_file=weights\srgan\gan_generator.h5 --output_file=weights\srgan\gan_generator.tflite运行结果:

出错了,可以在官方教程“Save and load”(https://tensorflow.google.cn/tutorials/keras/save_and_load#hdf5_format)中找到答案,

上面说了,如果自定义对象时,使用SavedModel就没问题,如果用HDF5保存模型还需要自定义get_config方法。既然HDF5那么麻烦,那么,一个最简单的方法就是,将HDF5先转成SavedModel后再转成tflite。使用下面的代码,将HDF5模型转成SavedModel模型,
from model.srgan import generator
from utils import load_image, plot_sample
from model import resolve_single
import tensorflow as tf
import os
model = generator()
model.load_weights('weights/srgan/gan_generator.h5')
print(model.summary())
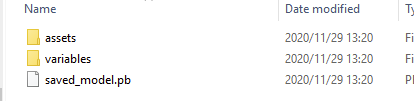
model.save("saved_model")运行上面的代码后,会生成一个saved_model的文件夹,文件夹内容如下,
接着,使用下面的命令将其转为tflite格式,
tflite_convert --saved_model_dir=saved_model --output_file=saved_model\gan_generator.tflite运行结果,
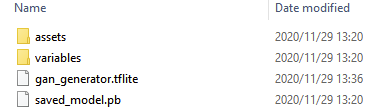
可以看到saved_model文件夹下生成了gan_generator.tflite文件。
5、验证tflite模型
接下来,我们继续写python的代码来验证这个gan_generator.tflite是OK的。参考tensorflow官方教程(https://tensorflow.google.cn/lite/guide/inference),首先,导入tflite模型并打印它的输入和输出详情,代码如下,
import tensorflow as tf
import cv2
from utils import load_image, plot_sample
import numpy as np
interpreter = tf.lite.Interpreter(model_path="./saved_model/gan_generator.tflite", num_threads=4)
# Get input and output tensors.
input_details = interpreter.get_input_details()
output_details = interpreter.get_output_details()
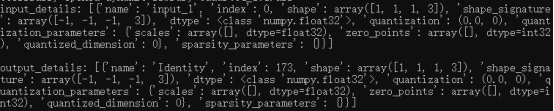
print("input_details:", input_details, "\n\noutput_details:", output_details)运行结果如下,
至少模型可以导入了。接着,模仿官方教程的python示例代码,设置模型输入和获取输出结果,代码如下,
import tensorflow as tf
import cv2
from utils import load_image, plot_sample
import numpy as np

interpreter = tf.lite.Interpreter(model_path="./saved_model/gan_generator.tflite", num_threads=4)

# Get input and output tensors.
input_details = interpreter.get_input_details()
output_details = interpreter.get_output_details()

print("input_details:", input_details, "\n\noutput_details:", output_details)

# Test the model on random input data.
image = load_image("demo/0869x4-crop.png")
image = np.asarray(image, np.float32)
image = np.expand_dims(image, axis=0)
print(image.shape)

interpreter.set_tensor(input_details[0]['index'], image)

interpreter.invoke()

# The function `get_tensor()` returns a copy of the tensor data.
# Use `tensor()` in order to get a pointer to the tensor.
output_data = interpreter.get_tensor(output_details[0]['index'])
print(output_data.shape)
运行结果,
input_details: [{'name': 'input_1', 'index': 0, 'shape': array([1, 1, 1, 3]), 'shape_signature': array([-1, -1, -1, 3]), 'dtype': <class 'numpy.float32'>, 'quantization': (0.0, 0), 'quantization_parameters': {'scales': array([], dtype=float32), 'zero_points': array([], dtype=int32), 'quantized_dimension': 0}, 'sparsity_parameters': {}}]
output_details: [{'name': 'Identity', 'index': 173, 'shape': array([1, 1, 1, 3]), 'shape_signature': array([-1, -1, -1, 3]), 'dtype': <class 'numpy.float32'>, 'quantization': (0.0, 0), 'quantization_parameters': {'scales': array([], dtype=float32), 'zero_points': array([], dtype=int32), 'quantized_dimension': 0}, 'sparsity_parameters': {}}]
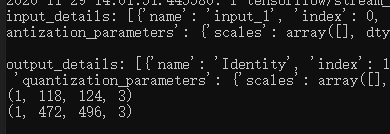
(1, 118, 124, 3)
Traceback (most recent call last):
File "demo3.py", line 21, in <module>
interpreter.set_tensor(input_details[0]['index'], image)
File "C:\Users\wilf\Anaconda3\lib\site-packages\tensorflow\lite\python\interpreter.py", line 407, in set_tensor
self._interpreter.SetTensor(tensor_index, value)
ValueError: Cannot set tensor: Dimension mismatch. Got 118 but expected 1 for dimension 1 of input 0.
出错,我们看错误提示,它说我们模型的输入维度不对,dimension 1需要的是1,但是我们提供的是118。
这个什么意思呢?通过input_details的log我们看到,模型输入的shape是
[1, 1, 1, 3],但是我们提供的输入图片的shape是(1, 118, 124, 3)。通过model/srgan.py里定义的SRGAN模型的网络结构可以看到,模型是输入shape其实是(None, None,3),也就是说其实模型的输入的宽高是不限制大小的,

所以,我们这里要通过resize_tensor_input函数重新设置模型的输入shape才行。对上面的代码进行修改,修改后的代码如下,
import tensorflow as tf
import cv2
from utils import load_image, plot_sample
import numpy as np

interpreter = tf.lite.Interpreter(model_path="./saved_model/gan_generator.tflite", num_threads=4)

# Get input and output tensors.
input_details = interpreter.get_input_details()
output_details = interpreter.get_output_details()

print("input_details:", input_details, "\n\noutput_details:", output_details)


# Test the model on random input data.
image = load_image("demo/0869x4-crop.png")
image = np.asarray(image, np.float32)
image = np.expand_dims(image, axis=0)
print(image.shape)
interpreter.resize_tensor_input(input_details[0]['index'], image.shape)

interpreter.allocate_tensors()

interpreter.set_tensor(input_details[0]['index'], image)

interpreter.invoke()

# The function `get_tensor()` returns a copy of the tensor data.
# Use `tensor()` in order to get a pointer to the tensor.
output_data = interpreter.get_tensor(output_details[0]['index'])
print(output_data.shape)
运行结果如下,
看样子是对了的,不过为了保险起见,我们把得到的结果显示成图片看看是不是达到预期效果。代码如下,
import tensorflow as tf
import cv2
from utils import load_image, plot_sample
import numpy as np

interpreter = tf.lite.Interpreter(model_path="./saved_model/gan_generator.tflite", num_threads=4)

# Get input and output tensors.
input_details = interpreter.get_input_details()
output_details = interpreter.get_output_details()

print("input_details:", input_details, "\n\noutput_details:", output_details)

# Test the model on random input data.
image = load_image("demo/0869x4-crop.png")
image = np.asarray(image, np.float32)
image = np.expand_dims(image, axis=0)
print(image.shape)
interpreter.resize_tensor_input(input_details[0]['index'], image.shape)

interpreter.allocate_tensors()

interpreter.set_tensor(input_details[0]['index'], image)

interpreter.invoke()

# The function `get_tensor()` returns a copy of the tensor data.
# Use `tensor()` in order to get a pointer to the tensor.
output_data = interpreter.get_tensor(output_details[0]['index'])
print(output_data.shape)

# show result
image = np.squeeze(image)
image = tf.clip_by_value(image, 0, 255)
image = tf.round(image)
image = tf.cast(image, tf.uint8)

output_data = np.squeeze(output_data)
output_data = tf.clip_by_value(output_data, 0, 255)
output_data = tf.round(output_data)
output_data = tf.cast(output_data, tf.uint8)

plot_sample(image, output_data)
运行结果,

嗯,达到预期结果,说明我们的模型转换是成功了,下一讲我们就可以开始进行安卓移植工作了。
6、完整代码

为开发者提供学习成长、分享交流、生态实践、资源工具等服务,帮助开发者快速成长。
更多推荐


 5
5 0
0- 0


 已为社区贡献3条内容

所有评论(0)