
深度学习——手写数字识别
深度学习——手写数字问题前不久入门学习了Tensorflow深度学习框架,了解一下什么是神经网络和Tensorflow的简单使用。下面通过Tensorflow框架来建造神经网络模型来对手写数字进行训练和识别。具体过程都在jupyter notebook中实现,步骤如下:一、手写数字训练1、代入相应的依赖库import tensorflow as tfimport pandas as pdimpor
·
深度学习——手写数字问题
前不久入门学习了Tensorflow深度学习框架,了解一下什么是神经网络和Tensorflow的简单使用。下面通过Tensorflow框架来建造神经网络模型来对手写数字进行训练和识别。
具体过程都在jupyter notebook中实现,步骤如下:
一、手写数字训练
1、代入相应的依赖库
import tensorflow as tf
import pandas as pd
import matplotlib.pyplot as plt
import numpy as np
2、加载mnist数据集
# 加载mnist数据集,mnist数据集包含了60000张的训练图像和10000张的测试图像
# train_x:训练数据 train_y:训练数据标签(0,1,2,3,4,5,6,7,8,9)
# test_x:测试数据 test_y:测试数据标签(0,1,2,3,4,5,6,7,8,9)
(train_x,train_y),(test_x,test_y) = tf.keras.datasets.mnist.load_data()
3、数据归一化处理
train_x = train_x / 255.
test_x = test_x / 255.
4、显示其中的一个图像数据和对用的标签
plt.imshow(train_x[0],cmap='gray')
plt.title(train_y[0])

5、建造神经网络模型
# 初始化神经网络模型
model =  tf.keras.Sequential()
# 向模型添加层
model.add(tf.keras.layers.Flatten(input_shape=(28,28))) # Flatten层将除第一维以外的维度展平
model.add(tf.keras.layers.Dense(128,activation='relu')) # Dense层的输出128个参数,激活函数为:relu
model.add(tf.keras.layers.Dense(64,activation='relu')) # Dense层的输出64个参数,激活函数为:relu
model.add(tf.keras.layers.Dense(10,activation='softmax')) # Dense层的输出10个参数, 激活函数为:softmax
6、模型各层的参数状况
model.summary()

7、模型配置
model.compile(
    optimizer='adam',# 优化器:adam
    loss='sparse_categorical_crossentropy', # 损失函数:sparse_categorical_crossentropy
    metrics=['acc'] # 训练准确率: acc
)
8、模型训练过程
# 训练过程,训练次数:epochs=10 validation_data:训练结果与测试数据的损失和准确率
history =  model.fit(train_x,train_y,epochs=10,validation_data=(test_x,test_y))

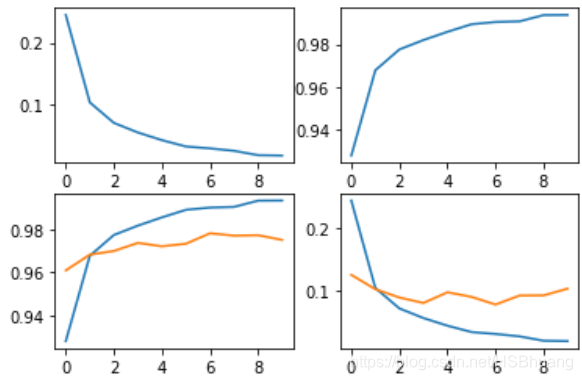
9、训练结果分析
# 损失函数与训练次数图
plt.subplot(2,2,1)
plt.plot(history.epoch,history.history.get('loss'))
# 准确率与训练次数图
plt.subplot(2,2,2)
plt.plot(history.epoch,history.history.get('acc'))
# 训练准确率与训练次数,测试准确率与训练次数图
plt.subplot(2,2,3)
plt.plot(history.epoch,history.history.get('acc'))
plt.plot(history.epoch,history.history.get('val_acc'))
# 训练损失函数与训练次数,测试损失函数与训练次数图
plt.subplot(2,2,4)
plt.plot(history.epoch,history.history.get('loss'))
plt.plot(history.epoch,history.history.get('val_loss'))
10、对测试集预测
# 对测试集进行评估
model.evaluate(test_x,test_y)

predict = model.predict(test_x)
# 对测试集的前十个数据进行估计
plt.figure(figsize=(12,16)) # 设定画图板尺寸
for i in range(10):
    plt.subplot(1,10,i+1)
    plt.imshow(test_x[i],cmap='gray') # 测试集图像
    plt.title(np.argmax(predict[i]),backgroundcolor='#ffffff') # 图对应的标题为该测试集的预测数字值
    plt.tight_layout() #设置默认的间距

二、手写数字识别
前面通过Tensorflow框架来建造神经网络模型对mnist手写数据集进行了训练,对测试数据集的估计准确率基本达到95%以上,基本能够识别测试数据集的手写数字图片里的数字信息,较准确的识别出手写数字。下面通过对自己的手写数字进行识别,进一步检验该神经网络模型的准确性.
1、准备手写数字图片
利用电脑的画图软件,通过画笔写了一个’8‘的数字,然后把它给截图下来保存

2、图片处理
这里利用了Python的图像处理库Pillow对图片进行尺寸和灰度的处理
# 导入依赖库
from PIL import Image

# 加载图片
image = Image.open('image/8.png')

# 重新设置图片的尺寸为28*28
img = image.resize((28,28))

# 把图片转换为灰度图
img1 = img.convert('L')

# 保存图片
img1.save('image/8_L.png')
通上面对图片的处理,已经改变了原图片的尺寸和色彩模式,处理后的图片如下:

3、模型识别
加载并处理图片
# 加载处理后的图片
image = Image.open('image/8_L.png')

# 将图片转为数组的形式
image = np.array(image)
# 反色处理
image_new = 255 - image
# 显示处理后的图片
plt.imshow(image_new,cmap='gray')

# 重新组织数组
img1 = image_new.reshape(1,28,28)
# 归一化处理
img1 = img1 / 255.
模型预测识别
# 模型预测
pre = model.predict(img1)
结果显示
# 结果显示
plt.imshow(image,cmap='gray')
plt.title(np.argmax(pre),backgroundcolor='#ffffff')


更多推荐


 3
3 0
0- 0


 已为社区贡献1条内容

所有评论(0)