In part three, we are going to talk about how to connect the backend and the frontend. Currently, the industry standard is to use something called REST API, which stands for representational state transfer application programming interface. API refers to the connection between two software applications, and REST refers to a specific architecture that this type of connection follows.

A REST API request usually consists of an endpoint, which points to the server, an HTTP method, a header and a body. The header provides meta information such as caching, user authentication and AB testing, and the body contains data that the client wants to send to the server.
You can download the source code for this tutorial here:
Download the Source Code
However, REST API has one small flaw, it is impossible to design APIs that only fetch the exact data that the client requires, so it is very common for the REST API to overfetch or underfetch. GraphQL was created to solve this problem. It uses schemas to make sure that with each request, it only fetches data that is required, we'll see how this works later.
Setup Django End
Let's start by setting up GraphQL at the backend. We need to install a new package called graphene-django. Run the following command:
pip install graphene-django
Next, go to settings.py and find the INSTALLED_APPS variable. We need to add graphene-django inside so that Django is able to find this module.
INSTALLED_APPS = [
  ...
  "blog",
  "graphene_django",
]
Configure graphene-django
There are still a few things we need to do before we can use GraphQL. First, we need to setup a URL pattern to serve the GraphQL APIs. Go to urls.py and add the following code:
from django.views.decorators.csrf import csrf_exempt
from graphene_django.views import GraphQLView

urlpatterns = [
    ...
    path("graphql", csrf_exempt(GraphQLView.as_view(graphiql=True))),
]
Next, we need to create the schemas and tell Django where to find them in the settings.py. GraphQL schemas define a pattern that allows Django to translate the database models into GraphQL and vice versa. Let's take the Site model as an example.
class Site(models.Model):
    name = models.CharField(max_length=200)
    description = models.TextField()
    logo = models.ImageField(upload_to='site/logo/')

    class Meta:
        verbose_name = 'site'
        verbose_name_plural = '1. Site'

    def __str__(self):
        return self.name
Create a schema.py file inside the blog directory.
import graphene
from graphene_django import DjangoObjectType
from blog import models

# Define type
class SiteType(DjangoObjectType):
    class Meta:
        model = models.Site

# The Query class
class Query(graphene.ObjectType):
    site = graphene.Field(types.SiteType)

    def resolve_site(root, info):
        return (
            models.Site.objects.first()
        )
As you can see, this file is divided into three parts. First, we import the necessary packages and models. Next, we define a SiteType, and this type is bonded with the Site model. And then, we have a Query class. This class is what allows us to retrieve information using the GraphQL API. To create or update information, we need to use a different class called Mutation, which we'll discuss in the next article.
Inside the Query class, we have a resolve_site function that binds with the site variable, which returns the first record of the Site model. This part works exactly the same as the regular Django QuerySet.
Create Schema
Now we can do the same for all of our models. To make sure the schema file isn't too long, I separated them into schema.py, types.py and queries.py.
schema.py
import graphene
from blog import queries

schema = graphene.Schema(query=queries.Query)
types.py
import graphene
from graphene_django import DjangoObjectType
from blog import models

class SiteType(DjangoObjectType):
    class Meta:
        model = models.Site

class UserType(DjangoObjectType):
    class Meta:
        model = models.User

class CategoryType(DjangoObjectType):
    class Meta:
        model = models.Category

class TagType(DjangoObjectType):
    class Meta:
        model = models.Tag

class PostType(DjangoObjectType):
    class Meta:
        model = models.Post
queries.py
import graphene
from blog import models
from blog import types

# The Query class
class Query(graphene.ObjectType):
    site = graphene.Field(types.SiteType)
    all_posts = graphene.List(types.PostType)
    all_categories = graphene.List(types.CategoryType)
    all_tags = graphene.List(types.TagType)
    posts_by_category = graphene.List(types.PostType, category=graphene.String())
    posts_by_tag = graphene.List(types.PostType, tag=graphene.String())
    post_by_slug = graphene.Field(types.PostType, slug=graphene.String())

    def resolve_site(root, info):
        return (
            models.Site.objects.first()
        )

    def resolve_all_posts(root, info):
        return (
            models.Post.objects.all()
        )

    def resolve_all_categories(root, info):
        return (
            models.Category.objects.all()
        )

    def resolve_all_tags(root, info):
        return (
            models.Tag.objects.all()
        )

    def resolve_posts_by_category(root, info, category):
        return (
            models.Post.objects.filter(category__slug__iexact=category)
        )

    def resolve_posts_by_tag(root, info, tag):
        return (
            models.Post.objects.filter(tag__slug__iexact=tag)
        )

    def resolve_post_by_slug(root, info, slug):
        return (
            models.Post.objects.get(slug__iexact=slug)
        )
Finally, we need to tell Django where to find the schema file. Go to settings.py and add the following code:
# Configure GraphQL
GRAPHENE = {
    "SCHEMA": "blog.schema.schema",
}
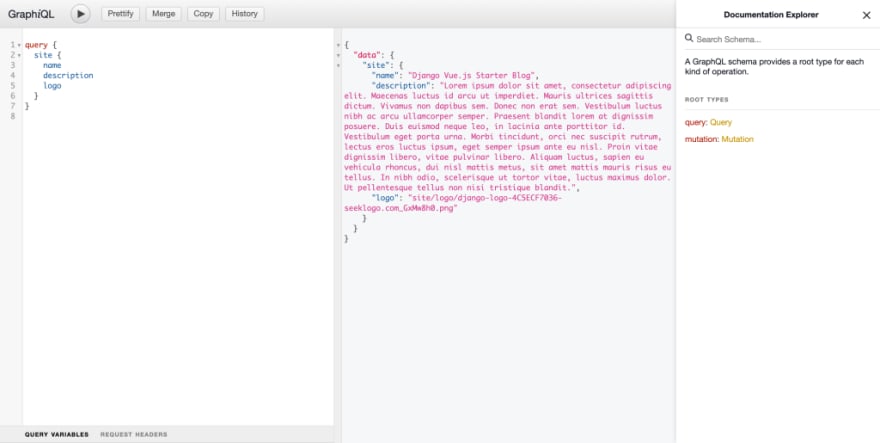
To verify that the schemas work, open your browser and go to http://127.0.0.1:8000/graphql. You should see the GraphiQL interface.

Notice how we are retrieving information in this example, it's the GraphQL language, and it is how we are going to retrieve data in the frontend, which you'll see later.
Setup CORS
Before we can move onto the frontend, there is still something we need to take care of. By default, data can only be transferred within the same application for security reasons, but in our case we need the data to flow between two applications. To tackle this problem, we need to enable the CORS (cross origin resource sharing) functionality.
First, install the django-cors-headers package. Inside the backend app, run the following command:
pip install django-cors-headers
Add "corsheaders" to the INSTALLED_APPS variable.
INSTALLED_APPS = [
  ...
  "corsheaders",
]
Then add "corsheaders.middleware.CorsMiddleware" to the MIDDLEWARE variable:
MIDDLEWARE = [
  "corsheaders.middleware.CorsMiddleware",
  ...
]
And finally, add the following code to the settings.py.
CORS_ORIGIN_ALLOW_ALL = False
CORS_ORIGIN_WHITELIST = ("http://localhost:8080",) # Matches the port that Vue.js is using
Setup Vue End
Now it's time for us to move to the frontend. First, we need to install a library called Apollo. It allows us to use GraphQL in the Vue app. To do that, run the following command:
npm install --save graphql graphql-tag @apollo/client
Under the src directory, create a new file called apollo-config.js and add the following code:
import { ApolloClient, createHttpLink, InMemoryCache } from '@apollo/client/core'

// HTTP connection to the API
const httpLink = createHttpLink({
  uri: 'http://127.0.0.1:8000/graphql', // Matches the url that Django is using
})

// Cache implementation
const cache = new InMemoryCache()

// Create the apollo client
const apolloClient = new ApolloClient({
  link: httpLink,
  cache,
})
Then go to main.js and import the apolloClient:
import { apolloClient } from "@/apollo-config";
createApp(App).use(router).use(apolloClient).mount("#app");
Now we can use the GraphQL language we just saw to retrieve data from the backend. Let's see an example. Go to App.vue, and here we'll retrieve the name of our website.
<template>
  <div class="container mx-auto max-w-3xl px-4 sm:px-6 xl:max-w-5xl xl:px-0">
    <div class="flex flex-col justify-between h-screen">
      <header class="flex flex-row items-center justify-between py-10">
        <div class="nav-logo text-2xl font-bold">
          <router-link to="/" v-if="mySite">{{ mySite.name }}</router-link>
        </div>
        ...
      </header>
      ...
    </div>
  </div>
</template>

<script>
import gql from "graphql-tag";

export default {
  data() {
    return {
      mySite: null,
    };
  },

  async created() {
    const siteInfo = await this.$apollo.query({
      query: gql`
        query {
          site {
            name
          }
        }`,
    });
    this.mySite = siteInfo.data.site;
  },
};
</script>
It is my personal habit to create a separate file for all the queries and then import it into the .vue file.
src/queries.js
import gql from "graphql-tag";

export const SITE_INFO = gql`
  query {
    site {
      name
    }
  }
`;
...

<script>
import { SITE_INFO } from "@/queries";

export default {
  data() {
    return {
      mySite: null,
    };
  },

  async created() {
    const siteInfo = await this.$apollo.query({
      query: SITE_INFO,
    });
    this.mySite = siteInfo.data.site;
  },
};
</script>
The Category Page
Now we have a problem left over from the previous article. When we invoke a router, how does the router know which page should be returned? For instance, when we click on a link Category One, a list of posts that belong to category one should be returned, but how does the router know how to do that? Let's see an example.
First, in the router/index.js file where we defined all of our routers, we should set a segment of the URL pattern as a variable. In the following example, the word after /category/ will be assigned to the variable category. This variable will be accessible in the CategoryView component.
import { createRouter, createWebHistory } from "vue-router";
...

const routes = [
  {
    path: "/",
    name: "Home",
    component: HomeView,
  },
  {
    path: "/category/:category",
    name: "Category",
    component: CategoryView,
  },
  ...
];

const router = createRouter({
  history: createWebHistory(process.env.BASE_URL),
  routes,
});

export default router;
Next, in the AllCategories view, we will pass some information to this category variable.
<template>
  <div class="flex flex-col place-content-center place-items-center">
    <div class="py-8 border-b-2">
      <h1 class="text-5xl font-extrabold">All Categories</h1>
    </div>
    <div class="flex flex-wrap py-8">
      <router-link
        v-for="category in this.allCategories"
        :key="category.name"
        class="..."
        :to="`/category/${category.slug}`"
        >{{ category.name }}</router-link
      >
    </div>
  </div>
</template>
In the Category view, we can access this category variable using this.$route property.
<script>
// @ is an alias to /src
import PostList from "@/components/PostList.vue";
import { POSTS_BY_CATEGORY } from "@/queries";

export default {
  components: { PostList },
  name: "CategoryView",

  data() {
    return {
      postsByCategory: null,
    };
  },

  async created() {
    const posts = await this.$apollo.query({
      query: POSTS_BY_CATEGORY,
      variables: {
        category: this.$route.params.category,
      },
    });
    this.postsByCategory = posts.data.postsByCategory;
  },
};
</script>
And finally, the corresponding posts can be retrieved using the POSTS_BY_CATEGORY query.
export const POSTS_BY_CATEGORY = gql`
  query ($category: String!) {
    postsByCategory(category: $category) {
      title
      slug
      content
      isPublished
      isFeatured
      createdAt
    }
  }
`;
With this example, you should be able to create the tag and post page.
In the next article, I'm going to demonstrate how to create and update information from the frontend to the backend, as well as user authentication using JWT.


 已为社区贡献126473条内容

所有评论(0)