Terraform Kubernetes 部署:详细演练
Terraform 和 Kubernetes 是其类别中最受欢迎的两个工具。 Terraform 被广泛用作基础设施即代码的首选工具,而 Kubernetes 在编排容器方面排名第一。是否可以将两者结合起来?当然!您可以使用 Terraform 部署 Kubernetes 集群。这实际上很常见,它让您可以像部署其他基础设施一样部署 Kubernetes。在这篇文章中,您将学习如何做到这一点。
Terraform + Kubernetes:如何以及为什么?
我们有两个主要问题要在这里回答。如何使用 Terraform 部署 Kubernetes,为什么要这样做?让我们从后者开始。
u200d
答案与“为什么要使用 Terraform 部署任何东西?”没有什么不同。从这个角度来看,Kubernetes 并没有什么特别之处,您可以通过使用 Terraform 来部署它,就像使用任何其他基础设施一样获得同样的好处。您可以获得自动化、基础架构版本控制、可靠性,甚至是执行基础架构安全扫描的能力。
至于如何,答案其实是相似的。您可以像部署任何其他基础设施一样使用 Terraform 部署 Kubernetes。这意味着,您首先需要为 Terraform 找到一个 Kubernetes 资源定义(我们将很快向您展示),根据您的需要调整一些参数,将其添加到您的 Terraform 代码中,然后就完成了。就像任何其他资源一样,Terraform 将能够跟踪对集群的更改并在您对代码进行更改后更新其配置。
部署 Kubernetes:第一步
理论够了。让我们看看它在实践中是如何工作的。首先,您需要为您的云找到一个 Terraform 提供商。如果你想在DigitalOcean上部署 Kubernetes,你需要遵循这个文档。对于Microsoft Azure,您需要前往此处了解详细信息。对于Google Cloud,您需要在这里查看。这些只是几个例子。但无论您使用哪个云提供商,一般方法都是相同的。对于今天的示例,我们将使用 DigitalOcean。
从零开始,在最简单的场景中,您需要创建两个文件,分别名为provider.tf和main.tf。您可以在一个文件中完成所有操作,但最好将提供程序和主要资源定义分开。在下面的代码中,您可以为 Terraform 定义 DigitalOcean 提供程序并传递您的 DigitalOcean 令牌:
terraform {
  required_providers {
    digitalocean = {
      source = "digitalocean/digitalocean"
      version = "~> 2.0"
    }
  }
}
variable "do_token" {
  default = "[replace_with_your_token]"
}
# Configure the DigitalOcean Provider
provider "digitalocean" {
  token = var.do_token
}
进入全屏模式 退出全屏模式
在main.tf中,您现在可以定义您的 Kubernetes。
resource "digitalocean_kubernetes_cluster" "test" {
  name   = "test_cluster"
  region = "nyc1"
  version = "1.22.11-do.0"
  node_pool {
    name       = "worker-pool"
    size       = "s-2vcpu-2gb"
    node_count = 3
  }
}
进入全屏模式 退出全屏模式
现在您已经准备好 Terraform 文件,您需要三件事。首先,您需要启动 DigitalOcean 提供程序。你可以用terraform init做到这一点。
# terraform init
Initializing the backend...
Initializing provider plugins...
- Finding digitalocean/digitalocean versions matching "~> 2.0"...
- Installing digitalocean/digitalocean v2.21.0...
- Installed digitalocean/digitalocean v2.21.0 (signed by a HashiCorp partner, key ID F82037E524B9C0E8)
Partner and community providers are signed by their developers.
If you'd like to know more about provider signing, you can read about it here:
https://www.terraform.io/docs/cli/plugins/signing.html
Terraform has created a lock file .terraform.lock.hcl to record the provider
selections it made above. Include this file in your version control repository
so that Terraform can guarantee to make the same selections by default when
you run "terraform init" in the future.
Terraform has been successfully initialized!
You may now begin working with Terraform. Try running "terraform plan" to see
any changes that are required for your infrastructure. All Terraform commands
should now work.
If you ever set or change modules or backend configuration for Terraform,
rerun this command to reinitialize your working directory. If you forget, other
commands will detect it and remind you to do so if necessary.
进入全屏模式 退出全屏模式
然后你可以运行你的terraform plan,它会向你展示对基础设施的计划更改(在这种情况下应该是创建一个新的 Kubernetes 集群)。
# terraform plan
Terraform used the selected providers to generate the following execution plan. Resource actions are indicated with the following
symbols:
  + create
Terraform will perform the following actions:
  # digitalocean_kubernetes_cluster.test will be created
  + resource "digitalocean_kubernetes_cluster" "test" {
      + cluster_subnet = (known after apply)
      + created_at     = (known after apply)
      + endpoint       = (known after apply)
      + ha             = false
      + id             = (known after apply)
      + ipv4_address   = (known after apply)
      + kube_config    = (sensitive value)
      + name           = "test-cluster"
      + region         = "nyc1"
      + service_subnet = (known after apply)
      + status         = (known after apply)
      + surge_upgrade  = true
      + updated_at     = (known after apply)
      + urn            = (known after apply)
      + version        = "1.22.11-do.0"
      + vpc_uuid       = (known after apply)
      + maintenance_policy {
          + day        = (known after apply)
          + duration   = (known after apply)
          + start_time = (known after apply)
        }
      + node_pool {
          + actual_node_count = (known after apply)
          + auto_scale        = false
          + id                = (known after apply)
          + name              = "worker-pool"
          + node_count        = 3
          + nodes             = (known after apply)
          + size              = "s-2vcpu-2gb"
        }
    }
Plan: 1 to add, 0 to change, 0 to destroy.
进入全屏模式 退出全屏模式
计划看起来不错。将添加一个资源,这就是您的 Kubernetes 集群,因此您可以继续使用terraform apply应用更改。
# terraform apply
(...)
Plan: 1 to add, 0 to change, 0 to destroy.
Do you want to perform these actions?
  Terraform will perform the actions described above.
  Only 'yes' will be accepted to approve.
  Enter a value: yes
digitalocean_kubernetes_cluster.test: Creating...
digitalocean_kubernetes_cluster.test: Still creating... [10s elapsed]
(...)
digitalocean_kubernetes_cluster.test: Still creating... [7m10s elapsed]
digitalocean_kubernetes_cluster.test: Creation complete after 7m16s [id=49fd0517-a4a5-41e8-997d-1412c081e000]
Apply complete! Resources: 1 added, 0 changed, 0 destroyed.
进入全屏模式 退出全屏模式
如果您现在前往 DigitalOcean 门户进行验证,您确实可以在那里看到它。
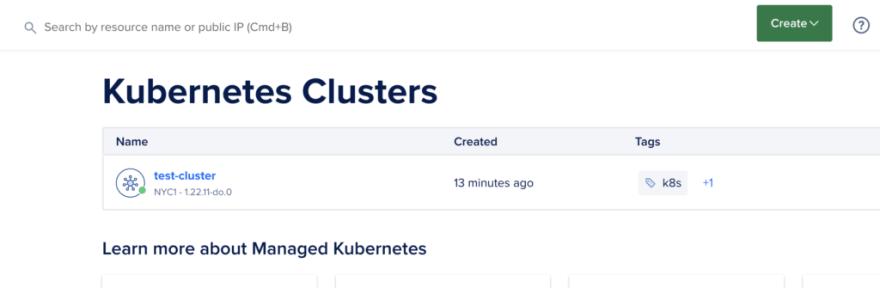
就是这样!这就是使用 Terraform 部署 Kubernetes 的方式。
u200d### 部署 Kubernetes:后续步骤
现在您已经了解了它的一般工作原理,接下来您需要学习一些东西。首先,您所做的只是部署基本的、最小的 Kubernetes。在更现实的场景中,您可能希望为 Kubernetes 参数化更多选项。但是,这在很大程度上取决于您的实际需要。如果您知道自己需要什么,可以前往 Terraform 文档并查看参数参考以了解您的 Kubernetes 资源。找到您需要的并将其添加到您的代码中。
例如,如果您希望 Kubernetes 集群自动升级,您可以在文档中找到以下内容:

为了让你新部署的集群自动升级,你只需要在main.tf中的 Kubernetes 资源定义中添加如下内容:
resource "digitalocean_kubernetes_cluster" "test" {
  name   = "test-cluster"
  region = "nyc1"
  version = "1.22.11-do.0"
  auto_upgrade = true
  node_pool {
    name       = "worker-pool"
    size       = "s-2vcpu-2gb"
    node_count = 3
  }
}
进入全屏模式 退出全屏模式
但你还没有。您可以在 DigitalOcean 门户中快速看到集群当前没有自动升级。

自动升级现在已禁用,因此您可以再次运行terraform plan以检查 Terraform 将尝试做什么。
# terraform plan
Terraform used the selected providers to generate the following execution plan. Resource actions are indicated with the following symbols:
  ~ update in-place
Terraform will perform the following actions:
  # digitalocean_kubernetes_cluster.test will be updated in-place
  ~ resource "digitalocean_kubernetes_cluster" "test" {
      ~ auto_upgrade   = false -> true
        id             = "49fd0517-a4a5-41e8-997d-1412c081e000"
        name           = "test-cluster"
        tags           = []
        # (13 unchanged attributes hidden)
        # (2 unchanged blocks hidden)
    }
Plan: 0 to add, 1 to change, 0 to destroy
进入全屏模式 退出全屏模式
正如预期的那样,Terraform 现在将尝试更新您的集群并为其添加自动升级选项。让我们继续应用该更改。
# terraform apply
(...)
Plan: 0 to add, 1 to change, 0 to destroy.
Do you want to perform these actions?
  Terraform will perform the actions described above.
  Only 'yes' will be accepted to approve.
  Enter a value: yes
digitalocean_kubernetes_cluster.test: Modifying... [id=49fd0517-a4a5-41e8-997d-1412c081e000]
digitalocean_kubernetes_cluster.test: Modifications complete after 2s [id=49fd0517-a4a5-41e8-997d-1412c081e000]
Apply complete! Resources: 0 added, 1 changed, 0 destroyed.
进入全屏模式 退出全屏模式
更改很快应用到您的集群,如果您再次检查门户,您可以看到,确实,自动升级选项现在已启用。

销毁 Kubernetes
如果您不再需要 Kubernetes 集群,您可以像部署它一样轻松地销毁它。您需要做的就是执行terraform destroy。
# terraform destroy
digitalocean_kubernetes_cluster.test: Refreshing state... [id=49fd0517-a4a5-41e8-997d-1412c081e000]
Terraform used the selected providers to generate the following execution plan. Resource actions are indicated with the following symbols:
  - destroy
Terraform will perform the following actions:
  # digitalocean_kubernetes_cluster.test will be destroyed
  - resource "digitalocean_kubernetes_cluster" "test" {
      - auto_upgrade   = true -> null
      - cluster_subnet = "10.244.0.0/16" -> null
      - created_at     = "2022-07-24 06:15:34 +0000 UTC" -> null
      - endpoint       = "https://49fd0517-a4a5-41e8-997d-1412c081e000.k8s.ondigitalocean.com" -> null
      - ha             = false -> null
      - id             = "49fd0517-a4a5-41e8-997d-1412c081e000" -> null
      - kube_config    = (sensitive value)
      - name           = "test-cluster" -> null
      - region         = "nyc1" -> null
      - service_subnet = "10.245.0.0/16" -> null
      - status         = "running" -> null
      - surge_upgrade  = true -> null
      - tags           = [] -> null
      - updated_at     = "2022-07-24 06:37:27 +0000 UTC" -> null
      - urn            = "do:kubernetes:49fd0517-a4a5-41e8-997d-1412c081e000" -> null
      - version        = "1.22.11-do.0" -> null
      - vpc_uuid       = "877cc187-97ad-426c-9301-079e3683d351" -> null
      - maintenance_policy {
          - day        = "any" -> null
          - duration   = "4h0m0s" -> null
          - start_time = "10:00" -> null
        }
      - node_pool {
          - actual_node_count = 3 -> null
          - auto_scale        = false -> null
          - id                = "8df9b48c-329d-41f5-899e-b7b896e28e15" -> null
          - labels            = {} -> null
          - max_nodes         = 0 -> null
          - min_nodes         = 0 -> null
          - name              = "worker-pool" -> null
          - node_count        = 3 -> null
          - nodes             = [
              - {
                  - created_at = "2022-07-24 06:15:34 +0000 UTC"
                  - droplet_id = "309670716"
                  - id         = "b82aeb19-78d8-4571-91e6-a0c2cffdb1db"
                  - name       = "worker-pool-c1766"
                  - status     = "running"
                  - updated_at = "2022-07-24 06:19:09 +0000 UTC"
                },
              - {
                  - created_at = "2022-07-24 06:15:34 +0000 UTC"
                  - droplet_id = "309670715"
                  - id         = "6b0d1ecf-4e48-427b-99a9-0e153056238d"
                  - name       = "worker-pool-c176t"
                  - status     = "running"
                  - updated_at = "2022-07-24 06:18:27 +0000 UTC"
                },
              - {
                  - created_at = "2022-07-24 06:15:34 +0000 UTC"
                  - droplet_id = "309670717"
                  - id         = "5ea0e536-96aa-4171-8602-dc0ab19e9888"
                  - name       = "worker-pool-c176l"
                  - status     = "running"
                  - updated_at = "2022-07-24 06:18:27 +0000 UTC"
                },
            ] -> null
          - size              = "s-2vcpu-2gb" -> null
          - tags              = [] -> null
        }
    }
Plan: 0 to add, 0 to change, 1 to destroy.
Do you really want to destroy all resources?
  Terraform will destroy all your managed infrastructure, as shown above.
  There is no undo. Only 'yes' will be accepted to confirm.
  Enter a value: yes
digitalocean_kubernetes_cluster.test: Destroying... [id=49fd0517-a4a5-41e8-997d-1412c081e000]
digitalocean_kubernetes_cluster.test: Destruction complete after 1s
Destroy complete! Resources: 1 destroyed.
进入全屏模式 退出全屏模式
就这样,集群消失了。
总结
你有它。这就是您可以使用 Terraform 管理 Kubernetes 集群的方式。您为此目的使用了 DigitalOcean Kubernetes,但如前所述,其他提供商的流程完全相同。您只需要在provider.tf中启动不同的提供者,然后在main.tf中调整 Kubernetes 资源定义。最好遵循 Terraform 文档。您将找到主要云提供商的示例和参数参考。
u200d
使用 Terraform 管理基础架构绝对可以帮助您节省时间,但是您是否知道您也可以直接从您的docker-compose文件轻松地在ReleaseHub上启动一个环境?在这里试一试,如果你想进一步扩展你的 Terraform 知识,请查看我们关于 for_each](https://releasehub.com/blog/terraforms-for-each-examples)的[帖子。
u200d

K8S/Kubernetes社区为您提供最前沿的新闻资讯和知识内容
更多推荐
 0
0 0
0- 0


 已为社区贡献20439条内容

所有评论(0)