使用 Terraform 创建 EKS 集群和节点组
说明
在这篇文章中,我将解释如何使用 Terraform 部署 EKS 集群和 EC2 节点组
该架构由一个 VPC 组成,该 VPC 在不同的可用区中具有 2 个公有子网和 2 个私有子网。每个公有子网都包含一个允许私有子网访问 Internet 的 nat 网关。
EKS 节点将在私有子网中创建。节点是由 EKS 管理的 EC2 t3-micro 实例
关于 EKS:https://docs.aws.amazon.com/eks/latest/userguide/what-is-eks.html
架构
[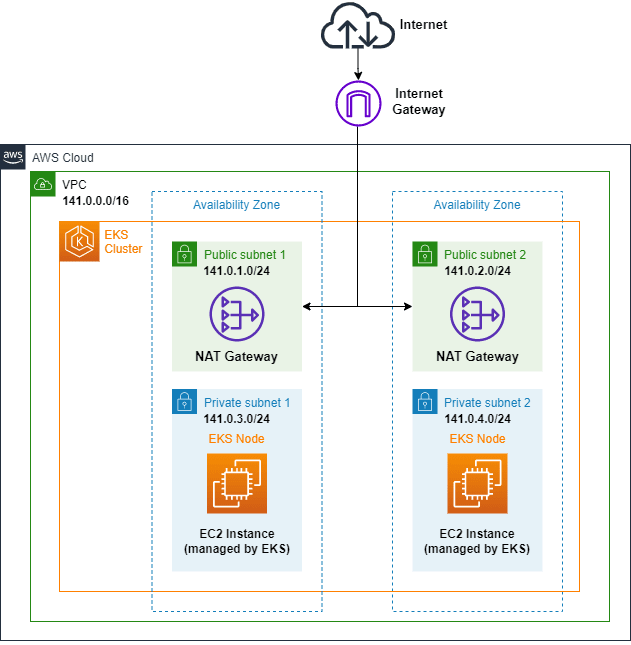 ](https://res.cloudinary.com/practicaldev/image/fetch/s--n_cbMy3c--/c_limit%2Cf_auto%2Cfl_progressive%2Cq_auto%2Cw_880/https://dev-to-uploads .s3.amazonaws.com/uploads/articles/cp8bxvvknzy6k7js7bi4.png)
代码
GITHUB 存储库:https://github.com/erozedguy/Terraform-EKS-Cluster-with-Node-Group
发展
STEP 01 - 提供网络部分
我正在使用自己的 terraform 模块来创建 vpc、子网、互联网网关、nat 网关等
AWS_VPC 模块:https://github.com/erozedguy/AWS-VPC-terraform-module
模块使用情况
module "aws_vpc" {
  source          = "github.com/erozedguy/AWS-VPC-terraform-module.git"
  networking      = var.networking
  security_groups = var.security_groups
}
进入全屏模式 退出全屏模式
模块变量
variable "networking" {
  type = object({
   cidr_block       = string
   vpc_name         = string
   azs              = list(string)
   public_subnets   = list(string)
   private_subnets  = list(string)
   nat_gateways     = bool
  })
  default = {
   cidr_block       = "10.0.0.0/16"
   vpc_name         = "terraform-vpc"
   azs              = ["us-east-1a", "us-east-1b"]
   public_subnets   = ["10.0.1.0/24", "10.0.2.0/24"]
   private_subnets  = ["10.0.3.0/24", "10.0.4.0/24"]
   nat_gateways     = true
  }
}

variable "security_groups" {
  type = list(object({
    name        = string
    description = string
    ingress = object({
      description      = string
      protocol         = string
      from_port        = number
      to_port          = number
      cidr_blocks      = list(string)
      ipv6_cidr_blocks = list(string)
    })
  }))

  default = [{
    name        = "ssh"
    description = "Port 22"
    ingress = {
      description      = "Allow SSH access"
      protocol         = "tcp"
      from_port        = 22
      to_port          = 22
      cidr_blocks      = ["0.0.0.0/0"]
      ipv6_cidr_blocks = null
    }
  }]
}
进入全屏模式 退出全屏模式
步骤 03 - IAM 角色
EKS 集群角色
由 Amazon EKS 管理的 Kubernetes 集群代表您调用其他 AWS 服务,以管理您用于该服务的资源。这就是我创建这个角色的原因
参考:https://docs.aws.amazon.com/eks/latest/userguide/service_IAM_role.html
resource "aws_iam_role" "EKSClusterRole" {
  name = "EKSClusterRole"
  assume_role_policy = jsonencode({
    Version = "2012-10-17"
    Statement = [
      {
        Action = "sts:AssumeRole"
        Effect = "Allow"
        Principal = {
          Service = "eks.amazonaws.com"
        }
      },
    ]
  })
}
进入全屏模式 退出全屏模式
节点组角色
Amazon EKS 节点 kubelet 守护程序代表您调用 AWS API。节点通过 IAM 实例配置文件和相关策略接收这些 API 调用的权限。在启动节点并将它们注册到集群之前,您必须创建一个 IAM 角色供这些节点在启动时使用。
参考资料:https://docs.aws.amazon.com/eks/latest/userguide/create-node-role.html
resource "aws_iam_role" "NodeGroupRole" {
  name = "EKSNodeGroupRole"
  assume_role_policy = jsonencode({
    Version = "2012-10-17"
    Statement = [
      {
        Action = "sts:AssumeRole"
        Effect = "Allow"
        Principal = {
          Service = "ec2.amazonaws.com"
        }
      },
    ]
  })
}
进入全屏模式 退出全屏模式
将托管 IAM 策略附加到 IAM 角色
此策略为 Kubernetes 提供代表您管理资源所需的权限。 Kubernetes 需要 Ec2:CreateTags 权限才能将识别信息放置在 EC2 资源上,包括但不限于实例、安全组和弹性网络接口。
resource "aws_iam_role_policy_attachment" "AmazonEKSClusterPolicy" {
  policy_arn = "arn:aws:iam::aws:policy/AmazonEKSClusterPolicy"
  role       = aws_iam_role.EKSClusterRole.name
}
进入全屏模式 退出全屏模式
此策略允许 Amazon EKS 工作线程节点连接到 Amazon EKS 集群。
resource "aws_iam_role_policy_attachment" "AmazonEKSWorkerNodePolicy" {
  policy_arn = "arn:aws:iam::aws:policy/AmazonEKSWorkerNodePolicy"
  role       = aws_iam_role.NodeGroupRole.name
}
进入全屏模式 退出全屏模式
提供对 Amazon EC2 Container Registry 存储库的只读访问权限。
resource "aws_iam_role_policy_attachment" "AmazonEC2ContainerRegistryReadOnly" {
  policy_arn = "arn:aws:iam::aws:policy/AmazonEC2ContainerRegistryReadOnly"
  role       = aws_iam_role.NodeGroupRole.name
}
进入全屏模式 退出全屏模式
此策略为 Amazon VPC CNI 插件 (amazon-vpc-cni-k8s) 提供修改 EKS 工作线程节点上的 IP 地址配置所需的权限。此权限集允许 CNI 代表您列出、描述和修改弹性网络接口
resource "aws_iam_role_policy_attachment" "AmazonEKS_CNI_Policy" {
  policy_arn = "arn:aws:iam::aws:policy/AmazonEKS_CNI_Policy"
  role       = aws_iam_role.NodeGroupRole.name
}
进入全屏模式 退出全屏模式
步骤 04 - 创建 EKS 集群
您必须设置 IAM 集群角色的 arn、kubernetes 版本和 vpc 配置
resource "aws_eks_cluster" "eks-cluster" {
  name     = "eks-cluster"
  role_arn = aws_iam_role.EKSClusterRole.arn
  version  = "1.21"

  vpc_config {
    subnet_ids          = flatten([ module.aws_vpc.public_subnets_id, module.aws_vpc.private_subnets_id ])
    security_group_ids  = flatten(module.aws_vpc.security_groups_id)
  }

  depends_on = [
    aws_iam_role_policy_attachment.AmazonEKSClusterPolicy
  ]
}
进入全屏模式 退出全屏模式
节点组
要创建和运行 PODS,我们需要一个基础设施。我们可以在 EC2 实例(工作节点)或 FARGATE 之间进行选择。
对于这个实现,我将提供 EC2“t3-micro”实例作为工作节点来运行 PODS
对于隔离的基础架构和更高的安全性,最佳做法是在私有子网中创建工作程序节点。
我们必须提供有关 AMI、实例类型、容量类型、磁盘大小的必要信息以创建工作节点,还必须提供扩展配置以指定所需的工作节点大小、最大和最小大小
resource "aws_eks_node_group" "node-ec2" {
  cluster_name    = aws_eks_cluster.eks-cluster.name
  node_group_name = "t3_micro-node_group"
  node_role_arn   = aws_iam_role.NodeGroupRole.arn
  subnet_ids      = flatten( module.aws_vpc.private_subnets_id )

  scaling_config {
    desired_size = 2
    max_size     = 3
    min_size     = 1
  }

  ami_type       = "AL2_x86_64"
  instance_types = ["t3.micro"]
  capacity_type  = "ON_DEMAND"
  disk_size      = 20

  depends_on = [
    aws_iam_role_policy_attachment.AmazonEKSWorkerNodePolicy,
    aws_iam_role_policy_attachment.AmazonEC2ContainerRegistryReadOnly,
    aws_iam_role_policy_attachment.AmazonEKS_CNI_Policy
  ]
}
进入全屏模式 退出全屏模式
用途
terraform init
terraform validate
terraform plan
terraform apply -auto-approve
进入全屏模式 退出全屏模式
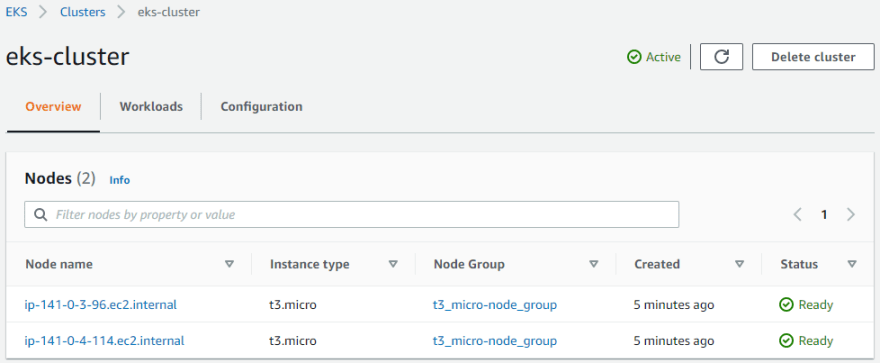
STEP 05 - 检查集群和节点组的创建
检查节点组是否是使用 AWS 控制台创建的
[ ](https://res.cloudinary.com/practicaldev/image/fetch/s--cisHMcr9--/c_limit%2Cf_auto%2Cfl_progressive%2Cq_auto%2Cw_880/https://dev-to- uploads.s3.amazonaws.com/uploads/articles/n633wmtoscaqdj2eq9k3.PNG)
为 Amazon EKS 创建或更新kubeconfig
为此,请使用以下命令:
aws eks update-kubeconfig --region <region-code> --name <cluster-name>
将<region-code>替换为您所在的地区,例如us-east-1
和<cluster-name与您的集群名称
[ ](https://res.cloudinary.com/practicaldev/image/fetch/s--NuDI-vsh--/c_limit%2Cf_auto%2Cfl_progressive%2Cq_auto%2Cw_880/https://dev-to -uploads.s3.amazonaws.com/uploads/articles/zzyoxc3vcexs84mhwdjz.PNG)
使用kubectl检查节点
[ ](https://res.cloudinary.com/practicaldev/image/fetch/s--61gBx7Yr--/c_limit%2Cf_auto%2Cfl_progressive%2Cq_auto%2Cw_880/https://dev-to- uploads.s3.amazonaws.com/uploads/articles/6urhxthouv5gqy4prq8k.PNG)
文档:https://docs.aws.amazon.com/eks/latest/userguide/create-kubeconfig.html

K8S/Kubernetes社区为您提供最前沿的新闻资讯和知识内容
更多推荐
 0
0 0
0- 0


 已为社区贡献4375条内容

所有评论(0)