使用 vcluster 的开发环境
安东尼奥·伯本
在Solo.io,我们倾听社区的声音并尝试最好的技术来帮助团队实现目标。这包括从事开源项目,以及提供可以帮助您更好地利用技术的支持和产品。
Gloo Mesh就是其中一种产品。它提供了一个很好的示例,说明如何将管理基础架构中整个应用程序网络的复杂性降至最低。可以理解,这意味着多集群架构。
在这种情况下,在迁移到更广泛的环境之前,如何在本地环境中验证多集群配置是否正确?
让我们把它放在上下文中。您的团队(或开发团队)想要发布新功能。他们想在系统中造成一些混乱。 Gloo Mesh 通过策略(故障转移、故障注入、异常检测、重试、超时、镜像、速率限制等)提供此功能和许多其他功能。但是您作为平台和 Gloo Mesh 的运营商,可能不确定哪个是正确的配置。您需要首先在开发或测试环境中进行调查。
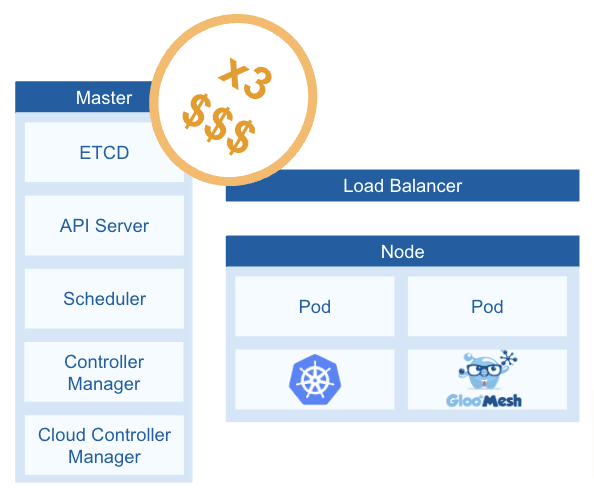
在使用三个集群(一个用于管理,两个用于工作负载)的模拟生产场景中,第一个问题显而易见:成本。在公共云中部署三个集群的成本很高。
[ ](https://res.cloudinary.com/practicaldev/image/fetch/s--8D53yZNA--/c_limit%2Cf_auto%2Cfl_progressive%2Cq_auto%2Cw_880/ https://loft.sh/blog/images/content/vcluster-gloo-1.png)
第二个关注点:网络。假设您决定首先在本地环境中进行调查。在您自己的工作站中部署三个完整的集群并不容易。您可以选择多个kind(kubernetes-in-docker) 或k3d等解决方案。两者都在主机顶部的容器中部署集群。一个集群,一个容器。如果您尝试其中一种方法,您可能需要调整容器和主机之间的网络。
第三个关注点:CPU。要在你自己的本地环境中部署东西,你需要确保你有足够的“肌肉”。
现在......如果我们开始考虑“集群中的集群”会怎样?
集群
我希望你看过标志性的电影《盗梦空间》。我非常喜欢它,我不时再看一遍。这个想法非常吸引人:“梦中梦”。
虚拟化技术遵循同样的理念。如果你熟悉Docker,几年前就需要 docker-in-docker。如今,它是 CI/CD 管道中非常常见的方法。例如,任务正在容器中运行,但您需要测试已经嵌入另一个容器中的应用程序。这将是 docker-in-docker 的一个用例。
考虑到这个想法,是什么阻止我们尝试集群中的集群?这就是vcluster提供一些好处的地方。 vcluster 允许您创建和管理虚拟 Kubernetes 集群。虚拟集群基本上是一个控制平面,在共享主机的命名空间中运行。这是一个可视化:
[ ](https://res.cloudinary.com/practicaldev/image/fetch/s--oKz8amyN--/c_limit%2Cf_auto%2Cfl_progressive%2Cq_auto%2Cw_880/https ://loft.sh/blog/images/content/vcluster-gloo-2.png)
在图片中我们可以看到,Gloo Mesh 之前需要三个集群来模拟生产就绪环境,现在只需要一个集群和三个虚拟集群。
快速的好处:
-
成本效益:现在,您的成本只有一个集群。确实,它需要比以前更大,但是通过部署一个集群而不是三个集群可以节省资金。
-
省时:当您在本地环境中工作时,您不想花时间创建新集群。如果使用 kind,可能需要几分钟才能获得三个新集群。使用 vcluster,您可以在大约 20 秒内获得三个新集群。
让我们在研讨会上证明这一切。
动手!
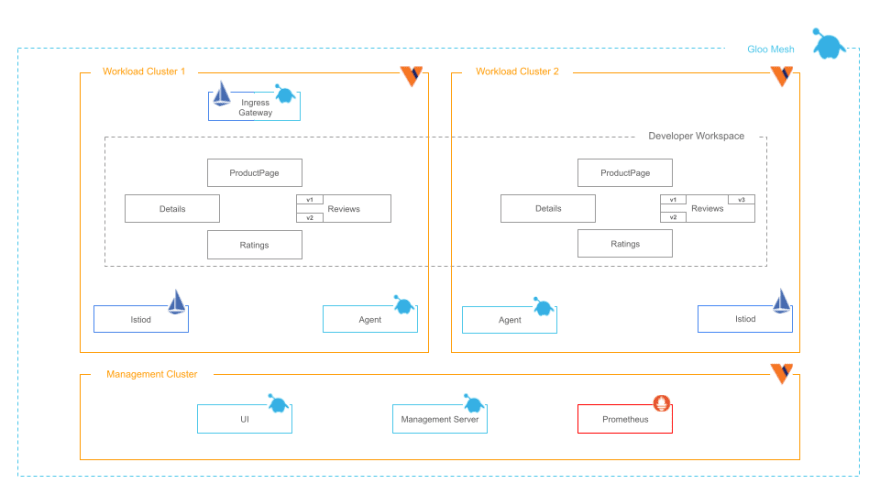
在本次研讨会中,您将在几秒钟内,在两个工作负载集群中部署Istio,一个在您的实验室中使用的演示应用程序,以及用于测试应用程序网络功能(多集群流量、流量拆分、故障注入等)。所有这一切都基于一个包含三个虚拟集群的主机 Kubernetes 集群。
您的架构将如下所示:
先决条件
-
一个Kubernetes集群,它将成为主机集群(种类、k3s、k0s 等)
-
vcluster CLI。这已经用 0.10.2 版本进行了测试
-
头盔v3
-
立方米
-
袋子
入门
让我们检查一下部署所有内容需要多长时间。测试是使用只有三个 CPU 的虚拟机进行的。因此,您还将使用最少的资源部署组件。
首先设置一些环境变量:
# Context name for the host cluster
export MAIN_CONTEXT=$(kubectl config current-context)

# Context names for the gloo mesh clusters (vclusters)
export MGMT_CLUSTER=devmgmt
export CLUSTER_1=devcluster1
export CLUSTER_2=devcluster2
进入全屏模式 退出全屏模式
安装环境
首先,让我们创建管理集群:
cat << EOF > vcluster-values.yaml
isolation:
  enabled: false
  limitRange:
    enabled: false
  podSecurityStandard: privileged
  resourceQuota:
    enabled: false
rbac:
  clusterRole:
    create: true
syncer:
  resources:
    limits:
      cpu: 100m
      memory: 1Gi
    requests:
      cpu: 100m
      memory: 128Mi
  extraArgs:
  - --fake-nodes=false
  - --sync-all-nodes
vcluster:
  resources:
    limits:
      cpu: 200m
      memory: 2Gi
    requests:
      cpu: 100m
      memory: 256Mi
  extraArgs:
  - --kubelet-arg=allowed-unsafe-sysctls=net.ipv4.*
  - --kube-apiserver-arg=feature-gates=EphemeralContainers=true
  - --kube-scheduler-arg=feature-gates=EphemeralContainers=true
  - --kubelet-arg=feature-gates=EphemeralContainers=true
  image: rancher/k3s:v1.22.5-k3s1
EOF


vcluster create $MGMT_CLUSTER -n $MGMT_CLUSTER --upgrade --connect=false --expose -f vcluster-values.yaml --context $MAIN_CONTEXT

vcluster connect $MGMT_CLUSTER -n $MGMT_CLUSTER --kube-config-context-name $MGMT_CLUSTER --update-current --context $MAIN_CONTEXT

kubectl --context $MGMT_CLUSTER get namespaces
进入全屏模式 退出全屏模式
接下来,工作负载集群 1:
vcluster create $CLUSTER_1 -n $CLUSTER_1 --upgrade --connect=false --expose -f vcluster-values.yaml --context $MAIN_CONTEXT

vcluster connect $CLUSTER_1 -n $CLUSTER_1 --kube-config-context-name $CLUSTER_1 --update-current --context $MAIN_CONTEXT

kubectl --context $CLUSTER_1 get namespaces
进入全屏模式 退出全屏模式
最后,工作负载集群 2:
vcluster create $CLUSTER_2 -n $CLUSTER_2 --upgrade --connect=false --expose -f vcluster-values.yaml --context $MAIN_CONTEXT

vcluster connect $CLUSTER_2 -n $CLUSTER_2 --kube-config-context-name $CLUSTER_2 --update-current --context $MAIN_CONTEXT

kubectl --context $CLUSTER_2 get namespaces
进入全屏模式 退出全屏模式
就是这个!在大约 20 秒内完成三个集群。如果您有兴趣了解更多信息,请在本文末尾找到有关您使用 vcluster 部署的内容的更深入解释以及一些需要记住的提示。
现在,是时候将 Istio 部署到工作负载集群中了:
安装Gloo Mesh
您将需要一个许可证密钥:
export GLOO_MESH_LICENSE_KEY=<license_key>
进入全屏模式 退出全屏模式
你需要定义Gloo Mesh版本:
export GLOO_MESH_VERSION=2.0.9
进入全屏模式 退出全屏模式
Gloo Mesh 可以通过 Helm 图表安装。但是,为了不让代码溢出这篇文章,您将使用 meshctl CLI:
meshctl install --kubecontext $MGMT_CLUSTER --license $GLOO_MESH_LICENSE_KEY --version $GLOO_MESH_VERSION
进入全屏模式 退出全屏模式
验证所有 pod 都在运行:
kubectl get pods -n gloo-mesh --context $MGMT_CLUSTER
进入全屏模式 退出全屏模式
你会看到类似的东西:
NAME                                     READY   STATUS    RESTARTS   AGE
gloo-mesh-mgmt-server-778d45c7b5-5d9nh   1/1     Running   0          41s
gloo-mesh-redis-844dc4f9-jnb4j           1/1     Running   0          41s
gloo-mesh-ui-749dc7875c-4z77k            3/3     Running   0          41s
prometheus-server-86854b778-r6r52        2/2     Running   0          41s
进入全屏模式 退出全屏模式
注册工作负载集群
Gloo Mesh 依赖于基于代理的方法。因此,在注册工作负载集群时,您需要告诉代理如何与管理服务器通信。
请注意,在 EKS 中,服务不返回 IP,而是返回地址。如果您使用的是 EKS,请使用以下命令进行调整。
MGMT_SERVER_NETWORKING_DOMAIN=$(kubectl get svc -n gloo-mesh gloo-mesh-mgmt-server --context $MGMT_CLUSTER -o jsonpath='{.status.loadBalancer.ingress[0].ip}')

MGMT_SERVER_NETWORKING_PORT=$(kubectl -n gloo-mesh get service gloo-mesh-mgmt-server --context $MGMT_CLUSTER -o jsonpath='{.spec.ports[?(@.name=="grpc")].port}')


MGMT_SERVER_NETWORKING_ADDRESS=${MGMT_SERVER_NETWORKING_DOMAIN}:${MGMT_SERVER_NETWORKING_PORT}
echo $MGMT_SERVER_NETWORKING_ADDRESS
进入全屏模式 退出全屏模式
注册工作负载集群。这也将部署代理:
meshctl cluster register \
  --remote-context=$CLUSTER_1 \
  --relay-server-address $MGMT_SERVER_NETWORKING_ADDRESS \
  --kubecontext $MGMT_CLUSTER \
  $CLUSTER_1
进入全屏模式 退出全屏模式
你会看到:
Registering cluster
📃 Copying root CA relay-root-tls-secret.gloo-mesh to remote cluster from management cluster
📃 Copying bootstrap token relay-identity-token-secret.gloo-mesh to remote cluster from management cluster
💻 Installing relay agent in the remote cluster
Finished installing chart 'gloo-mesh-agent' as release gloo-mesh:gloo-mesh-agent
📃 Creating remote.cluster KubernetesCluster CRD in management cluster
⌚ Waiting for relay agent to have a client certificate
         Checking...
         Checking...
🗑 Removing bootstrap token
✅ Done registering cluster!
进入全屏模式 退出全屏模式
注册第二个工作负载集群:
meshctl cluster register \
  --remote-context=$CLUSTER_2 \
  --relay-server-address $MGMT_SERVER_NETWORKING_ADDRESS \
  --kubecontext $MGMT_CLUSTER \
  $CLUSTER_2

#### Check that the resource is created in management:
进入全屏模式 退出全屏模式
重击
kubectl 获取 kubernetescluster -n gloo-mesh --context $MGMT_CLUSTER
And you will see:
进入全屏模式 退出全屏模式
重击
姓名年龄
devcluster1 27s
devcluster2 23s
#### Install Istio

Istio by default requires some resources. In your local environment, you might not have the resources to deploy three clusters fully functional and two Istio service meshes. Therefore, we need to reduce the required resources for Istio. That’s fine as this is just a development environment.

NOTE: This post is using Istio v1.12.6:
进入全屏模式 退出全屏模式
重击
导出 ISTIO_VERSIONu003d1.12.6
Install Istio’s CRDs:
进入全屏模式 退出全屏模式
重击
安装 Istio CRDS cluster1
helm upgrade --install istio-base istio/base \
-n istio 系统 \
--版本 $ISTIO_VERSION \
--kube 上下文 $CLUSTER_1 \
--创建命名空间
安装 Istio CRDS cluster2
helm upgrade --install istio-base istio/base \
-n istio 系统 \
--版本 $ISTIO_VERSION \
--kube-context $CLUSTER_2\
--创建命名空间
Install Istiod:
进入全屏模式 退出全屏模式
重击
cat << EOF > istiod-common-values.yaml
网格配置:
访问日志文件:/dev/stdout
默认配置:
保持ApplicationUntilProxyStarts:真
envoyMetricsService:
地址:glue-mesh-agent.glue-mesh:9977
发送访问日志服务:
地址:glue-mesh-agent.glue-mesh:9977
以前的元数据:
ISTIO_META_DNS_CAPTURE:“真”
ISTIO_META_DNS_AUTO_ALLOCATE:“真”
飞行员:
自动缩放启用:假
副本数:1
环境:
飞行员\跳过\验证\信任\域:“真”
资源:
要求:
中央处理器:10m
内存:2048米
限制:
中央处理器:10m
内存:2048米
EOF
安装 istiod cluster1
helm upgrade --install istiod istio/istiod \
-f istiod-common-values.yaml \
--设置 global.meshIDu003dmesh1 \
--设置 global.multiCluster.clusterNameu003d$CLUSTER_1 \
--设置 meshConfig.trustDomainu003d$CLUSTER_1 \
--设置 meshConfig.defaultConfig.proxyMetadata.GLOO_MESH_CLUSTER_NAMEu003d$CLUSTER_1\
--命名空间 istio 系统 \
--版本 $ISTIO_VERSION \
--kube-context $CLUSTER_1
安装 istiod cluster2
helm upgrade --install istiod istio/istiod \
-f istiod-common-values.yaml \
--设置 global.meshIDu003dmesh1 \
--设置 global.multiCluster.clusterNameu003d$CLUSTER_2 \
--设置 meshConfig.trustDomainu003d$CLUSTER_2 \
--设置 meshConfig.defaultConfig.proxyMetadata.GLOO_MESH_CLUSTER_NAMEu003d$CLUSTER_2 \
--命名空间 istio 系统 \
--版本 $ISTIO_VERSION \
--kube-context $CLUSTER_2
Install ingress gateways:
进入全屏模式 退出全屏模式
重击
cat << EOF > istio-ingress-common-values.yaml
副本数:1
自动缩放:
启用:假
名称:istio-ingressgateway
安全上下文:#runAsRoot
运行用户:1337
运行组:1337
runAsNonRoot:真
fs组:1337
标签:
istio:入口网关
服务:
类型:负载均衡器
端口:
-
端口:80 目标端口:8080 名称:http2
-
端口:443 目标端口:8443 名称:https 资源:限制:cpu:10m 内存:128Mi 请求:cpu:10m 内存:128Mi EOF
安装 Istio Ingress 网关集群 1
helm upgrade --install istio-ingressgateway istio/gateway \
-f istio-ingress-common-values.yaml \
--命名空间 istio 网关 \
--版本 $ISTIO_VERSION \
--kube 上下文 $CLUSTER_1 \
--创建命名空间
安装 Istio Ingress 网关集群 2
helm upgrade --install istio-ingressgateway istio/gateway \
-f istio-ingress-common-values.yaml \
--命名空间 istio 网关 \
--版本 $ISTIO_VERSION \
--kube 上下文 $CLUSTER_2 \
--创建命名空间
Install east-west gateways:
进入全屏模式 退出全屏模式
重击
cat << EOF > istio-eastwest-common-values.yaml
副本数:1
自动缩放:
启用:假
名称:istio-eastwestgateway
安全上下文:#runAsRoot
运行用户:1337
运行组:1337
runAsNonRoot:真
fs组:1337
标签:
istio:东西方网关
服务:
类型:负载均衡器
端口:
-
名称:tcp 状态端口端口:15021 目标端口:15021
-
名称:tls 端口:15443 目标端口:15443 资源:请求:cpu:10m 内存:128Mi 限制:cpu:10m 内存:128Mi EOF
安装Istio东西网关集群1
helm upgrade --install istio-eastwestgateway istio/gateway \
-f istio-eastwest-common-values.yaml \
--命名空间 istio 网关 \
--版本 $ISTIO_VERSION \
--kube-context $CLUSTER_1
安装Istio东西网关集群2
helm upgrade --install istio-eastwestgateway istio/gateway \
-f istio-eastwest-common-values.yaml \
--命名空间 istio 网关 \
--版本 $ISTIO_VERSION \
--kube-context $CLUSTER_2
#### Deploy Applications

In workload cluster 1:
进入全屏模式 退出全屏模式
重击
kubectl --context ${CLUSTER_1} 创建 ns bookinfo
导出 bookinfo_yamlu003dhttps://raw.githubusercontent.com/istio/istio/1.11.4/samples/bookinfo/platform/kube/bookinfo.yaml
kubectl --context ${CLUSTER_1} 标签命名空间 bookinfo istio-injectionu003denabled
kubectl --context ${CLUSTER_1} apply -f ${bookinfo_yaml} -l 'app,version notin (v3)' -n bookinfo
kubectl --context ${CLUSTER_1} apply -f ${bookinfo_yaml} -l 'account' -n bookinfo
And in workload cluster 2:
进入全屏模式 退出全屏模式
重击
kubectl --context ${CLUSTER_2} 创建 ns bookinfo
kubectl --context ${CLUSTER_2} 标签命名空间 bookinfo istio-injectionu003denabled
kubectl --context ${CLUSTER_2} apply -f ${bookinfo_yaml} -n bookinfo
Define your workspace (this is an abstraction given by Gloo Mesh to facilitate the organization of the workloads regardless the physical location):
进入全屏模式 退出全屏模式
重击
kubectl apply --context $MGMT_CLUSTER -n gloo-mesh -f- <<EOF
api版本:admin.gloo.solo.io/v2
种类:工作区
元数据:
名称:开发者
命名空间:gloo-mesh
规格:
工作负载集群:
-
名称:'*' 命名空间:
-
名称:'*' EOF
kubectl apply --context $CLUSTER_1 -n gloo-mesh -f- <<EOF
api版本:admin.gloo.solo.io/v2
种类:工作区设置
元数据:
名称:开发者
命名空间:gloo-mesh
规格:
选项:
服务隔离:
启用:假
联邦:
启用:假
EOF
Expose the application:
进入全屏模式 退出全屏模式
重击
kubectl --context ${CLUSTER_1} apply -f - <<EOF
api版本:networking.gloo.solo.io/v2
种类:虚拟网关
元数据:
名称:南北-gw
命名空间:istio-gateways
规格:
工作量:
- 选择器:
标签:
istio:入口网关
集群:${CLUSTER_1}
听众:
- http:{}
港口:
数量:80
allowedRouteTables:
- 主持人: '*'
EOF
kubectl --context ${CLUSTER_1} apply -f - <<EOF
api版本:networking.gloo.solo.io/v2
种类:路由表
元数据:
名称:产品页面
命名空间:bookinfo
标签:
暴露:“真实”
规格:
主持人:
- '*'
虚拟网关:
- 名称:南北-gw
命名空间:istio-gateways
集群:${CLUSTER_1}
工作负载选择器:[]
网址:
- 名称:产品页面
火柴:
- 乌里:
字首: /
转发:
目的地:
- 参考:
名称:产品页面
命名空间:bookinfo
港口:
号码:9080
EOF
#### Verify the Environment

Next, let’s create a bit of traffic and see what the UI displays. For that, port-forward the Gloo Mesh UI component:
进入全屏模式 退出全屏模式
重击
export ENDPOINT_HTTP_GW_CLUSTER1u003d$(kubectl --context ${CLUSTER_1} -n istio-gateways get svc istio-ingressgateway -o jsonpathu003d'{.status.loadBalancer.ingress[0].\ *}'):80
对于 {0..100} 中的 i;做 curl -s -o /dev/null -w "%{http_code}
" $ENDPOINT_HTTP_GW_CLUSTER1/productpage; 完成
You should see:
进入全屏模式 退出全屏模式
重击
❯ 对于 {0..100} 中的 i;做 curl -s -o /dev/null -w "%{http_code}
" $ENDPOINT_HTTP_GW_CLUSTER1/productpage; 完成
200
200
200
200
200
200
Now, let port-forward the UI:
进入全屏模式 退出全屏模式
重击
kubectl --context $MGMT_CLUSTER 端口转发 svc/gloo-mesh-ui -n gloo-mesh 8090
Go to: <http://localhost:8090/> and you will see all the information about your clusters and your workspaces.

You can also see the amazing graph to help with understanding your own system: Observability

That is all! You have achieved full control of the network in a matter of minutes in your local environment.
Now, you can test any capability that Gloo Mesh offers, including:
* Any kind of the policies that Gloo Mesh offers (such as failover, fault injection, outlier detection, retries, timeouts, traffic control, mirroring, rate limiting, and header and payload transformation)
* Access control
* Isolation of the services
* WAF
* Authentication with OIDC
* Authorization with OPA
## Tips for vcluster
Interested in learning more about vcluster? Here a simple diagram about how vcluster works:

In the workshop you have deployed three vclusters. If you run:
进入全屏模式 退出全屏模式
重击
kubectl --context $MAIN_CONTEXT 获取 sts -A
You will see:
进入全屏模式 退出全屏模式
重击
命名空间名称就绪年龄
devmgmt devmgmt 1/1 3h7m
devcluster2 devcluster2 1/1 3h2m
devcluster1 devcluster1 1/1 3h3m
Each of these StatefulSets belong to one vcluster. In its attached volume is stored all the data regarding the deployed vcluster.

Getting closer, you will find that one of the containers of those StatefulSets is an entire [k3s](https://k3s.io/), a lightweight Kubernetes flavor. You could also use any of the supported kubernetes flavors: [eks, k0s and vanilla k8s](https://www.vcluster.com/docs/operator/other-distributions).

The other container is a [syncer](https://www.vcluster.com/docs/architecture/basics#vcluster-syncer), an application which copies the pods that are created within the vcluster to the underlying host cluster. This is the reason you can see all the resources if you are the admin of the “host” cluster, and only your resources if you are the admin of the vcluster.

You can think of the StatefulSet like the control plane of a vcluster. This is the reason why you need to be careful how to deploy its pods.

Let’s see it in your just created environment. In your vcluster, you will see:
进入全屏模式 退出全屏模式
重击
kubectl --context $MGMT_CLUSTER 获取 pod -l appu003dgloo-mesh-mgmt-server -A
命名空间名称就绪状态
gloo-mesh gloo-mesh-mgmt-server-9fb55d686-w4n4l 1/1 正在运行
But in the host cluster you will see:
进入全屏模式 退出全屏模式
重击
kubectl --context $MAIN_CONTEXT 获取 pod -A -l vcluster.loft.sh/namespaceu003dgloo-mesh
命名空间名称
devcluster1 gloo-mesh-agent-df8c8c49d-jlhkh-x-gloo-mesh-x-devcluster1
devcluster2 gloo-mesh-agent-76b5b44b4f-56r5l-x-gloo-mesh-x-devcluster2
devmgmt gloo-mesh-mgmt-server-9fb55d686-w4n4l-x-gloo-mesh-x-devmgmt
devmgmt gloo-mesh-redis-794d79b7df-rlr99-x-gloo-mesh-x-devmgmt
devmgmt gloo-mesh-ui-cc98c5fc-tzq4s-x-gloo-mesh-x-devmgmt
devmgmt prometheus-server-647b488bb-r6hfc-x-gloo-mesh-x-devmgmt
Check the names. That is the translation layer that vcluster makes for you.

There are a couple of things to keep in mind when working with vclusters:

Reserve resources enough for those StatefulSet pods: It is a good practice to have nodes with resources dedicated solely to these pods and make sure that the pods are deployed in those nodes. The intention is that the StatefulSet pods (vcluster control planes) will not run out of resources which would dramatically impact the performance of the vcluster. To do this, you can play with taints and nodeselectors in the nodes.

Logs and Kubernetes metadata: Log Aggregators tools like [Fluentbit](https://fluentbit.io/) and [Grafana Promtail](https://grafana.com/docs/loki/latest/clients/promtail/) rely on the Kubernetes structure and naming convention. Log folders and files follow the kubernetes structure given by the host cluster.

From the command above, you could see that the same pod has different names in vcluster and in the host. Therefore, if you deploy one of the observability tools mentioned before in the vcluster, the expected structures will not match the one in the host cluster.The consequence is that the vcluster will not be able to leverage the Kubernetes metadata, nor the log traces from the applications in that cluster. This issue is currently being addressed by the [Loft Labs](https://loft.sh/) team at the time of writing this post.

The last interesting point to mention is the capability to pause/resume individual vcluster (StatefulSets). In case you do not want to destroy the entire environment created in the workshop you can just do:
进入全屏模式 退出全屏模式
重击
vcluster 暂停 $MGMT_CLUSTER -n $MGMT_CLUSTER --context $MAIN_CONTEXT
vcluster pause $CLUSTER_1 -n $CLUSTER_1 --context $MAIN_CONTEXT
vcluster pause $CLUSTER_2 -n $CLUSTER_2 --context $MAIN_CONTEXT
And whenever you want to keep working on the tests you can do:
进入全屏模式 退出全屏模式
重击
vcluster 恢复 $MGMT_CLUSTER -n $MGMT_CLUSTER --context $MAIN_CONTEXT
vcluster 恢复 $CLUSTER_1 -n $CLUSTER_1 --context $MAIN_CONTEXT
vcluster 恢复 $CLUSTER_2 -n $CLUSTER_2 --context $MAIN_CONTEXT
## Conclusions

Technology changes fast. Not many years ago, we were working with monoliths. Nowadays, you can have clusters deployed within another clusters.

Through this workshop, you were able to:

* Deploy all the components of Gloo Mesh in your local environment or in a cheap remote environment.
* Basic setup to test all Gloo Mesh capabilities to handle east-west and north-south traffic between your services.
* Reduce cost of deploying multiple clusters with vcluster. You just need one actual cluster.
* Reduce time of testing things out in a local environment.

This increases exponentially the efficiency in your projects. Which, at the end, is translated into an increase in productivity.

As a final comment, you can see that being able to test things in your local environment, reproducing heavy remote environments, is one of the goals of the DevOps practices.

If you want to talk more about all these tools, you can find me easily in these Slack workspaces: [solo.io](http://solo-io.slack.com), [istio](http://istio.slack.com) and [loft.sh](http://loft-sh.slack.com)
进入全屏模式 退出全屏模式

K8S/Kubernetes社区为您提供最前沿的新闻资讯和知识内容
更多推荐
 0
0 0
0- 0


 已为社区贡献4375条内容

所有评论(0)