使用 AWS API Gateway 和 AWS Lambda 的无服务器代理
AWS 中的公有子网和私有子网之间有时很难进行通信。
我们将了解如何在 API Gateway 和 AWS Lambda 的帮助下轻松做到这一点。
用例示例
示例 1
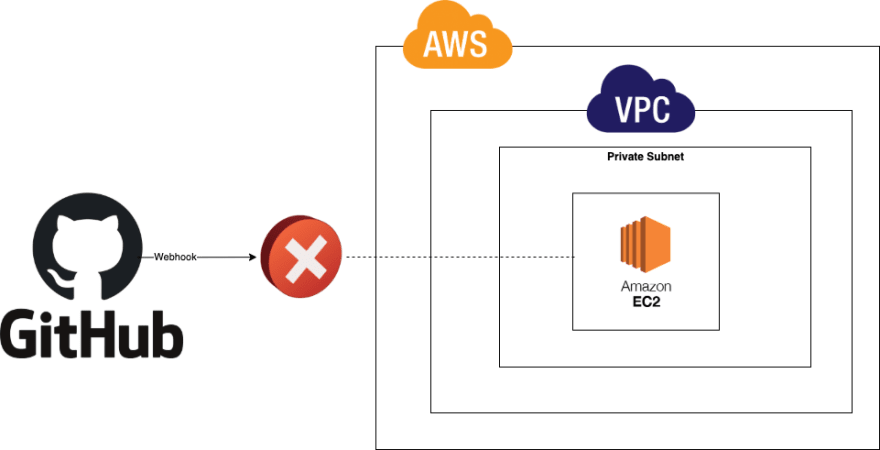
有时需要让 Github 存储库与私有 EC2 实例通信。
但是当一个实例是私有的时,它可以非常复杂而不影响实例的安全性。
[ ](https://res.cloudinary.com/practicaldev/image/fetch/s--ZGvO6MOs--/c_limit%2Cf_auto%2Cfl_progressive%2Cq_auto%2Cw_880/https://dev- to-uploads.s3.amazonaws.com/i/hunix4fbomsybaxo1k73.png)
解决方案
[ ](https://res.cloudinary.com/practicaldev/image/fetch/s--A5dr3HEV--/c_limit%2Cf_auto%2Cfl_progressive%2Cq_auto%2Cw_880/https://dev- to-uploads.s3.amazonaws.com/i/e9ekaa7igw73gl5raaau.png)
Github Webhook 调用公共 API 网关,API 网关触发附加到 VPC 的 Lambda。这个 Lambda 的作用是将 Github Webhook 的内容转发到 EC2 实例。
备注:附加到 VPC 的 AWS Lambda 未部署在 VPC 内部,而是创建了一个弹性网络接口 (ENI) 来链接 Lambda 函数和 VPC 内的不同子网。
示例 2
其他示例,我们可能需要在公共子网内的公共实例和 VPC 内的私有子网内的私有实例之间进行通信。
出于安全原因,公共子网和私有子网之间的直接路由是不可能的。因此,为了方便这一点,可以使用无服务器代理的这种解决方案。
[ ](https://res.cloudinary.com/practicaldev/image/fetch/s--zKM6upgr--/c_limit%2Cf_auto%2Cfl_progressive%2Cq_auto%2Cw_880/https://dev- to-uploads.s3.amazonaws.com/i/spjtgmfdjvrmjfer6k71.png)
解决方案
[ ](https://res.cloudinary.com/practicaldev/image/fetch/s--EGw5ZdUp--/c_limit%2Cf_auto%2Cfl_progressive%2Cq_auto%2Cw_880/https://dev- to-uploads.s3.amazonaws.com/i/z9fu2qjzvx1m15z9vi2h.png)
与解决方案 1 一样,借助 AWS Api Gateway 和 AWS Lambda,我们可以通过无服务器代理在公共和私有实例之间进行通信。
该解决方案易于实施、高度可扩展、安全且不昂贵。
实施
AWS Lambda
Lambda 函数非常简单。此 lambda 的目标只是将从 API Gateway 接收到的信息转发到 VPC 内的目的地。
这里我们使用 python 和 Lambda 函数就这么简单:
import json
import os

import urllib3


def main(event, context):
    url = os.environ['URL']

    # Two way to have http method following if lambda proxy is enabled or not
    if event.get('httpMethod'):
        http_method = event['httpMethod']
    else:
        http_method = event['requestContext']['http']['method']

    headers = ''
    if event.get('headers'):
        headers = event['headers']

    # Important to remove the Host header before forwarding the request
    if headers.get('Host'):
        headers.pop('Host')

    if headers.get('host'):
        headers.pop('host')

    body = ''
    if event.get('body'):
        body = event['body']

    try:
        http = urllib3.PoolManager()
        resp = http.request(method=http_method, url=url, headers=headers,
                            body=body)

        body = {
            "result": resp.data.decode('utf-8')
        }

        response = {
            "statusCode": resp.status,
            "body": json.dumps(body)
        }
    except urllib3.exceptions.NewConnectionError:
        print('Connection failed.')
        response = {
            "statusCode": 500,
            "body": 'Connection failed.'
        }

    return response
进入全屏模式 退出全屏模式
要重定向请求,我使用 python lib urllib3,有关更多信息或者如果您想更新代码,请查看官方文档。
为了方便部署,后端 url 在环境变量中传递。
此 lambda 需要附加到 VPC。
要了解如何优化 Lambda 的成本和/或性能,有 2 个工具:
1.众所周知的AWS Lambda Power Tuning
2.AWS 计算优化器
借助 Lambda Power Tuning 工具,通过执行 50 次并行执行的 Forwarder Lambda,我得到以下结果:

我们可以看到 512 mb 的内存是该 Lambda 的最佳内存,平均执行时间为 9 毫秒。
AWS Api 网关
这里 AWS Api Gateway 需要是公共的并且具有 AWS Lambda 集成。所以可以使用 2 种类型的 Api Gateway:
-
REST API
-
HTTP API
让我们看看如何在两种类型的 Api Gateway 之间进行选择。
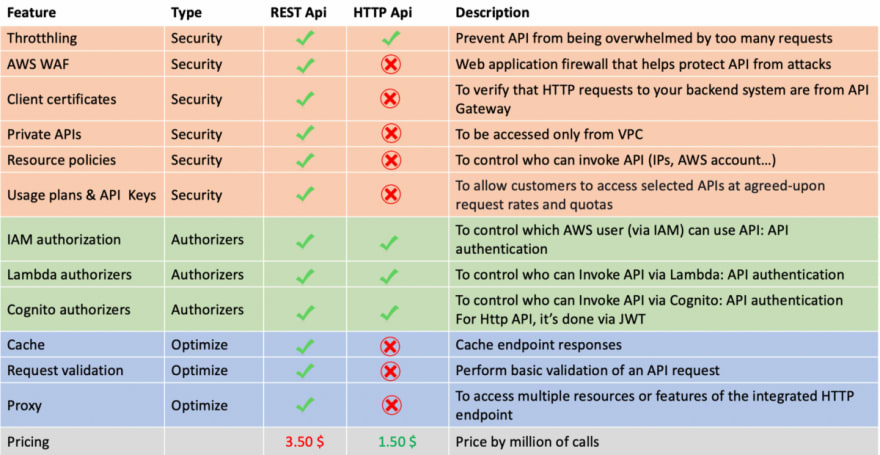
所以在这里,我们可以看到 REST Api 确实比 HTTP Api 具有更多的功能,尤其是在安全性和优化方面。
关于定价,了解以下内容也非常重要:
请求不会因授权和身份验证失败而收费。
当 API 密钥丢失或无效时,对需要 API 密钥的方法的调用不收费。
当请求速率或突发速率超过预配置的限制时,API 网关限制的请求不会收费。
当速率限制或配额超过预先配置的限制时,不会对使用计划限制的请求收费。
更多信息在这里。
在选择 REST Api 或 HTTP Api 之前要了解的另一件重要事情是注意安全性,尤其是云中最常见的攻击:
-
拒绝服务 (DoS) 和分布式拒绝服务 (DDoS) 攻击
-
拒绝钱包(DoW)攻击
Denial-of-Wallet (DoW)漏洞利用类似于传统的拒绝服务 (DoS) 攻击,因为两者都是以造成破坏为目的的。
然而,虽然 DoS 攻击旨在迫使目标服务下线,但 DoW 试图给受害者造成经济损失。
而且我们还可以看到,每个人都担心 DoW 或通常成本在云中失控,而不仅仅是大公司:存在多个示例,例如这个或最近这个。
推荐
根据上述所有信息,我的建议是在无法对 API 调用进行身份验证时使用 REST Api。
如果可以对 API 调用进行身份验证并且定价问题是一个重要的考虑因素,则可以使用 HTTP api。
因此,在示例 1 中,应该使用 REST api,因为无法对来自 Github 的调用进行身份验证。在示例 2 中,如果前端 API 调用经过身份验证,则可以使用 HTTP Api,否则应使用 REST Api。
备注:与 REST Api 相比,HTTP Api 是相当新的。有些功能是可能的,但部署起来很复杂。例如,尚不支持使用无服务器框架限制。
部署
为了部署堆栈,我决定使用无服务器框架。
如果你不了解 Serverless Framework,我让你看文档。
我的 serverless.yml 看起来像这样:
service: serverless-proxy

plugins:
  - serverless-python-requirements
  - serverless-prune-plugin

custom:
  url: http://myurl:80 #to be replaced by backend url
  vpcId: vpc-123456 #to be replaced by vpc id
  subnetIds: [ subnet-123, subnet-456, subnet-789 ] #to be replaced by subnet ids
  pythonRequirements: #serverless-python-requirements configuration
    dockerizePip: true
  prune: #serverless-prune-plugin configuration: 3 versions are kept
    automatic: true
    number: 3

#Create security group
resources:
  Resources:
    SecurityGroup:
      Type: AWS::EC2::SecurityGroup
      Properties:
        GroupDescription: SG for Serverless Proxy forwarder
        VpcId: ${self:custom.vpcId}
        SecurityGroupEgress:
          - IpProtocol: tcp
            FromPort: 80
            ToPort: 80
            CidrIp: 0.0.0.0/0
          - IpProtocol: tcp
            FromPort: 443
            ToPort: 443
            CidrIp: 0.0.0.0/0
        Tags:
          - Key: Name
            Value: serverless-proxy-sg

provider:
  name: aws
  runtime: python3.8
  region: eu-west-1 #to be changed by your AWS function

functions:
  serverless-proxy:
    handler: handler.main
    name: serverless-proxy
    description: Lambda Forwarder function
    memorySize: 512
    environment:
      URL: ${self:custom.url}
    vpc:
      securityGroupIds:
        - Ref: SecurityGroup
      subnetIds: ${self:custom.subnetIds}
    events:
      - http:
          path: forward
          method: get
      - http:
          path: forward
          method: head
      - http:
          path: forward
          method: post
      - http:
          path: forward
          method: put
进入全屏模式 退出全屏模式
使用了 2 个无服务器插件:
-
serverless-python-requirements:自动从 requirements.txt 捆绑 Python 依赖项
-
serverless-prune-plugin:自动清除以前版本的 AWS Lambda
“requirements.txt”看起来像这样:
urllib3==1.25.8
进入全屏模式 退出全屏模式
在部署堆栈之前需要更新 3 个参数:
-
url:使用正确的后端服务 url
-
vpc Id:部署后端服务的 vpc id
-
subnetIds:后端服务部署位置的子网 ID
“resources”部分用于创建新的安全组,我们将在安全部分中详细了解这一点。
关于“功能”部分:
根据 AWS Lambda Power Tuning,* memorySize 为 512mb
-
url 在“环境”部分的环境变量中传递
-
Lambda 在“vpc”部分附加到 vpc
在“事件”中,我们这里有一个带有 4 条路由 /forward 的 REST Api:GET、HEAD、POST 和 PUT。如果你想要另一个 HTTP 动词,只需在此处添加一个新路由。
如果您想用 HTTP Api 替换 REST Api,您只需替换:
events:
  - http:
      path: forward
      method: get
  - http:
      path: forward
      method: head
  - http:
      path: forward
      method: post
  - http:
      path: forward
      method: put
进入全屏模式 退出全屏模式
经过:
- httpApi:
    path: /forward
    method: get
- httpApi:
    path: /forward
    method: head
- httpApi:
    path: /forward
    method: post
- httpApi:
    path: /forward
    method: put
进入全屏模式 退出全屏模式
一切就绪后,只需执行以下命令即可部署堆栈:
sls deploy
进入全屏模式 退出全屏模式
安全
拉姆达
为了保护 Lambda 免受拒绝服务或拒绝钱包等安全攻击,重要的是:
-
保护安全组
-
为函数设置一个好的超时
安全组
对于安全组,只需要打开后端路由的 Egress 端口。并且只需要打开特定的 IP(或 CIDR 块)。 无需打开 Ingress 规则。
示例:如果您的后端路由在端口 80 和 IP:172.0.0.10,安全组需要如下:
[ ](https://res.cloudinary.com/practicaldev/image/fetch/s--fgSbh4kj--/c_limit%2Cf_auto%2Cfl_progressive%2Cq_auto%2Cw_880/https://dev- to-uploads.s3.amazonaws.com/i/i0r8zyc58kslm9vdk13b.png)
这给出了“serverless.yml”
resources:
  Resources:
    SecurityGroup:
      Type: AWS::EC2::SecurityGroup
      Properties:
        GroupDescription: SG for Serverless Proxy forwarder
        VpcId: ${self:custom.vpcId}
        SecurityGroupEgress:
          - IpProtocol: tcp
            FromPort: 80
            ToPort: 80
            CidrIp: 172.0.0.10/32
        Tags:
          - Key: Name
            Value: serverless-proxy-sg
进入全屏模式 退出全屏模式
暂停
关于超时,重要的是设置一个好的超时来保护成本。提醒一下,Lambda 函数的定价取决于内存和执行时间。最短超时为 1 秒,最长为 900 秒。
我的建议是将超时设置为平均执行时间的 3 倍,平均执行时间为 9 毫秒,所以在这里,我们需要将超时设置为最小 1 秒。
它提供“serverless.yml”
memorySize: 512
timeout: 1
进入全屏模式 退出全屏模式
API 网关
与 Lambda 一样,需要保护 Api Gateway 免受安全攻击。更重要的是,这里的 Api Gateway 是公开的。
所以我们需要确保:
-
节流已启用并由端点设置为正确的值
-
尽可能启用身份验证
-
使用计划和api key已启用
-
资源策略
节流
要更准确地了解节流的工作原理,请查看此文档。
要使用无服务器框架在 REST Api 上启用节流,我们需要安装一个新插件:
plugins:
  - serverless-api-gateway-throttling
进入全屏模式 退出全屏模式
在此之后,有两种方法,首先您在阶段级别设置限制,它将应用于所有端点:
custom:
  apiGatewayThrottling:
    maxRequestsPerSecond: 100
    maxConcurrentRequests: 50
进入全屏模式 退出全屏模式
否则,您可以直接在端点级别设置限制:
events:
  - http:
      path: forward
      method: get
      throttling:
        maxRequestsPerSecond: 100
        maxConcurrentRequests: 50
进入全屏模式 退出全屏模式
对于 HTTP Api,可以设置节流阀,但不能使用无服务器框架。
备注:设置适合您的用例的限制很重要。
验证
身份验证是保护 HTTP Api 或 REST Api 的好方法,并且可以通过不同的方式来实现。我不会在本文中详细介绍我们如何管理身份验证,但它可以成为以后的一篇非常好的文章。
使用计划和Api Key
保护 Api 的一个好方法是提供 Api Key。
为此,需要向 Api 提供一个 Api Key,并且在每次调用后需要有一个标头名称“x-api-key”,更多信息此处为。完成后,可以通过端点指定使用计划来限制允许的调用次数。
在无服务器框架中,可以借助插件serverless-add-api-key以这种方式:
plugins:
  - serverless-add-api-key
进入全屏模式 退出全屏模式
要指定键,让 AWS 自动设置值并在阶段级别指定使用计划:
custom:
  apiKeys:
  - name: secret
    usagePlan:
      name: "global-plan"
      quota:
        limit: 1000
        period: DAY
      throttle:
        burstLimit: 100
        rateLimit: 50
进入全屏模式 退出全屏模式
最后,通过以下方式在所有端点上要求 Api Key 很重要:
events:
  - http:
      path: forward
      method: get
      private: true
  - http:
      path: forward
      method: head
      private: true
  - http:
      path: forward
      method: post
      private: true
  - http:
      path: forward
      method: put
      private: true
进入全屏模式 退出全屏模式
完成后,要调用 api,您需要执行以下操作:
curl -X GET https://ep.execute-api.eu-west-1.amazonaws.com/stage/forward -H "x-api-key: my-generate-key"
进入全屏模式 退出全屏模式
备注:此功能仅适用于 REST Api,不适用于 HTTP Api。使用 Github 示例 1 无法轻松做到这一点,因为使用 Github Webhook 无法添加密钥“x-api-key”...... Lambda 授权方可以做到这一点,但要复杂得多。
资源政策
资源策略是保护 REST Api 的好方法,例如通过限制对特定 IP 或 CIDR 块的调用。
在使用 Github Webhook 的示例 1 中,这是一种将调用仅限于 Github 挂钩 CIDR 块的好方法。 Github hooks CIDR 块在此处公开可用。因此,在以下策略的帮助下,只有 Github IP 能够调用我的 REST Api。
{
    "Version": "2012-10-17",
    "Statement": [
        {
            "Effect": "Deny",
            "Principal": "*",
            "Action": "execute-api:Invoke",
            "Resource": "execute-api:/*",
            "Condition": {
                "NotIpAddress": {
                    "aws:SourceIp": [
                        "192.30.252.0/22",
                        "185.199.108.0/22",
                        "140.82.112.0/20"
                    ]
                }
            }
        },
        {
            "Effect": "Allow",
            "Principal": "*",
            "Action": "execute-api:Invoke",
            "Resource": "execute-api:/*",
            "Condition": {
                "IpAddress": {
                    "aws:SourceIp": [
                        "192.30.252.0/22",
                        "185.199.108.0/22",
                        "140.82.112.0/20"
                    ]
                }
            }
        }
    ]
}
进入全屏模式 退出全屏模式
如果我们对无服务器框架做同样的事情:
provider:
  name: aws
  runtime: python3.8
  region: eu-west-1
  resourcePolicy:
    - Effect: Deny
      Principal: "*"
      Action: execute-api:Invoke
      Resource:
        - execute-api:/*/*/forward
      Condition:
        NotIpAddress:
          aws:SourceIp:
            - 192.30.252.0/22
            - 185.199.108.0/22
            - 140.82.112.0/20
    - Effect: Allow
      Principal: "*"
      Action: execute-api:Invoke
      Resource:
        - execute-api:/*/*/forward
      Condition:
        IpAddress:
          aws:SourceIp:
            - 192.30.252.0/22
            - 185.199.108.0/22
            - 140.82.112.0/20
进入全屏模式 退出全屏模式
备注:此功能仅适用于 REST Api,不适用于 HTTP Api。
有了上面所有的安全保护,serverless.yml 看起来像:
service: serverless-proxy

plugins:
  - serverless-python-requirements
  - serverless-prune-plugin
  - serverless-api-gateway-throttling
  - serverless-add-api-key

custom:
  url: http://myurl:80 #to be replaced by backend url
  vpcId: vpc-123456 #to be replaced by vpc id
  subnetIds: [ subnet-123, subnet-456, subnet-789 ] #to be replaced by subnet ids
  pythonRequirements: #serverless-python-requirements configuration
    dockerizePip: true
  prune: #serverless-prune-plugin configuration: 3 versions are kept
    automatic: true
    number: 3
  apiGatewayThrottling:
    maxRequestsPerSecond: 100
    maxConcurrentRequests: 50
  apiKeys:
    - name: secret
      usagePlan:
        name: "global-plan"
        quota:
          limit: 1000
          period: DAY
        throttle:
          burstLimit: 100
          rateLimit: 50

resources:
  Resources:
    SecurityGroup:
      Type: AWS::EC2::SecurityGroup
      Properties:
        GroupDescription: SG for Serverless Proxy forwarder
        VpcId: ${self:custom.vpcId}
        SecurityGroupEgress:
          - IpProtocol: tcp
            FromPort: 80
            ToPort: 80
            CidrIp: 0.0.0.0/0
          - IpProtocol: tcp
            FromPort: 443
            ToPort: 443
            CidrIp: 0.0.0.0/0
        Tags:
          - Key: Name
            Value: serverless-proxy-sg

provider:
  name: aws
  runtime: python3.8
  region: eu-west-1
  resourcePolicy:
    - Effect: Deny
      Principal: "*"
      Action: execute-api:Invoke
      Resource:
        - execute-api:/*/*/forward
      Condition:
        NotIpAddress:
          aws:SourceIp:
            - 192.30.252.0/22
            - 185.199.108.0/22
            - 140.82.112.0/20
    - Effect: Allow
      Principal: "*"
      Action: execute-api:Invoke
      Resource:
        - execute-api:/*/*/forward
      Condition:
        IpAddress:
          aws:SourceIp:
            - 192.30.252.0/22
            - 185.199.108.0/22
            - 140.82.112.0/20

functions:
  serverless-proxy:
    handler: handler.main
    name: serverless-proxy
    description: Lambda Forwarder function
    memorySize: 512
    timeout: 1
    environment:
      URL: ${self:custom.url}
    vpc:
      securityGroupIds:
        - Ref: SecurityGroup
      subnetIds: ${self:custom.subnetIds}
    events:
      - http:
          path: forward
          method: get
          private: true
      - http:
          path: forward
          method: head
          private: true
      - http:
          path: forward
          method: post
          private: true
      - http:
          path: forward
          method: put
          private: true
      #- httpApi:
      #    path: /forward
      #    method: get
      #- httpApi:
      #    path: /forward
      #    method: head
      #- httpApi:
      #    path: /forward
      #    method: post
      #- httpApi:
      #    path: /forward
      #    method: put
进入全屏模式 退出全屏模式
走得更远
如果在您的 EC2 实例前面,您有一个网络负载均衡器 (NLB) 或一个应用程序负载均衡器 (ALB),则可以在没有 Lambda 的情况下集成它。
这是可能的,因为:
-
HTTP Api可以通过NLB和ALB与私有API集成
-
REST Api 可以通过 NLB only 与私有 API 集成
例如,在 EC2 实例前面带有 NLB 的示例 1 给出:
[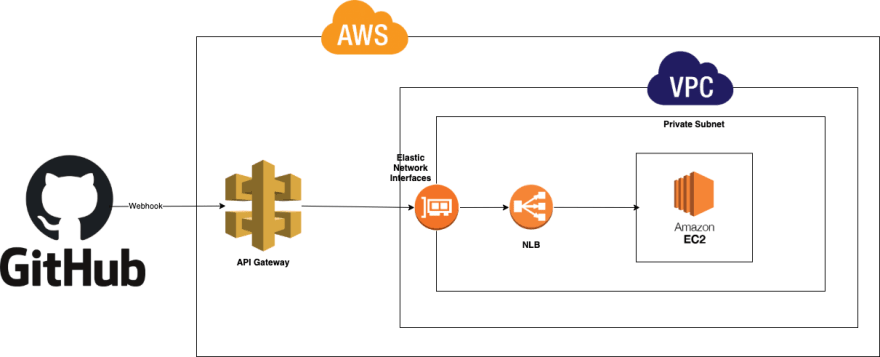 ](https://res.cloudinary.com/practicaldev/image/fetch/s--Y2ADGsW4--/c_limit%2Cf_auto%2Cfl_progressive%2Cq_auto%2Cw_880/https://dev- to-uploads.s3.amazonaws.com/i/9rj0clwuhs2evwwzyct1.png)
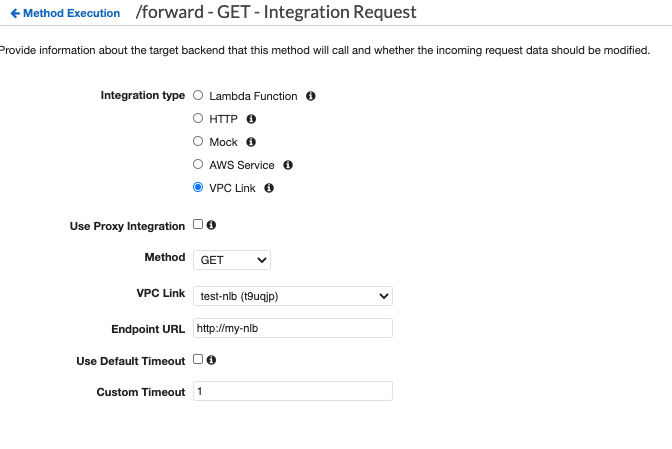
为此,您应该:
-
在 API Gateway 中创建 VPC 链接
-
将方法执行从 Lambda 更改为 VPC Link
[ ](https://res.cloudinary.com/practicaldev/image/fetch/s--ITRW97qo--/c_limit%2Cf_auto%2Cfl_progressive%2Cq_auto%2Cw_880/https://dev -to-uploads.s3.amazonaws.com/i/1ltyaex004y1yc033odk.png)
更多信息在这里。
评论:
-
关于 REST Api 和 HTTP Api 之间的选择,我有与上述相同的建议
-
上面列出的所有安全内容都适用于 API 网关
-
这个解决方案更简单但也不太可定制
结论
该解决方案相对容易实施、高度可扩展、安全且不昂贵。当我们在公共区域和私有区域之间出现通信问题时,可以部署它。
您可以在我的 github 帐户中找到解决方案的实现。

云原生社区为您提供最前沿的新闻资讯和知识内容
更多推荐


 0
0 0
0- 0


 已为社区贡献35528条内容

所有评论(0)