如何在 Docker 中运行 Selenium 测试?
自动化测试和持续集成 (CI) 是开发和测试活动的组成部分。 Selenium 测试自动化就是这样一种方法,有助于对 Web 产品进行端到端测试。使用Selenium 框架执行测试的不太受欢迎的方法包括安装所需的 Web 浏览器及其相应的浏览器驱动程序。在这篇博客中,我们深入探讨了如何在 Docker 中运行 Selenium 测试,以加速 Selenium 测试自动化活动。

Docker简介
对于 Selenium 自动化测试,重要的是在一个执行环境中运行的测试不会妨碍在另一个测试环境中运行的测试的执行。因此,自动化测试应该单独运行,而 Docker 有助于实现这一“基本”要求。
在 Docker 容器中运行 Selenium 测试有助于执行代码审查(以更快的速度),从而实现更好的代码质量,获得高测试覆盖率,并开发出质量上乘的产品。 Docker 提供了在容器中执行测试或隔离开发和部署中的测试的灵活性。使用 Selenium 和 Docker 进行 Web 应用程序测试的原因有很多。
什么是 Docker?
Docker 是一个开源容器化平台,可以使用容器以安全的方式轻松创建、部署和运行应用程序。 Docker 在操作系统 (OS) 级别提供虚拟化。 Docker 中的所有软件部分都组织在容器中。
默认情况下,Docker 具有最强的隔离能力,应用程序在相关容器中安全可靠地运行。此外,Docker 在主机上作为离散进程运行。除了在运行 Windows、Mac 或 Linux 的本地机器上运行 Docker 的灵活性之外,它还可以在 AWS、Azure 等云基础设施上运行。
Docker 映像
本质上,Docker 映像包含将应用程序作为容器运行所需的一切。 Docker 镜像包括以下内容:
-
代码
-
库
-
运行时变量
-
系统工具
-
设置
-
配置文件
-
环境变量等
对应的镜像可以作为 Docker 容器部署到任何 Docker 环境中,并且可以进一步促进在 Docker 容器中运行 Selenium 测试。
Docker 中的容器
Docker 中的容器是一个独立的软件单元,它打包代码和所有必需的依赖项,以便应用程序可以更快、更可靠地从一个计算环境运行到另一个计算环境。
由于 Docker 容器镜像是一个独立的、轻量级的、可执行的软件包,使用它很容易安装和运行相关的软件(和服务)。要运行容器,您无需启动来宾操作系统。
安装的 Docker 容器也可以与不同的用户共享,以便他们可以使用 Container 镜像快速开始实际工作。可用于基于 Windows 和 Linux 的应用程序的容器化软件与底层基础设施无关。许多开源无服务器框架也利用了 Docker 容器技术提供的优势。
集装箱对比虚拟机
容器化通常与虚拟机进行比较,但两者之间存在明显差异。
[ ](https://res.cloudinary.com/practicaldev/image/fetch/s--95bKJYe0--/c_limit%2Cf_auto%2Cfl_progressive%2Cq_auto%2Cw_880/https://www.lambdatest. com/blog/wp-content/uploads/2021/03/Virtual-Machines-1024x500.png)
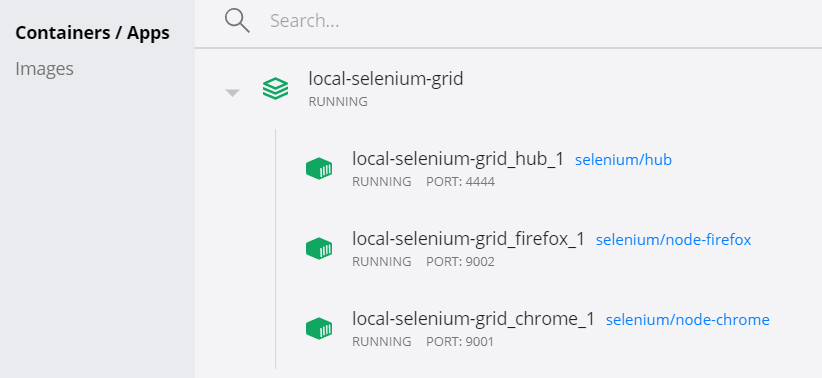
Docker 运行在主机操作系统(例如 Windows、Linux 等)上,Docker 容器包含库、配置文件等依赖项。这也包括应用程序本身。 Docker 容器是轻量级的,因为它们不包含任何客户操作系统。下面显示的是一个 Docker 容器,它由 Selenium Hub 和 Firefox & Chrome 节点组成。
[ ](https://res.cloudinary.com/practicaldev/image/fetch/s--F0c3IBql--/c_limit%2Cf_auto%2Cfl_progressive%2Cq_auto%2Cw_880/https://www.lambdatest. com/blog/wp-content/uploads/2021/03/Chrome-nodes.png)
另一方面,虚拟机拥有自己的客户操作系统,并运行主要负责运行 VM 的 Hypervisor。 Docker 也有 Hyper-V 后端,但建议使用 WSL(适用于 Linux 的 Windows 子系统)以获得更好的性能。由于虚拟机有自己的客户操作系统,虚拟机的大小要大得多,并且需要更多的资源来运行虚拟机。
如何在 Windows 上安装和设置 Docker
在 Docker 容器中运行 Selenium 测试之前,我们需要在 Windows 上安装和设置 Docker。在 Docker 容器中运行 Selenium 测试的先决条件是在主机上安装 Docker。在我们的例子中,我们将在 Windows 机器上安装 Docker。首先,您必须下载 DockerDesktop for Windows– Docker for Microsoft Windows 的社区版本。
适用于 Windows 10 的 Docker 桌面是本机 Windows 应用程序,它提供了一个易于使用的开发环境,用于构建、运行和交付 dockerized 应用程序。它支持 Linux 和基于 Windows 的容器。在我们的演示中,我们将使用基于 Linux 的容器。
双击“Docker for Windows Installer”运行安装程序。安装非常简单。
[ ](https://res.cloudinary.com/practicaldev/image/fetch/s--GldS5Ki2--/c_limit%2Cf_auto%2Cfl_progressive%2Cq_auto%2Cw_880/https://www.lambdatest .com/blog/wp-content/uploads/2021/03/Docker-for-Windows.png)
适用于 Windows 的 Docker 需要 WSL 2(适用于 Linux 的 Windows 子系统)支持。选择启用 Hyper-V Windows 功能和安装 WSL 2 所需的 Windows 组件的必要选项。
[ ](https://res.cloudinary.com/practicaldev/image/fetch/s--eGzG5J3O--/c_limit%2Cf_auto%2Cfl_progressive%2Cq_auto%2Cw_880/https://www.lambdatest .com/blog/wp-content/uploads/2021/03/Docker-for-Window.png)
安装成功后,您会收到以下消息。

在 Windows 10 上安装 Docker 时的常见问题和解决方案
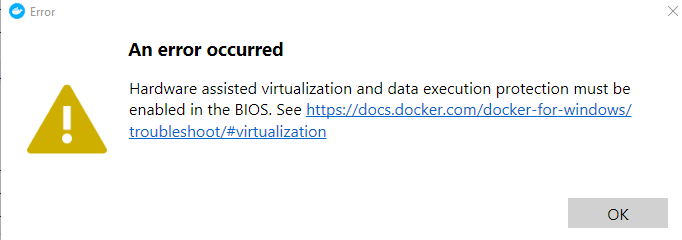
在 Docker 容器中运行 Selenium 测试之前,您可能会在启动 Docker 时遇到一些与在 BIOS 中启用 Hyper-V 和数据执行保护相关的问题。
- Hyper-V 和数据执行保护
[ ](https://res.cloudinary.com/practicaldev/image/fetch/s--Zuu1P2E3--/c_limit%2Cf_auto%2Cfl_progressive%2Cq_auto%2Cw_880/https:// www.lambdatest.com/blog/wp-content/uploads/2021/03/Hyper-V-and-Data-Execution.png)
应该首先在 BIOS 中启用对硬件辅助虚拟化的支持。这组步骤会因制造商而异,但进入 BIOS 并启用虚拟化应该会为您解决问题。重新启动系统后,打开任务管理器中的性能选项卡,您会看到机器中启用了虚拟化。

根据机器配置,您可以在终端上(以管理员身份)运行以下两个命令之一,以在主机上启用 Hyper-V 支持和数据执行保护:
dism.exe /Online /Enable-Feature:Microsoft-Hyper-V /All
进入全屏模式 退出全屏模式
bcdedit /set hypervisorlaunchtype auto
进入全屏模式 退出全屏模式
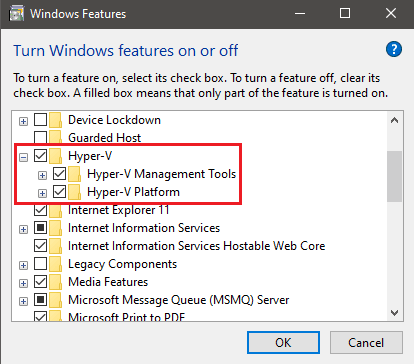
重新启动系统以应用更改。在某些情况下,您需要从“Windows 功能”启用 Hyper-V。为此,请导航至“控制面板”🡪“程序和功能”🡪“打开或关闭 Windows 功能”并启用这些项目– Hyper-V 和 Windows Hypervisor 平台。
[ ](https://res.cloudinary.com/practicaldev/image/fetch/s--d8KTUhd2--/c_limit%2Cf_auto%2Cfl_progressive%2Cq_auto%2Cw_880/https://www.lambdatest. com/blog/wp-content/uploads/2021/03/Windows-Feature.png)

重新启动机器以使更改生效。现在,如果主机上安装了 WSL 2,Docker 实例应该会成功启动。
- 未安装 WSL 2
虽然我们已经在主机上启用了 Hyper-V,但还是建议使用带有 Docker 的 WSL 2 而不是 Hyper-V。 WSL 2 提供比 Hyper-V 后端更好的性能。如果您在 Docker 设置中启用了 WSL 2 支持,但机器上未安装 WSL 2,您将看到“未安装 WSL 2”错误。
[ ](https://res.cloudinary.com/practicaldev/image/fetch/s--unJwGmrc--/c_limit%2Cf_auto%2Cfl_progressive%2Cq_auto%2Cw_880/https://www .lambdatest.com/blog/wp-content/uploads/2021/03/WSL-2-is-not-installed.png)
在 Control 的 Windows 功能部分中启用“Windows Subsystem for Linux”选项。
[ ](https://res.cloudinary.com/practicaldev/image/fetch/s--nhMubfXd--/c_limit%2Cf_auto%2Cfl_progressive%2Cq_auto%2Cw_880/https://www.lambdatest. com/blog/wp-content/uploads/2021/03/Windows-Subsystem.png)
如 Windows 10 的 WSL 安装指南中所述,首先,我们必须为 Linux 启用 Windows 子系统。这可以通过在终端上运行以下命令来完成(作为管理员):
dism.exe /online /enable-feature /featurename:Microsoft-Windows-Subsystem-Linux /all /norestart
进入全屏模式 退出全屏模式
在安装 WSL 2 之前,您可能需要虚拟机功能(这是一个可选步骤)。
dism.exe /online /enable-feature /featurename:VirtualMachinePlatform /all /norestart
进入全屏模式 退出全屏模式
下载x64机器](https://wslstorestorage.blob.core.windows.net/wslblob/wsl_update_x64.msi)的[WSL2 Linux内核更新包,安装到宿主机上。使用以下命令将 WSL 2 设置为默认版本:
wsl --set-default-version 2
进入全屏模式 退出全屏模式
重新启动机器以使更改生效。有了这个,你就可以使用带有 WSL 2 后端的 Docker 桌面了。在 Docker 桌面设置中,启用“使用基于 WSL 2 的引擎”选项,以便使用 WSL 2 而不是 Hyper-V 后端。
[ ](https://res.cloudinary.com/practicaldev/image/fetch/s--4hvH6HKu--/c_limit%2Cf_auto%2Cfl_progressive%2Cq_auto%2Cw_880/https://www.lambdatest. com/blog/wp-content/uploads/2021/03/Docker-Desktop-1024x371.png)
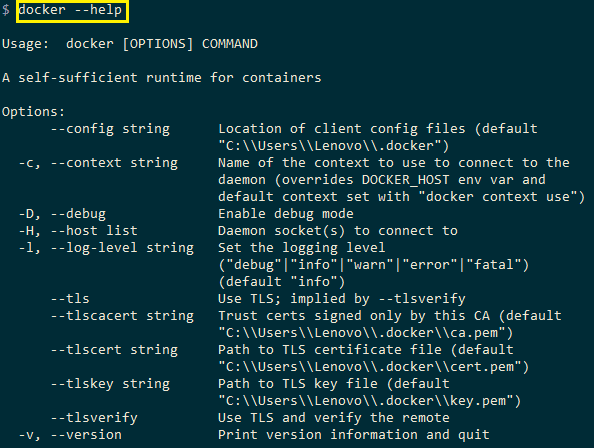
运行命令 docker –version 来检查 Docker 是否安装以及实例是否已经开始运行:
[ ](https://res.cloudinary.com/practicaldev/image/fetch/s--NuFslfzQ--/c_limit%2Cf_auto%2Cfl_progressive%2Cq_auto%2Cw_880/https://www.lambdatest .com/blog/wp-content/uploads/2021/03/docker-%25E2%2580%2593version.png)
为什么使用 Selenium 和 Docker 进行 Web 应用程序测试
在本关于如何在 Docker 中运行 Selenium 测试的教程中,我们将看到使 Selenium 与 Docker 成为 Web 应用程序测试的理想组合的一些主要优势:
- 可扩展且可靠
在正常的 Selenium Grid 设置中,配置包括将多个 VM(虚拟机)托管为“节点”并将“节点”连接到单个“集线器”。设置 Selenium Grid 时,您必须下载 Selenium Server jar (使用 Selenium 3) 并在用于设置 Grid 的机器上运行相同的程序。除此之外,浏览器及其各自的浏览器驱动程序应该在充当 Selenium 节点的 VM(或机器)上可用。
这种方法既不可扩展也不可靠,因为基础设施需要持续维护和升级,以确保从测试的角度来看它是可用的。此外,运行 Selenium Grid 会增加不必要的计算开销。
用于跨浏览器测试与 Selenium 的 Docker 映像在单个映像中包含多个节点。此外,Docker 镜像共享某些系统资源,因此与虚拟机相比,资源利用率更低。
- 测试本地托管站点
Docker 容器可以选择访问本地开发站点。如果您使用的是 Windows 或 Linux,则在运行 Docker 容器时使用选项 –host 有助于测试本地托管的站点。
- 更少的安装开销
将 Selenium 与 Docker 一起使用时,无需在主机上安装必要的浏览器和浏览器驱动程序。总体而言,使用预制的 Docker 容器开始使用 Selenium web自动化测试比安装和设置 Selenium Grid 要快得多。您可以将其称为“最少的安装和最大的收益”!
可以通过在终端上运行一些命令来使用 Docker Hub 上的一系列 Docker 映像(使用 Selenium)。 Docker Hub 上的一些镜像是由 Selenium HQ 开发和维护的。
以下是 Docker Hub 上可用并用于 Web 自动化测试的广泛类别的图像:
-
独立: 可以在 Selenium 服务器上运行的独立镜像(Chrome、Firefox 等)。这些镜像应该在不同的端口(例如 4444、4445 等)上运行,否则会导致端口冲突。
-
Hub: Selenium Hub 与 Docker 所起的作用与普通 Selenium Grid 的作用相同。在 Docker 术语中,Hub 是一种基于云的服务,可让您创建映像并对其进行测试。
-
Node: 类似于 Selenium 术语中的 Nodes,Node 容器可以与 Hub 映像一起启动。例如,Firefox 和 Chrome 节点容器可以使用 Selenium Hub 映像启动。
最重要的是,基础镜像用于构建您自己的镜像。稍后在博客中,我们将演示如何使用独立容器和容器网格在 Docker 中运行 selenium 测试。
- 提高安全性
Docker 安全且可移植,并且 Dockers 容器在隔离环境中运行。与本地 Selenium Grid 相比,使用 Docker 容器可以更安全地执行 Selenium 测试。
为了提高可扩展性,Docker 上的 Selenium 测试可以是:
- 出现差异的可能性较小
安装的 Docker 容器可以与其他用户共享,无论底层环境如何,行为都保持不变。例如,在 Widows 容器上进行的测试可以在基于 Linux 的容器上无缝运行。
于是,全队
成员可以使用相同的容器,而与使用的操作系统无关。
- **不再担心 Selenium Crash **
如果您是本地 Selenium Grid,那么很有可能目睹 Selenium 崩溃。这可能很烦人,唯一的解决方案是重新启动网格,以便所需的节点可以连接到网格。
使用 Docker 容器,您可以不用担心崩溃,因为它只是丢弃旧实例并在需要时启动新的 Selenium 实例。停止和启动同一个 Docker 容器(由 Selenium Hub 和节点组成)相当容易,只需几秒钟即可为 Selenium Web 自动化测试进行设置。
- **使用 Selenium 4 的 Docker **
Selenium 4仍处于Alpha阶段,受到了Selenium社区和用户的极大关注。除了 WebDriver W3C 协议、相对定位器的引入、改进的 Selenium Grid 和有用的 Selenium IDE 等大规模改进之外,Selenium 4 还支持 Docker。
Selenium 4 的Docker 映像Grid Server 让您可以使用 Chrome/Firefox/Opera 启动独立容器。为了设置和配置集线器和节点,Selenium 4 提供了多种方式来运行 Docker 映像并创建集线器和节点网络。
[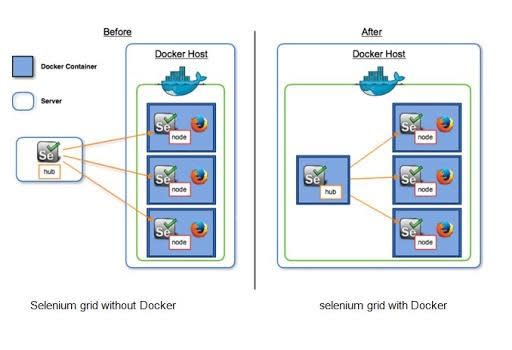 的 Docker 映像](https://res.cloudinary.com/practicaldev/image/fetch/s--zxOekRFg--/c_limit%2Cf_auto%2Cfl_progressive%2Cq_auto%2Cw_880/https://www .lambdatest.com/blog/wp-content/uploads/2021/03/Docker-images-for-Selenium-4.jpg)
总而言之,与传统的 Selenium Grid 设置相比,Docker Selenium 管理与 Selenium Web 自动化测试相关的任务相对容易。
在 Docker 中创建 Selenium 测试
现在 Docker 已经配置成功,我们来看看如何在 Docker 中运行 Selenium 测试。与普通的 Selenium Grid 一样,使用 Docker 配置 Selenium Grid 包括在容器中安装 Selenium Hub 和所需的浏览器节点。
使用 Selenium Docker 容器可以通过多种方式运行 Selenium 测试。 Selenium 可以在独立(或单个)Docker 容器上运行,也可以在由多个容器组成的网格上运行。
测试场景
使用 Docker 演示 Selenium 测试自动化时使用了相同的测试场景。测试在“方法”级别并行执行。
测试组 - 1 [测试组 - “搜索”]
测试场景 - 1(浏览器:Chrome)
-
去谷歌。
-
搜索“LambdaTest”。
-
点击第一个测试结果。
-
如果页面标题与预期标题不匹配,则断言。
测试场景 - 2(浏览器:Chrome)
-
去必应。
-
搜索“LambdaTest 博客”。
-
点击第一个测试结果。
-
如果页面标题与预期标题不匹配,则断言。
测试组 - 2 [测试组 - “ToDo”]
测试场景 - 1(浏览器:火狐)
1.转到https://lambdatest.github.io/sample-todo-app/
-
将前两项(li1 和 li2)标记为完成。
-
将一个新项目“在 LambdaTest 进行快乐测试”添加到 ToDo 列表。
-
断言新项目是否未添加到列表中。
测试场景——2(浏览器:火狐)
1.转到https://lambdatest.github.io/sample-todo-app/
- 将前三项(li1、li2 和 li3)标记为 Done
使用 Selenium Docker 运行测试时,您有以下选项:
-
使用单个(或独立)容器启动跨浏览器测试。
-
使用容器网格启动跨浏览器测试。
-
使用 Zalenium - 一个可扩展且灵活的基于容器的 Selenium 网格,提供视频录制、实时预览、仪表板等功能。您可以利用 Zalenium 的产品在LambdaTest提供的基于云的 Selenium Grid 上运行 Selenium 测试。
我们将在后续部分中更详细地介绍这些方法中的每一种。
在独立容器中运行 Selenium
在这份“如何在 Docker 中运行 Selenium 测试”指南中,我们使用单个容器来启动所有测试。首先,我们必须首先从Docker Hub中提取所需的图像。由于我们想在 Chrome 和 Firefox 浏览器上执行测试,我们下载了 Chrome 和 Firefox Container 镜像。
以管理员身份在终端(命令提示符或 PowerShell)上运行以下命令:
图片
命令
独立镀铬
码头工人拉硒/独立铬
独立火狐
码头工人拉硒/独立火狐
为standalone-chrome 和standalone-firefox 运行 docker pull 命令会下载最新版本的 Chrome 和 Firefox 容器镜像。
独立 Chrome(最新)
docker pull selenium/standalone-chrome
进入全屏模式 退出全屏模式
[ ](https://res.cloudinary.com/practicaldev/image/fetch/s--YdQRJW7k--/c_limit%2Cf_auto%2Cfl_progressive%2Cq_auto%2Cw_880/https://www.lambdatest. com/blog/wp-content/uploads/2021/03/Standalone-Chrome.png)
独立火狐(最新)
docker pull selenium/standalone-firefox
进入全屏模式 退出全屏模式
[ ](https://res.cloudinary.com/practicaldev/image/fetch/s--BjW2DZj_--/c_limit%2Cf_auto%2Cfl_progressive%2Cq_auto%2Cw_880/https://www.lambdatest. com/blog/wp-content/uploads/2021/03/Standalone-Firefox.png)
您还可以通过导航到 Docker Hub 并搜索所需的映像来下载特定版本的容器映像。例如,命令 docker pull selenium/standalone-chrome:87.0 将下载 Chrome 容器的 87.0 版本。

下载图像后,运行命令 docker images 以验证下载是否成功。如下所示,我们看到最新版本的 Chrome 和 Firefox 容器可供使用:

连接到 WebDriver 的默认端口是 4444,Chrome 和 Firefox 容器将暴露于 4444 端口。由于我们要针对 Chrome 和 Firefox 浏览器运行 Selenium 测试,我们将端口 4445 用于 Chrome 容器,将 4446 用于火狐容器。
运行暴露在端口号 4445 上的容器以连接到 Chrome WebDriver:
docker run -d -p 4445:4444 -v /dev/shm:/dev/shm selenium/standalone-chrome
进入全屏模式 退出全屏模式
运行暴露在端口号 4446 上的容器以连接到 Firefox WebDriver:
docker run -d -p 4446:4444 -v /dev/shm:/dev/shm selenium/standalone-firefox
进入全屏模式 退出全屏模式
如下图所示,Chrome 和 Firefox docker 容器启动成功:

在 Windows PowerShell 上运行 docker ps 命令显示 Chrome 和 Firefox Docker 容器已准备好使用:


现在我们必须配置远程 WebDriver URL:
铬容器
public static String remote_url_chrome = "http://localhost:4445/wd/hub";
ChromeOptions options = new ChromeOptions();
driver.set(new RemoteWebDriver(new URL(remote_url_chrome), options));
进入全屏模式 退出全屏模式
火狐容器
public static String remote_url_firefox = "http://localhost:4446/wd/hub";
FirefoxOptions options = new FirefoxOptions();
driver.set(new RemoteWebDriver(new URL(remote_url_firefox), options));
进入全屏模式 退出全屏模式
现在我们已经触及了为 Chrome 和 Firefox 启动单个 Docker 容器的基本要素,让我们来看看完整的实现。
执行
package org.testnggroup;

import java.net.MalformedURLException;
import java.net.URL;
import org.openqa.selenium.WebDriver;
import org.openqa.selenium.chrome.ChromeOptions;
import org.openqa.selenium.edge.EdgeOptions;
import org.openqa.selenium.firefox.FirefoxDriver;
import org.openqa.selenium.firefox.FirefoxOptions;
import org.openqa.selenium.remote.DesiredCapabilities;
import org.openqa.selenium.remote.RemoteWebDriver;
import org.openqa.selenium.safari.SafariOptions;

public class Helper {
    protected static ThreadLocal<RemoteWebDriver> driver = new ThreadLocal<>();
    public static String remote_url_chrome = "http://localhost:4445/wd/hub";
    public static String remote_url_firefox = "http://localhost:4446/wd/hub";

    public void setupThread(String browserName) throws MalformedURLException
    {
        if(browserName.equalsIgnoreCase("chrome"))
        {
            System.out.println("Inside Chrome");
            ChromeOptions options = new ChromeOptions();
            driver.set(new RemoteWebDriver(new URL(remote_url_chrome), options));
        }
        else if (browserName.equalsIgnoreCase("firefox"))
        {
            System.out.println("Inside Firefox");
            FirefoxOptions options = new FirefoxOptions();
            driver.set(new RemoteWebDriver(new URL(remote_url_firefox), options));
        }
    }

    public WebDriver getDriver()
    {
        return driver.get();
    }

    public void tearDownDriver()
    {
        getDriver().quit();
    }
}
进入全屏模式 退出全屏模式
根据从 testng.xml 传递的参数“环境”,测试在 Chrome 或 Firefox 浏览器上运行。
由于 Chrome 容器位于http://localhost:4445/wd/hub上,因此将远程 URL 设置为 Chrome 容器的 Remote WebDriver 实例用于在 Chrome 上运行测试。
public static String remote_url_chrome = "http://localhost:4445/wd/hub";

public void setupThread(String browserName) throws MalformedURLException
{
   if(browserName.equalsIgnoreCase("chrome"))
   {
      ChromeOptions options = new ChromeOptions();
      driver.set(new RemoteWebDriver(new URL(remote_url_chrome), options));
   }
   ......................
   ......................
}
进入全屏模式 退出全屏模式
由于 Firefox Container 在http://localhost:4446/wd/hub上,远程 URL 设置为 Firefox Container 的 Remote WebDriver 实例用于在 Firefox 上运行测试。
public static String remote_url_chrome = "http://localhost:4445/wd/hub";

public void setupThread(String browserName) throws MalformedURLException
{
   ......................
   ......................

   else if (browserName.equalsIgnoreCase("firefox"))
   {
      FirefoxOptions options = new FirefoxOptions();
      driver.set(new RemoteWebDriver(new URL(remote_url_firefox), options));
   }
进入全屏模式 退出全屏模式
package org.testnggroup;

import org.openqa.selenium.*;
import org.openqa.selenium.remote.DesiredCapabilities;
import org.openqa.selenium.remote.RemoteWebDriver;
import org.testng.Assert;
import org.testng.IExecutionListener;
import org.testng.annotations.Parameters;
import org.testng.annotations.Test;
import java.io.Console;
import java.net.MalformedURLException;
import java.net.URL;

public class TestNG_SearchGroup extends Helper implements IExecutionListener
{
    public static String status = "passed";

    @Override
    public void onExecutionStart()
    {
        System.out.println("onExecutionStart");
    }

    @Test(priority = 1, groups = {"Search"})
    @Parameters({"environment"})
    public void test_GoogleSearch(String environment) throws InterruptedException, MalformedURLException
    {
        String search_string =" LambdaTest";
        String exp_title = "Most Powerful Cross Browser Testing Tool Online | LambdaTest";

        if (environment.equalsIgnoreCase("local"))
        {
            setupThread("chrome");
        }
        WebDriver webdriver = getDriver();
        webdriver.navigate().to("https://www.google.com");
        webdriver.manage().window().maximize();
        System.out.println("Started session");

        try {
            /* Enter the search term in the Google Search Box */
            WebElement search_box = webdriver.findElement(By.xpath("//input[@name='q']"));
            search_box.sendKeys(search_string);

            search_box.submit();
            Thread.sleep(3000);

            /* Click on the first result which will open up the LambdaTest homepage */
            WebElement lt_link = webdriver.findElement(By.xpath("//span[.='LambdaTest: Most Powerful Cross Browser Testing Tool Online']"));
            lt_link.click();
            Thread.sleep(5000);

            String curr_window_title = webdriver.getTitle();
            Assert.assertEquals(curr_window_title, exp_title);
            status = "passed";
        } catch (Exception e) {
            System.out.println(e.getMessage());
        }
        if (getDriver() != null)
        {
            tearDownDriver();
        }
    }

    @Test(priority = 2, groups = {"Search"})
    @Parameters({"environment"})
    public void test_BingSearch(String environment) throws InterruptedException, MalformedURLException {
        String search_string ="LambdaTest Blog";
        String exp_title = "LambdaTest | A Cross Browser Testing Blog";

        if (environment.equalsIgnoreCase("local"))
        {
            setupThread("Chrome");
        }
        WebDriver webdriver = getDriver();
        webdriver.navigate().to("https://www.bing.com");
        webdriver.manage().window().maximize();
        System.out.println("Started session");

        try {
            /* Enter the search term in the Google Search Box */
            WebElement search_box = webdriver.findElement(By.xpath("//input[@id='sb_form_q']"));
            search_box.sendKeys(search_string + Keys.ENTER);
            Thread.sleep(3000);

            /* Click on the first result which will open up the LambdaTest homepage */
            WebElement lt_link = webdriver.findElement(By.xpath("//a[.='LambdaTest | A Cross Browser Testing Blog']"));
            lt_link.click();
            Thread.sleep(5000);

            String curr_window_title = webdriver.getTitle();
            Assert.assertEquals(curr_window_title, exp_title);
            status = "passed";
        } catch (Exception e) {
            System.out.println(e.getMessage());
        }
        if (getDriver() != null)
        {
            tearDownDriver();
        }
    }

    @Override
    public void onExecutionFinish()
    {
        System.out.println("onExecutionFinish");
    }
}
进入全屏模式 退出全屏模式
package org.testnggroup;

import org.openqa.selenium.*;
import org.testng.IExecutionListener;
import org.testng.annotations.Parameters;
import org.testng.annotations.Test;
import java.net.MalformedURLException;

public class TestNG_ToDoGroup extends Helper implements IExecutionListener {
    public static String status = "passed";

    @Override
    public void onExecutionStart()
    {
        System.out.println("onExecutionStart");
    }

    @Test(priority = 1, groups = {"ToDo"})
    @Parameters({"environment"})
    public void test_Selenium4_ToDoApp_Test1(String environment) throws InterruptedException, MalformedURLException
    {
        if (environment.equalsIgnoreCase("local"))
        {
            setupThread("Firefox");
        }
        WebDriver webdriver = getDriver();
        webdriver.navigate().to("https://lambdatest.github.io/sample-todo-app/");
        webdriver.manage().window().maximize();
        System.out.println("Started session");
        Thread.sleep(5000);

        try
        {
            /* Let's mark done first two items in the list. */
            webdriver.findElement(By.name("li1")).click();
            webdriver.findElement(By.name("li2")).click();

            /* Let's add an item in the list. */
            webdriver.findElement(By.id("sampletodotext")).sendKeys("Happy Testing at LambdaTest");
            webdriver.findElement(By.id("addbutton")).click();

            /* Let's check that the item we added is added in the list. */
            String enteredText = webdriver.findElement(By.xpath("/html/body/div/div/div/ul/li[6]/span")).getText();
            if (enteredText.equals("Happy Testing at LambdaTest")) {
                System.out.println("Demonstration is complete");
                status = "passed";
            }
        }
        catch (Exception e)
        {
            System.out.println(e.getMessage());
        }
        if (getDriver() != null)
        {
            tearDownDriver();
        }
    }

    @Test(priority = 2, groups = {"ToDo"})
    @Parameters({"environment"})
    public void test_Selenium4_ToDoApp_Test2(String environment) throws InterruptedException, MalformedURLException {
        if (environment.equalsIgnoreCase("local"))
        {
            setupThread("Firefox");
        }
        WebDriver webdriver = getDriver();
        webdriver.navigate().to("https://lambdatest.github.io/sample-todo-app/");
        webdriver.manage().window().maximize();
        System.out.println("Started session");
        Thread.sleep(5000);

        try
        {
            /* Let's mark done first three items in the list. */
            webdriver.findElement(By.name("li1")).click();
            webdriver.findElement(By.name("li2")).click();
            webdriver.findElement(By.name("li3")).click();
        }
        catch (Exception e)
        {
            System.out.println(e.getMessage());
        }
        status = "passed";
        if (getDriver() != null)
        {
            tearDownDriver();
        }
    }

    @Override
    public void onExecutionFinish()
    {
        System.out.println("onExecutionFinish");
    }
}
进入全屏模式 退出全屏模式
<?xml version="1.0" encoding="UTF-8"?>
<!DOCTYPE suite SYSTEM "http://testng.org/testng-1.0.dtd">
<suite name="TestNG Group Test" thread-count="4" parallel="methods">
    <!-- Tested in the Chrome instance -->
    <parameter name="environment" value="local"/>
    <test name="Search" verbose="2" preserve-order="true" enabled="true">
        <groups>
            <run>
                <include name = "Search"></include>
            </run>
        </groups>
        <classes>
            <class name="org.testnggroup.TestNG_SearchGroup"></class>
        </classes>
    </test>

    <!-- Tested in the Firefox instance -->
    <parameter name="environment" value="local"/>
    <test name="ToDoApp" verbose="2" preserve-order="true" enabled="true">
        <groups>
            <run>
                <include name = "ToDo"></include>
            </run>
        </groups>
        <classes>
            <class name="org.testnggroup.TestNG_ToDoGroup"></class>
        </classes>
    </test>
</suite>
进入全屏模式 退出全屏模式
执行
有了这个,我们都准备好在各自的容器中运行测试了。如容器截图所示,Chrome 浏览器(或 Chrome 驱动程序)的两个实例在 Chrome Docker 容器上实例化(在端口号 4445 上运行)
[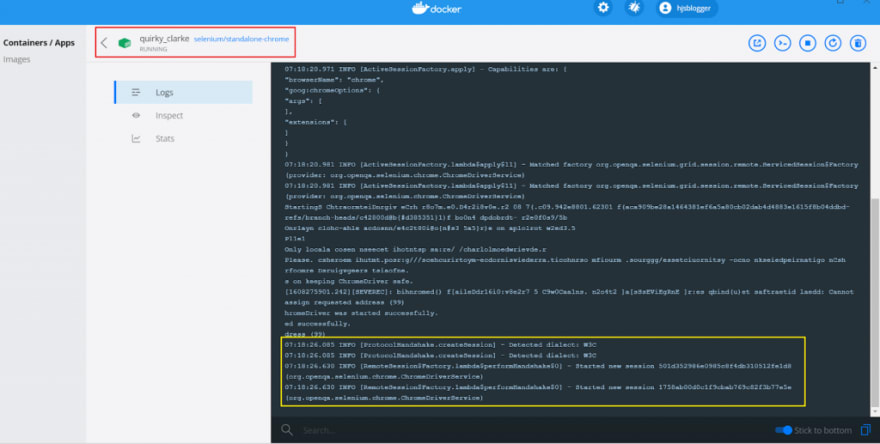 ](https://res.cloudinary.com/practicaldev/image/fetch/s--OUa56rIp--/c_limit%2Cf_auto%2Cfl_progressive%2Cq_auto%2Cw_880/https://www.lambdatest. com/blog/wp-content/uploads/2021/03/Chrome-Docker-1024x517.png)
同样,Firefox 浏览器(或 GeckoDriver)的两个实例在 Firefox Docker 容器上实例化(在端口号 4446 上运行)

由于我们没有安装未预装 VNC 的 Docker 映像,因此测试以无头方式执行。如下所示,测试执行成功:

要查看容器内发生的情况,我们需要下载Standalone-chrome-debug和Standalone-firefox-debug预装了 VNC 的映像。在独立容器中执行测试的主要缺点是可伸缩性低。因此,在独立(或单个)容器中运行 Selenium 仅适用于小型项目。
在容器网格中运行 Selenium
第一个选项带来的可伸缩性问题可以通过在容器网格中运行 Selenium 来解决。在大型项目中,您可能希望在不同的浏览器和操作系统组合上并行执行 Selenium Web 自动化测试。这是可以使用不同容器的网格来加速跨浏览器测试活动的地方。
使用这种方法,您可以获得不同浏览器(和浏览器版本)的多个实例。例如,您可以拥有“X 个 Chrome v83.0 实例、“y”个 Chrome v76.0 实例、“Z 个 Firefox 68.0 实例”,等等。可以针对各种浏览器的不同版本并行执行测试。
[ ](https://res.cloudinary.com/practicaldev/image/fetch/s--jWWKcnVL--/c_limit%2Cf_auto%2Cfl_progressive%2Cq_auto%2Cw_880/https:/ /www.lambdatest.com/blog/wp-content/uploads/2021/03/Running-Selenium-in-a-Grid-of-Containers.png)
这种方法使用 Selenium Grid 的“Hub/Node”模型。测试请求由客户端(或测试代码)发送到集线器,然后集线器将测试请求分派到最适合执行测试的节点。
为了演示如何使用容器网格在 Docker 中运行 Selenium 测试,我们使用了最适合开发环境的设置。我们将使用 Debug 变体节点或独立映像,以便我们可以使用 VNC 查看器在 Docker 中查看正在运行的测试。
默认情况下,调试映像在端口号 5900 上启动 VNC 服务器。但是,可以将默认端口重新映射到当前未使用的任何外部端口。
拉取所需的 Docker 镜像
Grid 是多个 Docker 镜像的组合,在我们使用 Hub 和 Nodes 之前应该先拉取这些镜像。
图片
命令
硒集线器
码头工人拉硒/集线器
铬节点
docker pull selenium/node-chrome-debug
火狐节点
docker pull selenium/node-firefox-debug
默认情况下,会下载最新版本的 Container 镜像。下图是 Chrome 和 Firefox 的 Hub 镜像和调试镜像拉取成功的截图。
[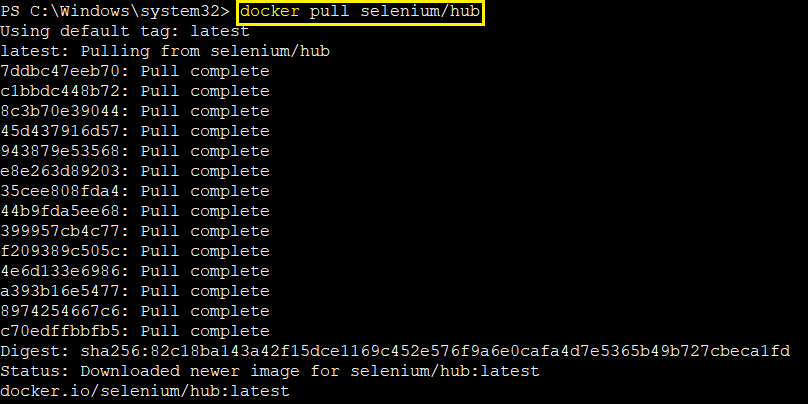 ](https://res.cloudinary.com/practicaldev/image/fetch/s--ByNnQDl5--/c_limit%2Cf_auto%2Cfl_progressive%2Cq_auto%2Cw_880/https://www.lambdatest. com/blog/wp-content/uploads/2021/03/Container-images.png)

[ ](https://res.cloudinary.com/practicaldev/image/fetch/s---tEbaqfe--/c_limit%2Cf_auto%2Cfl_progressive%2Cq_auto%2Cw_880/https://www.lambdatest.com /blog/wp-content/uploads/2021/03/image29.png)

运行命令 docker images 确保所有镜像都拉取成功。
[ ](https://res.cloudinary.com/practicaldev/image/fetch/s---MmQLo2I---/c_limit%2Cf_auto%2Cfl_progressive%2Cq_auto%2Cw_880/https://www.lambdatest.com /blog/wp-content/uploads/2021/03/image22.png)
安装了 Chrome 和 Firefox 的网格节点必须连接到 Grid Hub。现在我们有了所需的图像,我们可以按照以下方法之一在容器网格中运行 Selenium:
-
触发 docker run 命令一次运行并启动一个容器。
-
使用docker-compose(或Compose)定义和运行多容器Docker应用并配置应用服务。
在第一种方法中,我们手动运行所需的命令来启动 Selenium Hub 并将所需的浏览器节点(或图像)连接到 Hub。这种方法最适合少量测试,因为必须使用必要的命令手动启动集线器和节点。
在 docker-compose(或 Compose)中,您使用 YAML 文件来配置应用程序服务。使用单个命令,您可以灵活地从配置中创建和启动所有服务。使用 Compose 的另一个好处是它可以在一系列环境中工作,例如登台、生产、开发、测试和 CI 工作流。
如何使用Docker run启动Docker容器
在这里,我们使用 docker run 命令来启动下载的 Selenium 镜像。 Hub 启动后,我们将 Chrome 和 Firefox 节点连接到 Hub,以便可以在其上执行 Selenium Web 自动化测试。
以下是 docker run 命令的语法:
docker run [OPTIONS] IMAGE[:TAG|@DIGEST] [COMMAND] [ARG...]
进入全屏模式 退出全屏模式
docker run 命令应该强制指定一个镜像来派生容器。让我们使用 docker run 命令启动 Hub 并将节点附加到它。
运行 Selenium Hub
提取所需的 Docker 映像后,我们在 Docker 中启动 Selenium Hub。我们使用以下命令启动 Selenium Hub:
docker run -d -P -p "4444:4444" --name selenium-hub selenium/hub
进入全屏模式 退出全屏模式
在这里,我们告诉 Docker 使用名为“selenium/hub”的映像执行一个容器。该映像被标记为“selenium-hub”,它充当映像的标识符。
要公开一个端口,我们使用以下格式:
[ip]:host_port:container_port
进入全屏模式 退出全屏模式
[ip] 字段用于定义源,默认为 0.0.0.0(如果未定义 ip)。 –publish list(或 –p)选项将容器的端口发布到主机。 –publish-all(或 –P)选项将所有公开的端口发布到随机端口。
在这里,外部世界可以访问主机_端口 4444(4444:4444 中的第一次出现)。您可以通过导航到 URL:http://localhost:4444/grid/console来监视在所述端口上运行的 Grid 的状态。
我们通过在终端上运行命令 docker ps –a 来验证 Selenium Hub 容器是否已启动。

将浏览器链接到 Selenium Hub
–link 标志采用以下形式:
--link <name or id>:alias
进入全屏模式 退出全屏模式
其中“name”是需要链接的容器的名称,“alias”是链接名称的别名。
随着 Selenium Hub 的启动和运行,我们现在通过在终端上运行以下命令来启动 Chrome 和 Firefox 节点:
Chrome(调试)节点
docker run -d -P -p 5900:5900 --link selenium-hub:hub selenium/node-chrome-debug
进入全屏模式 退出全屏模式
Firefox(调试)节点
docker run -d -P -p 5901:5900 --link selenium-hub:hub selenium/node-firefox-debug
进入全屏模式 退出全屏模式
在我们的例子中,selenium-hub (-link selenium-hub : hub ) 是我们要链接的容器,而 hub 是容器的别名 (-link selenium-hub : hub )。

执行上述命令后,Chrome 和 Firefox 节点镜像将连接(或链接)到名为 selenium-hub 的 Container。我们使用 docker ps –a 命令验证浏览器容器是否正在运行。
要检查 Selenium Hub(或服务器)是否正在运行以及 Chrome 和 Firefox 节点是否已连接到集线器,请运行命令 docker logs <Selenium Hub ContainerId>。
[ ](https://res.cloudinary.com/practicaldev/image/fetch/s--_IP-zMfH--/c_limit%2Cf_auto%2Cfl_progressive%2Cq_auto%2Cw_880/https://www.lambdatest. com/blog/wp-content/uploads/2021/03/image47-1024x506.png)
或者,URLhttp://localhost:4444/grid/console将显示 Selenium 集线器的状态以及连接到集线器的节点。如果您在不同的端口上运行 Selenium Hub 容器,请在 URL 中使用该端口号而不是 4444。

如何使用 Docker Compose 使用 Selenium Grid 运行测试
手动触发 docker run 命令以在 Docker 中运行 Selenium 测试非常适合必须在 Hub 映像上执行的测试数量较少的场景。浏览器(和相应版本)组合的数量越多,使用 docker run 命令管理起来就越困难。
通过 docker-compose(或 Compose)配置 Grid 相对容易,因为 Grid 是多个 docker 镜像的组合。使用 Compose 分为三个步骤:
-
使用 Dockerfile 定义应用程序的环境,以便可以在任何地方复制它。
-
在 YAML 文件(例如 docker-compose.yml)中定义构成应用程序的必要服务,以便它可以在隔离环境中运行。
-
运行命令 docker-compose –f .\ up –d 以便 compose 启动并运行完整的应用程序。
这是用于在 Chrome 和 Firefox 浏览器上运行相应测试场景的 Compose 文件 (docker-compose.yml)。
version: "3.9"
services:

  hub:
    image: selenium/hub
    ports:
      - "4444:4444"

    environment:
      GRID_MAX_SESSION: 16
      GRID_BROWSER_TIMEOUT: 3000
      GRID_TIMEOUT: 3000

  chrome:
    image: selenium/node-chrome-debug
    container_name: web-chrome
    depends_on:
      - hub
    environment:
      HUB_PORT_4444_TCP_ADDR: hub
      HUB_PORT_4444_TCP_PORT: 4444
      NODE_MAX_SESSION: 4
      NODE_MAX_INSTANCES: 4
    volumes:
      - /dev/shm:/dev/shm
    ports:
      - "5900:5900"
    links:
      - hub

  firefox:
    image: selenium/node-firefox-debug
    container_name: web-firefox
    depends_on:
      - hub
    environment:
      HUB_PORT_4444_TCP_ADDR: hub
      HUB_PORT_4444_TCP_PORT: 4444
      NODE_MAX_SESSION: 2
      NODE_MAX_INSTANCES: 2
    volumes:
      - /dev/shm:/dev/shm
    ports:
      - "5901:5900"
    links:
      - hub
进入全屏模式 退出全屏模式
以下是用于运行测试的 Docker Compose 文件的概述:
-
version – docker-compose 文件的最新版本。
-
服务(或容器)– 此部分包含正在使用的映像列表及其配置(例如,实例的最大数量、容器名称、主机端口和容器端口等)。
-
image – 用于启动容器的镜像。 Selenium Hub 以容器镜像 selenium/hub 启动。使用图像 selenium/node-chrome-debug 启动名为 web-chrome 的容器。同样,使用图像 selenium/node-firefox-debug 启动名为 web-firefox 的容器。
-
ports – 以 Host:Container 格式发布的端口。
-
volumes – 主机路径以 Host:Container 格式挂载到服务。
-
depends_on – 这表示容器的依赖顺序。在我们的例子中,Firefox 和 Chrome 图像应该仅在 Hub 启动后启动。因此,对于 selenium/node-chrome-debug 和 selenium/node-firefox-debug 容器,depends_on 设置为 hub(即 selenium/hub 容器)。
-
links – 需要链接的容器。它类似于前面讨论过的 –link 命令中使用的标志。
-
环境 – 这些由跨容器映像使用的环境变量组成。环境变量 HUB_PORT_4444_TCP_PORT 表示 Hub 暴露的容器端口号(即 4444)。
-
NODE_MAX_INSTANCES – 这表示在任何给定时刻可以实例化的浏览器实例的最大数量。我们将最大节点实例(chrome-debug 和 firefox-debug)设置为两个,这意味着最多两个 Chrome 实例和两个 firefox 实例可以并行运行。
-
NODE_MAX_SESSION – 此环境变量表示可以并行运行多少个浏览器(任何浏览器和版本)。例如,如果 NODE_MAX_INSTANCES 设置为 4 并且 NODE_MAX_SESSION 设置为 2,您可以在最大并行化级别上运行具有 4 个 Chrome(或 Firefox)实例的 Chrome 节点(或 Firefox 节点) 2(在 NODE_MAX_SESSION 中设置)。
运行命令时的 docker-compose YML 文件 (docker-compose.yml) 会启动一个 Hub 容器 (selenium/hub) 和两个节点服务 - selenium/node-chrome-debug 和 selenium/node-firefox-debug。 Node 服务的容器名称(或别名)分别是 web-chrome 和 web-firefox。我们通过在终端上触发以下命令来启动 Hub 和 Nodes:
docker-compose -f /path/to/docker-compose.yml up -d
进入全屏模式 退出全屏模式
docker-compose up 中的 –d(或 –detach)选项在后台运行容器并打印容器名称。此选项在您想要启动在后台运行的容器并让它们保持运行的情况下很有用,从而消除了每次您想要启动容器时触发 docker-compose 文件的麻烦。

[ ](https://res.cloudinary.com/practicaldev/image/fetch/s--SsSSC-Tz--/c_limit%2Cf_auto%2Cfl_progressive%2Cq_auto%2Cw_880/https://www.lambdatest. com/blog/wp-content/uploads/2021/03/image32.png)
我们使用 docker ps -a 命令检查 Selenium Hub 容器和 Chrome 和 Firefox 节点是否旋转:

由于 Selenium Hub 容器从端口 4444 开始,我们使用相同的 URLhttp://localhost:4444/grid/console来检查 Hub 和连接到它的节点的状态。

执行
使用 Docker Compose 在 Selenium Grid 上运行测试的实现类似于“在独立容器中运行 Selenium”一节中演示的实现。唯一的区别是测试现在将在包含调试版本的 Chrome 和火狐图片。
Grid 配置为在端口 4444 上运行,测试请求根据测试所需的浏览器在相应的 Docker (Chrome/Firefox) 中执行。因此,更改仅涉及远程 URL 设置为http://localhost:4444/wd/hub的 Helper.java。
package org.testnggroup;

import java.net.MalformedURLException;
import java.net.URL;
import org.openqa.selenium.WebDriver;
import org.openqa.selenium.chrome.ChromeOptions;
import org.openqa.selenium.edge.EdgeOptions;
import org.openqa.selenium.firefox.FirefoxDriver;
import org.openqa.selenium.firefox.FirefoxOptions;
import org.openqa.selenium.remote.DesiredCapabilities;
import org.openqa.selenium.remote.RemoteWebDriver;
import org.openqa.selenium.safari.SafariOptions;

public class Helper {
    protected static ThreadLocal<RemoteWebDriver> driver = new ThreadLocal<>();
    public static String remote_url = "http://localhost:4444/wd/hub";

    public void setupThread(String browserName) throws MalformedURLException
    {
        if(browserName.equalsIgnoreCase("chrome"))
        {
            ChromeOptions options = new ChromeOptions();
            driver.set(new RemoteWebDriver(new URL(remote_url), options));
        }
        else if (browserName.equalsIgnoreCase("firefox"))
        {
            FirefoxOptions options = new FirefoxOptions();
            driver.set(new RemoteWebDriver(new URL(remote_url), options));
        }
    }

    public WebDriver getDriver()
    {
        return driver.get();
    }

    public void tearDownDriver()
    {
        getDriver().quit();
    }
}
进入全屏模式 退出全屏模式
如上一节所述,其余的实现保持不变。
执行
如上所示,您可以使用 Docker 运行命令或 Docker Compose (docker-compose) 运行测试,这反过来会旋转所需的容器。在这两种情况下:
-
Selenium Hub 容器 – 它在 4444 端口旋转(如 4444 : 4444 所示)。浏览器超时和网格超时设置为 3000 秒。在任何给定时间,Hub 都可以处理 16 个并发会话(或测试)。
-
Node Containers – selenium/node-chrome-debug 和 selenium/node-firefox-debug 容器分别在端口 5900 和 5901 旋转。这些端口对外部世界可见,同样可用于使用 VNC 查看器(或 VNC 客户端)捕获测试状态。
从执行快照中可以看出,测试在 Selenium Grid 上成功运行。 Chrome(以及 Firefox)的两个实例显示为灰色(或禁用),表明在 Chrome(和 Firefox)上运行的测试是并行执行的。


由于 testng.xml 中的 Parallel 属性设置为 Methods,所以所有带有@test注解的方法都是并行执行的。

使用 RealVNC 查看器调试 Docker 容器
使用 Node 或独立映像的调试变体的主要优点是 VNC 服务器已预安装在这些映像中。默认情况下,调试镜像中的 VNC Server 从端口号 5900 开始。因此,这些镜像可用于调试在相应容器中运行的测试。
总的来说,它可以帮助您了解 Docker 容器内部发生的事情。
下载RealVNC查看器
第一步是下载 real-vnc(或 VNC Viewer)以安装在主机上。在我们的例子中,主机操作系统是 Windows 10,所以我们下载了VNC Viewer for Windows。
拉取节点的调试镜像
我们需要各个节点的调试映像(即selenium/node-chrome-debug和selenium/node-firefox-debug)。
作为在容器网格中运行 Selenium 部分下演示的一部分,我们已经提取了 Chrome 和 Firefox 节点的调试变体。拉取节点的调试映像后,您必须启动映像的 Docker 容器。我们在如何使用 Docker Compose 使用 Selenium Grid 运行测试部分下的演示中启动了 Docker 容器。
我们通过在终端触发 docker ps -a 命令来验证 Hub 和 Nodes 是否启动成功:
[ ](https://res.cloudinary.com/practicaldev/image/fetch/s--S-jQniq2--/c_limit%2Cf_auto%2Cfl_progressive%2Cq_auto%2Cw_880/https://www.lambdatest. com/blog/wp-content/uploads/2021/03/image37.png)
如命令截图所示,各个节点的端口号如下:
图片
集装箱港口编号
硒/节点铬调试
5900
硒/节点火狐调试
5901
要使用 RealVNC 查看器查看各个节点上发生的情况,必须将 VNC 服务器设置为以下内容:
图片
集装箱港口编号
VNC 服务器设置
硒/节点铬调试
5900
0.0.0:5900(或本地主机:5900)
硒/节点火狐调试
5901
0.0.0:5901(或本地主机:5901)
下一步是在安装在主机上的 Real VNC Viewer 中配置相应的 VNC Server 值。
启动 VNC 查看器以监控测试
按照下面提到的步骤检查容器内发生的情况,以便您可以监控 Selenium Web 自动化测试的状态:
1.通过运行以下命令获取VNC服务器暴露的端口:
docker port <Container Name | Container Id> 5900
进入全屏模式 退出全屏模式
在我们的例子中,节点 web-chrome 的 ID 是 7ee5a430ff46。可以通过运行以下任一命令来获取端口 5900:
docker port 7ee5a430ff46 5900
进入全屏模式 退出全屏模式

docker port 7ee5a430ff46 5900
进入全屏模式 退出全屏模式

-
在 Real VNC Viewer 中,通过导航到文件 🡪 创建新连接来创建新连接。
-
使用前面显示的设置创建两个连接,用于监控节点上运行的测试——selenium/node-chrome-debug 和 selenium/node-firefox-debug。
[ ](https://res.cloudinary.com/practicaldev/image/fetch/s--Y50T-GZk--/c_limit%2Cf_auto%2Cfl_progressive%2Cq_auto%2Cw_880/https://www.lambdatest。 com/blog/wp-content/uploads/2021/03/image54-1024x696.png)

-
打开我们在步骤 (2) 中创建的连接。
-
当提示输入密码时,输入密码作为密码。单击记住密码,这样您就不必每次打开连接时都输入密码。

- 现在 Selenium WebDriver Container 和 VNC Server 正在运行,您可以在 VNC Server 上的各个浏览器中看到正在运行的测试。
[ ](https://res.cloudinary.com/practicaldev/image/fetch/s--w3uPob3m--/c_limit%2Cf_auto%2Cfl_progressive%2Cq_auto%2Cw_880/https://www.lambdatest. com/blog/wp-content/uploads/2021/03/lambdatest-blogs.png)
[ ](https://res.cloudinary.com/practicaldev/image/fetch/s--dYdbH8Io--/c_limit%2Cf_auto%2Cfl_progressive%2Cq_auto%2Cw_880/https://www.lambdatest. com/blog/wp-content/uploads/2021/03/lambdatest-blogs-1.png)
[ ](https://res.cloudinary.com/practicaldev/image/fetch/s--tWyJOmD---/c_limit%2Cf_auto%2Cfl_progressive%2Cq_auto%2Cw_880/https://www.lambdatest.com /blog/wp-content/uploads/2021/03/image46.png)

VNC 服务器对于调试和检查容器内发生的事情很有用。主要要求是使用各个映像的调试变体,因为这些映像已预先安装了 VNC 服务器。
使用 Docker 在 LambdaTest 上运行 Selenium 测试
在这篇关于如何在 Docker 中运行 Selenium 测试的指南中,我们已经看到将 Selenium Grid 与 Docker 集成是很容易的。但是,通过将基于云的 Selenium Grid(如 LambdaTest)与 Docker 集成,可以进一步增强 Selenium Grid 和 Docker 提供的功能。 Zalenium 是一种基于开源 Docker 的 Selenium Grid 框架,可以实现这种集成。 Zalenium 提供有用的功能,如视频录制、实时预览、仪表板和基本身份验证。
Zalenium 是什么?
Zalenium 是一种基于 Docker 的开源解决方案,无需维护内部 Selenium Grid。 Zalenium 通过在云上提供基于 Docker 的 Selenium Grid 来实现这一点,该网格会自动使用最新的浏览器和浏览器版本进行更新。
与 Selenium 所需的功能类似,Zalenium 还提供了用于在测试自动化套件中定义所需功能的功能。 Zalenium 还允许您对本地托管页面执行自动化测试。但是,这种方法的缺点是只能在本地机器上安装的浏览器上执行自动浏览器测试。
Zalenium的主要特点
基于docker-selenium的解决方案可用于在内部 Selenium Grid 上运行测试,以及将测试重定向到 LambdaTest 提供的基于云的 Selenium Grid。
以下是 Zalenium 提供的主要功能:
-
用于分析 Selenium 脚本执行日志的直观仪表板。
-
Selenium Grid 上 Selenium 脚本执行的实时预览。

- 用于在首选屏幕分辨率和时区上运行跨浏览器测试和响应测试的自定义功能。

-
Selenium 测试的录制视频有助于审查和调试过程。
-
云上的 Zalenium Grid 带有基本身份验证,从而在访问 Grid 时提供基本的安全性。
如何将 LambdaTest 与 Zalenium Docker 一起使用
LambdaTest 与Zalenium Docker集成后,可用于跨 2,000 多个浏览器和浏览器版本对本地托管页面执行自动浏览器测试。
以下是使用 LambdaTest docker 的先决条件:
- 确保您已准备好 Zalenium docker 设置。要设置 Zalenium Docker,请拉取以下图像 - Docker-Selenium (elgalu/selenium) 和 Zalenium (dosel/zalenium)。在终端上运行以下命令(以管理员身份):
docker pull elgalu/selenium

docker pull dosel/zalenium
进入全屏模式 退出全屏模式
- 以下是以下图片的下载截图:


-
您需要 LambdaTest 上的工作(或有效)帐户。请记下LambdaTest Profile Page中的用户名和访问密钥。
-
通过在 Cygwin(在 Windows 上)上运行以下命令来设置必要的环境变量(LT_USERNAME 和 LT_ACCESS_KEY):
export LT_USERNAME=<lt_username>

export LT_ACCESS_KEY=<lt_access_key>
进入全屏模式 退出全屏模式
这是在 Cygwin 上运行时的执行屏幕截图:

- 现在我们已经下载了必要的 docker 镜像,下一步就是将 LambdaTest 环境变量指定到 Zalenium Docker 中。
将 Zalenium Docker 与 LambdaTest Selenium Grid 一起使用时,您可以选择使用 LambdaTest 隧道。要配置 LambdaTest 隧道,请下载 UnderPass 并将其安装在本地计算机上。从UnderPass开始隧道如下图:

- 将 LambdaTest 环境变量声明到必须执行自动浏览器测试的相应 Zalenium Docker 中:
docker run --rm -ti --name zalenium -p 4444:4444 \
-e LT_USERNAME -e LT_ACCESS_KEY -e https://hub.lambdatest.com/wd/hub \
-v /c/Test_Videos:/home/seluser/videos \
-v /var/run/docker.sock:/var/run/docker.sock \
--privileged dosel/zalenium start --lambdaTestEnabled true --startTunnel true
进入全屏模式 退出全屏模式
让我们弄清楚测试中每个参数的含义:
-
映像zalenium(即dosel/zalenium)在端口4444启动。
-
我们在上一步中声明的环境变量用于访问 LambdaTest Selenium Grid [即
https://hub.lambdatest.com/wd/hub]。 -
执行视频将存储在文件夹 C:/Test_Videos 中。在运行测试之前,在所需目标中创建一个文件夹。
-
变量 lambdaTestEnabled 设置为 true,因为我们将在 LambdaTest Selenium Grid 上运行测试。
-
将 startTunnel 设置为 true 意味着将在测试中使用 LambdaTest 隧道。它不创建隧道,而只是启动隧道。
当您在 Docker 中检查“容器/应用程序”时,您会看到 Zalenium Docker 正在端口 4444 上运行。
[ ](https://res.cloudinary.com/practicaldev/image/fetch/s--NDEY5TTo--/c_limit%2Cf_auto%2Cfl_progressive%2Cq_auto%2Cw_880/https://www.lambdatest. com/blog/wp-content/uploads/2021/03/Zalenium-Docker.png)
如下所示,该节点已注册到集线器,该集线器运行在http://localhost:4444/grid/registerZalenium 和 LambdaTest 现在可以使用了。
[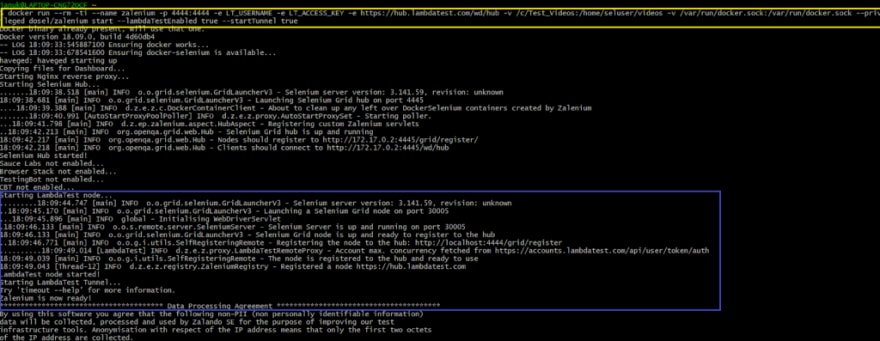 ](https://res.cloudinary.com/practicaldev/image/fetch/s--VcQ9J2G_--/c_limit%2Cf_auto%2Cfl_progressive%2Cq_auto%2Cw_880/https://www.lambdatest .com/blog/wp-content/uploads/2021/03/Zalenium-and-LambdaTest-1024x397.png)
在浏览器中输入http://localhost:4444/grid/console可以监控 Grid 的状态。
有了这个,我们都准备好使用 Zalenium Docker 在 LambdaTest Grid 上运行测试。该实现类似于用于在本地 Selenium Grid 上的 Docker 中运行 Selenium 测试的实现,只是跨浏览器请求现在由 Zalenium Docker 重定向到 LambdaTest 上基于云的 Selenium Grid。
执行
package org.testnggroup;

import java.net.MalformedURLException;
import java.net.URL;
import org.openqa.selenium.WebDriver;
import org.openqa.selenium.chrome.ChromeOptions;
import org.openqa.selenium.edge.EdgeOptions;
import org.openqa.selenium.firefox.FirefoxDriver;
import org.openqa.selenium.firefox.FirefoxOptions;
import org.openqa.selenium.remote.DesiredCapabilities;
import org.openqa.selenium.remote.RemoteWebDriver;
import org.openqa.selenium.safari.SafariOptions;

public class Helper {
    protected static ThreadLocal<RemoteWebDriver> driver = new ThreadLocal<>();
    public static String username = "user-name";
    public static String access_key = "access-key";
    public static String remote_url = "http://localhost:4444/wd/hub";

    public void setupLTCombination (String build, String name, String platformName, String browserName, String browserVersion) throws MalformedURLException
    {
        DesiredCapabilities capabilities = new DesiredCapabilities();

        capabilities.setCapability("build", build);
        capabilities.setCapability("name", name);
        capabilities.setCapability("platform", platformName);
        capabilities.setCapability("browserName", browserName);
        capabilities.setCapability("version",browserVersion);
        capabilities.setCapability("tunnel",true);

        driver.set(new RemoteWebDriver(new URL(remote_url), capabilities));
    }

    public WebDriver getDriver()
    {
        return driver.get();
    }

    public void tearDownDriver()
    {
        getDriver().quit();
    }
}
进入全屏模式 退出全屏模式
由于 Zalenium docker 映像(与 LambdaTest 集成)在端口 4444 上运行,因此测试 URL 设置为http://localhost:4444/wd/hub。
package org.testnggroup;

import org.openqa.selenium.*;
import org.openqa.selenium.remote.DesiredCapabilities;
import org.openqa.selenium.remote.RemoteWebDriver;
import org.testng.Assert;
import org.testng.IExecutionListener;
import org.testng.annotations.Parameters;
import org.testng.annotations.Test;
import java.io.Console;
import java.net.MalformedURLException;
import java.net.URL;

public class TestNG_SearchGroup extends Helper implements IExecutionListener
{
    public static String status = "passed";

    @Override
    public void onExecutionStart()
    {
        System.out.println("onExecutionStart");
    }

    @Test(priority = 1, groups = {"Search"})
    @Parameters({"environment"})
    public void test_GoogleSearch(String environment) throws InterruptedException, MalformedURLException
    {
        String search_string =" LambdaTest";
        String exp_title = "Most Powerful Cross Browser Testing Tool Online | LambdaTest";

        if (environment.equalsIgnoreCase("cloud"))
        {
            setupLTCombination("test_GoogleSearch", "test_GoogleSearch",
                    "MacOS Big sur", "Safari", "14.0");
        }
        WebDriver webdriver = getDriver();
        webdriver.navigate().to("https://www.google.com");
        webdriver.manage().window().maximize();
        System.out.println("Started session");

        try {
            /* Enter the search term in the Google Search Box */
            WebElement search_box = webdriver.findElement(By.xpath("//input[@name='q']"));
            search_box.sendKeys(search_string);

            search_box.submit();
            Thread.sleep(3000);

            /* Click on the first result which will open up the LambdaTest homepage */
            WebElement lt_link = webdriver.findElement(By.xpath("//span[.='LambdaTest: Most Powerful Cross Browser Testing Tool Online']"));
            lt_link.click();
            Thread.sleep(5000);

            String curr_window_title = webdriver.getTitle();
            Assert.assertEquals(curr_window_title, exp_title);
            status = "passed";
        } catch (Exception e) {
            System.out.println(e.getMessage());
        }
        if (getDriver() != null)
        {
            //webdriver.quit();
            tearDownDriver();
        }
    }

    @Test(priority = 2, groups = {"Search"})
    @Parameters({"environment"})
    public void test_BingSearch(String environment) throws InterruptedException, MalformedURLException {
        String search_string ="LambdaTest Blog";
        String exp_title = "LambdaTest | A Cross Browser Testing Blog";

        if (environment.equalsIgnoreCase("cloud"))
        {
            setupLTCombination("test_BingSearch", "test_BingSearch",
                    "Windows 7", "Firefox", "84.0");
        }
        WebDriver webdriver = getDriver();
        webdriver.navigate().to("https://www.bing.com");
        webdriver.manage().window().maximize();
        System.out.println("Started session");

        try {
            /* Enter the search term in the Google Search Box */
            WebElement search_box = webdriver.findElement(By.xpath("//input[@id='sb_form_q']"));
            search_box.sendKeys(search_string + Keys.ENTER);
            Thread.sleep(3000);

            /* Click on the first result which will open up the LambdaTest homepage */
            WebElement lt_link = webdriver.findElement(By.xpath("//a[.='LambdaTest | A Cross Browser Testing Blog']"));
            lt_link.click();
            Thread.sleep(5000);

            String curr_window_title = webdriver.getTitle();
            Assert.assertEquals(curr_window_title, exp_title);
            status = "passed";
        } catch (Exception e) {
            System.out.println(e.getMessage());
        }
        if (getDriver() != null)
        {
            //webdriver.quit();
            tearDownDriver();
        }
    }

    @Override
    public void onExecutionFinish()
    {
        System.out.println("onExecutionFinish");
    }
}
进入全屏模式 退出全屏模式
package org.testnggroup;

import org.openqa.selenium.*;
import org.testng.IExecutionListener;
import org.testng.annotations.Parameters;
import org.testng.annotations.Test;
import java.net.MalformedURLException;

public class TestNG_ToDoGroup extends Helper implements IExecutionListener {
    public static String status = "passed";

    @Override
    public void onExecutionStart()
    {
        System.out.println("onExecutionStart");
    }

    @Test(priority = 1, groups = {"ToDo"})
    @Parameters({"environment"})
    public void test_Selenium4_ToDoApp_Test1(String environment) throws InterruptedException, MalformedURLException
    {
        if (environment.equalsIgnoreCase("cloud"))
        {
            setupLTCombination("test_Selenium4_ToDoApp_Test1", "test_Selenium4_ToDoApp_Test1",
                    "Windows 10", "MicrosoftEdge", "87.0");
        }
        WebDriver webdriver = getDriver();
        webdriver.navigate().to("https://lambdatest.github.io/sample-todo-app/");
        webdriver.manage().window().maximize();
        System.out.println("Started session");
        Thread.sleep(5000);

        try
        {
            /* Let's mark done first two items in the list. */
            webdriver.findElement(By.name("li1")).click();
            webdriver.findElement(By.name("li2")).click();

            /* Let's add an item in the list. */
            webdriver.findElement(By.id("sampletodotext")).sendKeys("Happy Testing at LambdaTest");
            webdriver.findElement(By.id("addbutton")).click();

            /* Let's check that the item we added is added in the list. */
            String enteredText = webdriver.findElement(By.xpath("/html/body/div/div/div/ul/li[6]/span")).getText();
            if (enteredText.equals("Happy Testing at LambdaTest")) {
                System.out.println("Demonstration is complete");
                status = "passed";
            }
        }
        catch (Exception e)
        {
            System.out.println(e.getMessage());
        }
        if (getDriver() != null)
        {
            //webdriver.quit();
            tearDownDriver();
        }
    }

    @Test(priority = 2, groups = {"ToDo"})
    @Parameters({"environment"})
    public void test_Selenium4_ToDoApp_Test2(String environment) throws InterruptedException, MalformedURLException {
        if (environment.equalsIgnoreCase("cloud"))
        {
            setupLTCombination("test_Selenium4_ToDoApp_Test2", "test_Selenium4_ToDoApp_Test2",
                    "Windows 8", "Firefox", "84.0");
        }
        WebDriver webdriver = getDriver();
        webdriver.navigate().to("https://lambdatest.github.io/sample-todo-app/");
        webdriver.manage().window().maximize();
        System.out.println("Started session");
        Thread.sleep(5000);

        try
        {
            /* Let's mark done first three items in the list. */
            webdriver.findElement(By.name("li1")).click();
            webdriver.findElement(By.name("li2")).click();
            webdriver.findElement(By.name("li3")).click();
        }
        catch (Exception e)
        {
            System.out.println(e.getMessage());
        }
        status = "passed";
        if (getDriver() != null)
        {
            //webdriver.quit();
            tearDownDriver();
        }
    }

    @Override
    public void onExecutionFinish()
    {
        System.out.println("onExecutionFinish");
    }
}
进入全屏模式 退出全屏模式
<?xml version="1.0" encoding="UTF-8"?>
<!DOCTYPE suite SYSTEM "http://testng.org/testng-1.0.dtd">
<suite name="TestNG Group Test" thread-count="4" parallel="methods">
    <!-- Tested in the Chrome instance -->
    <parameter name="environment" value="cloud"/>
    <test name="Search" verbose="2" preserve-order="true" enabled="true">
        <groups>
            <run>
                <include name = "Search"></include>
            </run>
        </groups>
        <classes>
            <class name="org.testnggroup.TestNG_SearchGroup"></class>
        </classes>
    </test>

    <!-- Tested in the Firefox instance -->
    <parameter name="environment" value="cloud"/>
    <test name="ToDoApp" verbose="2" preserve-order="true" enabled="true">
        <groups>
            <run>
                <include name = "ToDo"></include>
            </run>
        </groups>
        <classes>
            <class name="org.testnggroup.TestNG_ToDoGroup"></class>
        </classes>
    </test>
</suite>
进入全屏模式 退出全屏模式
正如在 testng.xml 中看到的,一个名为“environment”的参数被传递给相应的测试。该参数设置为 Cloud 以指示 LambdaTest Selenium Grid 用于运行测试。我们不会深入研究实现,因为代码是不言自明的。
执行
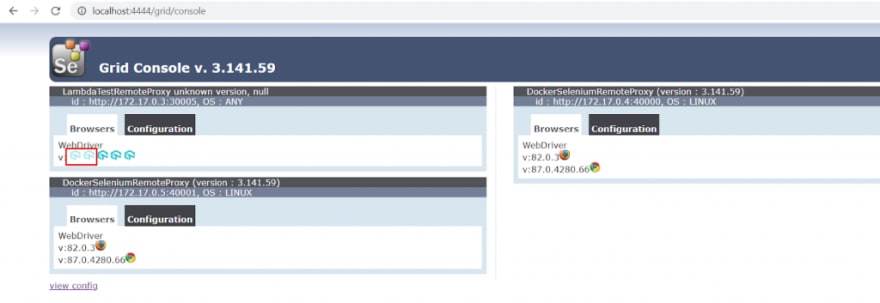
运行 TestNG 项目,通过触发 testng.xml 中的测试来展示 Zalenium Docker 与 LambdaTest 的使用。我们通过登录http://localhost:4444/grid/console来监控分配资源的状态。
由于我们正在对所有@test方法(即,parallelu003d“methods”)运行并行测试,因此单个类中的两个方法并行运行。当测试运行时,LambdaTest Grid 上的两个会话表明测试当前正在网格上运行。
[ ](https://res.cloudinary.com/practicaldev/image/fetch/s--IzUuudFz--/c_limit%2Cf_auto%2Cfl_progressive%2Cq_auto%2Cw_880/https://www.lambdatest. com/blog/wp-content/uploads/2021/03/TestNG-project-1024x353.png)
这是来自 LambdaTest 自动化仪表板的执行快照,它指示并行运行的测试的进度。
[ ](https://res.cloudinary.com/practicaldev/image/fetch/s--lVIKfAWn--/c_limit%2Cf_auto%2Cfl_progressive%2Cq_auto%2Cw_880/https://www.lambdatest. com/blog/wp-content/uploads/2021/03/Automation-Dashboard-1024x241.png)
这是从 Automation Dashboard 和 IntelliJ IDEA 获得的最终执行快照,表明测试已成功执行。


在使用 LambdaTest 设置 Zalenium docker 时,我们指定测试执行视频应存储在 C:\Test_Videos。

如下所示,执行视频位于 C:\Test_Videos。 Zalenium docker 中内置了视频录制工具,应该利用它来验证测试场景的状态。

对接

在这篇关于如何在 Docker 中运行Selenium测试的教程中,我们了解了 Docker 如何让您在容器中运行测试并隔离开发和部署中的测试。带有 Selenium 的 Docker 提供了一个轻量级的解决方案来运行 UI 测试,这也是在一个隔离的环境中。
Zalenium docker 可以与本地 Selenium Grid 一起使用,以执行自动浏览器测试。但是,当 Zalenium docker 与 LambdaTest 的基于云的 Selenium Grid 集成时,您可以大规模执行跨浏览器测试。简而言之,Docker 和 Selenium WebDriver 为执行一系列 Web 项目的自动化浏览器测试提供了理想的组合。
更多推荐
 已为社区贡献35528条内容


所有评论(0)