使用 oh-my-posh 主题自定义您的终端
[](https://res.cloudinary.com/practicaldev/image/fetch/s--ctEAs3GK--/c_limit%2Cf_auto%2Cfl_progressive%2Cq_auto%2Cw_880/https://dev- to-uploads.s3.amazonaws.com/uploads/articles/g81fo04v7pc7hgs75691.P
[ ](https://res.cloudinary.com/practicaldev/image/fetch/s--ctEAs3GK--/c_limit%2Cf_auto%2Cfl_progressive%2Cq_auto%2Cw_880/https://dev- to-uploads.s3.amazonaws.com/uploads/articles/g81fo04v7pc7hgs75691.PNG)
嘿开发人员,
今天,我将向您展示如何使用这样的测试自定义 Windows 终端。或者您可以添加自己的主题。相信我,这非常容易,任何人都可以做到。您需要了解简单的编码知识,然后您就可以开始了。如果您遇到任何问题,请在评论部分写下来。我会尽力解决你的问题。
在本教程中,我试图使其尽可能简单。我将解释您在制作终端主题时需要了解的每一个细节。
在不浪费您宝贵时间的情况下,让我们跳到教程。
按照这些简单的步骤。
Set up Powerline in PowerShell
进入全屏模式 退出全屏模式
第 1 步:使用此链接安装 windows 终端。
https://www.microsoft.com/en-us/p/windows-terminal/9n0dx20hk701?activetabu003dpivot:overviewtab
第 2 步:安装 Powerline 字体
https://www.nerdfonts.com/font-downloads
使用此链接,您将找到名为 FiraMono Nerd Font 的字体。下载并将其安装在您的系统上。
第 3 步:现在,您需要使用此链接安装 Install Git for Windows
https://git-scm.com/downloads
**第 4 步:让我们设置 Git **
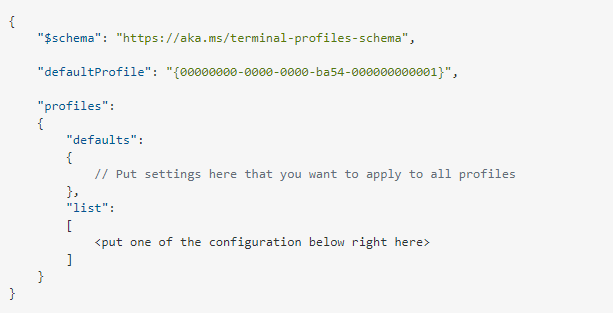
打开 windows 终端并输入 (CTRL +, ) 打开设置
您需要将以下配置文件选项之一(取决于您安装的 git 版本)附加到“列表”: settings.json 文件的部分
[ ](https://res.cloudinary.com/practicaldev/image/fetch/s--W4BEsORu--/c_limit%2Cf_auto%2Cfl_progressive%2Cq_auto%2Cw_880/https://dev-to-uploads .s3.amazonaws.com/uploads/articles/pol8ou7qjqccfdobujiw.png)
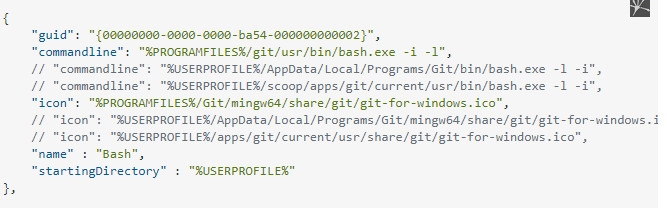
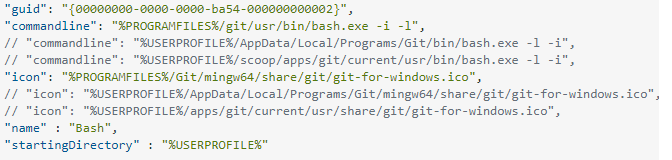
配置文件选项
如果您正在使用,请取消注释命令行和图标的正确路径:
*Git for Windows 在 %PROGRAMFILES%
*Git for Windows 在 %USERPROFILE%
*如果您使用的是独家新闻
[ ](https://res.cloudinary.com/practicaldev/image/fetch/s--lbyJEMGO--/c_limit%2Cf_auto%2Cfl_progressive%2Cq_auto%2Cw_880/https://dev-to-uploads .s3.amazonaws.com/uploads/articles/nhxesngcaj41prh5zaja.png)
[ ](https://res.cloudinary.com/practicaldev/image/fetch/s--MYWdx3hy--/c_limit%2Cf_auto%2Cfl_progressive%2Cq_auto%2Cw_880/https://dev-to-uploads .s3.amazonaws.com/uploads/articles/7so6ew5e3xlzkowo1gm3.png)
或者你可以使用我的 setting.json 文件复制粘贴
https://git.io/J3nNy。
[ ](https://res.cloudinary.com/practicaldev/image/fetch/s--DhtqZAUz--/c_limit%2Cf_auto%2Cfl_progressive%2Cq_auto%2Cw_880/https://dev- to-uploads.s3.amazonaws.com/uploads/articles/qnrnnbjwcpg982wlqw5n.PNG)
如果您喜欢 (Learn with Sumit) 终端,请粘贴此代码而不做任何更改。
第 5 步:在 Windows 终端上安装 oh my posh
https://ohmyposh.dev/
使用您的 Windows 终端,安装 Posh-Git 和 Oh-My-Posh:
Install-Module posh-git -Scope CurrentUser Install-Module oh-my-posh -Scope CurrentUser
如果您使用的是 PowerShell Core,请安装 PSReadline:
Install-Module -Name PSReadLine -Scope CurrentUser -Force -SkipPublisherCheck
Customize your PowerShell prompt
进入全屏模式 退出全屏模式
使用您的 windows 终端,导入模块 Posh-Git 和 Oh-My-Posh:
Import-Module posh-git Import-Module oh-my-posh Set-PoshPrompt -Theme hotstick.minimal
现在再粘贴一个命令
echo $profile
它会显示这个 ps1 文件路径。
"C:\Users\Shahi\OneDrive\Documents\WindowsPowerShell\Microsoft.PowerShell_profile.ps1"
然后粘贴另一个命令
notepad $profile
[ ](https://res.cloudinary.com/practicaldev/image/fetch/s--q7OUesaN--/c_limit%2Cf_auto%2Cfl_progressive%2Cq_auto%2Cw_880/https://dev-to-uploads .s3.amazonaws.com/uploads/articles/v6jgc99ug9re6iackjz9.png)
它将在这个空白处打开一个记事本。粘贴下面的代码并保存
导入模块 posh-git
导入模块 oh-my-posh
Set-PoshPrompt -Theme hotstick.minimal
第六步:设置windows终端setting.json
打开 windows 终端并输入 (CTRL +, ) 打开设置
更改这些设置
[ ](https://res.cloudinary.com/practicaldev/image/fetch/s--ca2i7I7I--/c_limit%2Cf_auto%2Cfl_progressive%2Cq_auto%2Cw_880/https://dev-to-uploads .s3.amazonaws.com/uploads/articles/v2buthgqb7cz20taswu6.png)
第七步:自定义windows终端主题JSON。
在这一步中,您需要复制粘贴我的自定义主题。
打开终端并运行
Get-PoshThemes
现在您可以看到 oh-my-posh 的所有主题列表。我们选择一个名为 hotstick.minimal.omp.json 的主题
将命令粘贴到终端。
Set-PoshPrompt -Theme hotstick.minimal
现在让我们自定义hotstick.minimal
https://git.io/J3cIq
**检查链接并下载 hotstick.minimal.omp.json
文件:**
替换此文件路径下的hotstick.minimal json文件
"C:\Program Files\WindowsPowerShell\Modules\oh-my-posh\3.134.0\themes\hotstick.minimal.omp.json"

CI/CD社区为您提供最前沿的新闻资讯和知识内容
更多推荐
 0
0 0
0- 0


 已为社区贡献22914条内容

所有评论(0)