python存储-文件操作,路径,with语句,pickle模块
目录
5>name stem suffix parent parents parts属性
1.文件操作
1.打开文件
open()
open(file_path, mode='r', encoding=None)
file_path(必需):要打开的文件路径(字符串类型),可以是绝对路径或相对路径。
mode(可选,默认’r’):指定文件的打开模式,控制读写行为及文件类型(文本/二进制)。
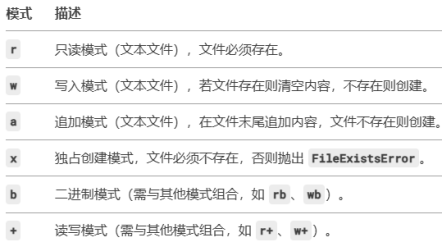
encoding(可选,默认 None):指定文件的编码格式(仅文本模式有效),如 'utf-8'、'gbk'。
# 以读取模式打开文件
file = open('example.txt', 'r', encoding='utf-8')

# 以写入模式打开文件(如果文件不存在则创建)
file = open('example.txt', 'w', encoding='utf-8')

# 以追加模式打开文件
file = open('example.txt', 'a', encoding='utf-8')

# 以二进制读取模式打开文件
file = open('example.png', 'rb')
2.读取文件
f.read()
读取整个文件
with open('example.txt', 'r', encoding='utf-8') as f:
    content = f.read()
    print(content)
逐行读取(方式1)
with open('example.txt', 'r', encoding='utf-8') as file:
    for line in file:
        print(line.strip())  # strip() 移除行末的换行符
读取所有行到列表(方式2)
with open('example.txt', 'r', encoding='utf-8') as file:
    lines = file.readlines()
    for line in lines:
        print(line.strip())
主要区别
1. 内存使用
方式1(直接迭代):一次只读取一行到内存中,内存使用效率高,适合处理大文件
方式2(readlines()):一次性将整个文件的所有行读入内存,返回一个包含所有行的列表,内存占用高
2. 性能特点
方式1:惰性读取,只有在需要时才会读取下一行,适合处理大文件或流式数据
方式2:一次性读取所有内容,对于小文件可能更快,但对于大文件可能导致内存问题
3. 适用场景
方式1:适合处理大文件、日志文件、实时数据流等内存敏感的场景
方式2:适合处理小文件,或者需要随机访问文件各行的情况
读取指定字节数
with open('F:\\test_install\\idel_install\\example.txt', 'r', encoding='utf-8') as file:
    chunk = file.read(100)  # 读取前100个字符
    print(chunk)
3.写入文件
f.write()-->返回值为写入的字符长度
f.writelines() 将多个字符串同时写入,需要自己加换行符;
写入字符串
>>> with open('F:\\test_install\\idel_install\\aa.txt', 'a', encoding='utf-8') as file:
	file.write("abc!\n")
	file.write("def")


5
3
写入多行
>>> lines=["111\n","222\n","333\n"]
>>> with open('F:\\test_install\\idel_install\\aa.txt', 'a', encoding='utf-8') as file:
	file.writelines(lines)
	file.writelines("444!\n")
	file.writelines("555\n")
4.关闭文件
with语句(推荐)
with open('example.txt', 'r', encoding='utf-8') as file:
    content = file.read()
# 文件会在 with 代码块结束后自动关闭
手动关闭文件 f.close()
文件对象关闭后,就没法操作了,想要继续操作文件,必须重新打开。
file = open('example.txt', 'r', encoding='utf-8')
try:
    content = file.read()
finally:
    file.close()  # 确保文件被关闭
5.文件操作的其他方法
#aa.txt内容
这是第一行
这是第二行

with open('F:\\test_install\\idel_install\\aa.txt', 'r+', encoding='utf-8') as file:
    # 获取当前文件指针的位置(以字节为单位)
    position = file.tell()
    print(f"Current position: {position}")

    # 移动到文件开头
    file.seek(0)

    # 读取一行
    line = file.readline()
    print(line)

    # 检查文件是否可读
    print(f"Readable: {file.readable()}")

    # 检查文件是否可写
    print(f"Writable: {file.writable()}")


Current position: 0
0
这是第一行

Readable: True
Writable: True1.file.tell(): 返回当前文件指针的位置(字节偏移量)
由于文件刚被打开,指针位置为 0(文件开头)
2.file.seek(offset[, whence])
参数说明
offset:偏移量,表示要移动的字节数,可以是正数或负数
whence(可选):参考位置,默认为 0
0:从文件开头开始计算(默认)
1:从当前位置开始计算
2:从文件末尾开始计算
返回值:返回新的文件指针位置
# 创建一个示例文件
with open('example.txt', 'w') as f:
    f.write("Hello, World!\nThis is a test file.\nPython is awesome!")

# 使用 seek() 方法
with open('example.txt', 'r') as f:
    # 移动到第 7 个字节(跳过 "Hello, ")
    f.seek(7)
    print(f.read(5))  # 输出: World

    # 移动到文件开头
    f.seek(0)
    print(f.readline())  # 输出: Hello, World!

    # 移动到文件末尾的前 10 个字节
    f.seek(-10, 2)
    print(f.read())  # 输出: awesome!

     # 移动到文件末尾并获取文件大小
    f.seek(0,2) #offset=0:表示从参考位置(文件末尾)偏移 0 个字节
"""将指针移动到文件末尾,返回新的指针位置(即从文件开头到末尾的字节数)
因此,这个返回值就是文件的大小(以字节为单位)"""3.file.readline(): 从文件中读取一行内容(包括换行符 \n)
4.file.readable(): 检查文件是否可读,返回布尔值
file.writable(): 检查文件是否可写,返回布尔值
由于文件是以 'r+' 模式打开的,两者都返回 True
2.路径
路径处理:不同系统路径分割不同,windows系统使用反斜杠,其他大多数参数系统使用斜杠来分割;
相对路径:以当前目录作为基准,进而逐级推导(.. 表示上级目录;. 当前目录)。
绝对路径:文件真正存在的路径,从根目录逐级推导到指定的文件 / 文件夹。
1.路径查询
1>cwd()
获取当前目录
>>> from pathlib import Path
>>> Path.cwd()
WindowsPath('F:/test_install/python_install')
2>创建路径对象
在Python中,使用`pathlib`模块创建路径对象时,可以使用正斜杠`/`来构建路径,这是因为`Path`对象重载了除法运算符,使得使用`/`来连接路径部分变得非常方便。而且,使用正斜杠的好处是代码可跨平台(Windows也接受正斜杠)。
注:在字符串中,反斜杠`\`在Windows系统中用作路径分隔符,但在Python字符串中反斜杠也是转义字符。
因此,如果使用反斜杠,需要注意转义(比如使用双反斜杠`\\`或原始字符串`r"..."`)。而使用正斜杠则没有这个问题。 所以,推荐使用正斜杠`/`来创建路径对象。
 方法1:使用正斜杠
 >>> from pathlib import Path
 >>> p = Path('F:/test_install/python_install')
 >>> aa = p / "hello.txt"
 >>> aa
WindowsPath('F:/test_install/python_install/hello.txt')

 方法2:使用反斜杠(不推荐,因为需要转义)
 >>> p = Path('F:\\test_install\\python_install')
 >>> aa = p / "hello.txt"
 >>> aa
WindowsPath('F:/test_install/python_install/hello.txt')

 方法3:使用原始字符串和反斜杠(仍然需要转换,不如直接用正斜杠方便)
 >>> p = Path(r'F:\test_install\python_install')
 >>> aa = p / "hello.txt"
 >>> aa
WindowsPath('F:/test_install/python_install/hello.txt')
3>is_dir() is_file()
判断一个路径是否为一个文件夹
>>> p.is_dir()
True
>>> aa.is_dir()
False

>>> p.is_file()
False

>>> aa.is_file()##文件必须存在,才为true
True
4>exists()
检测一个路径是否存在
>>> p.exists()
True
>>> aa.exists()
True
>>> Path("F:/hh").exists()
False
5>name stem suffix parent parents parts属性
name 属性获取路径的最后一个部分;
stem 属性获取文件名,suffix 属性获取文件后缀;
parent 属性获取其父级目录;
parents 属性获得逻辑祖先路径构成的不可变序列;
parts 属性将路径各个组件拆分成元组;
#name属性
>>> p.name
'python_install'
>>> aa.name
'hello.txt'

#stem suffix属性
>>> p.stem
'python_install'
>>> p.suffix
''
>>> aa.suffix
'.txt'

#parent属性
>>> p.parent
WindowsPath('F:/test_install')
>>> aa.parent
WindowsPath('F:/test_install/python_install')

#parents 属性
>>> p.parents
<WindowsPath.parents>
>>> pp=p.parents
>>> for each in pp:
	print(each)

F:\test_install
F:\
#支持索引
>>> pp[0]
WindowsPath('F:/test_install')
>>> pp[1]
WindowsPath('F:/')

#parts属性
>>> aa.parts
('F:\\', 'test_install', 'python_install', 'hello.txt')
6>stat()
查询文件或文件夹的状态信息;
>>> p.stat()
os.stat_result(st_mode=16895, st_ino=281474976759015, st_dev=441122116, st_nlink=1, st_uid=0, st_gid=0, st_size=4096, st_atime=1756178336, st_mtime=1756178335, st_ctime=1635133800)
>>> aa.stat()
os.stat_result(st_mode=33206, st_ino=8162774325091873, st_dev=441122116, st_nlink=1, st_uid=0, st_gid=0, st_size=0, st_atime=1756178322, st_mtime=1756178322, st_ctime=1756178322)
>>> p.stat().st_size
4096
7>resolve()
将相对路径转为绝对路径;
>>> Path('../B').resolve()
WindowsPath('F:/test_install/B')
8>iterdir()
获取当前路径下所有子文件和子文件夹对象;
生成的是一个迭代器对象,可以放到 for 语句中提取数据;
>>> ss=Path('./').iterdir()
>>> ss
<generator object Path.iterdir at 0x0000024450C2A448>
>>> for each in ss:
	print(each.name)


DLLs
Doc
hello.txt
include
Lib
libs
LICENSE.txt
NEWS.txt
python-3.7.4-amd64(win64bit).exe
python.exe
python3.dll
python37.dll
pythonw.exe
Scripts
tcl
Tools
vcruntime140.dll

#将当前路径下面的所有文件整理成一个列表
>>> p
WindowsPath('F:/test_install/python_install')
>>> [x for x in p.iterdir() if x.is_file()]
[WindowsPath('F:/test_install/python_install/hello.txt'), WindowsPath('F:/test_install/python_install/LICENSE.txt'), WindowsPath('F:/test_install/python_install/NEWS.txt'), WindowsPath('F:/test_install/python_install/python-3.7.4-amd64(win64bit).exe'), WindowsPath('F:/test_install/python_install/python.exe'), WindowsPath('F:/test_install/python_install/python3.dll'), WindowsPath('F:/test_install/python_install/python37.dll'), WindowsPath('F:/test_install/python_install/pythonw.exe'), WindowsPath('F:/test_install/python_install/vcruntime140.dll')]
2.路径修改
1>mkdir()
创建文件夹
路径/”文件夹名”.mkdir()
p=Path('F://test_install//python3.10.6_install')
p
WindowsPath('F:/test_install/python3.10.6_install')
n=p/"f_test"
n.mkdir()
#如果文件夹存在,会报错,
设置mkdir(exist_ok=True)不报错
n.mkdir()
Traceback (most recent call last):
  File "<pyshell#380>", line 1, in <module>
    n.mkdir()
  File "F:\test_install\python3.10.6_install\lib\pathlib.py", line 1175, in mkdir
    self._accessor.mkdir(self, mode)
FileExistsError: [WinError 183] 当文件已存在时,无法创建该文件。: 'F:\\test_install\\python3.10.6_install\\f_test'

n.mkdir(exist_ok=True)

路径中存在多个不存在的父级目录,也会出错,
设置参数parents=True,创建所有不存在的父目录,则不报错。
n=p/"f_test/A/B/C"
n.mkdir(exist_ok=True)
Traceback (most recent call last):
  File "<pyshell#383>", line 1, in <module>
    n.mkdir(exist_ok=True)
  File "F:\test_install\python3.10.6_install\lib\pathlib.py", line 1175, in mkdir
    self._accessor.mkdir(self, mode)
FileNotFoundError: [WinError 3] 系统找不到指定的路径。: 'F:\\test_install\\python3.10.6_install\\f_test\\A\\B\\C'

n.mkdir(parents=True,exist_ok=True)#会同时创建A,B,C文件夹
2>Path.open()
Path.open(mode='r', encoding=None)
除了不用传路径外,其它参数跟 open() 函数一样;
open() 方法返回一个文件对象,可以用于读取、写入或追加文件内容;
Path.open() 底层调用了 Python 内置的 open() 函数7,但使用上更简洁,因为已经通过 Path 对象持有了文件路径。
# 使用传统的open()函数,需要传递路径字符串
with open('path/to/your/file.txt', 'r', encoding='utf-8') as f:
    content = f.read()

# 使用Path.open()方法,路径已由Path对象管理
from pathlib import Path
file_path = Path('path/to/your/file.txt')
with file_path.open('r', encoding='utf-8') as f:
    content = f.read()
3>rename()
将文件/目录重命名或移动到新的路径。
Path.rename(target)
如果 target 是文件名,在同一目录下则重命名原文件,在不同目录下,则移动并重命名原文件;
如果 target 是绝对路径,可以跨目录移动文件。
Windows 限制:若目标文件已存在,直接调用 rename() 会抛出 FileExistsError(Linux/macOS 允许覆盖)。
#例1
>>> p
WindowsPath('F:/test_install/python_install')
>>> n1=p/'A/B/C/hello.txt'
>>> n1
WindowsPath('F:/test_install/python_install/A/B/C/hello.txt')
#不同目录下
#把C下的hello.txt移动到当前python工作目录(F:/test_install/python_install)下,并重命名为new_hello.txt
>>> n1.rename('new_hello.txt')

>>> import os
>>> os.path.abspath('new_hello.txt')#获取文件的绝对路径
'F:\\test_install\\python_install\\new_hello.txt'

#例2
#同一目录下
n2=Path('F:/test_install/python_install/new_hello.txt')
#把当前工作目录下的new_hello.txt重命名为new2_hello.txt
>>> n2.rename('new2_hello.txt')
>>> os.path.abspath('new2_hello.txt')
'F:\\test_install\\python_install\\new2_hello.txt'

#例3
>>> n3=Path('F:/test_install/python_install/A/B/C/a0.txt')
>>> n3
WindowsPath('F:/test_install/python_install/A/B/C/a0.txt')
#同一目录下
#把C下的a0.txt重命名为a1.txt
>>> n3.rename('F:/test_install/python_install/A/B/C/a1.txt')

#例4
#想把C下的a4.txt移动到当前工作目录(F:/test_install/python_install)下,并重命名为new2_hello.txt,
但是new2_hello.txt已存在,就会报错
>>> n4=Path('F:/test_install/python_install/A/B/C/a4.txt')
>>> n4.rename('F:/test_install/python_install/new2_hello.txt')
Traceback (most recent call last):
  File "<pyshell#114>", line 1, in <module>
    n4.rename('F:/test_install/python_install/new2_hello.txt')
  File "F:\test_install\python_install\lib\pathlib.py", line 1319, in rename
    self._accessor.rename(self, target)
FileExistsError: [WinError 183] 当文件已存在时,无法创建该文件。: 'F:\\test_install\\python_install\\A\\B\\C\\a4.txt' -> 'F:/test_install/python_install/new2_hello.txt'
#删除new2_hello.txt后,在运行就成功了
>>> n4.rename('F:/test_install/python_install/new2_hello.txt')
4>replace()
Path.replace()
移动和重命名文件;
如果目标路径已存在文件,replace()方法会覆盖它而不发出警告;
from pathlib import Path
>>> m=Path("new2_hello.txt")#源文件
>>> n=Path('F:/test_install/python_install/A/B/C/new3_hello.txt')#目标路径

# 确保目标目录存在
#parents=True 创建所有不存在的父目录
#exist_ok=True 如果目录已存在不会引发错误
>>> n.parent.mkdir(parents=True,exist_ok=True)

# 使用replace()方法移动并重命名文件
#将文件从源位置移动到目标位置,同时将文件名从"new_hello2.txt"改为"new_hello3.txt"
>>> m.replace(n)
5>unlink()
删除文件;
6>rmdir()
删除文件夹,如果是非空文件,需要先使用unlink()删除文件后,才能删除文件夹;
>>> from pathlib import Path
>>> n=Path('F:/test_install/python_install/A/B/C/new3_hello.txt')
>>> n
WindowsPath('F:/test_install/python_install/A/B/C/new3_hello.txt')

#删除C文件夹失败(文件夹非空)
>>> n.parent.rmdir()
Traceback (most recent call last):
  File "<pyshell#3>", line 1, in <module>
    n.parent.rmdir()
  File "F:\test_install\python_install\lib\pathlib.py", line 1302, in rmdir
    self._accessor.rmdir(self)
OSError: [WinError 145] 目录不是空的。: 'F:\\test_install\\python_install\\A\\B\\C'

#删除C文件夹下的new3_hello.txt
>>> n.unlink()

#删除C文件夹成功
>>> n.parent.rmdir()
7>glob()
查找功能
#当前路径
>>> p=Path('.')
#搜索指定路径下所有包含.txt后缀的文件
>>> list(p.glob("*.txt"))
[WindowsPath('LICENSE.txt'), WindowsPath('NEWS.txt')]

#搜索当前路径的下一级目录中所有包含.py后缀的文件
>>> list(p.glob("*/*.py"))

#递归搜索 当前目录及该目录下所有子目录 所有包含.py后缀的文件
>>> list(p.glob("**/*.py"))
3.with语句
传统文件操作,打开文件 -> 操作文件 -> 关闭文件
f=open('hello.txt','w')
f.write('hello,lily!')
11
f.close()
新建文件对象若有代码出错,未执行到文件关闭语句,内容则会留在文件缓冲区,而未能写入硬盘。
用with语句
with open('hello.txt','w') as f:
    f.write('pardon')
6
用with不需要手动关闭文件,确保资源释放(文件的正常关闭),
新建文件对象有代码出错,with也会帮你关闭。
4.pickle模块
支持将python的代码序列化,解决python对象永久存储问题,允许将字符串,列表,元组等python对象保存为文件形式;
Python 的 pickle 模块实现了基本的数据序列化和反序列化功能,可以将 Python 对象转换为二进制字节流(序列化),也可以将字节流还原为 Python 对象(反序列化)。
1>dump()写入
pickle.dump()
功能:将 Python 对象序列化后写入文件;
pickle.dump(obj, file, protocol=None, *, fix_imports=True, buffer_callback=None)
参数说明:
obj:要序列化的 Python 对象
file:文件对象,必须以二进制模式打开(如 'wb')
protocol:序列化协议版本(0-5),默认为最高可用版本
fix_imports:为 Python 2/3 兼容性设计
import pickle
x,y,z=1,2,3
s='hello'
m=['aa',20,9.99]
d={"name":'lily',"age":20}
with open('data.pkl','wb')as f:
    pickle.dump(x,f)
    pickle.dump(y,f)
    pickle.dump(z,f)
    pickle.dump(s,f)
    pickle.dump(m,f)
    pickle.dump(d,f)
运行后生成二进制文件data.pkl
优化(将多个对象打包成元组后再序列化):
with open('data.pkl','wb') as f:
    pickle.dump((x,y,z,s,m,d),f)
2>load()读取
pickle.load()
功能:从文件中读取序列化数据并还原为 Python 对象;
pickle.load(file, *, fix_imports=True, encoding="ASCII", errors="strict", buffers=None)
参数说明:
file:文件对象,必须以二进制模式打开(如 'rb')
encoding:指定解码字符串时使用的编码
import pickle
with open('data.pkl','rb')as f:
    x=pickle.load(f)
    y=pickle.load(f)
    z=pickle.load(f)
    s=pickle.load(f)
    m=pickle.load(f)
    d=pickle.load(f)

print(x,y,z,s,m,d,sep='\n') #读取为正常结果
1
2
3
hello
['aa', 20, 9.99]
{'name': 'lily', 'age': 20}
优化
with open('data.pkl','rb') as f:
    x,y,z,s,m,d=pickle.load(f)

print(x,y,z,s,m,d,sep='\n')
1
2
3
hello
['aa', 20, 9.99]
{'name': 'lily', 'age': 20}
惟楚有才,于斯为盛。欢迎来到长沙!!! 茶颜悦色、臭豆腐、CSDN和你一个都不能少~
更多推荐


 31
31 0
0- 0


 已为社区贡献1条内容

所有评论(0)