
Pytorch快速入门
Pytorch快速入门
0 PyTorch 简介
PyTorch 是由 Facebook(现 Meta)人工智能研究院开发并开源的深度学习框架,凭借其动态计算图、简洁的 Python 风格 API 和强大的 GPU 加速能力,已成为学术界与工业界最流行的深度学习工具之一。
- 动态计算图:PyTorch 采用「定义即运行」的方式,网络结构在每次前向传播时动态构建,调试直观、灵活易用。
- 自动求导:内置
autograd机制,可自动计算梯度,大幅简化反向传播的实现。 - 生态丰富:提供
torchvision(视觉)、torchaudio(音频)、torchtext(文本)等配套库,覆盖主流深度学习场景。 - 部署便捷:支持通过
torch.jit、ONNX导出模型,并可在移动端、服务端等多种环境部署。 - Pytorch的安装过程,可以参照:Pytorch安装。
本文将从张量的概念出发,带你快速上手 PyTorch 的基础操作。
1 张量的概念
张量(Tensor)是 PyTorch 中最核心的数据结构,可以理解为多维数组,是深度学习中进行数据存储和计算的基本单位。
- 0 维张量:标量(Scalar),即单个数值。
- 1 维张量:向量(Vector),即一维数组。
- 2 维张量:矩阵(Matrix),即二维数组。
- 3 维及以上张量:更高维度的数据,例如彩色图像可表示为
(高, 宽, 通道)的三维张量。
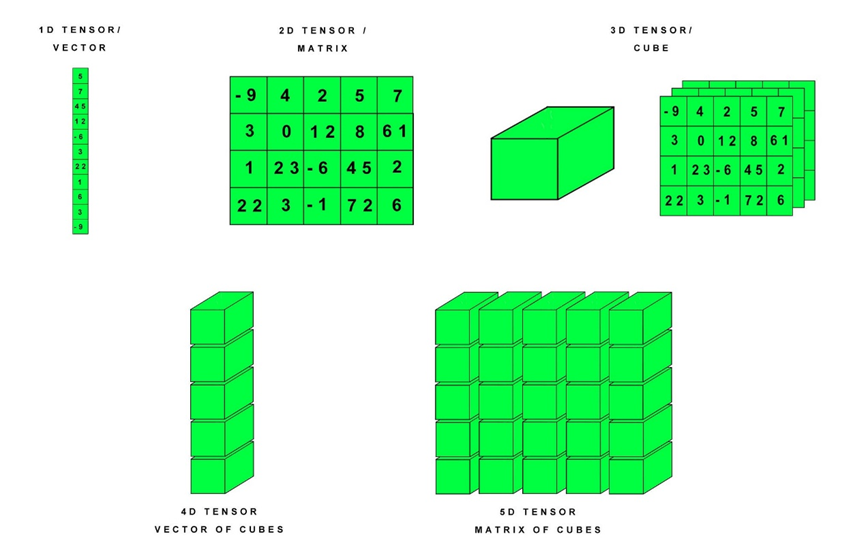
张量不仅支持类似 NumPy 数组的索引、切片和数学运算,还能在 GPU 上加速计算,并支持自动求导(autograd),这是训练神经网络的关键能力。
2 在Pytorch中创建张量
PyTorch 提供了多种创建张量的 API,下面介绍最常用的几种。
2.1 使用 torch.tensor 创建张量
torch.tensor 可以从 Python 列表或 NumPy 数组直接创建张量,是最直观的创建方式。
import torch

# 从列表创建一维张量
a = torch.tensor([1, 2, 3, 4])
print(a)
# 输出: tensor([1, 2, 3, 4])

# 从嵌套列表创建二维张量(矩阵)
b = torch.tensor([[1, 2], [3, 4]])
print(b)
# 输出: tensor([[1, 2],
#               [3, 4]])

# 指定数据类型
c = torch.tensor([1.5, 2.5], dtype=torch.float32)
print(c)
# 输出: tensor([1.5000, 2.5000])
2.2 使用 torch.zeros 创建全零张量
torch.zeros 用于创建指定形状、元素全为 0 的张量,常用于初始化权重或占位。
import torch

# 创建 2x3 的全零张量
z = torch.zeros(2, 3)
print(z)
# 输出: tensor([[0., 0., 0.],
#               [0., 0., 0.]])

# 创建形状为 (2, 2, 2) 的三维全零张量
z3 = torch.zeros(2, 2, 2)
print(z3)
# 输出: tensor([[[0., 0.],
#                [0., 0.]],
#
#               [[0., 0.],
#                [0., 0.]]])
2.3 使用 torch.randn 创建随机张量
torch.randn 从标准正态分布(均值为 0、方差为 1)中采样,生成指定形状的随机张量,常用于初始化神经网络的参数。
import torch

# 创建 2x3 的标准正态分布随机张量
r = torch.randn(2, 3)
print(r)
# 输出示例: tensor([[ 0.5234, -1.2345,  0.8765],
#                   [-0.4321,  1.0987, -0.6543]])
# 每次运行结果不同

# 创建形状为 (3,) 的一维随机张量
r1 = torch.randn(3)
print(r1)
# 输出示例: tensor([ 0.1234, -0.5678,  1.2345])
2.4 查看张量形状
通过 shape 属性可以查看张量的形状,返回一个 torch.Size 对象。
import torch

a = torch.tensor([[1, 2, 3], [4, 5, 6]])
print(a.shape)
# 输出: torch.Size([2, 3])

z = torch.zeros(2, 3, 4)
print(z.shape)
# 输出: torch.Size([2, 3, 4])
2.5 创建张量的其他方式
除了前面介绍的几种方式,PyTorch 还提供了许多便捷的创建 API,下面介绍最常用的几种。
2.5.1 使用 torch.ones 创建全一张量
torch.ones 用于创建指定形状、元素全为 1 的张量,常用于初始化偏置项或掩码。
import torch

# 创建 2x3 的全一张量
o = torch.ones(2, 3)
print(o)
# 输出: tensor([[1., 1., 1.],
#               [1., 1., 1.]])

# 创建形状为 (3,) 的一维全一张量
o1 = torch.ones(3)
print(o1)
# 输出: tensor([1., 1., 1.])
2.5.2 使用 torch.eye 创建单位矩阵
torch.eye 用于创建单位矩阵(对角线为 1、其余为 0),常用于线性代数运算。
import torch

# 创建 3x3 的单位矩阵
e = torch.eye(3)
print(e)
# 输出: tensor([[1., 0., 0.],
#               [0., 1., 0.],
#               [0., 0., 1.]])

# 创建 3x4 的矩形单位矩阵
e2 = torch.eye(3, 4)
print(e2)
# 输出: tensor([[1., 0., 0., 0.],
#               [0., 1., 0., 0.],
#               [0., 0., 1., 0.]])
2.5.3 使用 torch.arange 创建等差序列
torch.arange 类似于 Python 内置的 range,用于创建等差递增序列。
import torch

# 创建 0 到 9 的整数序列
a = torch.arange(10)
print(a)
# 输出: tensor([0, 1, 2, 3, 4, 5, 6, 7, 8, 9])

# 指定起始、结束和步长
b = torch.arange(2, 10, 2)
print(b)
# 输出: tensor([2, 4, 6, 8])
2.5.4 使用 torch.linspace 创建等间隔序列
torch.linspace 在指定区间内生成等间隔的数值,常用于坐标轴或采样点。
import torch

# 在 [0, 1] 区间生成 5 个等间隔数值
l = torch.linspace(0, 1, 5)
print(l)
# 输出: tensor([0.0000, 0.2500, 0.5000, 0.7500, 1.0000])
2.5.5 使用 torch.full 创建填充张量
torch.full 用指定数值填充整个张量,常用于初始化常数张量。
import torch

# 创建 2x3、元素全为 7 的张量
f = torch.full((2, 3), 7)
print(f)
# 输出: tensor([[7, 7, 7],
#               [7, 7, 7]])
2.5.6 使用 torch.empty 创建未初始化张量
torch.empty 分配内存但不初始化元素,速度最快,常用于后续立即覆盖的场景。
import torch

# 创建 2x3 的未初始化张量(内容为内存中的随机值)
emp = torch.empty(2, 3)
print(emp)
# 输出示例: tensor([[0.0000e+00, 0.0000e+00, 0.0000e+00],
#                   [0.0000e+00, 0.0000e+00, 0.0000e+00]])
# 实际内容取决于内存状态,每次运行可能不同
2.5.7 创建方式对比
下表汇总了本节介绍的几种创建 API 及其适用场景:
| API | 功能 | 典型场景 |
|---|---|---|
torch.ones | 全 1 张量 | 初始化偏置、掩码 |
torch.eye | 单位矩阵 | 线性代数运算 |
torch.arange | 等差整数序列 | 生成索引、循环 |
torch.linspace | 等间隔浮点序列 | 坐标轴、采样点 |
torch.full | 指定值填充 | 常数张量初始化 |
torch.empty | 未初始化张量 | 快速分配内存 |
3 张量操作和运算
创建好张量之后,就可以对其进行各种运算。本节介绍最常用的张量操作,包括算术运算、矩阵乘法、索引切片和形状变换等。
3.1 张量加法
张量加法要求两个张量形状相同,对应位置的元素相加。
import torch

a = torch.tensor([1, 2, 3])
b = torch.tensor([4, 5, 6])
c = a + b
print(c)
# 输出: tensor([5, 7, 9])

# 也可以使用 torch.add
d = torch.add(a, b)
print(d)
# 输出: tensor([5, 7, 9])
3.2 矩阵乘法
矩阵乘法使用 torch.matmul 或 @ 运算符,要求第一个矩阵的列数等于第二个矩阵的行数。
import torch

# 创建两个 2x3 和 3x2 的矩阵
A = torch.tensor([[1, 2, 3],
                  [4, 5, 6]])
B = torch.tensor([[7, 8],
                  [9, 10],
                  [11, 12]])

# 使用 torch.matmul 进行矩阵乘法
C = torch.matmul(A, B)
print(C)
# 输出: tensor([[ 58,  64],
#               [139, 154]])

# 也可以使用 @ 运算符
D = A @ B
print(D)
# 输出: tensor([[ 58,  64],
#               [139, 154]])
3.3 索引与切片
张量支持类似 NumPy 的索引和切片操作,可以方便地访问或修改元素。
import torch

a = torch.tensor([[1, 2, 3],
                  [4, 5, 6],
                  [7, 8, 9]])

# 访问单个元素
print(a[0, 1])
# 输出: tensor(2)

# 切片:取第一行
print(a[0, :])
# 输出: tensor([1, 2, 3])

# 切片:取第一列
print(a[:, 0])
# 输出: tensor([1, 4, 7])

# 切片:取左上角 2x2 子矩阵
print(a[:2, :2])
# 输出: tensor([[1, 2],
#               [4, 5]])
3.4 形状变换
reshape 和 view 可以改变张量的形状,但元素总数必须保持不变。
import torch

a = torch.arange(6)
print(a)
# 输出: tensor([0, 1, 2, 3, 4, 5])

# 使用 reshape 变为 2x3 矩阵
b = a.reshape(2, 3)
print(b)
# 输出: tensor([[0, 1, 2],
#               [3, 4, 5]])

# 使用 view 变为 3x2 矩阵
c = a.view(3, 2)
print(c)
# 输出: tensor([[0, 1],
#               [2, 3],
#               [4, 5]])
3.5 转置
t() 或 transpose 可以交换张量的维度,常用于矩阵转置。
import torch

a = torch.tensor([[1, 2, 3],
                  [4, 5, 6]])
print(a.shape)
# 输出: torch.Size([2, 3])

# 转置
b = a.t()
print(b)
# 输出: tensor([[1, 4],
#               [2, 5],
#               [3, 6]])
print(b.shape)
# 输出: torch.Size([3, 2])
3.6 张量运算小结
下表汇总了本节介绍的常用张量操作:
| 操作 | API / 运算符 | 说明 |
|---|---|---|
| 加法 | + / torch.add | 对应元素相加 |
| 矩阵乘法 | @ / torch.matmul | 矩阵乘法运算 |
| 索引切片 | a[i, j] / a[:, :] | 访问或截取元素 |
| 形状变换 | reshape / view | 改变张量形状 |
| 转置 | t() / transpose | 交换维度 |
4 torch.nn库
torch.nn 是 PyTorch 中用于构建神经网络的核心模块,提供了构建网络所需的各种层(Layer)、激活函数、损失函数和容器等组件。通过 torch.nn,我们可以像搭积木一样组合出各种深度学习模型。
4.1 核心组件
torch.nn 主要包含以下几类组件:
- 网络层(Layers):如全连接层
nn.Linear、卷积层nn.Conv2d、循环层nn.LSTM等。 - 激活函数(Activations):如
nn.ReLU、nn.Sigmoid、nn.Tanh等。 - 损失函数(Loss Functions):如
nn.CrossEntropyLoss、nn.MSELoss等。 - 容器(Containers):如
nn.Sequential、nn.ModuleList等,用于组织和管理网络结构。
4.2 使用 nn.Module 定义网络
在 PyTorch 中,自定义网络通常继承 nn.Module 类,并在 __init__ 方法中定义网络层,在 forward 方法中定义前向传播逻辑。
import torch
import torch.nn as nn

# 定义一个简单的两层全连接网络
class SimpleNet(nn.Module):
    def __init__(self):
        super(SimpleNet, self).__init__()
        self.fc1 = nn.Linear(4, 8)   # 输入 4 维,输出 8 维
        self.fc2 = nn.Linear(8, 2)   # 输入 8 维,输出 2 维

    def forward(self, x):
        x = torch.relu(self.fc1(x))  # 第一层 + ReLU 激活
        x = self.fc2(x)              # 第二层
        return x

# 实例化网络
net = SimpleNet()
print(net)
# 输出:
# SimpleNet(
#   (fc1): Linear(in_features=4, out_features=8, bias=True)
#   (fc2): Linear(in_features=8, out_features=2, bias=True)
# )

# 构造一个 3 个样本、每个 4 维的输入
x = torch.randn(3, 4)
output = net(x)
print(output.shape)
# 输出: torch.Size([3, 2])
4.3 使用 nn.Sequential 快速搭建
对于结构简单的网络,可以使用 nn.Sequential 按顺序堆叠各层,无需手动编写 forward 方法。
import torch
import torch.nn as nn

# 使用 Sequential 快速搭建网络
net = nn.Sequential(
    nn.Linear(4, 8),
    nn.ReLU(),
    nn.Linear(8, 2)
)

print(net)
# 输出:
# Sequential(
#   (0): Linear(in_features=4, out_features=8, bias=True)
#   (1): ReLU()
#   (2): Linear(in_features=8, out_features=2, bias=True)
# )

x = torch.randn(3, 4)
output = net(x)
print(output.shape)
# 输出: torch.Size([3, 2])
4.4 常用损失函数
训练神经网络时,需要损失函数来衡量预测值与真实值的差距。torch.nn 提供了多种常用损失函数:
import torch
import torch.nn as nn

# 均方误差损失(回归任务)
mse_loss = nn.MSELoss()
pred = torch.tensor([0.5, 0.8, 1.2])
target = torch.tensor([1.0, 1.0, 1.0])
print(mse_loss(pred, target))
# 输出: tensor(0.1100)

# 交叉熵损失(分类任务)
ce_loss = nn.CrossEntropyLoss()
logits = torch.tensor([[2.0, 0.5], [0.3, 1.8]])  # 2 个样本、2 个类别
labels = torch.tensor([0, 1])                     # 真实类别
print(ce_loss(logits, labels))
# 输出: tensor(0.2019)
4.5 小结
torch.nn 是 PyTorch 构建神经网络的基础模块,核心要点如下:
| 组件 | 说明 | 典型 API |
|---|---|---|
| 网络层 | 定义网络结构 | nn.Linear、nn.Conv2d、nn.LSTM |
| 激活函数 | 引入非线性 | nn.ReLU、nn.Sigmoid、nn.Tanh |
| 损失函数 | 衡量预测误差 | nn.MSELoss、nn.CrossEntropyLoss |
| 容器 | 组织网络结构 | nn.Module、nn.Sequential |
更多推荐


 1
1 0
0- 0


 已为社区贡献2条内容

所有评论(0)