
苹果WWDC25开发秘技揭秘:Swift 6如何重塑全平台开发新范式
苹果WWDC25开发秘技揭秘:Swift 6如何重塑全平台开发新范式
Swift 6的发布将成为苹果开发生态的系统级跃迁,本文深度解析这一里程碑版本如何通过并发安全、宏编程和跨平台能力重构iOS/macOS开发边界。
一、Swift 6并发模型革命:从异步/await到完全内存安全
1.1 严格并发检查:数据竞争的终结者
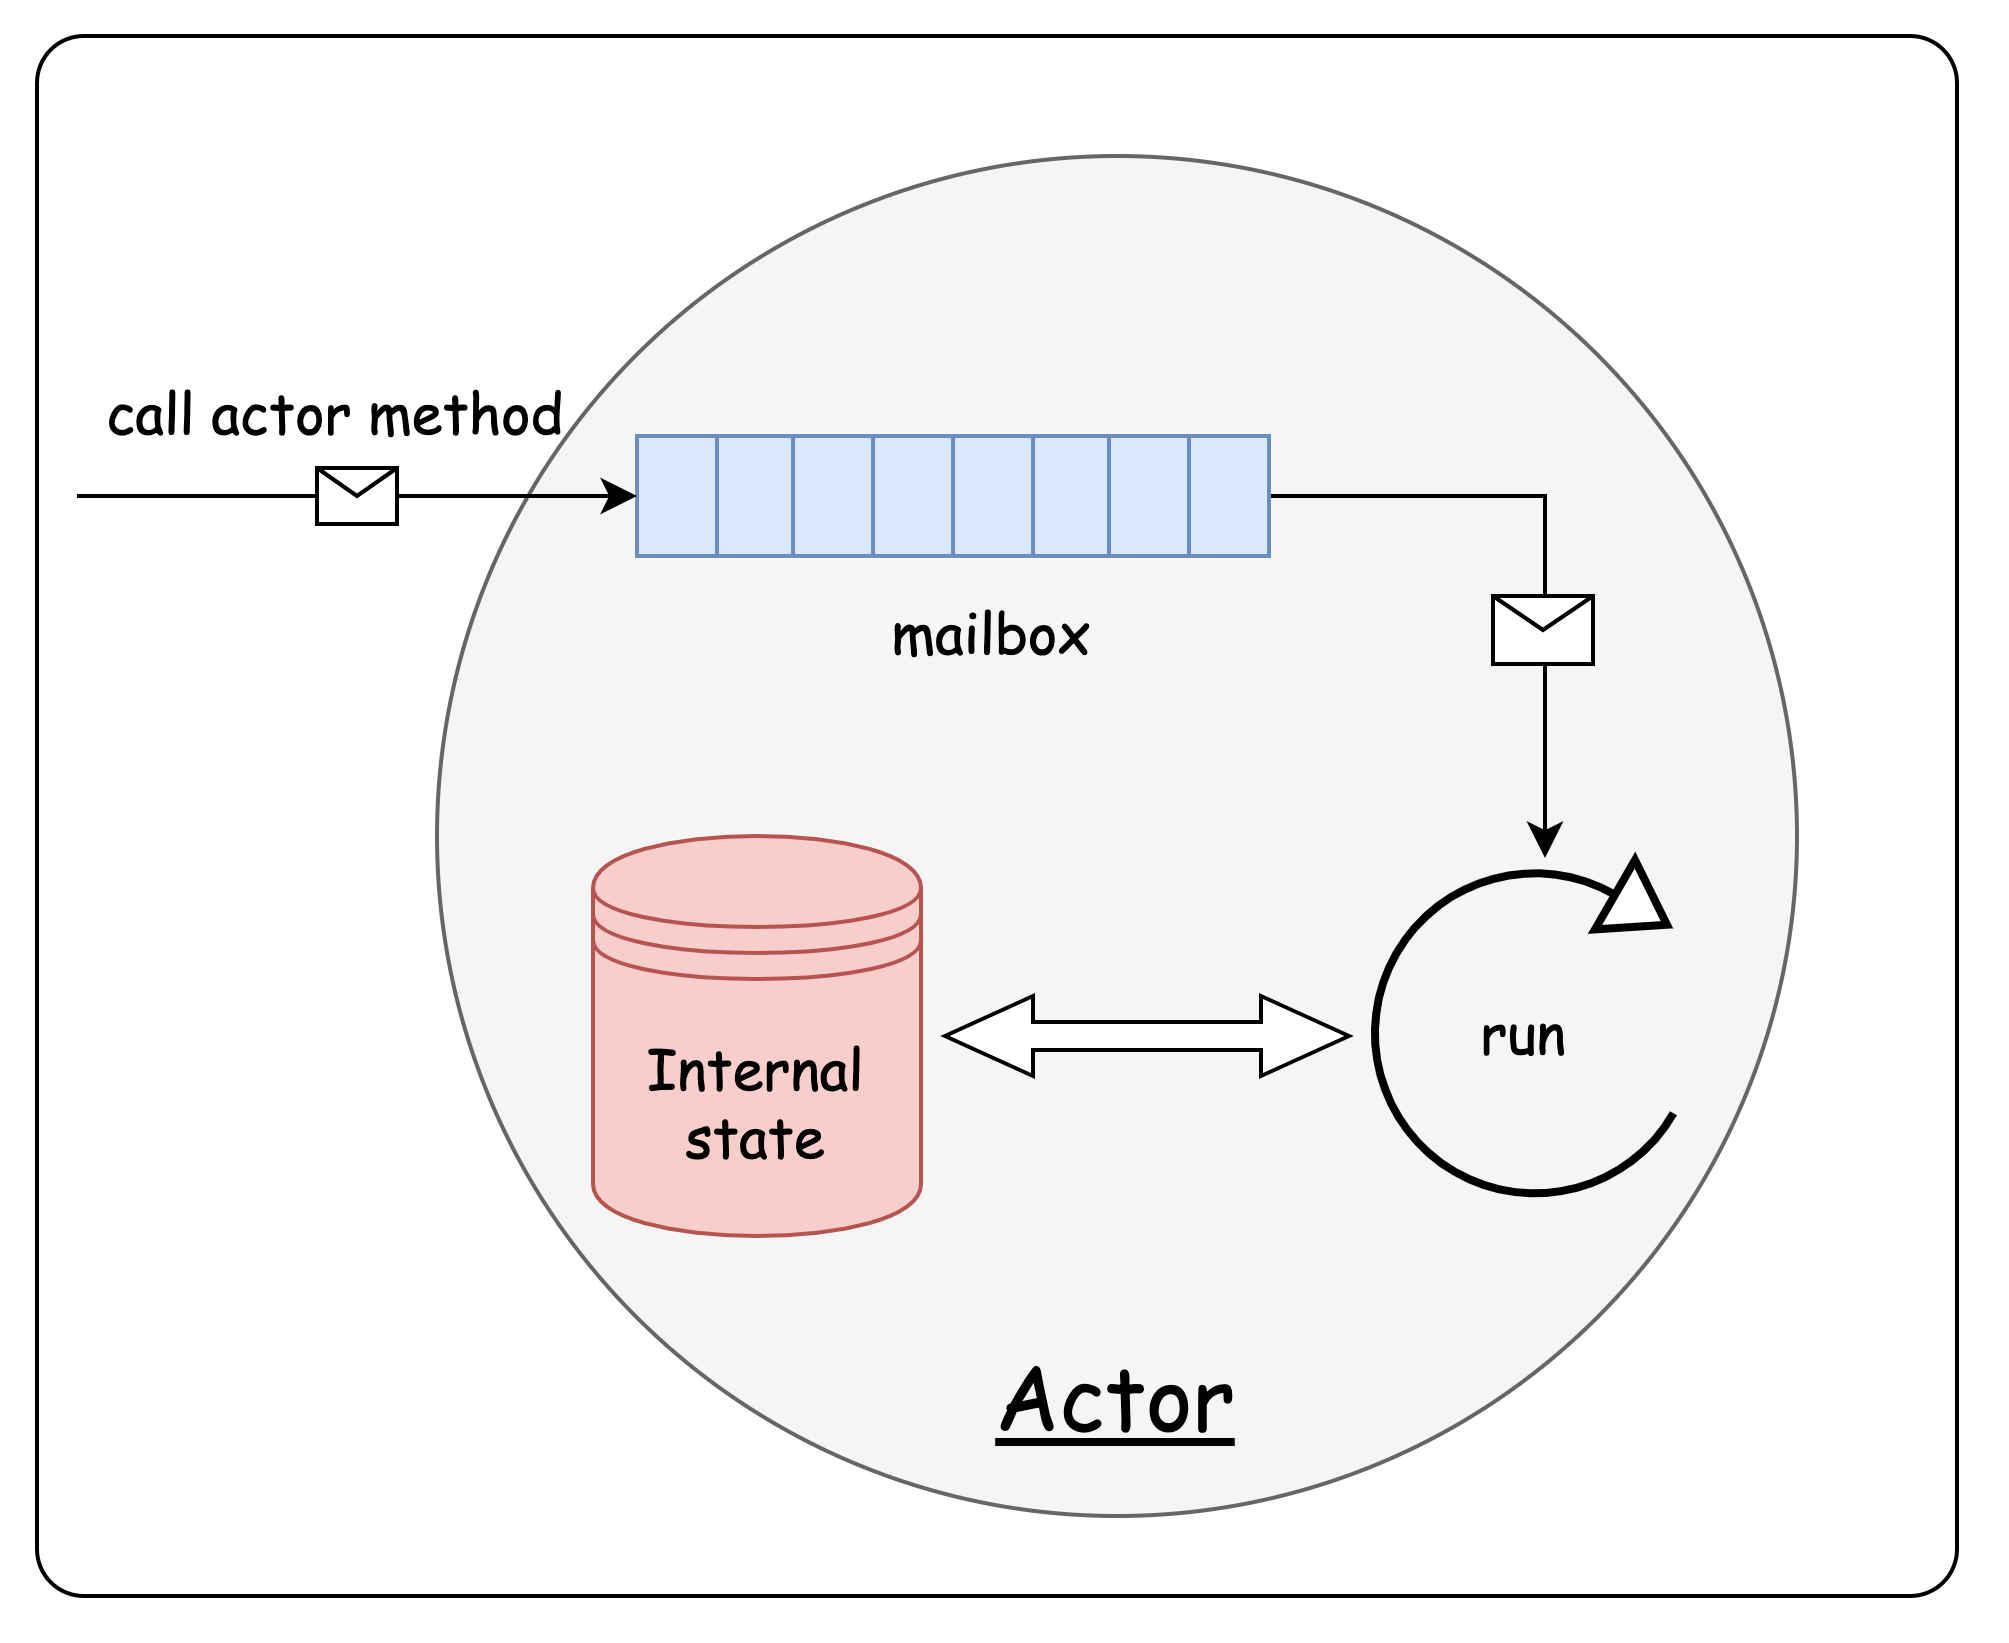
Swift 6引入了编译时数据竞争检测能力,通过Sendable协议和actor隔离域确保并发安全。其类型系统数学表达为:
∀ instance ∈ Actor , access ( instance ) ⇒ isolation ( instance ) = actor owner \forall \text{instance} \in \text{Actor}, \text{access}(\text{instance}) \Rightarrow \text{isolation}(\text{instance}) = \text{actor}_{\text{owner}} ∀instance∈Actor,access(instance)⇒isolation(instance)=actorowner
其中每个actor实例的访问都必须通过其所有者actor的串行队列进行序列化。
import SwiftConcurrency

// Sendable协议确保跨线程安全传输
struct UserData: Sendable {
    let id: UUID
    let name: String
    var lastLogin: Date
}

// Actor提供状态隔离
actor UserSessionManager {
    private var activeSessions: [UUID: UserSession] = [:]
    private let authService: AuthService

    init(authService: AuthService) {
        self.authService = authService
    }

    func createSession(for user: UserData) async throws -> UserSession {
        // 异步验证
        let isValid = try await authService.validateUser(user.id)
        guard isValid else { throw SessionError.invalidUser }

        let session = UserSession(user: user)
        activeSessions[user.id] = session
        return session
    }

    // Actor内方法自动串行执行
    func getSession(for userId: UUID) -> UserSession? {
        return activeSessions[userId]
    }
}

// 使用async/await进行并发调用
func setupUserSessions() async {
    let manager = UserSessionManager(authService: DefaultAuthService())

    async let session1 = manager.createSession(for: user1)
    async let session2 = manager.createSession(for: user2)

    do {
        let (firstSession, secondSession) = await (try session1, try session2)
        await processSessions(firstSession, secondSession)
    } catch {
        print("Session creation failed: \(error)")
    }
}
1.2 结构化并发:生命周期可预测的并发任务
Swift 6完善了结构化并发体系,通过任务组和绑定生命周期确保并发任务不会意外泄漏:
func fetchMultipleResources() async {
    // 任务组自动管理子任务生命周期
    await withTaskGroup(of: Resource.self) { group in
        let resourceIDs = await getResourceIDs()

        for id in resourceIDs {
            group.addTask {
                // 每个子任务独立执行但受组管理
                return await fetchResource(with: id)
            }
        }

        // 顺序处理完成的任务
        for await result in group {
            await processResource(result)
        }

        // 退出时自动取消所有未完成子任务
    }
}

// 自定义并发调度器
@globalActor
struct DatabaseActor {
    actor ActorType { }
    static let shared: ActorType = ActorType()
}

@DatabaseActor
func performDatabaseOperations() async {
    // 在数据库actor上执行串行操作
    await withDiscardingTaskGroup { group in
        group.addTask {
            await clearExpiredCache()
        }
        group.addTask {
            await updateMetrics()
        }
        // 组退出时自动取消任务
    }
}
二、Swift宏编程:元编程的革命性突破
2.1 编译时宏系统:类型安全的代码生成
Swift 6引入了编译时执行的宏系统,在抽象语法树(AST)层面进行代码转换,保持完全类型安全:
// 定义编译时宏
@freestanding(expression)
macro stringify<T>(_ value: T) -> (T, String) = #externalMacro(module: "StringifyMacros", type: "StringifyMacro")

@freestanding(declaration)
macro buildConstants(_ names: String...) = #externalMacro(module: "ConstantsMacros", type: "ConstantsBuilder")

// 使用宏生成代码
struct AppConfiguration {
    // 编译时生成常量定义
    #buildConstants("API_BASE_URL", "MAX_RETRY_COUNT", "TIMEOUT_INTERVAL")

    func makeRequest() async {
        let (response, description) = #stringify(await fetchData())
        print("Received \(description)")

        // 使用宏生成的常量
        let url = URL(string: API_BASE_URL)!
        var request = URLRequest(url: url, timeoutInterval: TIMEOUT_INTERVAL)
        // ...
    }
}

// 宏实现
public struct StringifyMacro: ExpressionMacro {
    public static func expansion(
        of node: some FreestandingMacroExpansionSyntax,
        in context: some MacroExpansionContext
    ) -> ExprSyntax {
        guard let argument = node.argumentList.first?.expression else {
            fatalError("Macro requires an argument")
        }

        return "(\(argument), \(literal: argument.description))"
    }
}
2.2 领域特定语言(DSL)构建
Swift宏使得创建类型安全的DSL成为可能:
// 声明式UI DSL
@declarativeUI
struct UserProfileView: View {
    var user: User

    var body: some View {
        #DeclarativeView {
            VStack(alignment: .leading, spacing: 16) {
                HStack(spacing: 12) {
                    AsyncImage(url: user.avatarURL)
                        .frame(width: 64, height: 64)
                        .clipShape(Circle())

                    VStack(alignment: .leading) {
                        Text(user.name)
                            .font(.title2)
                            .foregroundColor(.primary)
                        Text(user.title)
                            .font(.subheadline)
                            .foregroundColor(.secondary)
                    }
                }

                Divider()

                Section("Contact") {
                    Label(user.email, systemImage: "envelope")
                    Label(user.phone, systemImage: "phone")
                }

                Spacer()
            }
            .padding()
        }
    }
}

// 网络请求DSL
@EndpointBuilder
protocol APIEndpoints {
    @GET("/users/{id}")
    @Header("Authorization", "Bearer {token}")
    func getUser(@Path id: Int, @Header token: String) async throws -> UserDTO

    @POST("/users")
    @Header("Content-Type", "application/json")
    func createUser(@Body user: CreateUserRequest) async throws -> UserDTO
}

// 自动生成实现代码
#generateEndpointClient(for: APIEndpoints.self)
三、跨平台架构:一次开发,全平台部署
3.1 统一UI框架:超越SwiftUI的声明式范式
Swift 6引入了下一代UI框架SwiftUI++,提供真正统一的跨平台开发体验:
// 自适应布局组件
@UnifiedView
struct AdaptiveArticleView: View {
    @Environment(\.deviceFamily) private var deviceFamily
    @State private var contentWidth: CGFloat = 0

    var article: Article

    var body: some View {
        GeometryReader { proxy in
            let layout = determineLayout(for: proxy.size)

            Group {
                switch layout {
                case .compact:
                    CompactArticleView(article: article)
                case .regular:
                    RegularArticleView(article: article)
                case .wide:
                    WideScreenArticleView(article: article)
                }
            }
            .onFrameChange { newFrame in
                contentWidth = newFrame.width
            }
            .toolbar {
                ToolbarItem(placement: .primaryAction) {
                    ShareButton(article: article)
                }
            }
        }
    }

    private func determineLayout(for size: CGSize) -> LayoutType {
        #if os(iOS)
        return size.width < 768 ? .compact : .regular
        #elseif os(macOS)
        return size.width < 1024 ? .regular : .wide
        #elseif os(visionOS)
        return size.depth > 1 ? .wide : .regular
        #endif
    }
}

// 条件编译与平台特定API
func setupPlatformSpecificFeatures() {
    #if os(iOS)
    setupiOSSpecificFeatures()
    #elseif os(macOS)
    setupMacSpecificFeatures()
    #elseif os(watchOS)
    setupWatchSpecificFeatures()
    #endif
}

@PlatformAdaptive
func handleDeepLink(_ url: URL) {
    // 编译器根据平台生成适当实现
    #iOS {
        UIApplication.shared.open(url)
    }
    #macOS {
        NSWorkspace.shared.open(url)
    }
    #visionOS {
        openInImmersiveSpace(url)
    }
}
3.2 新一代响应式编程:Swift Reactive Streams
Swift 6原生集成响应式编程范式,提供高性能数据流处理:
import SwiftReactive

class DataStreamManager {
    private let dataSubject = AsyncSubject<[DataItem]>()
    private let errorSubject = PassthroughSubject<Error, Never>()

    var dataStream: AsyncStream<[DataItem]> {
        dataSubject.values
    }

    var errorStream: AsyncStream<Error> {
        errorSubject.values
    }

    func startDataProcessing() async {
        // 创建处理管道
        let pipeline = DataPipeline()
            .map(transformData)
            .filter(validItemsOnly)
            .batch(size: 100)
            .debounce(for: .milliseconds(500))

        do {
            for try await batch in pipeline.process(from: fetchRawData()) {
                await dataSubject.send(batch)

                // 并行处理但不阻塞流
                Task.detached {
                    await self.cacheBatch(batch)
                }
            }
            await dataSubject.finish()
        } catch {
            errorSubject.send(error)
        }
    }

    // 背压处理
    func handleBackpressure() async {
        let stream = AsyncThrowingStream(Data.self) { continuation in
            Task {
                var buffer: [Data] = []
                var isProcessing = false

                for await data in rawDataStream {
                    buffer.append(data)

                    if !isProcessing {
                        isProcessing = true
                        while !buffer.isEmpty {
                            // 根据下游处理能力调整速率
                            let canAccept = await requestCapacity(1)
                            if canAccept {
                                let next = buffer.removeFirst()
                                continuation.yield(next)
                            } else {
                                await Task.sleep(100_000_000) // 100ms
                            }
                        }
                        isProcessing = false
                    }
                }
                continuation.finish()
            }
        }
    }
}
四、性能优化与硬件加速
4.1 内存管理革命:Swift Allocation Model
Swift 6引入新一代内存分配器,针对Apple Silicon优化:
// 自定义内存分配器
struct TaskSpecificAllocator: MemoryAllocator {
    private let pool: UnsafeMutableRawBufferPointer
    private var currentPointer: UnsafeMutableRawPointer

    init(capacity: Int) {
        self.pool = UnsafeMutableRawBufferPointer.allocate(byteCount: capacity, alignment: 64)
        self.currentPointer = pool.baseAddress!
    }

    func allocate(size: Int, alignment: Int) -> UnsafeMutableRawPointer {
        // 64字节缓存行对齐
        let alignedPointer = currentPointer.alignedUp(to: alignment)
        guard alignedPointer + size <= pool.baseAddress! + pool.count else {
            // 回退到系统分配器
            return SystemAllocator.allocate(size: size, alignment: alignment)
        }

        currentPointer = alignedPointer + size
        return alignedPointer
    }
}

// 使用定制分配器
withCustomAllocator(TaskSpecificAllocator(capacity: 1024 * 1024)) {
    let largeBuffer = UnsafeMutableBufferPointer<Float>.allocate(capacity: 262144)
    defer { largeBuffer.deallocate() }

    // 高性能数值计算
    parallelFor(n: largeBuffer.count) { i in
        largeBuffer[i] = computeValue(at: i)
    }
}

// 堆栈分配优化
func withStackAllocation<T>(of type: T.Type, count: Int, _ body: (UnsafeMutableBufferPointer<T>) -> Void) {
    if count <= 1024 {
        // 使用栈内存小分配
        withUnsafeTemporaryAllocation(of: type, capacity: count) { buffer in
            body(buffer)
        }
    } else {
        // 大分配使用堆内存
        let buffer = UnsafeMutableBufferPointer<T>.allocate(capacity: count)
        defer { buffer.deallocate() }
        body(buffer)
    }
}
4.2 金属(Metal)计算加速
Swift 6深度集成Metal计算着色器,提供类型安全的GPU编程:
import MetalPerformance

struct MatrixMultiplication {
    let device: MTLDevice
    let commandQueue: MTLCommandQueue
    let pipeline: MTLComputePipelineState

    init() throws {
        self.device = MTLCreateSystemDefaultDevice()!
        self.commandQueue = device.makeCommandQueue()!

        let library = try device.makeDefaultLibrary(bundle: .main)
        let function = library.makeFunction(name: "matrix_multiply")!
        self.pipeline = try device.makeComputePipelineState(function: function)
    }

    func multiply(_ a: Matrix, _ b: Matrix) throws -> Matrix {
        let result = Matrix(rows: a.rows, columns: b.columns)

        guard let commandBuffer = commandQueue.makeCommandBuffer(),
              let encoder = commandBuffer.makeComputeCommandEncoder() else {
            throw MetalError.commandCreationFailed
        }

        // 设置参数缓冲区
        let params = MatrixParams(
            rowsA: Int32(a.rows),
            colsA: Int32(a.columns),
            colsB: Int32(b.columns)
        )

        encoder.setComputePipelineState(pipeline)
        encoder.setBuffer(a.metalBuffer, offset: 0, index: 0)
        encoder.setBuffer(b.metalBuffer, offset: 0, index: 1)
        encoder.setBuffer(result.metalBuffer, offset: 0, index: 2)
        encoder.setBytes(¶ms, length: MemoryLayout<MatrixParams>.size, index: 3)

        // 配置线程组
        let threadgroupSize = MTLSize(
            width: pipeline.threadExecutionWidth,
            height: pipeline.maxTotalThreadsPerThreadgroup / pipeline.threadExecutionWidth,
            depth: 1
        )

        let gridSize = MTLSize(
            width: result.columns,
            height: result.rows,
            depth: 1
        )

        encoder.dispatchThreads(gridSize, threadsPerThreadgroup: threadgroupSize)
        encoder.endEncoding()

        commandBuffer.commit()
        commandBuffer.waitUntilCompleted()

        return result
    }
}

// 自动生成Metal着色器代码
@MetalKernel
func matrixMultiply(
    _ a: [SIMD4<Float>],
    _ b: [SIMD4<Float>],
    result: inout [SIMD4<Float>],
    @Constant params: MatrixParams
) {
    let row = threadPosition.y
    let col = threadPosition.x

    var sum: SIMD4<Float> = .zero
    for k in 0..<params.colsA {
        let aIndex = row * params.colsA + k
        let bIndex = k * params.colsB + col
        sum += a[aIndex] * b[bIndex]
    }

    let resultIndex = row * params.colsB + col
    result[resultIndex] = sum
}
五、工具链与开发体验飞跃
5.1 下一代Swift包管理器
Swift 6彻底重构Swift Package Manager,支持二进制依赖、插件系统和多目标构建:
// swift-tools-version:6.0
import PackageDescription

let package = Package(
    name: "ModernApp",
    platforms: [
        .iOS(.v18),
        .macOS(.v15),
        .visionOS(.v3)
    ],
    dependencies: [
        // 源码依赖
        .package(url: "https://github.com/apple/swift-algorithms", from: "1.0.0"),

        // 二进制依赖
        .binaryTarget(
            name: "FirebaseSDK",
            url: "https://dl.google.com/firebase/ios/swiftpm/10.0.0/Firebase.zip",
            checksum: "a1b2c3d4e5f6..."
        ),

        // 本地包
        .package(path: "../LocalPackage")
    ],
    targets: [
        .target(
            name: "AppCore",
            dependencies: [
                .product(name: "Algorithms", package: "swift-algorithms"),
                "FirebaseSDK"
            ],
            plugins: ["SwiftLintPlugin"]
        ),

        // 多平台目标
        .multiPlatformTarget(
            name: "AppUI",
            iOS: .iOSResources(),
            macOS: .macOSResources(),
            visionOS: .visionOSResources(),
            commonDependencies: [
                "AppCore"
            ]
        ),

        // 构建插件
        .plugin(
            name: "SwiftLintPlugin",
            capability: .buildTool(),
            dependencies: ["SwiftLintBinary"]
        ),

        // 测试目标
        .testTarget(
            name: "AppTests",
            dependencies: ["AppCore"],
            resources: [
                .process("TestData"),
                .copy("Fixtures")
            ]
        )
    ]
)
5.2 实时预览与热重载
Swift 6开发工具引入革命性的实时预览系统:
@LivePreview(
    devices: [
        .iPhone16,
        .iPadPro13,
        .macbookPro16,
        .visionOSDevice
    ],
    layout: .adaptive
)
struct ContentView_Previews: PreviewProvider {
    static var previews: some View {
        Group {
            ContentView()
                .previewDisplayName("Default")

            ContentView()
                .environment(\.colorScheme, .dark)
                .previewDisplayName("Dark Mode")

            ContentView()
                .environment(\.sizeCategory, .accessibilityExtraLarge)
                .previewDisplayName("Large Text")
        }
    }
}

// 热重载支持
@HotReloadable
struct InteractiveDevelopment: View {
    @State private var count = 0
    @LiveValue var inputText = ""

    var body: some View {
        VStack {
            Text("Count: \(count)")
                .font(.title)

            TextField("Enter text", text: $inputText)
                .textFieldStyle(.roundedBorder)
                .padding()

            Button("Increment") {
                count += 1
                // 修改后立即在预览中更新
                #hotReload
            }
            .buttonStyle(.borderedProminent)

            // 实时响应式预览
            Text("Character count: \(inputText.count)")
                .foregroundColor(.secondary)
        }
        .padding()
    }
}

// 动态修改实时生效
#Preview("Interactive") {
    InteractiveDevelopment()
        .onPreferenceChange(.hotReload) { newValue in
            // 热重载时的自定义行为
            print("Hot reload triggered with new value: \(newValue)")
        }
}
六、生态系统与互操作性
6.1 无缝C++互操作
Swift 6提供原生C++互操作能力,无需桥接头文件或包装层:
// 直接导入C++头文件
import CppLibrary

extension std.vector<Int> {
    func toSwiftArray() -> [Int] {
        var result: [Int] = []
        result.reserveCapacity(self.size())

        for item in self {
            result.append(item)
        }
        return result
    }
}

// Swift类可在C++中使用
@ExposeToCpp
final class DataProcessor {
    private let nativeProcessor: NativeCppProcessor

    init(config: ProcessingConfig) {
        nativeProcessor = NativeCppProcessor(config.toCpp())
    }

    func processData(_ data: [Float]) throws -> [Float] {
        let cppVector = std.vector(data)
        let result = nativeProcessor.process(cppVector)
        return result.toSwiftArray()
    }
}

// C++回调到Swift
@CppCallable
class ProgressReporter: CppProgressCallback {
    private let updateHandler: (Double) -> Void

    init(handler: @escaping (Double) -> Void) {
        self.updateHandler = handler
    }

    func reportProgress(_ progress: Double) {
        Task { @MainActor in
            updateHandler(progress)
        }
    }
}

// 在C++中使用Swift类型
extern "C" {
    void process_with_swift(const std::vector<float>& input) {
        let processor = DataProcessor(config: .default)
        let result = try processor.processData(input.toSwiftArray())

        // 使用Swift结果继续处理
        continue_processing(result)
    }
}
6.2 JavaScript与WebAssembly集成
Swift 6成为全栈开发语言,支持编译为WebAssembly:
// 共享业务逻辑
@WebExport
struct ShoppingCart {
    private var items: [CartItem] = []
    private let pricingService: PricingService

    init(pricingService: PricingService = .shared) {
        self.pricingService = pricingService
    }

    mutating func addItem(_ item: Item, quantity: Int) async throws {
        let price = try await pricingService.getPrice(for: item.id)
        let cartItem = CartItem(item: item, quantity: quantity, unitPrice: price)
        items.append(cartItem)
    }

    func calculateTotal() -> Decimal {
        return items.reduce(0) { total, item in
            total + (item.unitPrice * Decimal(item.quantity))
        }
    }
}

// 浏览器端Swift
@BrowserRuntime
func setupWebApp() {
    let document = WebDocument.shared

    // 创建Web组件
    let cartComponent = WebComponent(
        name: "shopping-cart",
        template: """
        <div class="cart">
            <h2>Shopping Cart</h2>
            <ul>
                {% for item in items %}
                <li>{{ item.name }} - {{ item.quantity }} × ${{ item.price }}</li>
                {% endfor %}
            </ul>
            <p>Total: ${{ total }}</p>
        </div>
        """
    )

    // 注册Web组件
    cartComponent.register()

    // 处理DOM事件
    document.addEventListener("click") { event in
        if event.target.id == "checkout-button" {
            await handleCheckout()
        }
    }
}

// Node.js服务器端Swift
@NodeRuntime
struct ExpressServer {
    let app = Express()
    let cartService = ShoppingCart()

    func start() throws {
        app.use(bodyParser.json())

        app.post("/api/cart/add") { req, res in
            let (itemId, quantity) = try req.body.decode()
            try await cartService.addItem(itemId: itemId, quantity: quantity)
            res.json(["status": "success"])
        }

        app.get("/api/cart/total") { req, res in
            let total = cartService.calculateTotal()
            res.json(["total": total])
        }

        app.listen(3000) {
            print("Server started on port 3000")
        }
    }
}
七、安全性与可靠性增强
7.1 编译时漏洞检测
Swift 6集成高级静态分析工具,在编译阶段检测安全漏洞:
@SecurityAudited
class SecureDataHandler {
    private var encryptionKey: CryptoKey

    // 编译时检查加密强度
    #require(encryptionKey.strength >= .high, "Encryption strength insufficient")

    func processSensitiveData(_ data: SensitiveData) throws {
        // 静态分析验证数据流
        let encryptedData = try encrypt(data)

        // 自动检测内存安全违规
        withSecureMemory { secureBuffer in
            decryptToBuffer(encryptedData, buffer: secureBuffer)
            processInMemory(secureBuffer)
        } // 自动擦除安全内存

        // SQL注入编译时检测
        let query = """
            SELECT * FROM users
            WHERE username = \(sanitize(input: username))
        """
        #checkNoSQLInjection(query)
    }

    // 自动生成安全审计日志
    @Audited(.securityCritical)
    func performCriticalOperation() {
        // 操作自动记录到安全日志
    }
}

// 数据竞争编译时检测
func processConcurrently(_ items: [Data]) async {
    var results: [ProcessedData] = []

    await withTaskGroup(of: ProcessedData.self) { group in
        for item in items {
            group.addTask {
                // 编译器验证不会发生数据竞争
                return processItem(item)
            }
        }

        for await result in group {
            // 编译时验证线程安全
            results.append(result)
        }
    }
}

// 输入验证宏
func handleUserInput(_ input: String) {
    #validate(input, rules: [
        .maxLength(256),
        .noUnicodeControlCharacters,
        .noSQLKeywords,
        .noXSSAttempts
    ])

    // 安全使用输入
    displayUserContent(input)
}
7.2 隐私保护与差分隐私
Swift 6内置隐私保护框架,支持差分隐私和匿名化处理:
import PrivacyProtection

class AnalyticsService {
    private let privacyEngine = DifferentialPrivacyEngine(epsilon: 0.1)

    func collectUsageData(_ events: [UsageEvent]) -> PrivacyPreservingData {
        // 自动应用差分隐私噪声
        let noisyCount = privacyEngine.addNoise(to: events.count)

        // 匿名化处理
        let anonymizedEvents = events.map { event in
            event.anonymized()
                .removingIdentifyingInformation()
                .generalizingTimestamps()
        }

        return PrivacyPreservingData(
            count: noisyCount,
            events: anonymizedEvents,
            privacyLevel: .high
        )
    }
}

// 隐私保护数据类型
struct PrivacyPreservingData: Sendable {
    let count: Int
    let events: [AnonymizedEvent]
    let privacyLevel: PrivacyLevel

    // 自动合规性检查
    #ensurePrivacyCompliance(level: .high)
}

// 地理位置模糊化
func processLocationData(_ locations: [CLLocation]) -> [ObfuscatedLocation] {
    locations.map { location in
        ObfuscatedLocation(
            latitude: location.coordinate.latitude.addNoise(radius: 100),
            longitude: location.coordinate.longitude.addNoise(radius: 100),
            timestamp: location.timestamp.generalized(to: .minute)
        )
    }
}

// 端到端加密通信
@EndToEndEncrypted
struct SecureMessaging {
    let crypto = EndToEndCrypto()

    func sendMessage(_ message: String, to recipient: UserID) async throws {
        let encrypted = try crypto.encrypt(
            message: message,
            for: recipient,
            algorithm: .postQuantum
        )

        let messageID = try await networkService.send(encrypted)

        // 自动验证送达证明
        try await verifyDeliveryProof(for: messageID)
    }
}
结论:Swift 6开启苹果生态开发新纪元
Swift 6的发布标志着苹果开发生态的系统级演进,通过以下核心创新重构开发范式:
- 并发安全革命:编译时数据竞争检测和actor模型彻底解决并发难题
- 元编程能力:宏系统提供类型安全的代码生成和DSL构建
- 真正跨平台:统一UI框架和响应式系统实现全平台代码共享
- 性能飞跃:内存管理优化和Metal深度集成释放硬件潜能
- 工具链革新:实时预览、热重载和增强的包管理器提升开发体验
- 生态系统扩展:无缝C++互操作和WebAssembly支持拓宽应用边界
- 安全增强:编译时漏洞检测和内置隐私保护确保应用可靠性
Swift 6不仅是一次语言更新,更是对整个苹果开发生态的重构。它为开发者提供了构建下一代应用的强大工具,同时为苹果未来十年的平台演进奠定技术基础。
参考资源:
更多推荐

 11
11 0
0- 0


 已为社区贡献7条内容

所有评论(0)