
基于 YOLO的智能停车位检测系统(Python + 双框架 + PyQt5・多源识别)Tensorflow框架 Torch框架✅
·
博主介绍:✌全网粉丝10W+,前互联网大厂软件研发、集结硕博英豪成立工作室。专注于计算机相关专业项目实战6年之久,选择我们就是选择放心、选择安心毕业✌
> 🍅想要获取完整文章或者源码,或者代做,拉到文章底部即可与我联系了。🍅🍅感兴趣的可以先收藏起来,点赞、关注不迷路,大家在毕设选题,项目以及论文编写等相关问题都可以给我留言咨询,希望帮助同学们顺利毕业 。🍅
1、毕业设计:2025年计算机专业毕业设计选题汇总(建议收藏)✅
2、大数据毕业设计:2025年选题大全 深度学习 python语言 JAVA语言 hadoop和spark(建议收藏)✅
🍅感兴趣的可以先收藏起来,点赞、关注不迷路,大家在毕设选题,项目以及论文编写等相关问题都可以给我留言咨询,希望帮助同学们顺利毕业 。🍅
1、项目介绍
技术栈:
Python语言、YOLOv5模型、PyQt5界面、openCV、tensorflow、torch
深度学习项目:停车位检测识别系统 YOLO模型 PyQt5界面 openCV模块 Tensorflow框架 Torch框架✅
停车位检测系统是指利用计算机视觉技术对停车场内的停车位进行实时监测和识别,以便为车主提供及时准确的空余停车位信息。停车位检测系统主要包括两个主要组成部分:硬件和软件。硬件方面,停车位检测系统需要使用摄像头或传感器等设备对停车场进行实时监测,以获取停车位的状态信息。软件方面,停车位检测系统需要使用计算机视觉技术对摄像头或传感器拍摄的图像进行分析和处理,以实现停车位的检测和识别。停车位检测系统的主要功能包括实时监测停车场内的停车位,精准识别车位状态,即刻提供车位空余信息,提高停车场的利用效率,减少车主的停车等待时间,缓解停车位紧张问题,改善城市停车环境,提高城市交通管理水平等。停车位检测系统在智慧城市建设、交通管理、商业运营等领域具有广泛的应用前景。同时,停车位检测系统还可以结合车辆管理系统、支付系统等其他系统,实现更加智能化的停车场管理和服务。
停车位检测系统基于机器视觉深度学习技术能够实现无人值守的不间断工作,并且系统可以主动发现监控区域内的空闲停车位情况;极大的节约了人员成本,提高了工作效率。这里给出博主设计的软件界面,同款的简约风,功能也可以满足图片、视频和摄像头的识别检测
本项目是面向智慧城市停车管理开发的深度学习停车位检测识别系统,以 Python 为开发语言,核心集成 YOLOv5 目标检测模型、PyQt5 可视化界面、OpenCV 图像处理技术,搭配 TensorFlow 与 PyTorch 双深度学习框架,构建 “多源识别 - 实时检测 - 空车位标记 - 高效管理” 的一体化解决方案,可广泛应用于商场停车场、小区车库、公共停车区域等场景,解决传统停车场 “找位难、管理效率低、人工成本高” 的痛点,兼具技术创新性与实际应用价值。
技术架构上,项目形成 “数据处理 - 模型检测 - 界面交互 - 功能落地” 的完整体系:YOLOv5 模型作为核心检测引擎,凭借其高精度、实时性优势,经专属停车位数据集训练优化,能精准识别停车场内 “已泊车” 与 “空车位” 状态,输出车位位置(bounding box)与状态标签,适配不同停车场布局、光照、天气场景;OpenCV 负责图像预处理(如降噪、增强、畸变校正)与多源数据解析,支撑图片上传、视频导入、摄像头实时采集三种检测模式,为 YOLOv5 模型提供高质量输入数据;TensorFlow 与 PyTorch 双框架为模型训练与推理提供灵活支撑,可根据硬件环境与精度需求选择适配框架,保障系统兼容性与扩展性;PyQt5 搭建简约直观的交互界面,涵盖系统首页、检测控制、结果展示等模块,降低用户操作门槛,非技术人员也能快速上手。
系统在智慧城市建设、交通管理、商业运营等领域具有广泛应用前景,还可与车辆管理系统、停车支付系统对接,实现 “车位识别 - 导航 - 停车 - 支付” 的一体化服务,推动停车场管理向智能化、无人化升级。整体而言,项目将深度学习技术与停车管理实际需求深度融合,技术路线清晰、功能落地性强,既展现了深度学习与计算机视觉的技术应用能力,又为解决城市停车难题提供了切实有效的方案,是兼具技术深度与实用价值的深度学习项目。
2、项目界面
(1)停车位实时检测识别-----已泊车、空车位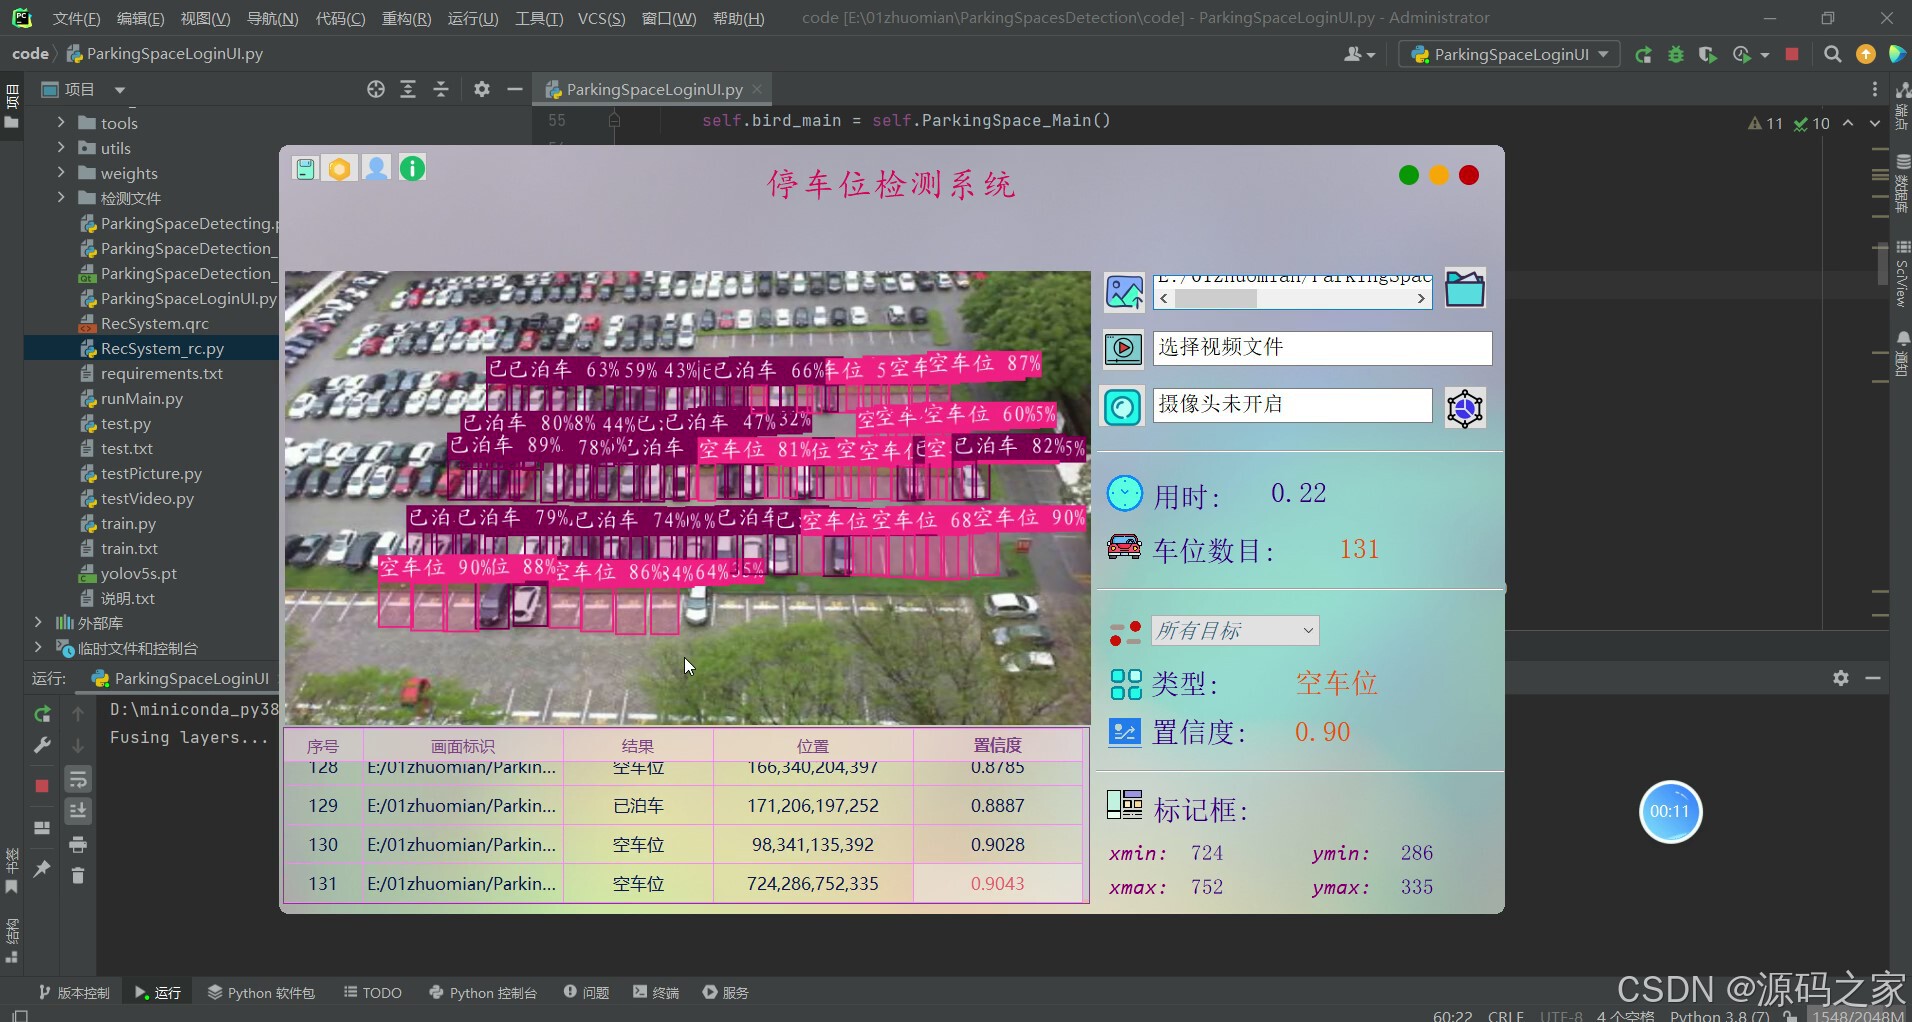
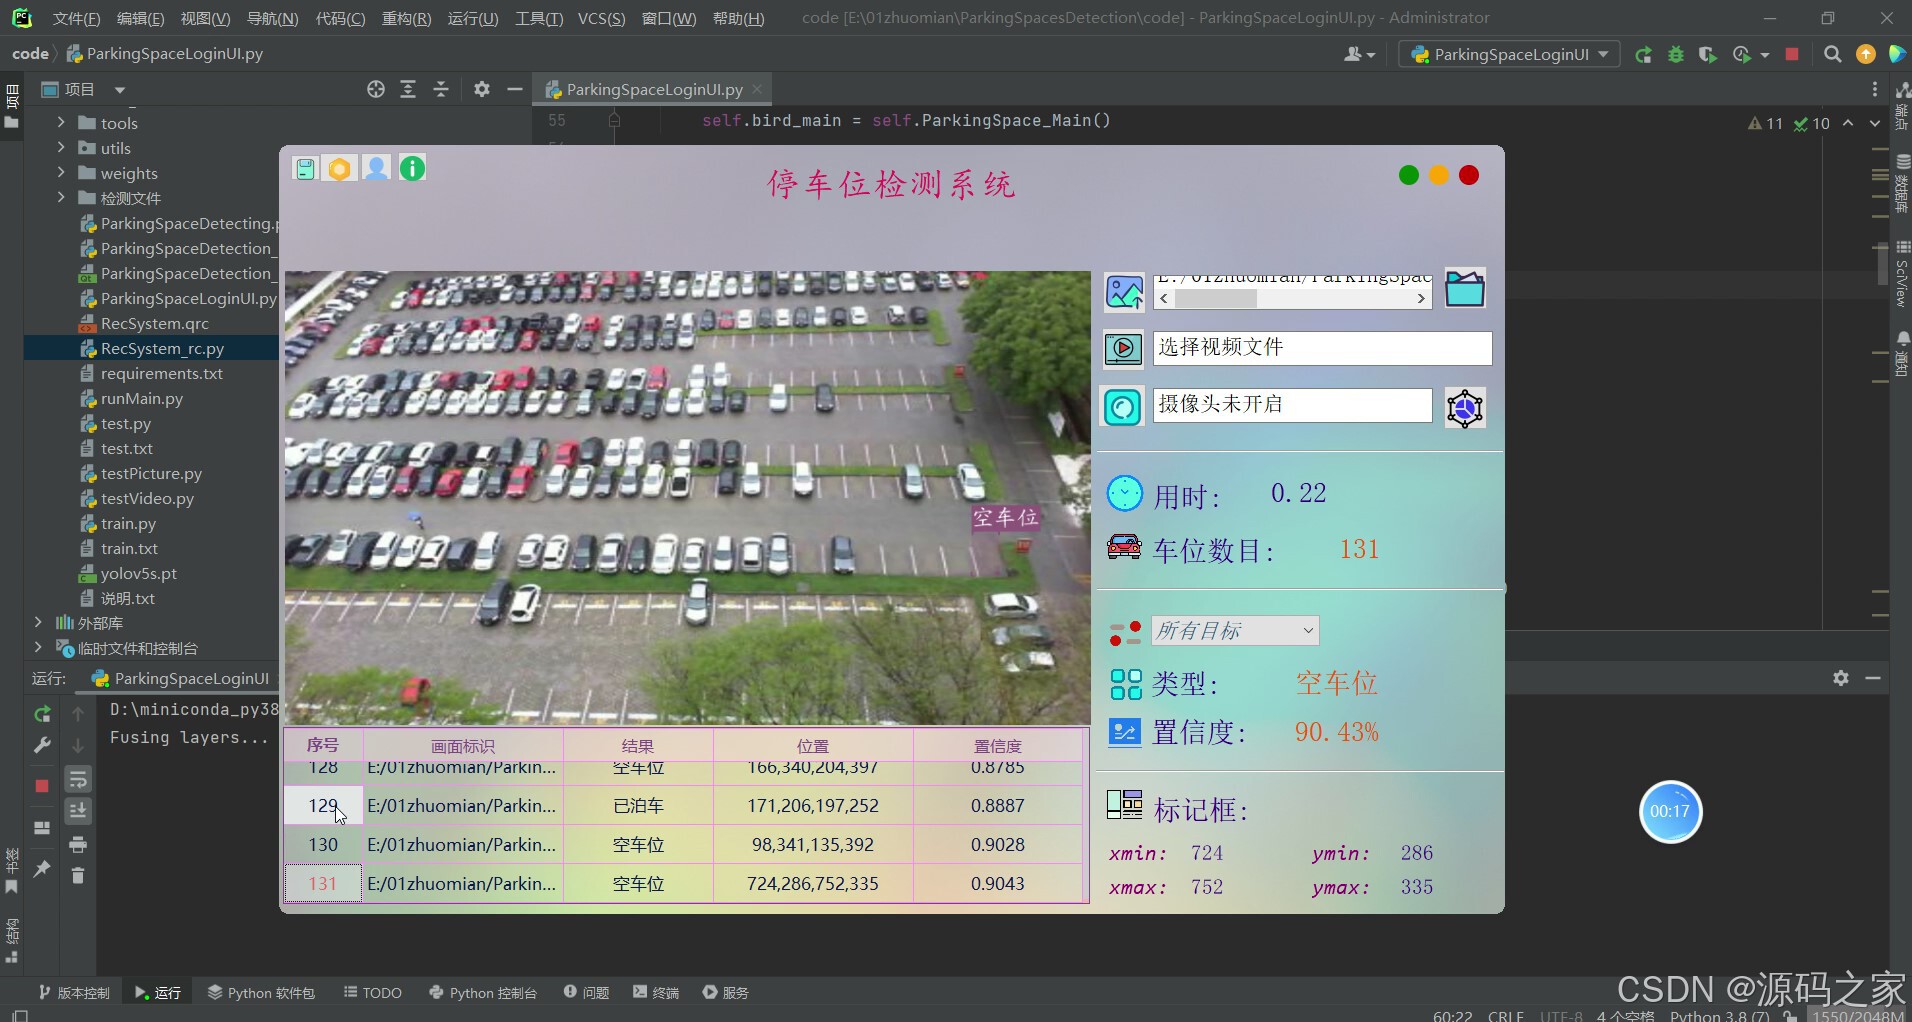
(2)停车位实时检测识别-----选择其中一个空车位
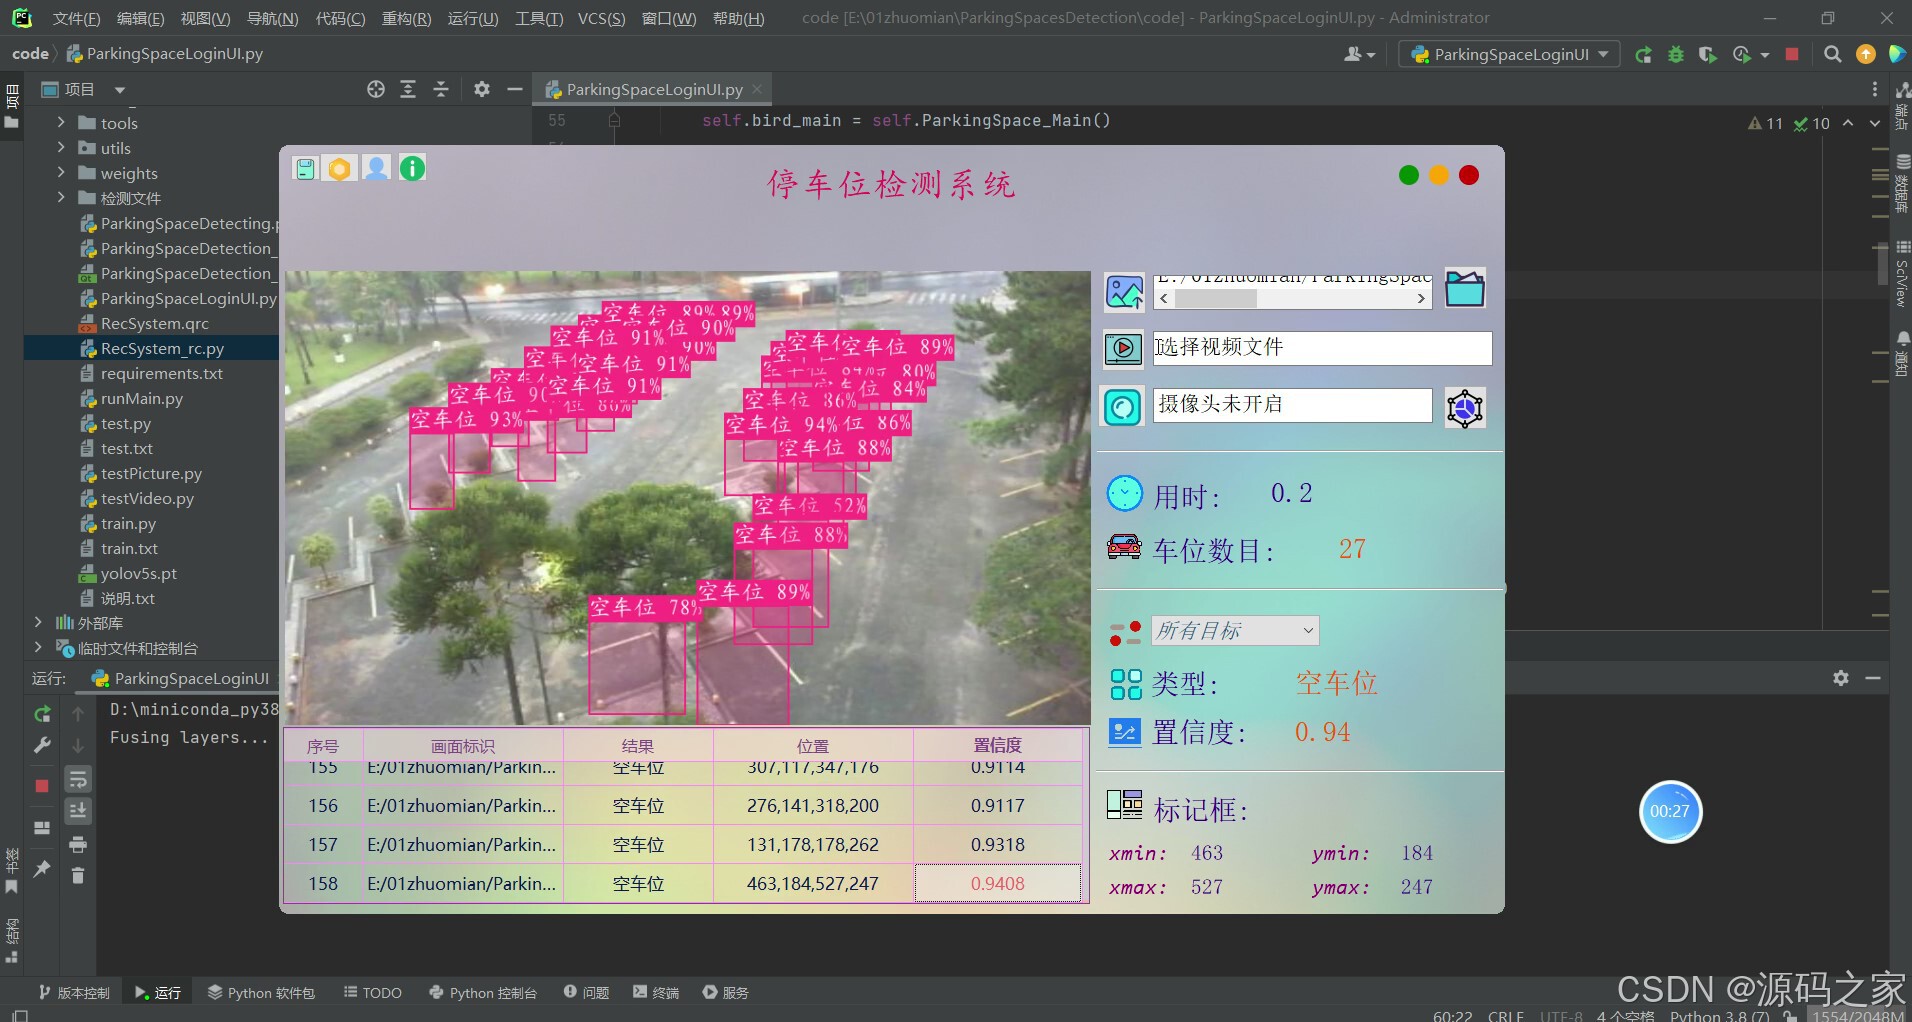
(3)上传图片检测识别
(4)上传视频检测识别
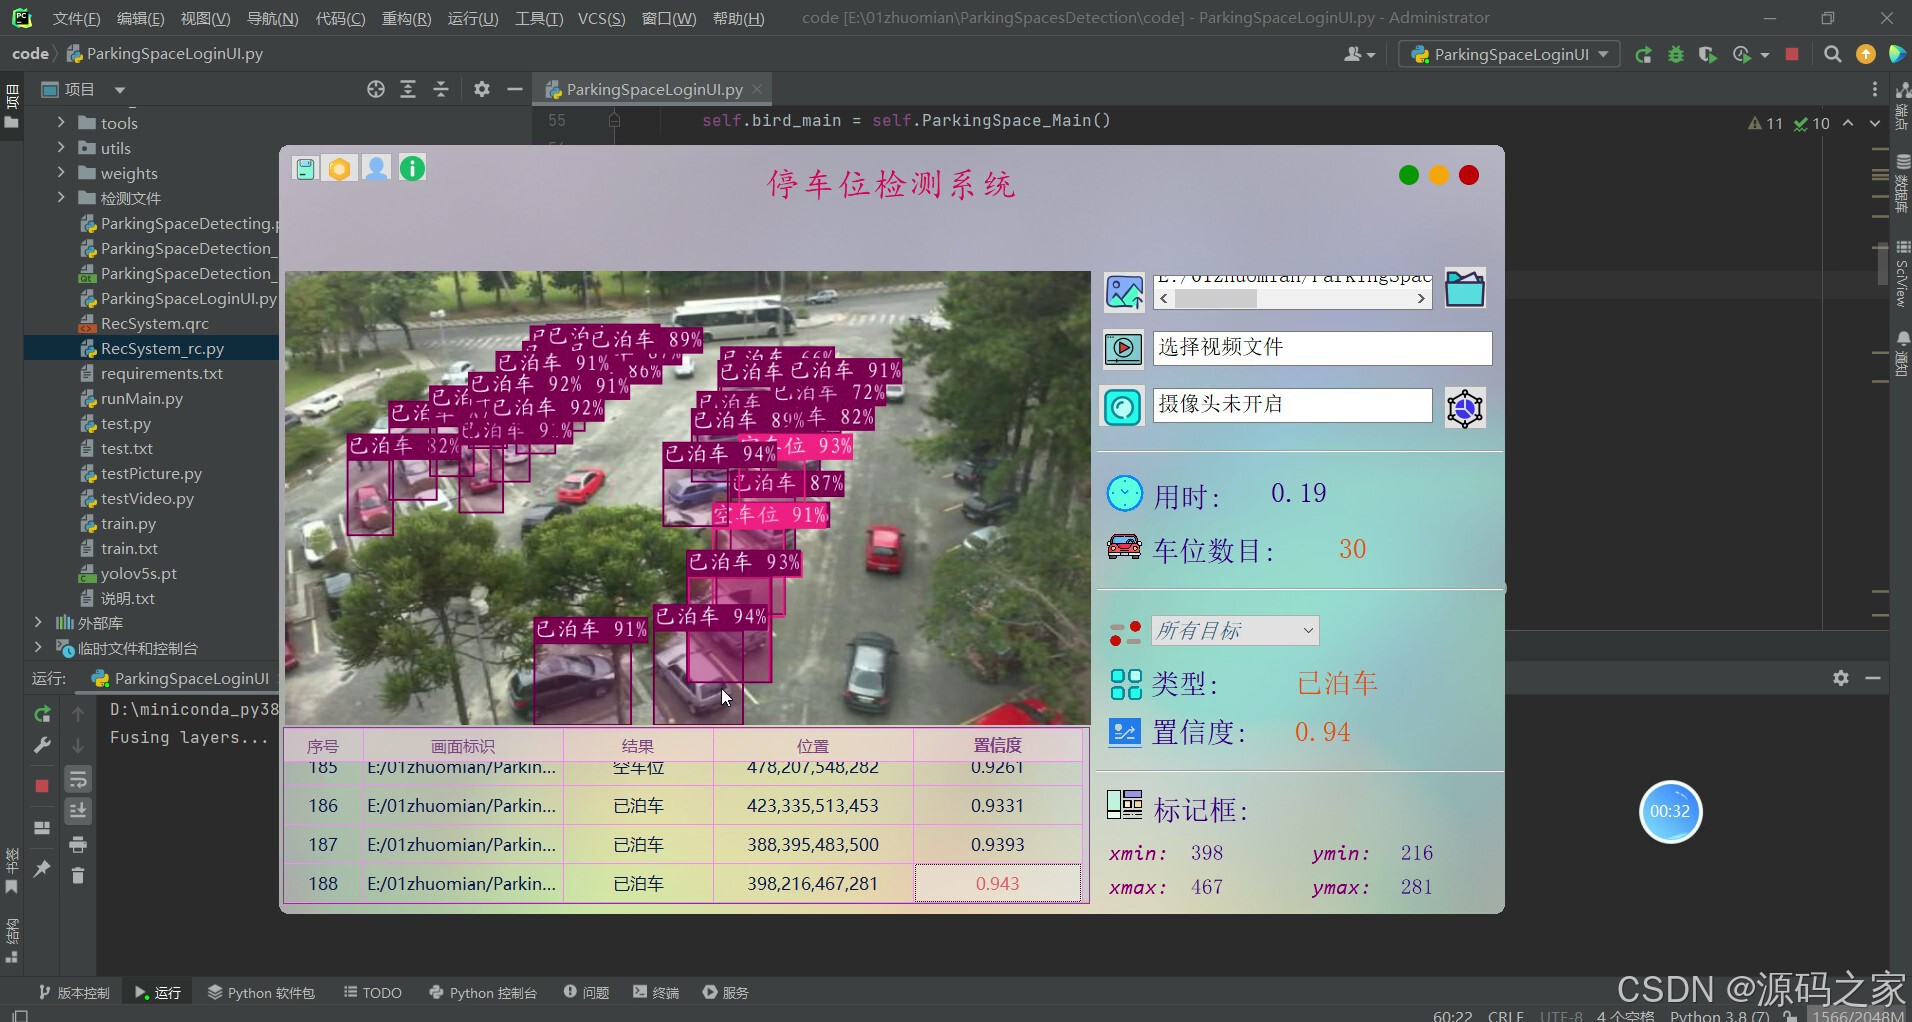
(6)摄像头或视频实时检测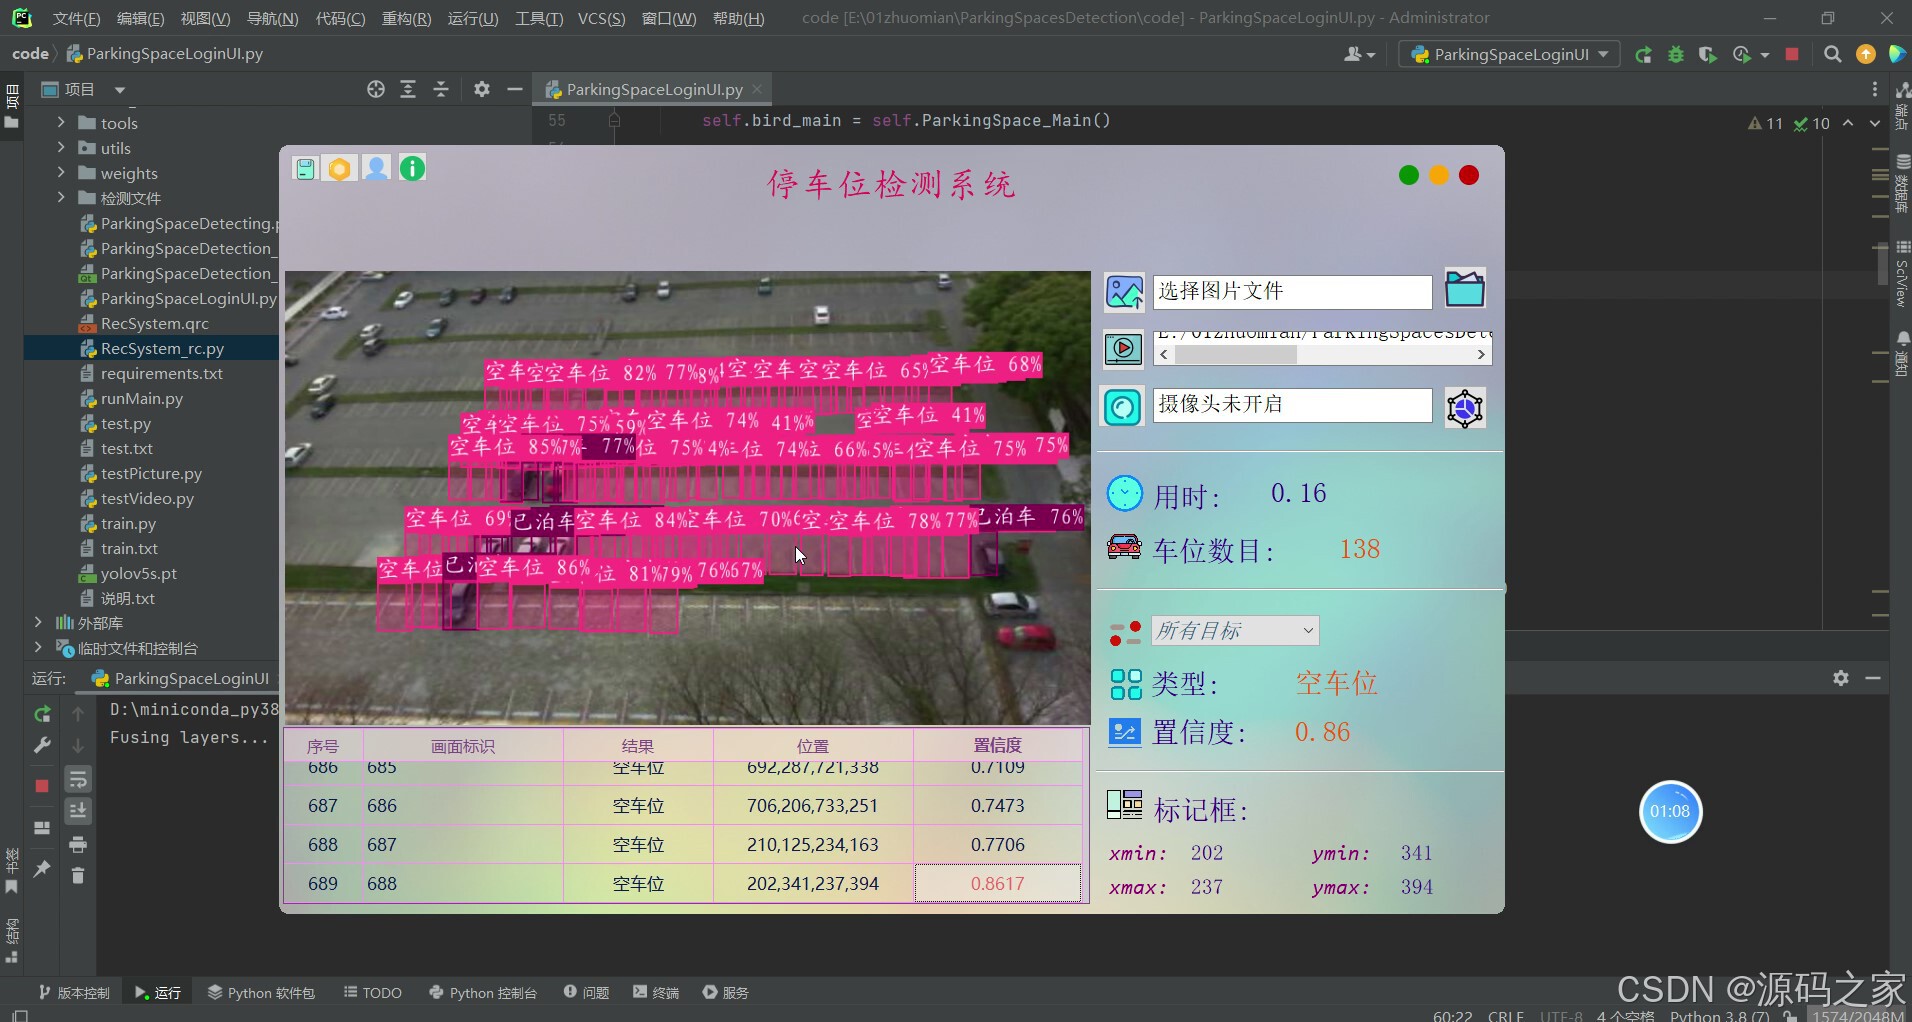
(8)摄像头或视频实时检测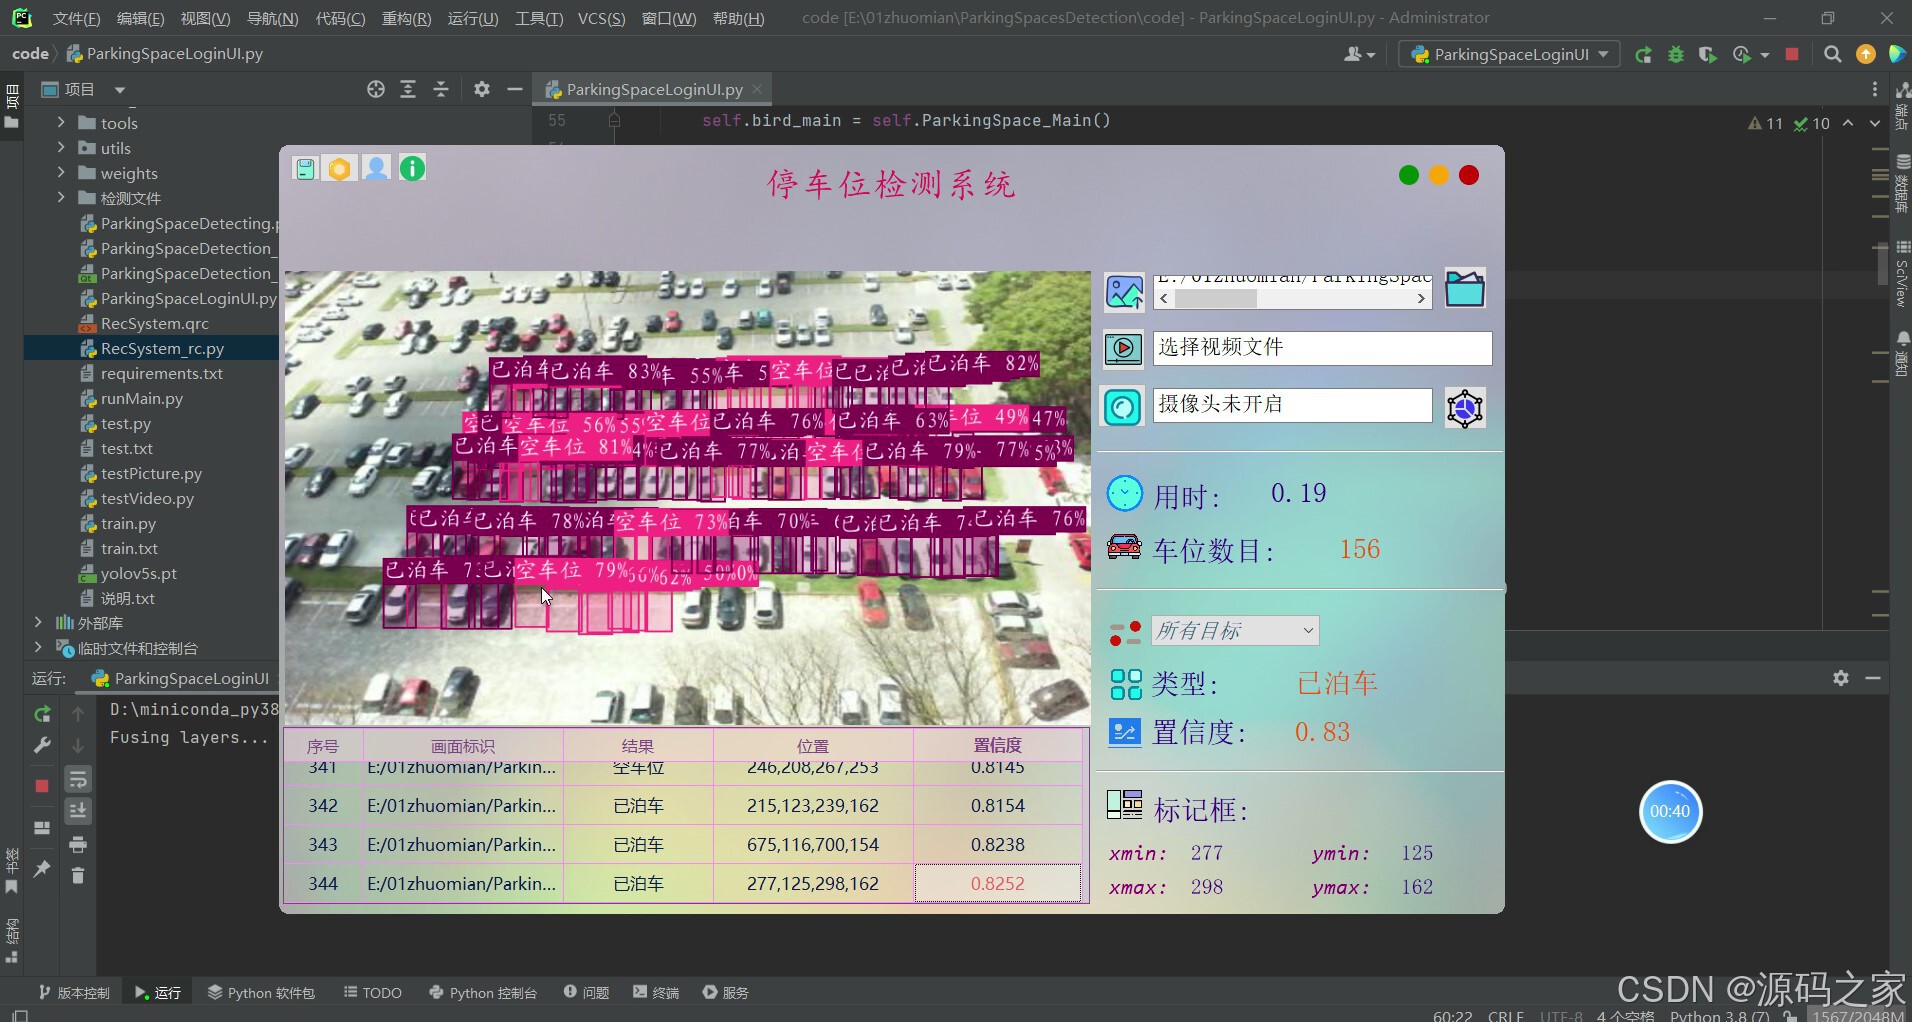
(9)系统首页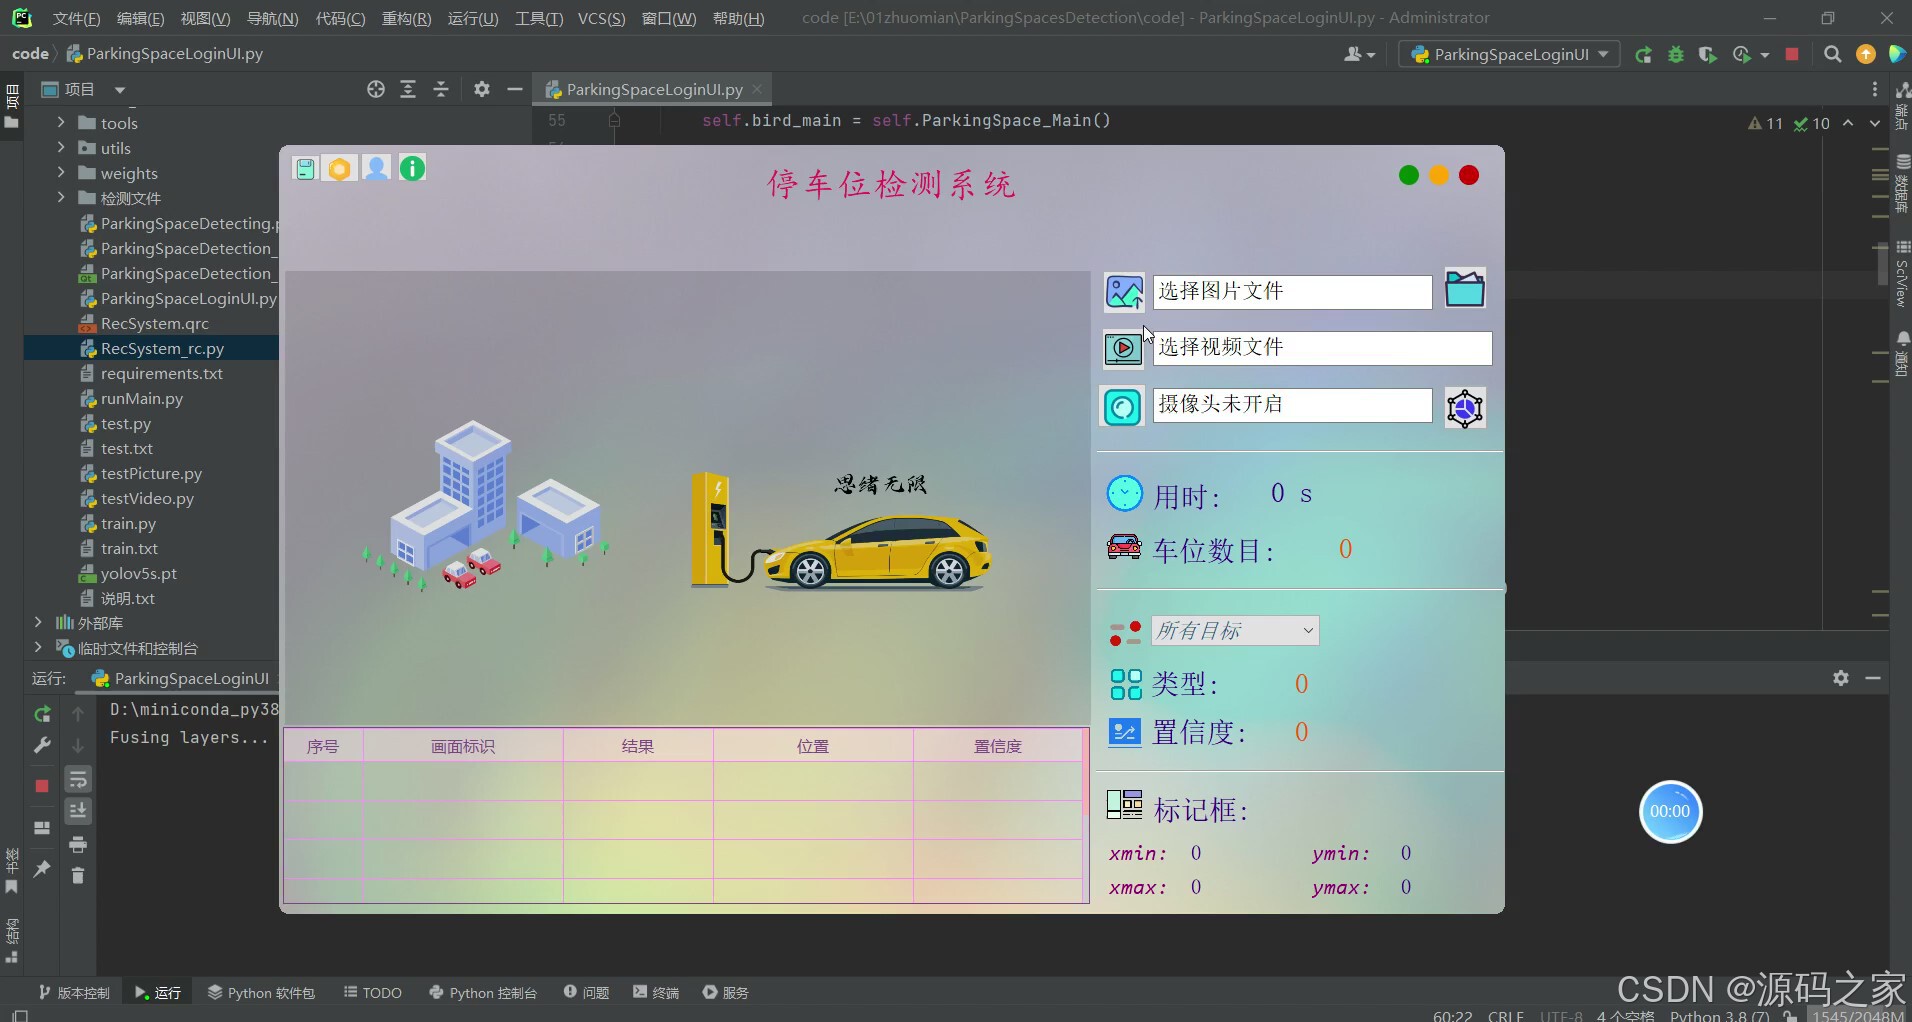
3、项目说明
停车位检测系统是指利用计算机视觉技术对停车场内的停车位进行实时监测和识别,以便为车主提供及时准确的空余停车位信息。停车位检测系统主要包括两个主要组成部分:硬件和软件。硬件方面,停车位检测系统需要使用摄像头或传感器等设备对停车场进行实时监测,以获取停车位的状态信息。软件方面,停车位检测系统需要使用计算机视觉技术对摄像头或传感器拍摄的图像进行分析和处理,以实现停车位的检测和识别。停车位检测系统的主要功能包括实时监测停车场内的停车位,精准识别车位状态,即刻提供车位空余信息,提高停车场的利用效率,减少车主的停车等待时间,缓解停车位紧张问题,改善城市停车环境,提高城市交通管理水平等。停车位检测系统在智慧城市建设、交通管理、商业运营等领域具有广泛的应用前景。同时,停车位检测系统还可以结合车辆管理系统、支付系统等其他系统,实现更加智能化的停车场管理和服务。
停车位检测系统基于机器视觉深度学习技术能够实现无人值守的不间断工作,并且系统可以主动发现监控区域内的空闲停车位情况;极大的节约了人员成本,提高了工作效率。这里给出博主设计的软件界面,同款的简约风,功能也可以满足图片、视频和摄像头的识别检测
4、核心代码
import argparse
import os
import random
import time
from os import getcwd
import cv2
import numpy as np
import torch
from PyQt5 import QtCore, QtWidgets
from PyQt5.QtWidgets import QFileDialog, QMessageBox
from ParkingSpaces.label_name import Chinese_name
from models.experimental import attempt_load
from utils import QMainWindow
from utils.datasets import letterbox
from utils.general import (
check_img_size, non_max_suppression, scale_coords)
from utils.torch_utils import select_device, time_synchronized
# 忽略警告
# os.environ["TF_CPP_MIN_LOG_LEVEL"] = "3"
# warnings.filterwarnings(action='ignore')
class ParkingSpace_MainWindow(QMainWindow):
def __init__(self, *args, obj=None, **kwargs):
super(ParkingSpace_MainWindow, self).__init__(*args, **kwargs)
self.author_flag = False # 是否输出信息 试一下
# self.pass_flag = True # 是否需要跳过登录界面
self.setupUi(self) # 界面生成
self.retranslateUi(self) # 界面控件
self.setUiStyle(window_flag=True, transBack_flag=True) # 设置界面样式
self.path = getcwd()
self.video_path = getcwd()
self.timer_camera = QtCore.QTimer() # 定时器
self.timer_video = QtCore.QTimer() # 视频定时器
self.flag_timer = "" # 用于标记正在进行的功能项(视频/摄像)
self.LoadModel() # 加载预训练模型
self.slot_init() # 定义槽函数
self.files = [] #
self.cap_video = None # 视频流对象
self.CAM_NUM = 0 # 摄像头标号
self.cap = cv2.VideoCapture(self.CAM_NUM) # 屏幕画面对象
self.detInfo = []
self.current_image = []
self.detected_image = None
# self.dataset = None
self.count = 0 # 表格行数,用于记录识别识别条目
self.res_set = [] # 用于历史结果记录的列表
self.c_video = 0
self.count_name = ["空车位", "已泊车"]
self.count_table = []
# self.plotBar(self.count_name, [0 for i in self.count_name], self.colors, margin=30)
def slot_init(self):
self.toolButton_file.clicked.connect(self.choose_file)
self.toolButton_folder.clicked.connect(self.choose_folder)
self.toolButton_video.clicked.connect(self.button_open_video_click)
self.timer_video.timeout.connect(self.show_video)
self.toolButton_camera.clicked.connect(self.button_open_camera_click)
self.timer_camera.timeout.connect(self.show_camera)
self.toolButton_model.clicked.connect(self.choose_model)
self.comboBox_select.currentIndexChanged.connect(self.select_obj)
self.tableWidget.cellPressed.connect(self.table_review)
self.toolButton_saveing.clicked.connect(self.save_file)
self.toolButton_settings.clicked.connect(self.setting)
self.toolButton_author.clicked.connect(self.disp_website)
self.toolButton_version.clicked.connect(self.disp_version)
def table_review(self, row, col):
try:
if col == 0: # 点击第一列时
this_path = self.tableWidget.item(row, 1) # 表格中的文件路径
res = self.tableWidget.item(row, 2) # 表格中记录的识别结果
axes = self.tableWidget.item(row, 3) # 表格中记录的坐标
if (this_path is not None) & (res is not None) & (axes is not None):
this_path = this_path.text()
if os.path.exists(this_path):
res = res.text()
axes = axes.text()
image = self.cv_imread(this_path) # 读取选择的图片
image = cv2.resize(image, (850, 500))
axes = [int(i) for i in axes.split(",")]
confi = float(self.tableWidget.item(row, 4).text())
# print(axes)
# image = self.drawRectBox(image, axes, res)
count = self.count_table[row]
# self.plotBar(self.count_name, count, self.colors, margin=30)
self.label_numer_result.setText(str(sum(count)))
image = self.drawRectEdge(image, axes, alpha=0.2, addText=res)
# 在Qt界面中显示检测完成画面
self.display_image(image) # 在界面中显示画面
# 在界面标签中显示结果
self.label_xmin_result.setText(str(int(axes[0])))
self.label_ymin_result.setText(str(int(axes[1])))
self.label_xmax_result.setText(str(int(axes[2])))
self.label_ymax_result.setText(str(int(axes[3])))
self.label_score_result.setText(str(round(confi * 100, 2)) + "%")
self.label_class_result.setText(res)
QtWidgets.QApplication.processEvents()
except:
self.label_display.setText('重现表格记录时出错,请检查表格内容!')
self.label_display.setStyleSheet("border-image: url(:/newPrefix/images_test/ini-image.png);")
def LoadModel(self, model_path=None):
"""
读取预训练模型
"""
parser = argparse.ArgumentParser()
parser.add_argument('--weights', nargs='+', type=str, default='./weights/parking-best.pt',
help='model.pt path(s)') # 模型路径仅支持.pt文件
parser.add_argument('--img-size', type=int, default=480, help='inference size (pixels)') # 检测图像大小,仅支持480
parser.add_argument('--conf-thres', type=float, default=0.25, help='object confidence threshold') # 置信度阈值
parser.add_argument('--iou-thres', type=float, default=0.45, help='IOU threshold for NMS') # NMS阈值
# 选中运行机器的GPU或者cpu,有GPU则GPU,没有则cpu,若想仅使用cpu,可以填cpu即可
parser.add_argument('--device', default='',
help='cuda device, i.e. 0 or 0,1,2,3 or cpu')
parser.add_argument('--save-dir', type=str, default='inference', help='directory to save results') # 文件保存路径
parser.add_argument('--classes', nargs='+', type=int,
help='filter by class: --class 0, or --class 0 2 3') # 分开类别
parser.add_argument('--agnostic-nms', action='store_true', help='class-agnostic NMS') # 使用NMS
self.opt = parser.parse_args() # opt局部变量,重要
out, weight, imgsz = self.opt.save_dir, self.opt.weights, self.opt.img_size # 得到文件保存路径,文件权重路径,图像尺寸
self.device = select_device(self.opt.device) # 检验计算单元,gpu还是cpu
self.half = self.device.type != 'cpu' # 如果使用gpu则进行半精度推理
if model_path:
weight = model_path
self.model = attempt_load(weight, map_location=self.device) # 读取模型
self.imgsz = check_img_size(imgsz, s=self.model.stride.max()) # 检查图像尺寸
if self.half: # 如果是半精度推理
self.model.half() # 转换模型的格式
self.names = self.model.module.names if hasattr(self.model, 'module') else self.model.names # 得到模型训练的类别名
# self.names = [Chinese_name[i] for i in self.names]
for i, v in enumerate(self.names):
if v in Chinese_name.keys():
self.names[i] = Chinese_name[v]
# hex = ('FF3838', 'FF9D97', 'FF701F', 'FFB21D', 'CFD231', '48F90A', '92CC17', '3DDB86', '1A9334', '00D4BB',
# '2C99A8', '00C2FF', '344593', '6473FF', '0018EC', '8438FF', '520085', 'CB38FF', 'FF95C8', 'FF37C7')
color = [[132, 56, 255], [82, 0, 133], [203, 56, 255], [255, 149, 200], [255, 55, 199],
[72, 249, 10], [146, 204, 23], [61, 219, 134], [26, 147, 52], [0, 212, 187],
[255, 56, 56], [255, 157, 151], [255, 112, 31], [255, 178, 29], [207, 210, 49],
[44, 153, 168], [0, 194, 255], [52, 69, 147], [100, 115, 255], [0, 24, 236]]
self.colors = color if len(self.names) <= len(color) else [[random.randint(0, 255) for _ in range(3)] for _ in
range(len(self.names))] # 给每个类别一个颜色
img = torch.zeros((1, 3, self.imgsz, self.imgsz), device=self.device) # 创建一个图像进行预推理
_ = self.model(img.half() if self.half else img) if self.device.type != 'cpu' else None # 预推理
def choose_model(self):
self.timer_camera.stop()
self.timer_video.stop()
if self.cap and self.cap.isOpened():
self.cap.release()
if self.cap_video:
self.cap_video.release() # 释放视频画面帧
self.comboBox_select.clear() # 下拉选框的显示
self.comboBox_select.addItem('所有目标') # 清除下拉选框
self.clearUI() # 清除UI上的label显示
self.flag_timer = ""
# 调用文件选择对话框
fileName_choose, filetype = QFileDialog.getOpenFileName(self.centralwidget,
"选取图片文件", getcwd(), # 起始路径
"Model File (*.pt)") # 文件类型
# 显示提示信息
if fileName_choose != '':
self.toolButton_model.setToolTip(fileName_choose + ' 已选中')
else:
fileName_choose = None # 模型默认路径
self.toolButton_model.setToolTip('使用默认模型')
self.LoadModel(fileName_choose)
def select_obj(self):
QtWidgets.QApplication.processEvents()
if self.flag_timer == "video":
# 打开定时器
self.timer_video.start(30)
elif self.flag_timer == "camera":
self.timer_camera.start(30)
ind = self.comboBox_select.currentIndex() - 1
ind_select = ind
if ind <= -1:
ind_select = 0
# else:
# ind_select = len(self.detInfo) - ind - 1
if len(self.detInfo) > 0:
# self.label_class_result.setFont(font)
self.label_class_result.setText(self.detInfo[ind_select][0]) # 显示类别
self.label_score_result.setText(str(self.detInfo[ind_select][2])) # 显示置信度值
# 显示位置坐标
self.label_xmin_result.setText(str(int(self.detInfo[ind_select][1][0])))
self.label_ymin_result.setText(str(int(self.detInfo[ind_select][1][1])))
self.label_xmax_result.setText(str(int(self.detInfo[ind_select][1][2])))
self.label_ymax_result.setText(str(int(self.detInfo[ind_select][1][3])))
image = self.current_image.copy()
if len(self.detInfo) > 0:
for i, box in enumerate(self.detInfo): # 遍历所有标记框
if ind != -1:
if ind != i:
continue
# 在图像上标记目标框
label = '%s %.0f%%' % (box[0], float(box[2]) * 100)
self.label_score_result.setText(box[2])
# label = str(box[0]) + " " + str(float(box[2])*100)
# 画出检测到的目标物
# self.names. box[0]
image = self.drawRectBox(image, box[1], addText=label, color=self.colors[box[3]])
# self.label_score_result.setText(str(len(self.detInfo) - count))
# 在Qt界面中显示检测完成画面
self.display_image(image)
# self.label_display.display_image(image)
def choose_folder(self):
self.timer_camera.stop()
self.timer_video.stop()
self.c_video = 0
if self.cap and self.cap.isOpened():
self.cap.release()
if self.cap_video:
self.cap_video.release() # 释放视频画面帧
self.comboBox_select.clear() # 下拉选框的显示
self.comboBox_select.addItem('所有目标') # 清除下拉选框
self.clearUI() # 清除UI上的label显示
self.flag_timer = ""
# 选择文件夹
dir_choose = QFileDialog.getExistingDirectory(self.centralwidget, "选取文件夹", self.path)
self.path = dir_choose # 保存路径
if dir_choose != "":
self.textEdit_pic.setText(dir_choose + '文件夹已选中')
self.label_display.setText('正在启动识别系统...\n\nleading')
QtWidgets.QApplication.processEvents()
rootdir = os.path.join(self.path)
for (dirpath, dirnames, filenames) in os.walk(rootdir):
for filename in filenames:
temp_type = os.path.splitext(filename)[1]
if temp_type == '.png' or temp_type == '.jpg' or temp_type == '.jpeg':
img_path = dirpath + '/' + filename
image = self.cv_imread(img_path) # 读取选择的图片
image = cv2.resize(image, (850, 500))
img0 = image.copy()
img = letterbox(img0, new_shape=self.imgsz)[0]
img = np.stack(img, 0)
img = img[:, :, ::-1].transpose(2, 0, 1) # BGR to RGB, to 3x416x416
img = np.ascontiguousarray(img)
img = torch.from_numpy(img).to(self.device) # 把图像矩阵移至到训练单元中(GPU中或CPU中)
img = img.half() if self.half else img.float() # 如果是半精度则转换图像格式
img /= 255.0 # 归一化
if img.ndimension() == 3: # 如果图像时三维的添加1维变成4维
img = img.unsqueeze(0)
t1 = time_synchronized() # 推理开始时间
pred = self.model(img, augment=False)[0] # 前向推理
pred = non_max_suppression(pred, self.opt.conf_thres, self.opt.iou_thres,
classes=self.opt.classes,
agnostic=self.opt.agnostic_nms) # NMS过滤
t2 = time_synchronized() # 结束时间
det = pred[0]
p, s, im0 = None, '', img0
self.current_image = img0.copy()
# save_path = str(Path(self.opt.save_dir) / Path(p).name) # 文件保存路径
if det is not None and len(det): # 如果有检测信息则进入
# self.label_numer_result.setText(str(len(det))) # 将检测个数放置到主界面中
det[:, :4] = scale_coords(img.shape[2:], det[:, :4], im0.shape).round() # 把图像缩放至im0的尺寸
number_i = 0 # 类别预编号
self.detInfo = []
count = [0 for i in self.count_name]
for *xyxy, conf, cls in reversed(det): # 遍历检测信息
c1, c2 = (int(xyxy[0]), int(xyxy[1])), (int(xyxy[2]), int(xyxy[3]))
# 将检测信息添加到字典中
self.detInfo.append(
[self.names[int(cls)], [c1[0], c1[1], c2[0], c2[1]], '%.2f' % conf, int(cls)])
number_i += 1 # 编号数+1
self.label_class_result.setText(str(self.names[int(cls)]))
for cn in range(len(self.count_name)):
if self.names[int(cls)] == self.count_name[cn]:
count[cn] += 1
self.label_score_result.setText('%.2f' % conf)
label = '%s %.0f%%' % (self.names[int(cls)], conf * 100)
# 画出检测到的目标物
# print(xyxy)
im0 = self.drawRectBox(im0, xyxy, alpha=0.2, addText=label, color=self.colors[int(cls)])
self.label_xmin_result.setText(str(c1[0]))
self.label_ymin_result.setText(str(c1[1]))
self.label_xmax_result.setText(str(c2[0]))
self.label_ymax_result.setText(str(c2[1]))
# 将结果记录至列表中
res_all = [self.names[int(cls)], conf.item(), [c1[0], c1[1], c2[0], c2[1]]]
self.res_set.append(res_all)
self.change_table(img_path, res_all[0], res_all[2], res_all[1])
for _ in range(len(det)):
self.count_table.append(count) # 记录各个类别数目
# self.plotBar(self.count_name, count, self.colors, margin=30)
self.label_numer_result.setText(str(sum(count)))
# self.label_score_result.setText(str(len(det) - count))
# 更新下拉选框
self.comboBox_select.currentIndexChanged.disconnect(self.select_obj)
self.comboBox_select.clear()
self.comboBox_select.addItem('所有目标')
for i in range(len(self.detInfo)):
text = "{}-{}".format(self.detInfo[i][0], i + 1)
self.comboBox_select.addItem(text)
self.comboBox_select.currentIndexChanged.connect(self.select_obj)
image = im0.copy()
InferenceNms = t2 - t1 # 单张图片推理时间
self.label_time_result.setText(str(round(InferenceNms, 2))) # 将推理时间放到右上角
else:
# 清除UI上的label显示
self.label_numer_result.setText("0")
self.label_class_result.setText('0')
# font = QtGui.QFont()
# font.setPointSize(16)
# self.label_class_result.setFont(font)
self.label_score_result.setText("0") # 显示置信度值
# 清除位置坐标
self.label_xmin_result.setText("0")
self.label_ymin_result.setText("0")
self.label_xmax_result.setText("0")
self.label_ymax_result.setText("0")
# 在Qt界面中显示检测完成画面
self.detected_image = image.copy()
self.display_image(image) # 在界面中显示画面
QtWidgets.QApplication.processEvents()
# self.label_display.display_image(image)
else:
self.clearUI()
5、源码获取方式
🍅由于篇幅限制,获取完整文章或源码、代做项目的,查看【用户名】、【专栏名称】就可以找到我啦🍅
感兴趣的可以先收藏起来,点赞、关注不迷路,下方查看👇🏻获取联系方式👇🏻
更多推荐

 13
13 0
0- 0


 已为社区贡献13条内容

所有评论(0)