
Win10上使用C++和PaddleOCR进行文字识别的CMake编译指南
Visual Studio
一、前言
随着人工智能的普及,文字识别技术(OCR)已经成为一项重要的应用领域。在Windows 10上,我们可以使用PaddleOCR进行快速、高效的文字识别。通过本指南,您将学会如何使用C++和PaddleOCR进行文字识别,并使用CMake进行项目构建。
二、准备工作
- 安装Visual Studio:您需要安装最新版本的Visual Studio,以支持C++开发。
- 安装CMake:在Visual Studio中安装CMake插件,以便于构建项目。
- 安装PaddleOCR:从PaddleOCR官网下载预训练模型和头文件,并解压到合适的位置。
三、创建CMake项目 - 打开Visual Studio,选择“创建新项目”。
- 选择“CMake”作为项目类型,并为项目命名。
- 选择项目存储位置,然后点击“确定”。
- 在“解决方案资源管理器”中,右键点击“源文件”,选择“添加”->“新建项”。
- 选择“C++文件(.cpp)”,输入文件名,然后点击“添加”。
四、编写代码
以下是一个简单的示例代码,演示如何使用PaddleOCR进行文字识别:#include "paddle_api.h"#include "ocr_engine.h"#include <iostream>int main() {// 初始化PaddleOCR引擎paddle::PaddleOCRLite ocr;ocr.Init();// 读取图片并进行识别std::string image_path = "path/to/image.jpg";std::vector<std::string> results = ocr.PredictToText(image_path);// 输出识别结果for (const auto& result : results) {std::cout << result << std::endl;}return 0;}
image_path为实际的图片路径。另外,确保您已经将PaddleOCR的头文件和库文件添加到项目中。
五、构建项目 - 在Visual Studio中,点击“生成”菜单,选择“生成解决方案”。
- 如果构建成功,您可以在“输出”窗口中看到编译输出的信息。
- 运行生成的可执行文件,即可进行文字识别。
六、注意事项 - 请确保您已经正确安装了所有必要的依赖项和库文件。
- 在进行文字识别时,请注意处理图像质量、光照条件等因素对识别结果的影响。
- 根据实际需求,您可以对代码进行修改和优化,以适应不同的应用场景。
- 请参考PaddleOCR的文档和教程,了解更多高级特性和使用方法。
- 如果遇到任何问题或错误,请仔细检查代码和配置文件,并参考相关文档和社区支持获取帮助。
系统要求
Visual Studio对操作系统有一定要求,例如Visual Studio 2022要求Windows 10版本1809或更高版本、Windows Server 2019或更高版本。同时,不同的工作负载可能还有额外的硬件和软件要求,如特定的显卡、.NET SDK等。
下载
可以从Visual Studio的官方网站(https://visualstudio.microsoft.com/ )下载安装程序。在该网站上,提供了不同版本的Visual Studio,如社区版(免费,适合个人开发者)、专业版和企业版。
安装步骤
-
运行下载的安装程序,会弹出Visual Studio安装程序界面。
-
在安装程序中,可以选择要安装的工作负载。工作负载是根据不同的开发需求组合的一系列工具和组件,例如,如果要进行.NET开发,可以选择.NET桌面开发工作负载;如果进行Web开发,可以选择ASP.NET和Web开发工作负载等。
-
除了工作负载,还可以选择单个组件进行安装,以满足特定的开发需求。
-
选择安装位置,默认情况下会安装在系统盘,但可以根据自己的需求更改安装路径。
-
点击“安装”按钮,安装程序会开始下载并安装所选的工作负载和组件。安装过程可能需要一些时间,具体取决于所选的内容和网络速度。
安装后的配置
安装完成后,首次启动Visual Studio可能需要进行一些配置,如选择主题、键盘快捷键方案等。还可以在“工具” -> “选项”中进行更详细的配置,如设置代码格式化规则、调试选项等。
Getting Started with Visual Studio for C and C++ Development

Program Manager
Read next
April 25, 2017
Visual Studio Code C/C++ extension April 2017 Update

Rong Lu
May 3, 2017
Vcpkg: introducing export command

EricMittelette
Are you new to Visual Studio and working with C++? Then you’ve come to the right place. Whether you’re a student writing one of your first programs or a seasoned C++ developer with years of experience, you’ll find Visual Studio to be a powerful environment for C++ development. Visual Studio is an IDE packed with features, from code browsing, colorization and navigation, to autocompletion of symbols, a built-in compiler and build system, a top of the line debugger, and built-in testing and code analysis tools. We have you covered from beginning to end, from code inception to continuous integration management, but of course this means there is a lot to learn. This blog post breaks down the basics to get you started. You will get only a small glimpse of the powerful tools that Visual Studio provides, but if you want to learn more, you should click the links throughout this post.
This blog post goes over the following concepts:
- Setting Up Visual Studio
- Opening Projects or Folders of Code
- Building the Application
- Code Editing & Navigation
- Debugging and Diagnosing Issues
- Testing
- Working With A Team
- Other Topics
- Conclusion
你是Visual Studio的新手,并且正在使用C++吗?那么你来对地方了。无论你是初学编程的学生,还是拥有多年经验的资深C++开发人员,你都会发现Visual Studio是C++开发的强大环境。Visual Studio是一个功能丰富的集成开发环境(IDE),从代码浏览、着色和导航,到符号自动补全、内置编译器和构建系统、顶级的调试器,以及内置的测试和代码分析工具,一应俱全。我们为你提供从始至终的全方位支持,从代码编写到持续集成管理,当然,这也意味着有很多东西需要学习。本文将分解基础知识,帮助你入门。你只能管中窥豹地了解Visual Studio提供的强大工具,但如果你想了解更多,应该点击本文中的链接。
这篇博客文章将介绍以下概念:
设置Visual Studio
打开代码项目或文件夹
构建应用程序
代码编辑与导航
调试和诊断问题
测试
与团队合作
其他主题
结论
Setting Up Visual Studio
Visual Studio crossed the 20-year mark with the release of Visual Studio 2017. There are many versions of the product out there, but in general, you should always pick the latest one. This will allow you to use the latest and greatest features, including the most up-to-date compiler. You’ll also benefit from recent bug fixes and performance improvements.
Visual Studio is available in three different editions: Community, Professional, and Enterprise. The Community Edition is completely free of charge for small businesses, open source projects, academic research, and classroom learning environments. If you don’t qualify for the Community License, you can purchase the Professional Edition instead. If you work for a large enterprise or simply want the best Visual Studio has to offer, then you should consider the Enterprise Edition. You can compare the offerings on the Visual Studio website if you are unsure. This guide is applicable to all editions.
Download the latest Visual Studio
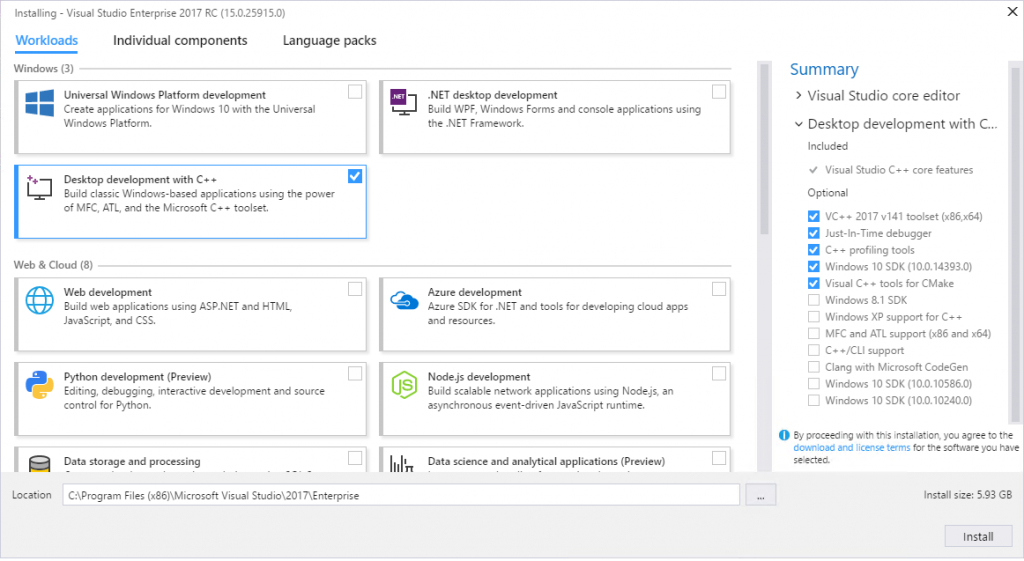
Once you have downloaded the installer, run it. Visual Studio allows you to choose what workloads you want to install, choosing only the components you want, and nothing you don’t. The following workloads are under the C++ umbrella:
设置Visual Studio
随着Visual Studio 2017的发布,Visual Studio迎来了其20周年纪念。该产品已经推出了多个版本,但总体而言,您应始终选择最新版本。这样,您就能使用最新、最强大的功能,包括最新的编译器。您还将受益于最近的错误修复和性能改进。
Visual Studio有三个不同的版本:社区版、专业版和企业版。社区版对小型企业、开源项目、学术研究以及课堂学习环境完全免费。如果您不符合社区版许可的资格,可以购买专业版。如果您在大型企业工作,或者只是想获得Visual Studio所能提供的最佳体验,那么您应该考虑企业版。如果您不确定,可以在Visual Studio网站上比较各版本的功能。本指南适用于所有版本。
下载最新版Visual Studio
下载安装程序后,请运行它。Visual Studio允许您选择要安装的工作负载,仅选择所需的组件,而不需要的组件则不会安装。以下工作负载属于C++类别:
|
|
Desktop development with C++ Provides the tools needed for building and debugging classic desktop applications. This includes classic Win32 console applications. |
|
|
Mobile development with C++ Includes the tools needed for targeting Android and iOS. |
|
|
Game development with C++ Enables you to quickly and easily get started building games using DirectX, Unreal Engine, or Cocos2d. |
|
|
Linux development with C++ All the necessary tools for developing and debugging Linux applications. |
|
|
Universal Windows Platform development This workload is not specific to just C++, but you can enable the C++ support by checking the individual component for “C++ UWP support”. |
There are a variety of other workloads for other languages such as C#, and other platforms such as Microsoft Azure (for your cloud needs). The workloads you install are not permanent, and you can always change these options by opening the installer and selecting Modify.
For this guide, please install the Desktop development with C++ workload.
对于其他语言(如C#)和其他平台(如Microsoft Azure,满足您的云需求)而言,还有多种其他工作负载。您安装的工作负载并非永久性的,您随时可以通过打开安装程序并选择“修改”来更改这些选项。
对于本指南,请安装C++桌面开发工作负载。
Once you have made your selection and clicked Install, Visual Studio will begin the installation process. Once it is complete, Visual Studio is all set up and ready to go!
Now let’s look at an actual project. For this next section, if at any time, you cannot find some feature or command that you are looking for, you can search for it via Quick Launch, the search box at the upper right of the IDE (or press Ctrl+Q to get there fast).
Opening Projects or Folders of Code
If you open the demo project folder in Windows File Explorer, you will find a variety of different files in addition to some source code. Generally, code organized by Visual Studio appears as a Solution, which contains a collection of Projects. When a codebase is organized this way, it includes a .sln file (which configures the solution) as well as .vcxproj files (which configure each project); these files help define things like include paths, compiler settings, and how the projects are connected.
Visual Studio also supports an Open Folder mode as of Visual Studio 2017 which does away with .sln and .vcxproj files and allows you as the user to configure your own environment independently. This approach is ideal for cross-platform projects that will be run from a variety of different IDEs or editors. Better yet, if you are a CMake user, as of Visual Studio 2017 there is a built-in CMake experience. This guide will not go over Open Folder or CMake, but you are encouraged to check out the relevant blog posts linked in this paragraph for more information.
To open demoApplication, double click the .sln file, or from Visual Studio go to File > Open > Project/Solution… and navigate to the appropriate solution.
Once you have opened the project, a view of the content in the project will appear in the Solution Explorer, pictured below:
一旦你做出选择并点击“安装”,Visual Studio就会开始安装过程。安装完成后,Visual Studio就全部设置完毕,可以开始使用了!
现在,让我们来看一个实际的项目。在接下来的部分中,如果任何时候你找不到你正在寻找的某个功能或命令,你可以通过“快速启动”来搜索,即集成开发环境(IDE)右上角的搜索框(或按Ctrl+Q快速进入)。
下载演示项目
打开代码项目或文件夹
如果你在Windows文件资源管理器中打开演示项目文件夹,除了源代码外,你还会发现各种不同的文件。通常,Visual Studio组织的代码会显示为一个解决方案,其中包含一组项目。当代码库以这种方式组织时,它会包含一个.sln文件(用于配置解决方案)以及.vcxproj文件(用于配置每个项目);这些文件有助于定义包含路径、编译器设置以及项目之间的连接方式等。
自Visual Studio 2017起,Visual Studio还支持“打开文件夹”模式,该模式摒弃了.sln和.vcxproj文件,允许用户独立配置自己的环境。这种方法非常适合那些将从各种不同的集成开发环境(IDE)或编辑器中运行的跨平台项目。更棒的是,如果你是CMake用户,自Visual Studio 2017起,它还提供了内置的CMake体验。本指南不会详细介绍“打开文件夹”或CMake,但鼓励你查阅本段中链接的相关博客文章以获取更多信息。
要打开demoApplication,请双击.sln文件,或者在Visual Studio中点击“文件”>“打开”>“项目/解决方案…”并导航到相应的解决方案。
打开项目后,解决方案资源管理器中将会显示项目内容的视图,如下图所示:

New projects can be also created by going to File > New > Project… and selecting the template that is appropriate. Console applications are under Visual C++ > Win32.
Building the Application
Visual Studio is closely integrated with the Visual C++ compiler, which makes it easy to build and debug your C++ applications. Near the top of the IDE inside the standard toolbar, there are dropdowns where you can change your build configuration and architecture. You can also easily add more configurations, as needed. For this exercise, you can leave the default settings of Debug and x86.
也可以通过转到“文件”>“新建”>“项目…”并选择合适的模板来创建新项目。控制台应用程序位于“Visual C++”>“Win32”下。
构建应用程序
Visual Studio与Visual C++编译器紧密集成,这使得构建和调试C++应用程序变得轻而易举。在标准工具栏内,靠近IDE顶部的地方,有一些下拉菜单,你可以在其中更改构建配置和架构。如果需要,你还可以轻松添加更多配置。对于本练习,你可以保留默认设置“调试”和“x86”。

Attempt to build the application by going to Build > Build Solution (or alternatively by pressing F7). The build will fail, since the code contains an error. The Output Window is a valuable tool while you are building; it provides information about the status of the build.
尝试通过转到“生成”>“生成解决方案”(或者按F7)来构建应用程序。由于代码中存在错误,构建将会失败。“输出窗口”在构建过程中是一个很有价值的工具;它提供了有关构建状态的信息。

Fixing compiler errors
You should see an error in the Error List at the bottom of the screen when you attempt to build. With this error, you not only get the location of the problem and a description, but if you double-click the line, you will be brought to the specific location in the code. This makes it easy to quickly navigate to problem areas.
Double-click on the error after building, and fix the offending line of code.
Code Editing & Navigation
This section provides a glimpse of what is possible in Visual Studio. To learn more about this area please visit the C++ Code Editing and Navigation in Visual Studio blog post.
Intellisense
One of the most useful features for helping you write code quickly in Visual Studio is IntelliSense, which is a context-aware code completion tool. As you type, Visual Studio will suggest classes, methods, objects, code snippets, and more symbols that make sense in relation to what you have typed so far and where you have typed it. You can scroll up and down the suggestions with the arrow keys, and complete symbols with Tab.
In the main function try adding a call to the farewell function to the mySorter object. You should see IntelliSense pop up with all the possible functions available from the sorter class.
当你尝试构建时,你应该会在屏幕底部的“错误列表”中看到一个错误。有了这个错误提示,你不仅可以获得问题的位置和描述,而且如果你双击该行,还会跳转到代码中的具体位置。这样,你就可以轻松快速地定位到问题区域。
构建后双击错误提示,并修复有问题的代码行。
代码编辑与导航
本节简要介绍了Visual Studio中的功能。如需了解更多关于此领域的信息,请访问“Visual Studio中的C++代码编辑与导航”博客文章。
智能感知
在Visual Studio中,帮助您快速编写代码的最实用功能之一是IntelliSense,它是一个上下文感知的代码补全工具。当您键入时,Visual Studio会根据您到目前为止键入的内容以及键入的位置,为您建议类、方法、对象、代码段以及更多相关的符号。您可以使用箭头键上下滚动建议列表,并使用Tab键完成符号。
在主函数中,尝试向mySorter对象添加一个对farewell函数的调用。你应该会看到IntelliSense弹出框,其中包含sorter类中所有可用的函数。

Go To
To efficiently write and understand code, easy code navigation is essential. By using the Go To feature (Ctrl+T) you can quickly get to where you need to go, without taking your hands off the keyboard. When you open the dialog, you can filter your results by clicking on the desired button, or by starting your query with a specific token. For example, you can go to a specific file by opening the Go To dialog and typing “f ”. Another common way to access this dialog is by going to a specific line number; you can do this by opening the menu traditionally and using the “:” token, or by pressing Ctrl+G. Try using Go To to navigate around the demo project.
Use the Go To menu (Ctrl+T) to open the file sorter.h by typing “f sorter.h”. Use the Ctrl+G shortcut to go to line 23 to change the private member “name” to your name.
为了高效编写和理解代码,便捷的代码导航至关重要。通过使用“转到”功能(Ctrl+T),您无需离开键盘即可快速到达所需位置。打开对话框后,您可以通过点击所需按钮或以特定标记开头来筛选结果。例如,您可以通过打开“转到”对话框并输入“f ”来转到特定文件。访问此对话框的另一种常见方式是转到特定行号;您可以通过传统方式打开菜单并使用“:”标记,或按Ctrl+G来实现。尝试使用“转到”功能在演示项目中导航。
使用“转到”菜单(Ctrl+T),输入“sorter.h”来打开文件“sorter.h”。使用快捷键Ctrl+G跳转到第23行,将私有成员“name”更改为你的名字。

Peek/Go to Definition
Sometimes it can be challenging to find out where a function or object is defined in your codebase. This problem is easily solved in Visual Studio, where you can easily peek into definitions. Try this in the demo project by selecting the function you want to look at, and pressing Alt+F12, or selecting it from the right-click menu. This will bring up a preview of the file where the function is defined, where you can quickly make small edits. Press Esc to close the preview window. You can also go directly to the definition by pressing only F12.
Use Peek Definition on the printVector function by selecting the function and pressing Alt+F12.
Add a dash between the numbers in the vector when they are printed.
有时,在代码库中查找某个函数或对象的定义位置可能颇具挑战。在Visual Studio中,这个问题很容易解决,因为你可以轻松地查看定义。在演示项目中尝试一下,选择你想要查看的函数,然后按下Alt+F12,或者从右键菜单中选择。这将弹出一个预览窗口,显示定义该函数的文件,你可以在其中快速进行小幅编辑。按下Esc键可关闭预览窗口。你也可以只按F12直接跳转到定义处。
通过选择printVector函数并按下Alt+F12,即可使用该函数的“查看定义”功能。
在打印向量中的数字时,在数字之间添加一个破折号。
编辑译文
段落对照

Rename
You can also use Visual Studio to refactor existing code. In the demo project, there is a function that has an unhelpful name. Rather than going to each file to change the name of each occurrence manually, choose one of the functions and press Ctrl+R, Ctrl+R or right-click it and choose Rename. This will bring up a menu where you can choose what you want to rename it to, and then preview the changes before they are committed.
Use Rename (Ctrl+R, Ctrl+R) to change the method “SILLY_SALUTATION_FUNCTION” to something more useful, such as “greeting”.
重命名
您还可以使用Visual Studio来重构现有代码。在演示项目中,有一个函数的名字不太直观。与其手动去每个文件更改每个出现的地方的名称,不如选择其中一个函数,然后按下Ctrl+R,Ctrl+R,或者右键单击它并选择“重命名”。这将弹出一个菜单,您可以在其中选择要重命名的名称,然后在提交更改之前预览更改效果。
使用重命名(Ctrl+R, Ctrl+R)将方法“SILLY_SALUTATION_FUNCTION”更改为更有用的名称,例如“greeting”。

Debugging and Diagnosing Issues
Once you can successfully build your application and write code easily, the next step is often debugging the application. Debugging can be a complex process, and Visual Studio provides many powerful tools to help along the way. The most commonly used debugging tool is the breakpoint, so let’s start with that. If you click on the bar to the left of your code, a red circle should appear. If you click the circle, the breakpoint will be removed.
调试和问题诊断
一旦你能成功构建应用程序并轻松编写代码,下一步通常就是调试应用程序。调试可能是一个复杂的过程,而Visual Studio提供了许多强大的工具来帮助你完成这一过程。最常用的调试工具是断点,所以我们就从它开始吧。如果你点击代码左侧的栏,应该会出现一个红圈。如果你点击这个红圈,断点就会被移除。

When a breakpoint is set and the program reaches that point of execution, it will stop, allowing you to inspect variables and the current state of the program.
Place a breakpoint on line 33 of demoApplication.cpp by clicking the bar to the left of the line numbers.
Click the red circle again to remove the breakpoint.

To begin debugging, you can either press the green arrow at the top of the IDE or press F5. Once the program has stopped on the breakpoint, there are many things you can do to help you diagnose problems. One of the best ways to find problems is to understand the current state of the program, versus what it should be. This can be easily achieved by using the Autos Window, which lists recently used variables and their values. You can also hover your mouse over a variable to see what the current value is.
Do the following:
- Place a breakpoint on line 14 of the main function.
- Click the green arrow at the top of the IDE or press F5 to begin debugging.
- Find out what the value of testInt is before it is initialized by hovering over the value in the code.
- Look at the value of testInt in the Autos window.
- Press the green arrow or F5 again to stop debugging.


When you have sufficiently understood the current state of the program, you can press the green arrow button or press F5 again to have the program run until the next breakpoint. You can also step the program one line at a time if needed by using the arrows at the top.

Step Over (F10) will run through whatever is on the current line, and suspend execution after the function returns. Step Into (F11) will follow the function call of the next line, allowing you to see what is happening inside that function. At any time, you can step out (Shift+F11), which will place the program just after it has completed the current functional scope. Once you are finished debugging you can run the program to its completion, or press the red square (or Shift+F5) at the top of the IDE to stop the debugging session.
Use a combination of these to explore the demo project and see if you can fix the logical bug in the sort algorithm (Hint: it is in the sort algorithm itself).
There are many more tools within Visual Studio that can help you profile and debug your applications. Check out the C++ Debugging and Diagnostics blog post to learn more.
Testing
Visual Studio has a built-in test framework to help you unit test your projects, ensuring that the code you write is working as expected. To test the demo project, which is a native console application, you can add a Native Unit Test Project to the solution.
Add a test project to the demo. This is done by going to File > New > Project then selecting Visual C++ > Test > Native Unit Test Project. Make sure to choose the Add to solution option in the Solution dropdown. You can also simply right-click your solution name in the Solution Explorer and choose Add > New Project to accomplish the same task.

Once you have added a unit test, you can open the .cpp file and see the basic testing skeleton in the template, and begin to add tests.
Add a test method, making sure that it will pass. Try the following code: TEST_METHOD(TestMethod1) { Assert::AreEqual(1,1); }

Once you have added a test, you can run the test by going to Test > Run > All Tests in the menu at the top of the IDE. Once you have run the tests, you will see the results in the Test Explorer window.
Run your test by going to Test > Run > All Tests. Try adding another test that will fail, and running the tests again.

If you would like to find out more information about unit testing, including how to connect your test project to your code under test, and check the code coverage of your unit tests, check out the C++ Unit Testing in Visual Studio blog post.
Working with A Team
It is very common these days to be working on a project with a team, and Visual Studio makes collaboration with others easy! You can easily create new source control repositories using Git or Team Foundation Server to manage your codebase. To create a new repo for a project, click the Add to Source Control button at the bottom of the screen, and add the opened project to the source control system of your choice.

Once you do that, a local repository will be made for your project. From here you can make commits, or push your changes to a remote Git service such as GitHub. This is all managed in the Team Explorer window.

Try adding the demo project to source control, and pushing it to GitHub. This is done by pressing the Add to source control button, and then pushing to a remote repository inside the Team Explorer.
You can also very easily clone from source control from the Team Explorer window. Choose Projects > New Repository, and then follow the prompts to clone the project. From here, all you must do is paste in the URL, and the project will be cloned.


To learn more about working on a project as a team in Visual Studio, check out the Visual Studio for Teams of C++ Developers blog post.
Other Topics
There are many other useful things Visual Studio can do. So many things, in fact, it is hard to cover it all in one guide. Follow the links below to find out more on how to get the most out of Visual Studio.
Code Analysis
Visual Studio by default catches a lot of code issues, but its Code Analysis tool can often uncover hard-to-find issues that would normally be missed. Common errors that are reported include buffer overflows, uninitialized memory, null pointer dereferences, and memory and resource leaks. This functionality is built into the IDE, and can easily be used to help you write better code. Try it out by going to the Analyze menu and choosing Run Code Analysis > On Solution. Learn more about Code Analysis as well as the C++ Core Guidelines Checkers in the announcement blog post.
Library Acquisition
Library acquisition in C++ can be challenging. While Visual Studio has support for NuGet package management, more recently a new tool called vcpkg was launched. Vcpkg is an open source tool maintained by Microsoft that simplifies acquiring and building open source libraries, with over 200 currently supported. This tool, while separate from Visual Studio itself, is a valuable companion for any C++ developer on Windows. Check out the announcement blog post for details.
Conclusion
We hope that this guide has allowed you to get up to speed with Visual Studio quickly, and that you have learned some of the core functionality. This should be enough to get you started, but there are still many more features that could not be covered in this guide. The Visual C++ Blog is a very useful resource to find out more about not only the product overall, but also what we are currently working on and changing. You can find the comprehensive product documentation on docs.microsoft.com as well. Now get out there and build something amazing!
We are constantly trying to improve, so if you have any feedback or suggestions for us, please feel free to reach out to us anytime! We can be reached via email at visualcpp at microsoft.com and you can provide feedback via Help > Report A Problem in the product, or via Developer Community.
https://visualstudio.microsoft.com/zh-hant/vs/features/cplusplus/
更多推荐


 4
4 0
0- 0


 已为社区贡献4条内容

所有评论(0)