
七、vscode四种调试方案完全指南
一、项目概述
|
属性 |
说明 |
|---|---|
|
硬件 |
Renesas RA8P1,ARM Cortex-M85 2Ghz,rtthread titan board |
|
工具链 |
Arm GNU Toolchain 13.3.Rel1 ( |
|
构建 |
RASC-CMake |
|
IDE |
vscode |
|
调试扩展 |
probe-rs-debug
+ |
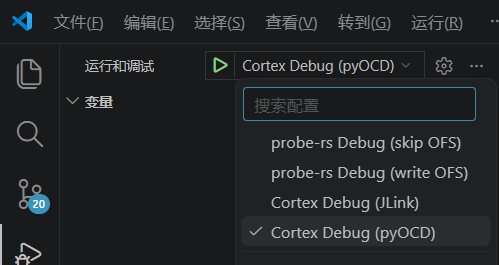
二、项目目录架构
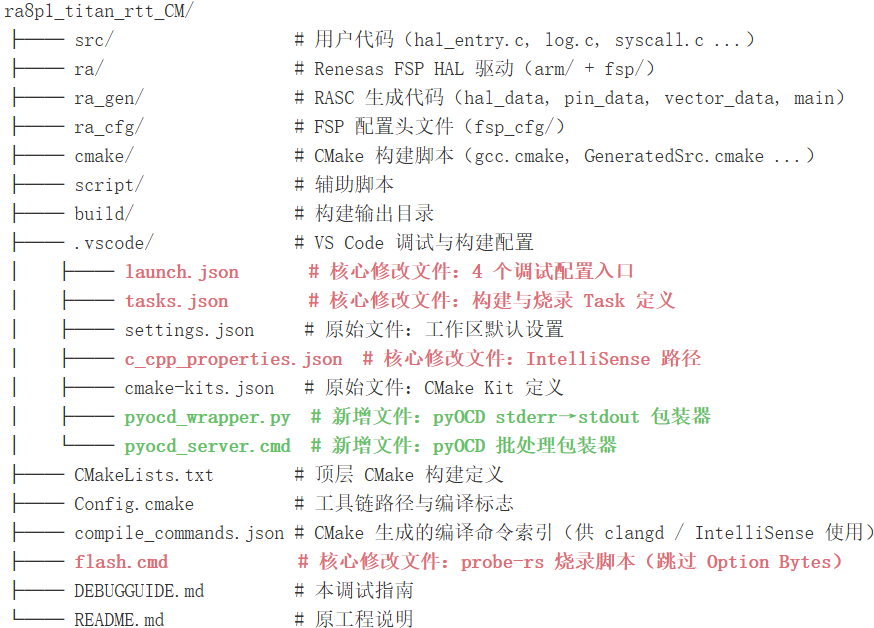
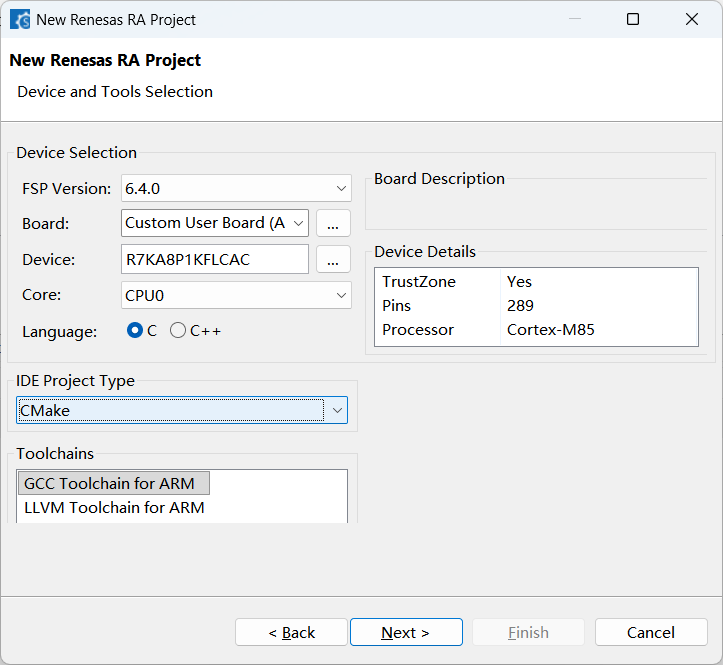
构建流程:CMake + MinGW Makefiles → Arm GNU Toolchain (arm-none-eabi-gcc) → .elf
构建命令:
:: 配置(首次 / 修改 CMakeLists.txt 后)
cmake-G"MinGW Makefiles"-S . -B build\Debug -DCMAKE_BUILD_TYPE=Debug

:: 编译
cmake--build build\Debug -j

:: 清理
cmake--build build\Debug --target clean

:: 全清(删除构建目录重新配置)
rmdir/s/q build\Debug
cmake-G"MinGW Makefiles"-S . -B build\Debug -DCMAKE_BUILD_TYPE=Debug

:: 一步到位:配置 + 编译(VS Code Task "Configure Project" + "Build Project")
调试架构:四种方案共用同一 .elf,区别在于 GDB Server(probe-rs dap-server / JLinkGDBServerCL / pyOCD gdbserver)和 Option Bytes 处理策略。
F5 行为说明:
|
方案 |
F5 下载? |
下载机制 |
日志显示在哪? |
|---|---|---|---|
| skip OFS |
✅ 是 |
preLaunchTask → |
终端 (Terminal)
面板,Task 输出 |
| write OFS |
✅ 是 |
flashingEnabled: true
,probe-rs 自动烧录 |
probe-rs 输出(Debug Console / 终端) |
| Cortex JLink |
✅ 是 |
GDB 启动后将 ELF 传给 JLinkGDBServerCL,JLink 自动擦除+烧录+校验 |
Debug Console
(见实测日志 |
| Cortex pyOCD |
✅ 是 |
GDB 启动后将 ELF 传给 pyOCD gdbserver,pyOCD 自动烧录( |
Debug Console
(见实测日志 |
所有方案 F5 都会自动下载固件到芯片,区别在于下载机制和 Option Bytes 处理策略。
FSP 配置:通过 RASC (RA Smart Configurator) 修改 configuration.xml,重新生成 ra_gen/ 和 cmake/。
三、四种调试方案对比
|
特性 |
方案 A: probe-rs (skip OFS) |
方案 B: probe-rs (write OFS) |
方案 C: Cortex JLink |
方案 D: Cortex pyOCD |
|---|---|---|---|---|
| 调试器 | JLink / DAPLink | JLink / DAPLink | JLink 仅 | DAPLink 仅 |
| Option Bytes | 跳过
(参考 e2studio,见下方说明) |
写入
(YAML Config 改为 Nvm) |
写入
(JLink 无 YAML 检查,GDB 发什么写什么) |
写入
(pyOCD 无 YAML 检查,GDB 发什么写什么) |
| 烧录方式 | F5 自动
: preLaunchTask → |
F5 自动
: |
F5 自动
: GDB → JLinkGDBServerCL 自动烧录 |
F5 自动
: GDB → pyOCD gdbserver 自动烧录( |
| 推荐场景 | 日常开发 ★★★ | 首次烧录新板 |
JLink 用户 |
DAPLink 备用 |
Option Bytes 跳过原理:
probe-rs 的芯片描述 YAML 定义了 Flash Config 区域,而 GNU LD 链接脚本也定义同名段(__option_setting_ofs*)。两者设计角度不同:LD 负责在 ELF 中生成 OFS 内容,YAML 告诉 probe-rs 如何烧录这些段。e2studio 的调试器(如 Renesas Flash Programmer)默认不擦除 Config 区域,保留 RASC 一次性写入的值。
关键区别在于 probe-rs 的 YAML 软件访问控制:默认 YAML 将 Config 标记为 !ReadOnly,probe-rs 在软件层面检查到这个标记就拒绝写入,直接报错。JLink 和 pyOCD 没有这个 YAML 检查层,收到 GDB 发来的地址就直接写,所以不报错、不跳过。
因此四种方案的实际行为:
|
方案 |
是否写 OFS? |
不报错原因 |
|---|---|---|
| A (skip OFS) | 不写
( |
不写当然不报错 |
| B (write OFS) | 写
(YAML 改为 |
YAML 允许写入 |
| C (JLink) | 写 |
无 YAML 检查层 |
| D (pyOCD) | 写 |
无 YAML 检查层 |
JLink/pyOCD 的行为等价于 probe-rs 方案 B(write OFS),每次 F5 都写入 OFS。因为 RASC 生成的 OFS 值是正确的,所以不会出问题。但若 OFS 配置不当(如安全位被覆盖),风险是一样的。方案 A(skip OFS)是唯一彻底不碰 Config 区域的方案,这就是它作为默认推荐的原因。
三、方案 A — probe-rs (skip OFS)
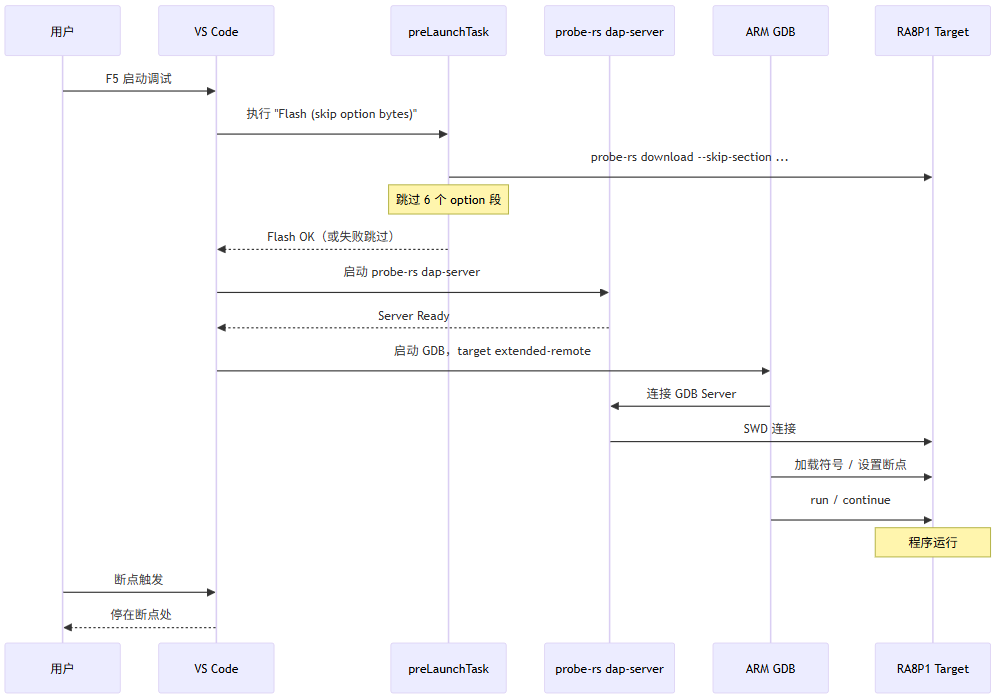
概述:推荐日常使用。probe-rs 内置 dap-server 作为 GDB Server,flashingEnabled: false 将烧录委托给 preLaunchTask(flash.cmd),通过 --skip-section 跳过 6 个 Option Bytes 段。
架构流程
配置关键点:
{
    "type": "probe-rs-debug",
    "chip": "R7KA8P1KF",
    "chipDescriptionPath": "...\\RA8P1_Series.yaml",    // 必须用原始(只读)YAML
    "runtimeExecutable": "...\\probe-rs.exe",
    "runtimeArgs": ["dap-server"],
    "flashingConfig": {
        "flashingEnabled": false                         // 烧录由 preLaunchTask 完成
    },
    "preLaunchTask": "Flash (skip option bytes)"
}
核心要点:
chipDescriptionPath→ 必须用
RA8P1_Series.yaml(Config 区域!ReadOnly),不可用_writable.yamlflashingEnabled: false→ 烧录由
flash.cmd独立完成flash.cmd→ 设计为"失败则跳过",不影响调试流程
YAML 文件差异:
|
文件 |
Config 区域 |
用途 |
|---|---|---|
RA8P1_Series.yaml |
!ReadOnly
,probe-rs 不会写入 |
方案 A(skip OFS) |
RA8P1_Series_writable.yaml |
!Nvm
,probe-rs 可以写入 |
方案 B(write OFS) |
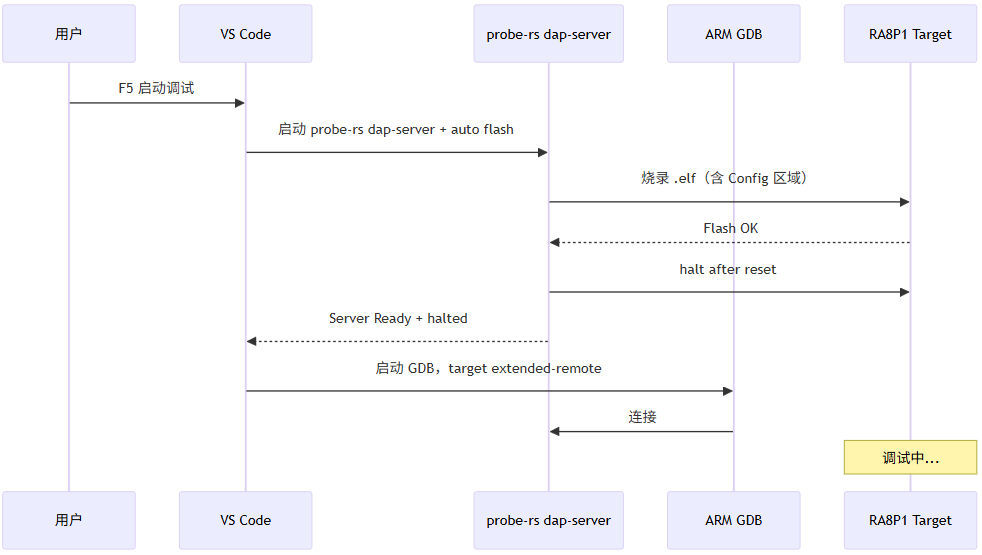
四、方案 B — probe-rs (write OFS)
概述:首次烧录新板或需要修改 Option Bytes 时使用。probe-rs 自动完成烧录(含 Config 区域),无需 preLaunchTask。
架构流程
配置关键点:
{
    "type": "probe-rs-debug",
    "chip": "R7KA8P1KF",
    "chipDescriptionPath": "...\\RA8P1_Series_writable.yaml",  // 必须用可写 YAML
    "runtimeExecutable": "...\\probe-rs.exe",
    "runtimeArgs": ["dap-server"],
    "flashingConfig": {
        "flashingEnabled": true,
        "haltAfterReset": true
    }
}
核心要点:
chipDescriptionPath→ 必须用
RA8P1_Series_writable.yaml(Config!Nvm)flashingEnabled: true→ probe-rs 自动烧录(含 Option Bytes)
-
首次烧录新板时推荐
五、方案 C — Cortex Debug (JLink)
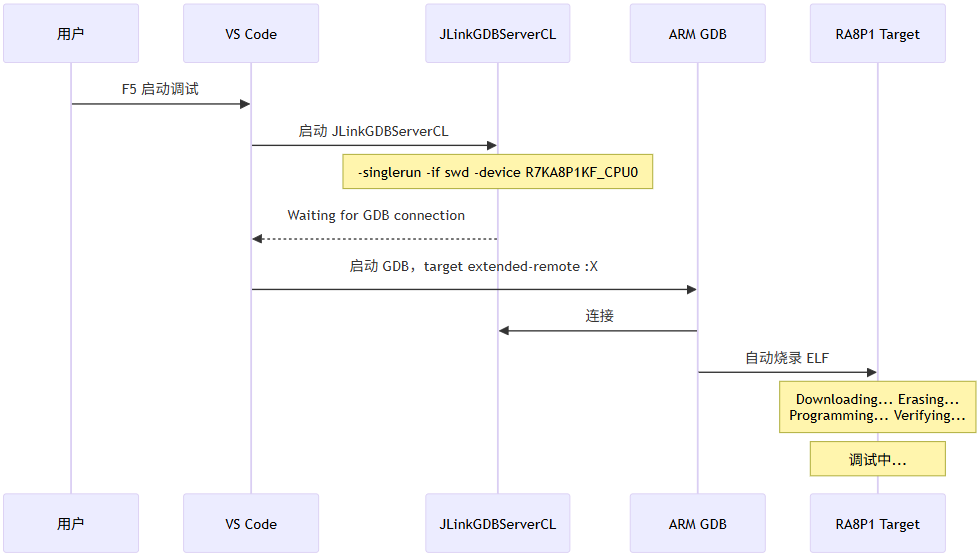
概述:传统 cortex-debug + JLink GDB Server 方案,调试速度快、功能成熟。
架构流程:
配置关键点:
{
    "name": "Cortex Debug (JLink)",
    "type": "cortex-debug",
    "servertype": "jlink",
    "interface": "swd",
    "device": "R7KA8P1KF_CPU0",      // 必须带 _CPU0 后缀
    "runToEntryPoint": "main"
}
核心要点:
device: "R7KA8P1KF_CPU0"→ 必须带
_CPU0后缀(JLink GDB Server 要求)-
F5 时 GDB 自动将 ELF 传给 JLinkGDBServerCL 完成烧录(+校验),日志见 Debug Console
-
JLink 无 YAML 检查,会写入 Option Bytes(等价于 probe-rs 方案 B)
-
无需
chipDescriptionPath
六、方案 D — Cortex Debug (pyOCD)
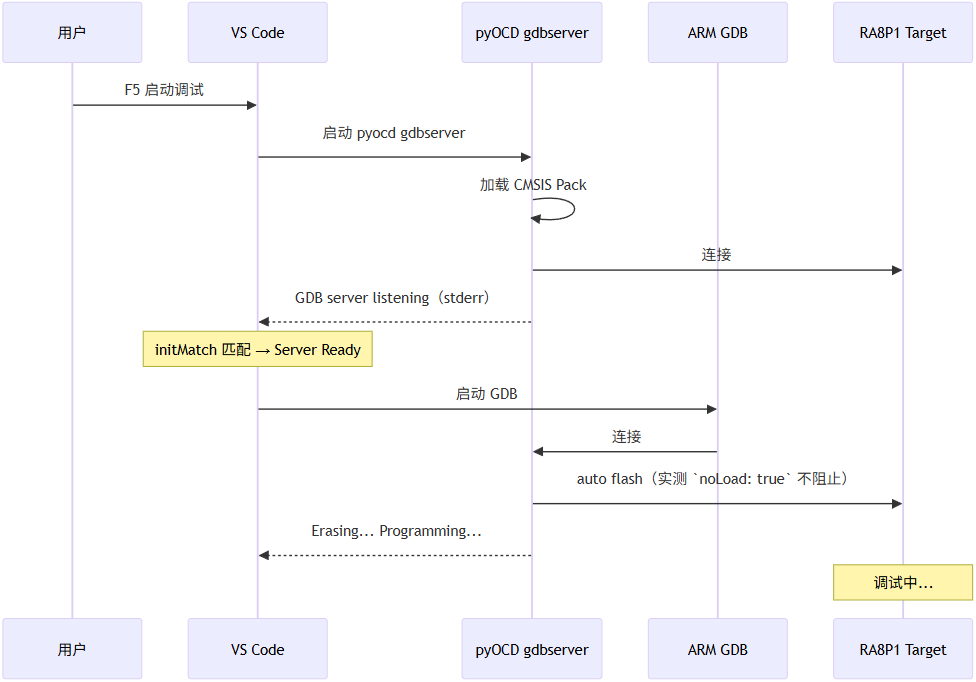
概述:cortex-debug + pyOCD GDB Server,适配 DAPLink。pyOCD 从 CMSIS Pack 读取芯片信息,无需 YAML 描述文件。
注意:实测 noLoad: true 不阻止 pyOCD gdbserver 烧录。F5 时 GDB 会将 ELF 传给 pyOCD,pyOCD 自动完成擦除+编程(见 Debug Console 日志 Erasing... Programming...)。但 noLoad 可能影响 cortex-debug 是否发送 GDB load 命令,不同版本行为可能不同。如需真正跳过烧录(保护 Option Bytes),建议改用方案 A(skip OFS)。
架构流程:
配置关键点:
{
    "name": "Cortex Debug (pyOCD)",
    "type": "cortex-debug",
    "servertype": "pyocd",
    "serverpath": "D:\\Program Files\\Python313\\Scripts\\pyocd.exe",
    "device": "R7KA8P1KF",              // 不带 _CPU0
    "targetId": "R7KA8P1KF",            // 传给 --target
    "cmsisPack": "D:\\Program Files\\pyocd\\packs\\Renesas.RA_DFP.6.1.0.pack",
    "noLoad": true                       // 仅调试不烧录(实测无效,pyOCD 仍会烧录)
}
核心要点:
device/
targetId→ 用R7KA8P1KF(不带_CPU0)cmsisPack→ 指向本地
.pack,pyOCD 自动转为--pack <path>-
pyOCD 无 YAML 检查,会写入 Option Bytes(等价于 probe-rs 方案 B)
noLoad: true→ 实测无法阻止 pyOCD 烧录,若要保护 Option Bytes 请用方案 A
cortex-debug 补丁说明:
cortex-debug 1.12.1 的 PyOCDServerController.initMatch 硬编码为正则 /GDB server started (at|on) port/,但 pyOCD 0.44.1 实际输出 GDB server **listening** on port 50000(输出到 stderr)。已手动补丁:
- initMatch(){return/GDB server started (at|on) port/}
+ initMatch(){return/GDB server (started (at|on) port|listening on port)/}
补丁位置:%USERPROFILE%\.vscode\extensions\marus25.cortex-debug-1.12.1\dist\debugadapter.js
该补丁在更新 cortex-debug 扩展后需重新应用。
备用方案(补丁丢失时):
-
使用
.vscode\pyocd_server.cmd(批处理包装器,添加--pack参数)
七、烧录命令详解(附加)
probe-rs 烧录
方案 A(跳过 Option Bytes,封装在 flash.cmd):
probe-rs download ^
--chip R7KA8P1KF ^
--chip-description-path"D:\Program Files\probe-rs-tools-x86_64-pc-windows-msvc\renesas_ra\RA8P1_Series.yaml"^
--protocol swd --speed1000--allow-erase-all^
--skip-section"__option_setting_ofs0_reg$$"^
--skip-section"__option_setting_ofs2_reg$$"^
--skip-section"__option_setting_ofs1_sec_reg$$"^
--skip-section"__option_setting_ofs1_sel_reg$$"^
--skip-section"__option_setting_ofs3_sec_reg$$"^
--skip-section"__option_setting_ofs3_sel_reg$$"^
  build\Debug\ra8p1_titan_rtt_CM.elf
要点:RA8P1_Series.yaml(只读)+ 6 个 --skip-section
6 个 Option Bytes 段:
|
段落名称 |
对应寄存器 |
|---|---|
__option_setting_ofs0_reg$$ |
OFS0 |
__option_setting_ofs2_reg$$ |
OFS2 |
__option_setting_ofs1_sec_reg$$ |
OFS1 Security |
__option_setting_ofs1_sel_reg$$ |
OFS1 Select |
__option_setting_ofs3_sec_reg$$ |
OFS3 Security |
__option_setting_ofs3_sel_reg$$ |
OFS3 Select |
方案 B(写入 Option Bytes):
probe-rs download ^
--chip R7KA8P1KF ^
--chip-description-path"D:\Program Files\probe-rs-tools-x86_64-pc-windows-msvc\renesas_ra\RA8P1_Series_writable.yaml"^
--protocol swd --speed1000--allow-erase-all^
  build\Debug\ra8p1_titan_rtt_CM.elf
要点:RA8P1_Series_writable.yaml(可写) + 无 --skip-section(烧录完整 Flash 含 Config)
其他命令:
:: 仅擦除
probe-rs erase --chip R7KA8P1KF --chip-description-path RA8P1_Series.yaml --protocol swd --allow-erase-all
:: 列出调试器
probe-rs list
pyOCD 烧录
pyocd flash ^
--target R7KA8P1KF ^
--pack"D:\Program Files\pyocd\packs\Renesas.RA_DFP.6.1.0.pack"^
--frequency1000000--erase auto ^
  build\Debug\ra8p1_titan_rtt_CM.elf
注意事项:
-
pyOCD 0.44.1 可能尝试烧录 Option Bytes,Config 区域写保护时失败,可使用
--skip跳过 --pack指定本地 Pack,避免从网络下载(国内约 1760 个描述符易超时;
launch.json中cmsisPack已等效于--pack)
JLink 烧录
"C:\Program Files\SEGGER\JLink_V858\JLinkExe.exe" -device R7KA8P1KF -if SWD -speed 1000 -autoconnect 1 -CommanderScript flash.jlink
交互式:
"C:\Program Files\SEGGER\JLink_V858\JLinkExe.exe"
  > device R7KA8P1KF
  > if SWD
  > speed 1000
  > loadfile build\Debug\ra8p1_titan_rtt_CM.elf
  > r
  > g
  > exit
烧录方式汇总
|
烧录方式 |
命令 |
跳过 OFS |
速度 |
适用调试方案 |
|---|---|---|---|---|
|
probe-rs download (skip) |
flash.cmd |
是 | 快 | 方案 A (skip OFS) |
|
probe-rs download (all) |
命令行 |
否 |
快 |
方案 B (write OFS) |
|
pyOCD flash (CLI) |
pyocd flash ... |
需 |
中 |
pyOCD 手动烧录 |
|
pyOCD debug (F5) |
cortex-debug + |
会烧录
(实测 |
— |
pyOCD F5 调试时会自动烧录 |
|
JLinkExe |
JLinkExe ... |
N/A |
快 |
方案 C (JLink) |
八、故障排除
|
问题 |
原因 |
解决 |
|---|---|---|
| probe-rs timeout |
调试器被前一会话占用 |
断开 USB 重连,重启 VS Code |
| flash.cmd failed |
probe-rs 忙或 YAML 路径错误 |
检查 |
| The chip description does not contain "Config" |
YAML 文件错误 |
确认使用正确的 YAML(只读 vs 可写) |
| pyOCD Timeout (no match) |
initMatch 不匹配 |
检查补丁,或使用 wrapper |
| pyOCD FlashAlgoException |
pyOCD 版本过旧 |
使用 pip 安装的 0.44.1+ |
| pyOCD pack index download timeout |
国内网络慢 |
使用 |
| JLink Could not connect |
驱动未安装或 USB 异常 |
重新安装 JLink 驱动 |
| JLink Unknown device |
名称错误 |
确认 |
| 断点不触发 |
调试器未 halt |
检查 |
| ELF 文件找不到 |
未编译 |
先执行 CMake Build |
九、参考资料
|
工具 / 资料 |
链接 / 说明 |
|---|---|
| probe-rs |
https://github.com/probe-rs/probe-rs — 嵌入式调试工具,内置 GDB server |
| probe-rs 文档 (Flash) |
https://probe.rs/docs/tools/flash/ |
| pyOCD |
https://github.com/pyocd/pyOCD — CMSIS-DAP 调试器 |
| pyOCD 文档 |
https://pyocd.io/docs/ |
| cortex-debug |
https://github.com/Marus/cortex-debug — VS Code 扩展 |
| JLink (SEGGER) |
https://www.segger.com/products/debug-probes/j-link/ |
| Renesas RA DFP Pack | Renesas.RA_DFP.6.1.0.pack
— 本地路径 |
| Arm GNU Toolchain |
Arm GNU Toolchain 13.3.Rel1 |
| RA8P1 (R7KA8P1KF) 数据手册 |
Renesas 官网文档 |
| RT-Thread Titan Board |
GitHub SDK BSP / RT-Thread 主线 BSP — 本工程使用的 RA8P1 测试开发板 |
十、总结
|
优先级 |
方案 |
调试器 |
场景 |
核心要点 |
|---|---|---|---|---|
| ★★★ | probe-rs (skip OFS) |
JLink / DAPLink |
日常调试 | 只读 YAML + flash.cmd + 6 个 --skip-section |
| ★★☆ | probe-rs (write OFS) |
JLink / DAPLink |
首次烧录 / 改 OFS | 可写 YAML + flashingEnabled: true |
| ★★☆ | Cortex JLink |
JLink 仅 |
传统调试 |
device 加 _CPU0 |
| ★☆☆ | Cortex pyOCD |
DAPLink 仅 |
DAPLink 备用 |
cmsisPack + noLoad(实测无效,仍会烧录) |
工具链:Arm GNU Toolchain 13.3.Rel1 @ D:\Program Files\GCC\arm-gnu-toolchain-13.3.rel1-mingw-w64-i686-arm-none-eabi\bin(通过 ARM_GCC_TOOLCHAIN_PATH 指定;旧 README 示例的 C:\12_2_mpacbti_rel1\bin 本机未安装)

更多推荐

 7
7 0
0- 0


 已为社区贡献2条内容

所有评论(0)