
【GitHub项目推荐--PySpur:AI智能体工作流可视化开发平台】
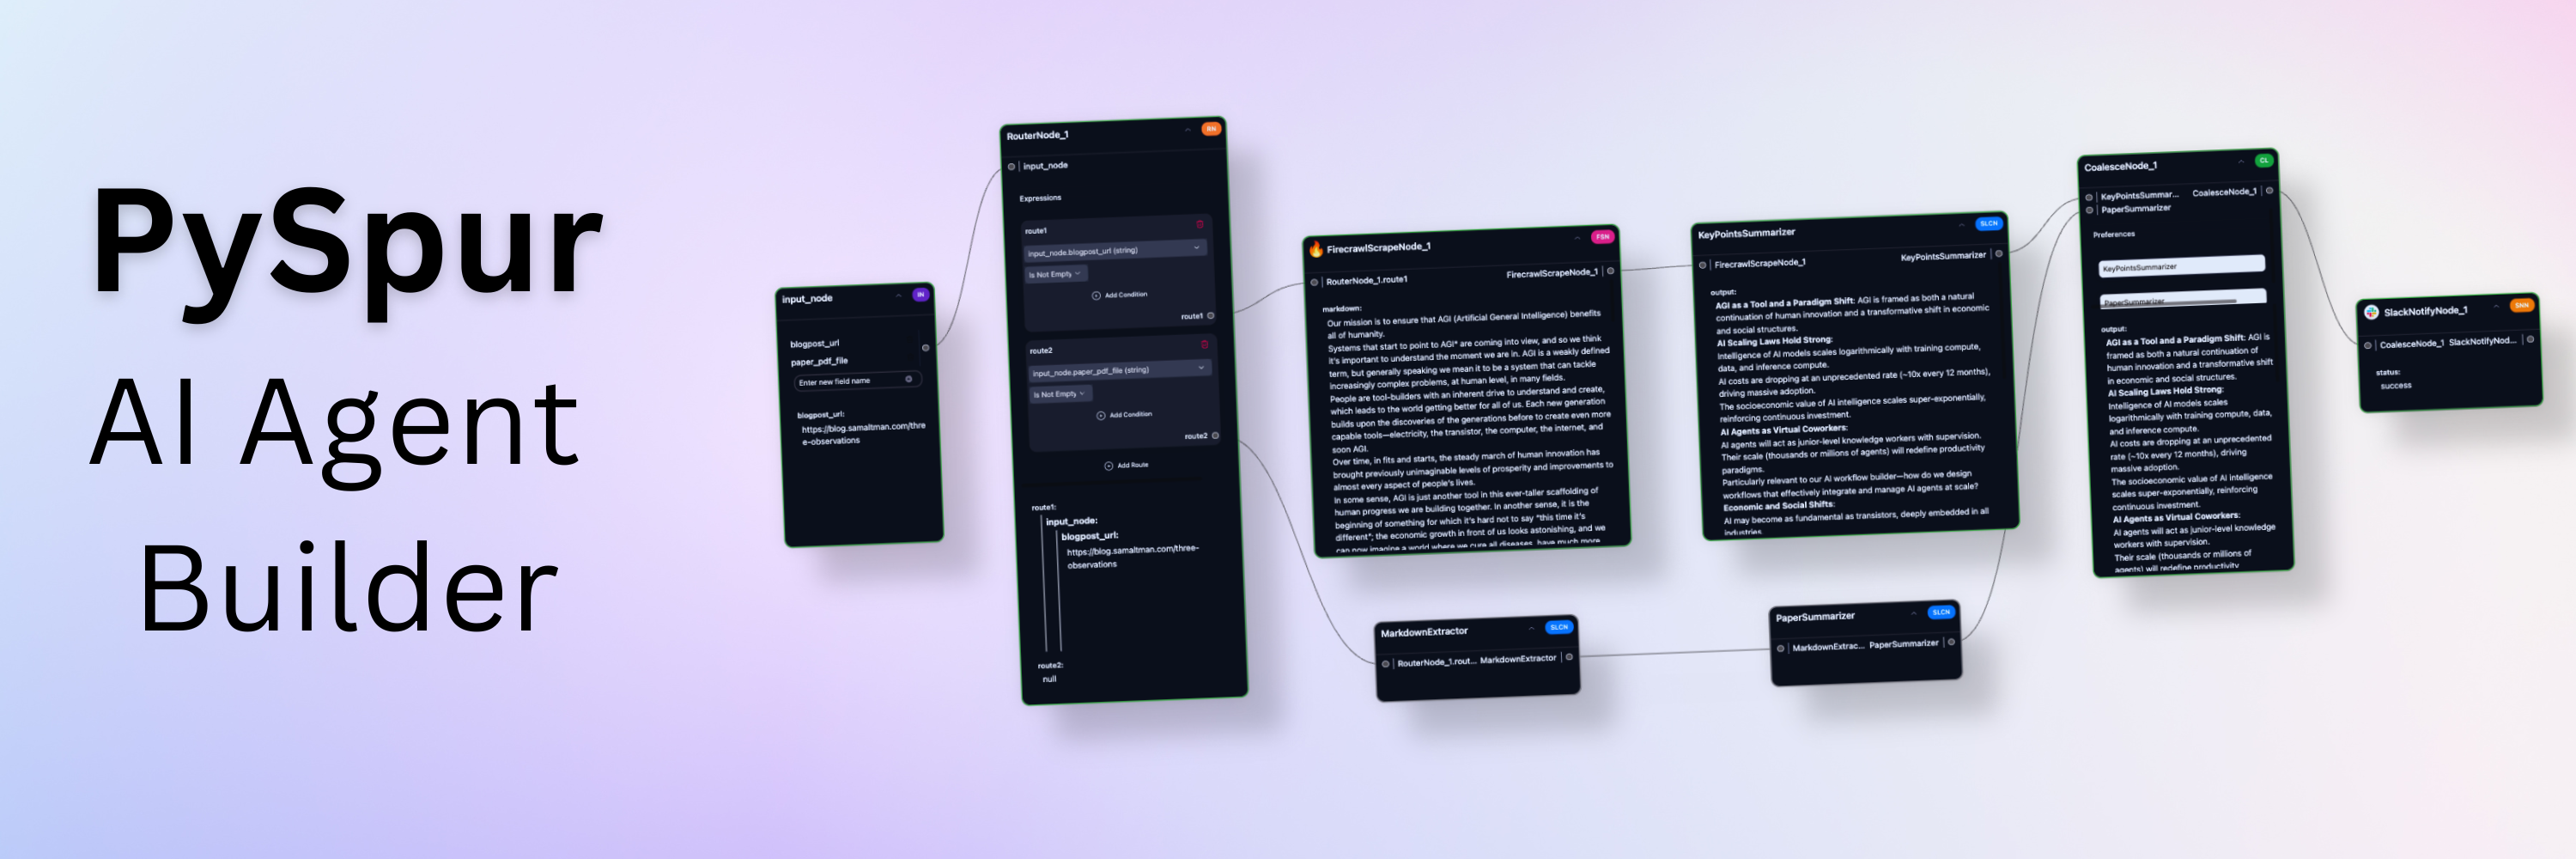
PySpur 是一个革命性的AI智能体开发平台,提供可视化界面来构建、测试和部署AI智能体工作流。它旨在帮助AI工程师和开发者以10倍的速度迭代AI智能体,无需重复造轮子。🔗 GitHub地址🚀 核心价值:AI智能体开发 · 可视化工作流 · 快速迭代 · 生产部署 · 开源免费项目背景:AI开发痛点:解决AI智能体开发中的重复工作和调试困难可视化需求:提供直观的可视化开
简介
PySpur 是一个革命性的AI智能体开发平台,提供可视化界面来构建、测试和部署AI智能体工作流。它旨在帮助AI工程师和开发者以10倍的速度迭代AI智能体,无需重复造轮子。
🔗 GitHub地址:
https://github.com/PySpur-Dev/pyspur
🚀 核心价值:
AI智能体开发 · 可视化工作流 · 快速迭代 · 生产部署 · 开源免费
项目背景:
-
AI开发痛点:解决AI智能体开发中的重复工作和调试困难
-
可视化需求:提供直观的可视化开发界面
-
迭代效率:大幅提升开发迭代速度
-
生产就绪:生产环境部署就绪的解决方案
-
开源社区:开源社区驱动的AI开发工具
项目特色:
-
🎨 可视化开发:拖拽式工作流构建
-
🤖 多模态支持:支持多种数据类型
-
🔄 快速迭代:10倍迭代速度提升
-
🚀 一键部署:生产环境一键部署
-
🆓 完全开源:代码完全开源免费
技术亮点:
-
工作流引擎:强大的工作流引擎
-
多模型集成:多种AI模型集成
-
可视化调试:可视化调试和跟踪
-
评估系统:自动化评估系统
-
扩展架构:模块化扩展架构
主要功能
1. 核心功能体系
PySpur提供了一套完整的AI智能体开发解决方案,涵盖工作流设计、模型集成、测试评估、部署监控等多个方面。
可视化开发功能:
工作流设计:
- 拖拽界面: 直观的拖拽式界面
- 节点库: 丰富的预建节点
- 连接管理: 可视化连接管理
- 参数配置: 图形化参数配置
- 模板系统: 可复用工作流模板

节点类型:
- 输入节点: 数据输入和处理
- 处理节点: 数据处理和转换
- AI节点: AI模型调用和处理
- 输出节点: 结果输出和导出
- 控制节点: 流程控制逻辑

界面功能:
- 实时预览: 实时结果预览
- 版本控制: 工作流版本管理
- 协作编辑: 多用户协作编辑
- 导入导出: 工作流导入导出
- 历史记录: 操作历史记录AI模型集成:
模型支持:
- LLM提供商: 100+ LLM提供商支持
- 多模态模型: 文本、图像、音频、视频
- 嵌入模型: 多种嵌入模型支持
- 向量数据库: 多种向量数据库集成
- 自定义模型: 自定义模型集成

模型管理:
- API密钥管理: 集中API密钥管理
- 模型配置: 模型参数配置
- 性能监控: 模型性能监控
- 成本控制: 使用成本控制
- 故障转移: 自动故障转移

工具集成:
- 外部工具: Slack、Google Sheets等集成
- 数据工具: 数据处理工具集成
- 分析工具: 数据分析工具集成
- 部署工具: 部署工具集成
- 监控工具: 监控工具集成测试评估功能:
测试框架:
- 测试用例: 测试用例管理
- 自动化测试: 自动化测试执行
- 性能测试: 性能测试工具
- 回归测试: 回归测试支持
- 负载测试: 负载测试能力

评估指标:
- 准确性: 结果准确性评估
- 性能: 响应性能评估
- 成本: 使用成本评估
- 可靠性: 系统可靠性评估
- 用户体验: 用户体验评估

数据管理:
- 测试数据: 测试数据集管理
- 结果分析: 测试结果分析
- 比较工具: 多版本结果比较
- 报告生成: 测试报告生成
- 数据可视化: 数据可视化展示部署监控功能:
部署选项:
- API部署: RESTful API部署
- 云部署: 云平台部署支持
- 本地部署: 本地服务器部署
- 边缘部署: 边缘设备部署
- 混合部署: 混合部署模式

监控能力:
- 实时监控: 实时性能监控
- 日志管理: 详细日志记录
- 告警系统: 智能告警系统
- 性能分析: 性能分析工具
- 使用统计: 使用统计报告

运维支持:
- 扩缩容: 自动扩缩容支持
- 备份恢复: 数据备份恢复
- 安全审计: 安全审计功能
- 版本管理: 版本管理支持
- 更新维护: 系统更新维护
2. 高级功能
多模态处理:
数据类型:
- 文本处理: 自然语言文本处理
- 图像处理: 图像识别和处理
- 音频处理: 音频分析和处理
- 视频处理: 视频内容分析
- 文档处理: PDF、Word等文档处理

处理能力:
- 内容提取: 多模态内容提取
- 特征识别: 特征识别和分析
- 转换处理: 格式转换和处理
- 融合分析: 多模态融合分析
- 生成能力: 多模态内容生成

集成支持:
- 文件上传: 文件上传支持
- URL处理: 网络资源处理
- 实时流: 实时流数据处理
- 批量处理: 批量数据处理
- 存储集成: 云存储集成RAG功能:
RAG流程:
- 文档解析: 文档内容解析
- 文本分块: 智能文本分块
- 向量嵌入: 向量嵌入处理
- 向量存储: 向量数据库存储
- 检索查询: 智能检索查询

增强能力:
- 知识增强: 知识库增强检索
- 上下文理解: 深度上下文理解
- 相关性排序: 相关性排序优化
- 多源检索: 多数据源检索
- 实时更新: 知识实时更新

应用场景:
- 问答系统: 智能问答系统
- 文档分析: 文档内容分析
- 研究辅助: 研究辅助工具
- 内容生成: 知识增强生成
- 决策支持: 决策支持系统人类参与循环:
交互模式:
- 审批节点: 人工审批节点
- 反馈收集: 用户反馈收集
- 质量控制: 人工质量控制
- 决策支持: 人工决策支持
- 异常处理: 人工异常处理

工作流集成:
- 暂停恢复: 工作流暂停恢复
- 通知提醒: 通知和提醒系统
- 任务分配: 任务分配和管理
- 进度跟踪: 进度跟踪管理
- 审计日志: 操作审计日志

用户体验:
- 界面友好: 用户友好界面
- 移动支持: 移动设备支持
- 响应式设计: 响应式设计
- 无障碍访问: 无障碍访问支持
- 多语言: 多语言支持
安装与配置
1. 环境准备
系统要求:
硬件要求:
- 内存: 8GB+ RAM (推荐16GB)
- 存储: 20GB+ 可用空间
- CPU: 多核处理器
- 网络: 稳定网络连接

软件要求:
- Python: 3.11+ 版本
- Node.js: 18.x+ 版本
- Docker: 容器化支持
- 数据库: SQLite/PostgreSQL

服务要求:
- AI服务: OpenAI/Anthropic等API访问
- 向量数据库: Pinecone/Weaviate等(可选)
- 云存储: AWS S3/Google Cloud Storage(可选)
2. 安装步骤
快速安装:
# 使用pip安装
pip install pyspur

# 初始化新项目
pyspur init my-ai-project
cd my-ai-project

# 启动开发服务器
pyspur serve --sqlite

# 访问应用
# http://localhost:6080Docker安装:
# 使用Docker Compose
git clone https://github.com/PySpur-Dev/pyspur.git
cd pyspur

# 启动开发环境
docker-compose -f docker-compose.dev.yml up --build -d

# 或生产环境
docker-compose up -d开发环境设置:
# 开发容器设置(推荐)
# 1. 使用VS Code或Cursor
# 2. 打开项目文件夹
# 3. 选择"Reopen in Container"
# 4. 自动配置开发环境

# 手动开发设置
pip install -e ".[dev]"
npm install
pre-commit install
3. 配置说明
环境配置:
# .env 配置文件示例
DATABASE_URL=sqlite:///./app.db
# 或使用PostgreSQL
# DATABASE_URL=postgresql://user:pass@localhost:5432/pyspur

OPENAI_API_KEY=your-openai-api-key
ANTHROPIC_API_KEY=your-anthropic-api-key

# 可选配置
PINECONE_API_KEY=your-pinecone-key
WEAVIATE_URL=your-weaviate-url
AWS_ACCESS_KEY=your-aws-key
AWS_SECRET_KEY=your-aws-secret

LOG_LEVEL=INFO
DEBUG=false
PORT=6080API密钥配置:
# 通过UI配置或编辑config/api_keys.yaml
api_keys:
  openai:
    api_key: sk-...
    organization: org-...
  anthropic:
    api_key: sk-ant-...
  cohere:
    api_key: ...
  huggingface:
    api_key: hf_...

  # 工具API密钥
  slack:
    bot_token: xoxb-...
  google:
    client_id: ...
    client_secret: ...
  github:
token: ghp_...工作流配置:
# 工作流配置文件示例
workflow:
  name: "文档处理流水线"
  version: "1.0.0"
  description: "多模态文档处理和分析流水线"

  nodes:
    - type: "input"
      id: "file_upload"
      config:
        accept: [".pdf", ".docx", ".txt"]
        max_size: "10MB"

    - type: "processor"
      id: "document_parser"
      config:
        parser: "pdfplumber"
        extract_images: true
        extract_tables: true

    - type: "ai"
      id: "content_analyzer"
      config:
        model: "gpt-4-turbo"
        temperature: 0.1
        max_tokens: 4000

    - type: "output"
      id: "result_exporter"
      config:
        format: "json"
        include_source: true

  connections:
    - from: "file_upload"
      to: "document_parser"
    - from: "document_parser"
      to: "content_analyzer"
    - from: "content_analyzer"
      to: "result_exporter"
使用指南
1. 基本工作流
使用PySpur的基本流程包括:环境准备 → 项目初始化 → 工作流设计 → 测试评估 → 部署监控。整个过程设计为简单直观。
2. 基本使用
项目初始化:
# 创建新项目
pyspur init my-ai-agent
cd my-ai-agent

# 安装依赖
pip install -r requirements.txt

# 配置环境变量
cp .env.example .env
# 编辑.env文件配置API密钥

# 启动开发服务器
pyspur serve

# 或使用生产模式
pyspur serve --production工作流创建:
# 通过Python代码创建工作流
from pyspur import Workflow, Node

# 创建新工作流
workflow = Workflow("智能文档分析")

# 添加输入节点
input_node = Node(
    type="input",
    name="文档上传",
    config={
        "accept": [".pdf", ".docx", ".txt"],
        "max_size": "10MB"
    }
)

# 添加处理节点
parser_node = Node(
    type="processor",
    name="文档解析",
    config={
        "parser": "pdfplumber",
        "extract_images": True
    }
)

# 添加AI节点
ai_node = Node(
    type="ai",
    name="内容分析",
    config={
        "model": "gpt-4-turbo",
        "temperature": 0.1
    }
)

# 添加输出节点
output_node = Node(
    type="output",
    name="结果导出",
    config={
        "format": "json"
    }
)

# 连接节点
workflow.connect(input_node, parser_node)
workflow.connect(parser_node, ai_node)
workflow.connect(ai_node, output_node)

# 保存工作流
workflow.save()可视化开发:
# 通过UI界面开发工作流
# 1. 启动服务器: pyspur serve
# 2. 访问 http://localhost:6080
# 3. 使用拖拽界面创建工作流
# 4. 配置节点参数
# 5. 连接节点建立流程
# 6. 保存工作流

# 工作流测试
workflow.test_with_file("document.pdf")

# 批量测试
workflow.batch_test("test_cases/")

# 性能评估
results = workflow.evaluate_performance()

# 部署工作流
deployment = workflow.deploy(
    name="production-api",
    environment="production"
)API使用:
# 使用PySpur API
from pyspur import PySpurClient

# 初始化客户端
client = PySpurClient(
    base_url="http://localhost:6080",
    api_key="your-api-key"
)

# 列出工作流
workflows = client.list_workflows()

# 执行工作流
result = client.execute_workflow(
    workflow_id="doc-analysis-001",
    input_data={
        "file": "document.pdf",
        "options": {
            "extract_tables": True,
            "analyze_images": True
        }
    }
)

# 监控执行
execution = client.get_execution("exec-123")
status = execution.status
logs = execution.get_logs()

# 获取评估结果
evaluation = client.get_evaluation("eval-456")
metrics = evaluation.metrics
3. 高级用法
自定义节点开发:
# 自定义处理节点
from pyspur.core import BaseNode

class CustomProcessorNode(BaseNode):
    def __init__(self, config=None):
        super().__init__(config)
        self.node_type = "processor"
        self.version = "1.0.0"

    async def execute(self, input_data, context):
        """执行节点处理"""
        try:
            # 处理输入数据
            processed_data = await self.process_data(input_data)

            # 更新执行上下文
            context.update({
                "processed_at": datetime.now(),
                "processing_time": time.time() - context.start_time
            })

            return {
                "success": True,
                "data": processed_data,
                "metadata": context
            }

        except Exception as e:
            return {
                "success": False,
                "error": str(e),
                "metadata": context
            }

    async def process_data(self, data):
        """自定义数据处理逻辑"""
        # 实现具体处理逻辑
        if isinstance(data, str):
            return self.process_text(data)
        elif isinstance(data, dict):
            return self.process_json(data)
        else:
            return data

    def process_text(self, text):
        """文本处理逻辑"""
        # 文本清洗、分析等
        return {
            "cleaned_text": text.strip(),
            "word_count": len(text.split()),
            "processed": True
        }

    def process_json(self, json_data):
        """JSON处理逻辑"""
        # JSON数据处理
        return {
            **json_data,
            "processed": True,
            "processed_at": datetime.now().isoformat()
        }

# 注册自定义节点
from pyspur.registry import NodeRegistry

NodeRegistry.register("custom_processor", CustomProcessorNode)工作流组合:
# 复杂工作流组合
class DocumentAnalysisWorkflow:
    def __init__(self):
        self.workflows = {}
        self.setup_workflows()

    def setup_workflows(self):
        # 文档提取工作流
        self.workflows['extraction'] = Workflow("文档提取")
        self.workflows['extraction'].add_nodes([
            Node("input", "file_upload"),
            Node("processor", "pdf_extractor"),
            Node("processor", "text_cleaner"),
            Node("output", "extracted_data")
        ])

        # 内容分析工作流
        self.workflows['analysis'] = Workflow("内容分析")
        self.workflows['analysis'].add_nodes([
            Node("input", "text_input"),
            Node("ai", "summarizer"),
            Node("ai", "sentiment_analyzer"),
            Node("output", "analysis_results")
        ])

        # 报告生成工作流
        self.workflows['reporting'] = Workflow("报告生成")
        self.workflows['reporting'].add_nodes([
            Node("input", "analysis_data"),
            Node("processor", "report_generator"),
            Node("output", "final_report")
        ])

    async def execute_pipeline(self, input_file):
        """执行完整管道"""
        # 执行文档提取
        extraction_result = await self.workflows['extraction'].execute({
            "file": input_file
        })

        if not extraction_result['success']:
            raise Exception("文档提取失败")

        # 执行内容分析
        analysis_result = await self.workflows['analysis'].execute({
            "text": extraction_result['data']['content']
        })

        if not analysis_result['success']:
            raise Exception("内容分析失败")

        # 执行报告生成
        report_result = await self.workflows['reporting'].execute({
            "data": analysis_result['data']
        })

        return {
            "extraction": extraction_result,
            "analysis": analysis_result,
            "report": report_result
}评估和监控:
# 工作流评估和监控
class WorkflowEvaluator:
    def __init__(self, workflow):
        self.workflow = workflow
        self.metrics = {
            'accuracy': 0,
            'performance': 0,
            'cost': 0,
            'reliability': 0
        }
        self.test_cases = []

    async def run_evaluation(self, test_dataset):
        """运行完整评估"""
        results = []

        for test_case in test_dataset:
            result = await self.run_test_case(test_case)
            results.append(result)

            # 更新指标
            self.update_metrics(result)

        return {
            'results': results,
            'metrics': self.metrics,
            'summary': self.generate_summary()
        }

    async def run_test_case(self, test_case):
        """执行单个测试用例"""
        start_time = time.time()

        try:
            result = await self.workflow.execute(test_case['input'])

            return {
                'success': True,
                'execution_time': time.time() - start_time,
                'result': result,
                'expected': test_case['expected'],
                'match_score': self.calculate_match_score(result, test_case['expected'])
            }

        except Exception as e:
            return {
                'success': False,
                'error': str(e),
                'execution_time': time.time() - start_time
            }

    def calculate_match_score(self, actual, expected):
        """计算结果匹配度"""
        # 实现匹配度计算逻辑
        if isinstance(actual, dict) and isinstance(expected, dict):
            return self.dict_match_score(actual, expected)
        elif isinstance(actual, str) and isinstance(expected, str):
            return self.text_match_score(actual, expected)
        else:
            return 0.0

    def generate_summary(self):
        """生成评估摘要"""
        return {
            'total_tests': len(self.test_cases),
            'success_rate': self.calculate_success_rate(),
            'average_time': self.calculate_average_time(),
            'total_cost': self.calculate_total_cost()
        }
应用场景实例
案例1:智能客服系统
场景:企业级智能客服系统
解决方案:使用PySpur构建智能客服工作流。
实施方法:
class CustomerServiceWorkflow:
    def __init__(self):
        self.workflow = self.create_customer_service_workflow()

    def create_customer_service_workflow(self):
        """创建客服工作流"""
        workflow = Workflow("智能客服系统")

        # 输入节点 - 客户查询
        input_node = Node(
            type="input",
            name="客户查询输入",
            config={
                "sources": ["web", "mobile", "email", "chat"],
                "format": "text"
            }
        )

        # 处理节点 - 查询解析
        parser_node = Node(
            type="processor",
            name="查询解析",
            config={
                "language": "auto",
                "extract_entities": True,
                "detect_intent": True
            }
        )

        # AI节点 - 意图识别
        intent_node = Node(
            type="ai",
            name="意图识别",
            config={
                "model": "gpt-4-turbo",
                "temperature": 0.1,
                "max_tokens": 1000
            }
        )

        # 知识库节点 - RAG检索
        rag_node = Node(
            type="rag",
            name="知识检索",
            config={
                "collection": "customer_service_kb",
                "max_results": 3,
                "similarity_threshold": 0.7
            }
        )

        # AI节点 - 响应生成
        response_node = Node(
            type="ai",
            name="响应生成",
            config={
                "model": "gpt-4-turbo",
                "temperature": 0.7,
                "max_tokens": 2000
            }
        )

        # 人工审核节点
        review_node = Node(
            type="human",
            name="人工审核",
            config={
                "required": False,
                "approval_threshold": 0.8,
                "reviewers": ["supervisor@company.com"]
            }
        )

        # 输出节点 - 响应输出
        output_node = Node(
            type="output",
            name="响应输出",
            config={
                "formats": ["text", "html", "json"],
                "channels": ["web", "email", "chat"]
            }
        )

        # 添加节点
        workflow.add_nodes([
            input_node, parser_node, intent_node,
            rag_node, response_node, review_node, output_node
        ])

        # 连接节点
        workflow.connect(input_node, parser_node)
        workflow.connect(parser_node, intent_node)
        workflow.connect(intent_node, rag_node)
        workflow.connect(rag_node, response_node)
        workflow.connect(response_node, review_node)
        workflow.connect(review_node, output_node)

        # 设置条件分支
        workflow.add_condition(intent_node, "urgent", review_node)

        return workflow

    async def handle_customer_query(self, query, context=None):
        """处理客户查询"""
        result = await self.workflow.execute({
            "query": query,
            "context": context or {},
            "customer_info": self.get_customer_info()
        })

        if result['success']:
            return {
                "response": result['data']['response'],
                "confidence": result['data']['confidence'],
                "sources": result['data']['sources']
            }
        else:
            # 降级处理
            return await self.fallback_response(query)

    async def fallback_response(self, query):
        """降级响应处理"""
        return {
            "response": "抱歉,我暂时无法处理您的查询。已转接人工客服,请稍等。",
            "confidence": 0.0,
            "escalated": True
        }

    def get_customer_info(self):
        """获取客户信息"""
        # 从CRM系统获取客户信息
        return {
            "tier": "premium",
            "history": [],
            "preferences": {}
        }

# 使用示例
async def customer_service_example():
    service = CustomerServiceWorkflow()

    # 处理客户查询
    response = await service.handle_customer_query(
        "我的订单状态如何?订单号123456"
    )

    print("客服响应:", response['response'])
    print("置信度:", response['confidence'])

# 启动服务
if __name__ == "__main__":
    import asyncio
asyncio.run(customer_service_example())客服系统价值:
-
智能响应:AI驱动的智能响应
-
知识增强:知识库增强响应
-
人工审核:人工审核和干预
-
多渠道:多渠道响应支持
-
性能监控:实时性能监控
案例2:内容审核系统
场景:多平台内容审核
解决方案:使用PySpur构建内容审核工作流。
实施方法:
class ContentModerationWorkflow:
    def __init__(self):
        self.workflow = self.create_moderation_workflow()
        self.policies = self.load_moderation_policies()

    def create_moderation_workflow(self):
        """创建内容审核工作流"""
        workflow = Workflow("内容审核系统")

        # 多模态输入节点
        input_node = Node(
            type="input",
            name="内容输入",
            config={
                "types": ["text", "image", "video"],
                "sources": ["social_media", "forum", "upload"]
            }
        )

        # 内容解析节点
        parser_node = Node(
            type="processor",
            name="内容解析",
            config={
                "text_extraction": True,
                "image_analysis": True,
                "video_analysis": True
            }
        )

        # 多模态分析节点
        analysis_node = Node(
            type="ai",
            name="多模态分析",
            config={
                "models": {
                    "text": "gpt-4-turbo",
                    "image": "clip-vit-large",
                    "video": "video-analysis-v1"
                },
                "confidence_threshold": 0.8
            }
        )

        # 策略检查节点
        policy_node = Node(
            type="processor",
            name="策略检查",
            config={
                "rule_engine": "rego",
                "policies": "moderation_policies.rego"
            }
        )

        # 人工审核节点
        human_review_node = Node(
            type="human",
            name="人工审核",
            config={
                "required": True,
                "reviewers": ["moderator@company.com"],
                "sla_minutes":[]
            }
        )

        # 决策节点
        decision_node = Node(
            type="processor",
            name="审核决策",
            config={
                "actions": ["approve", "reject", "escalate"],
                "default_action": "escalate"
            }
        )

        # 输出节点
        output_node = Node(
            type="output",
            name="审核结果",
            config={
                "formats": ["json", "webhook", "database"],
                "notifications": True
            }
        )

        # 添加节点
        workflow.add_nodes([
            input_node, parser_node, analysis_node,
            policy_node, human_review_node, decision_node, output_node
        ])

        # 连接节点
        workflow.connect(input_node, parser_node)
        workflow.connect(parser_node, analysis_node)
        workflow.connect(analysis_node, policy_node)
        workflow.connect(policy_node, human_review_node)
        workflow.connect(human_review_node, decision_node)
        workflow.connect(decision_node, output_node)

        # 设置条件分支
        workflow.add_condition(analysis_node, "high_confidence", decision_node)
        workflow.add_condition(policy_node, "clear_violation", decision_node)

        return workflow

    def load_moderation_policies(self):
        """加载审核策略"""
        return {
            "hate_speech": {
                "threshold": 0.9,
                "action": "reject",
                "escalate": True
            },
            "violence": {
                "threshold": 0.85,
                "action": "reject",
                "escalate": True
            },
            "spam": {
                "threshold": 0.8,
                "action": "reject",
                "escalate": False
            },
            "nsfw": {
                "threshold": 0.7,
                "action": "review",
                "escalate": True
            }
        }

    async def moderate_content(self, content, content_type="text"):
        """审核内容"""
        result = await self.workflow.execute({
            "content": content,
            "content_type": content_type,
            "policies": self.policies,
            "context": {
                "user_reputation": self.get_user_reputation(),
                "platform_rules": self.get_platform_rules()
            }
        })

        if result['success']:
            return {
                "decision": result['data']['decision'],
                "confidence": result['data']['confidence'],
                "reasons": result['data']['reasons'],
                "moderator": result['data']['moderator']
            }
        else:
            return {
                "decision": "escalate",
                "confidence": 0.0,
                "reasons": ["system_error"],
                "error": result['error']
            }

    def get_user_reputation(self):
        """获取用户信誉评分"""
        # 从用户系统获取信誉数据
        return {
            "score": 85,
            "violations": 2,
            "age_days": 365
        }

    def get_platform_rules(self):
        """获取平台规则"""
        return {
            "strict_mode": False,
            "regional_laws": ["gdpr", "ccpa"],
            "content_guidelines": "community_standards_v2"
        }

# 使用示例
async def moderation_example():
    moderator = ContentModerationWorkflow()

    # 审核文本内容
    text_result = await moderator.moderate_content(
        "这是一段需要审核的文本内容",
        "text"
    )

    print("文本审核结果:", text_result['decision'])
    print("置信度:", text_result['confidence'])

    # 审核图片内容
    image_result = await moderator.moderate_content(
        "https://example.com/image.jpg",
        "image"
    )

    print("图片审核结果:", image_result['decision'])

# 启动审核服务
if __name__ == "__main__":
    import asyncio
asyncio.run(moderation_example())内容审核价值:
-
多模态审核:文本、图像、视频多模态审核
-
策略驱动:灵活的审核策略配置
-
人工审核:人工审核和决策支持
-
实时处理:实时内容审核处理
-
合规支持:法规合规支持
案例3:智能数据分析
场景:企业数据分析和报告生成
解决方案:使用PySpur构建数据分析工作流。
实施方法:
class DataAnalysisWorkflow:
    def __init__(self):
        self.workflow = self.create_analysis_workflow()
        self.data_sources = self.configure_data_sources()

    def create_analysis_workflow(self):
        """创建数据分析工作流"""
        workflow = Workflow("智能数据分析")

        # 数据输入节点
        input_node = Node(
            type="input",
            name="数据输入",
            config={
                "sources": ["database", "api", "file", "stream"],
                "formats": ["json", "csv", "xml", "parquet"]
            }
        )

        # 数据清洗节点
        cleaning_node = Node(
            type="processor",
            name="数据清洗",
            config={
                "operations": ["deduplication", "normalization", "validation"],
                "quality_checks": True
            }
        )

        # 数据分析节点
        analysis_node = Node(
            type="ai",
            name="智能分析",
            config={
                "model": "gpt-4-turbo",
                "analysis_types": ["trends", "patterns", "anomalies", "predictions"],
                "max_tokens": 4000
            }
        )

        # 可视化节点
        visualization_node = Node(
            type="processor",
            name="可视化生成",
            config={
                "chart_types": ["line", "bar", "pie", "scatter"],
                "interactive": True,
                "export_formats": ["png", "svg", "html"]
            }
        )

        # 报告生成节点
        report_node = Node(
            type="ai",
            name="报告生成",
            config={
                "model": "gpt-4-turbo",
                "templates": ["executive", "technical", "summary"],
                "language": "auto"
            }
        )

        # 输出节点
        output_node = Node(
            type="output",
            name="分析结果",
            config={
                "destinations": ["email", "slack", "database", "cloud_storage"],
                "formats": ["pdf", "html", "json", "presentation"]
            }
        )

        # 添加节点
        workflow.add_nodes([
            input_node, cleaning_node, analysis_node,
            visualization_node, report_node, output_node
        ])

        # 连接节点
        workflow.connect(input_node, cleaning_node)
        workflow.connect(cleaning_node, analysis_node)
        workflow.connect(analysis_node, visualization_node)
        workflow.connect(visualization_node, report_node)
        workflow.connect(report_node, output_node)

        return workflow

    def configure_data_sources(self):
        """配置数据源"""
        return {
            "sales_db": {
                "type": "postgresql",
                "connection": "postgresql://user:pass@localhost:5432/sales",
                "tables": ["orders", "customers", "products"]
            },
            "marketing_api": {
                "type": "rest",
                "endpoint": "https://api.marketing.com/v1/data",
                "auth": "bearer_token"
            },
            "customer_feedback": {
                "type": "csv",
                "path": "/data/feedback/",
                "format": "csv"
            }
        }

    async def analyze_data(self, dataset, analysis_type="trends"):
        """分析数据"""
        result = await self.workflow.execute({
            "dataset": dataset,
            "analysis_type": analysis_type,
            "data_sources": self.data_sources,
            "timeframe": {
                "start": "2024-01-01",
                "end": "2024-09-30"
            },
            "metrics": ["revenue", "conversion", "retention"]
        })

        if result['success']:
            return {
                "insights": result['data']['insights'],
                "visualizations": result['data']['visualizations'],
                "report": result['data']['report'],
                "recommendations": result['data']['recommendations']
            }
        else:
            raise Exception(f"分析失败: {result['error']}")

    async def generate_report(self, analysis_results, report_type="executive"):
        """生成报告"""
        report_data = {
            "analysis": analysis_results,
            "type": report_type,
            "audience": "executive",
            "key_metrics": self.extract_key_metrics(analysis_results)
        }

        return await self.workflow.execute({
            "action": "generate_report",
            "data": report_data
        })

    def extract_key_metrics(self, analysis_results):
        """提取关键指标"""
        return {
            "revenue_growth": analysis_results.get('revenue_growth', 0),
            "conversion_rate": analysis_results.get('conversion_rate', 0),
            "customer_satisfaction": analysis_results.get('satisfaction_score', 0),
            "anomalies_detected": len(analysis_results.get('anomalies', []))
        }

# 使用示例
async def data_analysis_example():
    analyzer = DataAnalysisWorkflow()

    # 分析销售数据
    sales_data = {
        "source": "sales_db",
        "table": "orders",
        "filters": {
            "status": "completed",
            "date_range": ["2024-01-01", "2024-09-30"]
        }
    }

    try:
        # 执行分析
        results = await analyzer.analyze_data(sales_data, "trends")

        print("分析完成!")
        print("关键洞察:", results['insights'][:3])
        print("可视化数量:", len(results['visualizations']))

        # 生成报告
        report = await analyzer.generate_report(results, "executive")
        print("报告生成成功:", report['success'])

    except Exception as e:
        print("分析错误:", str(e))

# 启动分析服务
if __name__ == "__main__":
    import asyncio
asyncio.run(data_analysis_example())数据分析价值:
-
智能分析:AI驱动的数据分析
-
可视化:自动可视化生成
-
报告生成:自动报告生成
-
多数据源:多数据源支持
-
决策支持:数据驱动的决策支持
总结
PySpur作为一个革命性的AI智能体开发平台,通过其可视化界面、强大的工作流引擎、多模态支持和生产部署能力,为AI开发提供了完整的解决方案。
核心优势:
-
🎨 可视化开发:拖拽式工作流设计
-
🤖 AI集成:多种AI模型集成
-
📊 多模态支持:文本、图像、视频多模态处理
-
🚀 快速迭代:10倍开发速度提升
-
🆓 完全开源:代码完全开源免费
适用场景:
-
AI智能体开发和测试
-
多模态内容处理和分析
-
自动化工作流构建
-
数据分析和报告生成
-
内容审核和监控
立即开始使用:
# 安装PySpur
pip install pyspur

# 初始化项目
pyspur init my-ai-project

# 启动开发服务器
pyspur serve

# 访问应用
# http://localhost:6080资源链接:
-
📚 项目地址:GitHub仓库
-
📖 官方文档:详细技术文档
-
💬 社区支持:GitHub讨论区
-
🎥 演示示例:在线演示示例
-
🔧 配置参考:配置选项参考
通过PySpur,您可以:
-
快速开发:快速开发AI智能体
-
可视化调试:可视化调试和测试
-
生产部署:生产环境一键部署
-
性能优化:性能监控和优化
-
社区贡献:参与开源社区贡献
无论您是AI工程师、数据科学家、开发者还是技术爱好者,PySpur都能为您提供强大、灵活且免费的AI开发解决方案!
特别提示:
-
🔍 API配置:正确配置API密钥
-
📖 文档阅读:详细阅读技术文档
-
🤝 社区参与:积极参与社区贡献
-
🔧 性能优化:根据需求优化配置
-
⚠️ 生产准备:生产环境准备注意事项
通过PySpur,共同推动AI智能体开发的发展!
未来发展:
-
🚀 更多功能:持续添加新功能
-
🤖 模型扩展:支持更多AI模型
-
🌍 多语言:更多语言支持扩展
-
📊 性能优化:进一步性能优化
-
🔧 生态建设:开发者生态建设
加入社区:
参与方式:
- GitHub Issues: 问题反馈和功能建议
- 文档贡献: 技术文档改进贡献
- 代码贡献: 代码改进和功能添加
- 示例贡献: 示例项目贡献
- 插件开发: 插件和扩展开发

社区价值:
- 技术交流和学习
- 问题解答和支持
- 功能建议和讨论
- 项目贡献和认可
- 职业发展机会通过PySpur,共同构建更好的AI开发未来!
更多推荐
 16
16 0
0- 0


 已为社区贡献63条内容

所有评论(0)