
AI编程 -- 学习笔记
AI可以采用多种方式进行组织,具体取决于开发阶段或正在执行的操作。例如,AI 开发通常分为四个阶段: 企业在谈论 AI 时,通常会谈论训练数据。训练数据是什么意思呢?请记住,拥有有限记忆的人工智能是利用新数据进行训练,进而随着时间的推移而改进的 AI。机器学习是人工智能的一个细分领域,它使用算法训练数据来获取结果。概括来讲,机器学习中经常使用三种学习模型:Ollama默认安装到C盘,需要通过
一、AI简介
1.1、什么是AI
AI(人工智能,Artificial Intelligence)是指由计算机系统模拟人类智能的技术,使其能够执行通常需要人类智慧的任务,如学习、推理、决策、感知、语言理解等。AI 的目标是让机器具备类似人类的思维能力,甚至在某些方面超越人类。
- 1956年夏,麦卡锡、明斯基等科学家在美国达特茅斯学院开会研讨“如何用机器模拟人的智能”,首次提出“人工智能(Artificial Intelligence)”这一概念,标志着人工智能学科的诞生。
- AI 是一个广博的领域,涵盖许多不同的学科,包括计算机科学、数据分析和统计、硬件和软件工程、语言学、神经学,甚至哲学和心理学。
- 在业务使用的操作层面上,AI 是一组主要基于机器学习和深度学习的技术,用于数据分析、预测、对象分类、自然语言处理、推荐、智能数据检索等等。
1.2、AI如何运作
- 虽然不同 AI 技术的具体情况有所不同,但核心原则都是围绕数据展开。AI 系统会通过接触大量数据来学习和改进,以识别人类可能会忽视的模式和关系。
- 这个学习过程通常涉及算法,算法是指指导 AI 分析和决策的一组规则或指令。机器学习是 AI 的一个热门细分领域,其算法基于已加标签或未加标签的数据进行训练,以做出预测或对信息进行分类。
- 深度学习是另一个专精领域,它利用多层人工神经网络来处理信息,模仿人类大脑的结构和功能。通过持续学习和适应,AI 系统越来越擅长执行从图片识别到语言翻译等特定任务。
1.3、AI的类型
AI可以采用多种方式进行组织,具体取决于开发阶段或正在执行的操作。例如,AI 开发通常分为四个阶段:
- 反应式机器:有限的 AI,仅根据预编程规则对不同类型的刺激做出反应。不使用记忆,因此无法通过新数据进行学习。1997 年击败国际象棋冠军加里·卡斯帕罗夫的 IBM 深蓝超级计算机就是反应式机器的一个例子。
- 有限记忆:人们认为大多数现代 AI 都拥有有限的记忆。它可以通过新数据(通常是通过人工神经网络或其他训练模型)进行训练,从而使用记忆随着时间的推移进行改进。深度学习被视为具有有限记忆的人工智能。
- 心智理论:心智理论 AI 目前不存在,但研究正在实现其可能性。它描述了可以模拟人类心智并具有与人类相同的决策能力的 AI,包括识别和记忆情感以及在社交场合中像人类一样做出反应。
- 自我意识:自我意识 AI 比心智理论 AI 前进了一步,它描述了一种神秘的机器,这种机器知道自己的存在并具有人类的智力和情感能力。与心智理论 AI 一样,自我意识 AI 目前也不存在。
通用人工智能 AGI(Artificial General Intelligence) 是指机器可以像人类一样感知、思考和行动。AGI 目前不存在。下一个等级将是超级人工智能ASI(Artificial Super Intelligence),即机器可以在所有方面发挥出优于人类的功能。
1.4、AI训练模型
企业在谈论 AI 时,通常会谈论训练数据。训练数据是什么意思呢?请记住,拥有有限记忆的人工智能是利用新数据进行训练,进而随着时间的推移而改进的 AI。机器学习是人工智能的一个细分领域,它使用算法训练数据来获取结果。概括来讲,机器学习中经常使用三种学习模型:
- 监督式学习:一种使用带标签的训练数据(结构化数据)将特定输入映射到输出的机器学习模型。简单来说,如需训练可识别猫的图片的算法,应向其提供标记为猫的图片。
- 非监督式学习:一种根据无标签数据(非结构化数据)学习模式的机器学习模型。与监督式学习不同,最终结果不会提前知道。相反,算法会从数据中学习,并根据属性将数据分类为多个组。例如,非监督式学习擅长模式匹配和描述性建模。除了监督式和非监督式学习之外,人们通常还会采用一种名为“半监督式学习”的混合方法,其中只会对部分数据添加标签。在半监督式学习中,最终结果是已知的,但算法必须决定如何组织和构造数据以获得期望的结果。
- 强化学习:一种可以广义地描述为“边做边学”的机器学习模型。“代理”通过试错(反馈环)学习执行规定的任务,直到其表现处于理想范围内。当代理出色执行任务时,它会获得正强化;当代理表现不佳时,它会获得负强化。强化学习的一个例子是教机械手捡球。
1.5、AI的优势
- 自动化:AI 可以自动执行工作流和流程,也可以不依靠人工团队来独立自主地开展工作。例如,AI 可以通过持续监控和分析网络流量来帮助自动执行信息安全的各个方面。同样,智能工厂可能使用数十种不同类型的 AI,例如机器人使用计算机视觉在工厂车间移动或检查产品是否存在缺陷、创建数字孪生体,或使用实时分析来衡量效率和产量。
- 减少人为错误:AI 可以通过每次都遵循相同流程的自动化功能和算法来消除数据处理、分析、制造装配和其他任务中的人为错误。
- 消除重复任务:AI 可用于执行重复任务,从而让人力资源能够空出手来解决影响较大的问题。AI 可用于自动执行流程,例如验证文档、转写电话或回答“你们几点关门?”之类的简单客户问题。机器人通常用于代替人类执行“枯燥、肮脏或危险”的任务。
- 快速准确:与人类相比,AI 可以更快地处理更多信息,从而查找模式并发现人类可能错过的数据关系。
- 无限可用性:AI 不受时段、休息需求或其他人类负担的限制。在云端运行时,AI 和机器学习可以“始终开启”,从而持续处理分配的任务。
- 更快的研发速度 :快速分析大量数据的能力可以加快获得研发突破的速度。例如,AI 已用于潜在新药物疗法的预测建模,或量化人类基因组。
1.6、AI的应用领域
- 日常:语音识别、图像识别、翻译、数据分析等。
- 医疗:辅助诊断、疾病预测、药物研发和个性化治疗。
- 教育:提供个性化学习方案,根据学生的学习进度和风格调整教学内容。
- 交通:应用于交通流量预测、智能交通系统和自动驾驶。
- 金融:用于风险评估、欺诈检测和智能预测。
- 制造业:用于生产计划、质量控制和机器人自动化。
二、大模型简介
2.1、什么是大模型
大模型(Large Model,也称基础模型,即Foundation Model),是指具有大量参数和复杂结构的机器学习模型,能够处理海量数据、完成各种复杂的任务,如自然语言处理、计算机视觉、语音识别等。
- 大模型本质上是一个使用海量数据训练而成的深度神经网络模型,其巨大的数据和参数规模,实现了智能的涌现,展现出类似人类的智能。
- AI 中一种常见的训练模型是人工神经网络(一种松散地基于人脑的模型)。神经网络是人工神经元系统(有时称为感知机),该系统是用于对数据进行分类和分析的计算节点。数据被输入神经网络的第一层,每个感知机都会做出决定,然后将该信息传递到下一层的多个节点。超过三层的训练模型称为“深度神经网络”或“深度学习”。某些现代神经网络有数百或数千层。最终感知机的输出完成神经网络的任务集,例如对对象进行分类或在数据中查找模式。您可能会遇到的一些最常见的人工神经网络类型包括:
- 前馈神经网络 (FF):是一种最早的神经网络形式,其中数据单向流过人工神经元层,直到获得输出。在现代,大多数前馈神经网络都被视为具有多个层(以及多个“隐藏”层)的“深度前馈神经网络”。前馈神经网络通常与称为“反向传播算法”的纠错算法配对使用。简单说来,该算法从神经网络的结果开始,然后一直反向工作到开始,从而发现错误以提高神经网络的准确率。许多简单但强大的神经网络都是深度前馈神经网络。
- 循环神经网络 (RNN):是一种与前馈神经网络不同的神经网络,它们通常使用时序数据或涉及序列的数据。与在网络的每个节点中使用权重的前馈神经网络不同,循环神经网络对前一层发生的事情具有“记忆”,这取决于当前层的输出。例如,执行自然语言处理时,RNN 可以“记住”一个句子中使用的其他字词。RNN 通常用于语音识别、翻译和图片说明。
- 长/短期记忆 (LSTM):是一种高级形式的 RNN,它可以使用记忆来“记住”先前的层中发生的事情。RNN 和 LSTM 之间的区别在于,LSTM 可以通过使用“记忆单元”来记住几层之前发生的事情。LSTM 常用于语音识别和预测。
- 卷积神经网络 (CNN): 包含现代人工智能中一些最常见的神经网络。CNN 最常用于图像识别,它使用几个不同的层(一个卷积层,然后是一个 pooling 层),这些层在将图像重新组合在一起(在全连接层中)之前过滤图像的不同部分。较早的卷积层可能会寻找图像的简单特征,例如颜色和边缘,然后在附加层中寻找更复杂的特征。
- 生成对抗网络 (GAN):涉及两个神经网络,它们在游戏中会相互竞争,最终提高输出的准确率。一个网络(生成器)创建另一个网络(判别器)尝试证明真假的样本。GAN 用于制作逼真的图片,甚至用于制作艺术品。
- 相比小模型,大模型通常参数较多、层数较深,具有更强的表达能力和更高的准确度,但也需要更多的计算资源和时间来训练和推理,适用于数据量较大、计算资源充足的场景。
- 超大模型:超大模型是大模型的一个子集,它们的参数量远超过大模型。
- 大语言模型(Large Language Model) : 通常是具有大规模参数和计算能力的自然语言处理模型,例如 OpenAl 的 GPT-3 模型。这些模型可以通过大量的数据和参数进行训练,以生成人类类似的文本或回答自然语言的问题。大型语言模型在自然语言处理、文本生成和智能对话等领域有广泛应用。
- GPT (Generative Pre-trained Transformer):GPT 和ChatGPT都是基于FTransformer架构的语言模型,但它们在设计和应用上存在区别:GPT模型旨在生成自然语言文本并处理各种自然语言处理任务,如文本生成、翻译、摘要等。它通常在单向生成的情况下使用,即根据给定的文本生成连贯的输出。
- ChatGPT:ChatGPT则专注于对话和交互式对话。它经过特定的训练,以更好地处理多轮对话和上下文理解。ChatGPT设计用于提供流畅、连贯和有趣的对话体验,以响应用户的输入并生成合适的回复。
2.2、大模型发展历程
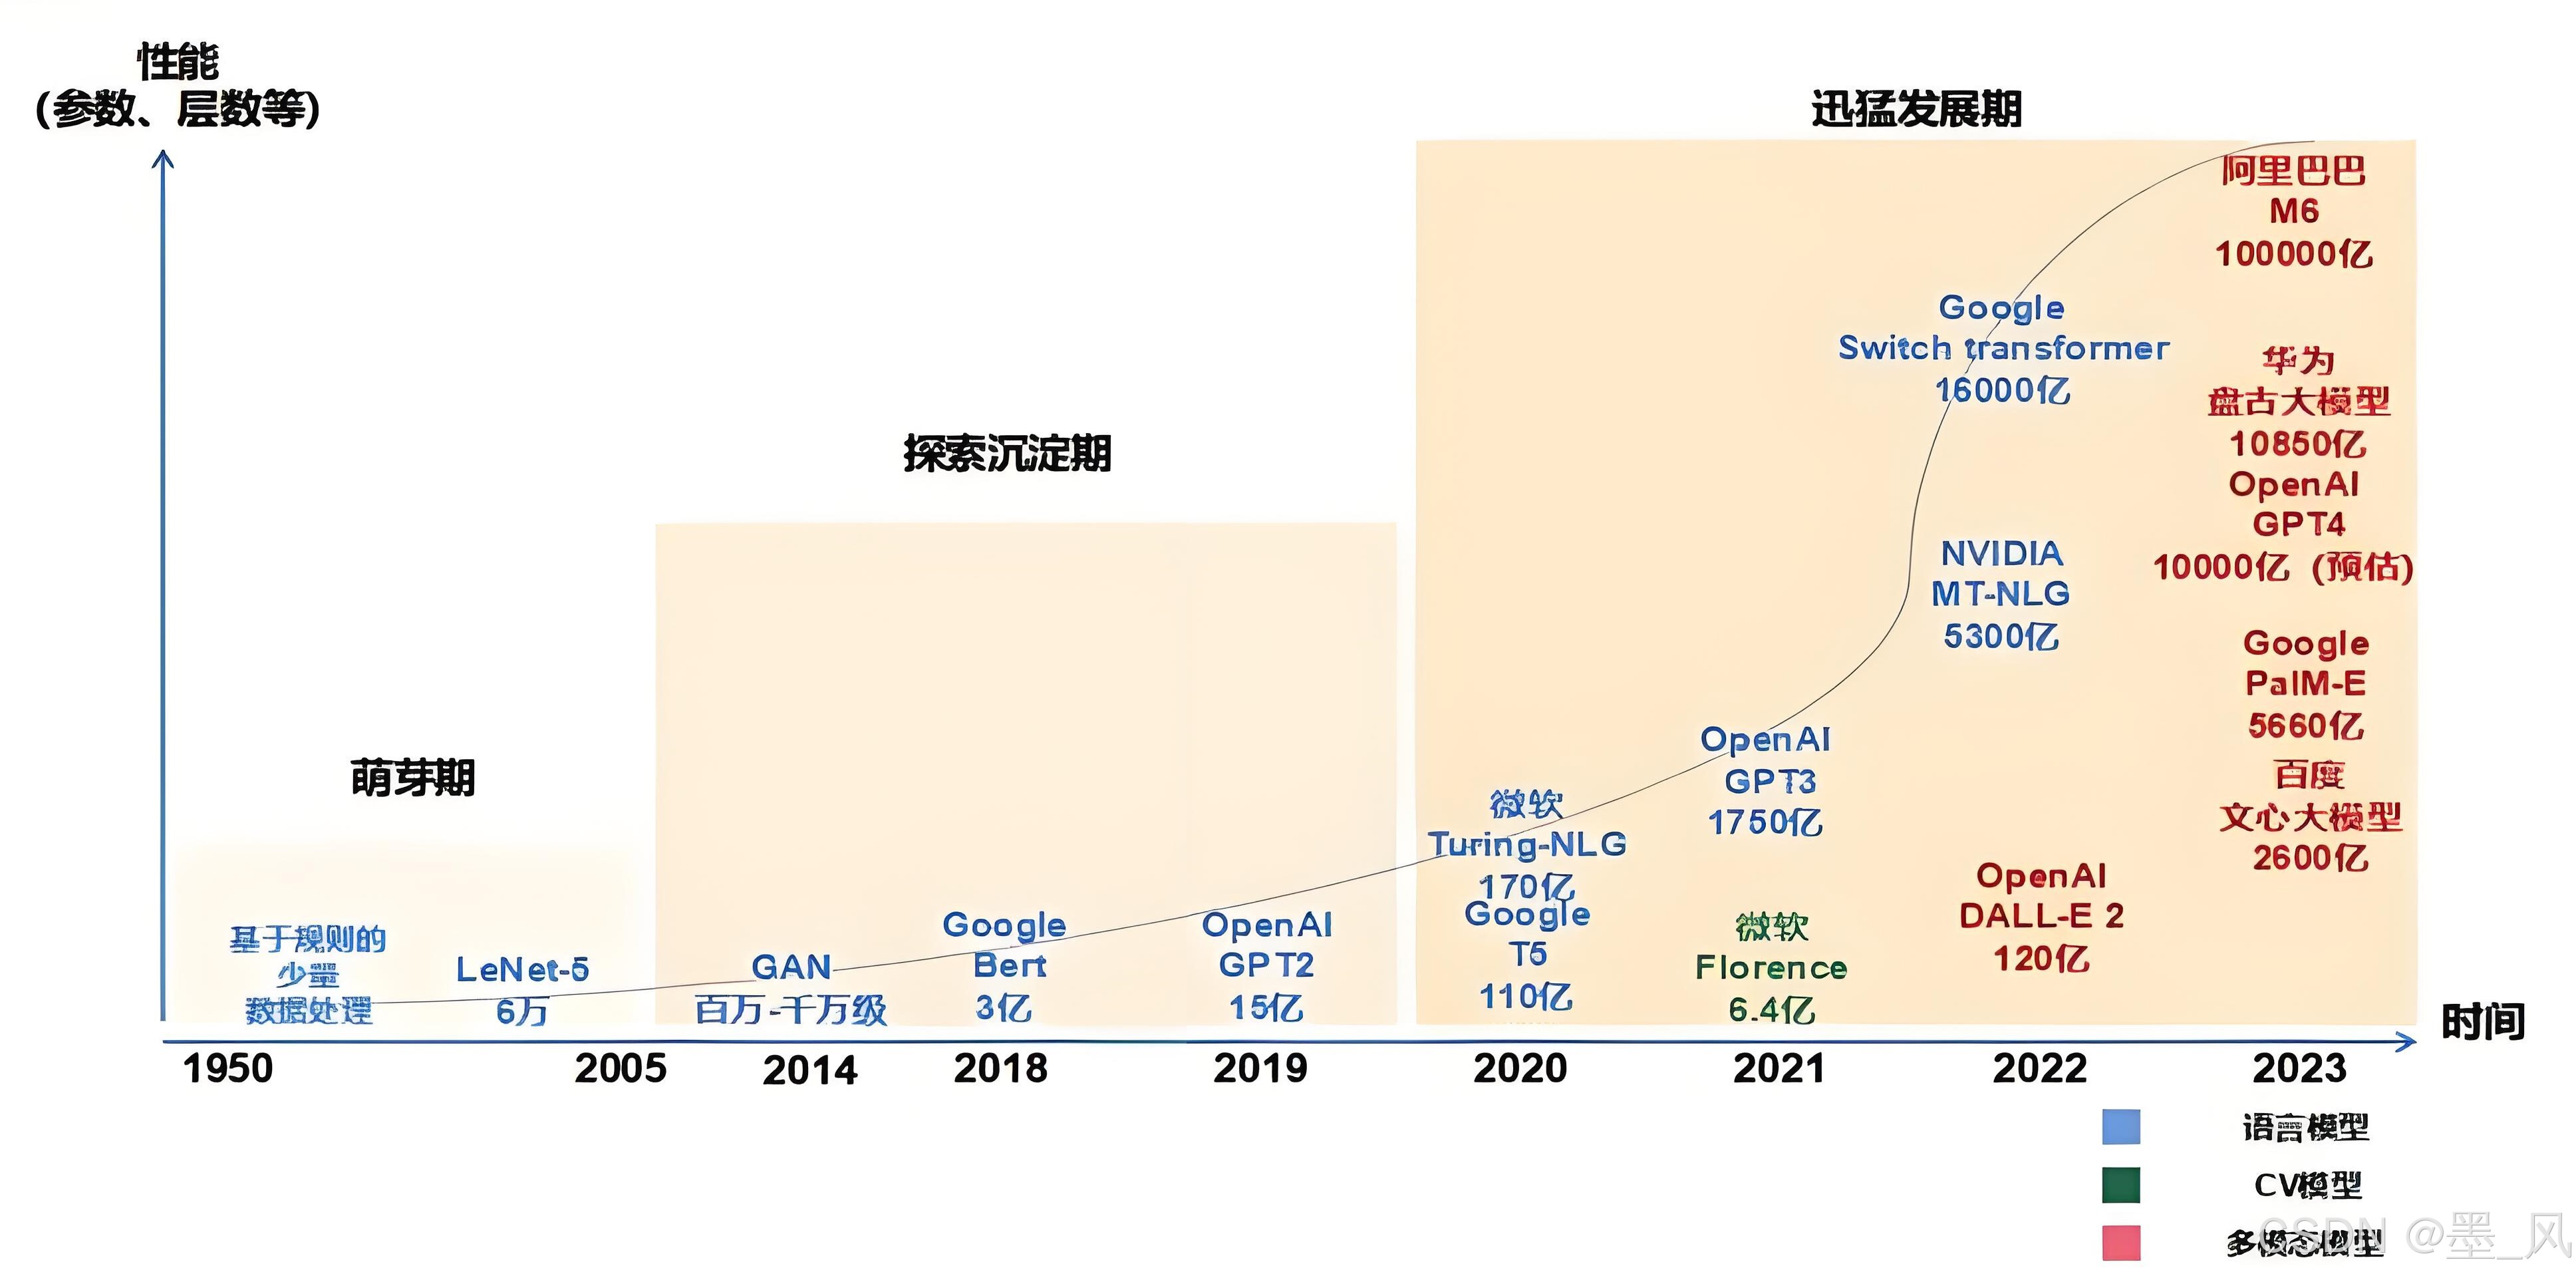
- 萌芽期 (1950-2005) : 以CNN、RNN为代表的传统神经网络模型阶段。
- 探索沉淀期 (2006-2019) : 以Transformer为代表的全新神经网络模型阶段。
- 迅猛发展期 (2020-至今) : 以GPT为代表的预训练大模型阶段。
2.3、大模型的分类
- 按照输入数据类型分类
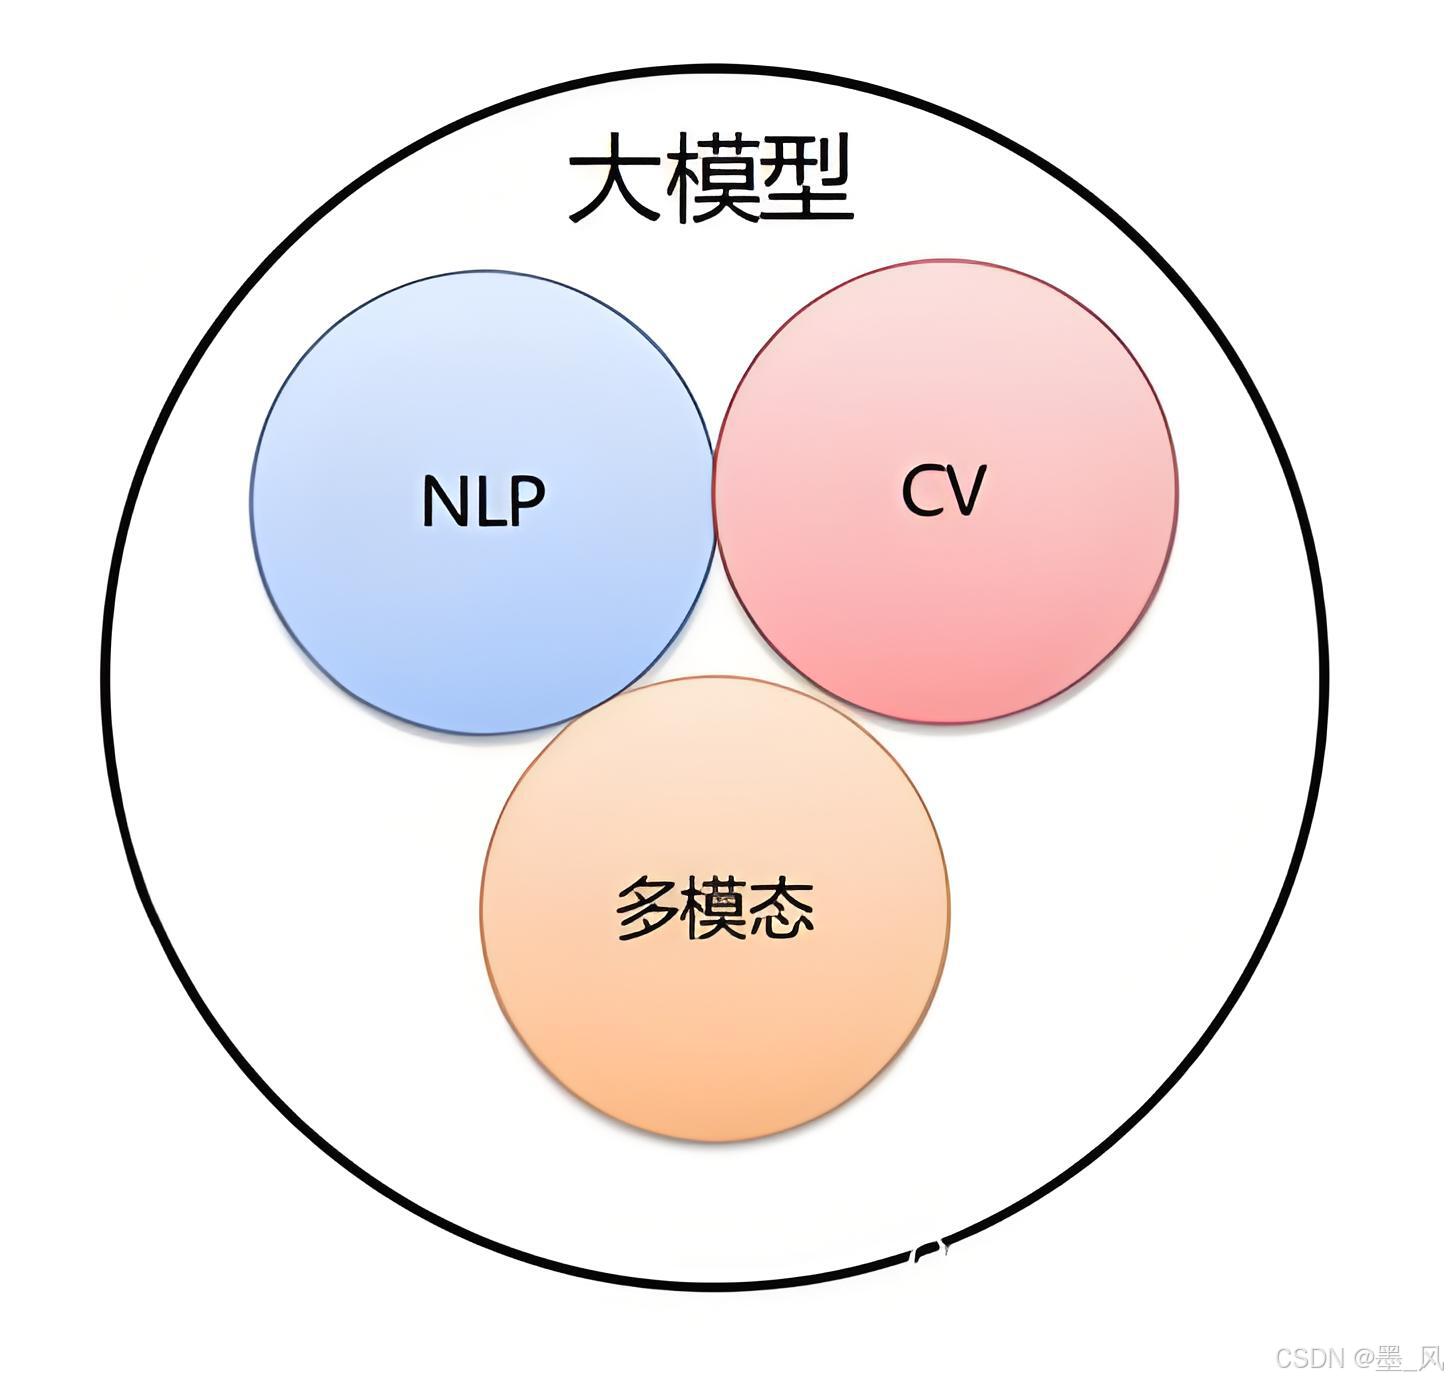
- 语言大模型(NLP):是指在自然语言处理(Natural Language Processing,NLP)领域中的一类大模型,通常用于处理文本数据和理解自然语言。这类大模型的主要特点是它们在大规模语料库上进行了训练,以学习自然语言的各种语法、语义和语境规则。例如:GPT系列 (OpenAl) 、Bard (Google) 、文心一言 (百度)。
- 视觉大模型(CV):是指在计算机视觉(Computer Vision,CV)领中使用的大模型,通常用于图像处理和分析。这类模型通过在大规模图像数据上进行训练,可以实现各种视觉任务,如图像分类、目标检测、图像分割、姿态估计、人脸识别等。例如: VIT系列(Google) 、文心UFO、华为盘古CV、INTERN (商汤)。
- 多模态大模型:是指能够处理多种不同类型数据的大模型,例如文本、图像、音频等多模态数据。这类模型结合了NLP和CV的能力,以实现对多模态信息的综合理解和分析,从而能够更全面地理解和处理复杂的数据。例如: DingoDB多模向量数据库(九章云极DataCanvas)、DALL-E(OpenAl)、悟空画画(华为) 、midjourney。
- 按照应用领域分类
- 通用大模型L0: 是指可以在多个领域和任务上通用的大模型。它们利用大算力、使用海量的开放数据与具有巨量参数的深度学习算法在大规模无标注数据上进行训练,以寻找特征并发现规律,进而形成可“举一反三"的强大泛化能力,可在不进行微调或少量微调的情况下完成多场景任务,相当于AI完成了“通识教育”。
- 行业大模型L1: 是指那些针对特定行业或领域的大模型。它们通常使用行业相关的数据进行预训练或微调,以提高在该领域的性能和准确度,相当于AI成为“行业专家”。
- 垂直大模型L2: 是指那些针对特定任务或场景的大模型。它们通常使用任务相关的数据进行预训练或微调,以提高在该任务上的性能和效果。
2.4、模型的泛化与微调
- 模型的泛化能力: 是指一个模型在面对新的、未见过的数据时,能够正确理解和预测这些数据的能力。在机器学习和人工智能领域,模型的泛化能力是评估模型性能的重要指标之。
- 模型的微调: 给定预训练模型(Pre-trained model),基于模型进行微调(Fine Tune) 。相对于从头开始训练(Training a modelfrom scatch),微调可以省去大量计算资源和计算时间,提高计算效率,甚至提高准确率。
模型微调的基本思想是使用少量带标签的数据对预训练模型进行再次训练,以适应特定任务。在这个过程中,模型的参数会根据新的数据分布进行调整。这种方法的好外在于,它利用了预训练模型的强大能力,同时还能够适应新的数据。因此,模型微调能够提高模型的泛化能力,减少过拟合现象。
- 模型微调方法
- Fine-tuning: 这是最常用的微调方法。通过在预训练模型的最后一层添加一个新的分类层,然后根据新的数据集进行微调。
- Feature augmentation: 这种方法通过向数据中添加一些人工特征来增强模型的性能。这些特征可以是手工设计的,也可以是通过自动特征生成技术生成的。
- Transfer leamning: 这种方法是使用在一个任务上训练过的模型作为新任务的起点,然后对模型的参数进行微调,以适应新的任务。
三、国内外常见的大模型
- 大语言模型排行榜:SuperCLUE中文大模型测评基准——评测榜单
- AI领域的GitHub:HF-Mirror
3.1、国外大模型
- OpenAI(GPT系列):OpenAI
- Anthropic(Claude系列):Home \ Anthropic
- Google DeepMind(Gemini系列):Google DeepMind
- Meta(LLaMA系列):Llama
- xAI(Grok系列):Welcome | xAI
3.2、国内大模型
3.2.1、C端对话类大模型
- 深度求索的DeepSeek
- DeepSeek - 探索未至之境
- 不支持多模态输入输出
- 主要实现文生文、识别图片/文件中的文字生文
- 腾讯的元宝
- 腾讯元宝 - 轻松工作 多点生活
- 文生文、文生图(AI画图)
- 百度的文心一言
- 文心一言
- 文生文、文生图等
- 阿里的通义千问
- 通义 - 你的个人AI助手
- 文生文、文生图、PPT创作等
- 字节跳动的豆包
- 豆包 - 字节跳动旗下 AI 智能助手
- 文生文、文生图、图生视频
- 科大讯飞的讯飞星火
- 讯飞星火-懂我的AI助手
- 文生文、文生图、PPT创造、儿童教育等
3.2.2、B端大模型
- DeepSeek:DeepSeek | 深度求索
- 百度千帆大模型:百度智能云-云智一体深入产业
- 阿里百炼大模型**:阿里云百炼
- 腾讯混元大模型:腾讯混元大模型_大语言模型_自然语言大模型- 腾讯云
- 华为盘古大模型:盘古大模型_panguLM_大模型_华为云
四、大模型本地部署
4.1、安装Ollama
- 去官网下载Ollam软件:Ollama
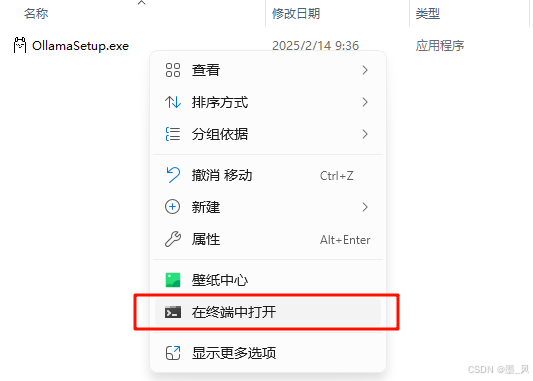
- 安装Ollama到指定的盘符
-
Ollama默认安装到C盘,需要通过命令行指定盘符安装
-
在OllamaSetup.exe文件所在的目录右键,打开命令行窗口
-
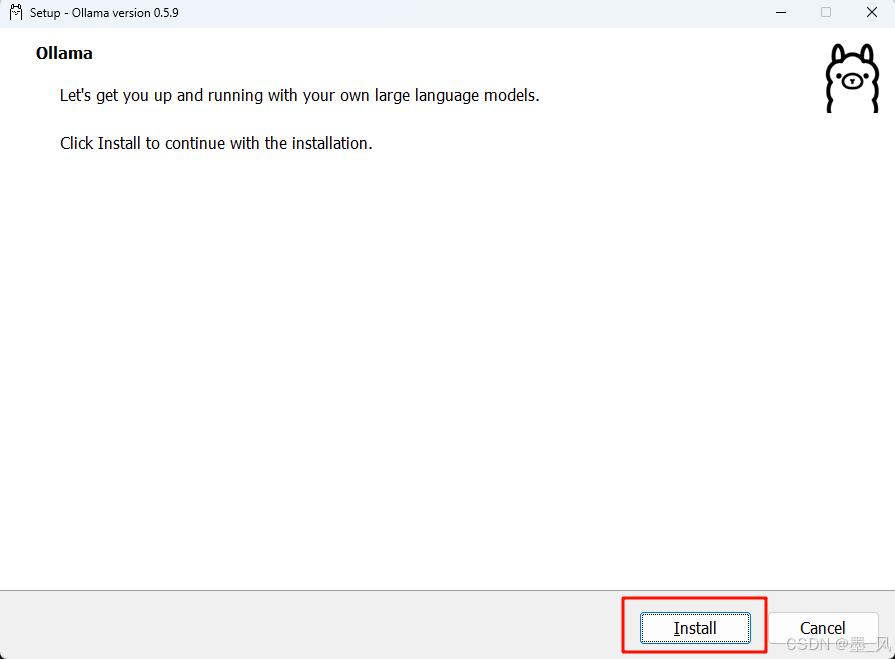
执行OllamaSetup.ext /DIR=你的安装目录

-
在弹出的窗口中点击Install开始安装
-
- 安装成功后在命令行窗口执行ollama --version如何能查询到版本即安装成功
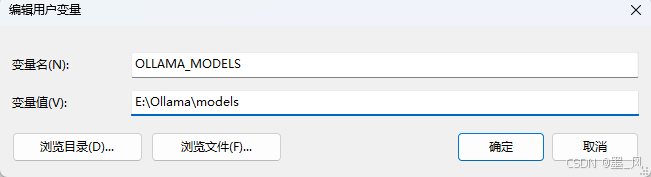
- 配置Ollama下载模型的目录
- Ollama默认下载的模型放在C:\Users\用户名\.ollama\models目录中。
- 我可以通过配置环境变量修改模型存放的路径。注意:配置完环境变量记得重启Ollama
- 去Ollama官网下载指定的大模型
- 复制下载大模型的命令
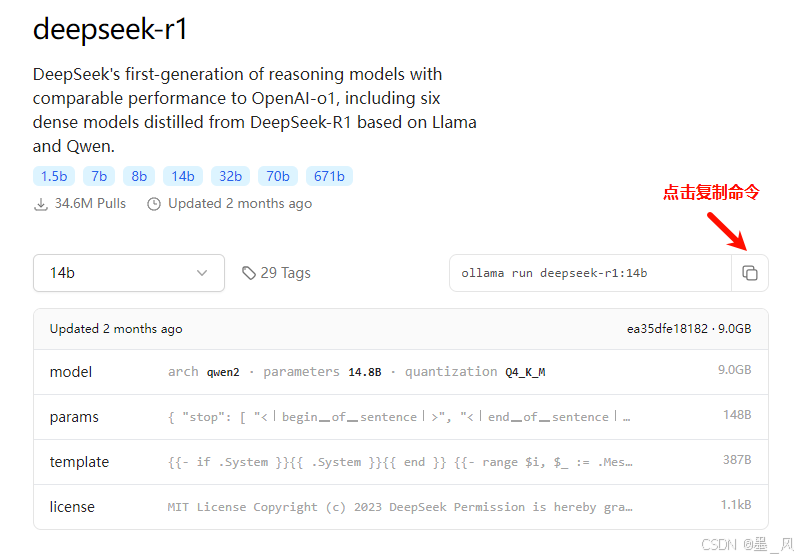
- 在cmd的命令行窗口粘贴命令下载大模型(下载时间较长)

- 复制下载大模型的命令
- 运行大模型
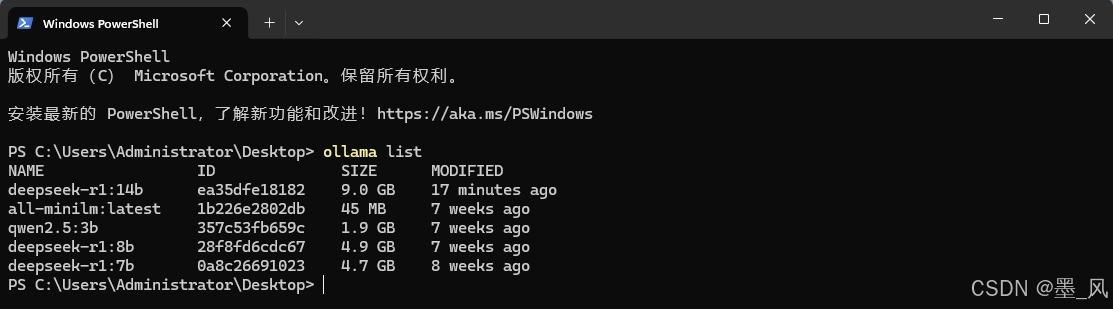
- 在命令行窗口执行ollama list查询下载的大模型。
- 在命令行窗口执行ollama run 下载的大模型运行大模型,如果本地没有会下载大模型之后运行。
- 输入内容与大模型对话。
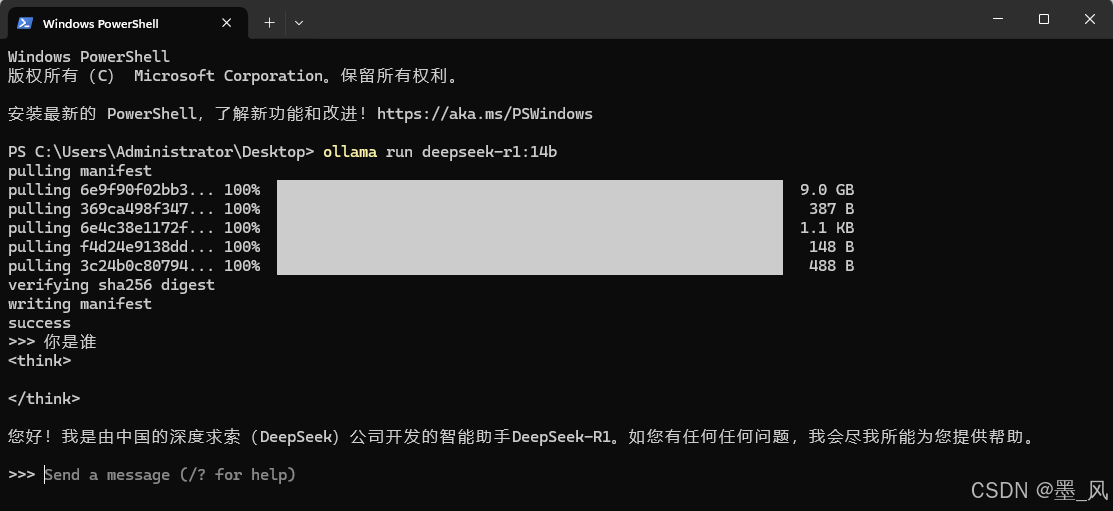
- 输入/bye退出大模型
- 在命令行窗口执行ollama list查询下载的大模型。
4.2、DeepSeek-R1部署硬件要求
以下是针对 DeepSeek-R1 系列模型在本地对话(推理)场景下的最低硬件要求,根据不同模型大小和量化方式分类说明:
FP16(半精度浮点数):使用16位浮点数(Half-Precision)存储模型参数,原始未量化的格式。
4-bit量化(通用概念):将模型参数从FP16压缩到4位表示(如整数或低位浮点数)。
GGUF 4-bit量化:专为CPU和通用GPU设计的量化格式,由llama.cpp团队推出。
4-bit GPTQ/AWQ量化(GPU专用)
GPTQ(NVIDIA显卡优化):针对NVIDIA GPU的4-bit量化技术,注重推理速度。
AWQ(低损失量化):通过保留关键权重(激活感知)减少量化误差,精度高于GPTQ。
- 模型概览与量化后大小
| 模型参数 | 原始大小(FP16) | 4-bit量化后大小 | 适用场景 |
|---|---|---|---|
| 1.5B | ~3GB | ~0.8GB | 超低配设备(手机/树莓派) |
| 7B | ~14GB | ~4GB | 消费级CPU/入门GPU |
| 8B | ~16GB | ~5GB | 中低端GPU(如GTX 1060) |
| 14B | ~28GB | ~9GB | 中端GPU(RTX 3060 12GB) |
| 32B | ~64GB | ~20GB | 高端GPU(A100 40GB) |
| 70B | ~140GB | ~43GB | 多卡并行(企业级硬件) |
| 671B | ~1.3TB | ~404GB | 分布式集群(科研/云服务) |
- 最低硬件要求(按设备类型)
-
纯CPU运行(GGUF 4-bit量化)
模型参数 内存需求 CPU要求 速度参考 1.5B ≥4GB 双核(如Intel i3) 5-10词/秒 7B ≥8GB 四核(如Ryzen 5) 2-5词/秒 8B ≥12GB 四核+ 1-3词/秒 14B ≥16GB 八核(如i7) 0.5-2词/秒 ≥32B 需64GB+内存 服务器级CPU 不推荐(极慢) -
低端GPU(4-bit GPTQ/AWQ量化)
模型参数 显存需求 显卡示例 优化工具 1.5B ≥2GB GTX 1050 Ti 4GB AutoGPTQ/ExLlama 7B ≥4GB RTX 2060 6GB Text-Generation-WebUI 8B ≥6GB RTX 3060 12GB vLLM(低batch) 14B ≥10GB RTX 3080 10GB AWQ/TensorRT-LLM ≥32B 需多卡拼接显存 A100 40GB(多卡) DeepSpeed推理 -
高端GPU(8-bit量化或原生FP16)
模型参数 显存需求 显卡推荐 适用场景 7B ≥8GB RTX 4070 12GB 高流畅度对话 14B ≥16GB RTX 4090 24GB 长上下文处理 32B ≥32GB A100 40GB 专业级应用
- 推荐配置总结
| 模型参数 | 最低配置(能跑) | 流畅配置(好用) |
|---|---|---|
| 1.5B | 4GB内存 + 双核CPU | 8GB内存 + GTX 1050 Ti |
| 7B | 8GB内存 + 四核CPU | RTX 3060 12GB |
| 8B | 12GB内存 + RTX 2060 6GB | RTX 3060 Ti 8GB |
| 14B | 16GB内存 + RTX 3080 10GB | RTX 4090 24GB |
| 32B+ | 多卡A100/H100 | 企业级GPU集群 |
五、使用Spring AI调用大模型
5.1、调用本地大模型
- Spring官网查看相关API:Spring AI
5.1.1、具体实现步骤
-
创建一个SpringBoot工程
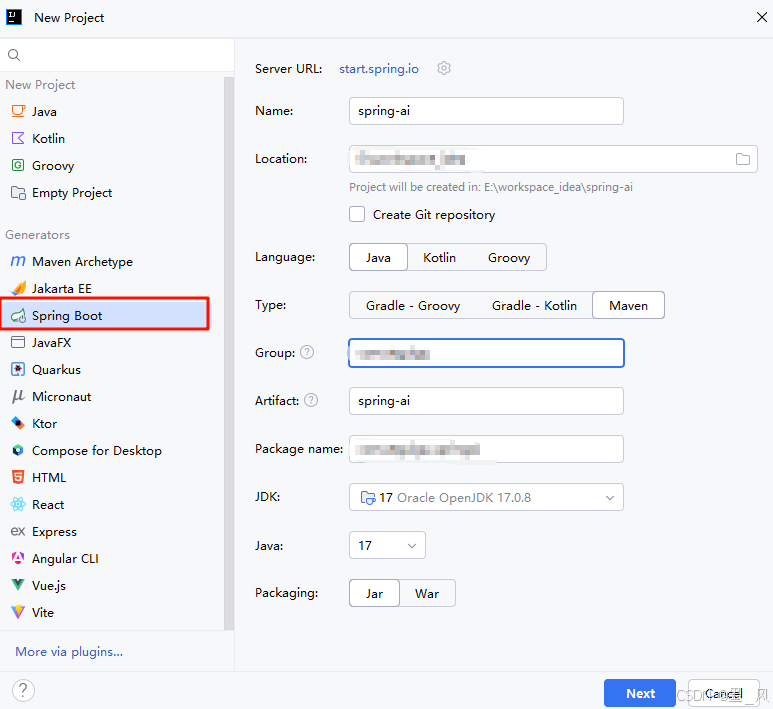
-
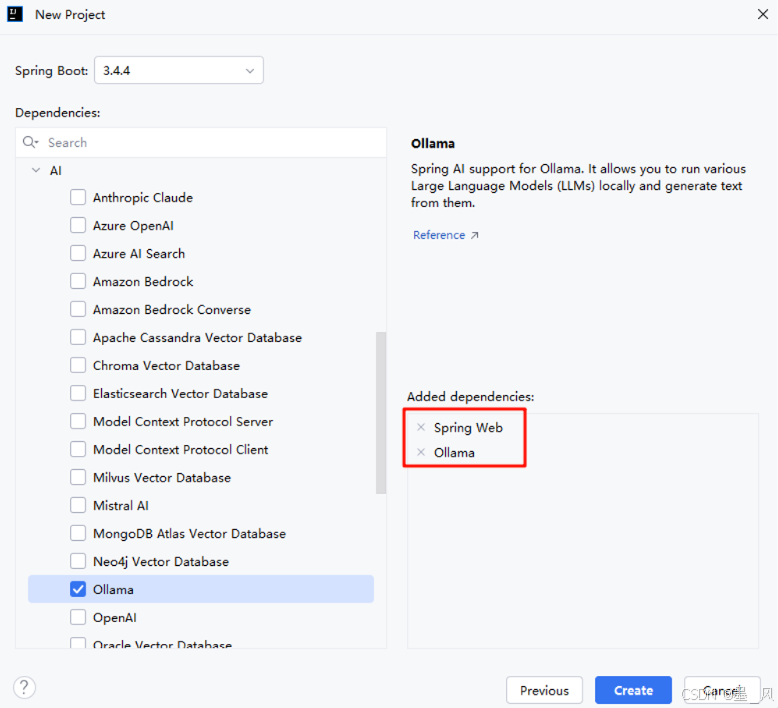
点击下一步选择SpringBoot版本为3.4.4,添加Web下的Spring Web依赖和AI下的Ollama依赖。注意:从2025年4月12日开始SpringBoot版本>3.4.0时创建SpringBoot工程时才能选择AI下的相关依赖
-
删除src和其他文件,保留pom.xml文件
<?xml version="1.0" encoding="UTF-8"?>
<project xmlns="http://maven.apache.org/POM/4.0.0" xmlns:xsi="http://www.w3.org/2001/XMLSchema-instance"
         xsi:schemaLocation="http://maven.apache.org/POM/4.0.0 https://maven.apache.org/xsd/maven-4.0.0.xsd">
    <modelVersion>4.0.0</modelVersion>

    <parent>
        <groupId>org.springframework.boot</groupId>
        <artifactId>spring-boot-starter-parent</artifactId>
        <version>3.4.4</version>
        <relativePath/> <!-- lookup parent from repository -->
    </parent>

    <groupId>com.ioart.polaris</groupId>
    <artifactId>server-ai</artifactId>
    <version>0.0.1-SNAPSHOT</version>
    <name>server-ai</name>
    <description>server-ai</description>

    <properties>
        <java.version>17</java.version>
        <spring-ai.version>1.0.0-M7</spring-ai.version>
    </properties>

    <dependencies>

        <!-- Spring Boot Web Starter依赖,用于构建Web应用程序 -->
        <!-- 包含了Spring MVC、Tomcat等Web开发所需的核心组件 -->
        <dependency>
            <groupId>org.springframework.boot</groupId>
            <artifactId>spring-boot-starter-web</artifactId>
        </dependency>

        <!-- Spring AI Ollama模型启动器依赖,用于集成Ollama AI模型 -->
        <!-- 提供了与Ollama本地AI模型服务交互的能力 -->
        <dependency>
            <groupId>org.springframework.ai</groupId>
            <artifactId>spring-ai-starter-model-ollama</artifactId>
        </dependency>

        <!-- Spring Boot测试启动器依赖,用于应用程序测试 -->
        <!-- 包含了JUnit、Spring Test等测试框架,scope设置为test表示仅在测试时使用 -->
        <dependency>
            <groupId>org.springframework.boot</groupId>
            <artifactId>spring-boot-starter-test</artifactId>
            <scope>test</scope>
        </dependency>
    </dependencies>

    <dependencyManagement>
        <!-- 依赖管理配置 -->
        <!-- 该配置用于引入Spring AI的BOM(Bill of Materials)文件 -->
        <!-- BOM文件用于统一管理Spring AI相关组件的版本,避免版本冲突 -->
        <!--
             依赖项说明:
             groupId: 组织标识,org.springframework.ai表示Spring AI项目
             artifactId: 组件标识,spring-ai-bom表示Spring AI的物料清单
             version: 版本号,使用占位符${spring-ai.version}引用外部定义的版本
             type: 依赖类型,pom表示这是一个Maven pom文件
             scope: 作用域,import表示将此BOM导入到当前项目的依赖管理中
        -->
        <dependencies>
            <dependency>
                <groupId>org.springframework.ai</groupId>
                <artifactId>spring-ai-bom</artifactId>
                <version>${spring-ai.version}</version>
                <type>pom</type>
                <scope>import</scope>
            </dependency>
        </dependencies>

    </dependencyManagement>

    <!--
        构建配置部分,用于定义项目构建过程中使用的插件
    -->
    <build>
        <!--
            插件配置列表,包含项目构建所需的各种Maven插件
        -->
        <plugins>
            <!--
                Spring Boot Maven插件配置
                该插件用于Spring Boot项目的打包和运行
                groupId: 组ID,标识插件的组织
                artifactId: 构件ID,标识具体的插件
            -->
            <plugin>
                <groupId>org.springframework.boot</groupId>
                <artifactId>spring-boot-maven-plugin</artifactId>
            </plugin>
        </plugins>
    </build>


</project>
- 创建配置文件添加以下配置
#调用本地大模型
#配置Ollama的本地请求路径
spring.ai.ollama.base-url=http://localhost:11434
#配置聊天模型
spring.ai.ollama.chat.model=deepseek-r1:8b
- 创建Controller注入ChatModel
package com.ioart.polaris.serverai.controller;

import org.springframework.ai.chat.model.ChatModel;
import org.springframework.beans.factory.annotation.Autowired;
import org.springframework.web.bind.annotation.RequestMapping;
import org.springframework.web.bind.annotation.RequestParam;
import org.springframework.web.bind.annotation.RestController;

@RestController
@RequestMapping("/springAi")
public class SpringAiChatController {
    @Autowired
    private ChatModel chatModel;

    @GetMapping("/chatToAi")
    public String chatToAi(@RequestParam(value = "message", required = false, defaultValue = "请做个自我介绍") String message) {
        //调用ChatModel中的call方法
        String result = chatModel.call(message);
        return result;
    }
}
- 启动测试
- 还可以根据后端接口让DeepSeek创建一个前端页面进行对话,DeepSeek创建的html页面需要放在resources/static目录中
5.2、大模型流式响应
调用大模型时大模型直接将所有的结果一次性响应到前端,为了让用户能有更好的用户体验,我们让大模型以打字效果的方式给用户响应(流式输出),具体实现步骤如下:
- pom.xml文件中导入以下依赖
        <!--
            Spring Boot WebFlux starter依赖项
            用于构建响应式Web应用程序,提供响应式编程模型和非阻塞I/O支持
            包含Spring WebFlux框架的核心功能和自动配置
        -->
        <dependency>
            <groupId>org.springframework.boot</groupId>
            <artifactId>spring-boot-starter-webflux</artifactId>
        </dependency>
- 添加流式响应的接口方法
package com.ioart.polaris.serverai.controller;

import org.springframework.ai.chat.model.ChatModel;
import org.springframework.beans.factory.annotation.Autowired;
import org.springframework.web.bind.annotation.GetMapping;
import org.springframework.web.bind.annotation.RequestMapping;
import org.springframework.web.bind.annotation.RequestParam;
import org.springframework.web.bind.annotation.RestController;
import reactor.core.publisher.Flux;

@RestController
@RequestMapping("/springAi")
public class SpringAiChatController {
    @Autowired
    private ChatModel chatModel;

    @GetMapping("/chatToAi")
    public String chatToAi(@RequestParam(value = "message", required = false, defaultValue = "请做个自我介绍") String message) {
        //调用ChatModel中的call方法
        String result = chatModel.call(message);
        return result;
    }
    @GetMapping("/chatToAiStream")
    public Flux<String> chatToAiStream(@RequestParam(value = "message",required = false,defaultValue = "请做个自我介绍") String message) {
        //调用ChatModel中的call方法
        Flux<String> result = chatModel.stream(message);
        return result;
    }
}
- 让DeepSeek基于后端流式响应的结果创建对话页面,以下便是DeepSeek给我生成的页面
<!DOCTYPE html>
<html lang="zh-CN">
<head>
<meta charset="UTF-8">
<meta name="viewport" content="width=device-width, initial-scale=1.0">
<title>NexusAI - 智能对话平台</title>
<link href="https://fonts.googleapis.com/css2?family=Inter:wght@400;500;600&family=JetBrains+Mono&display=swap" rel="stylesheet">
<link rel="stylesheet" href="https://cdnjs.cloudflare.com/ajax/libs/font-awesome/6.4.0/css/all.min.css">
<style>
:root {
--primary: #6366f1;
--primary-dark: #4f46e5;
--primary-light: #e0e7ff;
--dark: #1e293b;
--light: #f8fafc;
--gray: #94a3b8;
--gray-dark: #64748b;
--gray-light: #e2e8f0;
--success: #10b981;
--error: #ef4444;
--warning: #f59e0b;
--sidebar-width: 280px;
--border-radius: 12px;
--shadow-sm: 0 1px 2px 0 rgba(0, 0, 0, 0.05);
--shadow: 0 4px 6px -1px rgba(0, 0, 0, 0.1), 0 2px 4px -1px rgba(0, 0, 0, 0.06);
--shadow-md: 0 10px 15px -3px rgba(0, 0, 0, 0.1), 0 4px 6px -2px rgba(0, 0, 0, 0.05);
--transition: all 0.2s cubic-bezier(0.4, 0, 0.2, 1);
}
* {
margin: 0;
padding: 0;
box-sizing: border-box;
}
body {
font-family: 'Inter', -apple-system, BlinkMacSystemFont, sans-serif;
color: var(--dark);
background-color: #f1f5f9;
line-height: 1.6;
height: 100vh;
display: flex;
overflow: hidden;
}
/* 侧边栏样式 */
.sidebar {
width: var(--sidebar-width);
background: white;
border-right: 1px solid var(--gray-light);
height: 100vh;
display: flex;
flex-direction: column;
padding: 1.5rem;
box-shadow: var(--shadow-sm);
z-index: 10;
}
.logo {
display: flex;
align-items: center;
margin-bottom: 2rem;
padding-bottom: 1.5rem;
border-bottom: 1px solid var(--gray-light);
}
.logo-icon {
width: 32px;
height: 32px;
background: var(--primary);
border-radius: 8px;
display: flex;
align-items: center;
justify-content: center;
margin-right: 12px;
color: white;
font-weight: bold;
}
.logo-text {
font-size: 1.25rem;
font-weight: 600;
color: var(--dark);
}
.new-chat-btn {
display: flex;
align-items: center;
justify-content: center;
width: 100%;
padding: 0.75rem;
background: var(--primary);
color: white;
border: none;
border-radius: var(--border-radius);
font-weight: 500;
margin-bottom: 1.5rem;
cursor: pointer;
transition: var(--transition);
}
.new-chat-btn:hover {
background: var(--primary-dark);
transform: translateY(-1px);
}
.new-chat-btn i {
margin-right: 8px;
}
.history-list {
flex: 1;
overflow-y: auto;
margin-bottom: 1rem;
}
.history-item {
padding: 0.75rem;
border-radius: 8px;
cursor: pointer;
margin-bottom: 4px;
font-size: 0.875rem;
display: flex;
align-items: center;
transition: var(--transition);
white-space: nowrap;
overflow: hidden;
text-overflow: ellipsis;
}
.history-item:hover {
background: var(--gray-light);
}
.history-item.active {
background: var(--primary-light);
color: var(--primary-dark);
font-weight: 500;
}
.history-item i {
margin-right: 8px;
color: var(--gray-dark);
}
.sidebar-footer {
padding-top: 1rem;
border-top: 1px solid var(--gray-light);
}
.user-profile {
display: flex;
align-items: center;
padding: 0.5rem;
border-radius: 8px;
cursor: pointer;
transition: var(--transition);
}
.user-profile:hover {
background: var(--gray-light);
}
.user-avatar {
width: 32px;
height: 32px;
border-radius: 50%;
background: var(--primary);
color: white;
display: flex;
align-items: center;
justify-content: center;
margin-right: 12px;
font-weight: 500;
}
.user-name {
font-size: 0.875rem;
font-weight: 500;
}
/* 主内容区样式 */
.main-content {
flex: 1;
display: flex;
flex-direction: column;
height: 100vh;
overflow: hidden;
}
.chat-header {
padding: 1.25rem 2rem;
background: white;
border-bottom: 1px solid var(--gray-light);
display: flex;
align-items: center;
justify-content: space-between;
box-shadow: var(--shadow-sm);
z-index: 5;
}
.chat-title {
font-size: 1.125rem;
font-weight: 600;
}
.chat-actions {
display: flex;
gap: 12px;
}
.action-btn {
width: 36px;
height: 36px;
border-radius: 50%;
background: white;
border: 1px solid var(--gray-light);
display: flex;
align-items: center;
justify-content: center;
cursor: pointer;
transition: var(--transition);
color: var(--gray-dark);
}
.action-btn:hover {
background: var(--gray-light);
color: var(--dark);
}
.chat-container {
flex: 1;
overflow: hidden;
display: flex;
flex-direction: column;
background: white;
position: relative;
}
.chat-messages {
flex: 1;
padding: 2rem;
overflow-y: auto;
scroll-behavior: smooth;
background: linear-gradient(to bottom, #ffffff, #f8fafc);
}
.message {
max-width: 800px;
margin: 0 auto 1.5rem;
display: flex;
gap: 1rem;
animation: fadeIn 0.3s ease-out;
}
@keyframes fadeIn {
from { opacity: 0; transform: translateY(10px); }
to { opacity: 1; transform: translateY(0); }
}
.message-avatar {
width: 36px;
height: 36px;
border-radius: 50%;
background: var(--primary-light);
color: var(--primary-dark);
display: flex;
align-items: center;
justify-content: center;
flex-shrink: 0;
font-weight: 600;
}
.ai-avatar {
background: var(--primary);
color: white;
}
.message-content {
flex: 1;
padding-top: 4px;
}
.message-header {
display: flex;
align-items: center;
margin-bottom: 8px;
}
.message-sender {
font-weight: 600;
margin-right: 8px;
}
.message-time {
font-size: 0.75rem;
color: var(--gray-dark);
}
.message-text {
line-height: 1.7;
color: var(--dark);
}
.markdown-content {
word-break: break-word;
}
.markdown-content p {
margin-bottom: 1em;
}
.markdown-content pre {
background: var(--dark);
color: white;
padding: 1rem;
border-radius: 8px;
overflow-x: auto;
margin: 1rem 0;
font-family: 'JetBrains Mono', monospace;
font-size: 0.875rem;
line-height: 1.5;
}
.markdown-content code {
font-family: 'JetBrains Mono', monospace;
background: var(--primary-light);
color: var(--primary-dark);
padding: 0.2em 0.4em;
border-radius: 4px;
font-size: 0.875rem;
}
.markdown-content ul,
.markdown-content ol {
margin-left: 1.5rem;
margin-bottom: 1rem;
}
.markdown-content blockquote {
border-left: 3px solid var(--gray-light);
padding-left: 1rem;
margin: 1rem 0;
color: var(--gray-dark);
}
.message-actions {
display: flex;
gap: 8px;
margin-top: 12px;
opacity: 0;
transition: var(--transition);
}
.message:hover .message-actions {
opacity: 1;
}
.action-icon {
width: 28px;
height: 28px;
border-radius: 50%;
background: var(--gray-light);
display: flex;
align-items: center;
justify-content: center;
cursor: pointer;
transition: var(--transition);
color: var(--gray-dark);
}
.action-icon:hover {
background: var(--primary-light);
color: var(--primary-dark);
}
.typing-indicator {
display: inline-flex;
align-items: center;
background: var(--gray-light);
padding: 8px 12px;
border-radius: 18px;
margin-top: 8px;
}
.typing-dots {
display: flex;
margin-left: 8px;
}
.typing-dot {
width: 6px;
height: 6px;
background: var(--gray-dark);
border-radius: 50%;
margin: 0 2px;
animation: typingAnimation 1.4s infinite ease-in-out;
}
.typing-dot:nth-child(1) { animation-delay: 0s; }
.typing-dot:nth-child(2) { animation-delay: 0.2s; }
.typing-dot:nth-child(3) { animation-delay: 0.4s; }
@keyframes typingAnimation {
0%, 60%, 100% { transform: translateY(0); }
30% { transform: translateY(-4px); }
}
.input-container {
padding: 1.5rem;
background: white;
border-top: 1px solid var(--gray-light);
position: relative;
}
.input-box {
max-width: 800px;
margin: 0 auto;
position: relative;
}
#message-input {
width: 100%;
min-height: 56px;
max-height: 200px;
padding: 16px 60px 16px 20px;
border: 1px solid var(--gray-light);
border-radius: var(--border-radius);
background: white;
resize: none;
font-family: 'Inter', sans-serif;
font-size: 1rem;
line-height: 1.5;
color: var(--dark);
box-shadow: var(--shadow-sm);
transition: var(--transition);
}
#message-input:focus {
outline: none;
border-color: var(--primary);
box-shadow: 0 0 0 3px rgba(99, 102, 241, 0.2);
}
.input-actions {
position: absolute;
right: 16px;
bottom: 16px;
display: flex;
gap: 8px;
}
.send-btn {
width: 40px;
height: 40px;
border-radius: 50%;
background: var(--primary);
color: white;
border: none;
display: flex;
align-items: center;
justify-content: center;
cursor: pointer;
transition: var(--transition);
}
.send-btn:hover {
background: var(--primary-dark);
transform: translateY(-2px);
}
.send-btn:disabled {
background: var(--gray-light);
color: var(--gray-dark);
cursor: not-allowed;
transform: none;
}
.attach-btn {
width: 40px;
height: 40px;
border-radius: 50%;
background: white;
border: 1px solid var(--gray-light);
display: flex;
align-items: center;
justify-content: center;
cursor: pointer;
transition: var(--transition);
color: var(--gray-dark);
}
.attach-btn:hover {
background: var(--gray-light);
}
.status-bar {
position: absolute;
bottom: 70px;
left: 50%;
transform: translateX(-50%);
background: rgba(0, 0, 0, 0.7);
color: white;
padding: 8px 16px;
border-radius: 20px;
font-size: 0.875rem;
opacity: 0;
transition: var(--transition);
pointer-events: none;
}
.status-bar.show {
opacity: 1;
}
/* 滚动条样式 */
::-webkit-scrollbar {
width: 8px;
height: 8px;
}
::-webkit-scrollbar-track {
background: var(--gray-light);
border-radius: 4px;
}
::-webkit-scrollbar-thumb {
background: var(--gray-dark);
border-radius: 4px;
}
::-webkit-scrollbar-thumb:hover {
background: var(--dark);
}
/* 响应式调整 */
@media (max-width: 1024px) {
.sidebar {
width: 240px;
padding: 1rem;
}
}
</style>
</head>
<body>
<!-- 侧边栏 -->
<div class="sidebar">
<div class="logo">
<div class="logo-icon">
<i class="fas fa-robot"></i>
</div>
<div class="logo-text">NexusAI</div>
</div>
<button class="new-chat-btn">
<i class="fas fa-plus"></i>
新的对话
</button>
<div class="history-list">
<div class="history-item active">
<i class="fas fa-comment"></i>
今天的对话
</div>
<div class="history-item">
<i class="fas fa-comment"></i>
React组件设计讨论
</div>
<div class="history-item">
<i class="fas fa-comment"></i>
Spring Boot问题排查
</div>
<div class="history-item">
<i class="fas fa-comment"></i>
项目架构设计方案
</div>
<div class="history-item">
<i class="fas fa-comment"></i>
UI设计反馈
</div>
</div>
<div class="sidebar-footer">
<div class="user-profile">
<div class="user-avatar">JD</div>
<div class="user-name">John Doe</div>
</div>
</div>
</div>
<!-- 主内容区 -->
<div class="main-content">
<div class="chat-header">
<div class="chat-title">今天的对话</div>
<div class="chat-actions">
<button class="action-btn" title="设置">
<i class="fas fa-cog"></i>
</button>
<button class="action-btn" title="清空对话">
<i class="fas fa-trash-alt"></i>
</button>
<button class="action-btn" title="导出对话">
<i class="fas fa-download"></i>
</button>
</div>
</div>
<div class="chat-container">
<div class="chat-messages" id="chat-messages">
<!-- 示例消息 -->
<div class="message">
<div class="message-avatar ai-avatar">
<i class="fas fa-robot"></i>
</div>
<div class="message-content">
<div class="message-header">
<div class="message-sender">NexusAI</div>
<div class="message-time">今天 10:30</div>
</div>
<div class="message-text">
<div class="markdown-content">
您好!我是NexusAI,您的智能助手。我可以帮助您解答技术问题、提供代码示例、进行架构设计讨论等。请问今天有什么可以帮您的吗?
</div>
</div>
<div class="message-actions">
<div class="action-icon" title="复制">
<i class="fas fa-copy"></i>
</div>
<div class="action-icon" title="重新生成">
<i class="fas fa-sync-alt"></i>
</div>
<div class="action-icon" title="反馈">
<i class="fas fa-thumbs-up"></i>
</div>
</div>
</div>
</div>
</div>
<div class="input-container">
<div class="input-box">
<textarea id="message-input" placeholder="输入您的问题..." rows="1" autocomplete="off"></textarea>
<div class="input-actions">
<button class="attach-btn" title="附加文件">
<i class="fas fa-paperclip"></i>
</button>
<button id="send-button" class="send-btn" title="发送" disabled>
<i class="fas fa-paper-plane"></i>
</button>
</div>
</div>
<div class="status-bar" id="status-bar"></div>
</div>
</div>
</div>
<script>
document.addEventListener('DOMContentLoaded', function() {
const chatMessages = document.getElementById('chat-messages');
const messageInput = document.getElementById('message-input');
const sendButton = document.getElementById('send-button');
const statusBar = document.getElementById('status-bar');
const newChatBtn = document.querySelector('.new-chat-btn');
const historyItems = document.querySelectorAll('.history-item');
let eventSource = null;
let isStreaming = false;
let currentAiMessage = null;
// 自动调整输入框高度
function adjustInputHeight() {
messageInput.style.height = 'auto';
messageInput.style.height = (messageInput.scrollHeight) + 'px';
}
messageInput.addEventListener('input', adjustInputHeight);
// 初始化消息操作按钮
function initMessageActions() {
document.querySelectorAll('.action-icon[title="复制"]').forEach(btn => {
btn.addEventListener('click', function() {
const messageContent = this.closest('.message').querySelector('.message-text').textContent;
navigator.clipboard.writeText(messageContent.trim()).then(() => {
showStatus('已复制到剪贴板');
});
});
});
}
initMessageActions();
// 显示状态消息
function showStatus(message, type = 'info') {
statusBar.textContent = message;
statusBar.className = 'status-bar show';
setTimeout(() => {
statusBar.classList.remove('show');
}, 3000);
}
// 添加消息到聊天界面
function addMessage(sender, content, isMarkdown = true) {
const messageElement = document.createElement('div');
messageElement.className = 'message';
const avatar = document.createElement('div');
avatar.className = `message-avatar ${sender === 'ai' ? 'ai-avatar' : ''}`;
avatar.innerHTML = sender === 'ai' ? '<i class="fas fa-robot"></i>' : '<i class="fas fa-user"></i>';
const messageContent = document.createElement('div');
messageContent.className = 'message-content';
const messageHeader = document.createElement('div');
messageHeader.className = 'message-header';
const senderName = document.createElement('div');
senderName.className = 'message-sender';
senderName.textContent = sender === 'ai' ? 'NexusAI' : '您';
const messageTime = document.createElement('div');
messageTime.className = 'message-time';
messageTime.textContent = formatTime(new Date());
messageHeader.appendChild(senderName);
messageHeader.appendChild(messageTime);
const messageText = document.createElement('div');
messageText.className = 'message-text';
const contentDiv = document.createElement('div');
contentDiv.className = isMarkdown ? 'markdown-content' : '';
contentDiv.innerHTML = isMarkdown ? parseMarkdown(content) : content;
messageText.appendChild(contentDiv);
const messageActions = document.createElement('div');
messageActions.className = 'message-actions';
const copyBtn = document.createElement('div');
copyBtn.className = 'action-icon';
copyBtn.title = '复制';
copyBtn.innerHTML = '<i class="fas fa-copy"></i>';
const regenerateBtn = document.createElement('div');
regenerateBtn.className = 'action-icon';
regenerateBtn.title = '重新生成';
regenerateBtn.innerHTML = '<i class="fas fa-sync-alt"></i>';
const feedbackBtn = document.createElement('div');
feedbackBtn.className = 'action-icon';
feedbackBtn.title = '反馈';
feedbackBtn.innerHTML = '<i class="fas fa-thumbs-up"></i>';
messageActions.appendChild(copyBtn);
messageActions.appendChild(regenerateBtn);
messageActions.appendChild(feedbackBtn);
messageContent.appendChild(messageHeader);
messageContent.appendChild(messageText);
messageContent.appendChild(messageActions);
messageElement.appendChild(avatar);
messageElement.appendChild(messageContent);
chatMessages.appendChild(messageElement);
scrollToBottom();
// 初始化消息操作
copyBtn.addEventListener('click', () => {
navigator.clipboard.writeText(content.trim()).then(() => {
showStatus('已复制到剪贴板');
});
});
return messageElement;
}
// 格式化时间
function formatTime(date) {
const hours = date.getHours().toString().padStart(2, '0');
const minutes = date.getMinutes().toString().padStart(2, '0');
return `${hours}:${minutes}`;
}
// 简单的Markdown解析
function parseMarkdown(text) {
// 处理代码块
text = text.replace(/```([a-z]*)\n([\s\S]*?)\n```/g, '<pre><code>$2</code></pre>');
// 处理内联代码
text = text.replace(/`([^`]+)`/g, '<code>$1</code>');
// 处理粗体
text = text.replace(/\*\*([^*]+)\*\*/g, '<strong>$1</strong>');
// 处理斜体
text = text.replace(/\*([^*]+)\*/g, '<em>$1</em>');
// 处理链接
text = text.replace(/\[([^\]]+)\]\(([^)]+)\)/g, '<a href="$2" target="_blank">$1</a>');
// 处理换行
text = text.replace(/\n/g, '<br>');
// 处理无序列表
text = text.replace(/^\s*-\s(.+)/gm, '<li>$1</li>');
text = text.replace(/(<li>.*<\/li>)+/g, '<ul>$&</ul>');
// 处理有序列表
text = text.replace(/^\s*\d+\.\s(.+)/gm, '<li>$1</li>');
text = text.replace(/(<li>.*<\/li>)+/g, '<ol>$&</ol>');
// 处理引用
text = text.replace(/^>\s(.+)/gm, '<blockquote>$1</blockquote>');
return text;
}
// 滚动到底部
function scrollToBottom() {
chatMessages.scrollTop = chatMessages.scrollHeight;
}
// 创建AI正在输入指示器
function createTypingIndicator() {
const messageElement = document.createElement('div');
messageElement.className = 'message';
const avatar = document.createElement('div');
avatar.className = 'message-avatar ai-avatar';
avatar.innerHTML = '<i class="fas fa-robot"></i>';
const messageContent = document.createElement('div');
messageContent.className = 'message-content';
const messageHeader = document.createElement('div');
messageHeader.className = 'message-header';
const senderName = document.createElement('div');
senderName.className = 'message-sender';
senderName.textContent = 'NexusAI';
messageHeader.appendChild(senderName);
const messageText = document.createElement('div');
messageText.className = 'message-text';
const typingDiv = document.createElement('div');
typingDiv.className = 'typing-indicator';
typingDiv.innerHTML = '正在思考 <div class="typing-dots"><div class="typing-dot"></div><div class="typing-dot"></div><div class="typing-dot"></div></div>';
messageText.appendChild(typingDiv);
messageContent.appendChild(messageHeader);
messageContent.appendChild(messageText);
messageElement.appendChild(avatar);
messageElement.appendChild(messageContent);
chatMessages.appendChild(messageElement);
scrollToBottom();
return messageElement;
}
// 移除正在输入指示器
function removeTypingIndicator() {
const indicators = document.querySelectorAll('.message .typing-indicator');
indicators.forEach(indicator => {
indicator.closest('.message').remove();
});
}
// 发送消息到后端
function sendMessage() {
const message = messageInput.value.trim();
if (!message || isStreaming) return;
// 添加用户消息
addMessage('user', message, false);
messageInput.value = '';
adjustInputHeight();
sendButton.disabled = true;
isStreaming = true;
// 显示正在连接状态
showStatus('正在连接AI...');
// 创建正在输入指示器
const typingIndicator = createTypingIndicator();
// 如果有现有的连接,先关闭
if (eventSource) {
eventSource.close();
}
// 创建新的EventSource连接
const encodedMessage = encodeURIComponent(message);
eventSource = new EventSource(`/chatToAiStream?message=${encodedMessage}`);
// 创建AI消息容器
currentAiMessage = addMessage('ai', '', true);
const aiContentElement = currentAiMessage.querySelector('.markdown-content');
// 移除正在输入指示器
removeTypingIndicator();
let fullResponse = '';
// 处理流式数据
eventSource.onmessage = function(event) {
if (event.data === '[DONE]') {
// 流结束
eventSource.close();
isStreaming = false;
messageInput.disabled = false;
messageInput.focus();
showStatus('响应完成');
return;
}
// 更新状态
showStatus('正在接收响应...');
// 追加响应内容
fullResponse += event.data;
// 更新AI消息内容
aiContentElement.innerHTML = parseMarkdown(fullResponse);
// 保持滚动到底部
scrollToBottom();
};
eventSource.onerror = function() {
showStatus('连接错误,请重试', 'error');
isStreaming = false;
messageInput.disabled = false;
messageInput.focus();
eventSource.close();
// 如果没有任何响应,显示错误消息
if (fullResponse === '') {
const errorMessage = '抱歉,与AI的通信出现问题,请稍后再试。';
aiContentElement.innerHTML = errorMessage;
}
};
}
// 输入框变化事件
messageInput.addEventListener('input', function() {
sendButton.disabled = this.value.trim() === '';
});
// 发送按钮点击事件
sendButton.addEventListener('click', sendMessage);
// 输入框回车事件
messageInput.addEventListener('keydown', function(e) {
if (e.key === 'Enter' && !e.shiftKey) {
e.preventDefault();
sendMessage();
}
});
// 新的对话按钮
newChatBtn.addEventListener('click', function() {
if (confirm('确定要开始新的对话吗?当前对话将保存到历史记录中。')) {
chatMessages.innerHTML = '';
addMessage('ai', '您好!我是NexusAI,您的智能助手。请问今天有什么可以帮您的吗?');
}
});
// 历史记录点击
historyItems.forEach(item => {
item.addEventListener('click', function() {
historyItems.forEach(i => i.classList.remove('active'));
this.classList.add('active');
// 这里可以添加加载历史对话的逻辑
});
});
// 自动聚焦输入框
messageInput.focus();
});
</script>
</body>
</html>
5.3、调用云端大模型
与ChatGPT相比,调用DeepSeek要便宜20到40倍!接下来我们以DeepSeek为例,说一下具体步骤。
- 注册DeepSeek账号
- DeepSeek | 深度求索
- 点击API开发平台
- 点击API keys→创建API key(注意:API key仅在创建时可见可复制)

- 点击充值充值一定的金额
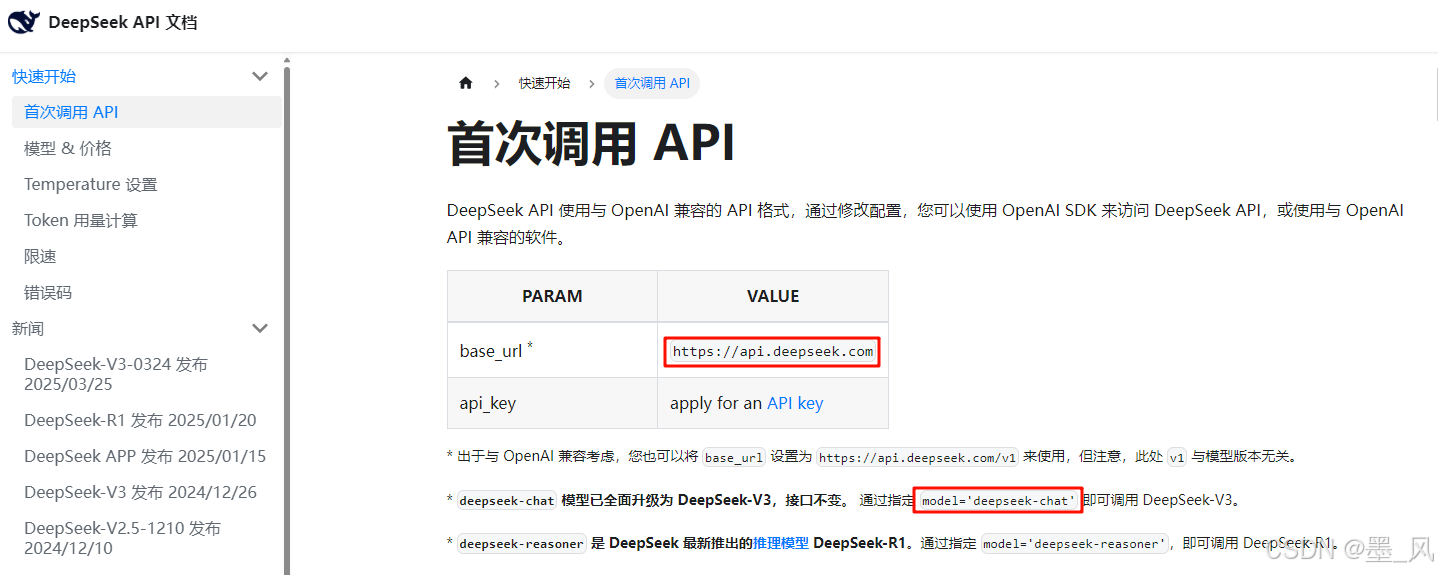
- 点击接口文档可以查询base_url和**模型名称
- spring-ai工程中导入以下依赖
        <!--
            Spring AI OpenAI模型启动器依赖配置
            用于集成OpenAI大语言模型功能

            groupId: org.springframework.ai - Spring AI项目组ID
            artifactId: spring-ai-starter-model-openai - OpenAI模型启动器组件

            该依赖提供了与OpenAI API集成所需的核心功能,
            包括模型调用、配置管理等自动化配置支持
        -->
        <dependency>
            <groupId>org.springframework.ai</groupId>
            <artifactId>spring-ai-starter-model-openai</artifactId>
        </dependency>
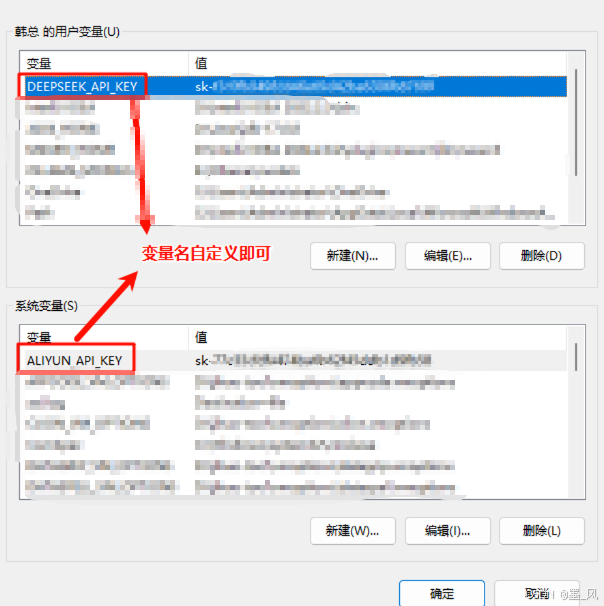
- 为了不暴露api-key,我们可以将它配置到环境变量中,配置到用户变量或系统变量中都可以。
- 在配置文件中添加以下配置
#调用云端大模型
spring.ai.openai.api-key=${DEEPSEEK_API_KEY}
spring.ai.openai.chat.base-url=https://api.deepseek.com
spring.ai.openai.chat.options.model=deepseek-chat
- 在Controller中注入OpenAiChatModel,因为此时ChatModel接口有连个实现类,所以需要通过**@Qualifier**注解指定要注入那个模型
package com.ioart.polaris.serverai.controller;

import org.springframework.ai.chat.model.ChatModel;
import org.springframework.beans.factory.annotation.Autowired;
import org.springframework.beans.factory.annotation.Qualifier;
import org.springframework.web.bind.annotation.RequestMapping;
import org.springframework.web.bind.annotation.RequestParam;
import org.springframework.web.bind.annotation.RestController;
import reactor.core.publisher.Flux;


@RestController
public class SpringAiTextController {

    @Qualifier("openAiChatModel")
//    @Qualifier("ollamaChatModel")
    @Autowired
    private ChatModel chatModel;

    @RequestMapping("/chatToAi")
    public String chatToAi(@RequestParam(value = "message",required = false,defaultValue = "请做个自我介绍") String message) {
        //调用ChatModel中的call方法
        String result = chatModel.call(message);
        return result;
    }

    @RequestMapping("/chatToAiStream")
    public Flux<String> chatToAiStream(@RequestParam(value = "message",required = false,defaultValue = "请做个自我介绍") String message) {
        //调用ChatModel中的call方法
        Flux<String> result = chatModel.stream(message);
        return result;
    }

}
- 之前生成的界面测试
- 其他大模型如阿里云百炼、百度千帆等步骤类似,大家可以自行尝试一下,阿里云百炼注册每个模型送100万个token,半年有效期,兼容OpenAi,如果调用阿里云百炼需要添加以下配置
#调用阿里百炼的模型
spring.ai.openai.api-key=${ALIYUN_API_KEY}
spring.ai.openai.chat.base-url=https://dashscope.aliyuncs.com/compatible-mode
spring.ai.openai.chat.options.model=qwen-max
5.4、实现聊天记忆
前面与大模型的对话都不具备记忆功能,如果要实现聊天记忆功能,我们需要通过Spring AI官方文档创建聊天客户端,具体步骤如下:
- 创建配置类得到ChatMemory对象
package com.ioart.polaris.serverai.config;

import org.springframework.ai.chat.memory.ChatMemory;
import org.springframework.ai.chat.memory.InMemoryChatMemory;
import org.springframework.boot.SpringBootConfiguration;
import org.springframework.context.annotation.Bean;

@SpringBootConfiguration
public class ChatMemoryConfiguration {

    @Bean
    public ChatMemory chatMemory() {
        return new InMemoryChatMemory();
    }
}
- 修改Controller中流式响应的方法
package com.ioart.polaris.serverai.controller;

import org.springframework.ai.chat.client.ChatClient;
import org.springframework.ai.chat.client.advisor.MessageChatMemoryAdvisor;
import org.springframework.ai.chat.memory.ChatMemory;
import org.springframework.ai.chat.model.ChatModel;
import org.springframework.beans.factory.annotation.Autowired;
import org.springframework.beans.factory.annotation.Qualifier;
import org.springframework.web.bind.annotation.RequestMapping;
import org.springframework.web.bind.annotation.RequestParam;
import org.springframework.web.bind.annotation.RestController;
import reactor.core.publisher.Flux;


@RestController
public class SpringAiTextController {

    @Qualifier("openAiChatModel")
//    @Qualifier("ollamaChatModel")
    @Autowired
    private ChatModel chatModel;

    @Autowired
    private ChatMemory chatMemory;

    @RequestMapping("/chatToAi")
    public String chatToAi(@RequestParam(value = "message",required = false,defaultValue = "请做个自我介绍") String message) {
        //调用ChatModel中的call方法
        String result = chatModel.call(message);
        return result;
    }

    @RequestMapping("/chatToAiStream")
    public Flux<String> chatToAiStream(@RequestParam(value = "message",required = false,defaultValue = "请做个自我介绍") String message) {
        //调用ChatModel中的call方法
        Flux<String> result = chatModel.stream(message);
        return result;
    }

    @RequestMapping("/chatToAiStream")
    public Flux<String> chatToAiWithMemory(@RequestParam(value = "message",required = false,defaultValue = "请做个自我介绍") String message) {
        //创建ChatClient对象
        ChatClient chatClient = ChatClient
                .builder(chatModel)
                .defaultAdvisors(new MessageChatMemoryAdvisor(chatMemory))
                .build();
        //获取响应流
        Flux<String> result = chatClient.prompt("你是一个专业的AI助手").user(message).stream().content();
        return result;
    }

}
- 使用DeepSeek生成的前端页面测试
5.5、调用大模型的客户端工具
除了使用代码调用大模型之外,我们还可以安装一些软件来调用本地或云端的大模型,接下来给大家推荐两款软件:
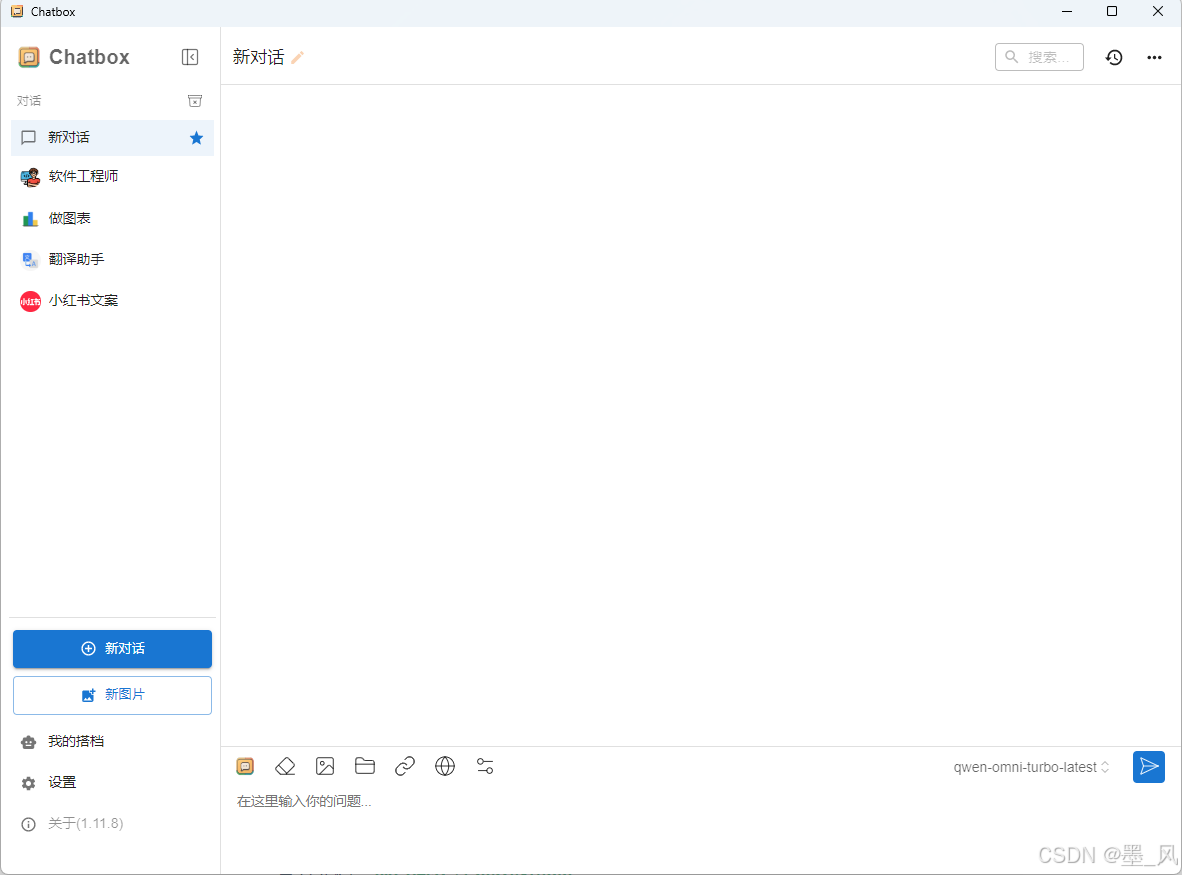
- Chatbox:支持桌面应用(Windows、Linux、Mac)和移动应用(IOS、Android),使用方法见官网官网:Chatbox AI官网:办公学习的AI好助手,全平台AI客户端,官方免费下载
- CherryStudio:目前只支持桌面应用,使用方法见官方文档官方文档:项目简介 | CherryStudio,使用界面:
六、使用LangChain4j调用大模型
6.1、基础了解
6.1.1、介绍
- LangChain4j官网查看相关API: LangChain4j | LangChain4j
- LangChain4j 的目标是简化将大语言模型(LLM - Large Language Model)集成到 Java 应用程序中的过程。
- 历史背景
- 2022 年11月30日OpenAI发布了Chat GPT(GPT-3.5)
- 早在 2022 年10月,Harrison Chase 发布了基于Python的LangChain。
- 随后同时包含了Python版和JavaScript(LangChain.js)版的LangChain 也发布了。
- 2023 年 11 月,Quarkus 发布了 LangChain4j 的 0.1 版本,2025 年 2 月发布了 1.0 - Beta1 版本,4 月发布了 1.0 - Beta3 版本
6.1.2、主要功能
- 与大型语言模型和向量数据库的便捷交互:通过统一的应用程序编程接口(API),可以轻松访问所有主要的商业和开源大型语言模型以及向量数据库,使你能够构建聊天机器人、智能助手等应用。
- 专为 Java 打造:借助Spring Boot 集成,能够将大模型集成到ava 应用程序中。大型语言模型与 Java 之间实现了双向集成:你可以从 Java 中调用大型语言模型,同时也允许大型语言模型反过来调用你的 Java 代码。
- 智能代理、工具、检索增强生成(RAG):为常见的大语言模型操作提供了广泛的工具,涵盖从底层的提示词模板创建、聊天记忆管理和输出解析,到智能代理和检索增强生成等高级模式。
6.1.3、应用示例
- 你想要实现一个自定义的由人工智能驱动的聊天机器人,它可以访问你的数据,并按照你期望的方式运行:
- 客户支持聊天机器人,它可以:
- 礼貌地回答客户问题
- 处理 / 更改 / 取消订单
- 教育助手,它可以:
- 教授各种学科
- 解释不清楚的部分
- 评估用户的理解 / 知识水平
- 客户支持聊天机器人,它可以:
- 你想要处理大量的非结构化数据(文件、网页等),并从中提取结构化信息。例如:
- 从客户评价和支持聊天记录中提取有效评价
- 从竞争对手的网站上提取有趣的信息
- 从求职者的简历中提取有效信息
- 你想要生成信息,例如:
- 为你的每个客户量身定制的电子邮件
- 为你的应用程序 / 网站生成内容:
- 博客文章
- 故事
- 你想要转换信息,例如:
- 总结
- 校对和改写
- 翻译
6.2、低级API实现
实现步骤:
- 创建一个SpringBoot工程(版本3.4.4)或Maven工程langchain4j,导入Web启动器
- 删除src目录,创建子模块langchain4j-chat,继承langchain4j工程
- 父工程中导入LangChain4j相关依赖。
<dependencies>
    <dependency>
        <groupId>org.springframework.boot</groupId>
        <artifactId>spring-boot-starter-web</artifactId>
    </dependency>
    <dependencies>
</dependencies>
<dependencyManagement>
    <dependencies>
        <dependency>
            <groupId>dev.langchain4j</groupId>
            <artifactId>langchain4j-bom</artifactId>
            <version>1.0.0-beta3</version>
            <type>pom</type>
            <scope>import</scope>
        </dependency>
    </dependencies>
</dependencyManagement>
- 子模块导入以下依赖
<dependency>
    <groupId>dev.langchain4j</groupId>
    <artifactId>langchain4j-ollama-spring-boot-starter</artifactId>
</dependency>
<dependency>
    <groupId>dev.langchain4j</groupId>
    <artifactId>langchain4j-open-ai-spring-boot-starter</artifactId>
</dependency>
- 创建配置文件添加以下配置
spring.application.name=langchain4j-text
#调用本地大模型
langchain4j.ollama.chat-model.base-url=http://127.0.0.1:11434
langchain4j.ollama.chat-model.model-name=qwen2.5:3b
#开启请求和响应日志
langchain4j.ollama.chat-model.log-requests=true
langchain4j.ollama.chat-model.log-responses=true

#调用云端大模型
langchain4j.open-ai.chat-model.api-key=${DEEPSEEK_API_KEY}
langchain4j.open-ai.chat-model.base-url=https://api.deepseek.com
langchain4j.open-ai.chat-model.model-name=deepseek-chat
langchain4j.open-ai.chat-model.log-requests=true
langchain4j.open-ai.chat-model.log-responses=true
#温度系数:取值范围通常在 0 到 1 之间。值越高,模型的输出越随机、富有创造性;
# 值越低,输出越确定、保守。这里设置为 0.8,意味着模型会有一定的随机性,生成的回复可能会比较多样化。
langchain4j.open-ai.chat-model.temperature=0.8

#配置根日志级别
logging.level.root=debug
- 结合官方文档创建API接口
import dev.langchain4j.model.chat.ChatLanguageModel;
import org.springframework.beans.factory.annotation.Autowired;
import org.springframework.beans.factory.annotation.Qualifier;
import org.springframework.web.bind.annotation.RequestMapping;
import org.springframework.web.bind.annotation.RequestParam;
import org.springframework.web.bind.annotation.RestController;

@RestController
@RequestMapping("/langChain4j")
public class LangChain4jChatController {

    //    @Qualifier(value = "openAiChatModel")
    @Qualifier(value = "ollamaChatModel")
    @Autowired
    private ChatLanguageModel chatLanguageModel;


    @GetMapping("/chatToAi")
    public String chatToAi(@RequestParam (value = "message",required = false,defaultValue = "请做个自我介绍") String message) {
        String chat = chatLanguageModel.chat(message);
        return chat;
    }

}
- 流式AIP接口
- 在父工程或子模块中导入以下依赖
        <!--
            Spring Boot WebFlux starter依赖项
            用于构建响应式Web应用程序,提供响应式编程模型和非阻塞I/O支持
            包含Spring WebFlux框架的核心功能和自动配置
        -->
        <dependency>
            <groupId>org.springframework.boot</groupId>
            <artifactId>spring-boot-starter-webflux</artifactId>
        </dependency>
- 在配置文件中添加以下配置
#调用本地大模型
langchain4j.ollama.streaming-chat-model.base-url=http://127.0.0.1:11434
langchain4j.ollama.streaming-chat-model.model-name=qwen2.5:3b
langchain4j.ollama.streaming-chat-model.log-requests=true
langchain4j.ollama.streaming-chat-model.log-responses=true
#调用云端大模型
 langchain4j.open-ai.streaming-chat-model.api-key=${DEEPSEEK_API_KEY}
 langchain4j.open-ai.streaming-chat-model.base-url=https://api.deepseek.com
 langchain4j.open-ai.streaming-chat-model.model-name=deepseek-chat
 langchain4j.open-ai.streaming-chat-model.log-requests=true
 langchain4j.open-ai.streaming-chat-model.log-responses=true

 logging.level.root=debug
6.3、高级API实现
可以使用LangChain4j的高级大语言模型 API,通过面向接口开发的方式调用大模型
- 创建一个新的模块langchain4j-ai,继承langchain4j工程。
- 在langchain4j-ai模块中导入以下依赖
<!--langchain4j start-->
        <!--用于集成 Ollama 模型的 LangChain4J Spring Boot 启动器,提供与 Ollama 本地大语言模型服务的集成支持-->
        <dependency>
            <groupId>dev.langchain4j</groupId>
            <artifactId>langchain4j-ollama-spring-boot-starter</artifactId>
        </dependency>

        <!-- 用于集成 OpenAI 模型的 LangChain4J Spring Boot 启动器,提供与 OpenAI API 服务的集成支持-->
        <dependency>
            <groupId>dev.langchain4j</groupId>
            <artifactId>langchain4j-open-ai-spring-boot-starter</artifactId>
        </dependency>
        <!--LangChain4j的Spring Boot启动器,提供AI应用开发的基础功能-->
        <dependency>
            <groupId>dev.langchain4j</groupId>
            <artifactId>langchain4j-spring-boot-starter</artifactId>
        </dependency>
        <!--响应式编程支持模块,用于构建异步非阻塞的AI应用-->
        <dependency>
            <groupId>dev.langchain4j</groupId>
            <artifactId>langchain4j-reactor</artifactId>
        </dependency>
        <!--langchain4j end-->
- 接下来可以选择使用一种模型还是**同时使用两种模型
6.3.1、使用一种大模型
- 在配置文件中添加以下配置(本地或云端二选一)
#调用云端大模型
langchain4j:
#  open-ai:
#    chat-model:
#      api-key: sk-xxxxxxxxxxxxxxxxxxxxxx
#      base-url: https://api.deepseek.com
#      model-name: deepseek-chat
#      log-requests: true
#      log-responses: true
#    streaming-chat-model:
#      api-key: ${DEEPSEEK_API_KEY}
#      base-url: https://api.deepseek.com
#      model-name: deepseek-chat
#      log-requests: true
#      log-responses: true
  #调用本地大模型
  ollama:
    chat-model:
      base-url: http://127.0.0.1:11434
      model-name: qwen2.5:3b
      log-requests: true
      log-responses: true
    streaming-chat-model:
      base-url: http://127.0.0.1:11434
      model-name: qwen2.5:3b
      log-requests: true
      log-responses: true
- 自定义接口,在接口上添加**@AIService**注解
import dev.langchain4j.service.spring.AiService;
import reactor.core.publisher.Flux;

@AiService
public interface AssistantService {

    String chat(String message);

    Flux<String> chatStream(String message);
}
- 创建API接口
import com.ioart.polaris.serverai.service.AssistantService;
import org.springframework.beans.factory.annotation.Autowired;
import org.springframework.web.bind.annotation.RequestMapping;
import org.springframework.web.bind.annotation.RequestParam;
import org.springframework.web.bind.annotation.RestController;
import reactor.core.publisher.Flux;

public class AssistantController {

    @Autowired
    private AssistantService assistantService;

    public String chatToAi(@RequestParam(value = "message", required = false, defaultValue = "请做个自我介绍") String message) {
        return assistantService.chat(message);
    }

    @RequestMapping("/chatToAiStream")
    public Flux<String> chatToAiStream(@RequestParam(value = "message", required = false, defaultValue = "请做个自我介绍") String message) {
        return assistantService.chatStream(message);
    }
}
6.3.2、同时使用两种大模型
- 配置文件中配置本地和云端模型
#调用云端大模型
langchain4j:
  open-ai:
    chat-model:
      api-key: ${DEEPSEEK_API_KEY}
      base-url: https://api.deepseek.com
      model-name: deepseek-chat
      log-requests: true
      log-responses: trueag-0-1j5bnfcn4ag-1-1j5bnfcn4
    streaming-chat-model:
      api-key: ${DEEPSEEK_API_KEY}
      base-url: https://api.deepseek.com
      model-name: deepseek-chat
      log-requests: true
      log-responses: true
  #调用本地大模型
  ollama:
    chat-model:
      base-url: http://127.0.0.1:11434
      model-name: qwen2.5:3b
      log-requests: true
      log-responses: true
    streaming-chat-model:
      base-url: http://127.0.0.1:11434
      model-name: qwen2.5:3b
      log-requests: true
      log-responses: true
- 自定义两个接口,添加**@AiService**注解,并配置属性值
- @AiService注解属性说明
- wiringMode:设置自动装配模型还是明确指定模型,值是枚举类型
- AiServiceWiringMode.AUTOMATIC:自动装配
- AiServiceWiringMode.EXPLICIT:明确指定 - chatModel:指定对话模型的名字
- streamingChatModel
- 指定流式响应对话模型的名字
- wiringMode:设置自动装配模型还是明确指定模型,值是枚举类型
- @AiService注解属性说明
- OllamaAssistantService
import dev.langchain4j.service.spring.AiService;
import dev.langchain4j.service.spring.AiServiceWiringMode;
import reactor.core.publisher.Flux;

@AiService(wiringMode = AiServiceWiringMode.EXPLICIT, chatModel = "ollamaChatModel", streamingChatModel = "ollamaStreamingChatModel")
public interface OllamaAssistantService {

    String chat(String message);

    Flux<String> chatStream(String message);
}
- OpenAiAssistantService
import dev.langchain4j.service.spring.AiService;
import dev.langchain4j.service.spring.AiServiceWiringMode;
import reactor.core.publisher.Flux;

@AiService(wiringMode = AiServiceWiringMode.EXPLICIT, chatModel = "openAiChatModel" ,streamingChatModel = "openAiStreamingChatModel")
public interface OpenAiAssistantService {

  String chat(String message);

  Flux<String> chatStream(String message);
}
- 创建AIP接口
import com.ioart.polaris.serverai.service.AssistantService;
import com.ioart.polaris.serverai.service.OllamaAssistantService;
import com.ioart.polaris.serverai.service.OpenAiAssistantService;
import org.springframework.beans.factory.annotation.Autowired;
import org.springframework.web.bind.annotation.RequestMapping;
import org.springframework.web.bind.annotation.RequestParam;
import org.springframework.web.bind.annotation.RestController;
import reactor.core.publisher.Flux;

public class AssistantController {

    @Autowired
    private AssistantService assistantService;

    @Autowired
    private OllamaAssistantService ollamaAssistantService;

    @Autowired
    private OpenAiAssistantService openAiAssistantService;

    @RequestMapping("/chatToAi")
    public Flux<String> chatToAi(@RequestParam(value = "message",required = false,defaultValue = "请做个自我介绍") String message)
    {
        return ollamaAssistantService.chatStream(message);
    }

    @RequestMapping("/chatToAiStream")
    public Flux<String> chatToAiStream(@RequestParam(value = "message",required = false,defaultValue = "请做个自我介绍") String message)
    {
        return openAiAssistantService.chatStream(message);
    }
}
6.4、实现聊天记忆
之前调用大模型进行会话都不具备记忆功能,接下来我们单独创建一个模块给大模型添加记忆
- 创建langchain4j-memory模块,继承langchain4j工程
- 导入以下依赖
<dependencies>
    <!--调用本地部署的大模型需要导入的jar包-->
    <dependency>
        <groupId>dev.langchain4j</groupId>
        <artifactId>langchain4j-ollama-spring-boot-starter</artifactId>
    </dependency>
    <!--高级API需要导入的jar包-->
    <dependency>
        <groupId>dev.langchain4j</groupId>
        <artifactId>langchain4j-spring-boot-starter</artifactId>
    </dependency>
</dependencies>
- 创建yml配置文件
#调用本地大模型
langchain4j:
  ollama:
    chat-model:
      base-url: http://127.0.0.1:11434
      model-name: qwen2.5:3b
      log-requests: true
      log-responses: true
6.4.1、低级API实现
- 创建配置类
import dev.langchain4j.memory.chat.MessageWindowChatMemory;
import org.springframework.boot.SpringBootConfiguration;
import org.springframework.context.annotation.Bean;

@SpringBootConfiguration
public class ChatMemoryConfiguration {

     @Bean
    public ChatMemory getChatMemory(){
        return MessageWindowChatMemory.withMaxMessages(100);
    }
}
- 创建API接口
@RestController
@RequestMapping("/low")
public class LowLevelAPIController {

    @Autowired
    private OllamaChatModel ollamaChatModel;

    @Autowired
    private ChatMemory chatMemory;

    @RequestMapping("/chatToAi")
    public String chatToAi(@RequestParam(value = "message",required = false,defaultValue = "请做个自我介绍") String message) {
        //将用户问题添加到内存中
        chatMemory.add(UserMessage.userMessage(message));
        //获取大模型的回答
        ChatResponse chatResponse = ollamaChatModel.chat(chatMemory.messages());
        //将大模型的回答添加到内存中
        chatMemory.add(chatResponse.aiMessage());
        //返回大模型的回答
        String text = chatResponse.aiMessage().text();
        return text;
    }
}
6.4.2、高级API实现
- 核心注解
- @AiService:标识某个接口是调用大模型的Ai服务接口。
- @MemoryId:对话记忆的唯一标识,有了它可以区分记忆属于那个用户,实现对话隔离。
- @UserMessage:标识用户消息。
- 创建配置类
import dev.langchain4j.memory.chat.ChatMemoryProvider;
import dev.langchain4j.memory.chat.MessageWindowChatMemory;
import org.springframework.boot.SpringBootConfiguration;
import org.springframework.context.annotation.Bean;

@SpringBootConfiguration
public class ChatMemoryProviderConfiguration {

    @Bean
    public ChatMemoryProvider chatMemoryProvider() {
        return memoryId -> MessageWindowChatMemory.builder().id(memoryId).maxMessages(100).build();
    }
}
- 自定义一个接口,在接口上添加**@AiService注解及对应的属性,在方法参数前面添加@MemoryId注解和@UserMessage**注解
import dev.langchain4j.service.MemoryId;
import dev.langchain4j.service.UserMessage;
import dev.langchain4j.service.spring.AiService;

@AiService(chatMemoryProvider = "chatMemoryProvider")
public interface AssistantService {

    String chat(@MemoryId String memoryId, @UserMessage String message);

}
- 创建API接口
import com.ioart.polaris.serverai.service.AssistantService;
import org.springframework.beans.factory.annotation.Autowired;
import org.springframework.web.bind.annotation.RequestMapping;
import org.springframework.web.bind.annotation.RequestParam;
import org.springframework.web.bind.annotation.RestController;

@RestController
@RequestMapping("/high")
public class HighLevelAPIController {

    @Autowired
    private AssistantService assistantService;

    @RequestMapping("/chatToAi")
    public String chatToAi(@RequestParam(value = "memoryId", required = false, defaultValue = "1") String memoryId, @RequestParam(value = "message", required = false, defaultValue = "请做个自我介绍") String message) {
        return assistantService.chat(memoryId, message);
    }
}
6.5、直接接入阿里云百炼平台
LangChain4j官网:DashScope (Qwen) | LangChain4j
- 父工程导入以下依赖
<dependencyManagement>
    <dependency>
        <groupId>dev.langchain4j</groupId>
        <artifactId>langchain4j-community-bom</artifactId>
        <version>1.0.0-beta3</version>
        <type>pom</type>
        <scope>import</scope>
    </dependency>
</dependencyManagement>
- 创建langchai4j-dashscope子模块,导入以下依赖
<dependencies>
    <dependency>
        <groupId>dev.langchain4j</groupId>
        <artifactId>langchain4j-community-dashscope-spring-boot-starter</artifactId>
    </dependency>
</dependencies>
6.5.1、千问文生文
- 在yml配置文件中添加以下配置
#调用阿里云百炼文生图大模型
langchain4j:
  community:
    dashscope:
      chat-model:
        api-key: ${ALIYUN_API_KEY}
        model-name: qwen-plus
- 创建API接口
import dev.langchain4j.community.model.dashscope.QwenChatModel;
import org.springframework.beans.factory.annotation.Autowired;
import org.springframework.web.bind.annotation.RequestMapping;
import org.springframework.web.bind.annotation.RequestParam;
import org.springframework.web.bind.annotation.RestController;


@RestController
public class LangChain4jDashScopeController {

    @Autowired
    private QwenChatModel qwenChatModel;

    @RequestMapping("/chatToAi")
    public String chatToAi(@RequestParam(value = "promt", required = false, defaultValue = "你好") String prompt){
        return qwenChatModel.chat(prompt);
    }

}
6.5.2、千问文生文
- 创建配置类
import dev.langchain4j.data.image.Image;
import org.springframework.beans.factory.annotation.Autowired;
import org.springframework.web.bind.annotation.RequestMapping;
import org.springframework.web.bind.annotation.RequestParam;
import org.springframework.web.bind.annotation.RestController;

import java.net.URI;


@RestController
public class LangChain4jDashScopeController {

    @Autowired
    private QwenChatModel qwenChatModel;

    @Autowired
    private WanxImageModel wanxImageModel;

    @RequestMapping("/chatToAi")
    public String chatToAi(@RequestParam(value = "promt", required = false, defaultValue = "你好") String prompt) {
        return qwenChatModel.chat(prompt);
    }

    @RequestMapping("/textToImage")
    public String textToImage(@RequestParam(value = "prompt", required = false, defaultValue = "你好") String prompt) {
        Image content = wanxImageModel.generate(prompt).content();
        URI url = content.url();
        System.out.println("url = " + url);
        return "图片生成成功";
    }
}
七、Promt
7.1、简介
提示词(Promt)可以明确告诉大模型需要完成的任务、输出格式、输出风格、理解范围等,通过精准的 Prompt 可以减少大模型的幻觉(Hallucination)或偏见,所以提示词在大模型调用中非常重要。
- 提示词分为系统提示词和用户提示词
- 系统提示词用于设定角色,塑造AI助手的专业身份,明确助手的能力范围。
- 系统提示词的内容只会发送给大模型一次,如果修改了系统提示词,新的系统提示词会被发送给大模型,之前的聊天记忆会失效。
7.2、LangChain4j中设置提示词
- 使用**@SystemMessage**注解设置系统提示词,该注解中的属性如下:
- value:指定一行或多行提示词,值是String类型的数组。
- delimiter:指定提示词的分隔符,默认是换行符。
- fromResource:从资源文件中获取提示词模板。
- 使用**@UserMessage**注解设置用户提示词,该注解中的属性与
@SystemMessage一样。
@SystemMessage("请使用郭德纲的语气跟我对话")
String chatToAi(@MemoryId String memoryId , @UserMessage String message);
八、Tool Calling(Function Calling)
8.1、简介
工具调用(也称为函数调用) 是 AI 应用程序中的一种常见模式,允许模型与一组 API 或工具进行交互,从而增强其功能。
- 工具调用的主要作用
- 信息检索:可用于从外部来源(如数据库、Web 服务、文件系统或 Web 搜索引擎)检索信息。目标是增强模型的知识,使其能够回答其他方式无法回答的问题。因此,它们可用于检索增强生成 (RAG) 方案。例如,工具可用于检索给定位置的当前天气、检索最新的新闻文章或查询数据库的特定记录。
- 采取行动:可用于在软件系统中执行作,例如发送电子邮件、在数据库中创建新记录、提交表单或触发工作流。目标是自动执行原本需要人工干预或显式编程的任务。例如,工具可用于为与聊天机器人交互的客户预订航班、在网页上填写表单等。
8.2、LangChain4j高级API工具调用
官方文档:Tools (Function Calling) | LangChain4j
8.2.1、核心注解
- @Tool:标识大模型可以调用的方法
- name属性:设置工具的名称,不指定则使用方法名
- value属性:设置方法具体功能的描述
- @P:对工具方法中参数的描述
- value属性:设置参数的描述
- required属性:设置参数是否是必须的,默认为true
- @V:当自定义的AI服务方法的参数前添加了@V注解时,它的值将注入到提示词的变量中
- value属性:设置提示词中的变量名
- @ToolMemoryId:区分多个聊天记忆,如果高级API接口方法中添加了
@MemoryId,那么工具方法中也可以添加该注解。
8.2.2、方法调用
- 创建包含工具方法的类
import dev.langchain4j.agent.tool.P;
import dev.langchain4j.agent.tool.Tool;
import dev.langchain4j.agent.tool.ToolMemoryId;
import dev.langchain4j.service.UserMessage;
import org.springframework.stereotype.Service;

@Service
public class FunctionTool {

    /**
     * 不带参数的工具函数
     */
    @Tool(name = "first", value = "你是谁")
    public String getName() {
        return "机器人";
    }

    /**
     * 带参数的工具函数
     */
    @Tool(name = "language", value = {"学习什么开发语言", "什么开发语言最好", "那个开发语言最牛"})
    public String getName(@P(value = "开发语言", required = false) String language) {
        System.out.println("language = " + language);
        return "java";
    }

    record User(String name, Integer age) {
    }

    /**
     * 参数是对象
     */
    @Tool(name = "save", value = "添加")
    private void getUserInfo(@ToolMemoryId String memoryId, @UserMessage User user) {
        System.out.println("memoryId = " + memoryId);
        System.out.println("user = " + user);
    }
}
- 在自定义接口的
@AiService注解中指定工具函数所在类的bean名称
@AiService(chatMemoryProvider = "chatMemoryProvider",tools = "functionTool")
public interface AssistantService {

    Flux<String> chatToAiStream(@MemoryId String memoryId, @UserMessage String message);

}
```java
@AiService(chatMemoryProvider = "chatMemoryProvider",tools = "functionTool")
public interface AssistantService {

    Flux<String> chatToAiStream(@MemoryId String memoryId, @UserMessage String message);

}
8.2.3、酒店预订Demo
- 创建酒店预订Ai服务方法
@AiService(chatMemoryProvider = "chatMemoryProvider",tools = "functionTool")
public interface AssistantService {

    @SystemMessage(value = """
                你是一个专业的智能助理,主要负责酒店预订工作
                当用户每次预订酒店时,需要让用户提供酒店名称、顾客姓名和顾客电话
                请说中文
                当前时间是:{{current_date}}
            """)
    Flux<String> chat(@MemoryId String memoryId, @UserMessage String message, @V(value = "current_date") String currentDate);
}
- 创建酒店预订工具函数
@Tool(name = "hotel", value = "预订酒店")
public String hotel(@P(value = "酒店名称",required = false) String hotelName,
                    @P(value = "顾客姓名",required = false) String name,
                    @P(value = "顾客电话",required = false) String phone) {
    System.out.println("hotelName = " + hotelName);
    System.out.println("name = " + name);
    System.out.println("phone = " + phone);
    //TODO:调用酒店预订接口
    return "预订成功";
}
注意:配置的大模型需要支持Function Calling
九、RAG
9.1、简介
RAG(Retrieval-Augmented Generation,检索增强生成)是一种将大型语言模型(LLM)与外部知识检索相结合的技术框架。其目的是为了提升大语言模型(LLM)生成内容的准确性和可靠性。它通过从外部知识库中检索相关信息,并让模型基于检索结果生成回答,从而减少幻觉(Hallucination)问题,提高事实准确性。
- 技术组件
- 检索组件:通常由嵌入模型和向量数据库构成,负责从知识库中筛选与查询相关的内容。
- 生成组件:由LLM根据检索结果生成最终回答,减少“幻觉”(即无依据的虚构内容)。
- RAG可以解决的问题
- 知识局限性:LLM的训练数据通常无法覆盖实时或私有领域知识,而RAG通过外接知识库实现“开卷考试”。
- 幻觉问题:通过提供检索到的依据,降低模型凭空生成错误答案的概率。
- 数据安全性:企业无需上传私有数据训练模型,可直接通过RAG整合内部知识库。
- RAG常用的方法
- 全文(关键词)搜索:这种方法通过将问题和提示词中的关键词与文档数据库进行匹配来搜索文档。根据这些关键词在每个文档中的出现频率和相关性对搜索结果进行排序。
- 向量搜索:也被称为 “语义搜索”。文本通过嵌入模型被转换为数字向量。然后,它根据查询向量与文档向量之间的余弦相似度或其他相似性 / 距离度量来查找和排序文档,从而捕捉更深层次的语义含义。
- 混合搜索:结合多种搜索方法(例如,全文搜索 + 向量搜索)通常可以提高搜索的效果。
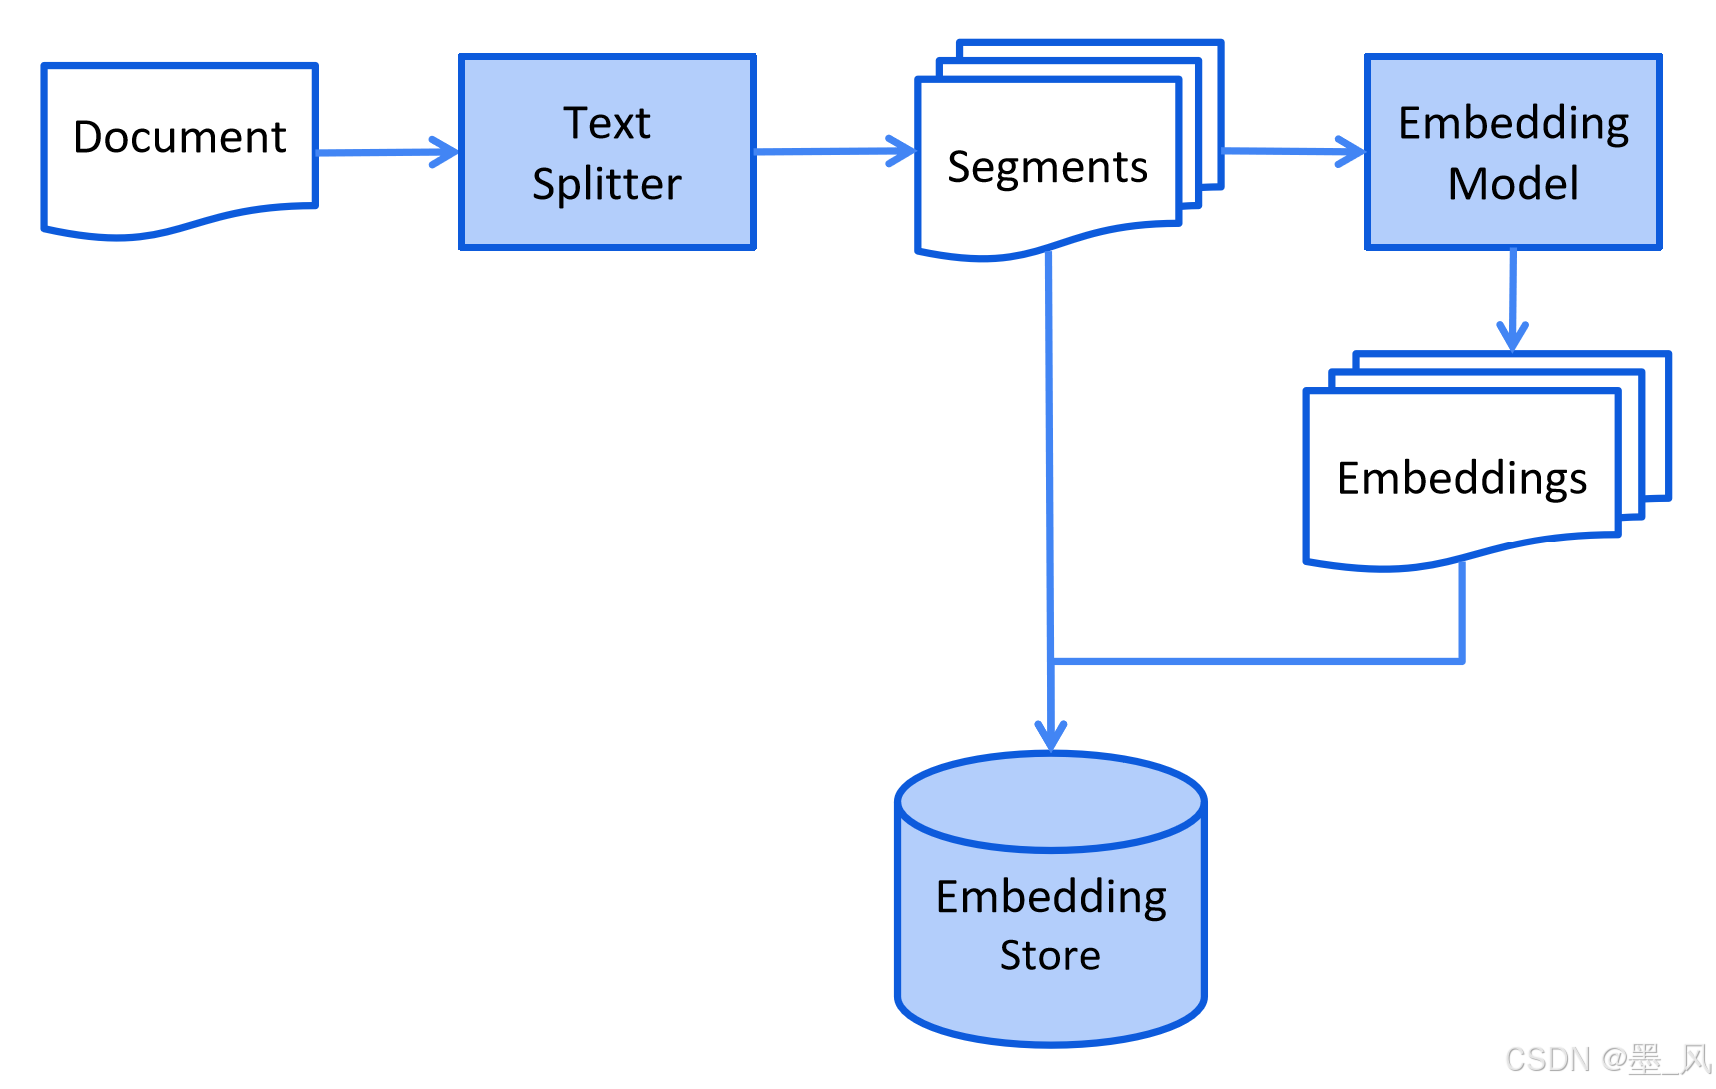
9.2、RAG的运行流程
- 索引(Indexing):将文档通过嵌入模型分块并向量化,存入向量数据库。
2. 检索(Retrieval):根据用户查询匹配最相关的文档片段(块)。
3. **增强(Augmentation)**:将检索结果与原始问题合并为提示词(Prompt)。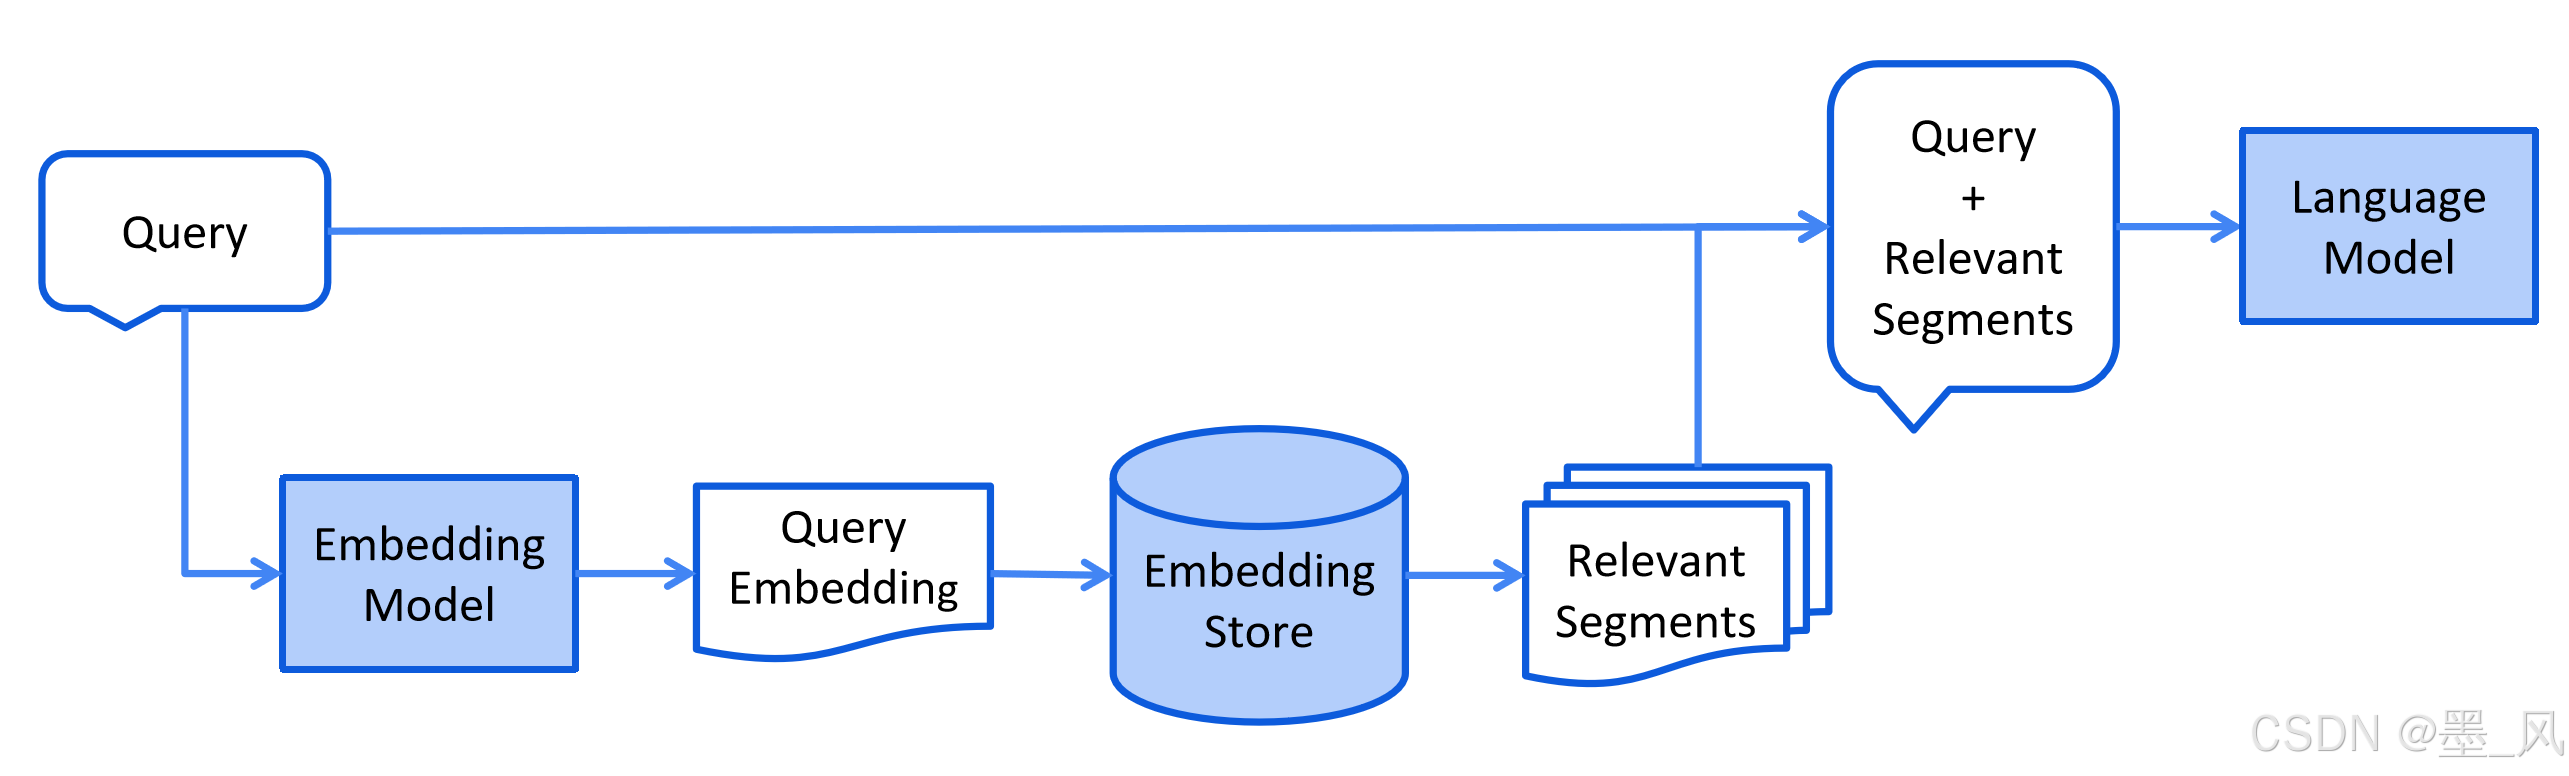
4. **生成(Generation)**:LLM基于增强后的上下文生成最终回答。
9.3、嵌入模型
嵌入(Embeddings) 是对文本、图像或视频的数值化表示,能够捕捉输入数据之间的关联关系。
- 嵌入的工作原理是将文本、图像和视频转换为由浮点数组成的数组(即向量)。这些向量旨在捕捉文本、图像和视频的语义信息。嵌入数组的长度称为向量的维度。
- 通过计算两个文本的向量表示之间的数值距离,应用程序可以判断生成这些嵌入向量的对象之间的相似性。
- 嵌入的主要作用是将文本转换为数值向量。
9.4、向量搜索
9.4.1、向量(Vector)
- 向量可以理解为从空间中的一个点到另一个点的移动。例如,在下图中,我们可以看到一些二维空间中的向量:a是一个从 (100, 50) 到 (-50, -50) 的向量,b 是一个从 (0, 0) 到 (100, -50) 的向量。
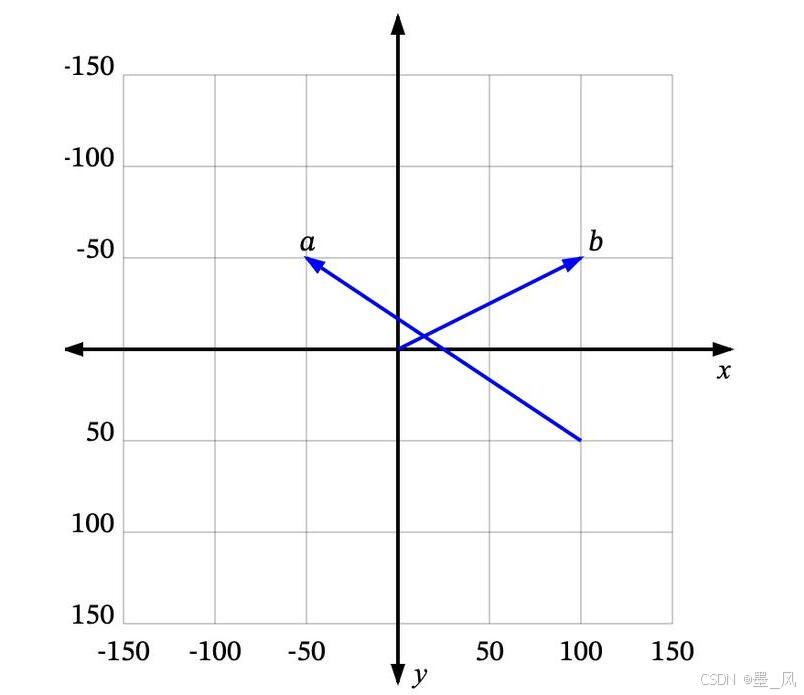
- 很多时候,我们处理的向量是从原点 (0, 0) 开始的,比如b。这样我们可以省略向量起点部分,直接说 b 是向量 (100, -50)。
- 但是生活中的物品如何使用向量表示呢?
9.4.2、维度(Dimension)
- 如我们所见,每个数值向量都有 x 和 y 坐标(或者在多维系统中是 x、y、z,…)。x、y、z… 是这个向量空间的轴,称为维度。对于我们想要表示为向量的一些非数值实体,我们首先需要决定这些维度,并为每个实体在每个维度上分配一个值。
- 例如,在一个交通工具数据集中,我们可以定义四个维度:“轮子数量”、“是否可以在地上开动”、“是否有发动机”和“最大乘客数”。然后我们可以将一些车辆表示为:
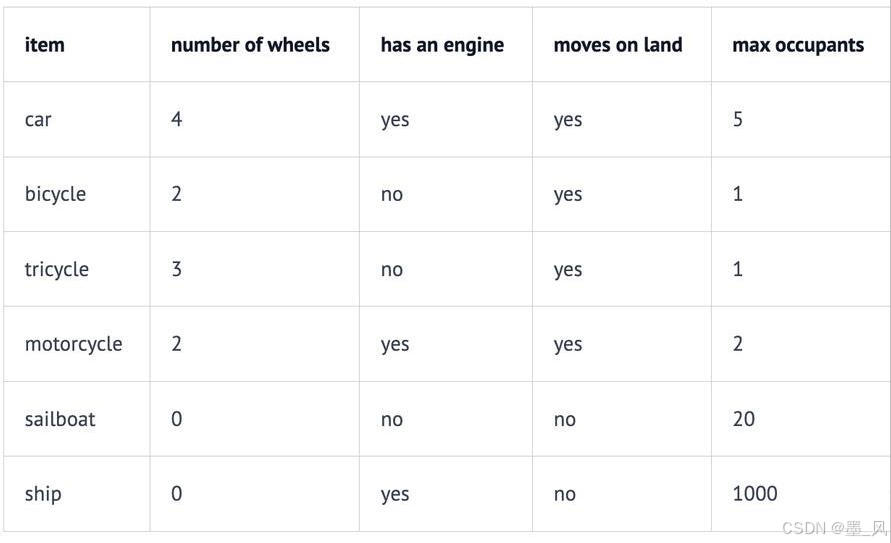
- 因此,我们的汽车Car向量将是 (4, yes, yes, 5),或者用数值表示为 (4, 1, 1, 5)(将 yes 设为 1,no 设为 0)。
- 向量的每个维度代表数据的不同特性,维度越多对事务的描述越精确,我们可以使用“是否有翅膀”、“是否使用柴油”、“最高速度”、“平均重量”、“价格”等等更多的维度信息。
9.4.3、相似度(Similarity)
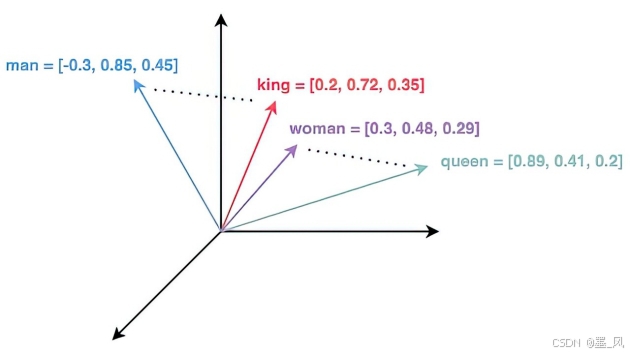
- 如果用户搜索汽车Car,你希望能够返回所有与汽车automobile和车辆vehicle等信息相关的结果。向量搜索就是实现这个目标的一种方法。
- 如何确定哪些是最相似的?
- 每个向量都有一个长度和方向。例如,在下图中,p 和 a 指向相同的方向,但长度不同。p 和 b 正好指向相反的方向,但有相同的长度。然后还有c,长度比p短一点,方向不完全相同,但很接近。
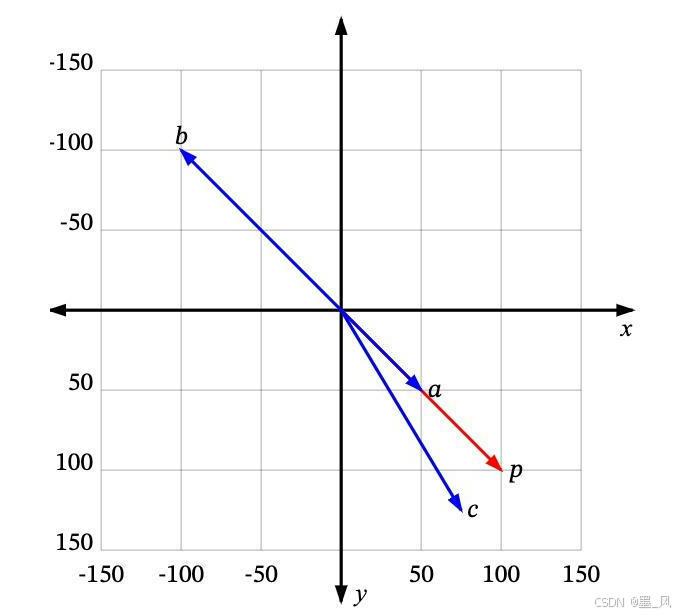
- 每个向量都有一个长度和方向。例如,在下图中,p 和 a 指向相同的方向,但长度不同。p 和 b 正好指向相反的方向,但有相同的长度。然后还有c,长度比p短一点,方向不完全相同,但很接近。
- 那么,哪一个最接近 p 呢?
- 如果“相似”仅仅意味着指向相似的方向,那么a 是最接近 p 的。接下来是 c。b 是最不相似的,因为它正好指向与p 相反的方向。如果“相似”仅仅意味着相似的长度,那么 b 是最接近 p 的(因为它有相同的长度),接下来是 c,然后是 a。
- 由于向量通常用于描述语义意义,仅仅看长度通常无法满足需求,大多数相似度测量要么仅依赖于方向,要么同时考虑方向和大小。
9.4.4、相似度测量 (Measures of similarity)
相似度测量即相似度计算,以下是四种常见的向量相似度计算方法(这里不展开讨论):
- 欧几里得距离 Euclidean distance
- 曼哈顿距离 Manhattan distance
- 点积 Dot product
- 余弦相似度 Cosine similarity
9.5、向量数据库
**向量数据库(Vector Database)**是专门用于存储、检索和管理高维向量数据的数据库系统,广泛应用于相似性搜索、推荐系统、自然语言处理(NLP)、计算机视觉等领域。
- 常用的向量数据库
- Milvus
- Pinecone
- 全托管的云服务,无需运维,支持实时更新和检索。
- The vector database to build knowledgeable AI | Pinecone
- Weaviate
- Qdrant
- PGVector
- PostgreSQL 的开源扩展,支持在 PostgreSQL 中直接存储和检索向量数据(Embeddings),并高效执行相似性搜索(如最近邻查询)。
- pgvector/pgvector:Postgres 的开源向量相似性搜索
- Redis:向量数据库和向量搜索 - Redis
9.6、LangChain4j检索增强生成
LangChain4j自带一个向量数据库InMemoryEmbeddingStore,接下来就使用自带的向量数据库和本地Ollama配置的嵌入模型实现RAG功能
- 创建langchain4j-rag模块,继承langchain4j工程
- 导入以下依赖
<dependencies>
    <!--集成Ollama-->
    <dependency>
        <groupId>dev.langchain4j</groupId>
        <artifactId>langchain4j-ollama-spring-boot-starter</artifactId>
    </dependency>
    <!--高级API需要的依赖-->
    <dependency>
        <groupId>dev.langchain4j</groupId>
        <artifactId>langchain4j-spring-boot-starter</artifactId>
    </dependency>
    <!--流式响应需要添加以下依赖-->
    <dependency>
        <groupId>dev.langchain4j</groupId>
        <artifactId>langchain4j-reactor</artifactId>
    </dependency>
    <!--easy rag-->
    <dependency>
        <groupId>dev.langchain4j</groupId>
        <artifactId>langchain4j-easy-rag</artifactId>
    </dependency>
</dependencies>
- 创建yml配置文件添加以下配置
#调用本地大模型流式响应
langchain4j:
  ollama:
    #流式响应的对话模型
    streaming-chat-model:
      base-url: http://localhost:11434
      model-name: qwen2.5:3b
      log-requests: true
      log-responses: true
    #嵌入模型
    embedding-model:
      base-url: http://localhost:11434
      model-name: qwen2.5:3b
      log-requests: true
      log-responses: true
- 在项目根目录创建一个文件夹rag存放知识库,我们将使用阿帕奇的Tika文档解析器,可以解析一千多种类型的文件
- 创建配置类
import dev.langchain4j.data.segment.TextSegment;
import dev.langchain4j.memory.chat.ChatMemoryProvider;
import dev.langchain4j.memory.chat.MessageWindowChatMemory;
import dev.langchain4j.model.embedding.EmbeddingModel;
import dev.langchain4j.rag.content.retriever.EmbeddingStoreContentRetriever;
import dev.langchain4j.store.embedding.EmbeddingStore;
import dev.langchain4j.store.embedding.inmemory.InMemoryEmbeddingStore;
import org.springframework.boot.SpringBootConfiguration;
import org.springframework.context.annotation.Bean;

@SpringBootConfiguration
public class RAGConfiguration {

    @Bean
    public ChatMemoryProvider chatMemoryProvider() {
        return memoryId -> MessageWindowChatMemory.builder().id(memoryId).maxMessages(100).build();
    }

    //配置LangChain4j自带的向量数据库
    @Bean
    public EmbeddingStore<TextSegment> embeddingStore() {
        return new InMemoryEmbeddingStore<>();
    }

    //配置嵌入存储检索内容的对象
    @Bean
    public EmbeddingStoreContentRetriever embeddingStoreRetriever(EmbeddingModel embeddingModel, EmbeddingStore<TextSegment> embeddingStore) {
        return EmbeddingStoreContentRetriever.builder()
                //配置嵌入模型
                .embeddingModel(embeddingModel)
                //配置向量数据库
                .embeddingStore(embeddingStore)
                //配置最大取前几个结果
                .maxResults(5)
                //配置能容忍的最低评分
                .minScore(0.3)
                .build();
    }
}
- 自定义Ai服务接口
import dev.langchain4j.service.MemoryId;
import dev.langchain4j.service.UserMessage;
import dev.langchain4j.service.spring.AiService;
import reactor.core.publisher.Flux;

@AiService(chatMemoryProvider = "chatMemoryProvider",contentRetriever = "embeddingStoreRetriever")
public interface AssistantService {

    Flux<String> chatStream(@MemoryId String memoryId, @UserMessage String message);
}
- 创建Controller并添加嵌入数据和与大模型对话的方法
import com.ioart.polaris.serverai.service.AssistantService;
import dev.langchain4j.data.document.Document;
import dev.langchain4j.data.document.loader.FileSystemDocumentLoader;
import dev.langchain4j.data.document.parser.apache.tika.ApacheTikaDocumentParser;
import dev.langchain4j.data.embedding.Embedding;
import dev.langchain4j.data.segment.TextSegment;
import dev.langchain4j.model.embedding.EmbeddingModel;
import dev.langchain4j.model.output.Response;
import dev.langchain4j.store.embedding.EmbeddingStore;
import org.springframework.beans.factory.annotation.Autowired;
import org.springframework.web.bind.annotation.RequestMapping;
import org.springframework.web.bind.annotation.RequestParam;
import org.springframework.web.bind.annotation.RestController;
import reactor.core.publisher.Flux;

import java.util.List;

@RestController
public class LangChain4jRAGController {

    @Autowired
    private AssistantService assistantService;

    @Autowired
    private EmbeddingModel embeddingModel;

    @Autowired
    private EmbeddingStore<TextSegment> embeddingStore;

    //将知识库存储到向量数据库的方法
    @RequestMapping("/embedding")
    public void embedding() {
        //获取知识库得到文档集合
        List<Document> documents = FileSystemDocumentLoader.loadDocuments("E:\\workspace_idea\\java241023\\langchain4j\\langchain4j-rag\\rag", new ApacheTikaDocumentParser());
        //遍历文档集合
        for (Document document : documents) {
            //将文档转换为文本片段
            TextSegment textSegment = document.toTextSegment();
            //通过嵌入模型嵌入将文本块转换为向量
            Response<Embedding> embed = embeddingModel.embed(textSegment);
            //获取向量内容
            Embedding content = embed.content();
            //存储到向量数据库
            embeddingStore.add(content, textSegment);
            //将浮点数组(向量)转换为集合
            List<Float> floats = content.vectorAsList();
            System.out.println("转换成的向量是:" + floats);
            //获取向量的维度
            int dimension = content.dimension();
            System.out.println("向量的维度是:" + dimension);
        }
    }

    @RequestMapping("/chatToAiStream")
    public Flux<String> chatToAiStream(@RequestParam(value = "memoryId", required = false, defaultValue = "1") String memoryId,
                                       @RequestParam(value = "message", required = false, defaultValue = "你好") String message) {
        return assistantService.chatStream(memoryId, message);
    }
}
十、Spring AI Alibaba
官网:Spring Cloud Alibaba官网_基于Springboot的微服务教程-阿里云
10.1、简介
Spring AI Alibaba 开源项目基于 Spring AI 构建,是阿里云通义系列模型及服务在 Java AI 应用开发领域的最佳实践,提供高层次的 AI API 抽象与云原生基础设施集成方案,帮助开发者快速构建 AI 应用。
10.2、所有功能案例
下载地址:springaialibaba/spring-ai-alibaba-examples: Examples demonstrating usage of Spring AI Alibaba 📜
10.3、智能机票助手
十一、项目集成
11.1、集成LangChain4j
11.1.1、依赖
    <properties>
        <java.version>17</java.version>
        <spring-ai.version>1.0.0-M7</spring-ai.version>
        <langchain4j.version>1.0.0-beta3</langchain4j.version>
    </properties>

    <dependencyManagement>
            <!--LangChain4j BOM (Bill of Materials) 依赖管理,用于统一管理 LangChain4j 相关组件的版本依赖-->
            <dependency>
                <groupId>dev.langchain4j</groupId>
                <artifactId>langchain4j-bom</artifactId>
                <version>${langchain4j.version}</version>
                <type>pom</type>
                <scope>import</scope>
            </dependency>
        </dependencies>
    </dependencyManagement>
11.1.2、配置文件
spring:
  application:
    name: server-ai

langchain4j:
  # 调用本地大模型
  ollama:
    # 配置聊天模型的基本参数
    chat-model:
      # Ollama服务的基础URL地址
      base-url: http://localhost:11434
      # 指定使用的模型名称
      model-name: qwen2.5:7b
      # 是否记录请求日志
      log-requests: true
      # 是否记录响应日志
      log-responses: true
    # 配置流式聊天模型的基本参数
    streaming-chat-model:
      # Ollama服务的基础URL地址
      base-url: http://localhost:11434
      # 指定使用的模型名称
      model-name: qwen2.5:7b
      # 是否记录请求日志
      log-requests: true
      # 是否记录响应日志
      log-responses: true

# 配置日志级别
logging:
  level:
    # 设置根日志级别为debug
    root: debug
11.1.3、代码
- 启动类
import org.springframework.boot.SpringApplication;
import org.springframework.boot.autoconfigure.SpringBootApplication;
import org.springframework.boot.autoconfigure.jdbc.DataSourceAutoConfiguration;

@SpringBootApplication(exclude = DataSourceAutoConfiguration.class)
public class ServerAiApplication {

    public static void main(String[] args) {
        SpringApplication.run(ServerAiApplication.class, args);
    }
}
- 配置类
import dev.langchain4j.memory.chat.ChatMemoryProvider;
import dev.langchain4j.memory.chat.MessageWindowChatMemory;
import org.springframework.boot.SpringBootConfiguration;
import org.springframework.context.annotation.Bean;

@SpringBootConfiguration
public class LangChain4jAiConfiguration {
    /**
     * 创建并配置聊天记忆提供器Bean
     * @return ChatMemoryProvider 聊天记忆提供器实例,用于管理聊天对话的历史记录,每个记忆实例限制最多保存100条消息
     */
    @Bean
    public ChatMemoryProvider chatMemoryProvider() {
        // 创建基于消息窗口的聊天记忆提供器,限制每个会话最多保存100条消息
        return memoryId -> MessageWindowChatMemory.builder()
                .id(memoryId)
                .maxMessages(100)
                .build();

    }
}
- service
import dev.langchain4j.service.MemoryId;
import dev.langchain4j.service.SystemMessage;
import dev.langchain4j.service.UserMessage;
import dev.langchain4j.service.V;
import dev.langchain4j.service.spring.AiService;
import reactor.core.publisher.Flux;


@AiService
public interface AssistantService {
    /**
     * 与AI进行聊天对话
     *
     * @param memoryId 会话记忆ID,用于标识不同的对话上下文
     * @param message 用户发送的消息内容
     * @param currentDate 当前日期,用于系统消息中的日期占位符替换
     * @return AI返回的聊天响应字符串
     */
    @SystemMessage(value = """
            你是一个专业的架构师
            请说中文
            今天的日期:{current_date}
            """)
    String chatToAi(@MemoryId String memoryId , @UserMessage String message, @V(value = "current_date") String currentDate);

    /**
     * 与AI进行流式聊天对话
     *
     * @param memoryId 会话记忆ID,用于标识不同的对话上下文
     * @param message 用户发送的消息内容
     * @param currentDate 当前日期,用于系统消息中的日期占位符替换
     * @return AI返回的流式聊天响应,以Flux形式返回多个字符串片段
     */
    @SystemMessage(value = """
            你是一个专业的架构师
            请说中文
            今天的日期:{current_date}
            """)
    Flux<String> chatToAiStreaming(@MemoryId String memoryId , @UserMessage String message, @V(value = "current_date") String currentDate);
}
11.2、集成Spring AI
11.2.1、依赖
	<dependencies>
		        <!--openai start-->
        <!--用于集成OpenAI大语言模型功能该依赖提供了与OpenAI API集成所需的核心功能,包括模型调用、配置管理等自动化配置支持-->
        <dependency>
            <groupId>org.springframework.ai</groupId>
            <artifactId>spring-ai-starter-model-openai</artifactId>
        </dependency>
        <!-- Spring AI Ollama模型启动器依赖,用于集成Ollama AI模型,提供了与Ollama本地AI模型服务交互的能力 -->
        <dependency>
            <groupId>org.springframework.ai</groupId>
            <artifactId>spring-ai-starter-model-ollama</artifactId>
        </dependency>
        <!--openai end-->
    </dependencies>


    <dependencyManagement>
            <!--Spring AI BOM (Bill of Materials) 依赖管理,用于统一管理 Spring AI 相关组件的版本依赖-->
            <dependency>
                <groupId>org.springframework.ai</groupId>
                <artifactId>spring-ai-bom</artifactId>
                <version>${spring-ai.version}</version>
                <type>pom</type>
                <scope>import</scope>
            </dependency>

        </dependencies>
    </dependencyManagement>
12.1.2、配置文件
chat-model:
   base-url: http://localhost:11434
   model-name: qwen2.5:7b
   log-requests: true
   log-responses: true
注意:Spring AI在IOC容器中注入了一个名为ollamaChatModel的bean,如果有了以上配置,也会在IOC容器中注入一个ollamaChatModel,启动会报错,删除以上配置之后记得将LangChain4j返回字符串的方法注释掉或删除
12.1.3、代码
- 配置类
import org.springframework.ai.chat.client.ChatClient;
import org.springframework.ai.chat.client.advisor.MessageChatMemoryAdvisor;
import org.springframework.ai.chat.memory.ChatMemory;
import org.springframework.ai.chat.memory.InMemoryChatMemory;
import org.springframework.ai.chat.model.ChatModel;
import org.springframework.beans.factory.annotation.Autowired;
import org.springframework.boot.SpringBootConfiguration;
import org.springframework.context.annotation.Bean;

@SpringBootConfiguration
public class SpringAIConfiguration {
 @Bean
    public ChatMemory chatMemory() {
        return new InMemoryChatMemory();
    }

    @Bean
    public ChatClient chatClient(ChatModel chatModel, ChatMemory chatMemor) {
        return ChatClient.builder(chatModel)
                //设置系统提示词,限定角色
                .defaultSystem("""
                        你是一个专业的架构师
                        请说中文
                        今天的日期:{current_date}
                        """)
                //设置聊天记忆顾问
                .defaultAdvisors(
                        new MessageChatMemoryAdvisor(chatMemor)
                )
                .build();
    }

}
- controller
import org.springframework.ai.chat.client.ChatClient;
import org.springframework.ai.chat.client.advisor.AbstractChatMemoryAdvisor;
import org.springframework.beans.factory.annotation.Autowired;
import org.springframework.web.bind.annotation.RequestMapping;
import org.springframework.web.bind.annotation.RequestParam;
import org.springframework.web.bind.annotation.RestController;
import reactor.core.publisher.Flux;

import java.time.LocalDateTime;

@RestController
@RequestMapping("/springAi")
public class SpringAIController {

    @Autowired
    private ChatClient chatClient;

    @RequestMapping("/chatToAi")
    public String chatToAi(@RequestParam(value = "memoryId",required = false,defaultValue = "1") String memoryId,
                           @RequestParam(value = "message",required = false,defaultValue = "你是谁") String message) {
        String aiMessage = chatClient.prompt()
                //设置系统提示词中的占位符的值
                .system(s -> s.param("current_date", LocalDateTime.now().toString()))
                //设置聊天记忆的占位符的值
                .advisors(a -> a.param(AbstractChatMemoryAdvisor.CHAT_MEMORY_CONVERSATION_ID_KEY, memoryId))
                .user(message)
                .call()
                .content();
        return aiMessage;
    }

    @RequestMapping("/chatToAiStreaming")
    public Flux<String> chatToAiStreaming(@RequestParam(value = "memoryId",required = false,defaultValue = "1") String memoryId,
                                          @RequestParam(value = "message",required = false,defaultValue = "你是谁") String message) {
        Flux<String> aiMessage = chatClient.prompt()
                //设置系统提示词中的占位符的值
                .system(s -> s.param("current_date", LocalDateTime.now().toString()))
                //设置聊天记忆的占位符的值
                .advisors(a -> a.param(AbstractChatMemoryAdvisor.CHAT_MEMORY_CONVERSATION_ID_KEY, memoryId))
                .user(message)
                .stream()
                .content();
        return aiMessage;
    }
}
11.3、前端界面
<!DOCTYPE html>
<html lang="zh-CN">
<head>
  <meta charset="UTF-8">
  <meta name="viewport" content="width=device-width, initial-scale=1.0">
  <title>硅谷到家AI助手</title>
  <link href="https://cdnjs.cloudflare.com/ajax/libs/font-awesome/6.0.0/css/all.min.css" rel="stylesheet">
  <style>
    :root {
      --primary: #6366f1;
      --secondary: #10b981;
      --gradient: linear-gradient(135deg, #e0e7ff 0%, #cffafe 100%);
    }

    body {
      margin: 0;
      background: var(--gradient);
      font-family: 'Segoe UI', system-ui, sans-serif;
      min-height: 100vh;
      display: grid;
      place-items: center;
    }

    .container {
      width: 90%;
      max-width: 800px;
      background: rgba(255, 255, 255, 0.95);
      backdrop-filter: blur(10px);
      border-radius: 1.5rem;
      box-shadow: 0 8px 32px rgba(31, 38, 135, 0.15);
      overflow: hidden;
    }

    .chat-container {
      height: 65vh;
      padding: 2rem;
      overflow-y: auto;
      display: flex;
      flex-direction: column;
      gap: 1.2rem;
    }

    .message {
      max-width: 75%;
      padding: 1.2rem;
      border-radius: 1.25rem;
      animation: popIn 0.25s ease;
      display: flex;
      align-items: start;
      gap: 0.8rem;
    }

    .ai-message {
      background: white;
      color: #1e293b;
      align-self: flex-start;
      box-shadow: 0 2px 8px rgba(99, 102, 241, 0.1);
    }

    .user-message {
      background: var(--primary);
      color: white;
      align-self: flex-end;
    }

    .ai-icon {
      color: var(--primary);
      font-size: 1.5rem;
      margin-top: 0.2rem;
    }

    .input-group {
      padding: 1.5rem;
      background: rgba(255, 255, 255, 0.9);
      display: flex;
      gap: 1rem;
      border-top: 1px solid #e2e8f0;
    }

    select {
      padding: 0.8rem 1.2rem;
      border: 2px solid var(--primary);
      border-radius: 0.75rem;
      background: white;
      color: var(--primary);
      font-weight: 600;
      appearance: none;
      background-image: url("data:image/svg+xml;charset=UTF-8,%3csvg xmlns='http://www.w3.org/2000/svg' viewBox='0 0 24 24' fill='none' stroke='%236366f1' stroke-width='2' stroke-linecap='round' stroke-linejoin='round'%3e%3cpolyline points='6 9 12 15 18 9'%3e%3c/polyline%3e%3c/svg%3e");
      background-repeat: no-repeat;
      background-position: right 0.8rem center;
      background-size: 1rem;
    }

    input {
      flex: 1;
      padding: 0.8rem 1.5rem;
      border: 2px solid #e2e8f0;
      border-radius: 2rem;
      font-size: 1rem;
      transition: all 0.2s ease;
    }

    button {
      padding: 0.8rem 1.8rem;
      background: var(--primary);
      border: none;
      border-radius: 2rem;
      color: white;
      font-weight: 600;
      cursor: pointer;
      transition: transform 0.2s ease;
    }

    @keyframes popIn {
      from { opacity: 0; transform: scale(0.95); }
      to { opacity: 1; transform: scale(1); }
    }
  </style>
</head>
<body>
<div class="container">
  <div class="chat-container" id="chatBox"></div>
  <div class="input-group">
    <select id="aiSelector">
      <option value="langchain">LangChain4j</option>
      <option value="springai">Spring AI</option>
    </select>
    <input type="text" id="userInput" placeholder="输入您的问题...">
    <button onclick="sendMessage()">发送</button>
  </div>
</div>

<script>
  const chatBox = document.getElementById('chatBox');
  const userInput = document.getElementById('userInput');

  // 初始化欢迎消息
  function init() {
    const welcomeMsg = document.createElement('div');
    welcomeMsg.className = 'message ai-message';
    welcomeMsg.innerHTML = `
                <i class="fas fa-robot ai-icon"></i>
                <div>
                    欢迎来到硅谷到家,我是您的AI助理,请问有什么可以帮助您?
                </div>
            `;
    chatBox.appendChild(welcomeMsg);
  }

  async function sendMessage() {
    const message = userInput.value.trim();
    if (!message) return;

    // 添加用户消息
    const userMsg = document.createElement('div');
    userMsg.className = 'message user-message';
    userMsg.textContent = message;
    chatBox.appendChild(userMsg);

    userInput.value = '';

    // 创建AI消息容器
    const aiMsg = document.createElement('div');
    aiMsg.className = 'message ai-message';
    aiMsg.innerHTML = `
                <i class="fas fa-robot ai-icon"></i>
                <div class="response-content"></div>
            `;
    chatBox.appendChild(aiMsg);

    try {
      const selector = document.getElementById('aiSelector');
      const endpoint = selector.value === 'langchain'
              ? '/langchain4j/chatToAiStreaming'
              : '/springAi/chatToAiStreaming';

      const response = await fetch(`${endpoint}?message=${encodeURIComponent(message)}`);
      const reader = response.body.getReader();
      const decoder = new TextDecoder();
      let content = '';

      while (true) {
        const { done, value } = await reader.read();
        if (done) break;
        content += decoder.decode(value);
        aiMsg.querySelector('.response-content').textContent = content;
        chatBox.scrollTop = chatBox.scrollHeight;
      }
    } catch (error) {
      aiMsg.querySelector('.response-content').textContent = '服务暂时不可用,请稍后再试';
      console.error('API Error:', error);
    }
  }

  // 回车发送
  userInput.addEventListener('keypress', (e) => {
    if (e.key === 'Enter') sendMessage();
  });

  init();
</script>
</body>
</html>
11.4、基于LangChain4j添加RAG
- 配置类
import dev.langchain4j.data.document.Document;
import dev.langchain4j.data.document.loader.FileSystemDocumentLoader;
import dev.langchain4j.data.embedding.Embedding;
import dev.langchain4j.data.segment.TextSegment;
import dev.langchain4j.memory.chat.ChatMemoryProvider;
import dev.langchain4j.memory.chat.MessageWindowChatMemory;
import dev.langchain4j.model.embedding.EmbeddingModel;
import dev.langchain4j.model.output.Response;
import dev.langchain4j.rag.content.retriever.EmbeddingStoreContentRetriever;
import dev.langchain4j.store.embedding.EmbeddingStore;
import dev.langchain4j.store.embedding.inmemory.InMemoryEmbeddingStore;
import org.springframework.boot.CommandLineRunner;
import org.springframework.boot.SpringBootConfiguration;
import org.springframework.context.annotation.Bean;

import java.util.List;

@SpringBootConfiguration
public class LangChain4jAiConfiguration {
    /**
     * 创建并配置聊天记忆提供器Bean
     *
     * @return ChatMemoryProvider 聊天记忆提供器实例,用于管理聊天对话的历史记录,每个记忆实例限制最多保存100条消息
     */
    @Bean
    public ChatMemoryProvider chatMemoryProvider() {
        // 创建基于消息窗口的聊天记忆提供器,限制每个会话最多保存100条消息
        return memoryId -> MessageWindowChatMemory.builder()
                .id(memoryId)
                .maxMessages(100)
                .build();

    }
    //    //因为在IOC容器中已经存在一个名字为ollamaEmbeddingModel的bean,(Spring AI提供的)所以这里只能通过这种方式来配置嵌入模型
//    @Bean
//    public EmbeddingModel embeddingModel(){
//        return OllamaEmbeddingModel.builder()
//                .baseUrl("http://127.0.0.1:11434")
//                .modelName("qwen2.5:7b")
//                .build();
//    }

    /**
     * 用于存储和检索文本片段的向量嵌入表示。
     */
    @Bean
    public EmbeddingStore<TextSegment> embeddingStore() {
        return new InMemoryEmbeddingStore<>();
    }


    //配置嵌入存储检索内容的对象
    @Bean
    public EmbeddingStoreContentRetriever embeddingStoreRetriever(EmbeddingModel embeddingModel, EmbeddingStore<TextSegment> embeddingStore) {
        return EmbeddingStoreContentRetriever.builder()
                //配置嵌入模型
                .embeddingModel(embeddingModel)
                //配置向量数据库
                .embeddingStore(embeddingStore)
                //配置最大取前几个结果
                .maxResults(5)
                //配置能容忍的最低评分
                .minScore(0.3)
                .build();
    }

    @Bean
    CommandLineRunner commandLineRunner(EmbeddingModel embeddingModel, EmbeddingStore embeddingStore) {
        return args -> {
            Document document = FileSystemDocumentLoader.loadDocument("E:\\project\\src\\main\\resources\\rag\\scope.txt");
            //将文档转换为文本片段
            TextSegment textSegment = document.toTextSegment();
            //嵌入
            Response<Embedding> embed = embeddingModel.embed(textSegment);
            //获取嵌入向量
            Embedding content = embed.content();
            //将向量保存到向量数据库
            embeddingStore.add(content, textSegment);
            //将向量转换为集合
            List<Float> floats = content.vectorAsList();
            System.out.println("floats = " + floats);
            //获取向量维度
            int dimension = content.dimension();
            System.out.println("dimension = " + dimension);
        };
    }
}
- Controller
@Autowired
private EmbeddingStoreContentRetriever embeddingStoreContentRetriever;

@RequestMapping("/chatToAi")
public Flux<String> chatToAi(@RequestParam(value = "userId",required = false,defaultValue = "1") String userId,
                             @RequestParam(value = "message",required = false,defaultValue = "做个自我介绍") String message){
    List<Content> retrieve = embeddingStoreContentRetriever.retrieve(new Query(message));
    for (Content content : retrieve) {
        System.out.println("检索出的内容:" + content);
    }
    return assistantService.chatToAi(userId,message, LocalDate.now().toString());
}
11.5、基于LangChain4j添加Tool Calling
- 注意:基于Spring AI添加RAG以及Function Calling可以参考Spring AI Alibaba的实现完成。
11.6、使用AI代码编辑器开发前端
由于大模型不断更新和优化,AI代码编辑器的也越来越强大,同学们可以尝试使用第1章提到的Cursor和字节公司的Trae来开发前端H5或App。
- Cursor官网:Cursor - The AI Code Editor
- Trae官网:Trae - AI 原生 IDE
更多推荐

 5
5 0
0- 0


 已为社区贡献1条内容

所有评论(0)